@RSJB18 posted:Before and after videos.
Oh yeah Bob , HUGE improvement. Nice idea. ![]()


|
|
@RSJB18 posted:Before and after videos.
Oh yeah Bob , HUGE improvement. Nice idea. ![]()
@Dallas Joseph posted:Oh yeah Bob , HUGE improvement. Nice idea.
Thanks Dallas. Short of ripping up the switches and re-wiring, I have to live with it so this may turn out to be a solution. Still some tweaking to do, I have found that at lower voltages when running conventional locos, a couple don't quite throw all the way.
Bob
Darlander, thanks for the photos and details on the Coal Hopper Loads. I too have used wax paper successfully, for mold release on scenery projects. I have even better luck with the heavy duty coated paper they wrap my salmon in at the grocery store, but they don't always have it.
Well managed to finish the concrete road sections, then had to "bring in the carpenters" to cut timbers for the crossing over the frog of the #6 switch. Although it got late, I got the first 10 inch strip of warm white LED's cut, mounted and tested in the 3 story section of the warehouse. 

@Putnam Division posted:Got it done this weekend......the sun and wind were good for the paint, even though it got cold Friday afternoon.....
A few more pictures here:
https://ogrforum.ogaugerr.com/...7#159096765539255877
Have a great weekend folks.....
Peter
Peter,
I'm catching up on some of these posts...Nice job!
Tom


 I haven't actually done anything on my layout in a couple weeks, but I've built a workbench in the back room so I'm farther away from my wife when soldering or using the dremel because she's asthmatic and the smells bother her. Plus by doing that she now has the living room table back that I've been using for a temporary workarea. We're


 in a small one story house with only a crawl space and no accessible attic. My layout takes up the bedroom its in so no space in there to have the workbench in there, but it's only 2 rooms away. I laid a dropcloth down and had a piece of plywood to use when soldering or cutting so not to damage the table. It's still a work in progress, I want to stain and seal the wood in the spring when I can have windows open. I'm going to put down approx 4 ft of Fastrack with bumpers at each end for a test track. I have a spare CW-80 to use for Track and Accessory Power and by use of AC-DC and Adjustable DC Voltage Buck Converters I will have Banana Plug Jacks and Banana Plug to Alligator Clips for doing any testing I need to do for the trains and accessories. I have switched outlets for the CW-Transformer, Dremel, and Weller Soldering Gun plus metal cans to hold the Dremel and Soldering Gun for when they're hot from use. A couple LED Light Fixtures, LED desk lamp, a couple power strips, and everything feeds into a GFIR for safety. Happy wife, happy life!😀
@Gary P, your photos are not showing up in your postings. Are you selecting “add attachments” in the lower right corner, then navigate to your photo album, select your photos and then upload?
@TedW posted:@RSJB18, I checked my other M.O.W. crew in the tunnel. These guys are “working” just as hard. They’re from the LI DOT. Recognize anybody?
Really interesting photos. Looking at them gives me the feeling of being in the tunnel with the crew. I get a feeling of claustrophobia. ![]()
The close up in low light looks like it would qualify asa great addition to the Imagineering in OG photography thread.
Nice ![]()
@TedW posted:@Gary P, your photos are not showing up in your postings. Are you selecting “add attachments” in the lower right corner, then navigate to your photo album, select your photos and then upload?
I did but I'll try it again. Thanks for letting me know. I'm seeing them but we'll see what happens this time when I try editing my post now. I hope you all are seeing them now, I'm seeing 3 of each one now, why, I have no idea! Posting is above my pay grade understanding how servers let some things through sometimes and other times not!
This is my main yard for the New Haven section of my layout. The goal was to create a platform for the station and do away with the old 20" Bowser turntable which is too short for some of my newer engines along with the roundhouse. Also to ballast the entire yard. Some of the ballast was sifted out our cinder block mix which does have a good color and glues in ok. The other two colors ( black for the yard tracks and grey for the main lines is Brennan's ballast. ")


")


@Bill Park posted:This is my main yard for the New Haven section of my layout. The goal was to create a platform for the station and do away with the old 20" Bowser turntable which is too short for some of my newer engines along with the roundhouse. Also to ballast the entire yard. Some of the ballast was sifted out our cinder block mix which does have a good color and glues in ok. The other two colors ( black for the yard tracks and grey for the main lines is Brennan's ballast.
Great looking ballast Bill. ![]()
Gary P I can see the first few pictures of your workbench but the other pics are still not showing. BTW great job on the bench!
You dudes do some spectacular work. I'd like to hire you all to stop by and I bet we could finish my layout in a weekend!![]()
The first coal load was released from the form this morning after an overnight set. I am please with the way it turned out and it now has a new home, DM&IR hopper #12108.


Live & learn: I will not use aluminum foil on the remaining loads. No problem getting it to release, but the foil is quite fragile and easily tears. Comes away in pieces. I will use wax paper for the remaining loads.
Regarding the coal I am using: Brennan packages real anthracite coal in five sizes. The Brennan coal I got yesterday is #1. Brennan recommends #2 for 1:48 scale general purpose steam era. The bag of Lionel #207 coal is a little too coarse for the look I wanted. So I’m using my "gifted coal" (zip lock bag and middle pile of unknown origin or size but probably similar to Brennan #2) along with a dash to two of Brennan’s #1. Hey, doing so allows me to claim that I'm hauling real stuff! It's important to be real even though we're riding 3 rails!!

Cheers, Dave

@darlander posted:The first coal load was released from the form this morning after an overnight set. I am please with the way it turned out and it now has a new home, DM&IR hopper #12108.
Live & learn: I will not use aluminum foil on the remaining loads. No problem getting it to release, but the foil is quite fragile and easily tears. Comes away in pieces. I will use wax paper for the remaining loads.
Cheers, Dave
Dave- I forgot to mention that the wax paper kind of disappears when it gets wet. Once dry it tears away easily from the form and is basically invisible.
The load looks great.
Bob
@RJ Shier posted:Gary P I can see the first few pictures of your workbench but the other pics are still not showing. BTW great job on the bench!
You dudes do some spectacular work. I'd like to hire you all to stop by and I bet we could finish my layout in a weekend!
Thank you very much, a lot in a tight space, I posted 6 pictures, I could see them all when I went back to the post, when I got the message they weren't showing so I tried editing and adding the attachments from my files, now from here I see all six of them 3 times. I can't figure it out, definitely above my pay grade🤣
Dave, that coal load turned out really awesome, I really like your method and choice of materials! I did something similar on a pair of Lionel BNSF open hoppers by adding a gravel (WS ballast) load, but I used a different method and materials.
I used Polystyrene Plastic Board Sheet 1/16" thick sheets. I then used fast curing epoxy to put the first layer of gravel on, as white glue does not stick to Polystyrene! Once the epoxy was dry I added more gravel and then used white glue like I as doing track ballast. It worked okay, but the Polystyrene warped a little bit on the ends. I will use your method of Styrofoam next time. Your coal loads are much snugger in the hopper than mine. Thanks for sharing your coal load project with us. And yes, live and learn!!! OGR is a great place to learn!


@RSJB18 posted:Dave- I forgot to mention that the wax paper kind of disappears when it gets wet. Once dry it tears away easily from the form and is basically invisible.
The load looks great.
Bob
Thanks Bob, I will confirm that in the morning as I have another load curing in the form with wax paper. Thanks for the insight!

Cheers, Dave
All;
Below are photos of my girders that I finally have gotten install in a semi permanent way. They may have to come out for landscaping. I will be moving on around the curves in both directions next. I also provided photos of the switchyard down in the valley. The last thing is I have gotten my train running across the hardwood floor. I have cut grooves into the floor and press fitted the rails in the floor so you walk over them without damage.
Thanks;
idea-thinker


@idea-thinker posted:All;
Below are photos of my girders that I finally have gotten install in a semi permanent way. They may have to come out for landscaping. I will be moving on around the curves in both directions next. I also provided photos of the switchyard down in the valley. The last thing is I have gotten my train running across the hardwood floor. I have cut grooves into the floor and press fitted the rails in the floor so you walk over them without damage.
Thanks;
idea-thinker
Looks like I might imagine in my dreams. Hope to view more. Thank you.
That is a very nice layout..Congrats
Rich
@idea-thinker posted:All;
Below are photos of my girders that I finally have gotten install in a semi permanent way. They may have to come out for landscaping. I will be moving on around the curves in both directions next. I also provided photos of the switchyard down in the valley. The last thing is I have gotten my train running across the hardwood floor. I have cut grooves into the floor and press fitted the rails in the floor so you walk over them without damage.
Thanks;
I am really intrigued by your space both your horizontal space and vertical space. You seem to be maximizing the total volume of your room. Well done and look forward to more progress pictures. Thanks for sharing!!!
Cheers, Dave
@idea-thinker wow - so much for a typical flat layout. Very interested on how you plan to tie everything together.
@Mark Boyce Well when it rains it pours. Have a bunch of photos to post on the progress on repairing a section of track I laid "poorly". A little foray into 2 rail made me discover the error of my ways. Good thing I am still new at this, so presumably no bad habits yet?
The series of photos show the back left corner of Twin Pines. Turns out I am raising sections of the track 3/8 ths of an inch to address a dip. Truly shocked at how far off flat I was here. However the section is part of an overhang and is otherwise un-supported, so it may have shifted with time.
First image is the corner piece. Built of pink 1" foam. Kind of like an aircraft wing top and bottom with vertical stringers in the middle and ends. The foam is flexible enough to bend to the needed shape. Surface is covered with cotton batting (think upholstery) glued down, painted dirt brown and covered in places with ground foam. I added pink foam in places to get the "ground movement". Fastest way I have found to get detail onto the layout. The batting adds a lot of strength so it is easily moved around. Or just change out that piece if you want something different.

This is a pop up corner for me. Once under the table I can stand up for better access. Turns out this was really handy in leveling the track. It was far easier to get shims in (and see what was going on) from inside the corner. Just 4 corner blocks hold up the section since it is very light.

Here is the section back in place. With a little fiddling I can get the seam closer. Then I usually cover over with low bushes. If I had been thinking at the time, I would have left an inch or so of batting hanging from the edge to lay on top of the other section. That would have left a smaller overlapping seam. The piece to the left is also modular and easily removable.

I did not realize how much of a pain it is to rework ballasted track. I'll have to re-ballast this section when I am convinced it is suitably flat. There is about a 1.5 % grade here, so not level. So far it looks good.
Well, tonight was one of those nights where you think you are gonna relax and the trains look at you and say yeah right man. lol. 
The photo is from Sunday when I just the track down and there was less chaos. I got some new switches but if anyone has ever worked with 60 year old switches they can be temperamental. Dealing with that, trying to find track pins that I lost and other stuff made for an interesting night in the train room...Thank God for the weekend...
@ScoutingDad posted:@idea-thinker wow - so much for a typical flat layout. Very interested on how you plan to tie everything together.
@Mark Boyce Well when it rains it pours. Have a bunch of photos to post on the progress on repairing a section of track I laid "poorly". A little foray into 2 rail made me discover the error of my ways. Good thing I am still new at this, so presumably no bad habits yet?
The series of photos show the back left corner of Twin Pines. Turns out I am raising sections of the track 3/8 ths of an inch to address a dip. Truly shocked at how far off flat I was here. However the section is part of an overhang and is otherwise un-supported, so it may have shifted with time.
First image is the corner piece. Built of pink 1" foam. Kind of like an aircraft wing top and bottom with vertical stringers in the middle and ends. The foam is flexible enough to bend to the needed shape. Surface is covered with cotton batting (think upholstery) glued down, painted dirt brown and covered in places with ground foam. I added pink foam in places to get the "ground movement". Fastest way I have found to get detail onto the layout. The batting adds a lot of strength so it is easily moved around. Or just change out that piece if you want something different.
This is a pop up corner for me. Once under the table I can stand up for better access. Turns out this was really handy in leveling the track. It was far easier to get shims in (and see what was going on) from inside the corner. Just 4 corner blocks hold up the section since it is very light.
Here is the section back in place. With a little fiddling I can get the seam closer. Then I usually cover over with low bushes. If I had been thinking at the time, I would have left an inch or so of batting hanging from the edge to lay on top of the other section. That would have left a smaller overlapping seam. The piece to the left is also modular and easily removable.
I did not realize how much of a pain it is to rework ballasted track. I'll have to re-ballast this section when I am convinced it is suitably flat. There is about a 1.5 % grade here, so not level. So far it looks good.
Jeff, the lift outs certainly made it possible to do the revision to the track/roadbed in relative ease. I can see what you mean that if you had made the batting overhang a bit, it may have been even easier to conceal the seams.
Idea-thinker, I did not realize how low your layout is, much on the floor. I can see why you did it that way with the low ceiling. Excellent job!
@idea-thinker- very neat train room. Can you post a close up of the rails embedded in the floor? Looks like the track is passing a door opening? That's a neat idea, but I don't know if I could convince the CEO to let me take a router to an oak floor though. ![]()
@ScoutingDad- Jeff- glad you got your track aligned. It can be a PITA to go back and fix stuff. The removable scenery looks good. I may try cotton batting one day. I've seen several guys use it and it is a cheap alternative to rigid foam and plaster cloth. Less of a mess than carving foam too.
Bob
@RSJB18 posted:@idea-thinker- very neat train room. Can you post a close up of the rails embedded in the floor? Looks like the track is passing a door opening? That's a neat idea, but I don't know if I could convince the CEO to let me take a router to an oak floor though.
@ScoutingDad- Jeff- glad you got your track aligned. It can be a PITA to go back and fix stuff. The removable scenery looks good. I may try cotton batting one day. I've seen several guys use it and it is a cheap alternative to rigid foam and plaster cloth. Less of a mess than carving foam too.
Bob
Bob;
I have attached a close up of the track through the Hardwood floor. It was quite a challenge to get that in place and operational. It actually works well. The rails are just above the top of the floor and the outer rails have a shallow inside cut to allow for the flanges on the wheels. We are able to walk on it without damage.


Thanks;
idea-thinker
@idea-thinker posted:Bob;
I have attached a close up of the track through the Hardwood floor. It was quite a challenge to get that in place and operational. It actually works well. The rails are just above the top of the floor and the outer rails have a shallow inside cut to allow for the flanges on the wheels. We are able to walk on it without damage.
Thanks;
idea-thinker
Very creative thinking. Guess I know how your screen name originated.......![]()
Thanks
@Mark Boyce posted:Jeff, the lift outs certainly made it possible to do the revision to the track/roadbed in relative ease. I can see what you mean that if you had made the batting overhang a bit, it may have been even easier to conceal the seams.
Idea-thinker, I did not realize how low your layout is, much on the floor. I can see why you did it that way with the low ceiling. Excellent job!
Mark;
While my Layout in some areas is low to the floor the room it is in has 10 ft. high ceilings. The room size is 40x50 feet. Around the perimeter there are knee walls that limit the height somewhat. The trains going to fill the room expect for the walk ways.
Thanks;
idea-thinker
@WesternPacific2217 posted:
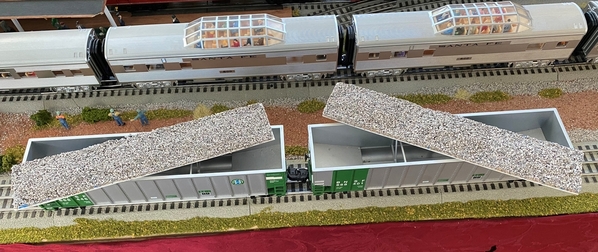
Scott, I'm making a coal load for a friend for his MTH hopper like you have. I discovered that the 3 interior cross braces are easily removed so you can use thicker styrofoam for the load. Just flex the sides out a bit as there is a small pin on each side near the top that holds it in place. Had to make a new glue form as these cars are a bit longer then the 3-bay Weaver hoppers. I will finish his load today. The cross braces can be stored under the load.


Cheers, Dave
PS: Both coal loads are placed and the wax paper worked much better than the aluminum foil!

@idea-thinker posted:
WOW! Most of us describe our layout space in terms of square footage. You need to express yours in Cubic Feet! Very impressive!
Cheers, Dave
That is some impressive trackwork. It seems to be all I can do to build and wire a little 5'x9' layout. My hat is off to you.
@darlander posted:Scott, I'm making a coal load for a friend for his MTH hopper like you have. I discovered that the 3 interior cross braces are easily removed so you can use thicker styrofoam for the load. Just flex the sides out a bit as there is a small pin on each side near the top that holds it in place. Had to make a new glue form as these cars are a bit longer then the 3-bay Weaver hoppers. I will finish his load today. The cross braces can be stored under the load.
Cheers, Dave
PS: Both coal loads are placed and the wax paper worked much better than the aluminum foil!
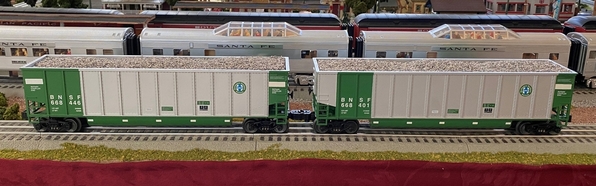
Dave, oh that's funny, we have the same BNSF hopper set, very cool! I take that back, my hoppers are Lionel and slightly different than the MTH hoppers. Now that I have seen there way you did it, I'm gonna redo my hoppers using the Styrofoam. Thanks for letting me know about the cross braces as I was wondering if they were snapped in or glued in. I think I'll make a trip over to my local packaging company, I can usually weasel some scrap Styrofoam out of them. LoL
Working on the layout where my oil refinery is . Need to work on more scenery but have my oil barge in place. 


Can’t imagine what you could do to that already impressive scene.
farmerjohn, that's incredible! well done
FarmerJohn;
Great looking setup.
Thanks;
idea-thinker
Everything looks great all. FarmerJohn, may I ask what the goosenecks lights are you are using on your refinery, it looks awesome!!
Jeff
@WesternPacific2217 posted:Dave, oh that's funny, we have the same BNSF hopper set, very cool! I take that back, my hoppers are Lionel and slightly different than the MTH hoppers. Now that I have seen there way you did it, I'm gonna redo my hoppers using the Styrofoam. Thanks for letting me know about the cross braces as I was wondering if they were snapped in or glued in. I think I'll make a trip over to my local packaging company, I can usually weasel some scrap Styrofoam out of them. LoL
Scott, the MTH hopper with new coal load:

Have fun with your redo!
Cheers, Dave
Weathered / detailed another car this week. Went a little crazy on some of the extra details. Unless you know they are there. Still need to go back and add the reflective sheeting.


Access to this requires an OGR Forum Supporting Membership


