@Mark Boyce posted:Johan, everything looks great!
Sam, so you have a deadline for getting the layout to a certain point for visitors. Your engines should do fine on your grades.
Mark,
Thank you Sir. 🤝
Johan


|
|
@Mark Boyce posted:Johan, everything looks great!
Sam, so you have a deadline for getting the layout to a certain point for visitors. Your engines should do fine on your grades.
Mark,
Thank you Sir. 🤝
Johan
Good morning everyone and Happy Easter!
Thought I would check in before I head out to the train room. I have a lot to do as I have to put autos and people out. I know I am going to have to take them back off, but we are having a Suprise retirement party for my lovely CEO and I know people are going to want to see the train room, I also have to clean track to try and keep the gremlins away! LOL
Any how here is a few comments before I go out,
@BAR GP7 #63 Johan what wonderful night photos! They really show how amazing your layout is weather it be day or night!
@Sams Trains Sam thanks for the comment, Iam not sure what you mean by stacking but thank you. As for your test run it looks really smooth and nothing to worry about! You can also ask Larry how much I love it when he post photos of BNSF stuff! ![]()
@Jim Van Every Jim thank you for the comment, I agree and will turn it to see if I can gain more room. It is hard to fine a place for such a big building.
@pennsyfan Hi Bob the only thing I can think of that you are seeing is the pedestrian bridge way in the background in the up position, Here is another photo at the same angle with the bridge in the down position. I will post both to compare with.


I hope I am correct if not please let me know.
I hope you all have a wonderful Easter Sunday and find time to share your wonderful layouts with your family and find time to have fun with your trains!![]()
@mike g. posted:Good morning everyone and Happy Easter!
Thought I would check in before I head out to the train room. I have a lot to do as I have to put autos and people out. I know I am going to have to take them back off, but we are having a Suprise retirement party for my lovely CEO and I know people are going to want to see the train room, I also have to clean track to try and keep the gremlins away! LOL
Any how here is a few comments before I go out,
@BAR GP7 #63 Johan what wonderful night photos! They really show how amazing your layout is weather it be day or night!
@Sams Trains Sam thanks for the comment, Iam not sure what you mean by stacking but thank you. As for your test run it looks really smooth and nothing to worry about! You can also ask Larry how much I love it when he post photos of BNSF stuff!
@Jim Van Every Jim thank you for the comment, I agree and will turn it to see if I can gain more room. It is hard to fine a place for such a big building.
@pennsyfan Hi Bob the only thing I can think of that you are seeing is the pedestrian bridge way in the background in the up position, Here is another photo at the same angle with the bridge in the down position. I will post both to compare with.
I hope I am correct if not please let me know.
I hope you all have a wonderful Easter Sunday and find time to share your wonderful layouts with your family and find time to have fun with your trains!
Mike,
Many thanks. Even when I finish one module, I plan to shoot the first videos with my layout. After that, about 60% of my module layout is still missing and I leave options for the expansion as well. 🤝
Johan
@Mark Boyce yes, I do. As long as trains are running that’s what matters, but I have yet to fully wire my layout. That’s the big hurdle
@mike g. have you ever gone to an H.O. Scale layout where they have trains running along the walls on different levels? That’s what I meant. It is uncommon (from what I’ve seen) in O scale to have trains running one over the other to make the track longer or to add more scenery. I know people have trains go over one another, but doing the extra loop under the table is the part that gets you the most space for your space. By doing what you did, you’re able to have more running area. Also, I take it you like BNSF stuff? I just bought Lionel’s BNSF ES44 #6075. I will lash the two up for a coal train sometime, keep an eye out for a video of that on my YouTube
There is activity at the station. It can only mean that the local train is about to arrive. In the background, a freight train passes the station carrying at least potatoes and oil products.

One of these days, I gotta get an Aristo-Craft PE PCC... ![]()

Mitch
@M. Mitchell Marmel posted:One of these days, I gotta get an Aristo-Craft PE PCC...
. . . or a 1:1 scale full-size trolley? ![]()
Imagine it parked in your back yard -- I'd make a great train shed! ![]()
@M. Mitchell Marmel posted:One of these days, I gotta get an Aristo-Craft PE PCC...
Mitch
Too bad the Pacific Electric never had single-ended PCCs. ![]() I just noticed that the O one is missing the butterfly.
I just noticed that the O one is missing the butterfly.
I did a similar shot with Bombardier tri-level commuter cars:


Sounder is K-Line 21"; the others (HO + N) are Athearn.
Very smooth operation and you can't hear a thing! Thanks for sharing. Terry
@DrSteveDC posted:Look ma…. No noise! Remove vibrotor and installed a 1.5vac mini gear reduction motor.
Steve- can you share some info on the motor and how you did the change out? I have a Lionel Yard Tower with the same noisy motor.

Thanks- Bob

Morning guys and gals, I hope your all having a wonderful week and are doing well!
@DrSteveDC Steve that is an outstanding job, moves nicely and no noise at all! I used the same motor somewhat that I got out of a small crashed drone my son gave me that he said he couldn't fix and thought I could use some of the parts! Now it runs the propeller on my small plane on my airfield.
@SIRT Good luck on your wiring! I always wish I understood wiring and electronics better!
Well folks not a lot really, I have been getting ready for my wife's retirement party this weekend and getting the train room kind of set up for folks to see. It is the first time in years that we have had most of our friends and family over at the same time so I know they are going to want to see the train room and I didn't want them to just see a mess. Here are some photos and mind you I still have to add people.


I thought I would throw this in just in case Steve hasn't seen it.
Have a great week everyone and I hope you find time to have fun with your layouts and trains!![]()


@mike g. posted:Morning guys and gals, I hope your all having a wonderful week and are doing well!
@DrSteveDC Steve that is an outstanding job, moves nicely and no noise at all! I used the same motor somewhat that I got out of a small crashed drone my son gave me that he said he couldn't fix and thought I could use some of the parts! Now it runs the propeller on my small plane on my airfield.
@SIRT Good luck on your wiring! I always wish I understood wiring and electronics better!
Well folks not a lot really, I have been getting ready for my wife's retirement party this weekend and getting the train room kind of set up for folks to see. It is the first time in years that we have had most of our friends and family over at the same time so I know they are going to want to see the train room and I didn't want them to just see a mess. Here are some photos and mind you I still have to add people.
I thought I would throw this in just in case Steve hasn't seen it.
Have a great week everyone and I hope you find time to have fun with your layouts and trains!
That plane lifting off is so cool!
Great work Mike!
@Mike g
Thank for the explanation on the pedestrian bridge.
@mike g. poste
So glad you found space for your runway in the new build!!!!! Great action!!!!
Cheers, Dave
@mike g. posted:Morning guys and gals, I hope your all having a wonderful week and are doing well!
@DrSteveDC Steve that is an outstanding job, moves nicely and no noise at all! I used the same motor somewhat that I got out of a small crashed drone my son gave me that he said he couldn't fix and thought I could use some of the parts! Now it runs the propeller on my small plane on my airfield.
@SIRT Good luck on your wiring! I always wish I understood wiring and electronics better!
Well folks not a lot really, I have been getting ready for my wife's retirement party this weekend and getting the train room kind of set up for folks to see. It is the first time in years that we have had most of our friends and family over at the same time so I know they are going to want to see the train room and I didn't want them to just see a mess. Here are some photos and mind you I still have to add people.
I thought I would throw this in just in case Steve hasn't seen it.
Have a great week everyone and I hope you find time to have fun with your layouts and trains!
Mike you have just Redefined cool! Have fun with the party and you will have many impressed guests. Great job!
Jay
Well, technically late last night/early morning, but I finished up landscaping a previously-bare corner of the layout, which kind of stuck out after I buried the speaker for a motion-activated camping sounds system in the foam base under that corner. So, I grabbed a bunch of leftover stuff and went to work:
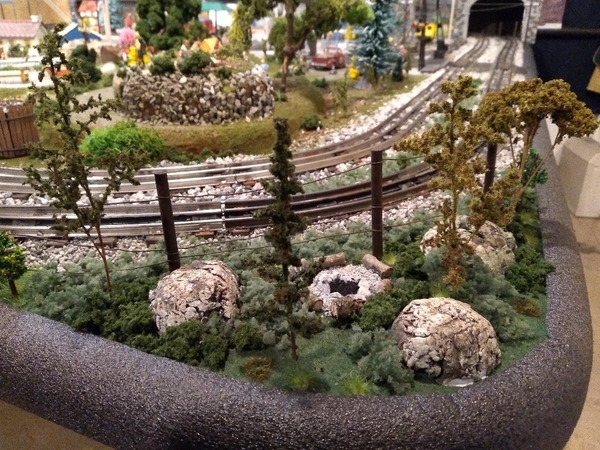

The post and wire 'fence' was pre-existing, an early attempt to keep an over-enthusiastic engine from making a suicide plunge off that edge (so far completely successful! ![]() ). The three 'boulders' I had hastily formed much earlier from some left-over sculptamold as it hardened, so all I had to do was mix up a few acrylic washes to color them a bit (and also touch up a few chipped and damaged rock areas on the layout while I had the brushes out!). The cold campfire ring was an on-the-fly improvisation, using a few of the larger screened stones from the earlier ballasting to form the ring, a dab of ground-up charcoal from our IRL firepit in the center, a bit of finer grade screening from the crusher run stone around the ring, and a few 'logs' I'd cut from hardwood deadfall in the yard as rustic seating. The larger trees and some of the ground foam (the rest was WS) were hand-crafted train show purchases over the last few years, while the smaller grass clumps and shrubs were either my own earlier static grass creations or Etsy purchases. While I was at it, I extended the ground foam to cover a strip between ballast on two adjacent tracks as well. I used full-strength white glue to secure everything down, and plan to shoot a top coat of hairspray after everything is dry and to my liking.
). The three 'boulders' I had hastily formed much earlier from some left-over sculptamold as it hardened, so all I had to do was mix up a few acrylic washes to color them a bit (and also touch up a few chipped and damaged rock areas on the layout while I had the brushes out!). The cold campfire ring was an on-the-fly improvisation, using a few of the larger screened stones from the earlier ballasting to form the ring, a dab of ground-up charcoal from our IRL firepit in the center, a bit of finer grade screening from the crusher run stone around the ring, and a few 'logs' I'd cut from hardwood deadfall in the yard as rustic seating. The larger trees and some of the ground foam (the rest was WS) were hand-crafted train show purchases over the last few years, while the smaller grass clumps and shrubs were either my own earlier static grass creations or Etsy purchases. While I was at it, I extended the ground foam to cover a strip between ballast on two adjacent tracks as well. I used full-strength white glue to secure everything down, and plan to shoot a top coat of hairspray after everything is dry and to my liking.
Even with the additional materials over it, the buried speaker still has plenty of volume, and today I plan to secure the sound module and wires underneath the layout (they're currently just dangling). At some point, I might consider adding some pieces of 'firewood' in the pit and/or stacked at the side, and/or populating the scene with suitable "little people", but for now I'm satisfied to show the evidence of past use and let the viewers fill in their own back story!
Sometimes, it's the little things . . . ![]()


@Steve Tyler posted:
Steve:
Your layout is GREAT. I love your scenery work. What material do you use for the platform border? I really like it. Is it easy to work and bend?
@Randy Harrison posted:Steve:
Your layout is GREAT. I love your scenery work. What material do you use for the platform border? I really like it. Is it easy to work and bend?
Looks like foam pipe insulation to me.


@RSJB18 posted:Looks like foam pipe insulation to me.
Yep, that's exactly what I used -- fairly cheap in the 3 to 4 foot length multi-packs at any hardware store, and recently I've seen it in longer lengths (6-8 feet or so?), which can reduce the number of seams needed. It easily opens up to grip the edge of the layout firmly, and can be removed and reinstalled as often as needed. The only problem is that, as you might expect, it prefers to go straight, but if you have at least a foot or two on either side of a sharp curve, it will usually hold well enough on its own. In a pinch, though, a strategically placed staple or two will keep it in place, though that makes it a bit more work to remove and reinstall.
I've successfully used it over plain half-inch plywood or, as shown in the pics, over half inch foam on top of half inch OSB -- the combined inch thickness is (literally!) a bit of a stretch, but still does well, protecting young visitors from enthusiastic encounters with the edges of your layout, while concealing the raw edges of your carpentry work and looking almost purpose-made for the use. My only other suggestion would be to buy all your anticipated needs at one go -- there are small but somewhat noticeable color variations from batch to batch.
Hung 3 Snyder shelves this morning. This is my first purchase from them, excellent quality.
Gene
@Randy Harrison posted:Your layout is GREAT. I love your scenery work. What material do you use for the platform border? I really like it. Is it easy to work and bend?
Thanks for the kind words, Randy! I believe I covered the answers to your questions in another post, but let me know if you have any other questions.
I've been playing with toy trains episodically for about seventy years or so, but among the unanticipated joys this time around has been the chance to do a deep dive into all aspects of landscaping, and finding not only the vast wealth of instruction and inspiration available on-line, but that even with limited efforts I could get pretty decent results! I'm still a journeyman at best, and don't get a lot of opportunities to 'drill' repeatedly on new skills, so this project was fun in part because I got a chance to reuse newly-learned skills, and use up some of the leftover materials in the process!
Evening guys I hope your all having a nice week! Nothing new from me as I am still working on a Retirement Party. I am just here checking up on all the great projects so I can throw so support to you all!
@Steve Tyler Steve what wonderful landscaping and I am so glad you took the time to explain how you went about building that scene and what materials you used! Thanks again and it looks wonderful!
@Genemed Gene, nice job on the shelves they look great! I also wanted to comment on how neat and clean your train room looks! Almost like an OR Room! LOL
@SIRT WOW That is some amazing work! Your skills are outstanding as you can't even tell the old from the new, and if one hasn't fallowed along they would never know!
I hope you all have a great Friday and weekend! Most of all I hope you all find time to have fun with your layout and trains!![]()
@WesternPacific2217 posted:This may not be a pure layout post, but the engine will run on my layout when finished. Besides, this is one of my favorite OGR threads.
I bought a used Lionel Santa Fe F3 ABA set from 2005 catalog about 3 years ago. It was delivered DOA, so I stashed it away with the thought I'd repair it one day. When I started to troubleshoot it I found the 5 volt rectifier for the smoke unit was miss wired to the plus side of the motor wires!!! It fried the DCDS, which is custom for this model and the 2004 F3 model. No wonder is was DOA!
Being a 2005 model Lionel replacement parts are a problem. I decided to replace all the Lionel stuff with ERR Commander, ERR F3/F7 RS board and then get creative for the lights. Also, I never use smoke so I'm going to omit the smoke unit.
Here's some photos of the beginning of the project, updates will follow if anybody is interested.
The original mess!
I had to drill a couple of holes to mount the ERR Commander and RS. Here's a photo of the PCA's installed. I had to remove the rear motor assembly to access one of the holes for the RS PCA.
I always wondered why the powered A unit weighed so much, I found this black hot poured metal ballast, on the left in the photo, in the fuel tank. It has to weigh at least a 1 lbs!
The adventure continues, waiting for LED's to arrive for the lighting.
Update: I installed the ERR Cruise Commander and RailSounds board, and wired everything up. Put it on the track, programmed it, switched it to run, and the front motor is DEAD. I clipped the wires and tested it with my variable DC power supply, and still DEAD. I sent the motor and truck off for repair this morning. In the meantime I will work on the lights and have those ready when the new truck with new motor arrives. I did try to get a motor from Lionel, but no more are available for this 2005 model. As I stated before, I'm not a smoke fan, so there's no smoke unit.

Happy Railroading!

@WesternPacific2217 posted:Update: I installed the ERR Cruise Commander and RailSounds board, and wired everything up. Put it on the track, programmed it, switched it to run, and the front motor is DEAD. I clipped the wires and tested it with my variable DC power supply, and still DEAD. I sent the motor and truck off for repair this morning. In the meantime I will work on the lights and have those ready when the new truck with new motor arrives. I did try to get a motor from Lionel, but no more are available for this 2005 model. As I stated before, I'm not a smoke fan, so there's no smoke unit.
Happy Railroading!
Scott sorry to hear of the dead motor. I have to ask, and I know some people are going to think this guys must have just crawled out from under a rock. But how do you know what wire from the board goes where? Does it come with a diagram or is it just from years of doing it?
Good evening everyone!
Got to work on the layout this afternoon by adding a crane to the freight platform at the mine. Since I had left over beams from the platform I decided to use them. I first started by making a base platform for the crane to be secured on. It is just a simple square frame with a floor. Next, I turned my attention to the crane structure. I planned on it to be a static structure so no complicated design needed. I built it to have a single upright beam supporting two extended beams. I cut notches out of the support and extended beams to make everything flush and allow the chain to be secured. To finish it off, I added some jewelry chain, fashioned a hook out of a twist tie, and gave everything a black paint job.

I secured the crane onto the platform and I think it looks great. However, a true crane is not complete unless it has a load to accompany it. So…

Much better! I took the left over beams and fashioned them into two large and one small stacks. I “wrapped” them in chain and placed them on the platform. They are now ready to be taken down into the mine!
This turned into a nice little afternoon project and I am glad I did it. Thanks for reading and good night!
Very impressive Trainmaster and the curvature is unique and works very nicely.
Jay
@Trainmaster04 posted:Good evening everyone!
Got to work on the layout this afternoon by adding a crane to the freight platform at the mine. Since I had left over beams from the platform I decided to use them. I first started by making a base platform for the crane to be secured on. It is just a simple square frame with a floor. Next, I turned my attention to the crane structure. I planned on it to be a static structure so no complicated design needed. I built it to have a single upright beam supporting two extended beams. I cut notches out of the support and extended beams to make everything flush and allow the chain to be secured. To finish it off, I added some jewelry chain, fashioned a hook out of a twist tie, and gave everything a black paint job.
I secured the crane onto the platform and I think it looks great. However, a true crane is not complete unless it has a load to accompany it. So…
Much better! I took the left over beams and fashioned them into two large and one small stacks. I “wrapped” them in chain and placed them on the platform. They are now ready to be taken down into the mine!
This turned into a nice little afternoon project and I am glad I did it. Thanks for reading and good night!
Trainmaster, great idea and looks awesome. Go back to the early 20th century and it could be prototypical. Mines and logging used the resources they had locally and nothing fancy. 👍
@mike g. posted:Scott sorry to hear of the dead motor. I have to ask, and I know some people are going to think this guys must have just crawled out from under a rock. But how do you know what wire from the board goes where? Does it come with a diagram or is it just from years of doing it?
Hi Mike, no you haven't been hiding under a rock, it's a legitimate question. gunrunnerjohn would probably be better at explaining then me, but I'll give it a try. As you probably already know DC motors in our model trains run in either direction depending on which side of the input is positive voltage (polarity).
There are two connectors on the ERR Cruise Commander that are directional and variable voltage outputs for the motor or motors (determines how fast and which direction the model goes). When the ERR is installed you may not always know what the polarity is for forwards and reverse (polarity on the motors). It's not a big deal it's a 50/50 chance. Forward is default when you start the engine, so it if goes in reverse then you just switch the motor wires on the ERR.
If you replace a motor it is possible to get the polarity wrong and that's a problem with two motors. You could have a motor running in reverse and the other one running in forward! Just flip the wires on one of the motors and off you go. Hope this helps.
@Trainmaster04 posted:Got to work on the layout this afternoon by adding a crane to the freight platform at the mine. Since I had left over beams from the platform I decided to use them. I first started by making a base platform for the crane to be secured on. It is just a simple square frame with a floor. Next, I turned my attention to the crane structure. I planned on it to be a static structure so no complicated design needed. I built it to have a single upright beam supporting two extended beams. I cut notches out of the support and extended beams to make everything flush and allow the chain to be secured. To finish it off, I added some jewelry chain, fashioned a hook out of a twist tie, and gave everything a black paint job.
I secured the crane onto the platform and I think it looks great. However, a true crane is not complete unless it has a load to accompany it. So…Much better! I took the left over beams and fashioned them into two large and one small stacks. I “wrapped” them in chain and placed them on the platform. They are now ready to be taken down into the mine!
This turned into a nice little afternoon project and I am glad I did it. Thanks for reading and good night!
Nice work, Trainmaster! Sometimes the most fun projects are the ones that just sort of organically grow out of our scrap and leftover piles! ![]()
@WesternPacific2217 posted:Update: I installed the ERR Cruise Commander and RailSounds board, and wired everything up. Put it on the track, programmed it, switched it to run, and the front motor is DEAD. I clipped the wires and tested it with my variable DC power supply, and still DEAD. I sent the motor and truck off for repair this morning. In the meantime I will work on the lights and have those ready when the new truck with new motor arrives. I did try to get a motor from Lionel, but no more are available for this 2005 model. As I stated before, I'm not a smoke fan, so there's no smoke unit.
Happy Railroading!
Scott,
Just curious; was the motor working before the electronics came in to play? Did they damage the motor? I did an ERR install several years ago. It ran good. I haven’t used it in awhile. When I attempted to run it last week it shorted out. I didn’t have time to check it out. It’s on my list.
Morning guys I hope you all have a wonderful weekend planned! I will be spending it with my wife for the first time in over a year as she has always worked weekends, but with today her last day of working I see more together!
@Trainmaster04 The crane looks perfect on your loading dock! It sure is nice to be able to use extra stuff from other projects!
@WesternPacific2217 Scott thanks for the response! I remember when I first joined this forum I asked a question and one person made fun of me cause I didn't know. Things sure have changed over the years, that is why I love this community so much!
@SIRT The fence install sure looks great! Is that scratch built?
Well guys I think the only thing that will be done one the layout for me today is to temporarily put some people on the layout for folks that want to see the layout tomorrow during my wife's retirement party see people not just cars and trains! LOL
I hope you all have a great weekend and find time to have fun with your layouts and trains!![]()
Scott, the motor is most likely the standard for Lionel diesels. Try looking up a motor from a different engine. Sometimes a motor may show no stock for a particular engine but is available under a different engine. This has worked for me at times. It’s worth a try.
@romiller49 posted:Scott, the motor is most likely the standard for Lionel diesels. Try looking up a motor from a different engine. Sometimes a motor may show no stock for a particular engine but is available under a different engine. This has worked for me at times. It’s worth a try.
Hi Rod, I did think of that, but the motor isn’t the issue as much as the worm gear. The are many variations with the gear. So I sent my dead motor to a guy that will remove the flywheel and worm and install on a new motor. Thanks for the input, I appreciate it!
@pennsyfan posted:Scott,
Just curious; was the motor working before the electronics came in to play? Did they damage the motor? I did an ERR install several years ago. It ran good. I haven’t used it in awhile. When I attempted to run it last week it shorted out. I didn’t have time to check it out. It’s on my list.
Hi Bob, when I received this F7 3 years ago it was DOA. It had been worked on before I got it and the 5 volt regulator was miss wired to one of the motor wires!!! That killed the DCDS and those are no longer available for this model. Anyway, after I installed the ERR is when I discovered the dead motor. The locomotive looked like it had some miles on it, and it is 18 years old!
@romiller49 posted:Scott, the motor is most likely the standard for Lionel diesels. Try looking up a motor from a different engine. Sometimes a motor may show no stock for a particular engine but is available under a different engine. This has worked for me at times. It’s worth a try.
Scott,
I just ordered these items for a 2005 gp9 from the Alaska Yukon set.
The motor in truck and motor separately was available.
| PILOT / MOLDED PLASTIC / BLACK | 1 | PILOT / MOLDED PLASTIC / BLACK | $6.50 | $6.50 | |
| COLLECTOR / ROLLER / STARTER SET - 6008209165 | 2 | COLLECTOR / ROLLER / STARTER SET | $1.95 | $3.90 | |
| 4-WHL MTR TRK / W/MTR / W/SNSR / STARTER DIESEL - 6208843106 | 1 | 4-WHL MTR TRK / W/MTR / W/SNSR / STARTER DIESEL | $32.00 | $32.00 | |
| COUPLER / MAGNETIC / PLASTIC / LOW-END DIESEL | 2 | COUPLER / MAGNETIC / PLASTIC / LOW-END DIESEL | $5.20 | $10.40 | |
| COUPLER PLUNGER / PLASTIC W/ THUMBTACK - 6109050057 / 6802731057 | 2 | COUPLER PLUNGER / PLASTIC W/ THUMBTACK | $1.85 | $3.70 | |
| CLUSTER GEAR / MOLDED / CELCON / STARTER TRUCK | 2 | CLUSTER GEAR / MOLDED / CELCON / STARTER TRUCK | $1.50 | $3.00 |
Access to this requires an OGR Forum Supporting Membership


