Hello’s everyone!
Worked on a video after my last post and was able to get it published this morning. Hope you all enjoy it.


|
|
Hello’s everyone!
Worked on a video after my last post and was able to get it published this morning. Hope you all enjoy it.
Been jumping around a bit on some things but finally got a few of my background buildings installed and wired u they really add to the overall effect of my layout. 


@farmerjohn One of these days I am going to have to go to one of your open houses. Wow, really need to see this in person ! ![]()
John, every scene looks great!
Thanks guys. Trains are so much fun when others enjoy them also. Ill post some more pics later. I'm on my way to York tonight. So muck fun .
On my layout today...I stopped deconstructing it ! Turns out our home's new buyer wanted it all left as -is , including the holes in the wall, since he models N-Gauge and will reuse my partial creations ! A silver lining to the end of my layout in this house.... On to the next basement !
Rich in SD awhile longer
@trestleking posted:On my layout today...I stopped deconstructing it ! Turns out our home's new buyer wanted it all left as -is , including the holes in the wall, since he models N-Gauge and will reuse my partial creations ! A silver lining to the end of my layout in this house.... On to the next basement !
Rich in SD awhile longer
Now *there's* a silver lining indeed if I ever saw one! ![]()
Morning guys and gals I hope your all having a wonderful Tuesday! From what I hear it is going to get cold and wet next weekend on the east side!
@farmerjohn John great looking backdrop buildings, Did you scratch build them or is it a kit?
@RIRocket, wonderful service area! I like how you are trying some oil spill areas, also that is quite the water tower!
@trestleking Rich what a great surprise! I sure hope he didn't mind that you took the track! Just wondering where are you off too?
As for me guys not much, spent the last couple day with the CEO celebrating her Retirment. Actually that was Saturday, I spent Sunday in my own little home recovery! LOL
I did get out yesterday, but it wasn't on the layout but for the layout. Below is a couple of my Redneck ballast washing and drying station. I had to was it cause it was all my old used ballast and I had to get the glue, grass, dirt and anything else that was stuck to it so I could reuse it!
First up washing!

Next up the drying station!

I thought about using the microwave, but thought I better not as some of the ballast sticks to a magnet! I don't think it would be good for the Microwave.
I hope you all have a great day and find time to have fun with your layouts and trains!![]()
@mike g. posted:I thought about using the microwave, but thought I better not as some of the ballast sticks to a magnet! I don't think it would be good for the Microwave.
Magnetic ballast??! What, are you creating your own Redneck Magne-traction system?? ![]()
@Steve Tyler posted:Magnetic ballast??! What, are you creating your own Redneck Magne-traction system??
LOL Thanks Steve, but no, it is funny thought when I would clean up after taking track up, I would use a strong magnet and run it over the area to find any nails I used to hold down the track. A lot of time the ballast would stick to the magnet. I will have to go out and see if I can get a photo of it for you all! LOL
Wired up my first uncoupling track section. The ballast should cover the wires, so you’ll never know they’re there. My only concern is the glue possibly messing with the connections, but I think it should be okay

Hi guys, I decided to stay in the house today and stay nice and warm! So needless to say nothing new from me today!
@Sams Trains Sam looks good and I don't think the glue will cause any problems as it doesn't bother the joints and joint pins.
@Obsidian looking great! I cant wait to see it from the outside also!
I hope you all have a great night and find time to have fun with your layouts and trains!![]()
@Sams Trains posted:Wired up my first uncoupling track section. The ballast should cover the wires, so you’ll never know they’re there. My only concern is the glue possibly messing with the connections, but I think it should be okay
Put some tape over the connections then ballast away. Then, later, if you ever have to work on them, just lift the tape and everything will be clean and easy to access.
@Obsidian posted:Work continues on the viaduct. Need to cut the arches for the opposite side. Because it's on a (O-108) curve, the outside arches will be larger. Thinking thin, flexible styrofoam sheets to form inside arches.
I really like that bridge.
Afternoon guys I was able to get out to the garage today to finish cooking my ballast! LOL so here is what I ended up with when everything was dried and packaged for storage till I am ready.
36.0 Lbs of gray ballast for the main line and sidings!


And 7.5 Lbs of nice clean black ballast! LOL


I have to tell you all this was so much fun! I can't wait to have the fun putting it down! LOL
I think for the rest of the day I might just run trains depending as long as the CEO has nothing new for me! LOL
I hope you all have a great day and find time to have fun with your layouts and trains!
Got two more engines programmed into my Cab 1L. Serviced both, and of course had to run them for a while..👍👍😁


@RSJB18 posted:Got two more engines programmed into my Cab 1L. Serviced both, and of course had to run them for a while..👍👍😁
Nice WM engine !
@trestleking posted:Nice WM engine !
Thanks. I bought from @Mark Boyce several years ago. It's one of my favorites.
Bob
@ mike g.
From what I understand you AND CEO are retired, there’s always tomorrow.
I feel you really enjoyed the trips around the loops today.
I found late night three Madison southern Crescent passengers and three buildings to add to my town late yesterday. What a great Forum ☺️
@Sams Trains posted:Wired up my first uncoupling track section. The ballast should cover the wires, so you’ll never know they’re there. My only concern is the glue possibly messing with the connections, but I think it should be okay
Looking good Sam! Is that a lionel Super O uncoupled? The reason that I ask is that I fitted Lionel Super O uncouplers into my Gargraves tracks. All was well until I added some acquisitions to my layout. I found out that the button sits to high for engines and trolleys with low pilots. In particular my Williams scale 44 tonner, and a Williams Peter Witt trolley. There are a few other scale engines that escape me right now. Intermittently my newly acquired Weaver Hiawatha passenger cars.
Looks like an Atlas O 6059 Uncoupling Section.
@Sams Trains, nice track work and the Atlas O uncouplers look right at home. They do resemble the super O uncouplers made years ago by Lionel but do not have the copper look. I’ve got mine ready to be wired by Lionel ASC’s so that I can use my cab 1L’s and Cab 2’s to operate them. You are making good progress on your layout.
I do not have many pictures but working on the turntable area. Happy Railroading Everyone 


I'm in the process of wiring my DZ1000 switch machines on my Ross switches. I decided to place the DZ1002 controllers near their corresponding switches. Rather than mount each controller separately, I am installing them in electronics project boxes with either two or three controllers per box. I'm going to recess the boxes on the surface of the layout. Here is a picture of one of the boxes with two of the three switches installed. 
@spudder posted:I'm in the process of wiring my DZ1000 switch machines on my Ross switches. I decided to place the DZ1002 controllers near their corresponding switches. Rather than mount each controller separately, I am installing them in electronics project boxes with either two or three controllers per box. I'm going to recess the boxes on the surface of the layout. Here is a picture of one of the boxes with two of the three switches installed.
Nice work!
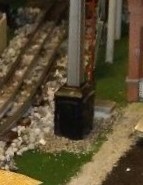
Somewhat similarly, in the pursuit of realism I've of late taken to sinking the bases of some of the vintage (and more current) accessories into the half-inch foam board on top of my layout, and have been very pleased so far with the resulting improvement. I'm still working on the best way to landscape up to/over the top of the accessory bases, but IMHO already it's a significant improvement over the "toy train" appearance of a lot of the vintage gear I favor. What I'm shooting for is kinda like a scale depiction of what prototype operations and equipment might have looked like if they'd been based on blueprints from the vaults of Marx, Lionel, AF, etc.! Here's an example (sorry for the poor photo quality -- it's just a crop from a larger pic, showing the base of a Lionel semaphore signal I recessed into the layout, with a cardstock and styrofoam surround and cover to protect the electrical connections from the fine ballast fill) :

@Steve Tyler
Steve, while I haven’t addressed signals, etc; the Lionel play ground accessories really need help. If just placed on the layout; the kids would have to climb up a 2’ embankment to get on the playground. I cut a hole in the table rather than build up the established surroundings. Here are my before and after pictures.

I recently added a golf accessory which I also submerged.

Awesome thread, lots of great stuff going on in here. There's always great ideas to take away.
Here's my little project this morning, pretty simple. My little Lionel Santa Fe Chief observation car tail light was just a red plastic lens with no illumination. I've been meaning to install an LED, just now getting to it.
The lens already went all the way through to the interior of the car, so no drilling required! I've pretty much stopped using hot glue (messy) and resorted to Gorilla Tape to secure wires.
Here's some photos. The LED is connected directly to track power, so a rectifier and resistor are used. LED's on 60 hertz drive me crazy with the flicker. Actually, I cheated here and used a 1/8" warm Evan Designs LED. ![]() Here's some photos.
Here's some photos.


@WesternPacific2217 posted:Awesome thread, lots of great stuff going on in here. There's always great ideas to take away.
Here's my little project this morning, pretty simple. My little Lionel Santa Fe Chief observation car tail light was just a red plastic lens with no illumination. I've been meaning to install an LED, just now getting to it.
The lens already went all the way through to the interior of the car, so no drilling required! I've pretty much stopped using hot glue (messy) and resorted to Gorilla Tape to secure wires.
Here's some photos. The LED is connected directly to track power, so a rectifier and resistor are used. LED's on 60 hertz drive me crazy with the flicker. Actually, I cheated here and used a 1/8" warm Evan Designs LED.
Here's some photos.
Nice work, WP! I agree, sometimes it's the little projects that scratch an itch that's been bugging you for a while that are quite satisfying!
Using pre-wired track voltage LEDs certainly saves time -- I bought a bunch of them a while back, and have used them on a lot of projects with great success. The only down side so far is that they seem to have a higher fail rate than I would have expected -- I have at least two on my layout awaiting my attention and replacement. AFAIK, I'm not feeding them excessive voltage or otherwise abusing them -- has anyone else had this type of problem, and if so, any solutions to consider? Obviously, throwing more resistance in series would most likely help (at the cost of dimming the LED), but that sort of defeats the purpose of paying for pre-wired LEDs, no?
@pennsyfan posted:@Steve Tyler
Steve, while I haven’t addressed signals, etc; the Lionel play ground accessories really need help. If just placed on the layout; the kids would have to climb up a 2’ embankment to get on the playground. I cut a hole in the table rather than build up the established surroundings. Here are my before and after pictures.
I recently added a golf accessory which I also submerged.
I agree -- recessing the base makes it look more like part of the scenery and less like part of a display case! ![]()
I'm still not sure the best way to finish such an installation, though. Using fine ballast or equivalent and watered white glue, etc. around the perimeter can certainly complete the integration, but I worry about having to remove the accessory later, for relocation or repair/adjustment. Some of the installations done so far I've just left loose, but the ballast tends to creep under the accessory and leave gaps at the surface, so there's a definite downside to *not* properly securing the landscaping. For now, I'll just continue to improvise on a case-by-case basis, learning (and hopefully improving!) as I go . . . ![]()
@Steve Tyler posted:I agree -- recessing the base makes it look more like part of the scenery and less like part of a display case!
I'm still not sure the best way to finish such an installation, though. Using fine ballast or equivalent and watered white glue, etc. around the perimeter can certainly complete the integration, but I worry about having to remove the accessory later, for relocation or repair/adjustment. Some of the installations done so far I've just left loose, but the ballast tends to creep under the accessory and leave gaps at the surface, so there's a definite downside to *not* properly securing the landscaping. For now, I'll just continue to improvise on a case-by-case basis, learning (and hopefully improving!) as I go . . .
I finish/smooth the edges with 1” painters tape and then diluted white glue, ballast and grass. If I ever have to remove it a razor knife will create a neat separation.
Hi guys I was going to comment on everyone and their wonderful projects. But at this point there is so many I would have to write a small book and people who are just checking in wouldn't have any idea of what I was talking about. But I have to say everything would really impress anyone who seen all these wonderful projects!
Nothing from me today and the CEO and I had to do some running around today!
Tomorrow is Friday so I hope everyone has a great weekend and finds time for fun with their layouts and trains!![]()
Boy Mike, isn’t that the truth! There is so much here, it is hard to keep up.
@Steve Tyler posted:Nice work, WP! I agree, sometimes it's the little projects that scratch an itch that's been bugging you for a while that are quite satisfying!
Using pre-wired track voltage LEDs certainly saves time -- I bought a bunch of them a while back, and have used them on a lot of projects with great success. The only down side so far is that they seem to have a higher fail rate than I would have expected -- I have at least two on my layout awaiting my attention and replacement. AFAIK, I'm not feeding them excessive voltage or otherwise abusing them -- has anyone else had this type of problem, and if so, any solutions to consider? Obviously, throwing more resistance in series would most likely help (at the cost of dimming the LED), but that sort of defeats the purpose of paying for pre-wired LEDs, no?
Hi Steve, thanks for the comments! As far as your concern for Evan Designs track voltage LED Failures I don't have all that many, and I have had no failures at this point. I'll be using more, as I'm terrible at assembling small components, wiring, and soldering, and I willing to pay for stuff already assembled to avoid it.
My following post I just finished, and it's pretty sloppy, but it works and looks fine on the tracks.
If I notice premature track voltage LED failures I'll let ya know.
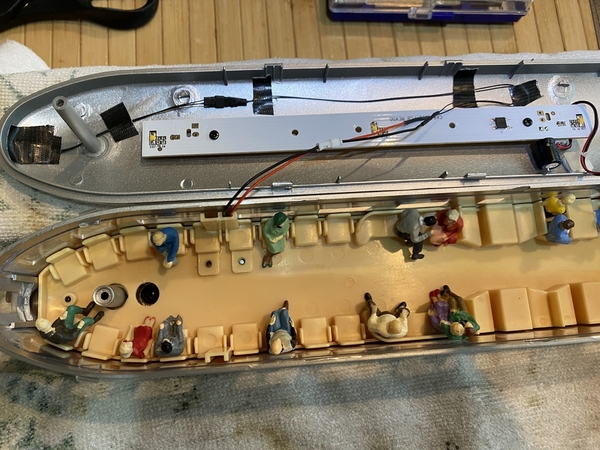
Inspired after installing the tail light on the Chief observation car, I decided to install the lights in the Chief baggage car. The baggage car had no lights or power pickup rollers, so had to order and install the pickup rollers and copper wheel grounds.
I used 12 volt LED strip and GRJ's variable LED power supplies. Excuse my sloppy wiring, it's not my one of my strengths!!! ![]() Fortunately, unless you look closely through the very small windows the wiring can't be seen.
Fortunately, unless you look closely through the very small windows the wiring can't be seen.
Original trucks.

Original trucks with pickup and ground. LED light strip with GRJ's LED PS.

These cars are all plastic and hot glue can cause issues, so I'm "sticking" to Gorilla Tape. It ain't pretty, but it works.

It used to be just a dark interior, now it's alive with light. ![]() Since the doors don't open I'm not planning to do anything to the interior.
Since the doors don't open I'm not planning to do anything to the interior.


This thread does move quickly. I just checked this morning (Sam's uncoupler),and you would think I've been away for days.
Scott, you've inspired me to do the same when I get to the baggage car in my B&O set. I've sourced the pick up rollers. Just need the wipers for the wheel axles. The trucks have the mounting holes already so it should be a simple install.
Now I need to find some time.......
Bob
@pennsyfan posted:Scott,
I just ordered these items for a 2005 gp9 from the Alaska Yukon set.
The motor in truck and motor separately was available.
PILOT / MOLDED PLASTIC / BLACK 1 PILOT / MOLDED PLASTIC / BLACK $6.50 $6.50 COLLECTOR / ROLLER / STARTER SET - 6008209165 2 COLLECTOR / ROLLER / STARTER SET $1.95 $3.90 4-WHL MTR TRK / W/MTR / W/SNSR / STARTER DIESEL - 6208843106 1 4-WHL MTR TRK / W/MTR / W/SNSR / STARTER DIESEL $32.00 $32.00 COUPLER / MAGNETIC / PLASTIC / LOW-END DIESEL 2 COUPLER / MAGNETIC / PLASTIC / LOW-END DIESEL $5.20 $10.40 COUPLER PLUNGER / PLASTIC W/ THUMBTACK - 6109050057 / 6802731057 2 COUPLER PLUNGER / PLASTIC W/ THUMBTACK $1.85 $3.70 CLUSTER GEAR / MOLDED / CELCON / STARTER TRUCK 2 CLUSTER GEAR / MOLDED / CELCON / STARTER TRUCK $1.50 $3.00
Hey Bob, thanks for all the info!! I should have my truck with new motor back in about a week. Looks like you'll have some work to do your Geep 9 when you receive all that stuff! Keep us posted.
@WesternPacific2217 posted:Hi Steve, thanks for the comments! As far as your concern for Evan Designs track voltage LED Failures I don't have all that many, and I have had no failures at this point. I'll be using more, as I'm terrible at assembling small components, wiring, and soldering, and I willing to pay for stuff already assembled to avoid it.
I should clarify that the pre-wired LEDs I've been having some trouble with were *not* from Evan Design. I've bought several specialty LEDs from them (flashing red for my scratch-built celltower and flickering orange for a campfire scene) and so far have not had any problems with any of them. The problematic ones were among a bundle of twenty from a no-name source, and as I said, I still have no idea what the problem was with those that failed. Other than being a tad pricey, I have had no complaints about any of the ED stuff!
Access to this requires an OGR Forum Supporting Membership


