I have been working on wiring up lights. and wiring the bridge. here's the results. not a light was on in the whole room except the layout there was some light coming in from the hallway.


|
|
Got back to trains now that a major project was finished with my 'Hot Rod'. Summer is here so I'm going to try my hand at making sisal twine trees this weekend, now that I can work outside. Maybe even finally start messing with my airbrush. Stay tuned.
Wow in Jhainer post of his layout in pictures 10-11 even on peoples train layouts there are sink holes.![]() You better get some caution tape up before someone falls in and you get sued.
You better get some caution tape up before someone falls in and you get sued.![]() Just kidding you layout looks great take care. Choo Choo Kenny
Just kidding you layout looks great take care. Choo Choo Kenny
Jhainer, the lighting looks good!
Wow in Jhainer post of his layout in pictures 10-11 even on peoples train layouts there are sink holes.![]() You better get some caution tape up before someone falls in and you get sued.
You better get some caution tape up before someone falls in and you get sued.![]() Just kidding you layout looks great take care. Choo Choo Kenny
Just kidding you layout looks great take care. Choo Choo Kenny
that's a pop up hole with no pop up I call it the Bella hole my granddaughter use's it to see the trains at her level ![]()
Jhainer, the lighting looks good!
thank you if you look in one of the pics of the bridge it looks lite up on the out side I was testing a led light shining up on the bridge as a spot light I slide the led into a piece of tubing then put shrink wrap around it so only the tip was sticking out and then drilled a hole in the base of the layout to mount the light in and pointed it at the bridge.
Yes, I noticed the spotlight. The lights on the bridge itself are good too!
Wow in Jhainer post of his layout in pictures 10-11 even on peoples train layouts there are sink holes.![]() You better get some caution tape up before someone falls in and you get sued.
You better get some caution tape up before someone falls in and you get sued.![]() Just kidding you layout looks great take care. Choo Choo Kenny
Just kidding you layout looks great take care. Choo Choo Kenny
that's a pop up hole with no pop up I call it the Bella hole my granddaughter use's it to see the trains at her level ![]()
The Bella hole is a great idea!
wish I had a pic of her standing in the hole ![]() my daughter who's 13 use's it too but she can stand in the hole and her head is just under the upper level so not much longer will she be able to stand in there .
my daughter who's 13 use's it too but she can stand in the hole and her head is just under the upper level so not much longer will she be able to stand in there .
Me I have to be on my knee's
Still working on shelfs for the train room. Taking longer than planned.
Power outages from storm, and fishing slowing me down.
Most of the shelfs are "Glenn Snyder Display Systems"
Some custom work with the table saw.
Gary
Cheers from Michigan
Today I made a wooden terminal strip out of a piece of Oak. Sure did make the drill bit hot ! This will be where the various Transformers terminate. Feeders will come off the appropriate "binding post".. I must have drank too much Jim Beam because I feel stupid for drilling the bolt holes all over the place. I drew a straight line, too, and spaced the bolts 3/4" apart. Really embarassing too !
The other photos show Suzie's 027 train set making its first test run over the inner loop. More to come.
KRK


The young dog(110lbs) got tangled in my low hanging wires under layout. And...well, some of the wires lost. All the "wrong" wires were off the terminals.
So again, I worked on the right 1/2, loose, under-table, "spaghetti wiring".
But this time, was easier.
One by one, strand by strand. Rerouting each one carefully.
Running groupings of 3 track busses; accessory control by area; 3 voltages for access. functions, and turnout controls for the super O line, and 0-27.
The El.s timer was neat and clean the first time.
On the Super-O, a back-in, two passenger car length depot siding is all I have.
It ran full time track power at the bumper end. It also got a constant voltage un-coupler. And between the un-coupler and the turnout, is a track block that can have the power killed, sized just right for a switcher.
When that short siding block is energized by switch, the mainline semaphore signal energizes too, now occupied/stop.
Soon, I think I'm going to ad another block to the mainline, that shuts off when the short siding block is on. And ad second, switch killable main line section,(small), to hold the switcher a minute at "half loop".
I need one more Super-O un-coupler in the long run too.
That would allow me a little better switching even though its mainly a decorative siding.
Ken,
I could have drilled those holes like that without Jim. That's one reason I don't drink. Who knows, I might hurt myself. lol
Suzie's train looks real smart on the layout. You are making some good progress!
The young dog(110lbs) got tangled in my low hanging wires under layout. And...well, some of the wires lost. All the "wrong" wires were off the terminals.
So again, I worked on the right 1/2, loose, under-table, "spaghetti wiring".
But this time, was easier.
One by one, strand by strand. Rerouting each one carefully.
Running groupings of 3 track busses; accessory control by area; 3 voltages for access. functions, and turnout controls for the super O line, and 0-27.
The El.s timer was neat and clean the first time.
On the Super-O, a back-in, two passenger car length depot siding is all I have.
It ran full time track power at the bumper end. It also got a constant voltage un-coupler. And between the un-coupler and the turnout, is a track block that can have the power killed, sized just right for a switcher.
When that short siding block is energized by switch, the mainline semaphore signal energizes too, now occupied/stop.
Soon, I think I'm going to ad another block to the mainline, that shuts off when the short siding block is on. And ad second, switch killable main line section,(small), to hold the switcher a minute at "half loop".
I need one more Super-O un-coupler in the long run too.
That would allow me a little better switching even though its mainly a decorative siding.
The dog is the safety inspector telling you this wiring just won't do. ;-) Did you ever have someone come over check your work on whatever, and rip it apart? I had that happen once, the guy wasn't even my manager, and he started ripping on my wiring. I told him if he had let me finish everything would be bundled neatly. Something I observed he didn't do before he was manager.
Dog - 1
Adriatic - 0
You're making good progress.
Getting ready for my first-ever op session on Sunday.
I had made a panel of track as storage for extras cars, it finally went under the layout, very late last night. I have mostly book cases and dressers filled with stuff from my WW2 collection (and random other stuff) under the layout...
wow this thread has more life to it the Phantom of the Opera on Broadway!!!
wow this thread has more life to it the Phantom of the Opera on Broadway!!!
That's for sure, Steve! What a great question Jim asked to start it off! I just don't see it ending.
That's for sure, Steve! What a great question Jim asked to start it off! I just don't see it ending.
This is the thread that never ends
It just goes on and on my friend
Some people started posting here not knowing what it was,
And they'll continue posting here forever just because . . .
![]()
Mitch
That's for sure, Steve! What a great question Jim asked to start it off! I just don't see it ending.
This is the thread that never ends
It just goes on and on my friend
Some people started posting here not knowing what it was,
And they'll continue posting here forever just because . . .
![]()
Mitch
Mitch,
I thought of that song when I was typing my message. ![]()
I remember it from Shari Lewis' show with Charlie Horse and Lamb Chop!
Still piecing the industrial area together. I spent a good hour and a half moving track and switches around. I think I may have a final solution. What was going to be two sidings for the power/chemical plant is now one. The MTH station is now going to have three tracks to it. Two sidings for RDC cars and one for box car unloading. Next to that a small siding for one small industry. I stopped there and I am going to think about it till tomorrow. If I still like it I'll mark everything off and glue down cork.......Paul
Right now, I'm waiting on a call-back for a new pw engine deal today.
Waiting again![]()
![]()
My wiring works before I solder, or bundle.
Old spaghetti wired pinball machines got me over the fear of birds nests. Some of those are real pieces of s...um, work.
Proper groups and hanging doesn't mean Puppy wont want to taste the quality of the work, to see if its close to that of chicken.
My having touched it alone, means it must be inspected by wet nose at least![]()
You should have seen him press his nose against 6-9volts on the G scale track!![]() "Ahh...you big dummy"
"Ahh...you big dummy" ![]() Sometimes I'm sooo glad he's not really mine
Sometimes I'm sooo glad he's not really mine ![]()
Shari may have been my first crush ![]()
I knew Lamb Chop was too cool to hang with a "fake" ![]()
Meeting her flustered me![]() . I talked to Lamb Chop, and she eased me into conversation with eye contact.
. I talked to Lamb Chop, and she eased me into conversation with eye contact. ![]() A great lady
A great lady![]() .
.
...still waiting......
wow this thread has more life to it the Phantom of the Opera on Broadway!!!
Yep, and it really could just keep going.
I love it because everyone gets to share and you get to see people's posts you might not normally see otherwise.
I also love 'in progress' reports and photos, too.
Well, I just finished unpacking some more Trolleys. There are now EIGHT trolleys awaiting their call to duty in my new trolley yard. There are about SIX more out in my Shop somewhere which includes three PCC's.
Getting ready to start the trestle network to the 2nd level using K-Line and Lionel trestle pieces. Have never done trestles before so wish me luck. Yesterday, I made a custom lift-out section for the outer mainline loop. When not in place, it allows me access to be able to reach over the table, here and there.
Cheers.
KRK
I wanted to run a tank car train (9 tankers, one 2 bay coal hopper and cabin car) pulled by a Lionel Consolidation. I quickly found places where recent ground cover installation trackside left a film on the track. I cleaned that track and as the train moved along a kept finding more places that needed cleaning. But I also thought that the loco wheels and pickup rollers might need a cleaning so I put the Lionel Consolidation on my bench. When I inspected the rollers on the loco and tender, they were dirty but I also found the front loco roller to grind a little when I tried to move it. It did not spin freely. I had no Lionel roller so I replaced it with an MTH roller from a long dead railking Consolidation. Two little wings on the roller base interfered with it seating flat and firm so I removed those with a dremel. The bolt that holds the roller base is over an inch long and is secured with a nut inside the loco. I had to remove the shell, find the nut, remove a wiring terminal screwed just aft of the smoke stack to screw the bolt into the nut. It worked!
So now another thing on my maintenance list is checking rollers for free spin and lubrication. BTW, are Lionel pickup rollers difficult to find. I might invest in a couple back ups.
Train Tender has plenty of rollers in stock, and they're inexpensive. Buy 'em in bulk! ![]()
Mitch
MMM...do you want to translate that Cockney statement? I took a train ride in GB
from London down to a cathedral town where you could catch a bus out to Stonehenge.
Only, the conductor or whomever that was announcing stations had a Cockney accent
that was unintelligible, and I missed my station and had to take a train back to it. So
I was on the last bus out to Stonehenge, and after exploring it, found there was no
ride back to the station. Inquiry revealed a bus did come to a country cross roads five
miles from Stonehenge. I had a nice walk in the English countryside to that cross
roads, but, sure enough, a bus showed up and I rode back to the station and back into
London. There isn't a snowball's chance if I was stuck anywhere in rural America, a
bus ride is gonna show up at a remote country crossroads.
Today I did some painting, flat black on all the interior of this kitbashed gas electric,
and sprayed the soldered sides yellow. I also shaped the roof, which fits the back
Williams car end but does not fit so well the Walthers heavy alloy gas electric front
end casting. I may need to lower it on the frame or take some metal off the top.
I finally got part of the upper shelf built, it will have 2 tracks looped and travel 88 feet around the loft, with a 12'x20' 3 finger layout against the far wall (377 feet of track), 8 of 12 benchwork complete, so much to do and so little time.
I put my bridges back up and put the track back on so trains can be run until I work next. The house till is work hard but always leave the layout in full running order between work sessions. Also got Billadelphia pretty much done except for the details but I'm doing high lever work right now then I'll come back n add the stuff that makes it special.


I know the UPS area had special meaning to you Spence. Sorry to see it go. ![]() Looking forward to an even better UPS on your rebuilt layout.
Looking forward to an even better UPS on your rebuilt layout. ![]()
Matt
Looks like your powering your layout with windmills.![]()
Larry
After a month on the road, almost 2 months off the layout and a week back home, I finally went down stairs. I needed a project that was easy on the body and the brain. I started with a little vacuuming and tool gathering.
A while back I purchased some small wooden knobs which will be used with radio control push rods to throw manual switches, that are too hard to reach, on the upper deck.
This is a picture of my prototype. There is a 2-56 Allen head screw that threads right into the yellow tube. In order to accomplish this with this knob, a number of drilling operations have to be performed as well as inserting a plug in the original hole.

The first operation is to drill through the face of the knob with a size just large enough for the screw head.

Next the original hole in the knob needs to be plugged. I superglue a piece of dowel in place. The new hole I just drilled is smaller, so there is a shoulder on the inside that stops the plug.

There are still a number of operations left to complete each knob, and there are about 100 knobs in the project. Time to get back to work.![]()
well I finally poured another layer of water on my river. not to get into too many details like saying somehow I messed up but some spots never hardened ?? so poured over it tonight made sure I measured and stirred correctly. then I changed lights in the room from regular bulbs to LED's wow what a difference I went with daylight bulbs. then I ran trains for about 2 hrs and painted my bridge Black. last pic is of the old bulbs


I cleaned my train room and under my platform, and I organized just about everything![]() .
.
What is this "clean" of which you speak? ![]()
Mitch
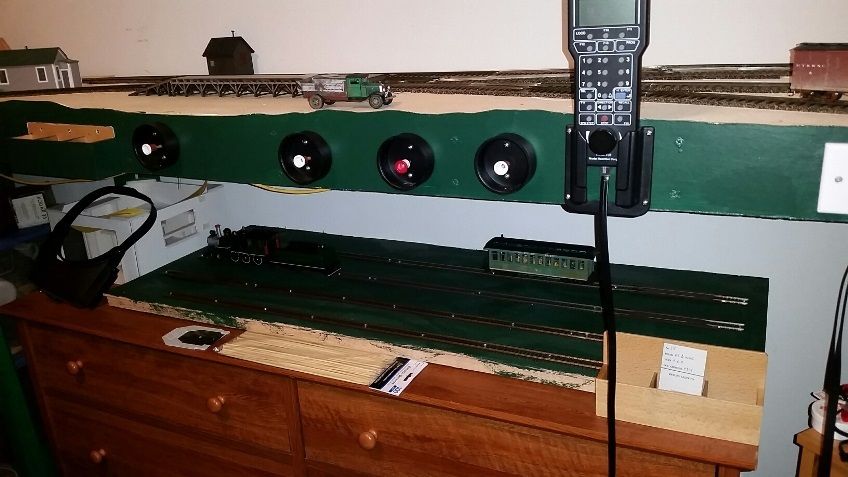
I have been working on wiring up lights. and wiring the bridge. here's the results. not a light was on in the whole room except the layout there was some light coming in from the hallway.
Atmospheric and inviting to the eye (I repeat only two of your photos here to use a minimum of space for my reply.) You must be quite satisfied with these good looking results. I love it all.
FrankM.
Last night I did what most RR modelers can't do - I stood over my layout with just the layout light on and watched from overhead my trains running 15 ft. below. Pretty cool. My lighting "system" is a mix of bulbs and LEDs and the rough sawed brown wood of the ceiling gives it a warm golden glow. My bedroom is a loft above the LR/DR space where the layout is so you look down on it. Perfect for self defense.
I have been working on wiring up lights. and wiring the bridge. here's the results. not a light was on in the whole room except the layout there was some light coming in from the hallway.
Atmospheric and inviting to the eye (I repeat only two of your photos here to use a minimum of space for my reply.) You must be quite satisfied with these good looking results. I love it all.
FrankM.
thank you very much FrankM that means a lot that also means I have learned something from the forums. 2 years ago I had no clue on how to build a layout. one thing I have learned it I am some what artistic LOL I enjoy the scenery.
Steamer, more photos of your turntable, please tell us about it, looks interesting.
Steamer,
That is inspiring, simple, yet with lots of possibilities for enhancement, like flipping the bridges upside down, giving them a strong, thin one piece deck that over hangs a bit for the side walkways, some railings, then recess the entire thing so that it is level with the tabletop, dress up the pit and walls, and perhaps add the rail around the inside perimeter of the pit, even if only for looks, and finally add a bridge tower and a control box building on the deck.
Access to this requires an OGR Forum Supporting Membership

")

")


")

")


