


Looking good Elliott, I bet it sure is nice to be moving on from just laying track and switches. To ballasting and buildings, and other aspects!![]()
Thanks Mike. Actually, I really like track laying. On the other hand, boring ballasting, while tedious, is also rewarding. It means the track is finished. The plan is to have "Christmas in April" and finally start putting more of my rolling stock fleet on the rails. I'll fill this yard in no time.![]()
Big_Boy_4005 posted:RSJB18 posted:Was wondering what you've been up to Elliott. Hadn't seen any updates in a while. Hope the rib heals quickly. That is a lot of paint and ballast. Wondering if you are keeping track of how many pounds of ballast you are going to use.
Bob
Thanks Bob. I got eighteen 50 pound bags of material from a local quarry a few years ago. Doing the math, that's just under a half a ton.
I finished the first bag a couple days ago, and I'm half way through the second. It will be interesting to see how many bags it will take. I did some rough calculations to estimate how much to get, by counting square feet of coverage at 1/4" depth, and padding that number just in case.
The material was really inexpensive. I love it because it came from a quarry that actually supplies the real railroads with some of their ballast. There is only one slight problem with it. It is laced with grains that are too large, so I'm constantly picking the worst ones out of every scoop I take.
Ballasting is time consuming. Spreading it evenly and cleaning everything after gluing are the slow part. I'm almost halfway through the yard. Pictures later.

How many feet of track do you plan to ballast with these bags?
Kerrigan posted:How many feet of track do you plan to ballast with these bags?
I did the calculations so long ago, I've forgotten my number, but here's the math. You can cover 48 square feet at 1/4" depth with one cubic foot of material. Each bag is about 1.5 cubic feet. Just Pig's Eye yard is about two sheets of plywood or 64 square feet, about one bag. And , guess what... That's just about what I used.![]()
EDIT:
To carry the math a step further, almost all tracks are spaced at 4" centers. If we take that square foot of 1/4" depth and apply it to one track, it conveniently works out 3 linear feet 4" wide, AKA one piece of GarGraves flex.
If the original question meant, "How much track is on the layout?", that's a number that I have never taken the time to measure accurately. The ballpark answer is more than 20 cases. Ten were salvaged from enterTRAINment, and ten were added over the years. At 153 feet per case, I know it is over 3000'. What I don't know is how much over. Could be two or three cases.
One last thing, not all of the track will get ballast. About 20% of all track on the layout is "hidden".
So that we could run the 2055 engine, Grandson and I temporarily hooked up the ZW transformer to the layout in place of the 1033 to check out whether we had a transformer issue or something else. Turns out it was a bit of both. One of the switches on the main line would sometimes flip from straight through to divert when the train would go over it, or sometimes when the train was on the other end of the layout. It was a bit work to get the switch out, but after a careful cleaning and checking alignment of various parts, it now works just fine. However, diverting into what will be the town/industrial area, everything comes to a halt. Checking some voltages with the Fluke, it looks like we may have to take apart and clean another 4 or 5 switches this weekend. Little guy loved seeing the "Big Black Engine" making loops for the first time since Christmas.
Got the elevated loop up and running temporarily on my 1063 work table transformer with only one Lockon. Going to run it for awhile before I start wiring, paint and guardrails for each section. It is just sitting on the table everywhere but at the crossover between tables where it is fixed to the table ends.
Today I got the last section of plywood in. I took the bridge and placed on the plywood. Still have to fine tune it to the right position and then I can screw the abutments down and cut the plywood down. Once I do that lifting out the bridge I should have about a 30 inch opening to go through.......Pics..............Paul


Attachments
Images (4)
KRM posted:
Got the elevated loop up and running temporarily on my 1063 work table transformer with only one Lockon. Going to run it for awhile before I start wiring, paint and guardrails for each section. It is just sitting on the table everywhere but at the crossover between tables where it is fixed to the table ends.
I've always loved the loop to loop track plan. Well executed!![]()
![]()

I've always loved the loop to loop track plan.![]()
Yes, me to Big Boy.
Larry![]()
KRM posted:
Got the elevated loop up and running temporarily on my 1063 work table transformer with only one Lockon. Going to run it for awhile before I start wiring, paint and guardrails for each section. It is just sitting on the table everywhere but at the crossover between tables where it is fixed to the table ends.
Great video. Love the activity - 5 trains a running!!! I n my book, a gang car as a train! Lots of fun stuff.
Dave
paul 2 posted:Today I got the last section of plywood in. I took the bridge and placed on the plywood. Still have to fine tune it to the right position and then I can screw the abutments down and cut the plywood down. Once I do that lifting out the bridge I should have about a 30 inch opening to go through.......Pics..............Paul
Paul,
Now I see how the crossing will work! Looks like a good plan.
Miggy posted:Sooooo Elliot, and I was concerned about laying on the tracks to work on the ditches... BUT, 1/2 ton of ballast...... heck I am good. Need a hand sifting, sir? Lol
Not to worry Scott, I should have plenty of material.
As for the sifting, I just ordered a new set of sieves. The one I have is a #12. The set I ordered has a #5, #10, #60 and #230. It is the #5 and #10 that will be helpful when combined with my #12. The particles between 10 and 12 are the best O scale ballast. Only problem is the new sieves won't be here in time for Monday. Tracking says Wednesday.
With the help of of two RC3R club members, we wired 21 of 28 turn out feeders to my three AIUs. Seven to go, and then on to the switch machines. We also made the inaugural run of the inner mainline. There are two double slip switches to wire to make that loop run correctly.
So I have spent the last week away from the layout. I have had tons of plans to work on it but life has been a bit crazy and I have been way to tired after work.
I hope to work on the control panel this week and get all the blocks wired up along with my AMP and VOLT meters.
On another note. I accepted a promotion at work today! More money and less hours. Can't go wrong with that!
Jdevleerjr posted:So I have spent the last week away from the layout. I have had tons of plans to work on it but life has been a bit crazy and I have been way to tired after work.
I hope to work on the control panel this week and get all the blocks wired up along with my AMP and VOLT meters.
On another note. I accepted a promotion at work today! More money and less hours. Can't go wrong with that!
Congratulations Jim! Sounds good for the layout build and running with the family!
Wired a MTH Western Maryland switch tower so that it now lights up. Did some general layout maintenance, took some photos and videos, while running


 trains for about 4 hours..... and enjoyed every moment of it!!!
![]()
![]()
Attachments
Images (4)
I'm still working on this, but it's going to be a shed on the layout. I removed the under frame and the steps at the bottom of the body, as refrigerated cars got used as sheds whenever they could. The ET&WNC never had any refrigerated cars, so that's why I lettered it for the Stoney Creek Southern.

Attachments
Images (2)
Jdevleerjr posted:So I have spent the last week away from the layout. I have had tons of plans to work on it but life has been a bit crazy and I have been way to tired after work.
I hope to work on the control panel this week and get all the blocks wired up along with my AMP and VOLT meters.
On another note. I accepted a promotion at work today! More money and less hours. Can't go wrong with that!
More money + less work = MORE TRAINS ![]()
Congrats!
JDEVLEERJR, congratulations. I am adding one more to RSJB18's reply........more family time...........Paul
Jdevleerjr posted:So I have spent the last week away from the layout. I have had tons of plans to work on it but life has been a bit crazy and I have been way to tired after work.
I hope to work on the control panel this week and get all the blocks wired up along with my AMP and VOLT meters.
On another note. I accepted a promotion at work today! More money and less hours. Can't go wrong with that!
Congratulations and best of luck in your new position.
Today I got the plywood shaped and the bridge abutments screwed down. As an added precaution I glue the pieces of the abutments together so I would not have to worry about pulling them apart when I took the bridge out. And I am glad I bought the girder bridges to go on both ends. I think it would of been a little too hard to blend scenery to table. I probably could of worked around it but I bought two small transition sections of fast track to go on the ends of the girder bridges. I replaced the pins for tubular track with gar graves transition pins. So with the bridge in place I have a call into a friend of mine to borrow his hot knife for cutting pink foam. That's it for work now I think I'll head to the attic to run some trains. Tomorrow morning going to go to a train show in Medina Ohio. Maybe I will be lucky and find something off my bucket list. Pic of the bridge in place.................Paul


Attachments
Images (4)
Nice looking there Paul, I see you have things coming right along! Thumbs Up big guy!![]()
Continued with layout room prep, flipped the entry door to open OUT instead of into the precious square footage of the
layout-to-be. Need a window installed for an A/C unit (3rd floor attic in Oklahoma), 2 guys recommended by my local hardware store did not show for their appts so it's on to the Lowe's window dept for an estimate. Nothing "fun" but it needs to be done.
Weather was nice,
I soldered TVSs to 5 lockons today to power the elevated loop. I also cut 80+ foot of guard rail out of the FRP panel I got to use on the platform. The rest of the day I enjoined the high 50 temps and sunshine we had .
Spring break this past week....was able to reconfigure track plan in order to install my lionel lift bridge I bought last year. wired it up and checked forclearences everything working perfectly.
Attachments
Images (1)


Did a little weathering to a couple box cars today. Tried some new techniques.
Attachments
Images (2)
Bryan in Ohio posted:Spring break this past week....was able to reconfigure track plan in order to install my lionel lift bridge I bought last year. wired it up and checked forclearences everything working perfectly.
Good to see that you are back to the dark side Bryan!


Today, I had a sales table at a model train show, sold some excess stuff...
Tonight, I worked on the shed, put a frame and cribbing underneath with some steps. I'll soon add some foliage around the lower sides.
Just haven't nailed down a spot in which to place it, yet.

Attachments
Images (1)
Looking good Lee. Going to be another great scene.........Paul
JDFonz posted:
Finished my farm scene and trestle today.
Hi JDFONZ, The whole scene is composed with a judicious and picturesque use of space, and I especially applaud your artful blending of a variety of soils and stands of grass, which was articulated very nicely, in my opinion.
FrankM.
Thank you Frank, you always have such nice things to say about my work.
-Joel
Nothing worth a pic. This morning I went to Medina Ohio for a train show. Went in with a empty bag and came out with a empty bag. I couldn't even get my ballast because he was out of it again. So during the week I'll give him a call and go to his house to get it. On the layout I decided I wanted the bridge to sit better on the bridge abutments. I took one up and re drilled new holes for the screws. Now it is ready so I can start gluing down some pink board but I am still waiting for my buddy to drop off his hot cutting knife. So that was it for today............Paul
Thanks to forumite Flyboy62, I added a fourth Atlas O PRR block signal to my outer loop in the last couple of days. Now my signals can display a clear block without my having to run ridiculously short trains.
My big task today was mounting the controllers for my traffic signals onto a new board that can hang below my layout. I realized I don't have the real estate for a drop-in unit like I had on my prior layout, but I saw where I could make the under-layout wiring much neater for when I do install the signals.
I wasn't looking forward to this job. Here is the mess I brought from my prior layout. You can see the fine wires from the signals coming through at the corners. This assembly dropped through an opening in the benchwork and the mat board "road" on top covered the opening. Yes, this really did work fine.

And this is what it looks like now:


The smaller terminal strip is where the black leads from the four signals, with their dropping resistors, will attach. The red, yellow, and green signal wires will connect to the larger strip. Color-coded wiring will make it fairly simple to connect the signals once everything is in place.
Joel
Attachments
Images (4)

I'm in the middle of the tedious process of "re-wiring".
I don't really like the look of the lock ons for the Real Trax, so I have soldered all my power leads and hidden them under the track.
I've re-run all the power wires for my switches, and am starting on a control panel shortly. I didn't like the look of the bulky RK switch controllers, so following a topic started by MJRODG3N88, I'm in the process of changing those out as well as the new control panel.
Once I get all this finished, I can get back to scenery and structures!!!


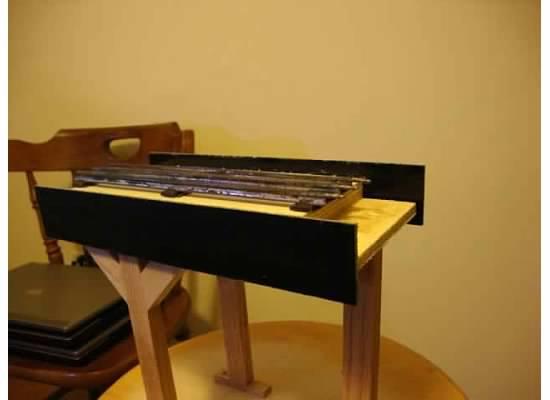
Nice work everyone, For me it was a slow day but I did mock up a short section to see just what the elevated track will look like with the FRP strips I cut as guard rail. Next I will paint the wood in a concrete color and check it out and try to figure out how to best build it with the least amount of effort. The single leg is just there to keep it from falling over. ![]()


Attachments
Images (5)


Eric,
Looks like you had a nice crowd for the TTOS open house. From what I can see the layout is looking good too!
Thanks Mark, we had 70+ attend.
Add Reply
Sign In To Reply
