MaxSouthOz posted:Painted another coat of white on the superstructure. (Still to cut the grey in).
And made a gangway.

Like the looks there Max. Nice gangplank just wondering where is the crew? LOL


|
|
MaxSouthOz posted:Painted another coat of white on the superstructure. (Still to cut the grey in).
And made a gangway.
Like the looks there Max. Nice gangplank just wondering where is the crew? LOL
Thanks, Mike.
Ralph will be there somewhere. I'll see if I can find him. ![]()
caught the morning run....

a little while later, a Pennsy freight heading out.....

Took purdy pitchers. Of my steam coach nose to nose with three other "critters", railcars l have ginned up on 3 rail chasses. There is the MoPac EMD kit-built, the Rio Grande's home built gas electric, from a kit, and a kit bashed Edwards created from a Walthers kit. Researching doing a C&S gas car from another Walthers kit and looking for plans with specs for an RDC-3. Although l have reached a goal, by modeling the steam coach pictured in a photo on the ceiling of the RR station in the Shelburne,VT, museum, there is a long list of other critters that could be done.
Pat Kn posted:That's a real nice picture, Lee.
suzukovich posted:Lee, now that's a great pic!!!!!!
paul 2 posted:Lee, you continue to amaze with the pics. Great job......Paul
mike g. posted:Looks good Lee, I sure like the black and white picture!
Thanks, guys, that means a great deal.
I've done a lot of experimentation with model photography, using the 'old school' tricks where the image include the effects as much as possible at the time of the shot. Photo software was only used on that photo for changing the color balance a tiny bit as well as contrast.
quick train run at lunch....

fl9turbo2 posted:
Finish assembly of my 2nd crawler crane this went better than the first
I prefer the real thing...


RSJB18 posted:fl9turbo2 posted:
I prefer the real thing...
but that wont fit on my layout
The Crane looks Great!!![]()
fl9turbo2 posted:RSJB18 posted:fl9turbo2 posted:
I prefer the real thing...
but that wont fit on my layout
LOL- Won't fit on mine either but I had to share. I work for a University on LI NY and it was on campus two years ago when we were putting up a new building and precast garage. You know you are dealing with a big crane when it takes 10 flatbeds to bring all of the pieces and a second crane to assemble it! Notice the size of the hook compared to the truck. They are only about 20' apart.
RSJB18 posted:fl9turbo2 posted:RSJB18 posted:fl9turbo2 posted:
I prefer the real thing...
but that wont fit on my layout
LOL- Won't fit on mine either but I had to share. I work for a University on LI NY and it was on campus two years ago when we were putting up a new building and precast garage. You know you are dealing with a big crane when it takes 10 flatbeds to bring all of the pieces and a second crane to assemble it! Notice the size of the hook compared to the truck. They are only about 20' apart.
Looks good my next crane is going to be bigger
A couple of days ago I painted the edges around the bridge abutments black but it looks like I missed some nooks with the big brush. Today I got the wiring out of the old bathroom walls. So tomorrow I can cut out the remaining walls. Clean up the area and maybe measure for some tables. Also today I got a package from Scenic Express. I think the trees are a new item but they caught my eye and they were on sale this month so I thought I would try them especially around the bridge abutments and on the cliffs. Pics...............Paul


Things are looking good Paul, cant wait to see whats next, also the water in the stream!![]()
paul 2 posted:
Paul,
That looks great so far. You have to post lots of pics when it's 'done' as I bet it'll look amazing, even more so than it already does!
Yes Paul, it is looking very good indeed!
Paul - beauty work there, inspiring, please post more pics as you proceed!
Mostly tests and experiments done in the last while. There is an area on a 072 curve made of Atlas sections, that cause my Legacy GG1 to stall. Because this particular area is were the grade transitions to level, I'm wondering if a momentary interruption of power is caused by the drive wheels, or rollers, being lifted off the rails. My other scale GG1's don't have this issue but their bogie wheels aren't stiffly suspended like they are on Lionel's. Not sure if other Legacy GG1 owners experience this, but any slight interruption of power requires a complete power down to reset the engine.
Picked up a K-Line K4s with TMCC and cruise. As usual, the fireman was having difficulty jumping the gap between the cab and tender with a shovel full of coal, so a new drawbar was in order. A shorter affair was cobbled together out of 2 washers soldered to a brass bar. Any of these type mods require a test run, just to confirm there's no binding on curves. It passed the test and I'm pretty sure a shorter one would also work. Rather than go back to the bench tonight, I just kept running the K4s.


Bruce
It took some time, but I finally got the Whitcomb DCC decoder programmed to the actual road number I assigned to it. Before now, it was just 0003 on the throttle.
Note the difference in headlight strength for this diesel, and the factory lights for the ten wheeler. This diesel actually has a working headlight you could run the locomotive at night with if you really wanted to.

train running before work.....

briansilvermustang posted:train running before work.....
That's the best kind!
I am working on foam core roads and crossings and building placement on the west end of the layout. These are WIP pictures. There's a long way to go but this is a start.


Scenery pieces are finally rolling out of the "paint shop"...
No, it's not a boa constrictor. This embankment will fit inside a curve which is also a 4% grade. Part of the tortuous upper route. This piece still needs a bunch of greenery and other minor tweaks.

Cap piece, new portal and small section of embankment. Just raw paint at this point - still needs the green stuff.

This small mountain module was rescued from the former layout configuration. It was nearly double this size but I cut it down to fit a corner section. Also lacking grass, turf, bushes, trees, etc.

This phase involves a lot of painting & gluing which take time to dry properly between sessions. It'll be 90 degrees here today so many of these items will dry more quickly.
-RM

645 posted:p51 posted:Just got the Whitcomb back together again after putting new decals and detail parts on and I still need to do some weathering with it, but I think it looks pretty good so far.
Looks good and I realize you did much research as you can for paint colors/markings to fit your layout's era. It almost looks "backwards" to have 'Transportation Corps' before 'U.S. Army' - would think 'U.S. Army' (cab) 'Transportation Corps' would read better.
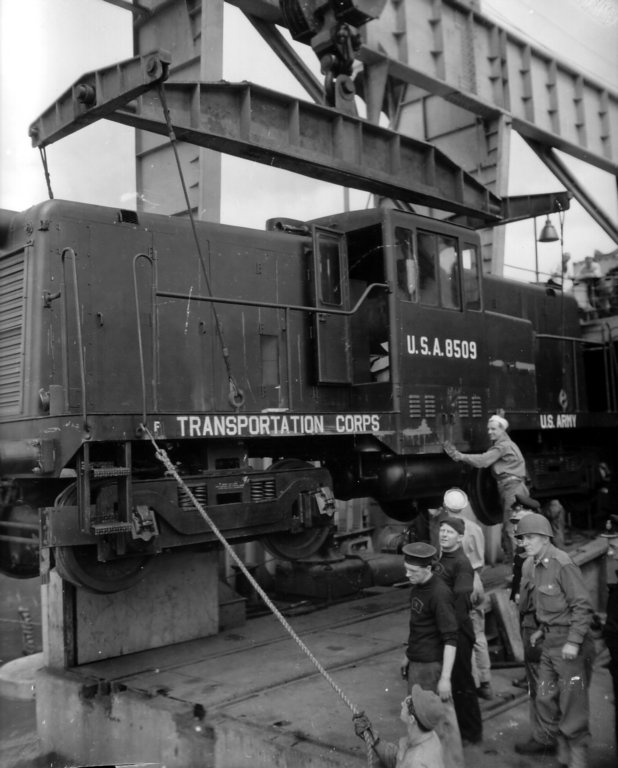
I did a lot of research on markings and Transportation Corps was often placed before US Army. That's a standard gauge Whitcomb in the above shot. I couldn't do the markings on the running board as I couldn't make white decals and nobody makes lettering in the correct typeface I wanted.
Diesels were painted black, OD green, grey and yellow. The stateside ones were sometimes lettered right off the production line when the engine was intended for another user. That was what I modeled here, as taking apart one of these locos to paint one would entail destroying a lot of detail I'd have to rebuild later and take part a lot of the wiring. It was never built to be repainted, that's for sure! Just masking the hoods off for dullcoat was a nightmare enough.
The markings you showed are for the late 50s. No yellow running boards on black units, no oversized Transportation Corps emblems on WW2 diesels. The problem with so many books on WW2 railroads is that editors and authors are lazy and they use the first thing they can find. Far more photos were taken of Army diesel locos in the 50s and 60s than during WW2.
Greetings Everyone,
This isn't exactly a layout but it's something I built that will eventually be added to the layout I AM working on. The base vehicle is a New Ray 1/43 snow plow. The emergency lighting is a rendition of the style used by The Ohio Dept. of Transportation. It is a combination of green, yellow and white strobes.
The light bar on top of the cab is scratch built using Plastruct "L" shape pieces for the brackets and a piece of Lucite square rod that was milled to size on a small hobby style milling machine. It has a total of 6 LED's (2 of each green, yellow and white) wired to 3 separate flashing circuits which provide a nice random pattern. Two "cool white" LED's for headlights complete the cab.
On the rear of the truck there are 2 (one on each side of the hopper) green and yellow triple flash strobes. The green and yellow are wired to flash independently of each other. These lights were custom built out of the same Lucite rod that was used for the Light Bar on the cab. There are 4 "wig-wag" style lights on the panel just above the rear bumper along with green and yellow "Hi-Viz" safety stripes. Two red tail lights are mounted in the bumper to complete the rear lighting.
All of the electronics, along with a 9 volt battery are housed inside the salt hopper which allowed me to employ several types of lighting to attain the effect seen in the video. BTW, there is a total of 18 LED's used in this project and they were purchased through Evan Design which is a Forum Sponsor. This is posted in "Scenery and Structures" as well. Thanks for Lookin'.
Chief Bob (Retired) 

Bob, that truck is really impressive!!
Wowsers! Great lighting job! ![]()
Added foam board under my town buildings and then placed the Lemax plaza pieces to make the sidewalks.


lunch time train run, trying new different lights for camera, now a little to bright....

I think the townhouses look the best there. ![]()
Pat Kn posted:I think the townhouses look the best there.
With a few family scenes this corner will look terrific!
AG- looks good. I liked the bail bondsman but this will be nice.
The "working townhouses" is another very handsome look, Andre. Bravo! The old pavement is an important factor in the success of that scene, too.
FrankM
All I did today was finally get the Menards car carriers out of the boxes I picked up a few days ago. They are really nice....and heavy too. I put my bridge in place to see how the cars would look. I only have a number of days till Tuesday night when I host the Tuesday night guys. So I have to make the extra effort to get things cleaned up by then. But here are a couple of pics of the cars.........Paul


WOW Paul, you must have bought all the auto's on the lot! LOL Looks great going across the bridge!![]()
Paul, Very impressive looking with the train on it! Neat with the Menards car carriers
I am researching building a Walthers gas electric kit in three rail for one of the Colorado prairie roads. I have done an American Standard Car Co. kit for the MoPac and was glad to learn those St. Louis Car Co. bodies in the Am. Std. kit were almost identical for a lot of roads. I have better understood that since researching rhe Walthers C&NW model which is of a very different EMC gas electric, but there were dozens of similar EMC cars built for a lot of roads, too. Often the difference was in makeup or exclusion of postal, baggage, or passenger compartments. I prefer all three in a car, and the Burlington had several, but l'd prefer its subsidiary, Colorado & Southern. However both C&S EMC's had no RPO compartment. Now it is easy to cut and solder Walthers kit sides....to take out the RPO section....but l hate to give it up. I found a photo of a Q lettered EMC on C&S track, but..no RPO. Quandary. Little interest in gas cars on here, except for Brother Love's Huckety-Buck, but this stalls me..guess should go on to another project...
That is a good thing, Paul. ![]()
Access to this requires an OGR Forum Supporting Membership


