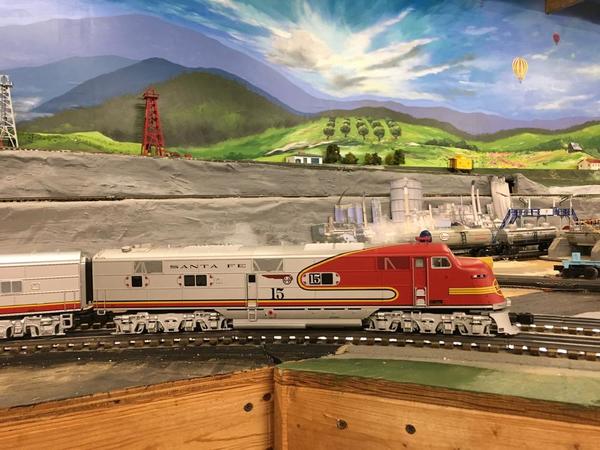
Making progress on the Smokey Mountain Model RR .

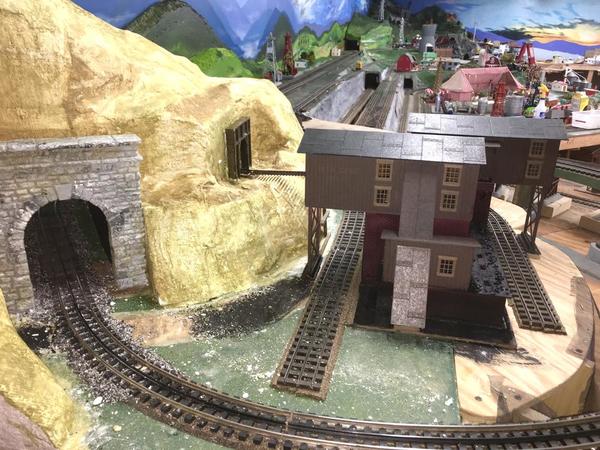
Club member Jerry Keys has been working on this kit-bashed Lionel Mine complex using 3 kits  that has progressed quite well.  Here are several views from different angles.  It is located to the far left end on the layout as people enter the room.

IMG_6570IMG_6572IMG_6575

Attachments

Images (3)
  • IMG_6570
  • IMG_6572
  • IMG_6575

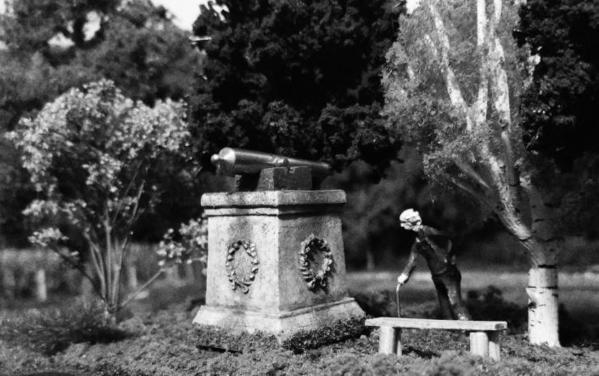
Yep, I like the civil war memorial much better among the trees where I placed it last night...

0531172230b-1-01_resized

I have also completed my cow field. The fence is in place, the enclosure and plays, the hay bales and signs that has been eating is all there, as well as the cow poop. I even have a wooden bucket filled with water modelled in the center.

0531172352a_resized

Attachments

Images (2)
  • 0531172230b-1-01_resized
  • 0531172352a_resized
Last edited by p51
p51 posted:
s-l1600 [1)-1_resized0530172332-1_resized
I just had to show the gate on the cow fence as soon as I put it up, even though the glue hasn't dried yet.
I think I did justice to the types of fences and gates they had then.

This is really great and to see it just about match the photo is awesome as well the cow pasture is including the cow chips. and this is a cool shot
0531172230b-1-01_resized


suzukovich posted:
 
s-l1600 [1)-1_resized0530172332-1_resized

This is really great and to see it just about match the photo is awesome as well the cow pasture is including the cow chips. and this is a cool shot

0531172230b-1-01_resized

Thank you very much! The funny part is that as I was building the benchwork, I was asking questions to my parents (who were kids in the time and place my layout takes place) about all the detail stuff I’d never find in any history book. What kinds of mailboxes, fences, what colors the houses were painted, and little stuff like that. Both described these gates with the slots for poles to go across. I was so lucky to not only find a shot of the ET&WNC like that with such a gate, but to have it in the foreground like that (I’ve never found another photo of a gate like that). My folks confirmed that’s exactly the type of gates they remembered.

They saved me a lot of money on detail parts I never could have correctly used. For example, I wanted to use a small tractor but they confirmed NOBODY up there had the money for one until well after WW2 was over. Also, only the main road had electrical wires (most houses didn’t get electricity up in those hollows until the rural electrification act, also well after the war).

As for the cow chips, I’d had brown modeling clay and I needed to know how big to make them. I’d been in plenty of cow pastures in my youth, but it’d been years since the last time I was in one. Last night before the sun went down, I drove over to a cow pasture near my house. I’d forgotten hot big cow pies can get. I think some might see the ones on my layout and say they’re too big. Nope, but they still don’t look right to my eye. Maybe when the cows are in the pasture, it’ll look more correct. I need to ‘weather’ a few to look older, too…

As for the photo of the memorial, that was all done with my cell phone, even the 'film' conversion!

Last edited by p51
p51 posted:
suzukovich posted:
 
s-l1600 [1)-1_resized0530172332-1_resized

This is really great and to see it just about match the photo is awesome as well the cow pasture is including the cow chips. and this is a cool shot

0531172230b-1-01_resized

Thank you very much! The funny part is that as I was building the benchwork, I was asking questions to my parents (who were kids in the time and place my layout takes place) about all the detail stuff I’d never find in any history book. What kinds of mailboxes, fences, what colors the houses were painted, and little stuff like that. Both described these gates with the slots for poles to go across. I was so lucky to not only find a shot of the ET&WNC like that with such a gate, but to have it in the foreground like that (I’ve never found another photo of a gate like that). My folks confirmed that’s exactly the type of gates they remembered.

They saved me a lot of money on detail parts I never could have correctly used. For example, I wanted to use a small tractor but they confirmed NOBODY up there had the money for one until well after WW2 was over. Also, only the main road had electrical wires (most houses didn’t get electricity up in those hollows until the rural electrification act, also well after the war).

As for the cow chips, I’d had brown modeling clay and I needed to know how big to make them. I’d been in plenty of cow pastures in my youth, but it’d been years since the last time I was in one. Last night before the sun went down, I drove over to a cow pasture near my house. I’d forgotten hot big cow pies can get. I think some might see the ones on my layout and say they’re too big. Nope, but they still don’t look right to my eye. Maybe when the cows are in the pasture, it’ll look more correct. I need to ‘weather’ a few to look older, too…

As for the photo of the memorial, that was all done with my cell phone, even the 'film' conversion!

Excellent attention to detail. Maybe I missed, can I ask how you built the fence? Appears simple balsa with drill holes and copper wire. Looking at building a fence for my Rio Grande switching layout.  Thanks.

Over the weekend I put in an order to Scenic Express. I wanted to start working on the streams and cliffs. Going to try some new blends, to me, for the scenery and I got three colors to put on the stream beds before I add the water. Was finishing work outside today but the wife will be watching the basketball game tonight so that means I can spend the evening working on the basement layout. Pics...............Paul

DSCN0521DSCN0522

Attachments

Images (2)
  • DSCN0521
  • DSCN0522
ChessieMD posted:0530172332-1_resized

Excellent attention to detail. Maybe I missed, can I ask how you built the fence? Appears simple balsa with drill holes and copper wire. Looking at building a fence for my Rio Grande switching layout.  Thanks.

It wasn't tough. I used Berkshire Junction's EZ-Line string in rust color, attached the various small dowel types (which were scraped with a razor saw and dipped in India ink/alcohol mixture) with gorilla glue. I strung the string on a cutting board with a grid on it, then placed the dowels underneath, evenly spaced, making what looked like a rope ladder. I then glued each post evenly to the layout with more gorilla glue.

I finally got to accomplish a little bit on the layout tonight. Wife was watching her Cavs and I got to work on a couple of things. Opening the package from Scenic Express I went to work coloring the river beds. After I did that I knew it would take a good while for the paints to dry. I placed my Morton Salt building and started laying cork down. I will eventually have the track connected at both ends of the siding so hoppers can be pushed through as if they are being loaded. On the side where they will be going in I am going to add two sidings for storing hoppers. I have enough real estate to make a small switching yard for empties. Tomorrow I can paint the cork, lay down some track and maybe even ballast. Also I hope to start adding the water as soon as I make sure I have sealed the ends so I will not lose any liquid water. Some pics..............Paul

DSCN0523DSCN0524DSCN0525DSCN0526DSCN0527DSCN0528DSCN0529DSCN0530


Attachments

Images (8)
  • DSCN0523
  • DSCN0524
  • DSCN0525
  • DSCN0526
  • DSCN0527
  • DSCN0528
  • DSCN0529
  • DSCN0530

Finished transferring the basic TMCC electronics from a late 90's Dash 9 into this ABA set of equally old MTH F7's and gave them a good test run tonight.  To activate the powered rear A and other associated CC goodies, the stock 4 wire tether was replaced with a home made 12 wire concoction.  Integrated into the tether is a styrene drawbar, all covered in shrink tube and permanently attached to each unit with nylon machine screws.  By replacing the dummy couplers with the new drawbars I could shorten the gap between units.  To accommodate the shorter gap, I simply removed both diaphragms from the B unit.  Admittedly, loading 3 permanently locked units onto the rails is kinda awkward, but visually it's worth it.  Both cabs got a coat of green inside after the engineer and fireman got evicted from the rear cab.  The Dash 9 smoke unit was installed in the B, along with the second 16 ohm speaker.  I need to go back inside the B and tweak the position of my custom made smoke plenum , as the smoke exits through the cooling fans.  Plus, I want to install LED headlights but will wait until I finalize the upgrade with Cruise M board.

brwebster posted:

Finished transferring the basic TMCC electronics from a late 90's Dash 9 into this ABA set of equally old MTH F7's and gave them a good test run tonight.  To activate the powered rear A and other associated CC goodies, the stock 4 wire tether was replaced with a home made 12 wire concoction.  Integrated into the tether is a styrene drawbar, all covered in shrink tube and permanently attached to each unit with nylon machine screws.  By replacing the dummy couplers with the new drawbars I could shorten the gap between units.  To accommodate the shorter gap, I simply removed both diaphragms from the B unit.  Admittedly, loading 3 permanently locked units onto the rails is kinda awkward, but visually it's worth it.  Both cabs got a coat of green inside after the engineer and fireman got evicted from the rear cab.  The Dash 9 smoke unit was installed in the B, along with the second 16 ohm speaker.  I need to go back inside the B and tweak the position of my custom made smoke plenum , as the smoke exits through the cooling fans.  Plus, I want to install LED headlights but will wait until I finalize the upgrade with Cruise M board.

Nice!! Do you know what the minimum track radius the ABA unit will handle??


paul 2 posted:

I finally got to accomplish a little bit on the layout tonight. Wife was watching her Cavs and I got to work on a couple of things. Opening the package from Scenic Express I went to work coloring the river beds. After I did that I knew it would take a good while for the paints to dry. I placed my Morton Salt building and started laying cork down. I will eventually have the track connected at both ends of the siding so hoppers can be pushed through as if they are being loaded. On the side where they will be going in I am going to add two sidings for storing hoppers. I have enough real estate to make a small switching yard for empties. Tomorrow I can paint the cork, lay down some track and maybe even ballast. Also I hope to start adding the water as soon as I make sure I have sealed the ends so I will not lose any liquid water. Some pics..............Paul

DSCN0523DSCN0524DSCN0525DSCN0526DSCN0527DSCN0528DSCN0529DSCN0530


Hey there Paul, I really like how the stream is turning out and I also like the placement of the Morton Salt building. Your just moving right along with the roadbed and track! But I do have a question for you. In the sixth picture down you got me wondering what you use all those pennies for?

Mike, thanks for the compliments. I see I am going to have to police my areas before I take a pic. You are too observant LOL. I could say the pile of pennies are for the copper smelter I am going to put in but because I am like George Washington and cannot tell a lie the truth is months ago I spilled them and I have just been too lazy to pick them up and get them off the table...........Paul

paul 2 posted:

Mike, thanks for the compliments. I see I am going to have to police my areas before I take a pic. You are too observant LOL. I could say the pile of pennies are for the copper smelter I am going to put in but because I am like George Washington and cannot tell a lie the truth is months ago I spilled them and I have just been too lazy to pick them up and get them off the table...........Paul

Its all good Paul, I just thought it might be something for me to learn!

paul 2 posted:

Mike, thanks for the compliments. I see I am going to have to police my areas before I take a pic. You are too observant LOL. I could say the pile of pennies are for the copper smelter I am going to put in but because I am like George Washington and cannot tell a lie the truth is months ago I spilled them and I have just been too lazy to pick them up and get them off the table...........Paul

I thought you were leaving them there for visitors to toss into the river- or- for the wishing well where you can wish for more trains

Woodson posted:
Nice!! Do you know what the minimum track radius the ABA unit will handle??


No way to tell for sure since the tightest curve on both layouts is 072.  An S configured track of 054 might cause issues since you lose one pivot point between units by using a solid drawbar....just guessing.  Traversing a crossover S of 2 Gargraves 100 switches is no problem.  The nature of the F unit body end design and wheel base layout allow for tighter than usual curves without binding. 

Bruce

Half a good day today. The good half was getting the cork painted. I decided to paint the inside floor of the loading area black. Later I can start to put down some track but first I have to drill  hole so I can run the plug to inside the building. The other half did not go as well. I was unprepared for the water. I thought the tape, a lot of tape would hold but after a while the tape seemed to let go in spots. So before moving on to do the other side what can I use to seal the ends because I am going to have to put another coat on where I just did. All help is appreciated. This was my first try at water...............Pics.......Paul

DSCN0533DSCN0534DSCN0535DSCN0536DSCN0531DSCN0532 

Attachments

Images (6)
  • DSCN0533
  • DSCN0534
  • DSCN0535
  • DSCN0536
  • DSCN0531
  • DSCN0532
paul 2 posted:

Half a good day today. The good half was getting the cork painted. I decided to paint the inside floor of the loading area black. Later I can start to put down some track but first I have to drill  hole so I can run the plug to inside the building. The other half did not go as well. I was unprepared for the water. I thought the tape, a lot of tape would hold but after a while the tape seemed to let go in spots. So before moving on to do the other side what can I use to seal the ends because I am going to have to put another coat on where I just did. All help is appreciated. This was my first try at water...............Pics.......Paul

DSCN0533DSCN0534DSCN0535DSCN0536DSCN0531DSCN0532 

Hi Paul, things are looking great with the roadbed and the loading area is wonderful! Now as far as your water, here is an idea that just might work for you. You know the plastic that the Menards cars come in, cut a strip to the height that you need, it is flexable enough to bend around the end. You can then staple both sides and use duck tape to seal the bottom off. I hope this is a good idea for you!

c.sam posted:

I've been wanting to update the progress on our club layout for quite awhile but it's such a mess that good photos are almost impossible. A member from SC visited today and wanted to see the progress. I received a 'new' Lionel AT&SF E6 from LOS recently and decided to unbox it and try for a few pics.

Hopefully, you can get an idea of where we are in construction. The murals are almost complete and some scenery is well underway. Much of the track is ballasted and most has been weathered. We are striving to be open soon to the guests at our landlord's Vacation Rental complex.

Much to do!      Any of you guys who live in our region are more than welcome to visit and lend a hand if you'd like.

IMG_6525IMG_6532IMG_6533IMG_6552IMG_6553IMG_6565 

Wow, what a beautiful engine !  May I ask what you paid ?  I doubt I could ever afford one, but it's something to dream about :> Your layout is looking great !

Add Reply

Post

OGR Publishing, Inc., 1310 Eastside Centre Ct, Suite 6, Mountain Home, AR 72653
800-980-OGRR (6477)
www.ogaugerr.com

×
×
×
×
Link copied to your clipboard.
×
×