Not much, this morning I put in 5 feet of grass between the tracks and the edge of the table.


|
|
Not much, this morning I put in 5 feet of grass between the tracks and the edge of the table.
I know it's not too exciting to look at, but I just busted a hole in 10 inches of concrete to allow passage from my layout to my future yard.
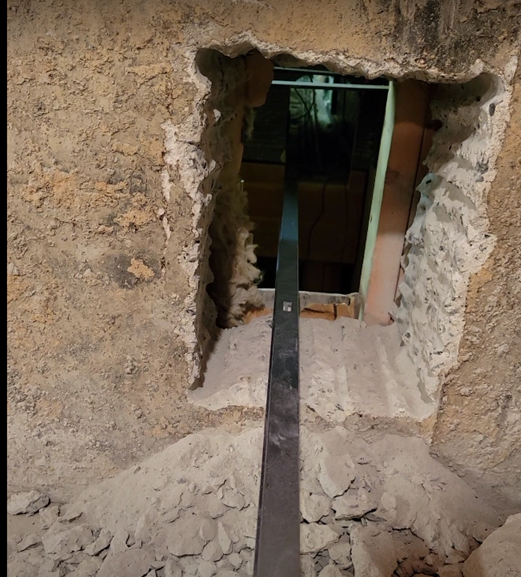

@shorling posted:I know it's not too exciting to look at, but I just busted a hole in 10 inches of concrete to allow passage from my layout to my future yard.
That's dedication. I've bored concrete and I know that took some effort.
@shorling posted:I know it's not too exciting to look at, but I just busted a hole in 10 inches of concrete to allow passage from my layout to my future yard.
Thank you very much for posting this , Steve.
Maybe when I show it to Mrs. 'Ski she will get over me gutting a closet and cutting two tunnels into the back wall of what I now call "The Alcove", tearing down a basement bedroom wall to expand what was becoming Warrenville out of it into what was the basement Rec room and removing 3 quarters of a another large storage closet to make room for the "Warrenville Docks" expansion
@shorling posted:I know it's not too exciting to look at, but I just busted a hole in 10 inches of concrete to allow passage from my layout to my future yard.
I don't want to be a party pooper here but that is a big hole. What is that wall holding up? Structurally- a void that big in concrete can be an issue. Was there any rebar in the wall?
I admire the dedication tho. ![]()
@RSJB18 posted:I don't want to be a party pooper here but that is a big hole. What is that wall holding up? Structurally- a void that big in concrete can be an issue. Was there any rebar in the wall?
I admire the dedication tho.
Not to worry. The hole is only 9 x 12 inches. We could worry about cracks emanating from stress concentrations at the corners.
Steve - you did use scale dynamite - yes? You could make a nice little scene right there adjacent to the tracks. A few workers coring some more holes with dynamite sticking out a little - a line over to the ignitor box etc, I think Artista makes a box with a plunger for people who want to blow things up. Can you tell I'm on the destructive side ? Lol JP
@Bill Sherry posted:Steve - you did use scale dynamite - yes? You could make a nice little scene right there adjacent to the tracks. A few workers coring some more holes with dynamite sticking out a little - a line over to the ignitor box etc, I think Artista makes a box with a plunger for people who want to blow things up. Can you tell I'm on the destructive side ? Lol JP
Sorry, no dynamite here. Drilled lots of holes, chipping and plug/feathers. Took about 10 hours. Among the more useless tools were cement rated reciprocating saw blades, and our antique 1950's electric jack hammer. I'm going to be boxing it in. The bridge between the layout and hole (18 inches) is located below Menard's York Towne Hotel.
@mike g. posted:Dave, sure looks great! You sure have been busy. Like JP said, don't forget they guy working on his car and the wife hanging laundry on the cloths line in the back yard!
Bob, I am glad you were able to save the track cleaning car! That would have really sucked to have to start over!
FECRailroaddog, Your sounding like one of the rich folks in town! Who knows maybe the trailers were there way before the houses were built and now they don't like the look across the street! LOL
Well guys I was able to get some work done in the train room. I got the side rails made for my lower loop bridge, but still have to print up some side rails.
Then as you can see in this photo right next to the clamp I was able to get one of the most important item installed, well as far as the wife and grandkids think! LOL
I would have got more done, but the wife came out and told me we had company coming over and wanted me to make sure the trains were running well. So I spent a good amount of time running the my mow crew train with the track cleaning car. Then I ran trains on the lower and upper loop for a good hour just to make sure everything was working correctly!
It was a good day cause after dinner I was able to show my train room off and run trains for another half hour!
Mike - lookin' good, but that single 2X4 supporting the bridge looks like it might be a little shaky.
Hard to tell from the picture, but it looks like there might be some bracing/gusseting underneath ?
Do you plan on adding additional supports ?
Is the track base plywood ? What did you use for the sides ?
Thanks
I bought this MTH two-car addon set in New York Central about a year ago intending to convert them to Penn Central. My PC passenger consists reflects the drop off in rail passenger travel so two coaches plus a lot of baggage and freight is just about right. Well I finally "got around to it". ![]() One of the choices I made was to use the red & white "mating worms" logo. It's not prototypical, I just like the way they look against a silver background.
One of the choices I made was to use the red & white "mating worms" logo. It's not prototypical, I just like the way they look against a silver background.


I did the grass between the grass and the tracks in sections so it didn't match. I started by blending in a new top coat so all 13 feet are more uniform. Then I lighgtened up the church parking lot to make it look more like white limestone gravel insted of dirt. I added guard rails on the church lot and reflocked the trees outside the cemetary and but matching fallen leaves ground cover under them.


@Ralph M posted:I bought this MTH two-car addon set in New York Central about a year ago intending to convert them to Penn Central. My PC passenger consists reflects the drop off in rail passenger travel so two coaches plus a lot of baggage and freight is just about right. Well I finally "got around to it".
One of the choices I made was to use the red & white "mating worms" logo. It's not prototypical, I just like the way they look against a silver background.
Those look great, I love the PC it fit's into my 1971 era.
Dave R - I love those Mopars at the church. Before the energy crisis for sure!
I inserted a 3A Eaton circuit breaker on the track circuits. Hopefully this will avoid frying the electronic reverse boards and the one sound board I have. Most of the stuff is post-war but I have a few K-Line locos and a couple more modern Lionel and others that have a modest put pricey electronic componets.

@Ralph M posted:I bought this MTH two-car addon set in New York Central about a year ago intending to convert them to Penn Central. My PC passenger consists reflects the drop off in rail passenger travel so two coaches plus a lot of baggage and freight is just about right. Well I finally "got around to it".
Ralph , they look good with the backround . 👍
I'm not a prototypical guy either when I like how things look to me . Your layout looks pretty sharp .
@Richie C. posted:Mike - lookin' good, but that single 2X4 supporting the bridge looks like it might be a little shaky.
Hard to tell from the picture, but it looks like there might be some bracing/gusseting underneath ?
Do you plan on adding additional supports ?
Is the track base plywood ? What did you use for the sides ?
Thanks
Hi Richie, Thanks for liking how things are going. As for the 2x4 its a old rough cut true 2x4. It is probably older then I am. Under the plywood road bed is another 2x4 and they are screwed together with 4" screws. I don't think its going anywhere, but your probably right that a couple gussets wouldn't hurt.
As for the side, I ripped down some 1/8th inch paneling that we took out of our house when we did our remodel. I spray it with water to help it bend and then attach with liquid nail and some small nails.
Ralph, Nice work on the switch over to Penn Central! I am with Dallas, great looking background but I bet the rest of your layout looks just as nice!
Dave, Your landscaping is just Outstanding! You did a wonderful job on the church parking lot. I like how you blended the grass and brought it all the way to the edge of the track!
Victor, its better to be safe to be sorry!
As for me I spent my day yesterday moving things so I could continue ballasting! I also got a little ballast down. Last but not least I spent some time packing up things I put n here for sale to ship them out as I am trying to get enough money to get me a Polar Express type steam engine! LOL
I hope you all have a great day and find some time to have fun with your layouts and trains!
@mike g. posted:Hi Richie, Thanks for liking how things are going. As for the 2x4 its a old rough cut true 2x4. It is probably older then I am. Under the plywood road bed is another 2x4 and they are screwed together with 4" screws. I don't think its going anywhere, but your probably right that a couple gussets wouldn't hurt.
As for the side, I ripped down some 1/8th inch paneling that we took out of our house when we did our remodel. I spray it with water to help it bend and then attach with liquid nail and some small nails.
Hi Mike - I'm sure the vertical support and strength are there. I was concerned about lateral movement as it looks like the track is balanced on the 2X4 and could sway a little bit side-to-side if someone accidentally bumped into it, but I'm sure you have it figured out.
My winter project is to expand my layout a little by adding a long straightaway to convert a reversing curve into a simple curve with two separate in-and-out tracks and at the other end I'll have to build something very similar to what you have - basically, a free-standing bridge across to the main layout. Mine will be a little trickier because I have to put a lift-out in the middle, so I was planning on putting vertical supports (smaller than 2X4's) on both sides of the track, rather than just using single 2X4's underneath.
I'll start a thread to show progress once I get started in a couple of months.
@Richie C. posted:Hi Mike - I'm sure the vertical support and strength are there. I was concerned about lateral movement as it looks like the track is balanced on the 2X4 and could sway a little bit side-to-side if someone accidentally bumped into it, but I'm sure you have it figured out.
My winter project is to expand my layout a little by adding a long straightaway to convert a reversing curve into a simple curve with two separate in-and-out tracks and at the other end I'll have to build something very similar to what you have - basically, a free-standing bridge across to the main layout. Mine will be a little trickier because I have to put a lift-out in the middle, so I was planning on putting vertical supports (smaller than 2X4's) on both sides of the track, rather than just using single 2X4's underneath.
I'll start a thread to show progress once I get started in a couple of months.
Hi Richie, thanks for being concerned, it locks in really tight when the lift up section is in place, when its down there is no train on the part that sticks out onto the 2x4. Normally the only ones in the train room when the lift section is down is myself and Tank!
I really look forward to seeing your winter project! I am sure its going to be a fun build to watch!

@fl9turbo2 posted:
Finally picked up my new oil rig Al Granzano out did him self again
WOW that looks Amazing! I dont think I have ever seen anything like that to date here on the forum! But then again everything I have seen photos of what Al has built is Amazing and out of this world! Your a lucky man to have it1
@fl9turbo2 posted:Finally picked up my new oil rig Al Granzano out did him self again
That's really cool. I look to see what Al builds every week in the scenec showcase. Looks like it's a nice addition to a great layout.
I started working on my downtown today. I got 4 buildings figured out out I still have to work on painting around them.


@mike g. posted:Well guys I didnt get much done today, but I did get the first corner and the maintenance yard ballasted! Just a couple photos. Now I havea new problem, I am not going to have enough gray ballast and will have to get more.
Mike that looks great. I have a 5 gallon bucket of used woodland scenecs light gray ballest. I could fill a priority shipping box full if the shippings cheaper than buying it. I have zero use for it but have yet to throw it away.
@Dave Ripp. posted:I started working on my downtown today. I got 4 buildings figored out I still have to work on painting around them.
Dave,
That corner building is spectacular.
John
@Dave Ripp. posted:Mike that looks great. I have a 5 gallon bucket of used woodland scenecs light gray ballest. I could fill a priority shipping box full if the shippings cheaper than buying it. I have zero use for it but have yet to throw it away.
Do I have to wash it? LOL Also do you know what the rate would be?
@Craftech posted:Dave,
That corner building is spectacular.
John
Thanks John, Woodland Scenics and Menards had different store names so I made it a double corner building.
Working on the farm on my latest layout!![IMG_7971[1]](https://ogrforum.ogaugerr.com/fileSendAction/fcType/0/fcOid/12129987997660671/filePointer/157406523788622324/fodoid/157406523788622320/imageType/LARGE/inlineImage/true/IMG_7971%255B1%255D.JPG "IMG_7971[1]")
![IMG_7971[1]: My new farm](https://ogrforum.ogaugerr.com/fileSendAction/fcType/0/fcOid/12129987997660671/filePointer/157406523788622324/fodoid/157406523788622320/imageType/LARGE/inlineImage/true/IMG_7971%5B1%5D.JPG "IMG_7971[1]: My new farm")
@CopperCountryJake posted:Working on the farm on my latest layout!
Lookig good, what are you using the operating track for or is it an uncoupler?
Dave, your buildings are looking great! As for the Ballast if you can ship it for that price I will take it!
Jake, Looks like you have a wonderful start on your Farm!
@DaveRipp The operating section is there for the exploding ammo dump farther down the line.
Dave. You're buildings look super especially the ones that are butted up next to each other .Super look. May I ask what color are you using for the blacktop in these scenes. I'm very interested as I am working on some town scenes also . Thanks Farmerjohn
@farmerjohn posted:Dave. You're buildings look super especially the ones that are butted up next to each other .Super look. May I ask what color are you using for the blacktop in these scenes. I'm very interested as I am working on some town scenes also . Thanks Farmerjohn
Thanks John, I use Rustolium Chalkboard paint. Black of course but it's blue when you paint it and dries black.
Lots of great projects everyone! I have had little train room time, so wiring has been slow. I have slowly been working on my power substation kit. The parts are so tiny, lightweight, and odd shaped that it has been slow going too. I usually paint parts first before assembly, and that is what I did on the transformer. It was hard to not get paint on the surfaces that are to be glued. After completing the transformer, I decided to build the rest and then paint. The sub assemblies are almost done and are just sitting in place, since I need to gravel the yard and paint each assembly. Next will be to glue all the disconnects that are laying on the table in place on the structure on the left. That will be a bit slow going. Here is how it looks now,


@Mark Boyce posted:Lots of great projects everyone! I have had little train room time, so wiring has been slow. I have slowly been working on my power substation kit. The parts are so tiny, lightweight, and odd shaped that it has been slow going too. I usually paint parts first before assembly, and that is what I did on the transformer. It was hard to not get paint on the surfaces that are to be glued. After completing the transformer, I decided to build the rest and then paint. The sub assemblies are almost done and are just sitting in place, since I need to gravel the yard and paint each assembly. Next will be to glue all the disconnects behind between the substation and green mat in place on the structure on the left. That will be a bit slow going. Here is how it looks now,
Wow Mark, that's a big undertaking. I don't think my fat fingers could work with those small parts. It's looking good and painting first was smart.
@Mark Boyce posted:Lots of great projects everyone! I have had little train room time, so wiring has been slow. I have slowly been working on my power substation kit. The parts are so tiny, lightweight, and odd shaped that it has been slow going too. I usually paint parts first before assembly, and that is what I did on the transformer. It was hard to not get paint on the surfaces that are to be glued. After completing the transformer, I decided to build the rest and then paint. The sub assemblies are almost done and are just sitting in place, since I need to gravel the yard and paint each assembly. Next will be to glue all the disconnects behind between the substation and green mat in place on the structure on the left. That will be a bit slow going. Here is how it looks now,
Nice work Mark. I would have lost half the insulators by now. ![]()
Bob
Spent some time installing the upper level platforms and doing some scenery grass, dirt, roads. sidewalks. Now for the buildings and street lights. John


Everyone's recent work looks great! Thanks for sharing!
-Greg
Sculptamold, sculptamold and more sculptamold. One thing I loved about Marty Fitzhenry's layout is that the initial view a visitor has is that gorgeous yard. I had only room for a small yard and in the loop across the yard I put a...uh...water feature. I've never figured out if it is a lake or a river and I doubt that it matters which it is. But the upshot is that the yard with the lake (?) beyond is the first thing a visitor sees--and THAT is what I am trying to get done.
The pic shows where I am with this. The bridge closest to the camera has been removed for some cosmetic work. The lake edges and bottom are consuming all my sculptamold. And layout time.
Don Merz
@Radioman77 posted:Spent some time installing the upper level platforms and doing some scenery grass, dirt, roads. sidewalks. Now for the buildings and street lights. John
That's looking really good and it looks like you can reach from both sides.
@Don Merz 070317 posted:Sculptamold, sculptamold and more sculptamold. One thing I loved about Marty Fitzhenry's layout is that the initial view a visitor has is that gorgeous yard. I had only room for a small yard and in the loop across the yard I put a...uh...water feature. I've never figured out if it is a lake or a river and I doubt that it matters which it is. But the upshot is that the yard with the lake (?) beyond is the first thing a visitor sees--and THAT is what I am trying to get done.
The pic shows where I am with this. The bridge closest to the camera has been removed for some cosmetic work. The lake edges and bottom are consuming all my sculptamold. And layout time.
Don Merz
Very nice Don. Is that sculpamold easy to get paint to stick to? I used Woodland Scenics Flex Paste before and had a hard time with it.
It is on wheels so I can move it around. It also tilts up so I can get to the underside. John
Did a little painting for the building base and part of the main drag. When this dries I'll paint in the allys and get the buildings in. It'll lighten up and blend when dry, sloppy looking when wet.


Afternoon guys, not alot here from me. I have been doing a little work on the upper loop on the other end, but dont want to get to far as I want to make sure I am cutting the right curve. I will post a photo later!
Mark, great job on the power Substation! Its going to look sharp on your layout!
Raidoman77 (John) wonderful looking grass and dirt, but I really like your new upper level platform!
Don, from what I see here when your done its going to be an AMZING focal point to your layout!
Dave,I love how you just keep trucking on! It kinda makes me feel lazy! LOL It's really looking good and remember that everything looks sloppy till it done!
Hope everyone is having a great day!
@Dave Ripp. posted:Wow Mark, that's a big undertaking. I don't think my fat fingers could work with those small parts. It's looking good and painting first was smart.
@RSJB18 posted:Nice work Mark. I would have lost half the insulators by now.
Bob
@mike g. posted:Mark, great job on the power Substation! Its going to look sharp on your layout!
Thank you Dave, Bob, Mike! Yes these parts are really small and easy to lose track of. I am finding it much harder now than when I built N-scale models in my 30s. I think it is a good looking kit. I wish there were some more tabs or something to help align parts. I guess if there were, realism would be sacrificed.
Don, where does all that sculptamold go? The scene is shaping up nicely!
@Mark Boyce posted:Lots of great projects everyone! I have had little train room time, so wiring has been slow. I have slowly been working on my power substation kit. The parts are so tiny, lightweight, and odd shaped that it has been slow going too. I usually paint parts first before assembly, and that is what I did on the transformer. It was hard to not get paint on the surfaces that are to be glued. After completing the transformer, I decided to build the rest and then paint. The sub assemblies are almost done and are just sitting in place, since I need to gravel the yard and paint each assembly. Next will be to glue all the disconnects that are laying on the table in place on the structure on the left. That will be a bit slow going. Here is how it looks now,
Mark , are all the parts number coded ? 😉
They would have to be if I was trying to put the substation together .![]()
@Dallas Joseph posted:Mark , are all the parts number coded ? 😉
They would have to be if I was trying to put the substation together .
Yes they are number coded. Although I worked in substations from the mid '70s to early '90s and the parts make sense to me, I have needed to check the numbers on a few. I didn't mention it is a Walthers HO kit. They did a nice job on it, and I think it still scales right for a small town distribution station.
Mark,
I had to delete my last post because you answered my question above. The substation looks good. Please show us when you get it on the layout.
Dave
@Craftech posted:Dave,
That corner building is spectacular.
John
Yes, I love the original building but the kit-bash is WHOA!
Dave
While not as impressive as most posts, a banner day for me. My first attempt at painting a figurine. A good thing his back is to us, as apparently I cannot paint eyes or sun glasses (no, I won't post the front of George!)
George is an executive of the C&J and spends off time brushing up on his putting. Since there alot of construction going on he has more time than usual

Got back to my NP North Coast Limited dome cars, four of them, and went through another "final" check before clear coating. Found a couple of paint touch-up issues that were easily fixed.
But to my consternation, I found the serif in the "M" of "VISTA DOME" on a decal was missing its left side serif!!!
How the heck did the serif not get printed?
So, with my 73 year old, occasionally trembling, hands, I cut a fresh decal's serif off, and attached it to the defective decal on the car, successfully. Photos below.
The delay on the four dome cars is caused by doing a large door baggage car using a LIONEL UP baggage car from the 6-31712 Anniversary set as the donor. Its roof vents, large doors, and skirtless shell closely resemble NP's 73' prototypes. Photos this week-end. (I screwed up the stripe on the four doors and I'm redoing them now.) It too requires some paint touch-up on the car ends because I carry the white stripe and two-tone green across the car's plastic end and my masking skills are not good enough to create a sharp stripe line between the two colors on the molded ends.
@luvindemtrains posted:Mark,
I had to delete my last post because you answered my question above. The substation looks good. Please show us when you get it on the layout.
Dave
Dave, I will say the sub station really reminds me of some old stations tucked away on small town side streets back in the ‘70s and ‘80s. Since my layout is set in the ‘50s I’ll put it at the edge of town I think. I’ll add it to the mix of buildings and post it for everyone!
Love the substation! And all the many other posts. There's some real terrific scenery and ideas, along with the talent to learn from and aspire to. Thanks to everyone (can't name them all)
My steam heating plant is now fully functioning along side my Machine Shop, although it could use some refinement. Runs great on 5 VDC. Still need ground cover, trees, and some life/action figures. The LEGO guy on the marble steps is for my Grandson. Need to keep them engaged!
I have brand new smoke detectors in the house. Nary a peep from any of them!!


@Mark Boyce posted:Yes they are number coded. Although I worked in substations from the mid '70s to early '90s and the parts make sense to me, I have needed to check the numbers on a few. I didn't mention it is a Walthers HO kit. They did a nice job on it, and I think it still scales right for a small town distribution station.
Mark .......I can't wait to see the final result..........after you get the glue off of your fingers 😉
Thank you Endless Track and Dallas!
Get the glue off my fingers? Get my stuck together fingers unstuck is more like it. Yes I have trouble manipulating tweezers and small pliers, so fingers are sometimes better.
Reminds me of a guy I worked with 30 years ago. He built model airplanes. One evening he accidentally squirted glue in his eye and his eyelids were immediately glued shut. He laughed telling the story how his wife laughed the whole trip to the hospital to get him unstuck.
@Mark Boyce posted:Thank you Endless Track and Dallas!
Get the glue off my fingers? Get my stuck together fingers unstuck is more like it. Yes I have trouble manipulating tweezers and small pliers, so fingers are sometimes better.
Reminds me of a guy I worked with 30 years ago. He built model airplanes. One evening he accidentally squirted glue in his eye and his eyelids were immediately glued shut. He laughed telling the story how his wife laughed the whole trip to the hospital to get him unstuck.
Reminds me of a Comedy of Errors...........I guess that is the fun part of being married. 😉
@Dallas Joseph posted:Reminds me of a Comedy of Errors...........I guess that is the fun part of being married. 😉
Amen! The guy was great telling a story where he was the but of the joke.
@Dave Ripp. posted:I started working on my downtown today. I got 4 buildings figured out out I still have to work on painting around them.
Dave, I had to look at that Davenport building for awhile and realized it's two Davenport buildings back to back! Really ingenious as it looks fantastic. Once again this will be another awesome scene.
Scott
I got my allys painted and a few more buildings in place. I was having trouble picking the next row so I'm done for today. I also took a front picture of a building I've had questions on. It is half Woodland Scenics Davenport and half Menards Mercantile .


Hi there guys!
CR Cole, Nice little putting green, George looks good and don't worry were not nit pickers here! You can show us the front of George, He cant be any worst the most of us here! LOL
Carl, for all the work you have put into this project, I think they look outstanding!
Endless Tracks, Looks GREAT!
Tom nice job on the shelf and even better that you have your dad's train to display on it!
Well guys I wen tout a painted some of the plywood for the layout and started work on a special project, I am working on a setup to try and make my jet take off from my runway, if it works out I will share with you good folks. It was all brought about FarmerJohn and his plane with the turning prop! I hope it works as I really want to share it with him so his plane can fly also! Here is a photo of the beginning .

@Dave Ripp. posted:I got my allys painted and a few more buildings in place. I was having trouble picking the next row so I'm done for today. I also took a front picture of a building I've had questions on. It is half Woodland Scenics Davenport and half Menards Mercantile .
Hi Dave, so I was correct that it was two buildings, but they are not back to back, but rather left side to back. You must have removed the wrought iron balconies on the left side of the Menards building? Woodland Scenics and Menards must share tooling and manufacturing?!
I did a little interior work on my Davenport building by enclosing 4 rooms on the second and third story and installing LED's in each room. I used 4 WS LED stick-on lights and a WS sequencing hub, so the lights go on and off in each room. The sequencing hub has an adjustment to increase or decrease the speed at which the lights go on and off. It looks like somebody is actually home.
Really looks great Dave, I'm having a blast watching your layout grow! Thanks for taking the time to photograph your progress!
@mike g. posted:Hi there guys!
CR Cole, Nice little putting green, George looks good and don't worry were not nit pickers here! You can show us the front of George, He cant be any worst the most of us here! LOL
Carl, for all the work you have put into this project, I think they look outstanding!
Endless Tracks, Looks GREAT!
Tom nice job on the shelf and even better that you have your dad's train to display on it!
Well guys I wen tout a painted some of the plywood for the layout and started work on a special project, I am working on a setup to try and make my jet take off from my runway, if it works out I will share with you good folks. It was all brought about FarmerJohn and his plane with the turning prop! I hope it works as I really want to share it with him so his plane can fly also! Here is a photo of the beginning .
I'm makin' the popcorn.....😁😁
Bob, I'm glad you are making the popcorn. I really don't know quite what Mike is up to here, but as always it will be worth watching!! ![]()
You both know it's going to be crude, but if it works I will be happy. The problem is it's all in my head and I'm playing it by ear! I have to be careful if I shake my head to hard I could lose the master plan! 😂 LOL
@mike g. posted:You both know it's going to be crude, but if it works I will be happy. The problem is it's all in my head and I'm playing it by ear! I have to be careful if I shake my head to hard I could lose the master plan! 😂 LOL
Less crude than anything I can come up with! ![]() Maybe a shake of the head will come up with a better design!!
Maybe a shake of the head will come up with a better design!! ![]()
You would think having trained as an electronics technician, draftsman and working as a technician, designer, and field engineer, I would be better able to put my ideas on paper than I am.
My O scale news
Last week I primed my brass 44 T locomotive.
today I airbrushed (scalecoat 1) the chassis, removed the mask, and baked it as well. This was my first brass painting project. It sat on a shelf in a box un decorated for 7 years! Tomorrow I will paint the shell Pine tree MEC Green.


Leeroof, Thats quite the undertaking! I mean for both projects, They both also look great! I dont think I could ever do anything like that!
Well guys I went out to work on my airplane lift and found out that 1/8" paneling is to week! So I am back to the start, this time I am using 1/8" plexi glass. I am here writing cause I am letting the glue dry.
While its drying I painted more of the table top of the layout and I am getting ready to do the girders for my lower loop, I will post photos later!
I hope everyone is all set to have a great weekend!
@RSJB18 posted:I'm makin' the popcorn.....😁😁
Bob , can you bring some Pizzaria Combos ? 🤔
Mike - I hope this jet thing doesn't involve an Estes rocket engine, 😳 just kidding, interested to see what you come up with.
Scott
@B&O Fan posted:Mike - I hope this jet thing doesn't involve an Estes rocket engine, 😳 just kidding, interested to see what you come up with.
Scott
😆 😆😆
Didn't get much done today about an hours work this morning and another hour and 1/2 when I got home. I extended the down town base with ramps and sidewalks and 2 coats of paint one still wet. Perliminary plans are parking for the train store,movie theater and Woodland Scenics J. Frank's Grocery store. This may be it till Monday I have a busy weekend planed.

There will be interior cab finishing, and live constant headlight beams.
I am taking my time. The model is a limited W &R industries model that was in a box on a shelf un decorated for over eight years not seven I reported last time posting!
I am opening my overflowing bucket lists now!
Hi Guys hope your all having a wonderful Friday!
Scott, dont worry its going to be nice and slow!
Dave, looks like a great start on your town addition!
Leeroof, your work looks just amazing!
Well guys the glue is still drying so no photos of that, we all know what glue drying looks like!
But here are a couple photos of my table top painting and I was able to get my printed girders put up!

I would have to say one of the best $16 spent on decal paper!


I hope you all have a great weekend and find time for your layout and trains! But most of all I hope you all have fun!
@mike g. posted:Hi Guys hope your all having a wonderful Friday!
Scott, dont worry its going to be nice and slow!
Dave, looks like a great start on your town addition!
Leeroof, your work looks just amazing!
Well guys the glue is still drying so no photos of that, we all know what glue drying looks like!
But here are a couple photos of my table top painting and I was able to get my printed girders put up!
I would have to say one of the best $16 spent on decal paper!
I hope you all have a great weekend and find time for your layout and trains! But most of all I hope you all have fun!
Mike the girders look great!
@Dave Ripp. posted:Mike the girders look great!
Thanks Dave, looks better then just plain wood!
Got busy the last 2 days. added street lights some trees and started mounting the buildings. Thanks to Pocono Jack's suggestion I used Aileen's Tack It Over and Over Glue plus some latex caulk. The Aileens's is neat to use. Also added stairs to the upper level stations.


@mike g. postedBut here are a couple photos of my table top painting and I was able to get my printed girders put upI would have to say one of the best $16 spent on decal paper!
The girders look outstanding! Nice job, Mike!
Wow Mike, what a unique idea and it looks authentic. You have given me something I hadn’t considered. Thanks for sharing your expertise and creativity.
@Leroof posted:My O scale news
Last week I primed my brass 44 T locomotive.today I airbrushed (scalecoat 1) the chassis, removed the mask, and baked it as well. This was my first brass painting project. It sat on a shelf in a box un decorated for 7 years! Tomorrow I will paint the shell Pine tree MEC Green.
@Leroof posted:What I did on or towards my layout today, the MEC 44 T body was painted today.
Have a good weekend forumites!
Nice stuff Leroof. 👍 This kind of work ( play ) takes LOL and patience. ( I always get in too much of a hurry 😶 )
The finjsh on the MEC44-T looks first rate . Do you apply a protective coating or is it the baking that makes it more durable ?
Look forward to seeing the end product.
@mike g. posted:Hi Guys hope your all having a wonderful Friday!
Scott, dont worry its going to be nice and slow!
Dave, looks like a great start on your town addition!
Leeroof, your work looks just amazing!
Well guys the glue is still drying so no photos of that, we all know what glue drying looks like!
But here are a couple photos of my table top painting and I was able to get my printed girders put up!
I would have to say one of the best $16 spent on decal paper!
I hope you all have a great weekend and find time for your layout and trains! But most of all I hope you all have fun!
There for awhile Mike , I was wondering if you were going to really get back into the swing of things after your issue..............boy are you flying into it !
I thought you were getting into a big job trying to put detail pieces in the girder ,but that printed girder looks really 3d. What a cool idea.
Is that board hanging out over the paint job the mechanism you climb out on to get to that area !?! 😨😉
@mike g. posted:Hi Guys hope your all having a wonderful Friday!
Scott, dont worry its going to be nice and slow!
Dave, looks like a great start on your town addition!
Leeroof, your work looks just amazing!
Well guys the glue is still drying so no photos of that, we all know what glue drying looks like!
But here are a couple photos of my table top painting and I was able to get my printed girders put up!
I would have to say one of the best $16 spent on decal paper!
I hope you all have a great weekend and find time for your layout and trains! But most of all I hope you all have fun!
Awesome! Great work and look.
Hey Dallas Joseph, thanks for the kind comments. The Scalecoat 1 paint dries somewhat glossy but if you bake it and it cures the finish is glossy enough to support decaling. There is no protective coating (yet). I plan on doing some weathering and apply a final protective coat This is my first brass paint job. I took it slow and learned a lot. I overcame a multitude of mistakes with corrections. The finish in person has its flaws. It has taught me to s l o w down and enjoy modeling ing in the moment. I will post progress when that occurs. Thanks again!
First off thank you all for the kind words! It really means alot to me that you like my ideas for a layout on a budget!
Dallas that board hanging out in the background is the start to the upper loop for that end of the layout. I set some buildings this morning I will take a photo later after my meeting I have to go to.
Mike G. That decal paper looks awesome. Was this something off the shelf or did you have it custom made. And if so how.
@E-UNIT-79 posted:Mike G. That decal paper looks awesome. Was this something off the shelf or did you have it custom made. And if so how.
Hi @E-UNIT-79, Its a pattern I pulled off the internet and just printed it on white decal paper from Walmart, the package comes with 3 sheets in it and I bought 2 packages and printed 6 copies. But as I said before its the best $18 I have spent in a long time. Well worth it.
The paper is called AVERY DYI Decals
@E-UNIT-79 posted:So @mike g. you did this with your home printer and compute using a photo off the internet correct?
Yep Just sent you an email.
I've done lot's of printed scenery. Cheap and easy to work with. I typically print on card stock and then glue the images to heaver stock for assembly. These background flats are all made from prints.

The fence is a print and I added balsa detailing for the posts and stringers.

@mike g.- I agree that the bridge girders look great.
Bob


@RSJB18 posted:I've done lot's of printed scenery. Cheap and easy to work with. I typically print on card stock and then glue the images to heaver stock for assembly. These background flats are all made from prints.
The fence is a print and I added balsa detailing for the posts and stringers.
@mike g.- I agree that the bridge girders look great.
Bob
Bob, It's amazing how good those look even close up. I find what I need and my wife prints it to size. So far just signs to change business names.
@Dave Ripp. posted:Bob, It's amazing how good those look even close up. I find what I need and my wife prints it to size. So far just signs to change business names.
Thanks Dave. I found them on a blog that a guy in the UK runs.
Bob, those look great! I would never know about printing stuff like that if it wasnt for you!
Well guys I did a very little today. I worked on the plane thingy and put some building out just to have a look! Here are a couple photos.


I weathered the trucks on my track cleaning car. I wasn't sure how to go at this but I experimented on a spare wheel first.
First attempt was to apply the powder dry. It didn't really give me the level of color I was looking for.
Second try I added a couple of drops of wet water to the powder and made a paste. It stuck to the metal wheel better so that's what I used on the car.
I applied the mix to the truck and wheels with the small brush shown, and then dry brushed it to blend and even out the color. I will see how it is today. I might have to give them a light spray of clear coat if the finish is not smudge proof.
Bob


Access to this requires an OGR Forum Supporting Membership


