Hey Y'all,
I shot this video last night. I bought a Lionel #8802 and some Southern cars for my birthday. All NIB. I am thrilled to have more Southern stock. I put my camera in the middle of my layout, facing out at me.
Bill


|
|
Hey Y'all,
I shot this video last night. I bought a Lionel #8802 and some Southern cars for my birthday. All NIB. I am thrilled to have more Southern stock. I put my camera in the middle of my layout, facing out at me.
Bill

Bill could not tell if you were smiling or not? Looked like you were trying to keep a straight face. Interesting camera angle none the less. Never seen that take before - that's called innovation! I would break my camera if I tried that. ![]()
@Odenville Bill posted:Hey Y'all,
I shot this video last night. I bought a Lionel #8802 and some Southern cars for my birthday. All NIB. I am thrilled to have more Southern stock. I put my camera in the middle of my layout, facing out at me.
Bill
@ScoutingDad posted:Bill could not tell if you were smiling or not? Looked like you were trying to keep a straight face. Interesting camera angle none the less. Never seen that take before - that's called innovation! I would break my camera if I tried that.
I was waiting to see if you moved, Bill. You finally did at the end. Were you watching the camera? I agree with Jeff! That is a great camera angle. The train ran so smoothly as well ! I always have trouble taking videos, trying to pan with the train. I will have to give what you did a try!
I was watching the camera. Next time I'll watch the train. I would smile then.
Bill
On my new layout I've decided to go the MTH route for control of my switches and accessories. The current game plan calls for 3 AIUs. Given that they will be located in regions that are not extremely accessible, I've decided to do as much prewiring as I can before I install them. So here is an AIU with 2 busses. One side is for switches, the other for accessories. I also have individual leads for each of the switches and accessories. I'll mount this into position and make the connections to the layout with WAGO connectors.
Also, I've stolen an idea from GRJ (Thanks, John!) and have bought some desk cable groments. I used a hole saw the drill through the front of the layout. I'll glue a back plate to each with a momentary push button switch. This way I can have local control of an accessory, or use the remote through the AIU.
Chris
LVHR


@Ross posted:My son recently gave me an ETS Merci boxcar. I finished up putting the signs on it and installed it on the layout.
This is really sharp Ross.
What are the individual patches from ? ![]()
I'm familiar with the US patches. ( don't have to know what each patch is for ![]() )
)
@Bill Sherry posted:I finally finished up building the passenger car lighting kits. I actually enjoy soldering and assembling kits. Still have one of my original Heath Kits from way back. Anyway, a big thanks to John for designing these in the first place.
Next comes the not to fun part - installing them in the cars. Oh yea...
Wow Bill .......that is certainly some kind of commitment . ![]()
Kudos sir. ![]()
@Odenville Bill posted:Hey Y'all,
I shot this video last night. I bought a Lionel #8802 and some Southern cars for my birthday. All NIB. I am thrilled to have more Southern stock. I put my camera in the middle of my layout, facing out at me.
Bill
Aaha......just what i figured Bill. You can't hide with that scary profile photo. ![]()

Really a neat idea Bill and even with the other train and showing a unique way of showing the Southern layout . ![]()
@Dallas Joseph, the costs of arms are from 40 of the French districts that provided the gifts that were contained in the 49 cars.
Dallas Joseph - Big Ken, Thanks guys, appreciate the positive comments. I'll keep repeating them over and over again as I install the boards in the cars ! And guess what, I purchased the General Set from the Fundimensions era from my local hobby shop and that's two cars that won't be getting the lighting boards. I don't think I will build any more although I have plenty of parts left over except the naked boards.
@Greg Houser posted:But then again, my favorite genre of music is metal and I like it loud
-Greg
What other kind of music is there?? ![]()
@mike g. posted:Thanks Mark, I hope Bill Webb shares some input. I would really like to know if it hard to wire and learn!
Mike I just saw this and am leaving to go fishing in ten minutes. I will try to get back to you when we get home. Will be glad to assist if we can.
The renovation project is done! Roof, siding, 2 new windows, front and rear steps replaced with granite and bluestone.
I returned to work today and found 3 boxes on my desk, 2 from Menards and one from RMT. ![]() I'll post pix on BACL later.
I'll post pix on BACL later.
Time to get back to the important stuff! ![]()
Bob
Built and installed an adjustable bookshelf that doubles as train storage and bench work for a two bay train shed on a side yard for the layout build. Allows three rows of train storage per shelf.

Didn’t take long for my son to fill it up.

@Ross posted:@Dallas Joseph, the costs of arms are from 40 of the French districts that provided the gifts that were contained in the 49 cars.
For those who might be in New England, a preserved example of one of these cars is located in the Museum of Work and Culture in Woonsocket RI. A story of it's discovery and rescue/restoration is here: http://mercitrain.org/RhodeIsland/
There is also one in Hays KS.
This website has a listing of all the cars and their status. http://www.mercitrain.org
Checking that my track is level. Or not.
@Ross posted:@Dallas Joseph, the costs of arms are from 40 of the French districts that provided the gifts that were contained in the 49 cars.
Definitely a wonderful and unique ( at least to me ) addition to the photo and story line collection on this forum Ross. ![]()
Thank you for sharing.
@ChiTown Steve posted:Checking that my track is level. Or not.
Nice Steve. On my layout I try to do that but I can't find a level with a wide enough BUBBLE. ![]()
@farmerjohn posted:A busy summer and fall it has been. Starting to work on my layout again. A few early pics of a scene I'm working on to finish the front of my layout which you see when you first come down the stairs
Nice John. Amazing layout. A lot going on here already . This is starting to rival the look of reality.........you are my hero.
Doing an upgrade to a corner of my layout with 1" foam, some prior and while being completed also using my dad's 3" piers from his HO layout back from the 70s, Thank a Vet.


Hi everyone, I sure hope your all doing well! I see on the news again it is to snow in the northeast. Please be safe!
I really haven't done much with the snow clearing here. It didn't snow for a few days while I was gone to my brothers in Seattle. But as soon as I get home it starts up again. I don't know about the rest of you dealing with snow, but I and done with it! LOL
@farmerjohn John, I am so sorry I thought I commented on your post of the update on your layout and looking back I didn't. So here I go, I love the middle construction photos along with it getting closer to the finish line. It really gives some of us an idea of how other people make things look great! Very Nice work!
@Bill Sherry Bill that is just out of this world! I wish I had the knowledge and skills to be able to do that!
@lehighline Chris Nice and neat wiring, I hope those AIU's are easy to wire! I like the idea of the recessed pushbutton hole.
@jstraw124 The train storage looks great and nice of your son to take the time to fill it for you!
@ChiTown Steve Steve, great idea using the car, but I would have to say it's a little off! LOL![]()
@Sitka WOW that sure is a big undertaking! But I am sure it is going to look as Outstanding as the rest of your layout!
I am hoping to get out to the train room tomorrow to get some more track up and clean more ballast off the track I am taking up. I also am trying to figure out if I can leave some of the track already down.
I hope you all have a great weekend and find time to have fun on your layout and with your trains!
Just rediscovered this thread. I'm just trying to get my trains running for my grandson (2yo) who keeps bugging his dad. Have been on respite for a few months (knee replacements). Went to start up and found my ZW-C has apparently failed me. No green light on power up and not reaction at all. Currently searching through all of my stored stuff to find a solution. Decided to rewire the power distribution as I was working on the problem. Typical.
Hope you, all, are having more fun than I am right now.
Dallas and Mike. Thanks for you're comments. Trains are so much fun when others enjoy them also. Here's a few pics of the area I posted earlier just a little more finished. 


@farmerjohn John, that looks Outstanding! How did you make the front of the porthole?
@DrSteveDC posted:Mountainscape just about done…
Steve the Mountain looks great! Nice work!
@farmerjohn that scene is really taking shape nicely! I like the double track tunnel and the road winding up the hill.
@DrSteveDC That mountain is really looking great!
I wish I was building scenery too. That is my favorite part of the hobby. I'm 6 years into the planning and building my layout in an 11x11 room. I decided the track arrangement didn't suit me like I thought I would. I've been working on some ideas. @ScoutingDad Jeff came up with some great ideas. He has been suggesting for probably 2 years that I raise my town to the upper level, make it easy to lift off, and put tracks underneath. Well, I finally took him up on it ripping off the overhead trestle, and building a small yard where the town was to be. Track is down, but there is no power since we are working on any enhancements before I commit to something. This iteration has 15 cars on tracks that will be powered and 5 cars on tracks close to the layout edge for placing on and off by hand. Full details are on the link in my signature line.


It’s also impressive Mark that you have rebounded so well to do all this physical maneuvering.
Jay
Thank you, Jay! It hasn't been without its challenges, but I find ways to work around and with them. I don't work on anything for very long at one time. ![]()
@farmerjohn posted:Dallas and Mike. Thanks for you're comments. Trains are so much fun when others enjoy them also. Here's a few pics of the area I posted earlier just a little more finished.
Farmerjohn,
I really enjoy progress photos such as you attached to your post, I always learn from them.
As a bonus, your post also allowed me to see more of your wonderful layout! Great work.
Thank you
@DrSteveDC posted:Mountainscape just about done…
DrSteveDC,
As I mentioned in a post to farmerjohn a moment ago, I love to see and learn from layout progress photos. Thanks for posting yours - more great work to admire
Sitka,
The same comments I made in my posts to farmerjohn and DrSteveDC certaintly apply to the recent work you posted.
You guys overwhelm me - THANKS FOR SHARING!
@Mark Boyce Mark, things sure are coming along nicely! I think it is a great idea!
Well guys I promissed Dallas I would post a couple photos here if my layout as I am in the middle of tearing it apart and cleaning track of all its ballast. So now I have track in stacks, in boxes, and I need to get more boxes. I haven't taken up anymore track as I was to see ifI can use some of it that is still in place without having to redo everything.
Here are a couple photos.
The first one shows where I have taken up track and cutout for my lift out section where the town will go along with a small river, I think! LOL If you look under the table where the black legs are showing is where the staging tracks will go.

The second one shows some of the tools I use,

and the last one shows the track that I have taken up track and cleaned so far!

I hope you all have a great weekend and will post on my own thread tomorrow sometime.
Remember to try and find time to have fun with your layout and trains!![]()
Mike. I made the tunnel front out of Styrofoam cut with a hot tool called a Tippi. 

Thanks John, I ment the brick face. It looks really good!
Mike, looks like you are ready to rebuild.
@Mark Boyce posted:Mike, looks like you are ready to rebuild.
Not quite Mark, I still have to move the bridge over and check table alignment.
@Mark Boyce posted:Thank you, Jay! It hasn't been without its challenges, but I find ways to work around and with them. I don't work on anything for very long at one time.
We get done what we can Mark. With this hobby there seems to be some new project we would like to get into that demands a good deal of movement .
I do a few small things and run trains when I can and organize areas to post photos. Soon I'll be getting a new hip and can't wait to see what kind of movement I'll be able to work with. Gotta keep hope.
Don't sit in the recliner too long Mark. ![]()
 We put up part of the backdrop on a wall. I learned to put up a backdrop before building out the layout.

@Dallas Joseph posted:We get done what we can Mark. With this hobby there seems to be some new project we would like to get into that demands a good deal of movement .
I do a few small things and run trains when I can and organize areas to post photos. Soon I'll be getting a new hip and can't wait to see what kind of movement I'll be able to work with. Gotta keep hope.
Don't sit in the recliner too long Mark.
Dallas, I’m glad you are getting your new hip soon. My mom’s hip replacement made all the difference when she got hers years ago.
No recliner for me. We have my late father-in-law’s recliner. I find it uncomfortable, but the dog loves it! 😄🐶


@Dallas Joseph posted:We get done what we can Mark. With this hobby there seems to be some new project we would like to get into that demands a good deal of movement .
I do a few small things and run trains when I can and organize areas to post photos. Soon I'll be getting a new hip and can't wait to see what kind of movement I'll be able to work with. Gotta keep hope.
Don't sit in the recliner too long Mark.
Dallas, Good luck with the hip replacement….mobility is a good thing. One of my least favorite aspects of this hobby is wiring, with the uncomfortable contorting, which one of our forum members, with humor, refers to as train yoga.
Be well sir,
John
Yes, Dallas - best wishes on your hip replacement!. I know several folks who've had them the past 5 years and to a person they are thrilled they got them.
-Greg
Did some scenery work today, Wish I did insulate foam board years ago, to many to mention but Great looking layouts on this thread. WTG go luck Dallas with the hip God Speed!


@Mark Boyce posted:Dallas, I’m glad you are getting your new hip soon. My mom’s hip replacement made all the difference when she got hers years ago.
No recliner for me. We have my late father-in-law’s recliner. I find it uncomfortable, but the dog loves it! 😄🐶
Showed Judy your reply........the recliner friends got a great big Aaaww. What great little creatures.
Judy should be getting our rescues the weekend before the big day.
Cleaveland residents at present.

Today project. Installed Atlas O red blinking light for caboose. Removed MTH factory non blinking light, drilled hole little enlarge, installed and soldered wires, assembled caboose together. Now exact like prototype C&NW! I have 5 kits to be install rest of C&NW cabooses.


@Sitka posted:Did some scenery work today, Wish I did insulate foam board years ago, to many to mention but Great looking layouts on this thread. WTG go luck Dallas with the hip God Speed!
The insulation board definitely would make a lot of work easier..........just keep your perfect lighting and great little areas with story lines in those photos Mark. Glad you are having a new found fun media for your creative juices. ![]()
Thanks for the good wish on the after market part swap. God speed to you sir.
@CGWforever posted:Today project. Installed Atlas O red blinking light for caboose. Removed MTH factory non blinking light, drilled hole little enlarge, installed and soldered wires,
Much better solution than my mounting an end of train flasher on a couple of my cabooses.
Nicely done sir. ![]()
@Fendermain posted:Dallas, Good luck with the hip replacement….mobility is a good thing. One of my least favorite aspects of this hobby is wiring, with the uncomfortable contorting, which one of our forum members, with humor, refers to as train yoga.
Be well sir,
John
@Greg Houser posted:Yes, Dallas - best wishes on your hip replacement!. I know several folks who've had them the past 5 years and to a person they are thrilled they got them.
-Greg
Thank you very much for the good wishes guys . Had the other side done in 2009 and still can't tell that there was ever a problem . These methods and people involved in the procedure are pretty amazing.
I have to think working with model railroading may have made this a more important decision. ![]()
Springfield, Ohio train show, NMRA MCR DIV 7 meeting layout visits and 'booty'.
My ballasting **** is over..lol I completed ballasting all my track with the exception of 5' of siding which I need to build a road next to first. All together about 190' of track....not fun. I also installed 3 sets of sliding shoes and dropped wires on 6 uncoupling magnets ahead of ballasting. Now the scenery fun can start and I can get all the trains on the layout. Next steps are roads and replacing my TIU. I recently purchased a Rev L from a fellow forumite to replace my older one.
-Greg
Hi Everyone,
It's late and I just finished up some work on the first of several DD kits I am building. This is the building taking on a bit of color after several light applications of acrylic washes. Much more work to do before completion but this should be fun.
Dave

FINALLY- I got around to airbrushing my FasTrack. I have been wanting to do this for a long time. I am using Tamiya acrylic through a double-action Badger- "red brown" on the outside rails, back on the center. Thorough top of the rails wipe down w/ alcohol.
@luvindemtrains posted:Hi Everyone,It's late and I just finished up some work on the first of several DD kits I am building. This is the building taking on a bit of color after several light applications of acrylic
Outstanding Dave .![]()
@Dallas Joseph posted:Thank you very much for the good wishes guys . Had the other side done in 2009 and still can't tell that there was ever a problem . These methods and people involved in the procedure are pretty amazing.
I have to think working with model railroading may have made this a more important decision.
Best of luck with the hip replacement Dallas. Pretty soon we will have to call you the Bionic Man! ![]()
Bob
@RSJB18 posted:Best of luck with the hip replacement Dallas. Pretty soon we will have to call you the Bionic Man!
Bob
Judy says I'm priceless Bob..........well .........at least all the titanium should be worth something. ![]()
Hello everyone! Just finished a product review on the 2016 issue of the Legacy GS-4. Hope you all enjoy it!
Just bought a postwar 736 with a 2046w tender that happened to have the holes in the back of the tender. Rather than pay for the kit I took an e10 14v bulb and socket and connected to the whistle. Some double sided tape holds the socket up. Then for the lens, I cut the tips off of some push pins, super glued on. Here is the finished product. Not bad and it saved me about 20 bucks! 
Mike . The brick face on the portal is made by burning lines in the Styrofoam for the stone outlines and then taking a wire brush and ruffing it up a bit to make it look somewhat weathered stone. I paint it with different colors and try to give it a weathered look. I've had to use this method because a lot of my tunnels are on a curve approach which requires a lot more room. Thanks for asking.

@farmerjohn - thanks for explaining how you did the portals. I just removed one (on a curve) - the vista dome car would snag on it. I will utilize your technique to replace it.
Dr. Steve. I'm not finished with this scene. Thanks for the comment. When I am a little further along with this scene I'll post some more pics. It's got a long ways to go. From trees to fences it takes time but so much fun . Farmer John
Gluing up more styrofoam, realizing I should've started this project sooner on the temporary Christmas layout. Most importantly made the inaugural run through the tunnel. Hoping to have the rest of the foam work done before heading out of town this weekend.


@chabs posted:Gluing up more styrofoam, realizing I should've started this project sooner on the temporary Christmas layout. Most importantly made the inaugural run through the tunnel. Hoping to have the rest of the foam work done before heading out of town this weekend.
Your project is good so far. When building a tunnel, make sure you allow yourself an access to get derailments out of the tunnel. Even though a train has run 100 times without incident over the section of track to be covered by the tunnel, once the tunnel is in place, it is almost a sure thing that a derailment will happen under your new tunnel.
Great work. Happy Holidays to you and yours.
Jon Chabs, don't worry about thinking you should have started sooner. Just adapt the project for the time you have available. I have seen where folks have just taken Styrofoam cut like yours and covered it with white ice and snow to make a nice cold looking Christmas scene!
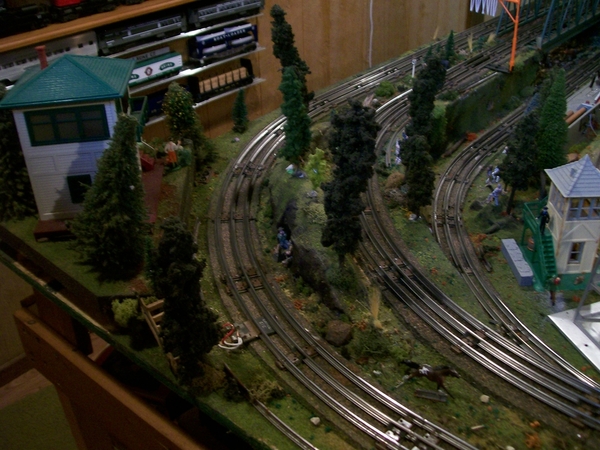
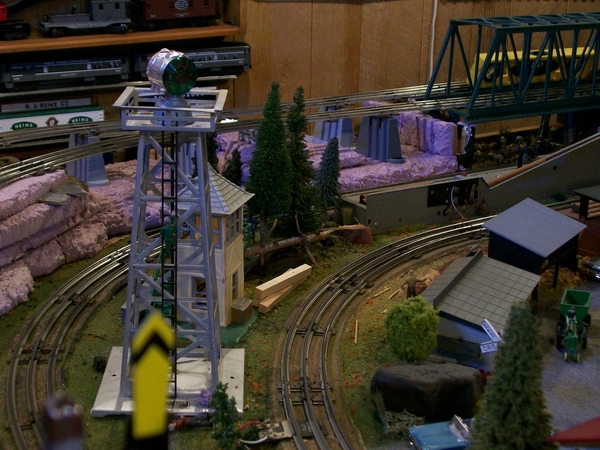
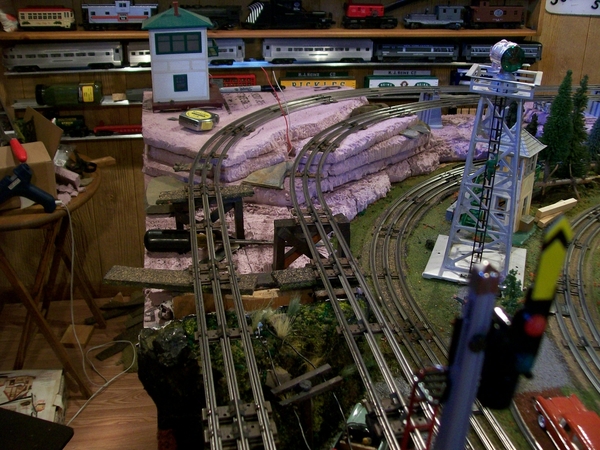
The new layout is progressing. I'm heavily into the accessory and switch wiring stage now. This is the back side of my control station which was featured in Run 327. I have capability for conventional, DCS, TMCC, and Legacy. At the moment, there is one other AIU which is located some distance from the 2 here. I figure I'll need another 2 AIUs before I'm done.
Chris
LVHR

Looks good, Chris!
Hello everyone! I hope you all enjoyed the video I posted yesterday. Today, I was able to work on the industrial row of my layout. This area is meant to be the old part of town that never got updated. As a result, the roads were never paved and the centuries old brick work still stands.
Now, onto what I did. It turns out there really is not any readily available “brick roads” to purchase. Until, my local Michele’s stocked Christmas decor. A Christmas village company called Lemax, similar to Department 56, produces vinyl brick roads. Bingo! I was able to grab a one and off I went.
So, tonight I was able to cut, iron and place two sections of road so far so good. I will continue to go down this row and fill in the alleyways section by section.
On other news, I got accepted into Baylor University to study Mechanical Engineering. Yay!
Thanks for reading and Merry Christmas!


Congratulations on the acceptance to Baylor University and the Mechanical Engineering Major.
@Trainmaster04- congrats on Baylor. Mechanical Engineering is a great field to work in. Best of luck. The town is looking good too.
@lehighline- lot's of wires to make a toy train go round and round. It was a lot simpler when we just had to snap a lock on to the track and hit the throttle.....![]()
@chabs- nice work on the tunnel. That was the first thing I did when I started my layout too. Just check you clearances carefully.
Bob
Morning guys, it's been a couple days since I have been here, been a little busy!
@Dallas Joseph Dallas good luck with the hip replacement!
@farmerjohn John thank you for the step by step instructions for the porthole!
@lehighline WOW Chris just looking at the makes my brain hurt! LOL Looks good!
@Trainmaster04 Have to say your industrial area sure is looking outstanding!
Well guys I took a little hit from Mark and did some track staging as I need to make sure I get the bridge alignment right! Here are a couple photos. I was able to get my grade from the upper loop almost down to the main table grade. This morning I installed some cork and waiting for more to arrive!


I am trying to get as much done as possible before snow again this weekend and knee surgery next month. I am sure that will slow me down for a little!
I hope your all having a great week and are finding time to have fun with your layout and trains!
@mike g. posted:Morning guys, it's been a couple days since I have been here, been a little busy!
@Dallas Joseph Dallas good luck with the hip replacement!
@farmerjohn John thank you for the step by step instructions for the porthole!
@lehighline WOW Chris just looking at the makes my brain hurt! LOL Looks good!
@Trainmaster04 Have to say your industrial area sure is looking outstanding!
Well guys I took a little hit from Mark and did some track staging as I need to make sure I get the bridge alignment right! Here are a couple photos. I was able to get my grade from the upper loop almost down to the main table grade. This morning I installed some cork and waiting for more to arrive!
I am trying to get as much done as possible before snow again this weekend and knee surgery next month. I am sure that will slow me down for a little!
I hope your all having a great week and are finding time to have fun with your layout and trains!
Good start Mike, did you post a final plan on your other tread? Also, sorry to hear about your knee everything on me hurts except my knees.
Hi Dave thank you for the kind words. I dont know if I did or not, but I will. I just have to remember what I titled it! LOL
I have been working on making my die-cast hoppers look more realistic. They were originally plastic molds. I glued some black diamond sandblasting material aka coal slag then applied black spray paint. They really sparkle. The pictures do not show how great they look. I have attached a before and after. The overhead photo of the hopper is the before photo. I have 12 of these in tow behind my JLC C&O Allegheny. I also worked on the tender to my NYC L3 Mohawk.


@The Cincinnatian Looks great I love the nice long train! We have a lot of them that run through WA. State still! Nice work on the new coal loads!
@Trainmaster04 posted:On other news, I got accepted into Baylor University to study Mechanical Engineering. Yay!
Thanks for reading and Merry Christmas!
Congrats!!!!
Peter
@The Cincinnatian posted:I have been working on making my die-cast hoppers look more realistic. They were originally plastic molds. I glued some black diamond sandblasting material aka coal slag then applied black spray paint. They really sparkle. The pictures do not show how great they look. I have attached a before and after. The overhead photo of the hopper is the before photo. I have 12 of these in tow behind my JLC C&O Allegheny. I also worked on the tender to my NYC L3 Mohawk.
What exactly is the sandblasting material you speak of?
Dave
@luvindemtrains posted:
Dave, the product is Black Diamond Medium Blasting Abrasives, FTS245. Comes in a 50 pound bag and can be purchased at Tractor Supply. They sell a fine and a medium selection. I chose the medium and they had to go in the back to get it for me. I learned about it on this forum by doing a search. There are videos on YouTube as well. Some people refer to it as black beauty.
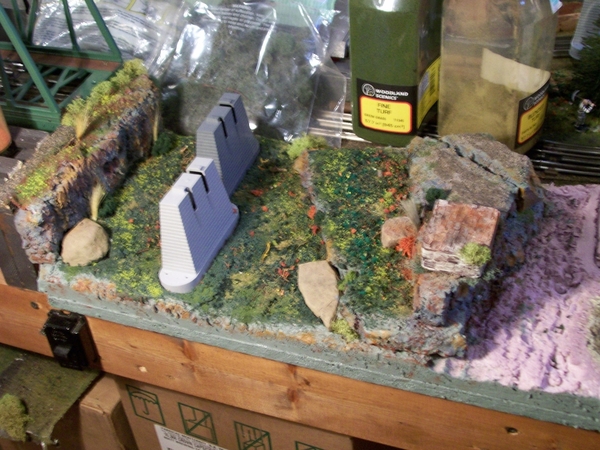
Spent the afternoon carving the top half of the mountain and then gave it a test fit so my wonderful wife (city planning department) could decide where to place the buildings. Coat of paint to go on this evening before we head out of town for the weekend. Super happy how it’s turning out for my first go at working with foam.


@chabs posted:Spent the afternoon carving the top half of the mountain and then gave it a test fit so my wonderful wife (city planning department) could decide where to place the buildings. Coat of paint to go on this evening before we head out of town for the weekend. Super happy how it’s turning out for my first go at working with foam.
Looks great. Rigid foam is very forgiving (and cheap), so if you don't like the results it's easy to add some new pieces and continue carving.
Adding plaster cloth over the foam gives it a more natural look and smooths out the sharp edges too.


Bob


Evening at the Grindstaff store, right before the end of the day. The local air raid warden is going to yell at them to 'put out that light' soon enough if they don't close up for the day...

I've been so busy with work, my pups and other things that I haven't gotten around to anything for the layout in a while. Heck, I haven't even sat in my WW2 Jeep after I worked so hard to get the brakes rebuilt and test drove it! Each time my wife gripes about some chore she demands gets done in that millisecond, I remind her I haven't gotten to the things I like lately, either!
Since we had a blizzard this week in SD, I had some extra home time & made progress on my Plant Room turnaround loop. Next is to test-fit my hole-in-the-wall so everybody fits thru.
Great projects everyone!
@p51 Lee I really love the B/W photo and the story to go with it!
@trestleking Looking good! I wish I had a room to bust into! LOL
Well guys it has been a busy day today. I was able to get the rest of the upper grade outer loop laid and the main level outer loop laid to where the bridge is going. The hard part is getting the angle cut on the decking that the bridge is attached to. I am getting close and will work on it again tomorrow.
There really is no hurry right now as I have no more cork, but then again, I still have a lot of tracks to still take up and clean. I just want to get this end of the room track laid so I can move everything under the layout on the other end! LOL
Here are a couple photos of today's work. I know it doesn't look like much but the angle for the bridge decking is kicking my rear! LOL


I hope you all have a wonderful weekend and find time to have fun with your trains and layout!
My hole-in-the-wall is “so far-so good”. I have about a 4” wide opening - which should be plenty for anything I will run. The fact that I had to vertically sawz-all-an intrusive 2x4 doesn’t need to be discussed! Next will be the loop’s upper level and some train guardrails, it’s a long way to the floor.
Looks like they approve!
@mike g. posted:Great projects everyone!
I hope you all have a wonderful weekend and find time to have fun with your trains and layout!
Aha Mike .......now I know what that pile of track was for. Glad to see you are having fun.
( nice under table lighting Mike ![]() )
)
@Stevemny posted:My neighbor bought this set for me at thrift store for $60.00. Having it checked out by our dogs, before I had to remove it from our living room.
Love their enthusiasm. Maybe tolerance is a better expression of their behavior!
Cheers, Dave
MikeG: Impressive work. I can only imagine the time and effort to design the bridge support and mechanics for deploying the bridge. Awesome.
@mike g. posted:Here are a couple photos of today's work. I know it doesn't look like much but the angle for the bridge decking is kicking my rear! LOL
I hope you all have a wonderful weekend and find time to have fun with your trains and layout!
Mike, The bridge installation looks great! Yours as mine sure went faster the second go round!
@mike g. posted:Great projects everyone!
@p51 Lee I really love the B/W photo and the story to go with it!
@trestleking Looking good! I wish I had a room to bust into! LOL
Well guys it has been a busy day today. I was able to get the rest of the upper grade outer loop laid and the main level outer loop laid to where the bridge is going. The hard part is getting the angle cut on the decking that the bridge is attached to. I am getting close and will work on it again tomorrow.
There really is no hurry right now as I have no more cork, but then again, I still have a lot of tracks to still take up and clean. I just want to get this end of the room track laid so I can move everything under the layout on the other end! LOL
Here are a couple photos of today's work. I know it doesn't look like much but the angle for the bridge decking is kicking my rear! LOL
I hope you all have a wonderful weekend and find time to have fun with your trains and layout!
Looks like it's shaping up nicely Mike ! I'm sure you'll figure out that lift bridge.
I was able to visit with a good friend today and borrow his new Legacy SF 2-10-4 to do a review on. It is engine 5001 in the infamous black bonnet paint scheme. The detail on the Indian head is incredible! Here are a couple videos of it running like a champ. Product review of it and a Christmas running session coming soon!


@p51 posted:That's amazing, Mike!
I'd like to second that Mike.![]()
@p51 posted:Evening at the Grindstaff store,
I've been so busy with work, my pups and other things
Excellent photo of the Grindstaff store Lee. ![]()
I know what you mean about the pups...........we were delivered our two 8 year old rescues from Ohio today. A great new regimen has begun again after our last one passed earlier this year.
Have a fun and peaceful holiday season Lee.
Cleaned my track last night. Then ran a train for a bit. ![]()
Bob

@mike g. the new lift bridge placement looks great. Now you will be able to enjoy watching trains roll over from both sides.
@p51- great photo Lee.
@Dallas Joseph- glad to hear the pups arrived on time. Please share a pic when you catch your breath.
@trestleking- I'd say the MOW crew did a great job.
@Trainmaster04- That steamer is a beauty.
@Stevemny- I would say the dogs are not impressed.....![]() Obedient though.....
Obedient though.....![]()
Have a great Sunday,
Bob
@RSJB18 posted:Cleaned my track last night. Then ran a train for a bit.
Bob
Nice relaxing video Bob. Watching trains run reminds me of years ago when I had a 30 gallon tropical fish aquarium..............never needed any sleep aids or tension suppressants.
Good to see the READING bringing home the bacon.
@RSJB18 posted:Cleaned my track last night. Then ran a train for a bit.
Bob
Bob, Your new acquisitions are looking good!
@RSJB18 posted:Cleaned my track last night. Then ran a train for a bit.
Bob
Bob…there is the magic! Great lighting implementation!
John
Access to this requires an OGR Forum Supporting Membership


