atanz posted:i wonder if you could have some vinyl graphics cut for the panel? online or local?
Good Idea!!!
Mike: Sorry you are having trouble. I think the thinner did it! Remember plexi is oil based!! UGGGGG : (
Jim


|
|
atanz posted:i wonder if you could have some vinyl graphics cut for the panel? online or local?
Good Idea!!!
Mike: Sorry you are having trouble. I think the thinner did it! Remember plexi is oil based!! UGGGGG : (
Jim
Mike - If you need a solvent, try mineral spirits. It may be more compatible. You're not using Rustoleum are you?
Modeltrainparts, that will be my next step if my first try doesn't work.
Atanz, that's what I did for my last layout!
Jim, NOW YOU TELL ME! LOL
Elliot, thanks for the tip. I was just trying to clean it before repainting it!
Mike: Might wanna just use soap and water, make sure any chemicals are cleaned off the plexi. Allow to dry well, then apply some Rustoleum primer. Again, allow to dry well before putting paint on. Hopefully, that'll do 'er! ![]()
Another hint: Use the same brand of primer and paint. Cheapo Wallyworld enamel doesn't always play well with Krylon, for example.
Mitch
modeltrainsparts posted:mike g. posted:Thank you sir! I will give it a try tomorrow and let you know how it turns out! I don't want to start over as this is the last of my plexiglass that size!
Mike, While plexi is nice, you may want to consider using a piece of Masonite. For a panel your size it should cost less than $10. Prime, paint, pinstripe, and seal with polyurethane. Sorry i don't have a better pic - mine is over 25 years old.
Very nice panel and layout also.
modeltrainsparts posted:mike g. posted:Not a good start to the day! I didn't like how my control panel looked and since I had to pull the switches to solder wire to them I pulled all the large pinstriping off. It looked bad so I sanded the paint wiped it down with lacquer thinner, let that dry and put my firs coat on. As soon as I started to let it dry the paint started to bubble and crack.
It went from this to this! Any ideas hoe I can fix this problem?
Short of replacing the entire panel - which may be the easiest course of action - sand the surface down bare, seal it with several coats of white shellac (Binz) and start over. Good luck with whatever you do, and keep the lacquer thinner can closed; it soesn't play well with every kind of paint.
Not sure if plexiglass plays nice with lacquer thinner either. It my be to acidic for the plastic. try sanding the whole thing clean and prime and repaint as others have suggested.
Bob
Fellers I bring good cheer!! If your down with LC, LC+ stuff. You will love the Lionel catalog this year!!!
Jim
Mike G, It's painted on the backside right?
Try black primer or "plastic safe" paint.
The gloss will remain because the plastic is a "gloss topcoat". Your applying pigment under it.
Even blobs or runs will hide behind the gloss, you just need the same, even, pigment color
I was going to say I got all the drywall screws out but when I was checking the pics I see I missed one. The only place I could not change out the screws is where the track goes under the stairs, So after dinner I'll head down to the basement, take care of that screw and then maybe add some more ground cover around the Saurekraut factory. Tomorow if the weather is good I get to Menards and buy some lumber for the next table. Pics........Paul


Wow Paul! The MOW foreman will be glad to hear when that job is done. Management has been pressing him hard! LOL
Watch out for all that snow tomorrow on the way to Menards!!
Paul the next table??????????????
Ok guys what do you think about this TOFC. Is it 1950s material??? 50ft flat car. 40 ft trailer. Trailer Train didn't start until 1956. Britannica says by 1958, 42 major railroads in the US had TOFC Intermodal Freight. 
Jim
looked at it.......![]()
![]()
![]()
I just posted my latest ideas on my new layout. I received word from Tim Foley today that my first Mianne Benchwork kit shipped. My back and sciatic nerve are feeling pretty good, although I am left with a drop toe that I am told is going to take a lot of work to get over. So, I am itching to get started on the New and improved Expanded Blackwater Canyon Line layout. Please take a look at my link for the latest and greatest ideas.
Well I did get my Vetter's sash and door building and trucks today! VERY nice! Bad thing is. I don't have anywhere to put them on the layout!!!! Building is huge! Wife and son say no to the free building I got. So now I reckon I have 2 Starbucks trucks, 2 lighted Hummers, and a house I aint allowed to use...…………………….. : (
Mark Im happy you can finally move forward!! WOOO HOOO!!! Will check out your plans!
Jim
Mark Boyce posted:I just posted my latest ideas on my new layout. I received word from Tim Foley today that my first Mianne Benchwork kit shipped. My back and sciatic nerve are feeling pretty good, although I am left with a drop toe that I am told is going to take a lot of work to get over. So, I am itching to get started on the New and improved Expanded Blackwater Canyon Line layout. Please take a look at my link for the latest and greatest ideas.
Glad to hear you are feeling better Mark.
Benchwork???? YAY !!!!!!!
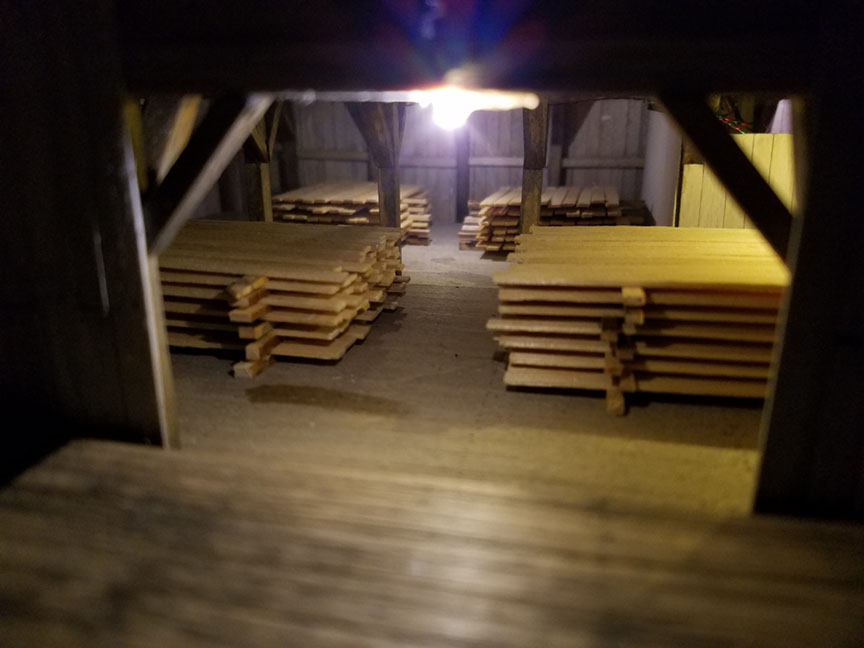
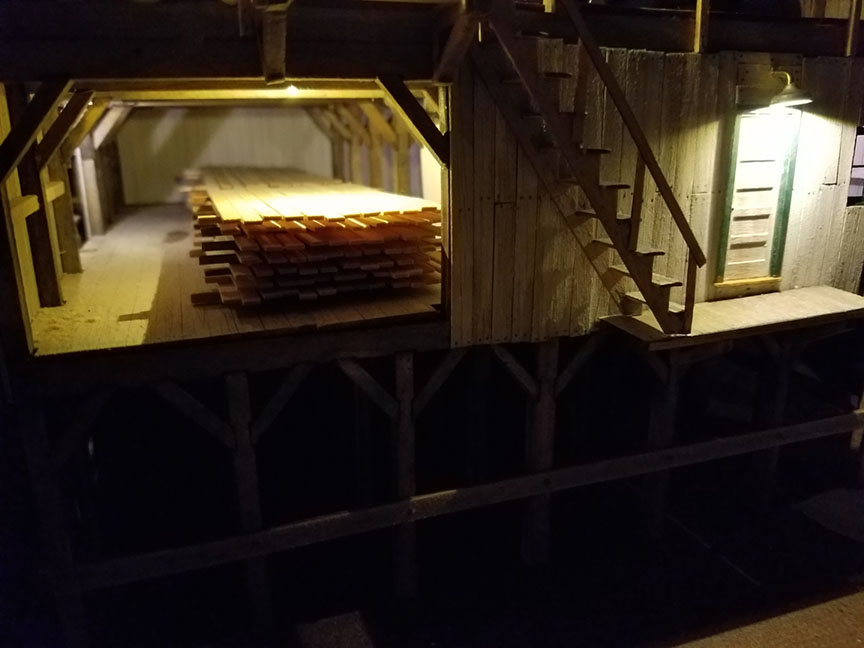
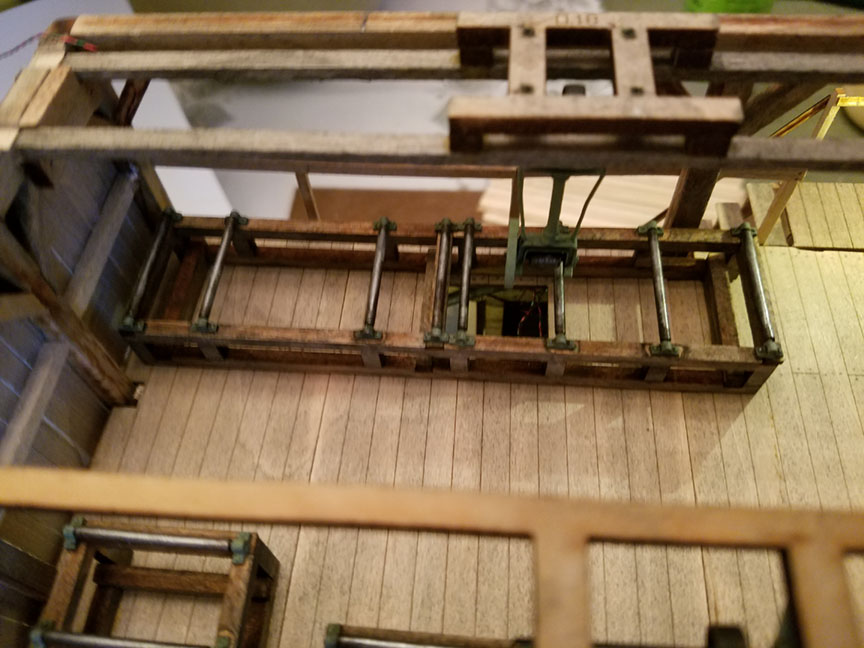
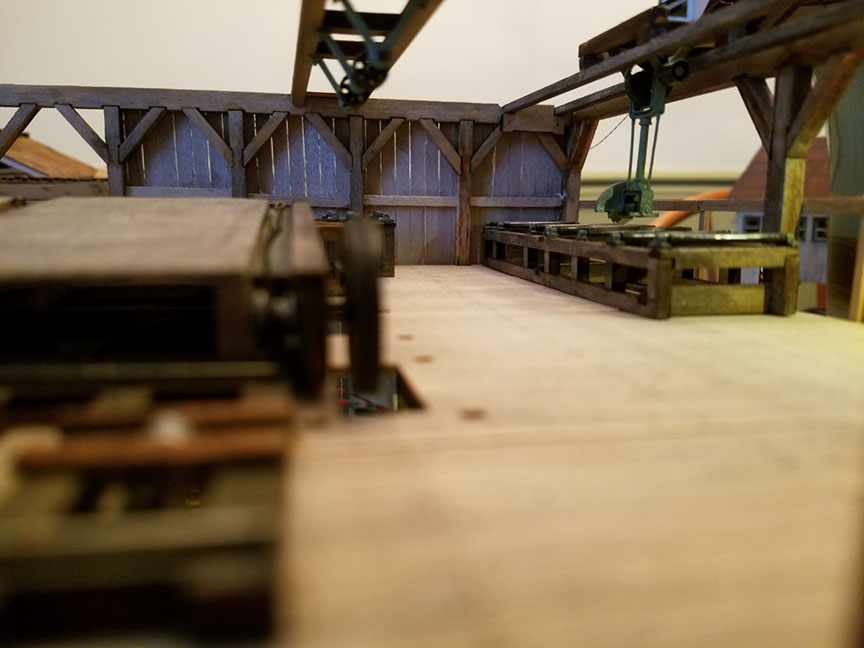
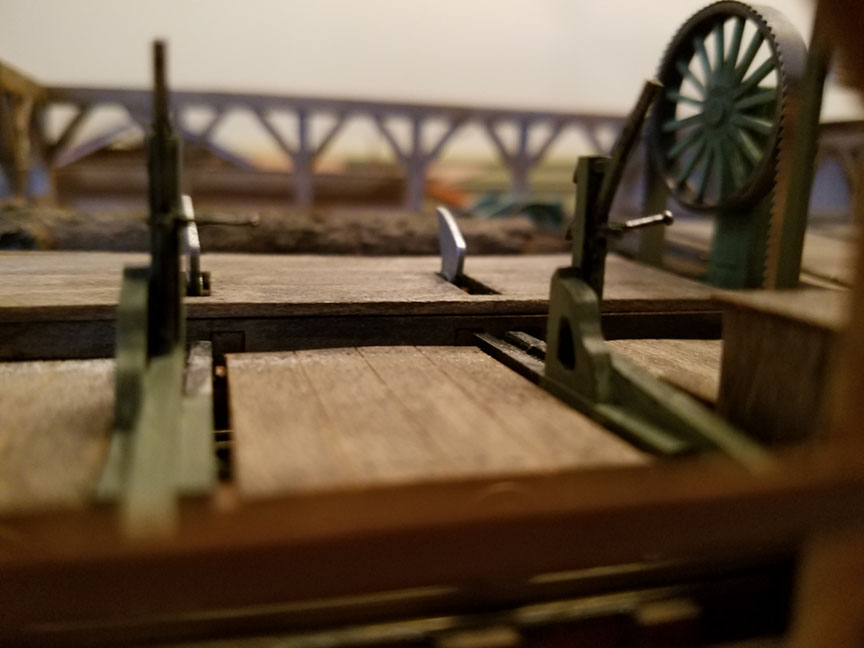
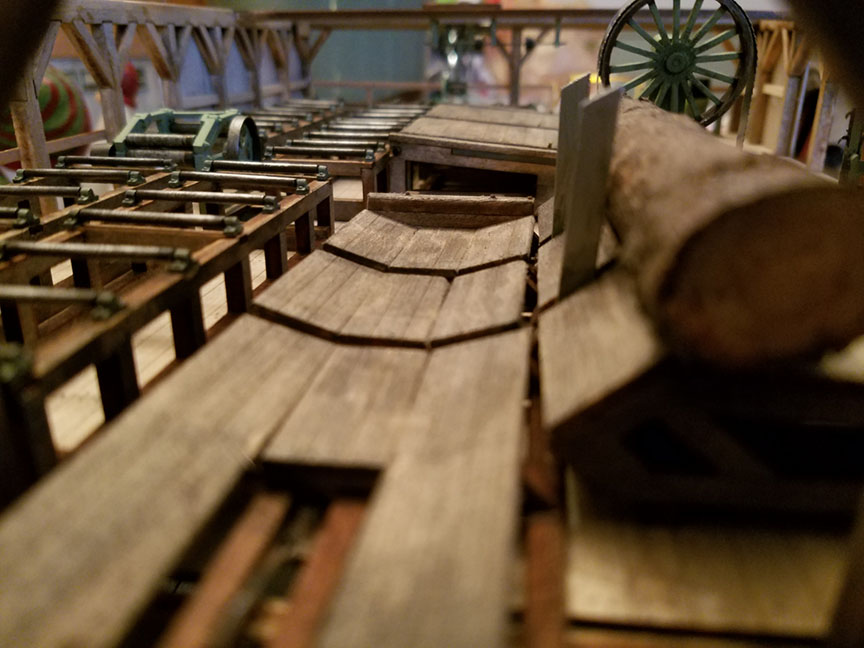
I've made some more progress on the sawmill. I made some stacks of cut lumber for the lower floor of the mill ( two in back I cheated, Cut stack in half and used it for two since you won't see back end of stacks from doorway) and more for outside. Spent the last few nights wiring up the pico LED lights on this floor. There are a few walls dividing up the space and so I put a light in each end so that the windows would light up. I then added 3 shaded lights over the man doors on the outside and one over the top of the stairs on the second floor. Then there are 3 lights to highlight the lumber stacks, since the view into the lower floor will mostly be from track side on the trestle. I just glued the second floor down and then I can start putting machinery back into saw floor. It doesn't seem like much, but running & connecting all those wire up and not have them hanging all over the place took a while.
Here is the stacks I installed
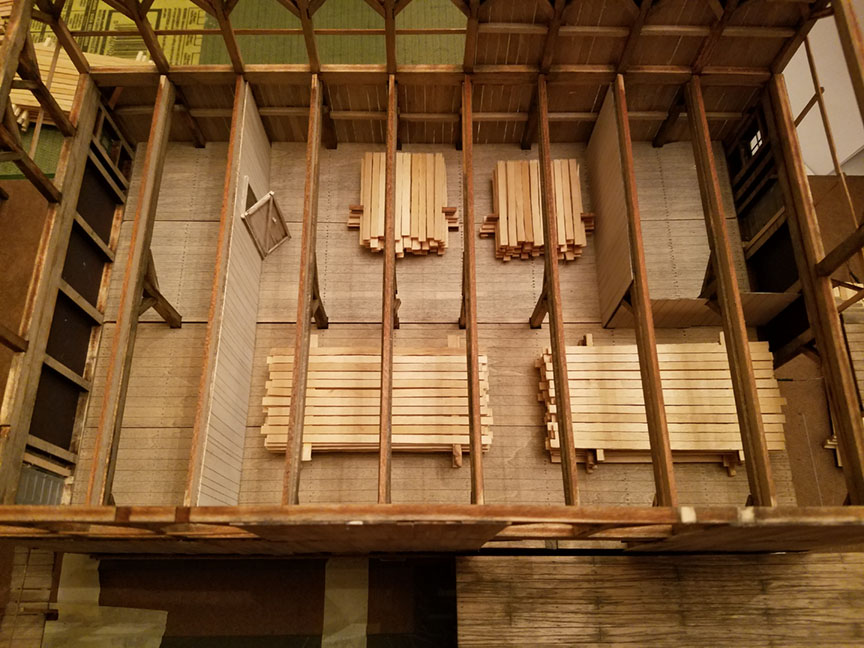
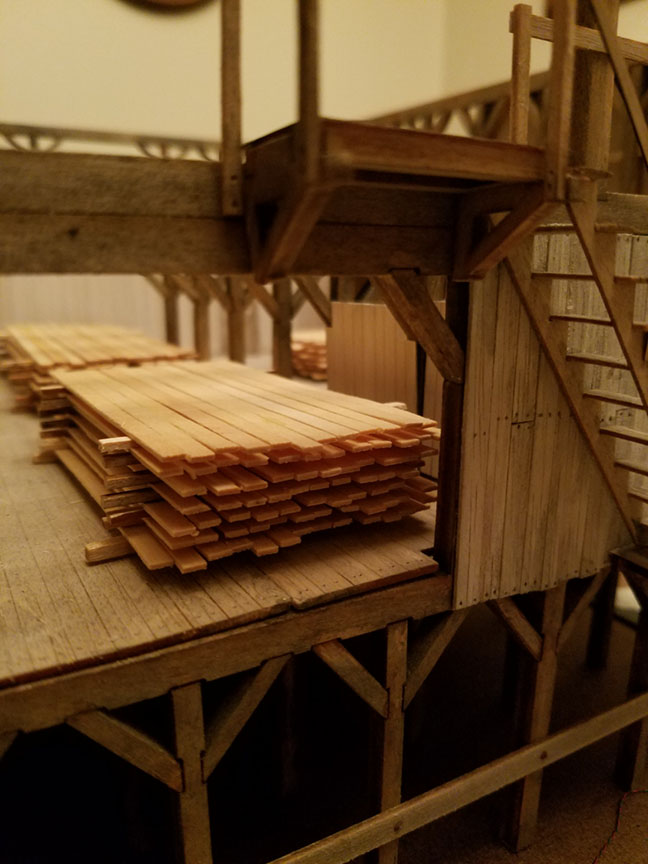
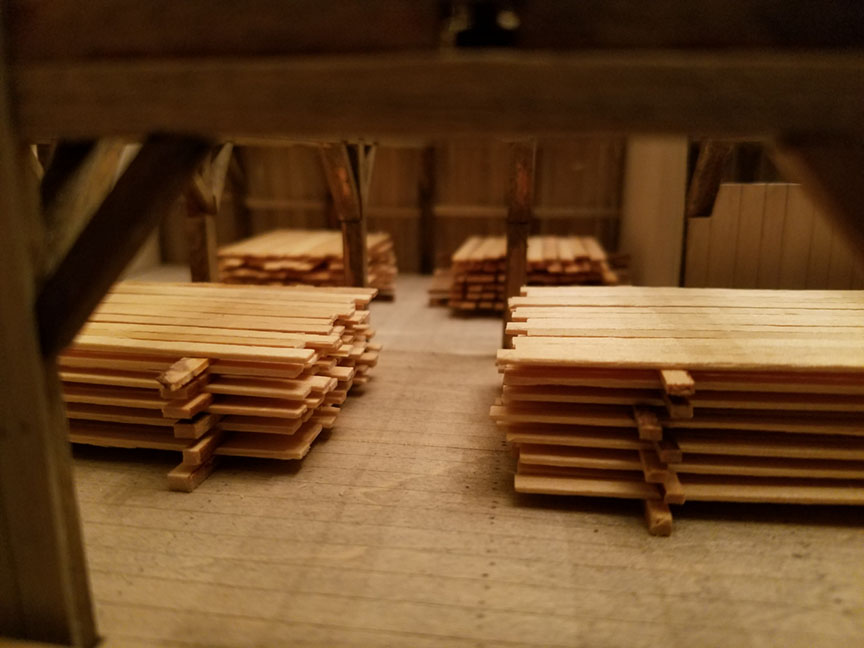
Here you can see the lights installed and the wiring in between the joists of 2nd floor
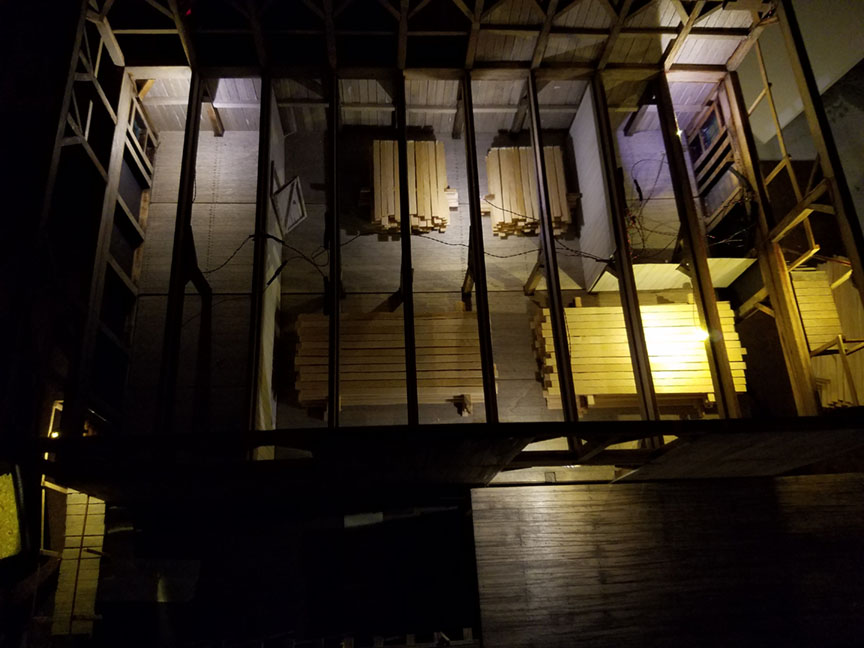
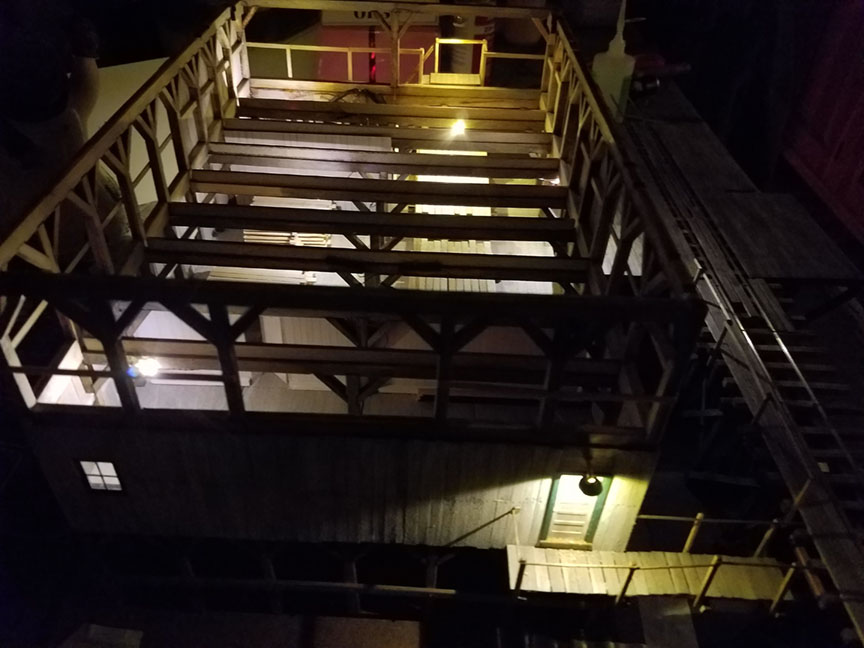
and here are a couple shots after the 2nd floor was installed
RSJB18 posted:looked at it.......
Look at the bright side, Bob... you have one to look at ![]()
![]()
![]()
RSJB18 posted:modeltrainsparts posted:mike g. posted:Not a good start to the day! I didn't like how my control panel looked and since I had to pull the switches to solder wire to them I pulled all the large pinstriping off. It looked bad so I sanded the paint wiped it down with lacquer thinner, let that dry and put my firs coat on. As soon as I started to let it dry the paint started to bubble and crack.
It went from this to this! Any ideas hoe I can fix this problem?
Short of replacing the entire panel - which may be the easiest course of action - sand the surface down bare, seal it with several coats of white shellac (Binz) and start over. Good luck with whatever you do, and keep the lacquer thinner can closed; it soesn't play well with every kind of paint.
Not sure if plexiglass plays nice with lacquer thinner either. It my be to acidic for the plastic. try sanding the whole thing clean and prime and repaint as others have suggested.
Bob


I used an aluminum composite (2 pieces of aluminum with a hard plastic piece sandwiched between them) available at Fedex Office and Print center. I took them a pdf that I created from RR-track sized to the size I wanted printed. It is 1/4 inch thick and very ridged. The larger panel is 16x24 and I needed no extra support underneath it.
CSX Al posted:I've made some more progress on the sawmill. I made some stacks of cut lumber for the lower floor of the mill ( two in back I cheated, Cut stack in half and used it for two since you won't see back end of stacks from doorway) and more for outside. Spent the last few nights wiring up the pico LED lights on this floor. There are a few walls dividing up the space and so I put a light in each end so that the windows would light up. I then added 3 shaded lights over the man doors on the outside and one over the top of the stairs on the second floor. Then there are 3 lights to highlight the lumber stacks, since the view into the lower floor will mostly be from track side on the trestle. I just glued the second floor down and then I can start putting machinery back into saw floor. It doesn't seem like much, but running & connection all those wire up and not have them hanging all over the place took a while.
Here is the stacks I installed
Here you can see the lights installed and the wiring in between the joists of 2nd floor
and here are a couple shots after the 2nd floor was installed
Great job, wish I had your patience and talent.
Mark Boyce posted:I just posted my latest ideas on my new layout. I received word from Tim Foley today that my first Mianne Benchwork kit shipped. My back and sciatic nerve are feeling pretty good, although I am left with a drop toe that I am told is going to take a lot of work to get over. So, I am itching to get started on the New and improved Expanded Blackwater Canyon Line layout. Please take a look at my link for the latest and greatest ideas.
Mark;
Glad to hear you’re feeling better - do whatever your physical torturer... er... therapist says. I’ve done two PT stints in the last two years (1 cardiac, 1 knee) and while they may be a pain in the ________ (fill in your favorite body part), they can do wonders for you.
In your condition, the one drawback of the Mianne benchwork is the shipping carton(s) can be heavy. But once it is out of the box, each of the pieces is quite light, but very strong. It should go together quickly and you’ll be on the way.
Apples55 posted:Mark Boyce posted:I just posted my latest ideas on my new layout. I received word from Tim Foley today that my first Mianne Benchwork kit shipped. My back and sciatic nerve are feeling pretty good, although I am left with a drop toe that I am told is going to take a lot of work to get over. So, I am itching to get started on the New and improved Expanded Blackwater Canyon Line layout. Please take a look at my link for the latest and greatest ideas.
Mark;
Glad to hear you’re feeling better - do whatever your physical torturer... er... therapist says. I’ve done two PT stints in the last two years (1 cardiac, 1 knee) and while they may be a pain in the ________ (fill in your favorite body part), they can do wonders for you.
In your condition, the one drawback of the Mianne benchwork is the shipping carton(s) can be heavy. But once it is out of the box, each of the pieces is quite light, but very strong. It should go together quickly and you’ll be on the way.
Paul, Thank you! I have been through PT for a rotator cuff and a knee. Also occupational therapy for two of my four carpal tunnel surgeries and a broken hand all in the last 10 years. Yes, this guy has been doing this since the early '70s, and he doesn't hold back. I'm getting close to the time insurance won't pay any more, but the pain is not bad and I have strengthened and increased flexibility. It is that goofy lazy toe that he said he is going to give me a bunch of exercises to strengthen the back which hopefully will help the toe and keep me from being prone to get this again.
You are right, he said I will have to be very careful lifting. The shipment from Mianne is 53 pounds. I intend to open it up on the front stoop and cary it in pieces at a time. That is all I can do. Thank you for the well wishes on getting started again!!!
Jim, I actually sold several of my Menards buildings, not because I didn't like them, but they just took up more space than I wanted to allow. I had thought of cutting a coupleof them up, then decided I would find something else more appropriate. The Vetters building is one nice building, but I shied away from it after selling the big power station, farmhouse, and another I don't remember. The Watkins block, and hobby shop work out okay for me.
Al, You are really doing a nice job detailing that sawmill. That is a skill in itself making a building look lived in or worked in.
Eric, Great looking control panel.
Mark Boyce posted:That is certainly a bad string of problems you have had, John. Quite disappointing indeed!
My order received from Ro's after the wonderful sales after Thanksgiving was disappointing. What I received was the Lionel Gantry Crane but not the correct crane. The contents description printed on the outside of the box was for the correct crane. But when I opened the crane box I was so astonished to find the wrong crane. No error was made by the seller, only error made was by Lionel, in China.
I returned the wrong crane to exchange for the correct one. All is well now except for apparent issues at the production plant.
John d.
What? Issues at the Production Plant in China? There are no issues. It is the full Subscription.
As the song goes, "You Ain't Seen Nothing Yet"'
Sincerely, John Rowlen
Here is a video of some of the freight cars I’ve weathered! Let me know what you think!
Butch, I would do as you say, but the plexi glass is smoked so I painted both sides already. I will sand clean and primer the heck out of it before any paint gets close it it!![]()
Paul, looks great! Just wondering whats next??![]()
Mark, your layout plan is going to be fun, plus its going to be fun to watch you building it! Just take it easy as we don't need you going down early in the game!![]()
Jim, Sorry to hear about the house! But when the boss speaks ! Well you know the rest! I am still looking for you I still have a few more boxes to go threw!![]()
CSX AL, WOW what wonderful work your doing! I don't know if I have it in me to get that in depth, maybe we will find out one day! Keep up the great work!![]()
Eric, very impressive control panel!![]()
NSRailfan100 posted:Here is a video of some of the freight cars I’ve weathered! Let me know what you think!
Nice work, the cars look wonderful! Was that all Air Brush?![]()
Thanks to everyone who posted today; your efforts never disappoint.
But I must single out CSX Al for his extraordinary modeling--and photography--STUNNIING!
I did get my order from NLTW and was very happy with the contents of the big brown box.
Did more body work on the PW F3 A and B units, as well as the smooth-sided cars. The striping on the GN Empire Builder locomotives and cars will make or break the project so I'm trying to get the surfaces just right.
Mike, Thank you. You are right! I don’t want to go down and be out for the season with a back injury in the first game! LOL
mike g. posted:NSRailfan100 posted:Here is a video of some of the freight cars I’ve weathered! Let me know what you think!
Nice work, the cars look wonderful! Was that all Air Brush?
Yes it was!
I have almost finished this logging bunkhouse. This is a highly detailed kit with an interior and lots of parts. I am considering either making more and adding bunks and lockers, or providing table and chairs for a sitting room. I have the skid logs done for a scratch built matching cook house. I am mulling over putting an interior in that, but didn't scare up a cookstove, sink, counters, tables and benches in a couple of catalogs.
NSRailfan100 posted:Here is a video of some of the freight cars I’ve weathered! Let me know what you think!
I'm a little reluctant to say this, but here goes. What you've done is a pretty good start, but it's too uniform to be convincing. I suggest that you look at pictures of real cars and try to copy what you see. Not all weathering should be done with an air brush. A regular paint brush will do a lot of things that an air brush can't. The use of multiple colors and washes will give you a better effect.
I weathered this hopper from a photo I found on railpicturesarchives.net. I only used a paint brush, but I did use two colors of paint. It was my first try, and it was good enough to win the popular vote at our NMRA division meeting. I used regular latex wall paint with varying degrees of water. The nice part, if you don't like it, you can wipe it off. This was actually my second try on this car.


Sorry I played critic, but you did ask.![]() I know you can do better, you just need a little input.
I know you can do better, you just need a little input.![]()
paul 2 posted:I was going to say I got all the drywall screws out but when I was checking the pics I see I missed one. The only place I could not change out the screws is where the track goes under the stairs, So after dinner I'll head down to the basement, take care of that screw and then maybe add some more ground cover around the Saurekraut factory. Tomorow if the weather is good I get to Menards and buy some lumber for the next table. Pics........Paul
This is a great shot Paul. Shows the complexity of your track plan. Lot's of switching fun to be had.
Bob
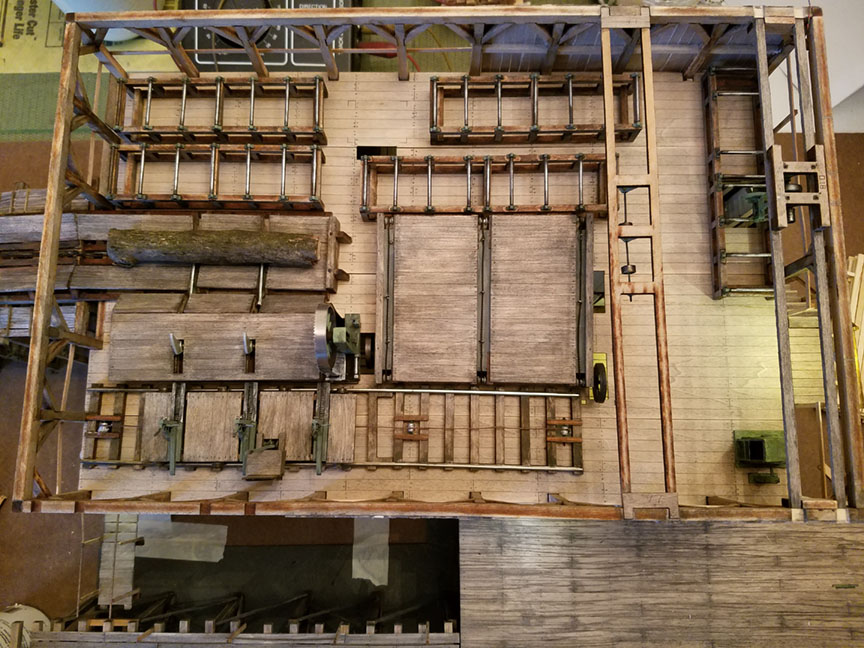
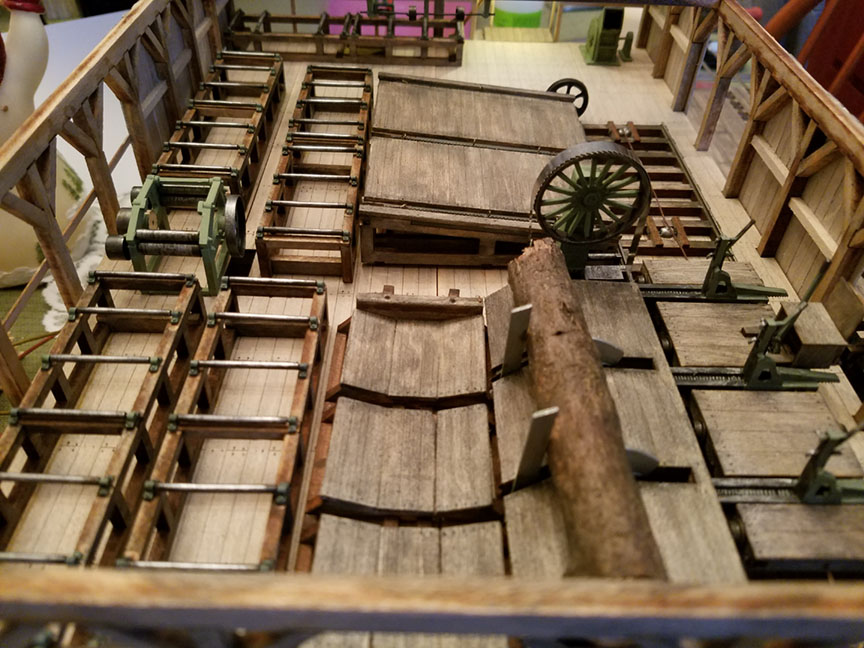
I got an early start this morning before heading out to the shop to build turntables. I got all of the equipment glued in and will tackle saw floor lights and saw filers floor lighting tonight.

Al, that model looks fantastic.
TedW posted:Al, that model looks fantastic.
Thanks Ted!
RSJB18 posted:paul 2 posted:I was going to say I got all the drywall screws out but when I was checking the pics I see I missed one. The only place I could not change out the screws is where the track goes under the stairs, So after dinner I'll head down to the basement, take care of that screw and then maybe add some more ground cover around the Saurekraut factory. Tomorow if the weather is good I get to Menards and buy some lumber for the next table. Pics........Paul
This is a great shot Paul. Shows the complexity of your track plan. Lot's of switching fun to be had.
Bob
Yes I agree. Awesome switching to be done there!! Now can we see the whole layout please?? LOL
CSX Al nice work. Id been considering doing a kit. BUT.. I broke the windshield frame on one of my little army jeeps. Cant even get it fixed. Guess I'll have to get my wife or son to do it lol Some of us just aint cut out for that stuff!! You have a gift!
Mike keep a diggin! LOL
Jim
CSX Al posted:I got an early start this morning before heading out to the shop to build turntables. I got all of the equipment glued in and will tackle saw floor lights and saw filers floor lighting tonight.
Al, your sawmill is a complete layout all by itself! Beautiful and impressive model!! Well done!!!
Dave
Access to this requires an OGR Forum Supporting Membership


