


Excellent!
@RSJB18 posted:Did a portal-ectomy today. Had to do some surgery on the outer upright to clear my new Doodlebug. I had to move a crossing flasher too.
The portal is very lopsided now but it is what it is.....🙄🙄🙄
Not thrilled with the stone print I added over the top. I'll sleep on it.
Bob


It looks fine Bob. Maybe smudge the facade a little. The doodlebug will make it all worthwhile.
Jay
@Tranquil Hollow RR posted:It looks fine Bob. Maybe smudge the facade a little. The doodlebug will make it all worthwhile.
It's probably a bit late, but if the off-center modification continues to be an issue, you could always carve *both* sides an equal amount, in order to make the modification symmetrical. Just sayin' . . .
[And believe me, I feel your pain -- when I added a tunnel on the layout, I found that the larger engines *barely* cleared the double track portals I used, so I ended up having to extend the edge of the layout an inch or two to allow me to reposition the portals -- and even then there's sometimes minor contact!]
@Tranquil Hollow RR posted:It looks fine Bob. Maybe smudge the facade a little. The doodlebug will make it all worthwhile.
Jay
@Steve Tyler posted:It's probably a bit late, but if the off-center modification continues to be an issue, you could always carve *both* sides an equal amount, in order to make the modification symmetrical. Just sayin' . . .
[And believe me, I feel your pain -- when I added a tunnel on the layout, I found that the larger engines *barely* cleared the double track portals I used, so I ended up having to extend the edge of the layout an inch or two to allow me to reposition the portals -- and even then there's sometimes minor contact!]
Jay- the "stone" on the top is carved rigid foam. I think I'll make another piece with an arch that I can paint to match. I had the paper print already so I gave it a shot.
Steve- thought of that too but the portal is T-111 and a big mess to cut. This is on the right side of the layout and you can't really stand in front of it to look at it straight on. This was the second time the MOW crew had to break out the sawzall too......![]()
Bob
Very nice - but where's the Italian Sausage sign ? ![]()
Did a similar project .....


Attachments
Images (2)


@Bob Golfs posted:Here’s a better view of the building insides. I’ll add a few patrons outside when the stand finds its way to the layout.
Ultimately, the lighting is all DC. I used a 12v buck converter for the 4.5v Miller sign and the LED lights were 5v to 12v whose supply I could bleed off the 12v input to the buck converter. I could have used the 4.5v too for the lighting and I tried, but it was too dim. Enjoy!

Great job on the Hot Dog stand. Very creative.
Bob
Finished my new bridge today. I got the idea from the Madison street bridge in downtown Chicago. It is basically a truss under bridge with short sides and with this one I applied simulated wood blanks for the walk area. It is almost 54 inches long and about 5 1/2 inches tall. I needed the bridge to be this long in order span across a walkway. It will be a lift out type.


idea-thinker
Attachments
Images (4)
@RSJB18 posted:Did a portal-ectomy today. Had to do some surgery on the outer upright to clear my new Doodlebug. I had to move a crossing flasher too.
The portal is very lopsided now but it is what it is.....🙄🙄🙄
Not thrilled with the stone print I added over the top. I'll sleep on it.
Bob
Ahhh… can scale passenger cars be far behind ![]()
![]()
![]()
@Richie C. posted:Very nice - but where's the Italian Sausage sign ?
Did a similar project .....
Rich, uncanny the similarity! And after I did the signage, I thought maybe I should have had an Italian Sausage sign, but didn’t act. Hearing it from you, I will now change one out to replace it. Thanks,
Bob
Starting to think about road crossings.......and, placement of these itads.....

Peter
Attachments
Images (1)
@Putnam Division posted:Starting to think about road crossings.......and, placement of these itads.....
Very timely Peter ! I have a bunch of these & would like to see how they work out for you. Rich
Peter
@RSJB18 posted:Did a portal-ectomy today. Had to do some surgery on the outer upright to clear my new Doodlebug. I had to move a crossing flasher too.
The portal is very lopsided now but it is what it is.....🙄🙄🙄
Not thrilled with the stone print I added over the top. I'll sleep on it.
Bob, I think the portal looks fine, we'all only noticed when you called our attention to it. Rich
Bob
Piled a bunch of stuff on it. Then I pushed enough of it out of the way to run my train.
@Mike D posted:Piled a bunch of stuff on it. Then I pushed enough of it out of the way to run my train.
I like your sense of priorities, Mike! ![]()
I modified this elevated area with the 4 bridges several times over the past year or so. Kept getting closer to something I like, but not quite:

Today I replaced the useless girder bridge over the solid wall with some railings I made - I think I'm finally happy:

Attachments
Images (2)
One of Warrenville's bridges needed maintenance, so I spent today building a scaffold and hiring a couple of guys to do the needed work.


Attachments
Images (2)
@Putnam Division posted:Starting to think about road crossings.......and, placement of these itads.....
Peter
I've always thought the base which houses the controls of the Lionel 153IR's was too big and ugly to have a spot on top of my layout. If you're so inclined, the top electrical cabinet which houses the IR sensor can be physically separated from the base and there's about three wires that connect the cabinet to the bases' electronics. They are too short to comfortably span the thickness of most layouts but, if you unsolder the wires and splice in about 6 inches of new wire you are able to drill a hole in the layout and feed the wires underneath and mount/hide the base under the layout. Obviously, you can only solder in one end and then run the wires through the hole and then have to solder the other end. The cabinet will hide the hole.
About the only issue is that the cabinet might not be high enough for the sensor to operate efficiently - you'll have to try it out. If it's too short, you can make a simple 1" tall base out of some styrene sheets and paint it silver/gray to match and glue to the cabinet. Looks much better than the original base.
IMHO, it makes for a much "cleaner" look and is something to think about when you find a good location for them.
You can see one of mine at the very bottom of the attached pic between the two small trees.
Just a thought.

Attachments
Images (1)

@Richie C. posted:I've always thought the base which houses the controls of the Lionel 153IR's was too big and ugly to have a spot on top of my layout. If you're so inclined, the top electrical cabinet which houses the IR sensor can be physically separated from the base and there's about three wires that connect the cabinet to the bases' electronics. They are too short to comfortably span the thickness of most layouts but, if you unsolder the wires and splice in about 6 inches of new wire you are able to drill a hole in the layout and feed the wires underneath and mount/hide the base under the layout. Obviously, you can only solder in one end and then run the wires through the hole and then have to solder the other end. The cabinet will hide the hole.
About the only issue is that the cabinet might not be high enough for the sensor to operate efficiently - you'll have to try it out. If it's too short, you can make a simple 1" tall base out of some styrene sheets and paint it silver/gray to match and glue to the cabinet. Looks much better than the original base.
IMHO, it makes for a much "cleaner" look and is something to think about when you find a good location for them.
You can see one of mine at the very bottom of the attached pic between the two small trees.
Just a thought.

Great information but probably beyond my skill set. I may also look at the stuff Dennis Zander of ZStuff sells.
@idea-thinker posted:Finished my new bridge today. I got the idea from the Madison street bridge in downtown Chicago. It is basically a truss under bridge with short sides and with this one I applied simulated wood blanks for the walk area. It is almost 54 inches long and about 5 1/2 inches tall. I needed the bridge to be this long in order span across a walkway. It will be a lift out type.
idea-thinker
Beautiful bridge work!
Your layout looks like it would be a lot of fun to run trains on!
Rod;
Our layout is getting to be a lot fun to run since we are now at 19 trains running at once. It is really nice to see trains in motion everywhere. Our goal is to get to about 50-75 trains running at once.
idea-thinker
@Putnam Division posted:Great information but probably beyond my skill set. I may also look at the stuff Dennis Zander of ZStuff sells.
Take a look at the IR detectors on Azatrax, also. Their detectors can be placed/buried between the tracks. Along with adjustable relays, I've used their stuff to do such things as throw a switch a pre-programmed number of seconds after a train passes through. Great products and easy to talk to.
Finished adding the Lionel Hobo Hotel. Started with the generic Lionel accessory, ground cover underlayment is Woodland Scenics shaper sheet, added ground cover, more Hobo figures and a piece of track to the left of the boxcar. I also added light in the boxcar, a flickering 50 gal drum, and hobo sound. I used the sound module from ITT Products. It's activated by a conventional switch, but I intend to change that to an ASC2 activation in the future. The sound card inputs 4v DC. I decided to mount the AC converter power board (Input is 18v AC) and the sound board on one piece of foamboard and then velcroed the entire setup under the layout right under the boxcar. The speaker is mounted separately.

Attachments
Images (1)
Videos (1)

@ToledoEd posted:Finished adding the Lionel Hobo Hotel. Started with the generic Lionel accessory, ground cover underlayment is Woodland Scenics shaper sheet, added ground cover, more Hobo figures and a piece of track to the left of the boxcar. I also added light in the boxcar, a flickering 50 gal drum, and hobo sound. I used the sound module from ITT Products. It's activated by a conventional switch, but I intend to change that to an ASC2 activation in the future. The sound card inputs 4v DC. I decided to mount the AC converter power board (Input is 18v AC) and the sound board on one piece of foamboard and then velcroed the entire setup under the layout right under the boxcar. The speaker is mounted separately.
The boys have themselves a nice little camp there. great job.
Bob
@Richie C. posted:Take a look at the IR detectors on Azatrax, also. Their detectors can be placed/buried between the tracks. Along with adjustable relays, I've used their stuff to do such things as throw a switch a pre-programmed number of seconds after a train passes through. Great products and easy to talk to.
THank you!
Peter
Old Suzanna'.. Is alive and well at the Ed-O hobo camp... You have become quite the electronic technician....... 😁👍 Nice work'...
Started my power distribution board. Still need to buy 2 more Powerhouse 180's and another AIU.
Really need the Base3 and WTIU to come in also.
Attachments
Images (7)


Bob, Ted, thanks for the comments and kind words.
@Dan Kelley posted:Started my power distribution board. Still need to buy 2 more Powerhouse 180's and another AIU.
Really need the Base3 and WTIU to come in also.
Nice looking - make charts of where all your distribution ports go - it will invariably come in handy one day. Don't ask how I know ![]()
Evening everyone, WOW what great work here! I am sorry I did not call each of you out, but it has been a while since I have been here and there is a lot to catch up on! I can say that everyone is doing AMAZING work and I always love to come to this thread as it makes a smile on my face to see all of your hard work!
I hope to get back at it soon as we leave for Missouri next Saturday to find the new trains room with the attached house! LOL It might be sometime before I am back, but be sure I will be back and building again one day!
I hope you all have a wonderful weekend and find time to have fun with your trains and layouts!![]()
@mike g. posted:I hope to get back at it soon as we leave for Missouri next Saturday to find the new trains room with the attached house! LOL It might be sometime before I am back, but be sure I will be back and building again one day!
I hope you all have a wonderful weekend and find time to have fun with your trains and layouts!
“Trains room with the attached house”… Gotta love the attitude!!! Best of luck with the move and the search, Mike.
Wiring…..the eternal Black Hole…….but, I got these babies running!


 415 Diesel Fueling Station….purchased in the Bronx in the early 60s with some Christmas gift money ($4……quite a deal, new in the box!)
128 Newsstand…..Christmas gift from my parents in 1959
MTH 334 Repro Dispatch Station…..a gift from my colleagues in 2002
Peter
Attachments
Images (3)
I’m like Mike, I haven’t been here for a few days. Excellent work everyone!
Mike, well wishes on finding that train room in Mizzou!! Maybe I’ll be able to visit someday since you will be half as far away. 👍🏻
Peter, Black hole indeed! That’s what I have thought about my layout which is much smaller than yours. The added control of the accessories is great!
Progress often comes in small increments. After deciding to change the center island to a waterfront feature, the track plan now includes a upper and lower spur. The section even includes a spur to park the South Shore Switcher.
Trying to decide on the seawall height. Right now its 3 1/2 inches, Thanks to Paul D @OhB1 for taking the time to take the boat and buildings off a layout and offering them to me. I think I will build an 8 silo grain bin on the lower section left of the grainary. Still not sure if the seawall should be wooden pilings instead of stone. Building will go on stilts over the water. (Like my blue cloth simulating water?)

Wider view of the area. The water area slides out so I can reach the back wall The upper town/building sections are removable. Right side of the photo is a TBD.

Attachments
Images (2)

Making progress, albeit at a "snail pace"..... Been working on this Korber Flag Co. kit I purchased used. Ended up re-spraying all the brick work and started over, as I didn't care for the way the previous owner did the mortar work. So got the walls pretty much where I want them, and they're all re-enforced with 3/8 x 3/8 timbers on the back sides to get the Korber Warp out. All 50 windows are painted, dull coated and weathered.


Attachments
Images (5)
@ScoutingDad posted:Progress often comes in small increments. After deciding to change the center island to a waterfront feature, the track plan now includes a upper and lower spur. The section even includes a spur to park the South Shore Switcher.
Trying to decide on the seawall height. Right now its 3 1/2 inches, Thanks to Paul D @OhB1 for taking the time to take the boat and buildings off a layout and offering them to me. I think I will build an 8 silo grain bin on the lower section left of the grainary. Still not sure if the seawall should be wooden pilings instead of stone. Building will go on stilts over the water. (Like my blue cloth simulating water?)
Wider view of the area. The water area slides out so I can reach the back wall The upper town/building sections are removable. Right side of the photo is a TBD.
I’m glad we could make it work out!!! They look great and I’m sure the previous owner is very pleased about where they went!
I haven't posted in here for a while, or in OGR for that matter! Free time to do fun stuff can be hard to find sometimes.
Anyway, I just received some Arttista figures I've been wanting for sometime, so here's some photo's of what I did this afternoon.
Added a driver for the CAT crane, he's smoking a stogie. The guy in the lower left is also new, he's a mechanic holding a wrench.
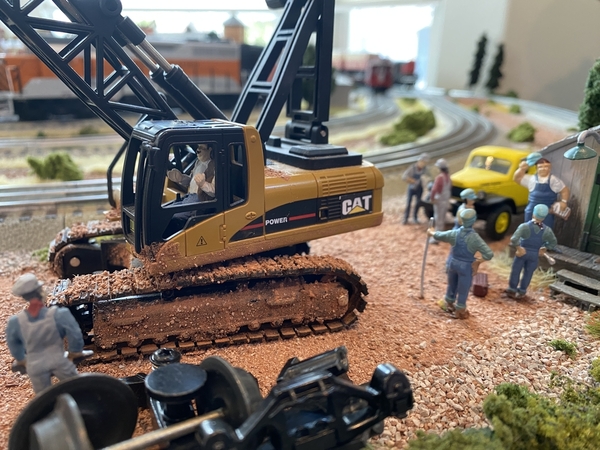
Two more mechanics. Jed on the right is saying to Herb, "The new truck ain't gonna get here any faster starring at the thing, we better find some work".

Another two mechanics standing in front of the Power Wagon. Monty with the wrench on his shoulder is giving Lando on the left some friendly mechanic banter, "We gotta get over to that WP Geep 38 and repair the water leak ASAP, so get movin' before I club you over the head with this here wrench". hehe

Added Emilio the chef and Carlos the server. Emilio is chatting with a couple of friends and Carlos is serving a couple with their child

This is the first time I've purchased Attista figures and I'm really please with them. They're pewter and are well detailed with a great paint job Dennis, the owner of Arttista was great to work with too. Very responsive and helpful. Ordering is a little old fashioned, but it works well with Dennis at the helm.
Attachments
Images (4)


I finally got all the way to my train room for the first time this month. Receiving a Lionel 3656 car and corral with today's mail was the needed inspiration. The car and corral work! While In the operators chair, I added weight to a few box cars. I feel a running session coming on.


Bill
Attachments
Images (2)


Videos (1)


 Got rid of the oversized base on the Lionel signal
Attachments
Images (2)
A second project completed today, however this one took about a week working on it off and on.
K line 15" aluminum California Zephyr Silver Diner car interior upgrade. These come monotone gray, definitely needed some color and floor. This is the second diner in my CZ consist.
This is what it looked like new out of the box:

I removed all the love seats and tables and painted the tables flat white to simulate a white table cloth. Painted the love seats kind of a desert pink and blue and alternated the colors. I then painted the kitchen with silver to simulate stainless steel and added a small kitchen serving table that with a table I had laying around. Added carpet that I printed on my Canon printer, and installed a slatted wood floor in the kitchen. Added a bunch of passengers, Lionel and K-Line, and the two chefs are Arttista. All paint is Testors enamel.
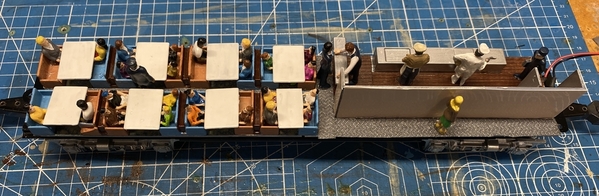


Fun project! I'm mostly happy with the results. I wish the windows were larger in the kitchen!
Attachments
Images (9)


@Lionelski posted:One of Warrenville's bridges needed maintenance, so I spent today building a scaffold and hiring a couple of guys to do the needed work.
@Lionelski You got away cheap John! Look at all the equipment and manpower that got involved for my bridge repair.
Attachments
Videos (1)

@WesternPacific2217 posted:A second project completed today, however this one took about a week working on it off and on.
K line 15" aluminum California Zephyr Silver Diner car interior upgrade. These come monotone gray, definitely needed some color and floor. This is the second diner in my CZ consist.
This is what it looked like new out of the box:
I removed all the love seats and tables and painted the tables flat white to simulate a white table cloth. Painted the love seats kind of a desert pink and blue and alternated the colors. I then painted the kitchen with silver to simulate stainless steel and added a small kitchen serving table that with a table I had laying around. Added carpet that I printed on my Canon printer, and installed a slatted wood floor in the kitchen. Added a bunch of passengers, Lionel and K-Line, and the two chefs are Arttista. All paint is Testors enamel.
Fun project! I'm mostly happy with the results. I wish the windows were larger in the kitchen!
Very nice!
American Motors dealership taking shape. Still more to do. Looking for a backdrop of service garage doors to cover the backwall. They are AMC's, service is inevitable. The yellow pacer already had the optional passenger side mirror fall off and need repair.
 It is the mid 1970s and AMC is trying to sell Pacers, Hornets, and Gremlins but the Jeeps are in stock and ready to move.
Attachments
Images (2)
Was blessed with some "Patience" today, I don't normally have much of that virtue... Anyway, been trying for a while to figure out how to best get the Cream, yellow colored aged brick look that I was striving for.... Finally got it today... Started by spraying the entire Ameritowne front wall Rustoleum Camo "Sand" color, then patiently dry brushed the brick in two colors, a light pale yellow called Lemonade, followed by another dry brush coat of "Antique Gold"... The patience comes in getting enough paint off the brush so that I dont' fill in the mortar lines.
Going to get the second front done for the matching pair... I left one upper right corner undone in one of the photos so we could see what it looked like after the Lemonade color was applied....
First photo is entire before and after dry brushing both colors..

Second photo shows top right corner after the 1st dry brush coat. Side wall on the left was my attempt to get the result doing washes of both colors. Probably going to wash and scrub all that off and start over.

Attachments
Images (2)
@RSJB18 posted:Did a portal-ectomy today...
... The portal is very lopsided now but it is what it is.....🙄🙄🙄....
What about placing some vines climbing up the stone wall at the right side of the portal? It might "hide in plain sight" the narrowness of that side. I'm replying several days later so you may have already decided what to do.
John
@VistaDomeScott posted:American Motors dealership taking shape. ... They are AMC's, service is inevitable....
It is the mid 1970s and AMC is trying to sell Pacers, Hornets, and Gremlins...
"They are AMC's, service is inevitable...."
Great line! And nice dealership. In the 70s, I despised the Gremlin but thought the Pacer looked futuristic, kinda like a personal Shuttlecraft.
A consist of PRSL interurbans running on third rail on the RTC...

With Norma Bates Kitteh supervising, natch.

Mitch
Attachments
Images (2)
@M. Mitchell Marmel posted:A consist of PRSL interurbans running on third rail on the RTC...
With Norma Bates Kitteh supervising, natch.
The New York Office suggested Norma should be waving a lantern. Me fix.

![]()
Mitch
Attachments
Images (1)
@WesternPacific2217 posted:A second project completed today, however this one took about a week working on it off and on.
K line 15" aluminum California Zephyr Silver Diner car interior upgrade. These come monotone gray, definitely needed some color and floor. This is the second diner in my CZ consist.
It's a shame to have to put the car body on top of that great detailing. Nice work !!!
@chris a posted:Was blessed with some "Patience" today, I don't normally have much of that virtue... Anyway, been trying for a while to figure out how to best get the Cream, yellow colored aged brick look that I was striving for.... Finally got it today... Started by spraying the entire Ameritowne front wall Rustoleum Camo "Sand" color, then patiently dry brushed the brick in two colors, a light pale yellow called Lemonade, followed by another dry brush coat of "Antique Gold"... The patience comes in getting enough paint off the brush so that I dont' fill in the mortar lines.
Going to get the second front done for the matching pair... I left one upper right corner undone in one of the photos so we could see what it looked like after the Lemonade color was applied....
First photo is entire before and after dry brushing both colors..
Second photo shows top right corner after the 1st dry brush coat. Side wall on the left was my attempt to get the result doing washes of both colors. Probably going to wash and scrub all that off and start over.
I love the effect.....I even like the "lemonade" only over the Camo sand....
Thank you for the detailed explanation!
Peter
@John's Trains posted:What about placing some vines climbing up the stone wall at the right side of the portal? It might "hide in plain sight" the narrowness of that side. I'm replying several days later so you may have already decided what to do.
John
Bob, what about just removing the portal entirely and just have stone supports on the left side and nothing on the right? I think you said it was difficult to see anyway so maybe not an issue? Jeff
@M. Mitchell Marmel posted:A consist of PRSL interurbans running on third rail on the RTC...
With Norma Bates Kitteh supervising, natch.
Mitch
Great looking consist Mitch. Did the PRSL operate such vehicle; and if so where?
Jay
@Tranquil Hollow RR posted:Great looking consist Mitch. Did the PRSL operate such vehicle; and if so where?
Briefly, yes.
http://www.rrpicturearchives.n...ture.aspx?id=5423781
http://www.rrpicturearchives.n...ture.aspx?id=5424583
![]()
@VistaDomeScott posted:American Motors dealership taking shape. Still more to do. Looking for a backdrop of service garage doors to cover the backwall. They are AMC's, service is inevitable. The yellow pacer already had the optional passenger side mirror fall off and need repair.
I had a friend who drove a Hornet; and yes it was Green!! ![]()
I bought that dealership kit thinking it would look good in my 1950s town. When I got it out of the box, I realized it takes up more real estate than I was imagining. My other buildings are smaller. I put it back in the box until my town is laid out and I see how I can fit it in. Yours looks great!!!!
@Putnam Division posted:I love the effect.....I even like the "lemonade" only over the Camo sand....
Thank you for the detailed explanation!
Peter
Peter, Thanks. Yes I agree just the first coat with the "lemonade" pale yellow has definite potential as a variation. I have dry brushed as a weathering technique before but never a large uniform area like this brick wall. I'll be doing more of this now that I have developed a technique that's working.
I found this great YouTube Video "O Scale Allied Switch Job" which is where I found the color scheme on these Ameritowne Building Front Walls. There's a good street view shot of them at 3:39 in the video as well as later..... This gentleman's modelling and weathering skills are exceptional as well as his ability to operate his railroad and switch cars in and out of a busy B & O industrial district.
@WesternPacific2217 That diner came out great. Those Arista figures in the kitchen are especially good.
@chris a You captured that old yellow brick look.
The only thing I worked on recently is a 36" truss bridge that I got from a friend who sold me his trains. He made it out of wood but it needed piers to support the center. I added aluminum bar stock to make it self-supporting, finished the bottom edge of the truss, then added gussets, painted it, and fabricated abutments. I would like it to be part of an elevated loop of O-27 track for tinplate trains separate from my regular layout.


I just had the nutty thought that my old decaying patio looks "very realistic." Should I remove some to use as a "dry riverbed"? Maybe not.
Attachments
Images (2)
Worked on this narrow area from the oil rig down to the processing center. It's a country setup and a work in progress.

Attachments
Images (1)

@chris a posted:Peter, Thanks. Yes I agree just the first coat with the "lemonade" pale yellow has definite potential as a variation. I have dry brushed as a weathering technique before but never a large uniform area like this brick wall. I'll be doing more of this now that I have developed a technique that's working.
I found this great YouTube Video "O Scale Allied Switch Job" which is where I found the color scheme on these Ameritowne Building Front Walls. There's a good street view shot of them at 3:39 in the video as well as later..... This gentleman's modelling and weathering skills are exceptional as well as his ability to operate his railroad and switch cars in and out of a busy B & O industrial district.
Chris,
That is the layout of Don Smith! Wonderful modeler. When I first saw what you were trying to accomplish with the color, I thought of those same building flats on Don's layout. It looks like he used the Midtown Hotel walls.
Dave
@M. Mitchell Marmel posted:
Thank you Mitch. You are great resource.
@Tranquil Hollow RR posted:Thank you Mitch. You are great resource.
My pleasure! ;-)
I decided with the CEO out of town for the weekend, that I would take care of a few things that have been bothering me and got a couple of bonus items done as well.
First, I decided I wasn’t happy with the Gargraves track on the upper level. It was all flex track and I was having difficulty with the trains derailing, so I decided to replace it with Atlas like the rest of the layout. While I had everything on the upper level torn apart I decided to get the piers painted properly to make them look like concrete columns. I also added a hand built bridge to the upper level. The bridge came from the O gager’s layout that I am taking apart due to his passing. You can see the bridge and the columns in the pics below.

The lower bridge is from Menards and I really love it but the scratch made one is looking pretty good as well.
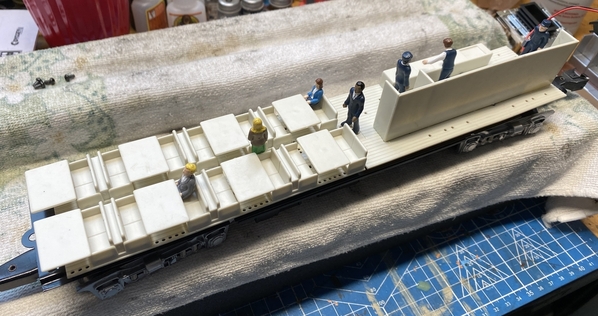
My next project was inspired by the rest of you adding passengers to your passenger cars. I sat and debated about painting the interior and ultimately decided just to add passengers. Based on the end result I think it was the right idea for this car anyways. This passenger car is the one that is used on the solid rocket booster train that I have posted about earlier. When I removed the shell I was surprised to find 7 toilets and only 1 sink. It got me thinking about what the interior should look like based on first hand accounts of fellow employees that had ridden on the train to escort the rocket to Florida. There is supposed to be a common living area, a kitchen area and 4 or 5 bedrooms. Anyways, when I put the shell back on I could only see about 3 or 4 of the passengers out of the 12 that I put in.

Still working on more but needed to take a break. Adding one more column and then putting the track up next. Hopefully everything will go well. 🤞🏼
Attachments
Images (4)
@Ross posted:
The 1/43 Pacers and Gremlins are hard to find. Most are overseas and command rediculous prices. I was lucky enough to find the 2 Gremlins for under $30 in Italy shipped. They were made by Polisto in Italy. The Pacers are by IXO and used to be found for about $20 each. They are rarely found in the U.S. and are always about $100 each. There is a Hornet coupe and Matador coupe more easily found and were a part of a James Bond movie set of cars.
@VistaDomeScott posted:American Motors dealership taking shape. Still more to do. Looking for a backdrop of service garage doors to cover the backwall. They are AMC's, service is inevitable. The yellow pacer already had the optional passenger side mirror fall off and need repair.
Maybe you indeed are "Super-modeler" with that mirror on the ground next to the car here! You've captured the AMC ethos! Thanks for making me laugh. ![]()
Also, can you post a close-up of your track and ballast behind it? I'm looking for some sort of fake ballast/painted ballast (for a future layout) if that is what you have. Thanks in advance.
Tom
Tom
It is Lionel Fastrack and I built up some of the surrounding area with blended in Woodland Scenics limestone ballast and static grass. I will get some more pics next time I get to working on the layout.
Scott
@chris a posted:Peter, Thanks. Yes I agree just the first coat with the "lemonade" pale yellow has definite potential as a variation. I have dry brushed as a weathering technique before but never a large uniform area like this brick wall. I'll be doing more of this now that I have developed a technique that's working.
I found this great YouTube Video "O Scale Allied Switch Job" which is where I found the color scheme on these Ameritowne Building Front Walls. There's a good street view shot of them at 3:39 in the video as well as later..... This gentleman's modelling and weathering skills are exceptional as well as his ability to operate his railroad and switch cars in and out of a busy B & O industrial district.
Thank you!
Peter
Thanks for the info! I’ll put my son to work, he’s got an European trip scheduled.
@PRR8976 posted:Also, can you post a close-up of your track and ballast behind it? I'm looking for some sort of fake ballast/painted ballast (for a future layout) if that is what you have. Thanks in advance.
Tom
Tom- I added ballast to the sides of the fastrack. It improves the appearance greatly. I applied a liberal coating of elmer's glue and sprinkled the gravel into the glue. After it dried I went over everything again with wet-water and diluted glue.


Here's the completed area.

Bob
Attachments
Images (4)


@OhB1 posted:I decided with the CEO out of town for the weekend, that I would take care of a few things that have been bothering me and got a couple of bonus items done as well.
.........and " WHILE THE CAT'S AWAY ..![]() ...... "
...... "
.......and boy did this mouse PLAY ![]()
You really did a lot more than I could ever get done on a weekend sir. Nice looking layout. ![]()
@RSJB18 posted:Tom- I added ballast to the sides of the fastrack. It improves the appearance greatly.
VERY nice Bob.![]()
Hard to tell it is Fastrack .
What kind of ballast did you use ? It really looks to be an accurate size for the Fastrack.
Did you solder your track before ballasting ? I only ask because I've had conductivity issues in the past with the Fastrack.
@Dallas Joseph posted:VERY nice Bob.
Hard to tell it is Fastrack .
What kind of ballast did you use ? It really looks to be an accurate size for the Fastrack.
Did you solder your track before ballasting ? I only ask because I've had conductivity issues in the past with the Fastrack.
The ballast is a floral gravel from Michael's. Available in several colors, I use gray/ silver, brown, and black.


I didn't solder these tracks. They are only 2 short sidings for engines. Each spur is a separate power block.
I use FT for my Christmas tree loop and I always check the pins. I also use small binder clips to hold the sections together.
I'm not a fan of FT for permanent layouts but I would paint the track and hide the gray plastic and shiny rails first if I did.
@PRR8976 Thanks Tom.
Bob
Attachments
Images (3)


@pennsyfan posted:Very nice!
So cool!!!
The last area of my layout to get landscaped is the Mel's Gap/Maybrook area. This has been ongoing for the last few weeks. The first two pictures are before any green was applied. The next 5 are a good start but more will be added. The ballasting of the foreground tracks will hopefully get done with the arrival of my ballast order from Dennis Brennan. I have some auto gates to be installed to the right of the station and I need an access panel piece being done by a friend and then I can get the town of Maybrook finished. So much more to do. The girder bridge spans the track which runs through Mel's Gap, named for our friend Mel Garelick.


Attachments
Images (7)


@RSJB18 posted:The ballast is a floral gravel from Michael's. Available in several colors, I use gray/ silver, brown, and black.
I didn't solder these tracks. They are only 2 short sidings for engines. Each spur is a separate power block.
I use FT for my Christmas tree loop and I always check the pins. I also use small binder clips to hold the sections together.
I'm not a fan of FT for permanent layouts but I would paint the track and hide the gray plastic and shiny rails first if I did.
@PRR8976 Thanks Tom.
Bob
Bob, I recognize the lid of that container. Our older daughter gave me some product in those containers. I need to find where I put them, since I wasn’t ready for scenery or ballast at the time. Your looks great!!
@Mark Boyce posted:Bob, I recognize the lid of that container. Our older daughter gave me some product in those containers. I need to find where I put them, since I wasn’t ready for scenery or ballast at the time. Your looks great!!
Some of them are a little shiny. I just do an acrylic wash of what ever color I'm using to tone it down if necessary.
Thanks
@Bill Park posted:The last area of my layout to get landscaped is the Mel's Gap/Maybrook area. This has been ongoing for the last few weeks. The first two pictures are before any green was applied. The next 5 are a good start but more will be added. The ballasting of the foreground tracks will hopefully get done with the arrival of my ballast order from Dennis Brennan. I have some auto gates to be installed to the right of the station and I need an access panel piece being done by a friend and then I can get the town of Maybrook finished. So much more to do. The girder bridge spans the track which runs through Mel's Gap, named for our friend Mel Garelick.
There’s some great work going on there Bill.
@RSJB18 posted:Some of them are a little shiny. I just do an acrylic wash of what ever color I'm using to tone it down if necessary.
Thanks
Bob, I just found the little containers in an old kitchen cupboard my late pa-in-law had them hang in the garage when ma-in-law insisted on new ones in the kitchen. 😄 As it turns out, the containers are for air dry clay. I recall now, she thought I could use them for scenery. One is designed for modeling stone it says. Hmmm. Same containers, though.
@pennsyfan posted:There’s some great work going on there Bill.
@Bill Park I totally agree with Bob’s statement! That is great naming the gap for Mel!
Afternoon to all you folks on the east coast, I hope your all having a wonderful day and time with your layouts. I have to say there is a ton of wonderful work being done!
@myles great looking dessert scene and love the helo!
@OhB1 great job on the bridge and hope the new Atlas track fixed your problem!
@RSJB18 Bob great job on hiding the fast track, you can't even tell until you get close up!
@Bill Park Bill you have a great start on the Mel's Gap area! I know it is just going to get better and better!
I will probably check in next week when I get to Missouri and find some WiFi!
I hope you all have a great week and find time to have fun with your trains and layouts!
@Bill Park posted:The last area of my layout to get landscaped is the Mel's Gap/Maybrook area. This has been ongoing for the last few weeks. The first two pictures are before any green was applied. The next 5 are a good start but more will be added. The ballasting of the foreground tracks will hopefully get done with the arrival of my ballast order from Dennis Brennan. I have some auto gates to be installed to the right of the station and I need an access panel piece being done by a friend and then I can get the town of Maybrook finished. So much more to do. The girder bridge spans the track which runs through Mel's Gap, named for our friend Mel Garelick.
Bill:
Your scenery is SUPERB!
@Bill Park great scenery work and creative track plan!
Following on the passenger car sets discussions - "do they count as 1 or 5" - regardless, they do take a lot of room on shelves. As I intended to create an engine area in a corner of my layout, I decided I could add pull out shelves to hold "excess" passenger coaches. Each shelve holds 12 cars so this takes care of 36 cars leaving limited shelf space for displaying my intermodals and coal hoppers.

Still have to figure out the engine area track plan and associated details. I realized I only have 3 coal steamers, the rest are oil. Kind of minimizes the need for the coaling station. Have a water tower and fuel/water columns, although the latter make no sense with steam. A broad year range for the transition period is the only answer - roughly 1945 thru 2000. This is also calling out for an engine house - the base is 20 x 42 - any suggestions???
The black buttons on the table edge are touch toggles which provide switching to my new water front area. A ToDo is drafting a layout plan so the toggles can be mounted behind the plan. As is I cannot remember which toggle controls which switch, I need to see the plan to know which turnout I am changing.
Attachments
Images (1)

Jeff, the roll out shelves look great for storing cars. I can't remember which switch is which either, and will have to come up with a couple partial track plan panels also.
A week of urban renewal……..foam core board put down in the downtown area at street level. Sidewalks/curbs will come later. I have 4 Buildings Unlimited kits and 2 River Leaf Models kits to do this Spring/Summer/Fall. I still may need a few more buildings and am looking at some Woodland Scenics buildings to add.


Have a great and safe weekend, folks!
Peter
Attachments
Images (12)
Peter, urban renewal is right! You are building a city there!! ![]()
@Putnam Division posted:A week of urban renewal……..foam core board put down in the downtown area at street level. Sidewalks/curbs will come later. I have 4 Buildings Unlimited kits and 2 River Leaf Models kits to do this Spring/Summer/Fall. I still may need a few more buildings and am looking at some Woodland Scenics buildings to add.
Have a great and safe weekend, folks!
Peter
Looks like you’re making some nice progress, Peter. And I’m glad to see your medical text books are also getting involved with the hobby in their retirement ![]()
![]()
@Apples55 posted:Looks like you’re making some nice progress, Peter. And I’m glad to see your medical text books are also getting involved with the hobby in their retirement

Paul, you always make the best observations! 😄
@Apples55 posted:Looks like you’re making some nice progress, Peter. And I’m glad to see your medical text books are also getting involved with the hobby in their retirement
![]()
![]()
Peter
I added a White Castle to my neighborhood Chicago layout. The first one built in Chicago was in 1929. Some are still standing today.
The real ones had a lot more lights than I added, but for a model it was unrealistic to do so.


Attachments
Images (3)
@ChiTown Steve posted:I added a White Castle to my neighborhood Chicago layout. The first one was built in 1929. Some are still standing today.
"Harold and Kumar could not be reached for comment." - The New York Office
@M. Mitchell Marmel posted:"Harold and Kumar could not be reached for comment." - The New York Office
Ha Ha. I'll have to check this one out.
Organized my train boxes. Put some of the Boy's Train and Girl's Train boxes in the same place.


Today I had a new friend over to the house and he brought his new to him C&O T1 4-8-4 and It’s a beautiful Lionel Legacy steamer…So, we ran his train for a few minutes. Happy Railroading Everyone 


Attachments
Images (5)
I have been working on the Maybrook portion of my layout (the last area to need landscaping). I finally received my ballast order from Brennan's and while most of my layout is Brennan's grey ballast, I did experiment by adding some Woodland Scenics brown for a little different look. I also decided to experiment using sculp-ta -mold for the grade crossing here. Once the area drys, I can paint the road way and add the road planks between the tracks. Around the road I used tube sand (Sand that comes in a long sack sold at Lowe's and Home Depot for weight in the back of a vehicle). Why this works well, it is mostly very fine but there are enough larger stones still less than a 1/4" to make the ground area look raw and undeveloped. I also used tile grout in several shades of brown. I put those items on over a heavy coat of white glue and then a mist of WS Scenic Cement. Operating gates will go on each side of the tracks and should add some more interest to the scene.


Attachments
Images (2)

With the help of my grandson, we completed the illumination effort to light the Plasticville town. It was a tedious process while attempting it on my own. He climbed on top of the layout and I was situated underneath as we worked our way along the remaining structures. The lighting was done with Dwarvin fiber optics.
Jay
Attachments
Images (1)

@Tranquil Hollow RR posted:With the help of my grandson, we completed the illumination effort to light the Plasticville town. It was a tedious process while attempting it on my own. He climbed on top of the layout and I was situated underneath as we worked our way along the remaining structures. The lighting was done with Dwarvin fiber optics.
Jay
WOW! That's a lot of Plasticville.......Fiber optics was the right solution for that town.
Looks great.
Bob
Thanks Bob and I didn’t fully appreciate how many structures I had until I started the lighting process.
Not familiar with the Dwarvin fiber optics system , but it sure looks like it gives the town life Jay ! ![]() Looks good.
Looks good.
How many bulbs would it take to light up the buildings if you wouldn't have used THE system ? 🤔
@Bill Park posted:I have been working on the Maybrook portion of my layout (the last area to need landscaping). I finally received my ballast order from Brennan's and while most of my layout is Brennan's grey ballast, I did experiment by adding some Woodland Scenics brown for a little different look. I also decided to experiment using sculp-ta -mold for the grade crossing here. Once the area drys, I can paint the road way and add the road planks between the tracks. Around the road I used tube sand (Sand that comes in a long sack sold at Lowe's and Home Depot for weight in the back of a vehicle). Why this works well, it is mostly very fine but there are enough larger stones still less than a 1/4" to make the ground area look raw and undeveloped. I also used tile grout in several shades of brown. I put those items on over a heavy coat of white glue and then a mist of WS Scenic Cement. Operating gates will go on each side of the tracks and should add some more interest to the scene.
Bill,
Things are looking good. Who makes the crossing signals that you will be using at the grade crossing?
Dave
Hi Dave, I had purchased two MTH gates a few years ago and they sat in the packaging until recently. When I tested them before installation, neither worked. Bob Shipley, a Forum member had two used MTH gates and they tested good so I elected to try to them So the response is MTH. I will post a video of them in use as soon as I get them installed. Bill
@Tranquil Hollow RR posted:With the help of my grandson, we completed the illumination effort to light the Plasticville town. It was a tedious process while attempting it on my own. He climbed on top of the layout and I was situated underneath as we worked our way along the remaining structures. The lighting was done with Dwarvin fiber optics.
Jay
Looks good! Does he hire out?
Some months ago I began to have some issues with a gargraves switch shorting out as the engines crossed it. I had some replacement switches and asked a question about changing track and a switch covered with glued down ballast. A forum member made me aware of a connector piece Gargraves has made for just situations like this. (See picture one) The benefit here is to be able to cut the bad piece out , in this case a switch, and be able to set the replacement section right down in the opening without pulling up a few sections of track in each direction caused by the connecting pins. I had to remove the ballast and then cut the switch out maybe a half inch back from the joint. Once that is done, the switch can be pulled out. Most likely it won't survive the removal. I prepped the ends of the new switch going into the two meeting tracks. Regular pins are again used to connect those tracks on that end. Next I slid each connector into a rail on the opposite track. The shim like connectors slide right into the Gargraves track and they are pushed in as far as need be to make the switch ends mate properly.( See picture three) I did check how the connectors would fit into a new Ross switch and they required a tiny bit of rearranging the ties. I pushed the switch into the two tracks coming together on one end ( See picture 4) and then just lowered the other end of the switch onto the connectors on the other end. It snapped together perfectly. ( See picture five). My compliments to Gargraves for coming up with this easy fix for a major problem. I hope this will help any member who has an similar problem. Bill Park


Attachments
Images (5)


@Bill Park posted:Hi Dave, I had purchased two MTH gates a few years ago and they sat in the packaging until recently. When I tested them before installation, neither worked. Bob Shipley, a Forum member had two used MTH gates and they tested good so I elected to try to them So the response is MTH. I will post a video of them in use as soon as I get them installed. Bill
OK. Keep us posted. I have used the MTH crossing gates for about 10 years. I have 2 pair for two grade crossings on the layout. So far I have only had to change out one gear, with the help of some donors I purchased online.
Dave
@Dallas Joseph posted:Not familiar with the Dwarvin fiber optics system , but it sure looks like it gives the town life Jay !
Looks good.
How many bulbs would it take to light up the buildings if you wouldn't have used THE system ? 🤔
Bob commented, “that’s a lot of Plasticville “. Well I did a recount and there are 32 structures 😮. The photos show the light source and how, with a drilled hole, they enter the structure. Cocktail straws were used for rigidity. I have two of the light sources.
Attachments
Images (3)


Swapped out the lights in my K-line switches to LEDs. Big improvement.
First 2 pix are the leds.


And I put a first coat on the Doodlebug interior.

Bob
Attachments
Images (5)
@Tranquil Hollow RR posted:Bob commented, “that’s a lot of Plasticville “. Well I did a recount and there are 32 structures 😮. The photos show the light source and how, with a drilled hole, they enter the structure. Cocktail straws were used for rigidity. I have two of the light sources.
This is really nice. ![]()
It even looks like it gives you some light under the layout for maintenance.
What is the wattage /voltage needed to run the Dwarvin ? ![]()
You just plug it in to any outlet.
Managed to get 4 Ameritowne Fronts weathered and all the trim painted up. Layout work and progress got interrupted for other urgent issues.
Received a pair of new to me 072 switches before the Easter Holiday, so the overall urban area plan is getting closer to what I had in mind.


Attachments
Images (4)
@chris a posted:Managed to get 4 Ameritowne Fronts weathered and all the trim painted up. Layout work and progress got interrupted for other urgent issues.
Received a pair of new to me 072 switches before the Easter Holiday, so the overall urban area plan is getting closer to what I had in mind.
The fronts looks good Chris. Looks like you have room for full buildings, why just fronts?
Bob
@RSJB18 posted:The fronts looks good Chris. Looks like you have room for full buildings, why just fronts?
Bob
Bob, my current thought process is that I will end up grouping a number of these fronts together and then just adding side and back walls to the group. I can save a bunch of side walls by not using 2 of them them with each individual front wall. If I need to "divide" them I'll just add some 1/8 inch hardboard, or something cheap and readily available to create a dividing wall. It's also not clear at this point, that based on the sidings running through the area that all building foot prints will be conventional squares or rectangles. I reasonably sure that the back walls may follow the path of the "street" which could very well be following the curve of the siding track as it winds through the district.
As I have been driving around looking at these types of buildings near where I live, it seems that most of them have different brick on the side and rear walls. From a little reading and research, it appears that it was pretty standard practice to use a less expensive brick on the side and rear walls and it was usually just a "standard cost effective monotone brick red" variety.
So, once I figure out the overall urban building layout, my plan is to figure out a much quicker way to just come up with a simpler less detailed weathering process to color and weather the side and rear walls and finalize this whole area.
I am fairly close to finding a quicker weathering method with probably only two colors to give me a back and sidewall that doesn't look like plain old red plastic with mortar, but won't take the painting and weathering time that these front walls are demanding.
@chris a posted:Bob, my current thought process is that I will end up grouping a number of these fronts together and then just adding side and back walls to the group.
I am fairly close to finding a quicker weathering method with probably only two colors to give me a back and sidewall that doesn't look like plain old red plastic with mortar, but won't take the painting and weathering time that these front walls are demanding.
Makes sense. Why spend extra time and money on less visible parts of the scene.
I'm sure it will look great when you are done.
thanks
Just finished making a couple hills on a modular section. Easy to build. I started with styrofoam glued on to the flat surface. Then using an extendable razor knife, I trimmed the edges so I’d end up with a rolling hill contour. I painted the surface to make it easier to see any uneven areas. Then using regular beach sand it poured it over the irregular surfaces, sprayed the whole area with water, then applied a soaking of 70 percent water and 30 percent white glue. Next came a sprinkling of Woodlands Blended Turf over everything. Because water runs downhill, I very lightly added some Yellow Grass to the high spots, and sprinkled Burnt Grass and some medium green along the base and low carved areas. I finished it off with some Clump Foliage and some small sifted road gravel here and there . The whole project took about 


 4hours to complete both hills. ( and 10 minutes to vacuum any loose materials ). A fun project and when dry overnight I can touch up or carry on.
Attachments
Images (5)
@chris a posted:Bob, my current thought process is that I will end up grouping a number of these fronts together and then just adding side and back walls to the group. I can save a bunch of side walls by not using 2 of them them with each individual front wall. If I need to "divide" them I'll just add some 1/8 inch hardboard, or something cheap and readily available to create a dividing wall. It's also not clear at this point, that based on the sidings running through the area that all building foot prints will be conventional squares or rectangles. I reasonably sure that the back walls may follow the path of the "street" which could very well be following the curve of the siding track as it winds through the district.
As I have been driving around looking at these types of buildings near where I live, it seems that most of them have different brick on the side and rear walls. From a little reading and research, it appears that it was pretty standard practice to use a less expensive brick on the side and rear walls and it was usually just a "standard cost effective monotone brick red" variety.
So, once I figure out the overall urban building layout, my plan is to figure out a much quicker way to just come up with a simpler less detailed weathering process to color and weather the side and rear walls and finalize this whole area.
I am fairly close to finding a quicker weathering method with probably only two colors to give me a back and sidewall that doesn't look like plain old red plastic with mortar, but won't take the painting and weathering time that these front walls are demanding.
Chris, I agree with Bob, that is a good plan. I have made similar observations of buildings in the small towns near where I live.
@myles posted:I finished it off with some Clump Foliage and some small sifted road gravel here and there . The whole project took about
4hours to complete both hills. ( and 10 minutes to vacuum any loose materials ). A fun project and when dry overnight I can touch up or carry on.
That's a very nice photo tutorial of those great looking hills, Myles!!
Thanks Mark , I had a great time doing them. Nice grouping of the structures Criss. That’s going to turn out nicely !
@Mark Boyce
Tonight I added characters and scenics to my empty depot. They all came from your depot I purchased from you over a year ago.
The depot has come alive with your help.
Seth Thomas
Attachments
Images (4)


@Seth Thomas posted:@Mark Boyce
Tonight I added characters and scenics to my empty depot. They all came from your depot I purchased from you over a year ago.
The depot has come alive with your help.Seth Thomas
Wow! Your depot looks so great! I’m glad I was able to provide a part of it, but you did the work! 😃
@RSJB18 posted:Makes sense. Why spend extra time and money on less visible parts of the scene.
This is totally the problem that I have.
Dave


@jstraw124 posted:Created some passenger car storage out of an old microfiche cabinet from work. Fits 7 cars per drawer with 1/2” foam between them. Half the drawers converted so far. Nice not to have to store them in their boxes anymore.
UGHHHH! Our campus library tossed about 2 dozen old cabinets last year. I would have taken a few but I don't have room for them in the basement. We had that style and vertical ones with 5 drawers with 4 shelves/ drawer. They had heavy duty glides and could handle decent weight.
Nice to know my idea would have worked.
Bob
@RSJB18 posted:UGHHHH! Our campus library tossed about 2 dozen old cabinets last year. I would have taken a few but I don't have room for them in the basement. We had that style and vertical ones with 5 drawers with 4 shelves/ drawer. They had heavy duty glides and could handle decent weight.
Nice to know my idea would have worked.
Bob
Those cabinets are really heavy. I moved this one, but decided I wouldn’t take another.
@jstraw124 posted:Those cabinets are really heavy. I moved this one, but decided I wouldn’t take another.
Yes they are. So were the hundreds of rolls of microfilm they got rid of.......
 Nasty weather forced me inside so I had some train-time. Our re-grading & overhang work on the house paid-off as we had zero water in the basement with this storm’s 3”+ of rain. Put up more benchwork sections for my roughly 8’ x 20’ layout. Need more lumber ! 😊
Attachments
Images (1)
Wired up my PostWar Bosco car……..Atlas operating rails are not made for Ross track…….I improvised some places for the operating rails to be positioned.


Have a great week.
Peter
Attachments
Images (2)
Videos (1)

Unfortunately just a little track work is all I've been doing when I'm up to it. Both my wife and I needed surgeries done these last two months, she needed Carpal Tunnel Release Surgery and Elbow Surgery to move a pinched nerve in mid February, and I needed Prostrate Cancer Removal Surgery in mid March, they feel they got all the Cancer out with the surgery so I wont need any chemo or radiation. We're trying to help each other cover the basics for now. We're both coming along slowly and hoping to get back to doing more fun things soon again.😊🙏
I'm hoping you both are on the upswing, Gary, and can get more than just a little track done.
Though not work on the layout directly, I work more on cleaning the Aegean Stables, aka my work area, so that once organized, Layout work can be given the highball and we can attack the layout full steam ahead.
My electrical genius friend Rick and my making a mountain out of a mole hill friend Jack were over for a productive five hours. Controllers and wiring for the RCS and sculpting the mountain side.
Jay
Attachments
Images (2)


@Gary P posted:Unfortunately just a little track work is all I've been doing when I'm up to it. Both my wife and I needed surgeries done these last two months, she needed Carpal Tunnel Release Surgery and Elbow Surgery to move a pinched nerve in mid February, and I needed Prostrate Cancer Removal Surgery in mid March, they feel they got all the Cancer out with the surgery so I wont need any chemo or radiation. We're trying to help each other cover the basics for now. We're both coming along slowly and hoping to get back to doing more fun things soon again.😊🙏
Wish you well Gary; do a little every day. When they knocked me down in 2017; I found solace and strength up at the layout.
🙏🙏
@Tranquil Hollow RR posted:My electrical genius friend Rick and my making a mountain out of a mole hill friend Jack were over for a productive five hours. Controllers and wiring for the RCS and sculpting the mountain side.
Jay
Rick and Jack do nice work! Isn’t it great to have good friends! 😊
@Mark Boyce posted:Rick and Jack do nice work! Isn’t it great to have good friends! 😊
Indeed I’m very fortunate. Plus I would never have the ability to wire the layout in the up to date manner in which it is being done. Plus, the mountain is more sensational than I would have created. In addition, I’m much further ahead than doing it on my own.
I just got my first mainline track running around the room. I have two more mainlines to go but at least I have one so for. I have posted a private YouTube link.
idea-thinker
@idea-thinker posted:I just got my first mainline track running around the room. I have two more mainlines to go but at least I have one so for. I have posted a private YouTube link.
idea-thinker
Excellent run! Of course I have commented on the tremendous bridges before, and am always impressed. I do have a question about your lowest track level. Looking at the doors and staircase, it appears that the lowest level is on the floor. Is that true? Nothing wrong with it if it is or isn't, I'm just wondering about the height differences between different levels. Thank you!
@idea-thinker posted:I just got my first mainline track running around the room. I have two more mainlines to go but at least I have one so for. I have posted a private YouTube link.
idea-thinker
Wow! You are building quite an empire.
Looks great.
Bob
Evening y'all,
I bought a Lionel 3656 cattle car and corral recently. I've had trouble finding a good spot on my layout for the Corral. Today I decided to remove a switch and spur. Here is a good spot. Well in reach of the operators position. I'll finish installation and testing in the morning.


Bill
Attachments
Images (2)


@idea-thinker posted:I just got my first mainline track running around the room. I have two more mainlines to go but at least I have one so for.
idea-thinker
Aw....... come on I-T......whatever happened to the simple ole circle of track. ![]()
THIS layout so far is really wild. ![]() OK , how long has this incredible work ( play ) been going on with this layout ?
OK , how long has this incredible work ( play ) been going on with this layout ? ![]() Nice .
Nice .
@Gary P posted:Unfortunately just a little track work is all I've been doing when I'm up to it. Both my wife and I needed surgeries done these last two months, she needed Carpal Tunnel Release Surgery and Elbow Surgery to move a pinched nerve in mid February, and I needed Prostrate Cancer Removal Surgery in mid March, they feel they got all the Cancer out with the surgery so I wont need any chemo or radiation. We're trying to help each other cover the basics for now. We're both coming along slowly and hoping to get back to doing more fun things soon again.😊🙏
Best wishes for a speedy recovery to you both.
Peter
Mark- The lower level of track is on the floor and the lower level track is cut into the hardwood floor so you walk across it. The height between track is about 12 inches for each.
RSJB18 Thanks for the nice comment.
Dallas - Actually it is a loop around the room. The loop length is about 300 feet. The train takes about 3 minutes to make a loop. I have been working on it for about 5 years, we mostly work on it during the winter months only.
idea-thinker
@idea-thinker posted:I just got my first mainline track running around the room. I have two more mainlines to go but at least I have one so for. I have posted a private YouTube link.
idea-thinker
Impressive!
Peter
@idea-thinker posted:Mark- The lower level of track is on the floor and the lower level track is cut into the hardwood floor so you walk across it. The height between track is about 12 inches for each.
RSJB18 Thanks for the nice comment.
Dallas - Actually it is a loop around the room. The loop length is about 300 feet. The train takes about 3 minutes to make a loop. I have been working on it for about 5 years, we mostly work on it during the winter months only.
idea-thinker
I never noticed that the track was on the floor until this last post. I was always admiring the custom bridges in the past, I guess. Cutting the track into floor sounds like a lot o work, but a great idea so you can walk across it!!!
Test fit the main level track and made a successful run on the outer loop. Cut some plywood to install as the permanent sub roadbed. My kids and wife enjoyed the test run.


Attachments
Images (3)
JStewart204,
Congratulations, this is a milestone moment.
@idea-thinker posted:Mark- The lower level of track is on the floor and the lower level track is cut into the hardwood floor so you walk across it. The height between track is about 12 inches for each.
RSJB18 Thanks for the nice comment.
Dallas - Actually it is a loop around the room. The loop length is about 300 feet. The train takes about 3 minutes to make a loop. I have been working on it for about 5 years, we mostly work on it during the winter months only.
idea-thinker
I have never heard of such an endeavor; very unique. Now that’s thinking outside the box.
Jay
Here's how I spent Friday and Saturday!
https://ogrforum.ogaugerr.com/...c/184297498075524849
Thanks to @CBS072 for the writeup! ![]()
Mitch
Idea Thinker, I wanted to compliment you on such an aggressive model railroad. I had to watch your Big Boy run around several times to try an digest all you have done so far. I have a 25'x45' 3 level layout with a loop like you have of sorts. The difference is I started mine 35 years ago, I can not imagine the amount of work you have put in getting that much done in 5 years. Most impressive and such great bridges. I look forward to seeing more as time progresses. Bill
Morning guys, It have been a long time from my last visit! I have to say you all have been doing some AMAZING work!
@idea-thinker WOW what a great amount of track and design! My mind just goes numb watching your train running and the amount of track you have!
@Jstewart204 Congrats on the run around your layout, I hope to be there one day again. But its is going to be awhile!
@chris a Chris wonderful work on the building and great idea on saving the side walls for other buildings!
Well guys I and the CEO have made the big move to Missouri and are now on the hunt for a nice train room with an attached house! We are hoping to find something soon as we both have projects we want to start before winter!
I hope you all had a great weekend and fround time to have fun with your layouts and trains!![]()
Detailed and re-painted this uncatalogued but "plain Jane" UP flat car with boat into a New Haven paint scheme. Removed the "SPEEDY" decal from the bass boat and replaced it with a more appropriate homemade water slide "RANGER" decal on a white background.
Next, I painted the wooden deck areas on the flat car in Krylon Saddle Brown paint and sealed with gloss clear and then masked those areas off in order to paint the rest of the flat car in New Haven orange. I used Krylon Gloss Popsicle Orange, which is a decent match. Applied decals from K-4, which I had left over from a previous project, using the tried and true process.
Usually, I make the lines between the wooden boards using an ultra-fine tip black Sharpie, but the spacing on these boards was too small even for that to work, so I made up a light wash of black watercolor paint and applied it. After about 10 seconds, I wiped the excess off, leaving the gaps covered and the board surfaces with a very light weathering. Final coat of Krylon Matte Clear.
The tie downs are inexpensive black, elastic hair bands from the local pharmacy. If anybody can use some "RANGER" boat decals on a white background, let me know and I'd be happy to send some out.


Attachments
Images (5)


Working on Lionel Fastrack turnouts with water damage, LH and RH O36 remotes, they were submerged in rain water.
These were cleaned up 3 years ago and then "lost" along with with the replacement switch motors I ordered.
Found them yesterday and also found the perfect use for them on my "2024 or bust" layout!
Only problem is my eyesight for soldering wire to that tiny DC motor ainʻt what it used to be...
Got it done but concerned that I overheated the motors doing it.
I tinned the wires and used a small magnifying glass, but I think a magnifying headset and a finer soldering tip are needed.


Attachments
Images (2)
@Kelunaboy posted:Working on Lionel Fastrack turnouts with water damage, LH and RH O36 remotes, they were submerged in rain water.
These were cleaned up 3 years ago and then "lost" along with with the replacement switch motors I ordered.
Found them yesterday and also found the perfect use for them on my "2024 or bust" layout!Only problem is my eyesight for soldering wire to that tiny DC motor ainʻt what it used to be...
Got it done but concerned that I overheated the motors doing it.
I tinned the wires and used a small magnifying glass, but I think a magnifying headset and a finer soldering tip are needed.
I have a needle point tip for my Weller gun. Makes soldering in tight spots easier.
Also a lighted magnifier work lamp on the bench.
Still amazed at how much stuff is crammed into FT switches.
A little of this and a little of that but still working. Mostly scenery related. Buildings and dioramas pulled out to do the work. It's funny how you plan to do one thing but in order to do it you find out you have to do something else first. The goal here is to try and stop that from happening in the future. No "I'll do it later" during this sweep.
Dave

Attachments
Images (1)
As usual Dave it looks great. Let us know how you make out with achieving your goal; we could all use a lesson in how to prevent that.
Jay
Oh Come On Dave! I thrive on "I'll do it later"........![]()
You do make a good point though. We'd probably all accomplish a lot more if we worked more methodically and didn't rush to finish one project and leave 3 or 4 behind. ![]()
Bob
@Tranquil Hollow RR posted:As usual Dave it looks great. Let us know how you make out with achieving your goal; we could all use a lesson in how to prevent that.
Jay
Jay, I'm going in. So far, the layout is still a mess because I keep finding things to do. I'll keep you posted.
@RSJB18 posted:Oh Come On Dave! I thrive on "I'll do it later"........
You do make a good point though. We'd probably all accomplish a lot more if we worked more methodically and didn't rush to finish one project and leave 3 or 4 behind.
Bob
I know Bob. I agree with your last statement. I for whatever reason decided that I needed to move on after completing a project and procrastinated when I knew what had to be done. In some cases stepping away or waiting is necessary. The types of things I am talking about could have been done initially with a little more patience. It's just another way of thinking about things.
Dave
Here are photos of the next section of our layout. This is where I have grouped the American Flyer Accessories that I have into one area. Our collection is primarily Lionel but I have over time accumulated some American Flyer Accessories that are nice. All of the bridge piers support the mainline trains that run above the accessories as you can see. I still have to complete some of the tracks but most are in place. This is also the area that connects to the 3 tiered bridge that I posted some weeks ago that goes across a doorway.


idea-thinker
Attachments
Images (8)
Hey y'all,
We're having an all day rain. Seems like a good time to work on my new-to-me Lionel cattle car and corral. I had to make some minor adjustments. So, I present my most recent Lionel postwar accessory.
I need a second #3656 cattle car now.
Bill
Attachments
Videos (1)

Picked up these three (3) flat cars for next to nothing at a local show. First one up is one of the red Lionel flats that I detailed, weathered and added the Menards fire truck load.


Attachments
Images (4)


Dave and Bob, I have occasionally pondered whether all of us would get more done if we weren't on the Forum as much. ![]() Blasphemy, I know!
Blasphemy, I know! ![]() I finally decided that my initial statement isn't true. If I am like others, which I suspect I am, I gain new insight, motivation, learn better techniques, lean about better tools for the job at, hand, you get the idea. Bob's suggestion for a fine soldering tip and lit magnifier is just one case in point.
I finally decided that my initial statement isn't true. If I am like others, which I suspect I am, I gain new insight, motivation, learn better techniques, lean about better tools for the job at, hand, you get the idea. Bob's suggestion for a fine soldering tip and lit magnifier is just one case in point.
Idea-thinker, that's great you have a lot of operating accessories to add to the layout.
Mike, As you and I talked elsewhere, it is good to see you commenting here again after your cross half country move. I'm praying you find the right train room soon and the CEO approves!
Bill, working on the cattle loader is a good task for a rainy day. We had dry but cloudy skies the last couple days, but the weatherman predicts it will start raining again tonight.
I took advantage of the dry weather to spray paint two parts I forgot about when I was spray painting parts for my Brennan's Sanky Wanky Coffee Co. I have described the process ad nauseum on my layout build thread, but here are a couple so you can see the project.


Attachments
Images (2)
@Mark Boyce posted:Dave and Bob, I have occasionally pondered whether all of us would get more done if we weren't on the Forum as much.
I finally decided that my initial statement isn't true. If I am like others, which I suspect I am, I gain new insight, motivation, learn better techniques, lean about better tools for the job at, hand, you get the idea. Bob's suggestion for a fine soldering tip and lit magnifier is just one case in point.
Mark,
Again your build has turned out very nice. I really appreciate the steps you showed during the process. I agree with your statement above. Sometimes the need to go back comes from a new idea or skill. That has been the case with some of my other projects in the past. Unfortunately, I can't use that for an excuse on the things I am currently working on.
Dave
Great work everyone! Its nice to see things keep moving forward!
@idea-thinker Mark I am impressed with your work and your build, but I have to say i get a little dizzy trying to fallow all your track. But as long as you keep posting I am in for the ride!![]()
@RSJB18 posted:I have a needle point tip for my Weller gun. Makes soldering in tight spots easier.
Also a lighted magnifier work lamp on the bench.
Still amazed at how much stuff is crammed into FT switches.
What kind of Weller gun and tip Bob. 🤔
@Dallas Joseph posted:What kind of Weller gun and tip Bob. 🤔
I have a Weller Digital WLC-100 from HD. Various size tips are available as well.

Attachments
Images (1)

@RSJB18 posted:I have a Weller Digital WLC-100 from HD. Various size tips are available as well.
Thanks Doc. 
Trains are now running, road system is coming along
Attachments
Images (2)


The layout is looking good, Signalwoman! 👍🏻
@Mark Boyce posted:Dave and Bob, I have occasionally pondered whether all of us would get more done if we weren't on the Forum as much.
Idea-thinker, that's great you have a lot of operating accessories to add to the layout.
Mike, As you and I talked elsewhere, it is good to see you commenting here again after your cross half country move. I'm praying you find the right train room soon and the CEO approves!
Bill, working on the cattle loader is a good task for a rainy day. We had dry but cloudy skies the last couple days, but the weatherman predicts it will start raining again tonight.
I took advantage of the dry weather to spray paint two parts I forgot about when I was spray painting parts for my Brennan's Sanky Wanky Coffee Co. I have described the process ad nauseum on my layout build thread, but here are a couple so you can see the project.
Mark, Great job on the Sanky Wanky Coffee Co. I'll need to go to your layout thread and read the details.
I managed to run into the deal of the decade and picked up quite a bit of dimensional select pine lumber used, 1x4's, 1x6's, 1x10's, all 8 foot long, as well as quite few 4+ foot cut-ffs (1x4) select pine. Same individual had two sheets of 1/4 inch luan underlayment plywood... So now I have everything I need for the West End Industrial District.
Made significant progress on "brick weathering"... Decided to kit bash the Brook Hill Farm Dairy building together with the Lionel Municipal building that I picked up at a local train show... The Lionel building was glued together, but now I have managed to get it "properly" weathered.
Got one sheet of the plywood cut on a 46 inch radius, so I could start getting serious about laying out the warehouses, factories and keep exploring possible track arrangements.
I plan on doing some operating in this area, so these two sidings in the photos below should have 4 to 5 locations to drop and pick up cars from.


Attachments
Images (7)
Chris, Thank you very much. Be sure to make a couple cups of coffee before sitting down to read about the Sanky Wanky. It will take you at least as long to drink them as to read the description.
Your good fortune on the wood deal is already coming in handy with your urban planning.
Second in the series of these inexpensive flat cars to be upgraded is this Texas & Pacific flat car with painted and weathered deck and a Menards die-cast military half-track held down with weathered chain.


Attachments
Images (4)


Richie, that is a really handsome job!
Thanks, Mark - for whatever reason, I like detailing these empty flatcars and creating custom-like loads for them. Who knew ?
That Menards half-track is a nicely detailed diecast model, especially for the price. I may go back and detail it if I can find the time.
Just finished a new style of bridge pier. This pier will support an overhead truss bridge as seen in the photos but space was tight where I was planning on putting a run of Super Streets in so I created a pier that has a passthrough at the bottom of it. I do not know how practical it would be in real life but in my world this pier makes it possible for me to keep my Super Street track in the same space. These images were setup just for the photos. This setup goes elsewhere on the layout which I will take photos of when it is in place.


idea-thinker
Attachments
Images (4)
What a handy idea! It looks good to me!
If you spread them out just a little more it will look better
5 steps forward 6 steps back - or so it seems.
Made good progress wiring in new MP4 switch motors and Tortoise motors controlled by Touch Toggles. Only thing that remains is the engine yard, which I am rethinking. Power appears to be good on all sections, waiting for the gremlin to pop up to prove otherwise.
Meanwhile, the CEO and I decided to co-locate all 170 feet of rolling stock shelving onto a single wall. That task is done, but all that rolling stock is now on my layout. YIKES. Question - since I appear to have track space for more cars and engines does that mean I need to buy more goodies???

As I mentioned earlier, the water feature on the left is removable. It had to slide out to provide access to run additional power and switch motor wiring.
Attachments
Images (1)

ScoutingDad,
Same dance over here. Three steps forward and four back. I removed a switch and spur to install another cool 50's accessory. Now I have a dead short somewhere on the main line. Tomorrow is another day.
Bill
@ScoutingDad posted:5 steps forward 6 steps back - or so it seems. Question - since I appear to have track space for more cars and engines does that mean I need to buy more goodies???
HMMM..........🤔...🤔.........😀😄😃😂🤣😂😃😅🙃
@Odenville Bill Bill, did you catch the name of that gremlin when he laid in the dead short?
@ScoutingDad posted:5 steps forward 6 steps back - or so it seems.
Made good progress wiring in new MP4 switch motors and Tortoise motors controlled by Touch Toggles. Only thing that remains is the engine yard, which I am rethinking. Power appears to be good on all sections, waiting for the gremlin to pop up to prove otherwise.
Meanwhile, the CEO and I decided to co-locate all 170 feet of rolling stock shelving onto a single wall. That task is done, but all that rolling stock is now on my layout. YIKES. Question - since I appear to have track space for more cars and engines does that mean I need to buy more goodies???
As I mentioned earlier, the water feature on the left is removable. It had to slide out to provide access to run additional power and switch motor wiring.
Wait! I'm confused.......Is this a trick question???????![]()
![]()
![]()
I decided to improve the look of one of my only three pieces of prewar Lionel. I didn't see a quick way of removing the stanchions(?) for the grab rails, so I taped them off and spray painted the tank. Not the best, but I wasn't trying to restore it, just make it look a little better to run once I get a locomotive. Then I used a chisel tipped "Deco-color" gold leaf paint marker from Walmart to paint over the grab rails. That marker is excellent for the brass color grab rails, although on the domes the paint pooled a little in spots. For a splapdash ham-handed effort I think the car came out pretty good. Before and after:


I also used sections of track to start mocking up what I want to do with a future 0-27 toy train layout. Where the H0 track is now will be the approximate location of the lower level 0-27 loop. The existing H0 track passes under the upper level 4 times, which I find visually interesting and plan to retain when I change it to 0-27. I'm thinking it will have a crossover in the middle to change direction at least once. I don't want an X crossing in the middle, so I might add a turnaround somewhere else so trains can change directions both ways without backing up. It will probably have one siding outside each side of the lower level. For visual interest, the siding will duck inside three of the trestles before rejoining the main line as in the photo below. I rebuilt three of the trestles wider so the trestle may be turned at an angle to allow the track to enter and exit without S-curves.


Attachments
Images (4)


John, The car came out very good. Thanks for sharing your procedures. What did you use for the silver, if I can ask?
Tom
Preparing to do some work on the row house diorama. This was built to be removable because it sets in the back of the layout. The truss bridge has to be disassembled to get access to the area. Once that is done it's just a matter of pulling the diorama out and placing it on the workbench. While I am back there, I probably will work on other things in the area so that I don't have to get back there for a while. That means no train running on the upper level until work is completed. Photos show bridge partially disassembled, space where diorama goes, and diorama on the workbench.
Dave


Attachments
Images (3)
@luvindemtrains posted:Preparing to do some work on the row house diorama. This was built to be removable because it sets in the back of the layout. The truss bridge has to be disassembled to get access to the area. Once that is done it's just a matter of pulling the diorama out and placing it on the workbench. While I am back there, I probably will work on other things in the area so that I don't have to get back there for a while. That means no train running on the upper level until work is completed. Photos show bridge partially disassembled, space where diorama goes, and diorama on the workbench.
Dave
You do amazing work, Dave. It's beyond museum quality.
John
@PRR8976 posted:John, The car came out very good. Thanks for sharing your procedures. What did you use for the silver, if I can ask?
Tom
Thank you, Tom. I used Krylon. (At work now but I think it was Satin finish.) It came out with a bit of a sandy texture. The original paint was kind of sandy, too, and I just lightly sanded it, so that surface probably got accentuated. But I'm not disappointed considering the time expenditure.
John
John,
Wowser, what a compliment. Thanks man!
Dave
More road work, nearing the end. It's been rather satisfying running the truck up and down the front stretch today.

Attachments
Images (2)
@Signalwoman posted:More road work, nearing the end. It's been rather satisfying running the truck up and down the front stretch today.
Looking good. ![]()
Are you still planning some kind of mountain village for the upper level ?
It's not fair that YOU ONLY should find it satisfying to see the truck running " up and down the front stretch ".............. can you do a short video ? 🤔
Good morning guys and gals! I hope your all having a good week so far! I had to go back a little to see all the amazing work!
@chris a, what a great deal on the wood and man your going to busy putting all those buildings together! I know for one thing I will be watching your progress and trying to take notes for down the road!
@Richie C. Nice work on the new flat car! I will have to check out Menards!
@idea-thinker Now that is planning! It would be so neat to run trains and cars at the same time on a layout!
@ScoutingDad Jeff, its nice that the CEO was able to help you make more room for rolling stock! I hope you didn't ask her the same question! I know if it was me and my CEO helped me make more room I would take that as a go ahead for more stuff! LOL
@John's Trains John the tanker car really turned out perfect! and the layout you are putting together really looks fun!
@luvindemtrains Dave, it is so cool that your able to take the row houses off the layout to work on them and put them back! You do such AMAZING work and I often check out your YouTube page just to make sure I am not missing something!
@Signalwoman The roadway looks good, its a good addition to your layout!
As for me it's the same old thing right now. Still looking for that right house with a train room. We think we found one but waiting to see what the seller is going to be asking! We talked to them and found out it will be going on the market soon!
Here is a funny thing, When I was a young kid we lived near RR Tracks and I always thought it was great when a train went by, and that is what really got me into trains and building layouts, Now that were living in Missouri we are right near the RR tracks and they run trains all night long, kind of a drag! LOL
I hope you all are doing well and finding time to have fun with your trains and your layouts!![]()
Mike, it was more an issue of taking up wall-space the CEO wanted to use. I ended up removing all my shelves from two walls and reinstalling on a single wall, but this time the shelves went nearly floor to ceiling. The shelves were cut for a specific placement so they so not quite fit seamlessly.

I could use another 4 or 5 shelves to get everything on display. As is, I think I can get nearly all "still boxed" gear out on the layout, especially if I leave 2 passenger consists on the layout at any one time.
Attachments
Images (1)

The shelves look great, Jeff! What a Colorful display! 😉
Mike, we look be about the same distance from railroad tracks as I did growing up, about a quarter mile. Both cases the tracks are down in the hollow about 300 feet in elevation. Close enough to be heard, but not so close as to keep you up at night. Tell those folks what you want pay, and when they know you are building a model railroad they will be glad to take it. 😄
@mike g. posted:As for me it's the same old thing right now. Still looking for that right house with a train room.
Mike, Get real! You need to buy a train room with a house attached!!! Good luck with the process!
Cheers, Dave
New to me 253 from the NYC office:

Goes great with these green prewar Pullmans:

For the Tail End Tuesday crowd:

Enter Her Nibs, Norma Bates Kitteh, Road Supervisor:
Norma is, of course, her usual helpful self. ![]()


The 253 is missing its pantograph, so I subtituted a prewar fixed Pittman trolley pole.

The pole can be swung around for storage:

All in all, a good match for the 253 and its train! ![]()

Mitch
Attachments
Images (8)
Videos (1)

@Dallas Joseph posted:Looking good.
Are you still planning some kind of mountain village for the upper level ?
It's not fair that YOU ONLY should find it satisfying to see the truck running " up and down the front stretch ".............. can you do a short video ? 🤔
It's turning into more of a small city, as soon as I get the loops completed I'll post a video, it's to hard to chase the truck and work the camera with the room as cluttered as it is right now. It's a great effect though, the little front wheels turn through the corners and all.
I plan to have one car peaking in and out of the buildings in a city on the top, and another vehicle running on the bottom out in the open. Once I get the road system working I suppose I'll have to invest in a few more vehicles....

Superbly realistic!
Ran some of the permanent wires for the outer main loop.

Probably overkill with the amount of drops I have planned but I don't want to have to add more later when it would be 10x more difficult.
Attachments
Images (2)
Myles, the video is remarkable. You certainly have a talent for scenery.
Thank you Bob and Rod for your comments. I’ve done several clinics at Railroad shows and enjoy passing on the knowledge to others with hands on demonstrations.
I took up more than 15 feet of track while searching for a short on the main line. The short cleared. Now I'll put small sections back down and look for the cause. The short appeared after I removed a switch and spur to make room for another cool Lionel accessory. A work day on the layout is still quality train time.


Bill
Attachments
Images (2)


Add Reply
Sign In To Reply
