


Excellent!
@RSJB18 posted:Did a portal-ectomy today. Had to do some surgery on the outer upright to clear my new Doodlebug. I had to move a crossing flasher too.
The portal is very lopsided now but it is what it is.....🙄🙄🙄
Not thrilled with the stone print I added over the top. I'll sleep on it.
Bob


It looks fine Bob. Maybe smudge the facade a little. The doodlebug will make it all worthwhile.
Jay
@Tranquil Hollow RR posted:It looks fine Bob. Maybe smudge the facade a little. The doodlebug will make it all worthwhile.
It's probably a bit late, but if the off-center modification continues to be an issue, you could always carve *both* sides an equal amount, in order to make the modification symmetrical. Just sayin' . . .
[And believe me, I feel your pain -- when I added a tunnel on the layout, I found that the larger engines *barely* cleared the double track portals I used, so I ended up having to extend the edge of the layout an inch or two to allow me to reposition the portals -- and even then there's sometimes minor contact!]
@Tranquil Hollow RR posted:It looks fine Bob. Maybe smudge the facade a little. The doodlebug will make it all worthwhile.
Jay
@Steve Tyler posted:It's probably a bit late, but if the off-center modification continues to be an issue, you could always carve *both* sides an equal amount, in order to make the modification symmetrical. Just sayin' . . .
[And believe me, I feel your pain -- when I added a tunnel on the layout, I found that the larger engines *barely* cleared the double track portals I used, so I ended up having to extend the edge of the layout an inch or two to allow me to reposition the portals -- and even then there's sometimes minor contact!]
Jay- the "stone" on the top is carved rigid foam. I think I'll make another piece with an arch that I can paint to match. I had the paper print already so I gave it a shot.
Steve- thought of that too but the portal is T-111 and a big mess to cut. This is on the right side of the layout and you can't really stand in front of it to look at it straight on. This was the second time the MOW crew had to break out the sawzall too......![]()
Bob
Very nice - but where's the Italian Sausage sign ? ![]()
Did a similar project .....


Attachments
Images (2)


@Bob Golfs posted:Here’s a better view of the building insides. I’ll add a few patrons outside when the stand finds its way to the layout.
Ultimately, the lighting is all DC. I used a 12v buck converter for the 4.5v Miller sign and the LED lights were 5v to 12v whose supply I could bleed off the 12v input to the buck converter. I could have used the 4.5v too for the lighting and I tried, but it was too dim. Enjoy!

Great job on the Hot Dog stand. Very creative.
Bob
Finished my new bridge today. I got the idea from the Madison street bridge in downtown Chicago. It is basically a truss under bridge with short sides and with this one I applied simulated wood blanks for the walk area. It is almost 54 inches long and about 5 1/2 inches tall. I needed the bridge to be this long in order span across a walkway. It will be a lift out type.


idea-thinker
Attachments
Images (4)
@RSJB18 posted:Did a portal-ectomy today. Had to do some surgery on the outer upright to clear my new Doodlebug. I had to move a crossing flasher too.
The portal is very lopsided now but it is what it is.....🙄🙄🙄
Not thrilled with the stone print I added over the top. I'll sleep on it.
Bob
Ahhh… can scale passenger cars be far behind ![]()
![]()
![]()
@Richie C. posted:Very nice - but where's the Italian Sausage sign ?
Did a similar project .....
Rich, uncanny the similarity! And after I did the signage, I thought maybe I should have had an Italian Sausage sign, but didn’t act. Hearing it from you, I will now change one out to replace it. Thanks,
Bob
Starting to think about road crossings.......and, placement of these itads.....

Peter
Attachments
Images (1)
@Putnam Division posted:Starting to think about road crossings.......and, placement of these itads.....
Very timely Peter ! I have a bunch of these & would like to see how they work out for you. Rich
Peter
@RSJB18 posted:Did a portal-ectomy today. Had to do some surgery on the outer upright to clear my new Doodlebug. I had to move a crossing flasher too.
The portal is very lopsided now but it is what it is.....🙄🙄🙄
Not thrilled with the stone print I added over the top. I'll sleep on it.
Bob, I think the portal looks fine, we'all only noticed when you called our attention to it. Rich
Bob
Piled a bunch of stuff on it. Then I pushed enough of it out of the way to run my train.
@Mike D posted:Piled a bunch of stuff on it. Then I pushed enough of it out of the way to run my train.
I like your sense of priorities, Mike! ![]()
I modified this elevated area with the 4 bridges several times over the past year or so. Kept getting closer to something I like, but not quite:

Today I replaced the useless girder bridge over the solid wall with some railings I made - I think I'm finally happy:

Attachments
Images (2)
One of Warrenville's bridges needed maintenance, so I spent today building a scaffold and hiring a couple of guys to do the needed work.


Attachments
Images (2)
@Putnam Division posted:Starting to think about road crossings.......and, placement of these itads.....
Peter
I've always thought the base which houses the controls of the Lionel 153IR's was too big and ugly to have a spot on top of my layout. If you're so inclined, the top electrical cabinet which houses the IR sensor can be physically separated from the base and there's about three wires that connect the cabinet to the bases' electronics. They are too short to comfortably span the thickness of most layouts but, if you unsolder the wires and splice in about 6 inches of new wire you are able to drill a hole in the layout and feed the wires underneath and mount/hide the base under the layout. Obviously, you can only solder in one end and then run the wires through the hole and then have to solder the other end. The cabinet will hide the hole.
About the only issue is that the cabinet might not be high enough for the sensor to operate efficiently - you'll have to try it out. If it's too short, you can make a simple 1" tall base out of some styrene sheets and paint it silver/gray to match and glue to the cabinet. Looks much better than the original base.
IMHO, it makes for a much "cleaner" look and is something to think about when you find a good location for them.
You can see one of mine at the very bottom of the attached pic between the two small trees.
Just a thought.

Attachments
Images (1)

@Richie C. posted:I've always thought the base which houses the controls of the Lionel 153IR's was too big and ugly to have a spot on top of my layout. If you're so inclined, the top electrical cabinet which houses the IR sensor can be physically separated from the base and there's about three wires that connect the cabinet to the bases' electronics. They are too short to comfortably span the thickness of most layouts but, if you unsolder the wires and splice in about 6 inches of new wire you are able to drill a hole in the layout and feed the wires underneath and mount/hide the base under the layout. Obviously, you can only solder in one end and then run the wires through the hole and then have to solder the other end. The cabinet will hide the hole.
About the only issue is that the cabinet might not be high enough for the sensor to operate efficiently - you'll have to try it out. If it's too short, you can make a simple 1" tall base out of some styrene sheets and paint it silver/gray to match and glue to the cabinet. Looks much better than the original base.
IMHO, it makes for a much "cleaner" look and is something to think about when you find a good location for them.
You can see one of mine at the very bottom of the attached pic between the two small trees.
Just a thought.

Great information but probably beyond my skill set. I may also look at the stuff Dennis Zander of ZStuff sells.
@idea-thinker posted:Finished my new bridge today. I got the idea from the Madison street bridge in downtown Chicago. It is basically a truss under bridge with short sides and with this one I applied simulated wood blanks for the walk area. It is almost 54 inches long and about 5 1/2 inches tall. I needed the bridge to be this long in order span across a walkway. It will be a lift out type.
idea-thinker
Beautiful bridge work!
Your layout looks like it would be a lot of fun to run trains on!
Rod;
Our layout is getting to be a lot fun to run since we are now at 19 trains running at once. It is really nice to see trains in motion everywhere. Our goal is to get to about 50-75 trains running at once.
idea-thinker
@Putnam Division posted:Great information but probably beyond my skill set. I may also look at the stuff Dennis Zander of ZStuff sells.
Take a look at the IR detectors on Azatrax, also. Their detectors can be placed/buried between the tracks. Along with adjustable relays, I've used their stuff to do such things as throw a switch a pre-programmed number of seconds after a train passes through. Great products and easy to talk to.
Finished adding the Lionel Hobo Hotel. Started with the generic Lionel accessory, ground cover underlayment is Woodland Scenics shaper sheet, added ground cover, more Hobo figures and a piece of track to the left of the boxcar. I also added light in the boxcar, a flickering 50 gal drum, and hobo sound. I used the sound module from ITT Products. It's activated by a conventional switch, but I intend to change that to an ASC2 activation in the future. The sound card inputs 4v DC. I decided to mount the AC converter power board (Input is 18v AC) and the sound board on one piece of foamboard and then velcroed the entire setup under the layout right under the boxcar. The speaker is mounted separately.

Attachments
Images (1)
Videos (1)

@ToledoEd posted:Finished adding the Lionel Hobo Hotel. Started with the generic Lionel accessory, ground cover underlayment is Woodland Scenics shaper sheet, added ground cover, more Hobo figures and a piece of track to the left of the boxcar. I also added light in the boxcar, a flickering 50 gal drum, and hobo sound. I used the sound module from ITT Products. It's activated by a conventional switch, but I intend to change that to an ASC2 activation in the future. The sound card inputs 4v DC. I decided to mount the AC converter power board (Input is 18v AC) and the sound board on one piece of foamboard and then velcroed the entire setup under the layout right under the boxcar. The speaker is mounted separately.
The boys have themselves a nice little camp there. great job.
Bob
@Richie C. posted:Take a look at the IR detectors on Azatrax, also. Their detectors can be placed/buried between the tracks. Along with adjustable relays, I've used their stuff to do such things as throw a switch a pre-programmed number of seconds after a train passes through. Great products and easy to talk to.
THank you!
Peter
Old Suzanna'.. Is alive and well at the Ed-O hobo camp... You have become quite the electronic technician....... 😁👍 Nice work'...
Started my power distribution board. Still need to buy 2 more Powerhouse 180's and another AIU.
Really need the Base3 and WTIU to come in also.
Attachments
Images (7)


Bob, Ted, thanks for the comments and kind words.
@Dan Kelley posted:Started my power distribution board. Still need to buy 2 more Powerhouse 180's and another AIU.
Really need the Base3 and WTIU to come in also.
Nice looking - make charts of where all your distribution ports go - it will invariably come in handy one day. Don't ask how I know ![]()
Evening everyone, WOW what great work here! I am sorry I did not call each of you out, but it has been a while since I have been here and there is a lot to catch up on! I can say that everyone is doing AMAZING work and I always love to come to this thread as it makes a smile on my face to see all of your hard work!
I hope to get back at it soon as we leave for Missouri next Saturday to find the new trains room with the attached house! LOL It might be sometime before I am back, but be sure I will be back and building again one day!
I hope you all have a wonderful weekend and find time to have fun with your trains and layouts!![]()
@mike g. posted:I hope to get back at it soon as we leave for Missouri next Saturday to find the new trains room with the attached house! LOL It might be sometime before I am back, but be sure I will be back and building again one day!
I hope you all have a wonderful weekend and find time to have fun with your trains and layouts!
“Trains room with the attached house”… Gotta love the attitude!!! Best of luck with the move and the search, Mike.
Wiring…..the eternal Black Hole…….but, I got these babies running!


 415 Diesel Fueling Station….purchased in the Bronx in the early 60s with some Christmas gift money ($4……quite a deal, new in the box!)
128 Newsstand…..Christmas gift from my parents in 1959
MTH 334 Repro Dispatch Station…..a gift from my colleagues in 2002
Peter
Attachments
Images (3)
I’m like Mike, I haven’t been here for a few days. Excellent work everyone!
Mike, well wishes on finding that train room in Mizzou!! Maybe I’ll be able to visit someday since you will be half as far away. 👍🏻
Peter, Black hole indeed! That’s what I have thought about my layout which is much smaller than yours. The added control of the accessories is great!
Progress often comes in small increments. After deciding to change the center island to a waterfront feature, the track plan now includes a upper and lower spur. The section even includes a spur to park the South Shore Switcher.
Trying to decide on the seawall height. Right now its 3 1/2 inches, Thanks to Paul D @OhB1 for taking the time to take the boat and buildings off a layout and offering them to me. I think I will build an 8 silo grain bin on the lower section left of the grainary. Still not sure if the seawall should be wooden pilings instead of stone. Building will go on stilts over the water. (Like my blue cloth simulating water?)

Wider view of the area. The water area slides out so I can reach the back wall The upper town/building sections are removable. Right side of the photo is a TBD.

Attachments
Images (2)

Making progress, albeit at a "snail pace"..... Been working on this Korber Flag Co. kit I purchased used. Ended up re-spraying all the brick work and started over, as I didn't care for the way the previous owner did the mortar work. So got the walls pretty much where I want them, and they're all re-enforced with 3/8 x 3/8 timbers on the back sides to get the Korber Warp out. All 50 windows are painted, dull coated and weathered.


Attachments
Images (5)
@ScoutingDad posted:Progress often comes in small increments. After deciding to change the center island to a waterfront feature, the track plan now includes a upper and lower spur. The section even includes a spur to park the South Shore Switcher.
Trying to decide on the seawall height. Right now its 3 1/2 inches, Thanks to Paul D @OhB1 for taking the time to take the boat and buildings off a layout and offering them to me. I think I will build an 8 silo grain bin on the lower section left of the grainary. Still not sure if the seawall should be wooden pilings instead of stone. Building will go on stilts over the water. (Like my blue cloth simulating water?)
Wider view of the area. The water area slides out so I can reach the back wall The upper town/building sections are removable. Right side of the photo is a TBD.
I’m glad we could make it work out!!! They look great and I’m sure the previous owner is very pleased about where they went!
I haven't posted in here for a while, or in OGR for that matter! Free time to do fun stuff can be hard to find sometimes.
Anyway, I just received some Arttista figures I've been wanting for sometime, so here's some photo's of what I did this afternoon.
Added a driver for the CAT crane, he's smoking a stogie. The guy in the lower left is also new, he's a mechanic holding a wrench.
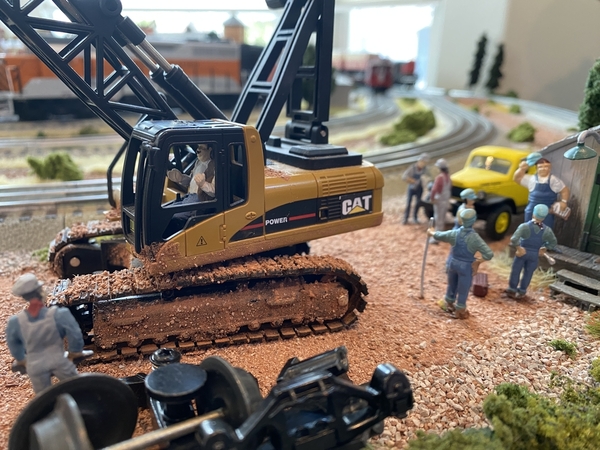
Two more mechanics. Jed on the right is saying to Herb, "The new truck ain't gonna get here any faster starring at the thing, we better find some work".

Another two mechanics standing in front of the Power Wagon. Monty with the wrench on his shoulder is giving Lando on the left some friendly mechanic banter, "We gotta get over to that WP Geep 38 and repair the water leak ASAP, so get movin' before I club you over the head with this here wrench". hehe

Added Emilio the chef and Carlos the server. Emilio is chatting with a couple of friends and Carlos is serving a couple with their child

This is the first time I've purchased Attista figures and I'm really please with them. They're pewter and are well detailed with a great paint job Dennis, the owner of Arttista was great to work with too. Very responsive and helpful. Ordering is a little old fashioned, but it works well with Dennis at the helm.
Attachments
Images (4)


I finally got all the way to my train room for the first time this month. Receiving a Lionel 3656 car and corral with today's mail was the needed inspiration. The car and corral work! While In the operators chair, I added weight to a few box cars. I feel a running session coming on.


Bill
Attachments
Images (2)


Videos (1)


 Got rid of the oversized base on the Lionel signal
Attachments
Images (2)
A second project completed today, however this one took about a week working on it off and on.
K line 15" aluminum California Zephyr Silver Diner car interior upgrade. These come monotone gray, definitely needed some color and floor. This is the second diner in my CZ consist.
This is what it looked like new out of the box:

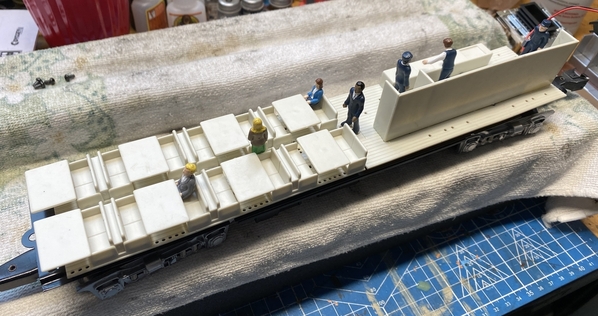
I removed all the love seats and tables and painted the tables flat white to simulate a white table cloth. Painted the love seats kind of a desert pink and blue and alternated the colors. I then painted the kitchen with silver to simulate stainless steel and added a small kitchen serving table that with a table I had laying around. Added carpet that I printed on my Canon printer, and installed a slatted wood floor in the kitchen. Added a bunch of passengers, Lionel and K-Line, and the two chefs are Arttista. All paint is Testors enamel.
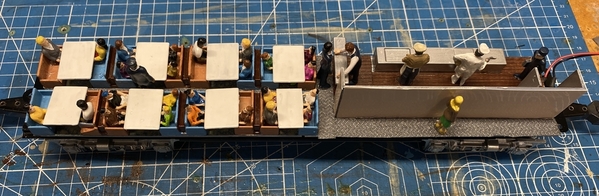


Fun project! I'm mostly happy with the results. I wish the windows were larger in the kitchen!
Attachments
Images (9)


@Lionelski posted:One of Warrenville's bridges needed maintenance, so I spent today building a scaffold and hiring a couple of guys to do the needed work.
@Lionelski You got away cheap John! Look at all the equipment and manpower that got involved for my bridge repair.
Attachments
Videos (1)

Add Reply
Sign In To Reply
