
So I’m playing around with leds some more, here’s another GRJ designed pcb.  He uses it for ground lights.  But it surely has many more uses in any number of applications you can think of(buildings, backyard lighting, out buildings, etc.).  The pcb(6 per board)is from OshPark at $2.30 for batch of three, shipped(12 cents each).  Way cheaper from off shore sources.  I bought the 3528 smt led from the bay at $8 for a hundred.  So I have 20 cents in each light.  They run off 3-5vdc(however you get there is up to you).  A resistor from around 220ohms to around 1k can dim them out a for a variety of lighting applications to suit your taste.  One tip, I put a tiny drop of glue on the pcb, place the led, then after it’s dry, solder them.  Stops me from pushing them around when I try to solder. Try em’ out if you have a need.  Click for larger image.

E73CA556-A23B-4D0D-BFA1-67C7218C8FF1 1A47F461-2F8B-4CE2-A74F-8A47306DE019

Attachments

Images (2)
  • 1A47F461-2F8B-4CE2-A74F-8A47306DE019
  • E73CA556-A23B-4D0D-BFA1-67C7218C8FF1
Last edited by TedW

I had some time to spend in the Train Room this morning so I decided to rebuild the motor in my Marx M10000 streamliner. It's been sitting on this shelf since it smoked up and broke down at the beginning of the winter.

IMG_20220416_080045003

With about 4 hex nuts and 2 machine screws (plus some encouragement with a wheel puller), the entire motor assembly came apart. It's very similar to some of the other prewar Marx motors I have worked on.

Motor disassembled

My M10000 set has an early manual reverse unit rather than the more typical 2-position E-unit. The ancient wires were crumbling and were in desperate need of replacement. I took this photo so I could remember what went where befoe cutting off the old wires.

Marx manual reverse unit wiring

I soaked all of the parts in my favorite general purpose metal cleaner, WD40, and spent an hour scrubbing off 85 years worth of grime and surface rust off of everything.

Cleaning all parts with WD40

I rewired the locomotive with heavier-gauge modern wire.

Replacing crumbling wire

I put the electrical components back together and tested the armature on the bench to make sure I had wired it correctly. The last step was to polish the wheels on my bench grinder and press them back on with my table vise.

Polish wheels with grinder

Here's the rebuilt motor, freshly lubed with light machine oil and ready to go back into the locomotive shell.

Motor ready for reassembly

The set runs a whole lot better now, check it out on my Marx / prewar Flyer table!

Attachments

Images (7)
  • IMG_20220416_080045003
  • Motor disassembled
  • Marx manual reverse unit wiring
  • Cleaning all parts with WD40
  • Replacing crumbling wire
  • Polish wheels with grinder
  • Motor ready for reassembly

Sorry for not having Pic;s  But for the last couple of weeks ,  Its been Flat cars , 2 AllNation cast aluminum , 2 LaBelle Stick built) a Walthers refurbish (From the late 1930's early 40's) and a very unique  Scratch build That hade scale details in a set of  late 1930's lionel tinplate trucks, (I have about 10 reefers and box cars done the same way)

Have a Santa Fe F3 from 1948 bought as junk and needed a good home once again the famous x is on the shells I have one other 2333 with the X on both powered and dummy units, I also have a pw Wabash  2240 AB unit no X along with a PW 2344 NYC ABA no X on either powered or dummy. Have some Greenburgh's Lionel books and nobody can figure out what the X is for Anyone have a PW Lionel F unit with the X other than Santa Fe. Thanks


Attachments

Images (1)
  • mceclip0

Working with solder paste:
I’ve been playing around with small flickering led boards designed by GRJ.  Hand soldering 0805 smt resistors on these boards is not easy.  An alternative would be using solder paste for mounting the resistors.  Having no experience what so ever, I promptly ordered some from Amazon.  A 15 gram syringe was around $15 shipped(wife’s Prime account).

Image.jpeg

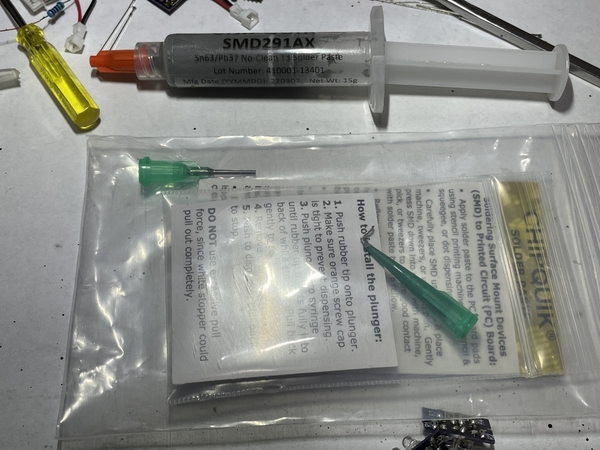
Comes with directions and a couple of tips for dispensing. I couldn’t get the plunger to clip into the barrel, and some of the paste eeked out around the seal.🤷‍♂️ No matter, forged ahead. The stuff comes out of the syringe in little globs making it fiddly to place on the pcb pads. But there again just go with it.

Image_1.jpeg

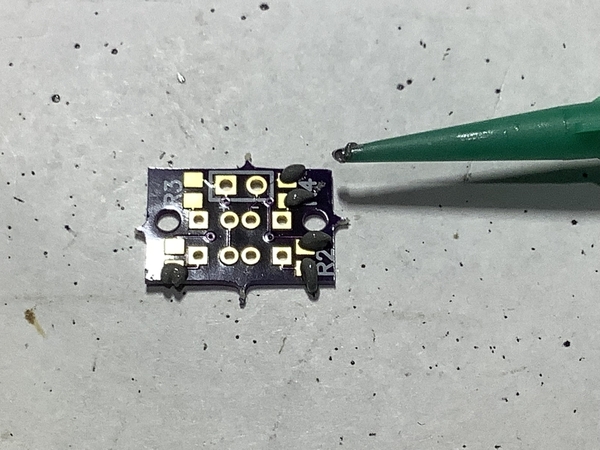
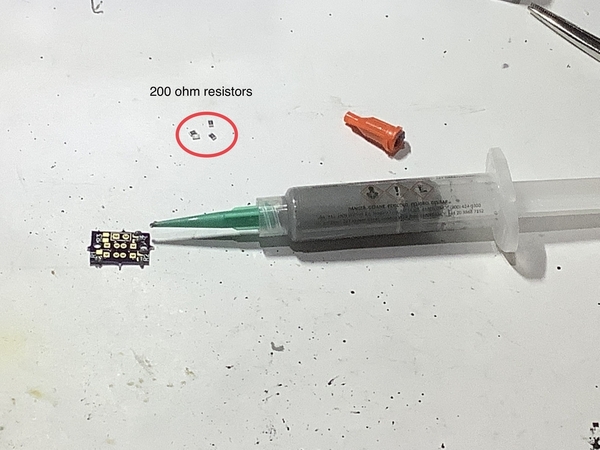
Placing the resistors on the paste was much easier.

Image_2.jpeg

Image_3.jpeg

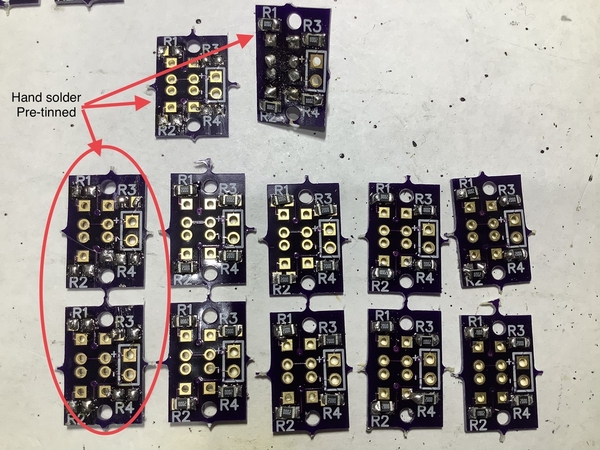
Put the boards on a piece of 3/8” plywood for heating.  Then came applying heat with a pretty cheap heat gun.  Took about 20 seconds at about an inch+ away moving around the board for the solder to turn silver.  After cooling all seems well, and I think a neater looking end result.  The electronic experts may opine on the length of the heat effect on the resistors.  I simply don’t know if they are impacted or not.

Image_4.jpeg

Over all, solder paste does a neater job but is kinda messy to start with. Experience might make the process easier and neater. My research revealed the paste has a shelf life of 6-12 months, the syringe I bought being a lifetime supply. So I’m sure some will be wasted. YMMV… Give it a whirl if you aren’t sure soldering with an iron is the best method.

Image_5.jpeg

A little experiment with a glob of paste, much bigger than needed to solder the resistors, placed on a strip of brass with an instant read thermometer.  It takes more time for the blob to flash to silver; thirty seconds instead of ~20 for the pcb.  The temperature is around 437 degrees F.  Not very scientific, but is an example of what to expect.


Attachments

Images (6)
  • blobid3
  • blobid2
  • blobid5
  • blobid1
  • blobid0
  • blobid4
Videos (1)
FullSizeRender
Last edited by TedW
@coach joe posted:

D&H LOVE NY WE 2207 ebay 22 [3)

Steve, it appears as if there is texture to the rust above the heart as there would be with such advanced rusting on the prototype.  Is that just the excellent blending of colors to obtain the rust or do you add something to give it actual texture?


Texture depends on how much paint is applied. Using 4 basic colors gives you the look and texture. 7 colors is needed for freight car roofs.

Here’s one just about to leave the workbench at last!

I had this old K-Line Pennsylvania L2S Mikado for years that I bought off a fellow forum member for a low price, and I finally upgraded its insides:
- New LED headlight
- Fan smoke w/ John’s Super Chuffer board
- 4 chuffs per wheel revolution with a 3D printed cam by Sid’s Trains
- 100 speed steps w/ ERR Cruise control
- Replaced the generic audio board with a Lionel RailSounds 5 board with the correct road name and number specific CrewTalk

268CB23B-D500-4EA3-BF8E-F65B6C555D61813B2FDE-C65A-4135-A62E-6E9086DB316FBF630160-1485-41B6-B927-7E917EADDB83
Needs a bit more TLC here and there, plus a dash of weathering, but the insides are fully finished and up to date for my usage.

Attachments

Images (3)
  • 268CB23B-D500-4EA3-BF8E-F65B6C555D61
  • 813B2FDE-C65A-4135-A62E-6E9086DB316F
  • BF630160-1485-41B6-B927-7E917EADDB83
Videos (1)
trim.DA65C293-6B3D-4BAC-8DA4-ABA76FCD0200

BD90C4AC-EF30-4725-9F69-3D528AA853468A75C171-0F75-421A-A5CC-2559826C8D1A7E9735B3-9681-4C12-8751-D28FD7F13BC7A0A2A43A-20FD-41D6-B596-18FAE2263AE7
B89C2C62-37DB-488A-BE1A-FB823EE0C42BA3B7C74E-7E06-4B1F-8679-3E68CCB383EA687087B1-1600-4F95-964C-7AA83F2795EF4339E04D-C689-4A70-8821-D2DDF49A453DYou could ask, “what did you manage to get off the workbench?”

There is still much to do on the two observation cars.  A major fix on the Frisco obs was to get rid of the full diaphagm.  The major fix for the FW&D obs was to blank out windows on the forward left side where a galley was located.  Still need to shorten the rooftop antenna and apply vents over the galley.  Maybe in September I can work on it some more.

Attachments

Images (8)
  • 7E9735B3-9681-4C12-8751-D28FD7F13BC7
  • A0A2A43A-20FD-41D6-B596-18FAE2263AE7
  • 8A75C171-0F75-421A-A5CC-2559826C8D1A
  • DA3171BD-16B7-4C00-8C65-783F3AE1C14C
  • B89C2C62-37DB-488A-BE1A-FB823EE0C42B
  • A3B7C74E-7E06-4B1F-8679-3E68CCB383EA
  • 687087B1-1600-4F95-964C-7AA83F2795EF
  • 4339E04D-C689-4A70-8821-D2DDF49A453D

Just finished making this McKeen passenger trailer for the Virginia and Truckee.

McKeen 48ft Passenger Trailer

As with many of my creations, everything is 3D printed in sturdy ABS plastic except the wheels and axles.

Trailer assembly

That includes the trucks and couplers by the way!

Long shank trucks for McKeen 48ft Trailer

Still some refinements to be made (need to add some weights to the inside and repaint the rooflines so they match better), but the opening doors work alright.

Opening doors

Attachments

Images (4)
  • McKeen 48ft Passenger Trailer
  • Trailer assembly
  • Long shank trucks for McKeen 48ft Trailer
  • Opening doors

Just finished making this McKeen passenger trailer for the Virginia and Truckee.

McKeen 48ft Passenger Trailer

As with many of my creations, everything is 3D printed in sturdy ABS plastic except the wheels and axles.

Trailer assembly

That includes the trucks and couplers by the way!

Long shank trucks for McKeen 48ft Trailer

Still some refinements to be made (need to add some weights to the inside and repaint the rooflines so they match better), but the opening doors work alright.

Opening doors

Interesting, I have STD Gauge, a O Gauge McKeen and today I got an H0 kit in the mail.

Steve

Add Reply

Post

OGR Publishing, Inc., 1310 Eastside Centre Ct, Suite 6, Mountain Home, AR 72653
800-980-OGRR (6477)
www.ogaugerr.com

×
×
×
×
Link copied to your clipboard.
×
×