Bob and Dallas - LOL
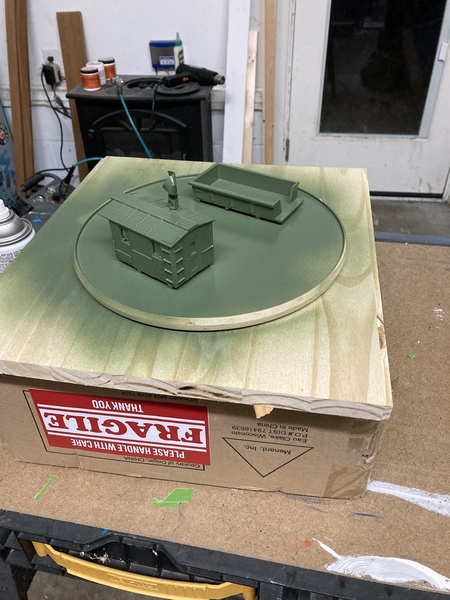
I've begun working on a WVRR maintenance building with some of these parts, a O27 switchtrack machine cover and part of a caboose body. Looks do-able in my mind at this point.
|


|
Bob and Dallas - LOL
I've begun working on a WVRR maintenance building with some of these parts, a O27 switchtrack machine cover and part of a caboose body. Looks do-able in my mind at this point.
@Lionelski posted:I commented because the Challenger looked so good on them - would have thought it required a wider curve tol ook so good.
Part of that is the level of the shot. It's basically as if you were standing near a real one moving. It looks worse from overhead, trust me. That's also because watching trains from above is unnatural, but we all do it with our models. 😉
It’s all in the details, a continuation of the MEC #11 project.
In order of their appearance from left to right first photo
The emergency fuel cutoff sheath/door, the GE builders plate, the fuel glass
second photo the prototype detail.
the (funky) safety pilot stripes last model photo.
Wiring up a Fastrack Uncoupling Track and Fastrack 0-36 Remote Switch both for Aux Power. Since reading the thread about Factory Wiring Errors on some Fastrack Switches I opened it up and checked to make sure the factory wiring was correct before hooking up power wire to Aux Input. Still doing some changes to my Menards 2 Bay Engine House.
Lou you're too modest. I have to concur with Dallas and Pat that COLA is a great job with spare parts.
LeRoof, two very nice projects going at the same time. The diamond looks like it's coming out great and the details on MEC #11 are spot on.
I've got a lot of projects in the works but no real work bench to work on. Here are a few that have been dragging on. Hopefully I'll get them done this year.
First up is an LIRR BEEP that I want to convert to USAF. I picked up two of these LIRR BEEPs when they were being cleared out. The idea was to repaint one of them and dress it up in USAF decals. Never had the heart to do the repaint so I started looking for donor shells. I bought a NOS Conrail one, thinking I could remove the lettering and decal it. Then along came this Kusan/Williams BEEP shell with PRR keystone stickers under the windows and white Pennsylvania above the fuel fill. Stickers peeled off and Mr. Clean Magic Eraser made short work of the lettering. The only issue is the handrails. I would love to use the metal RMT handrails instead of the plastic K/W handrails but Kusan/Williams has round holes and the RMT handrails have rectangular tabs. I need to figure that out before adding the decals.
Now I'm the rare bird that actually likes the GN Big Sky Blue paint scheme. I've got a MPC U36B and could never find any of the MTH engines that wear the BSB. I could never ring myself to splurge on any of the Lionel U33Cs. I found one of the U36B shells and fitted it on a Williams GP9. I had to alter the handrails but that's another story. I came across this GP7 shell. Found pictures of a prototype so I'm going to add the rooftop air tanks and the winterization hatch. I've got the decals and three possible donors for the chassis. Once I figure out which chassis I have to make a placard to attach to the hand rails for the road name.
Another BSB project. GN did have electrical operations. While they never had anything remotely close to the E60 I intend to dress this guy in a Fantasy Great Northern Big Sky Blue paint scheme. I've already peeled the red, white and blue stripe off. The repaint will be ambitious for me but I'm going to give it a shot. The Williams pantographs are a little sad but not in as bad shape as I remembered them to be. I would like to change them but finding these guys is impossible. I have one Atlas AEM 7 pantograph and would love to find another for this project.
@David Nissen posted:The LCRU headlight circuits change polarity at random times. This does not bother incandescent lights but LED's don't work on reverse polarity. A bridge rectifier and filter capacitors were added and the LED's then worked.
@gunrunnerjohn posted:I learned this lesson a number of years ago.
I tried to use the LCRX to add command to the Hot Box Reefer, I had one in the parts box. I worked occasionally, and then it wouldn't work, drove me crazy! I finally put a meter on it and found out about the polarity reversals! I never ran across this with the LCRU as I always had incandescent bulbs back then, so it never came up.
Wat?
That sounds infuriating! How would one even design a circuit to do that on purpose?! Another reason this forum is invaluable!
@rplst8 posted:Wat?
That sounds infuriating! How would one even design a circuit to do that on purpose?! Another reason this forum is invaluable!
Well, it's really the way that triac's work, depending on how it's triggered. You can either pass the positive or negative half-cycle input waveform or the full-wave input waveform. Obviously, they didn't think it would matter since in the 90's when it was developed, LED's for lighting were not generally used.
@SIRT posted:
Looks great Steve. Personally I would have kept the Iron City Beer and found a different donor, but that's just me.
Looked for many weeks. Gave up. Just nothing out there, even shells. Market is dried up.
Had to move on. The sound file needs to be changed to Bush Gardens - Budweiser, LOL!
@SIRT posted:Looked for many weeks. Gave up. Just nothing out there, even shells. Market is dried up.
Had to move on. The sound file needs to be changed to Bush Gardens - Budweiser, LOL!
LOL....
I was interested in one (not actively looking), to pull my Yuengling coaches with. I know K-line did a MP-15 engine as part of the collectors series but they are a rare as hens teeth.
I've gone back in time. My workbench is filled with Marx H0 that was put away years ago.
Steve
@SIRT posted:Looked for many weeks. Gave up. Just nothing out there, even shells. Market is dried up.
Had to move on. The sound file needs to be changed to Bush Gardens - Budweiser, LOL!
Steve, Many in these parts would say removing Iron City Beer logo is a sacrilege. Personally, I don't give a hoot. I know you will make it look far better than anything any of the manufacturers produced.
I had my work bench all cleaned up, for about a minute. Then I noticed cans of naphtha, alcohol, spray adhesive, contact cleaner, urethane stains and mineral spirts on a shelf 10 inches away from the furnace. So I’m mounting a steel case on a wall into concrete and away from the always running furnace for those hazmat goodies. Work bench was really cleaned up, not now. Oh well.
Haven’t posted in a while , currently have a JLC Big Boy on the workbench in need of power pickups rewired.
Last week I decided to up grade by putting backup lights in my 2671w tenders and also a 2046w tender.
@train steve posted:I had my work bench all cleaned up, for about a minute. Then I noticed cans of naphtha, alcohol, spray adhesive, contact cleaner, urethane stains and mineral spirts on a shelf 10 inches away from the furnace. So I’m mounting a steel case on a wall into concrete and away from the always running furnace for those hazmat goodies. Work bench was really cleaned up, not now. Oh well.
🔥🔥🚒🔥🚒🚒🚒🚔🚒🚑🚒..................Don't need any of this Steve............good catch. ![]()
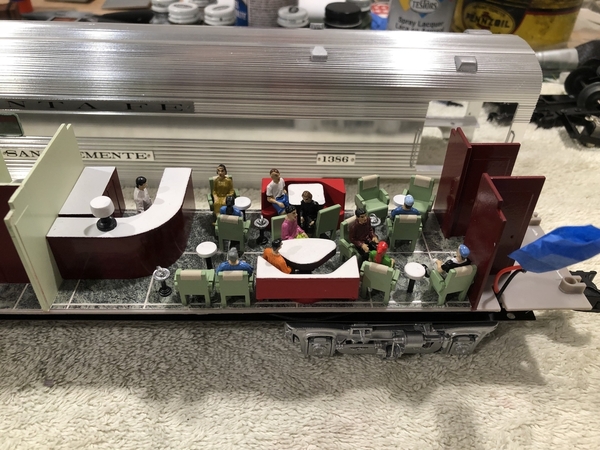
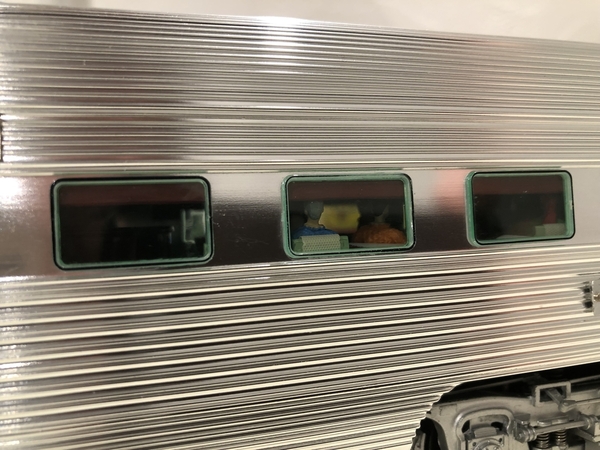
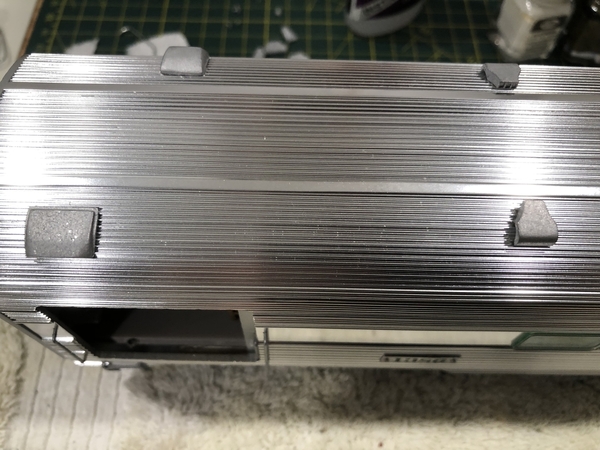
Just finished up my first try at an interior upgrade. I purchased a set of Lionel Santa Fe 18” aluminum passenger cars that needed to have the truck side frames replaced as well as most of the roof vents. The photos are of the baggage/lounge car. Removed the interior and put in floor covering, cut out one of the walls that blocked the interior view from the side windows, added head rest towels to the lounge chairs, put in floor mounted ashtrays, table lamp on the bar, window shades and rearranged the seating. Also painted some of the walls, bar and furnishings and added luggage to the baggage car shelves. Made most of the luggage myself and the rest is Woodland Scenics. Put new vents on the roof from Scale City Designs and finally got it back together.


@coach joe posted:I've got a lot of projects in the works but no real work bench to work on.
Another BSB project. GN did have electrical operations. While they never had anything remotely close to the E60 I intend to dress this guy in a Fantasy Great Northern Big Sky Blue paint scheme. I've already peeled the red, white and blue stripe off. The repaint will be ambitious for me but I'm going to give it a shot. The Williams pantographs are a little sad but not in as bad shape as I remembered them to be. I would like to change them but finding these guys is impossible. I have one Atlas AEM 7 pantograph and would love to find another for this project.
Did you ever consider getting the Acela Pantographs from Lionel parts dept? They were recently rerun.


 The first victim. 🤪 I wasn’t all impressed by this car. No loss if this experiment doesn’t pan out. It was less than $30 delivered. Since it’s powered for interior illumination I won’t change the cheap plastic trucks and couplers. I really don’t want to invest in the airbrush items I need to try this in a better method. I’m only planning on three pieces of rolling stock to finish my USMC train. All of my dreams of being featured in CTT were dashed upon the rocky shores of reality 20 years ago🤪 The best laid plans of mice and men….
The next victim.
Alex, do any of your customers actually tell you what may have happened. Looks like some of your repairs may have been self inflicted.
@romiller49 posted:Alex, do any of your customers actually tell you what may have happened. Looks like some of your repairs may have been self inflicted.
Good Morning Rod,
What i do with my customers is have them supply me a description of what happened to the engine. This one looks self inflicted.
Thanks, Alex
Fixed both of my Lionel TWs that needed repairs. In doing so I moved the needle on my soldering skills from "non-existent" to "conducts electricity & stays attached". My sole steam engine, Lionel DL&W #1501, was the guinea pig for my repairs & it approved !  Thks to Hennings for the TW parts.
Here is my workbench; a rolling cart beside the layout. I don't have room for a regular workbench with tools, paints, parts, etc. all in their place. Those items are in boxes on shelves under the layout. It works.
I am working on a Carolina Craftsman Kits model of the Thomas, West Virginia station for my Western Maryland in West Virginia layout, The Blackwater Canyon Line. The kit has great lasercut parts, and uses the thinnest wood siding I have ever used. It is great for wall thickness at window and door openings, but I have to be careful not to break the walls. Fortunately, they snap off along mortar lines and a little Aileen's Tacky Glue make for a joint I can't see when dry. I'm putting lots of stripwood bracing inside.
@Mark Boyce posted:Here is my workbench; a rolling cart beside the layout. I don't have room for a regular workbench with tools, paints, parts, etc. all in their place. Those items are in boxes on shelves under the layout. It works.
I am working on a Carolina Craftsman Kits model of the Thomas, West Virginia station for my Western Maryland in West Virginia layout, The Blackwater Canyon Line. The kit has great lasercut parts, and uses the thinnest wood siding I have ever used. It is great for wall thickness at window and door openings, but I have to be careful not to break the walls. Fortunately, they snap off along mortar lines and a little Aileen's Tacky Glue make for a joint I can't see when dry. I'm putting lots of stripwood bracing inside.
This is the kind of thing that is a lot of fun to do Mark. I would like to have room on my layout for such another interesting project.
I did an old coaling station building from a kit that was around about $ 100 . I modified it to get it to sit higher in the upper part of track at the one end of the layout. It is now an old abandoned structure. It too had paper thin laser cut wood siding. A little tricky but it kept me entertained for quite a few hours.
Have fun sir. ![]()
@Dallas Joseph posted:This is the kind of thing that is a lot of fun to do Mark. I would like to have room on my layout for such another interesting project.
I did an old coaling station building from a kit that was around about $ 100 . I modified it to get it to sit higher in the upper part of track at the one end of the layout. It is now an old abandoned structure. It too had paper thin laser cut wood siding. A little tricky but it kept me entertained for quite a few hours.
Have fun sir.
Thank you, Dallas! I used to build lots of models, but when our daughters were growing up there was always something else to do. I have no excuse for not getting back to model building sooner since the they are now 29 and 31! 🤷♂️
@Mark Boyce posted:Thank you, Dallas! I used to build lots of models, but when our daughters were growing up there was always something else to do. I have no excuse for not getting back to model building sooner since the they are now 29 and 31! 🤷♂️
SO.... now the DAUGHTERS don't have " something else to do " for you since they are 29 and 31 , Mark ? ![]()
![]()
Working their way to the workbench are half a dozen postwar Lionel F3B’s, in search of a solution… the problem - none of them have working couplers. Now in an ABA configuration that’s not an issue. But take then in just an AB lashup and you can’t couple anything to them— they were manufactured throughout their existence with non-centering dummy couplers. That’s a real hassle when you are trying to assemble a train in the yard, unless you always have a dummy car attached, and that causes a problem with the engine houses.
yes I know I can reach over and lift them up (most of the time) but after 60 years of production ( and I think those F3B’s are still made that way) doesn’t somebody have a more realistic way? But maybe not, it wasn’t until the Madison cars were reissued that an observation car was included, and surprise of surprises, it included a working rear coupler! But none of the many times reissued aluminum observations had a rear coupler. I had to do a little grinding and fitting on my own to resolve that issue.
so! I’m hoping this wonderfully astute group has a solution already created and I’ve just missed it over the years.
Dick Lawrence
@SIRT posted:
" BIG STUFF " improvement .😉
One of my early model MTH Premier Dreyfuss engines with the problematic swollen capacitors. This guy needs two replaced.
@SIRT posted:
Great save .![]()
Not a really big project but did save an interesting animated car. The Lionel 6201 . gondola was purchased in a box about 5 years ago. I wanted the K-Line loco and a bunch of freight cars were included. I did clean up the car and purchased the rubber bands that drive the capstans but the mechanism was really worn out with the capstans leaning inward toward each other so much that the film strip kept falling off. I thought I would give "rebushing" the chassis a try using brass washers glued in. It actually worked and the car now operates. I attached a few pictures and a video link.
Access to this requires an OGR Forum Supporting Membership
