Here is my attempt to convert an MTH undercoated "production sample" diesel loco I recently won in a Cabin Fever Auction.
It had geared drive trucks, with the pick-up rollers, protocouplers at each end, the engineer figure, all of the cabin glass, and the horn (all in a little plastic bag ready for assembling), but no motors or circuit boards.


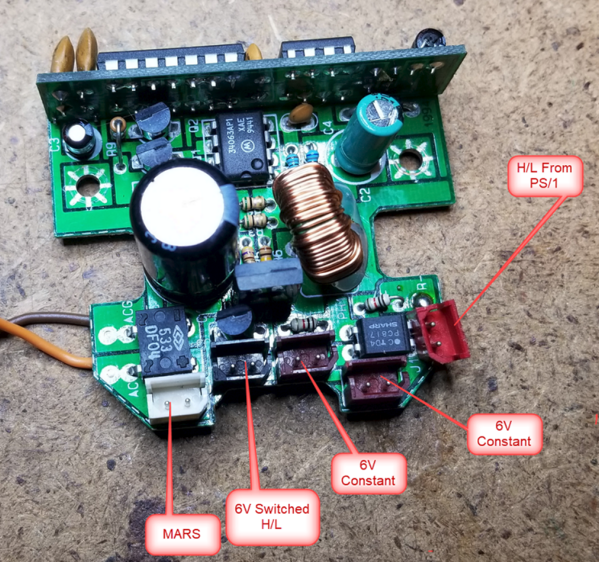
From the many MTH RailKing spare parts I have amassed since the closure of MTH, through the Cabin Fever clearance auctions, I installed two motors, a PS1 circuit board, and a new speaker. I didn't add lights at this stage as I am still trying to figure out where you take the lighting power from on the PS1 board, that will allow the headlights to be directional.
I got it up and running with all sounds and functions (except for the headlights), and then went about painting the shell in Norfolk Southern black. I found the loco was infact an ALCO C628, and was released as a "dummy" in the Delaware Hudson livery. Oh well....I already had the Norfolk Southern decals, and I do like that railroad!!!


I think it come up pretty good, and from a "boy from the bush" down-under in Australia. In my search for something not remotely associated with this loco, I found an original RailKing box and styrene clam-shell for this exact model. I think I got it in an earlier Cabin Fever Auction with something completely different in it.


I added notes to remind me to use the Z1000 controller and not my Z4000 (don't ask me why the Z4000 won't run it.....it's one of the mysteries of life!!!) and that I have replaced the battery with a BCR. I even got clever and printed out a new label for the end of the carton, stating it is a "Norfolk Southern", and was no longer a NON- POWERED unit.
Things are great in the "Sunshine State"- Queensland, Australia.
Peter.....Buco Australia


")