
Andy, it looks like Atlas claimed the 2-rail version will handle 36" minimum radius. I bet it will be fine on 40" and #5 and up turnouts. So you should be able to switch with it. 

It was in their lower-priced Trainman range, so not sure if they offered it as just DC/DCC ready or maybe there was a "Gold" version with a Loksound decoder installed.   Might be a plug or socket on the board for a decoder at least.

I'm not a NCE user so I'll defer on the DC loco question. 

If you do decide to take the shell off, be nice to the screws. Atlas has usesd 2 versions that I've seen: Self-tappers direct into plastic, or machine screws into threaded brass inserts.

If self-tappers, they come out fine, but can bring some of the plastic thread with them. When reinstalling, make sure the self-tapper goes into the exisiting thread and doesn't try to cut another thread.  You can gently start the screw slowly in reverse until you feel a slight click. At that moment the thread on the screw is aligned with the thread in the plastic and you can go ahead and screw it in gently. Don't over tighten!

The brass inserts may turn in the plastic and start to pull out with the screw. They can be pressed back in flush and secured with a tiny drop of superglue around the outside before refitting the shell.

Pete (whose Atlas locos only have about half their original shell screws left, just don't tell anyone)  

One thing to watch for with DC loco on DCC track is not to leave a DC loco sitting still for too long. The "zero-stretched" DCC signal causes can motors to slightly oscillate back and forth continuously when stopped (that's the buzz you hear as soon as you put the loco on DCC powered track),  which can cause motor heating over time.

Atlas O (trainman) CSX GE Dash 8-40CW diesel.

Details........

  • 2 rail DCC operation with QSI sound
  • Diesel Exhaust
  • New in Box,
  • factory warantee
  • All axles powered and dual can motors with brass flywheels
  • Scale dimensions
  • Directional LED lighting
  • Fixed pilots, scale wheel sets and scale couplers
  • Separately-applied wire grab irons and handrail stanchions
  • "Gull wing" cab
  • Prototypical painting and lettering
  • Length: 17.5" without couplers, 18" over couplers
  • Weight: 5 lbs.
  • Minimum radius curve: 36" (2-Rail)
  • Oscillating Ditch Lights
  • New truck design with single point lubrication for longer life with no disassembly required

QSI® Quantum System™ Features:

  • Authentic diesel engine sounds
  • Coupler impact sounds when operated with DCC
  • Squealing brakes, doppler effect and air let-off in neutral
  • Helper mode that mutes the whistle and bell for double heading
  • And more!

=================

Per Atlas ads. Atlas installed an ESU Decoder and not QSI.


@Kyle Evans  Great info.  THank you so much for the websites.  I will definitely head over there and take a look.  I started an HO layout 20 years ago and never finished...wife got pregnant, needed the spare room, etc, etc....LIFE.  I will take a look and maybe/hopefully it will give me inspiration.  

@christopher N&W  I read something about if you select a locomotive with road number "0" you can use it in DC mode...but no idea.  I can always try that and check the voltage on the track and see if it is controllable with the handheld. I am pretty sure this is what @TexasSP is talking about with his Digitrax system.


That looks promising!  I think maybe a Loksound LS5 DCC L would plug into both ends of the larger green board once you remove the smaller DC "decoder bypass" board. The LS5 DCC's pins look like they'd plug into the 2 sockets like the ones on the standard LS5 DCC L adapter board seen here:

Image result for Loksound 5 DCC L

http://www.esu.eu/en/products/...-l-loksound-5-l-dcc/

That ought to get you track pickup, motor power (parallell wired), head and rear lights, ditchlights (if present) and speaker.  That way you can run it without any soldering etc. right away, and maybe upgrade the speaker and better LED lighting later on.

But hopefully someone who's actually done this on this particular loco will chime in.  The LS5DCC L ain't exactly cheap... 

But if you prefer to try the D408 you have on hand, we can talk you through what wires go where after you remove the green boards.

Attachments

Images (1)
  • blobid0
Last edited by Pete M

@Pete M  I think that was the first board that was suggested to me on page 3 (maybe)..I found the 4.0 Select at one website as I think is has been discontinued...I sent an email to see if they actually have it in stock.  The 4.0 version is ESU part # 73399 and they can program it for me to the correct sound.  If the 5.0 L will work is there an advantage one over the other?  I think the 4.0 version is $20 less... Plug and play would be nice.   I am not the best solderer in the world, but I have a feeling I am going to get some practice.

A Select L or just plain "L" will work. The latter provides the user with more sound files to choose, like horns and bells. Atlas uses Select L's in their 2-rail Gold models.

I have a Trainman U23B that was DC only but had a speaker and a dummy plug like your Dash 8. I plugged in a Select L after I programmed it. Atlas designed these Trainman DC locos to be plug 'n play for DCC operation.

The ESU v5.0 L has improved sound with up to 10 simultaneous 16-bit sound tracks vs v4.0 that supports 8 simultaneous 16-bit sound channels.  The v5.0 also has improved motor speed control (apparently eliminating a faint hum at low speed when sound is off), and the O scale v5.0 L now has onboard keep alive capacitors where the v4.0 L has none.  You had to purchase a separate large size keep alive module for around ~$50 to get the keep alive feature on a v4.0 L decoder.

Also, given that you said that you are looking at a v4.0 Select L, which was targeted at the OEM aftermarket plug-n-play installs, this Select did not contain all the features that the straight v4.0 L version had and was always priced slightly less than the straight v4.0 version to begin with.   BTW, there is no longer a v5.0 Select, they dropped the select from the v5.0 product line, at least for now.

Therefore, for a mere $20 more,  you are actually getting more for your money with the up-to-date v5.0 L version since it is still competitively priced with an apples-to-apples straight v4.0 L version, which was priced at the same price as the newer v5.0 version. 

The only caveat I can see (as mentioned above) is if the v4.0 interface board already installed in the loco does not mate up with the new v5.0  L decoder (maybe someone else on here knows if the new v5.0 will mate up with the older v4.0 interface board).   However, you will still get a new interface board with a new v5.0 L and if the v5.0 L does not work with the v4.0 interface board currently installed, then you will have to do some soldering and, I have to say, those pads are a bit small on the decoder interface board, even for an O scale sized decoder ,(I have done some v4.0 installs using the ESU L interface board) ,  so you do need a bit of a steady hand and some reasonably good soldering skills to not get a solder link across neighboring pads.  Make sure to use a decent pencil tip iron or, even better, an electronics bench soldering station.

In the end, you really don't save any money going with the v4.0 vs. the v5,.0 when comparing features; however, you "may" save convenience of getting direct plug-n-play capability over the v5.0 if the older v4.0 interface board currently in the loco ends up not being compatible with the v5.0 L decoder header pin out.  They look to be almost identical but not 100% sure if it will actually work.  You could be an O scale trailblazer and let us know if you go and get a new v5.0 L .

Scott

Last edited by Scott Kay

OK, so I played around with my free copy of railmodel express (not much out there for a MAC)  I am limited to 50 pieces of track on this free version...that is why I didn't go to the end on the left side.

I am by no means good at design, but this is what I came up with so far...critique and suggest please.  The main thing that sticks out to me is how close to the front edge the track is.  All the track is Atlas, although I will be using signature switch turnouts...not sure how the size will change with those.  They are all #5 switches and the few curves I have are 40.5".  Size is 14'x2'.

The 3 way switch is a Lenz, but I will swap that for the Signature Switch Co.

switching layout


Attachments

Images (1)
  • switching layout
Last edited by roll_the_dice

Thanks Scott...great information!  The fact that the 5.0 has a keep alive system built in makes it worth it.  I actually emailed Atlas and asked if the 5.0 would work on this engine.  Hopefully they will respond...however, I will probably buy that one anyway since it comes with the adapter board.  Tony's has it for $139 I believe.  I do have a few friends that are more adept at me that can solder if I am not up to it yet.

Andy, the decoder you want is the LS5 DCC "L". Make sure it's the DCC version not the Euro version. See my note from earlier in this thread.
https://ogrforum.ogaugerr.com/...4#136148772671706894

As you're starting from scratch, you have the opportunity to standardize on a decoder type (in this case the LS 5 DCC range) which will make life a lot easier down the road for things like speed matching, consisting and especially if you get a ProtoThrottle.

The LS 5 DCC L should fit in the LS V4/Select L sockets which I am 99% sure is what's in the loco.   No soldering and as Scott says, the PowerPack (keep alive) is built in.

The only thing I'd do right away is fit a Tang Band 1931s speaker if it fits, or a 1925s if not. You will be amazed at the sound improvement over the stock speaker. 

Fun times coming!! 

Thanks Pete...That is the same one Scott recommended earlier...so we are full circle back to the original recommendation.  Thanks for everyones patience.  I should have listened to Scott and you and everyone before...

I am going to order the decoder tomorrow from Tonys which should be this one unless someone says NO. I have those TB speakers bookmarked from your earlier comment on them.  I will measure the fuel tank, but I think the larger one is to wide.

Last edited by roll_the_dice

Yes, that's the right decoder. 

I've found Parts Express to be a good source for the Tang Bands. TBH the smaller TB 1925s will still make you grin a lot wider than the factory speaker.

They're not too pricey so maybe get one of each.  The TB enclosures are quite thick material so you can shave 1mm off the sides if needed.  I cut the mounting tabs off and shave the 1931s sides to fit in my RS-11s and 32s.   Worth the risk for another 50Hz of bass! 

Scott Kay posted:
The only caveat I can see (as mentioned above) is if the v4.0 interface board already installed in the loco does not mate up with the new v5.0  L decoder (maybe someone else on here knows if the new v5.0 will mate up with the older v4.0 interface board).   However, you will still get a new interface board with a new v5.0 L and if the v5.0 L does not work with the v4.0 interface board currently installed, then you will have to do some soldering and, I have to say, those pads are a bit small on the decoder interface board, even for an O scale sized decoder ,(I have done some v4.0 installs using the ESU L interface board) ,  so you do need a bit of a steady hand and some reasonably good soldering skills to not get a solder link across neighboring pads.  Make sure to use a decent pencil tip iron or, even better, an electronics bench soldering station.

I can confirm the V5 adapter board is identical to the V4, as I just recently installed a V5 in my favorite MTH Great Northern S-2. Smart move on their part, as it makes upgrades from the V4 trivial. It's a feature I intend to take advantage of... 

I love all the V4s that I have, but the V5 takes it up a notch again. It has some really nice enhancements, mostly software related, over the V4. For example, the random sounds are now completely user customizable (without creating your own sound file). I set it up to randomly blow the grade crossing sequence every few minutes while underway! Sounds corny maybe, but it's awesome when I'm just kicking back for some hands off running to hear that whistle blow occasionally.

It does have integral keepalives, as Scott notes, but be aware they are quite small for O scale engines. They are really intended only for the briefest discontinuity. Don't expect them to carry you over unpowered turnouts and the like. See my analysis in this thread on the capacity of the onboard keepalives.

I've done a few posts in the DCC forum on the V4 decoder installs that I've done which might be helpful:

https://ogrforum.ogaugerr.com/...r-brass-4-6-4-hudson

https://ogrforum.ogaugerr.com/...stallataion-mth-shay

https://ogrforum.ogaugerr.com/...mth-4-8-4-greenbrier

Finally, I highly recommend getting the ESU programmer if you are going to do more that one or two decoders. It is really slick - powerful and easy to use.

@thor73  Thanks for the info.  Wow, great write ups on the keep alives.  I bookmarked them so I could use them later on when I am more comfortable with all of this.  Not only switching to 2 rail, but my first experience with DCC.  I got out of the HO hobby when DCC was becoming mainstream.

I told my wife I wanted a good soldering station for my Bday coming up...I was thinking something like this for my first one.

EDIT:  I received an email reply from Atlas confirming what you guys said.  The ESU 5 LDCC as a plug and play for this engine.  Impressed they answered that quickly.

Last edited by roll_the_dice

OK I ordered the sound board from Tony's.  Will keep you posted when it arrives.  Now to measure the fuel tank and order the speaker.  Now that is out of the way for now...any thoughts on my proposed layout...I was able to add more track...so here it is updated.  Again critique it...tell me where/how to change it...etc.  It is all a learning experience and fun!

switching layout

Attachments

Images (1)
  • switching layout

Andy that's good about the decoder. 

For your layout, what kind of operations to you want to model?  Probably some kind of switching would work well in the space you have.

My preference is for trying to replicate the industrial switching I can railfan around where I live, so that's all I know about.

For a shelf layout, switching an industry or two, and an implied connection to "the rest of the world" to receive cars and send them back out might be a starting point. I'll use an example from my layout. It's supposed to be modern era, so I have fewer larger industries, but several car spots. 

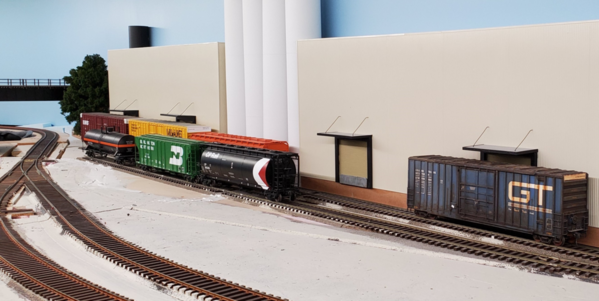
Here's my Magna auto parts plant. It has 2 spurs. One has 4 shipping spots for box cars that are loaded with various parts, and one spot for a hopper that delivers plastic pellets. The second spur has 2 more spots for plastic hopper unloading and one for a chemical tank car unloading for PVC Pro that shares the spur.

There's a main line running by and a siding or interchange track where another "way freight" train (real or imagined) can drop off the cars Magna needs and collect the cars the switcher pulled from Magna yesterday. I'm still modelling plywood season by the way. 


In a shelf layout situation, the cars for today's switching job could already be on the passing siding or interchange track in the foregound. Here's a simplified diagram of Magna (click the attachment for a clearer view) as you might lay it out on a shelf:

You need some headroom on the main to the right so you have enough length to pull and sort cars from Magna and the interchange siding.

The switching job (that's you) would need to pull all the cars that are ready to ship from Magna and replace them with cars from the interchange track.  Cars pulled from Magna would be set out in the interchange track ready for the next passing train (imaginary) to lift when it sets out Magna cars for tomorrow. 

Might seem a bit quick and easy, but bear in mind that not all Magna dock doors can load a whole car in a day. And not all doors need a car every day.  As well some of the plastics hoppers get used as storage and may sit there for several days.  So you can make a switchlist that shows some cars to be pulled every day, and some that need to be put back (re-spotted) because they weren't ready yet. The works is a bit different every day.

As well perhaps the passing way freight dropped off more cars than Magna has room for some days, so you'd need to sort out the ones for today from a longer cut of cars in the interchange.  You'll find this job can keep you or a 2-person crew busy for up to an hour if you work at scale speeds and have each crew member doing all the real-world work.    

I hope this gives a bit of food for thought! You can get a lot of fun out of a fairly simple layout -  4 turnouts and a box of flex track. 

Attachments

Images (2)
  • mceclip0
  • mceclip1
Last edited by Pete M
roll_the_dice posted:

@christopher N&W  I read something about if you select a locomotive with road number "0" you can use it in DC mode...but no idea.  I can always try that and check the voltage on the track and see if it is controllable with the handheld. I am pretty sure this is what @TexasSP is talking about with his Digitrax system.


That's good news to know from you guys. I'm still not going to try it.

roll_the_dice posted:

OK I ordered the sound board from Tony's.  Will keep you posted when it arrives.  Now to measure the fuel tank and order the speaker.  Now that is out of the way for now...any thoughts on my proposed layout...I was able to add more track...so here it is updated.  Again critique it...tell me where/how to change it...etc.  It is all a learning experience and fun!

switching layout

I would consider moving the right hand crossover from its current location to the two tracks at the lower right. This will give the ability to run around more than 1 car at a time.See below.

switchingx

Attachments

Images (1)
  • switchingx

Thanks Pete...nice simple design.  I think I have always been in the frame of mind to get as much track in the space as possible...which isn't realistic.

I will eventually model maybe late 40's to late 60's, but right now not set on anything.  I do like coal cars and tank cars with some boxcars....so that is what I will probably go with usually shorter tank cars, but I do like modern stuff as well...so I am not sure I will care...I am in the frame of mind that if I like it use it.  I like buildings to be older...but can still do a mix of everything.

@Jim Scorse  Good idea making the siding longer.  I am working on it, but to make it work, I will have to ditch the 3 way turnout, which is fine, but I do like the longer siding for more cars.  I will work more on the design...

roll_the_dice posted:

Thanks Pete...nice simple design.  I think I have always been in the frame of mind to get as much track in the space as possible...which isn't realistic.

I will eventually model maybe late 40's to late 60's, but right now not set on anything.  I do like coal cars and tank cars with some boxcars....so that is what I will probably go with usually shorter tank cars, but I do like modern stuff as well...so I am not sure I will care...I am in the frame of mind that if I like it use it.  I like buildings to be older...but can still do a mix of everything.

@Jim Scorse  Good idea making the siding longer.  I am working on it, but to make it work, I will have to ditch the 3 way turnout, which is fine, but I do like the longer siding for more cars.  I will work more on the design...

You can keep the 3 way just use a piece of flex track rather than sectional to make the connections.

Played around a little this morning and moved things around.  I think this might be able to be incorporated into a larger layout down the road.  Still a lot of track, but only 3 #5 switches, 2 wyes, and one 3 way.  The 3 way is a Lenz and I also have 3 Lenz curves...the rest is Atlas for this design, but will use signature switch.  I need to see calculate the measurements of the Sig turnouts vs the Atlas.  I like this on the best so far that I have played with...I think it gives more space for industry and a mainline running through it.

Final dimensions of this is 14' x 2'

Still too much?  Thoughts?

March7

Attachments

Images (1)
  • March7

Andy,

I thibk this is a better layout. You may find it helps to indentify which track is which and where the industries are at this point. Then draw in the industries and where each freight car spot is.

With that done, you can "run the switching moves in your head". I did a couple of sketches with the main line designated two different ways so I could run the moves myself.   I find this helps to see where the bottlenecks are, such as not enough headroom to pull a few cars out of a spur and get them into the siding. Yellow cars are at industry spots. Green are coming from or going to interchange. 

Of course you might have a totally different vision of what goes where, so please feel free to ingore. I just can't help myself. I spend half my time running switching moves in my head... 

Pete "Ahead five cars to a joint, 56".     

Attachments

Images (2)
  • mceclip0
  • mceclip1

Pete's #1 option is what I had in my head.  The main line is straight through the layout.  All I did on this one is swap the loco service and have the mainline curving at the right instead of left.

March7new


I couldn't figure out what you meant on #2 Pete "flip the runaround track switches LH to RH and vice versa."

Attachments

Images (2)
  • March7new
  • March7new

OK good - seeing your idea for the industries really helps.  

So maybe now you can work through a switching session and see how the spur lengths vs. main track and interchange track would work in practice. For example, let's assume there are cars at various industry spots, some or all of which are ready to be pulled. And in the interchange track are some inbound cars that need to be spotted at the industries. How will the moves work out?

Depending on how many cars need to be pulled from each spur, you might find you have a bottleneck at A, B, C or D below:

For example, if there's a car spotted at the industry on the right, can you fit more than just the loco in there if you pull cars from the refinery?

Try to think through each move in terms of the loco plus x number of cars to try and get the work done efficiently. Maybe you can look at more of a balance between spur lengths and the available space at A, B, C and D.  For example, the refinery and left hand industry spurs are quite long, whereas the A, B, C and D areas are short. If the main track can continue beyond the drawing, that's really good. That would solve B and C.  

Maybe moving the switch to the Refinery spur to the left could solve A?

Attachments

Images (2)
  • mceclip0
  • mceclip1

My main concern with this layout was A also...very short into that industry.  Not much room to move cars.    In theory the mainline goes beyond, but not in reality...14' is the max length I can do...I did move some switches around to connect the long bottom industry, which I think may alleviate some of the problems.  

Switching is all new to me...never had a switching layout or even ran one.  I understand the concept, but tough in reality with a specific size layout.

March7new2

The top left industry is still long, but this opens the right side to more track length in the spurs.

Attachments

Images (1)
  • March7new2

Looking better for sure! [Edit - referring to version B]

I think maybe the first crossover lower right, closest to the engine facility, isn't needed.  As well, if you're not wedded to the 3-way turnout, you could move the switch off the main into the top left industry to the left, giving you a better balance between the spur length and headroom on the main.

I didn't mean to throw you in the deep end re operations, sorry about that!  But I think it will add to your fun in the long term.   

Last edited by Pete M
roll_the_dice posted:

Alternatively I made this very simple layout...that should provide good switching and has good room for scenery.  It has two 3 way switches and two #5's....simple but I like it as well.

small

This is very interesting.  Essentially 2 inglenooks 'face to face'. 

Here are a few links to some interesting Inglenooks and their variations.

http://www.wymann.info/Shuntin...es/sw-inglenook.html

http://www.wymann.info/Shuntin...glenook-layouts.html

http://www.wymann.info/Shuntin...s/small-layouts.html


And a interesting discussion on small switching layouts:

This is a long thread covering 10 or more pages of discussion (scroll down to the bottom of the page)

https://model-railroad-hobbyist.com/node/29976


Last edited by Jim Scorse

OK, so give me some feedback on this one...I incorporated a double crossover.  I have always loved double crossovers and wanted to see how it would look in a switching layout.  It is big, because there is not a double crossover on the planning program...so I had to build it out of #5 switches and a Lenz crossing...a good 50"+ in length.  I emailed Brad at SS Co to ask him the length of his #6 and #10 double crossovers.  With that said, I assume his will be significantly shorter and narrower since his are 4" on center.  This one is 6" I believe...anyway, the shorter crossover will get me more leg room for the industry on the left....which may make it work better...

So Pete or anyone, go over it and tell me where the flaws are for a switching design in practicality.  If you see that it can work with the industries moved to different spots, let me know that as well.  Thanks!

Also, this is longer than any I have done...this one is 15' long x 2' wide.

doublecross

Attachments

Images (1)
  • doublecross

The only place that real railroads use a double crossover is where space is constrained such as in a terminal area.  They are a maintenance problem for the railroads.  The same is true for model railroads.  In addition, model railroads may have conductivity and polarity issues with double crossovers.

Anything can be made to work in the model railroad world.  I have seen many 2-rail double crossovers work just fine after a lot of work is done to make mechanical and electrical adjustments.  I would avoid a double crossover in a track plan unless it serves a specific purpose. 

However, it is your railroad.  Go for it if it makes you happy just to have it.  NH Joe

Andy,

Maybe this is a good time to think more about what will give you the most fun and enjoyment from your first 2-rail shelf layout in use?  I suggested some ideas based on what I know and like. But that might be totally different for you! 

The Time Saver is a great challenge to complete efficiently for sure. But not so fun for me because I want to try and replicate real-world track layout and the moves and pace of real operations, as well as the radio communications between crew members. The engineer guy in the Time Saver video would likely strangle me after a minute or two if I was his conductor, because I'd be asking him to stretch joints and give me 3-step protection to lace up the air.  

Of course, we're all just playing with toys when you get right down to it.    It's just your preference that matters, there's no wrong way to do this.

If you have some turnouts already, why not get a few sticks of flex track and just pin down a layout on your shelf (or lay it out on the floor if no shelf yet) and give it a try with what you have. You can easily unpin and adjust until you find what works.

Then you can go back to the planning software and finalize the layout that works for you, and buy only the turnouts you know are needed.

Besides, I need to hear that Dash 8 running with LS5DCC sound and Tang Band speaker really soon! 

Add Reply

Post

OGR Publishing, Inc., 1310 Eastside Centre Ct, Suite 6, Mountain Home, AR 72653
800-980-OGRR (6477)
www.ogaugerr.com

×
×
×
×
Link copied to your clipboard.
×
×