Thank you, Dave, Andy!!

Ha ha!  Dave I do remember the Muppets’ on that!  Yes it is close, if all goes well I should be able to get trains moving between levels before spring.

Saying spring, it looks like the latest winter storm is going to hit just to the north of us once again.  The freezing rain just turned to rain as the temperature goes up.  As most times Erie will get the snowfall and we get off the hook.  Strange winter.  All that to say no need for snow removal for me once again.  Maybe I can get in the train room today.  Yesterday I visited Mum and Dad at the personal care home.  At 92, they are both well!

Andy, I am a bit OCD, but my years at the power company and telephone company showed the benefits of neat wiring and the problems with messy wiring.  The power company guys are amazing with wiring, but some telephone not so good at places.  Actually, the panel proved to be too small, but as long as I document everything, it’s not bad.

We had a tornado pop up in Lawrence Township on 295. My brother works over by the Delaware River up from Lambertville. He said that they had hail and snow, after that, sunshine and warmth. Where I work it was warm, then we had rain around 3-3:30ish, and it was pretty cool when I left around 5. Got into the low 40's. Today is cold, tomorrow in the low 60's.

Thank you, Andy, Mike, Jay!

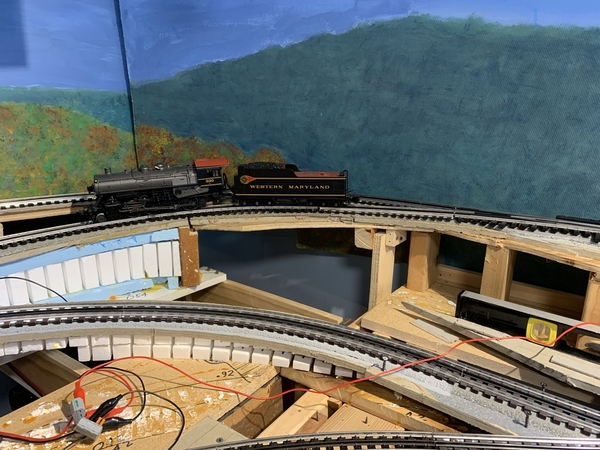
I didn’t get it quite as smooth as I would like, but it is pretty good.  The problem was with the roadbed transitioning from level to the grade on the diverting side of the switch.  I shaved some off one place and raised it some another place.  Then I did part of it over again.  A passenger car with 6-wheel trucks handles it fine.  A H9 Consolidation handles it well at speeds well above what I normally run.  Never a hiccup.  I’m too tired to fiddle with a video, so here is a photograph!  😄

5B2AC895-2825-45E6-B474-5C6B89DF96D0

Attachments

Images (2)
  • 928DE6E4-3E70-4C1B-8777-B8B405FD30BC
  • 5B2AC895-2825-45E6-B474-5C6B89DF96D0
@Mark Boyce posted:
...I shaved some off one place and raised it some another place.  Then I did part of it over again. ...

Mark, sounds like a great approach: easing in the Easement easing....   Seriously though, better to take off a little at time to get the grade transition the way you want it.

I'm also impressed at how you're still keeping your wiring runs so neat, despite adding more than you had originally planned for.

Thank you for the updates.  I'm enjoying watching your progress.  Please keep up the great work.

Last edited by SteveH

Mark, that is a tough transition location. I think you really need to be 10 to 12 inches away from the diverging portion before you begin the transition. I had a spot like that and could never get it right. My GS4 did not like that transition at all. Diesels seemed to have no problem.  From what I have noticed, the bigger the drivers the more sensitive they are to track imperfections - especially at grade changes or a bit of track twist. Maybe just me.

Snarky comment - do you have any new wood on the layout or anything longer than 12 inches. Quite a job of recycling.  Overall looking good.

Thank you, Jay, Steve, Jeff!

Good idea, Jay!  Yes, I worked hard trying to get that gang working well. 

Steve, The wiring is an issue.  I will be reassigning some of the wires.  Also, originally I had TIU 1 Fixed channel assigned to the mainline and TIU 2 Fixed channel assigned to all passing tracks and sidings.  Now with 2 levels and sidings on each, I need to rethink whether I want one channel for the upper level and the other channel for the other level.  Regardless, I will be able to keep the panel neat.

Jeff, you brought up some excellent points.  The roadbed and track isn't as easy for me to keep neat and functional as the wiring is.  I agree with you the transition to the incline is too close to the switch on this side of the layout.  I did a much better job of that on the first one on the other side of the room.  That one is in keeping with your suggested 10-12 inches from the diverging location.  I just matched up to the incline already in place, and that is why I had so much trouble.  I would need to raise the roadbed of the ramp at that end of the layout to make it a better transition.  I was looking at how to do that the best way.  It is worth the effort to pursue that this week before moving on to the next section of roadbed and track.  Thank you.

LOL Jeff!  You are correct, there isn't much new wood in this layout.  Before I started building, I deliberated over buying some kind of table saw.  I have never used any kind of table saw, and didn't see I would need one beyond building the layout.  Also, there was the problem, that I don't have any place to put one.  I finally decided to put the money towards some Mianne Benchwork.  I bought one of their kits, which is easy to setup, but has some limitations as expected.  After that, I cleaned out my Dad's workshop before selling their house, and brought a bunch of various sizes and lengths of wood home.  After evaluating what I had I decided it should be close enough to build the rest of the layout.  I was close; if you don't count the Mianne portion of the layout, about 90% of the rest is old wood.  Now I am down to a bunch of short scraps.  If I had started buying new wood, I wouldn't have bought all the track and switches yet.  Therefore, I may not have even undertaken the task of switching from the twice around to the lower and upper loops.  Who knows.    As always, thank you for asking the tough questions!  They are most valuable!

One more comment about the lumber.  I have found I can no longer control the hand circular saw even when using a fence or control the saber saw.  I now cut everything by hand, just like I did in my early teens when Dad had no power tools whatsoever.  It takes some time, but it is good exercise. 

Last edited by Mark Boyce

Thank you, John, Bill!

John, I couldn’t have thought up this plan.  @ScoutingDad Jeff deserves credit.  He was able to see how to adapt without a lot of trouble.

Bill, there is very little distance for sure!  I did raise the roadbed leading up to that section as Jeff suggested.  It is sort of floating there and needs supported better, but it will work.

Thank you, Mike!  I took Jeff's comment as a bit of a tease and a bit of just observation!  One thing with the old wood, I don't have a problem with warping like @BillYo414 Bill experienced with his plywood on his layout build topic.  Some of mine has been well seasoned for decades.    I did buy poplar 1x3s and 1x2s which seemed reasonably prices and one sheet of 3/4" 7-ply plywood that was a bit expensive, but worked well for some critical applications.

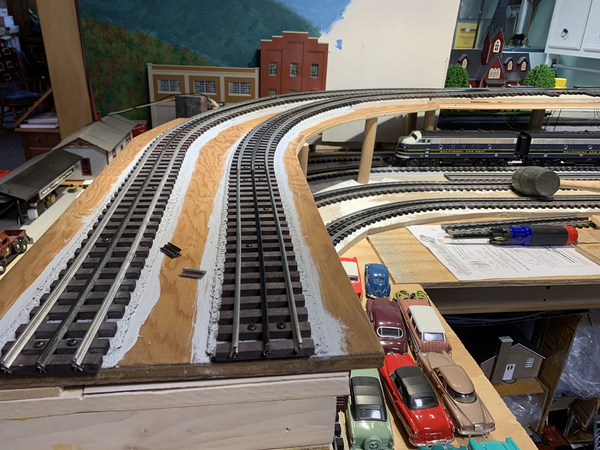
I forgot to mention, before tackling the final support of the ramp and finished the track and power drop for the passing siding.  I have not run a train over it, though.

20230228_160634603_iOS

Attachments

Images (1)
  • 20230228_160634603_iOS
@mike g. posted:

As for the used wood, I think a lot of people in this hobby use it. I know I bought new wood for my first try but everything from then on has been used or given to me.

Mike, Mark had the intent right, it was an observation and bit of a tease.  For what its worth, I used some old wood I picked up in the 70s in my layouts. Its moved many times from home to home. I can't bear to throw that stuff out.  The pine boards from them have a much tighter grain than the new stuff and were far more dimensionally stable.  At the same time recycling has its limits and after a while too much splicing together produces marginal results. 

My former boss built his own log cabin in Western New York. Being frugal he bought a LOT of building materials on closeouts and other discounts paying a fraction of normal.  When it came to property tax assessment time, he convinced the assessor the house should be taxed at a lower rate due to all the "seconds" material.  From then on it was the "seconds house" to the assessor. 

It’s been a couple weeks since I posted here.  I finished my second ramp/incline, but it is too sharp a transition to the new switch at the bottom. Last night I removed all the screws holding the track and roadbed to the supports, bo now I need to move the supports to make the grade a little steeper and have a better transition. It’s not a big job at all.  I’ll post some photographs once I have it back together.

Another modeler commented on another thread about rebuilding some of his 'finished' layout, that the unexpected obstacles would be fun; maybe!   Converting my layout from a twice around over and under to a high line and low line with inclines in opposite directions has been filled with obstacles.  The first incline went fairly smoothly, while the second incline has been a a problem!  I had to increase the grade some to make it all fit, and have now done it three times to get the grade not too steep in one place.    I'll get some photographs when I get the lower end cleaned up.  You can't see the work for all the tools and extra track sections. 

Hey Mark, don't fret it! when it is time it will just pop into place, it is almost there it is just asking you to fiddle with it a little bit more! I can't tell you how many times I have redone my inclines. I swear it sure helped me having a hand planer to bevel the end meeting the main table.

Either way Mark, I can't wait to see your photos and progress!

@Mark Boyce posted:

Another modeler commented on another thread about rebuilding some of his 'finished' layout, that the unexpected obstacles would be fun; maybe!   Converting my layout from a twice around over and under to a high line and low line with inclines in opposite directions has been filled with obstacles.  The first incline went fairly smoothly, while the second incline has been a a problem!  I had to increase the grade some to make it all fit, and have now done it three times to get the grade not too steep in one place.    I'll get some photographs when I get the lower end cleaned up.  You can't see the work for all the tools and extra track sections. 

Mark, all the problem solving you are doing is a further enhancement of your neuronal capacity.

Jay

Mark - just a suggestion. When I was laying out my "as installed" incline grade, I took height and distance measurements from one end to the other.  From there I was able to calculate grades.  It was much easier to see problems on paper. (I put a sample table on TPRR.)

From what I can "see", the transition grade should be no more than 1/4 inch for a 16 to 18 inch run (1.5% - 1.4% grade) and that is letting the plywood bend into the curve.  For the long wheel base steamers we have a little less than the height of the wheel flange to work with. We compound the problem with blind flanges on the middle drive wheels, so if we lift off one end the entire engine can slip to a side and derail when the wheels come back down.

Thank you, Mike, Bill, Jay, Jeff, Andy!

Jay, I need all the neuronal capacity I can get because it seems to be diminishing faster than it can be replaced.  

Jeff, you give good advice.  I think my problem is trying to reuse existing roadbed and track instead of just doing it all from scratch.  Also, my total length of the grade is about 12 feet if I leave a foot or so beyond the switches to the passing track that goes around the other side of the layout.  Another issue is I didn’t buy a table saw of any kind that would help me get nice square cuts.  I have always been extremely challenged in getting nice square cuts giving exact measurements using any kind of saw, powered or non-powered.  At least no one can call me a square!  😄  Bad joke, I know.

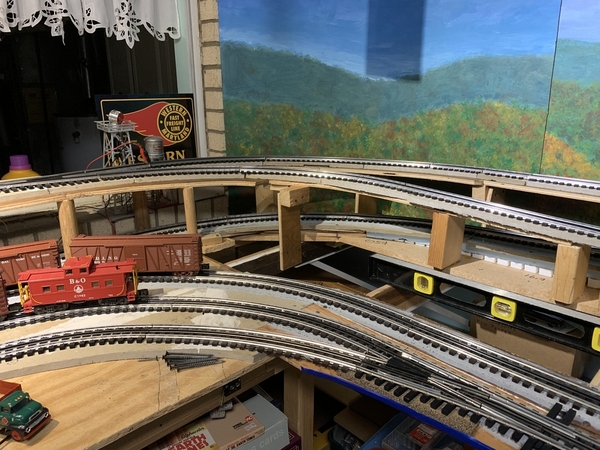
So with all those poor excuses, here is what I have come up with.  This is an overall view with my back literally against the wall.  Right now we are talking about the grade in the foreground that inclines from right to left.

B1A3D2F3-8470-426E-BB88-5C0BB09AF431

Everything works really slick at this end of the grade.  The Consolidation pulls 6 hoppers and a caboose up around the curve like nothing.

BBEBE2A1-71F2-46A1-B4EE-FAD298401785

The curve at the top makes the engine work quite a bit harder with the whole train on the grade and considering the extra effort needed on the curve.  At the bottom it draws about 1 amp.  On the top curve it draws about 3 amps!!  I don’t really like that.  
CBA1011D-13D8-473F-A066-81D989F7C7D1

Since this grade is already about 6%, I hate to increase it anymore by leveling it off for the curve.  I could end the passing track around the curve which would put it right after the double track bridge, then move the switch at the top of the grade over about 18”.  Extending the grade, could lessen the steepness at the top curve, but decrease the clearance for the track below.  Another option is to use helpers on trains going up the grade like the B&O did on the mainline 1/2-mile from where I grew up.  We will see.  😊

Attachments

Images (3)
  • B1A3D2F3-8470-426E-BB88-5C0BB09AF431
  • BBEBE2A1-71F2-46A1-B4EE-FAD298401785
  • CBA1011D-13D8-473F-A066-81D989F7C7D1

Thank you, Bill, Rich!

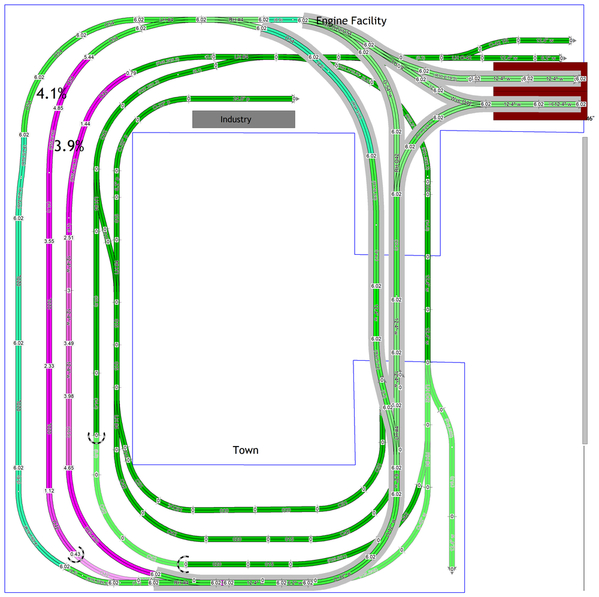
Jeff, here is a capture of the plan you sent me.

Mark Back to the Drawingboard jrw5c

Here is what I changed, extending the passing track to the switches at the bottom of the drawing.

Mark Back to the Drawingboard jrw5c mab1

I built it as shown except I haven't finished in the area at the top where you marked 'Industry'.  That has no effect on the discrepancy in grade.  There is one issue, though.  I had already built the supports for the double track bridge, which ended up being 7" above Zero level, not 6".  That was something that reverted back to when I built the engine service area above the original short yard.  Evidently, when I was updating the as-built drawing 2 years ago, I forgot to update the elevation.  Now wonder they pushed me out with early retirement!!!!   I was aware, I was working with 7" not 6".  Nevertheless, I am not going back and changing that on the layout.

Bill, the helper operation is a fun thing to do with DCS.  As you may recall, my run with two engines on the point, and one helper in the rear.  My grandparents lived at the top of the Bakerstown Hill, I mentioned earlier (3 miles away from where I grew up ).  Grandpa had been a fireman for the B&O before he was disabled in WWI.  Once recovered from his injuries in 1925 on possibly until his death in 1952, he served as secretary for the Brotherhood of Locomotive Engineer and Firemen Pittsburgh chapter.  He died 4 years before I was born, but Grandma had told my dad that he would lay in bed at nights listening to the sound of the engines coming up the hollow towards the summit either direction.  (This was my maternal grandparents)  Grandpa could tell by the sounds of the engines whether they were going to make it or have to signal by whistles for a helper.  The helper pocket and water tower was a half mile or so from my house in the opposite direction.  Interestingly, my paternal great-grandpa worked as a pump man at the helper pocket earlier on.  He would carry soup for his lunch in a Mason jar and walk through the woods and fields down to the tank.  The same woods and fields I tramped through as a teenager and young man.  I grew up in the same house Great-grandpa built in 1888.

Rich, yes indeed, the glacier blue looks great!  Many thanks!!   You can see I also got out the REA lit truck to apply power, but didn't get to it yet.  With these Menard's lit trucks, I am going to be shamed into lighting all my cars and trucks that are positioned on the road as driving, and not parked.  Another task to go with finishing changing the lights in my passenger cars and cabooses to LEDs.  I'll have to live to be 92 like my Mum and Dad just to get all the projects done!! 

Attachments

Images (2)
  • Mark Back to the Drawingboard jrw5c
  • Mark Back to the Drawingboard jrw5c mab1

Thank you, Rich!  Here is another consideration.  None of my cars and trucks will look right if there aren't passengers in the cars that are supposed to be 'moving' down the roads or streets. 

I did some experimenting with trains on the inclines and finished laying track on a siding yesterday.  I was going to setup the DCS 'lash-up' where I had one Consolidation pulling and one pushing.  Well, I then recalled I had put the other Consolidation on the shelf because something had locked up in the mechanism.  I didn't want to investigate at the time.  My next option was to put an 0-8-0 switcher on the end for pushing.  As soon as I tried to setup the lash-up, I came to the selection for a DCS Lash-up or a TMCC Lash-up.  The Consolidation is DCS and the switcher is TMCC, so that won't work. 

I then selected the fairly new SD9 with two motors.  It pulled the train up the hill without breaking a sweat.  The ammeter read 0.7 amps the whole way up.  So, the heavy single motor Consolidation isn't as good at pulling by far.

I left the experimenting alone to cut and screw down two sections of track to complete all the track laying (for the moment).  That is, I may leave everything as is, or make some changes.  Regardless, I pulled out the Golden Spike for a pending ceremony!!

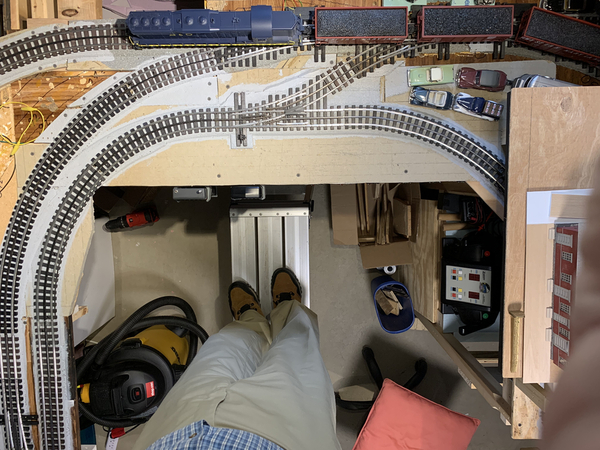
Here is what I have right now.  I will show with photographs how it differs from the SCARM design instead of combining parts of the old design (Plan D) with the new design (Plan E).  Here is a 'drone' view from the ceiling of the trackwork at the bottom of the grade we have been discussing.  You can see I left the two switches in place that had lead to the old single siding.

20230317_152538357_iOS

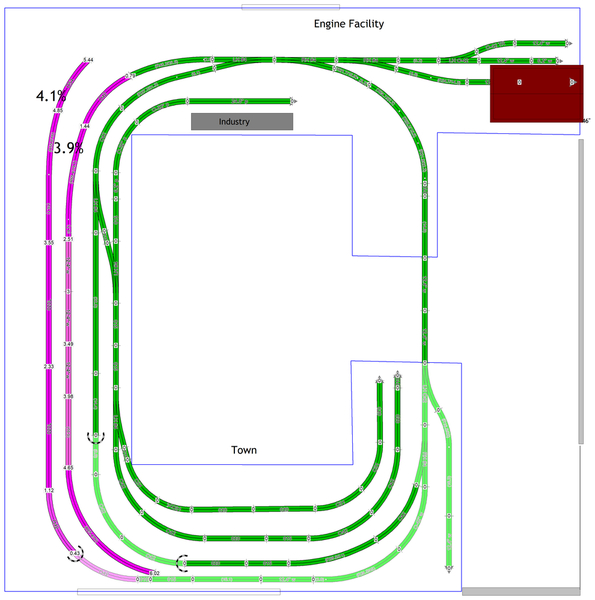
The nose of the SD9 is at the bottom of the grade.  The track that diverts at the SD9 cab is the lower mainline.  The two 042 switches that are back to back by the first two hoppers are the switches that I left in from Plan D which Jeff doesn't show in Plan E.  This is SCARM lower level capture from Plan E.  The above photograph is of the area where Jeff placed a suggested industry.

Mark Back to the Drawingboard jrw5c mab1 lower

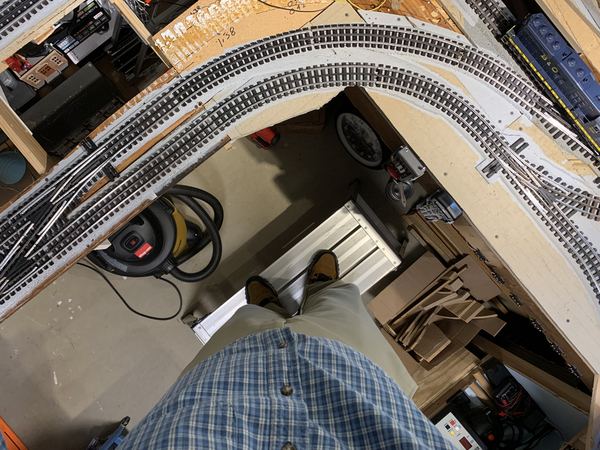
I could remove the two 042 switches and slide over 12 inches the switch that starts the grade.  I do not know if 12 inches would lessen the grade enough to bother with.  Secondly, I could remove the 042 switches since they are redundant because of the new switches that lead to the yard and industry siding on the left hand side of the drawing and in the lower left of the next photograph.

20230317_152810439_iOS

Does anyone see a reason why I should leave the 042 switches in place to provide some kind of run around?  I can't see any reason, but I am certainly not much higher than a novice at rail yard operations.  This is why I have reserved setting up a Golden Spike ceremony.

Thank you for any comments and critiques.  Criticisms are welcome as well. 

Attachments

Images (3)
  • 20230317_152538357_iOS
  • 20230317_152810439_iOS
  • Mark Back to the Drawingboard jrw5c mab1 lower

Add Reply

Post
The Track Planning and Layout Design Forum is sponsored by

AN OGR FORUM CHARTER SPONSOR

OGR Publishing, Inc., 1310 Eastside Centre Ct, Suite 6, Mountain Home, AR 72653
800-980-OGRR (6477)
www.ogaugerr.com

×
×
×
×
Link copied to your clipboard.
×
×