@lehighline posted:John, I think you mean "without".
Fixed. ![]()


|
|
@lehighline posted:John, I think you mean "without".
Fixed. ![]()
John, What I am hoping to do is use a 2 tier helix to bridge under the layout to storage tracks and if I have the room, one between the levels so any train can traverse the entire layout. Any future layout will have 072 and wider curves so any locomotive can run. My current 060/048 is good but half my trains won't run well on them, so they only run at the club.
Until we find property, with or without an out building, It is all general planning right now. I want a 40x60 shop this time. My current 40x45 is good but the layout is not conducive to having a combined welding/wood working room plus a train room. The wife will be glad it is out of the house, late night whistles, smoke and track rumbling, not to mention the sound cars with slack, brake squeals and PSA tend to have her at the entrance with that scowl tapping her foot.
Hi Jay, thank you for the compliment however this is just elementary wood working techniques adapting non essential but esthetically flowing lines into a model RR.
If you can draw a flowing line on plywood, cut it out with a new 32 tooth jig saw blade, smooth it out with a 100 grit disk, tack on some bendable plywood with Premium Urethane adhesive you can fashion anything. Now getting into three dimensional construction can be a bit more entertaining. Example:

If you are stymied somewhat in a gluing project just call Franklin Adhesives. They have a tech who guide you in adhesive selection and application.
Just cut the biggest pieces first so when you screw it up you can reallocate it to the next smaller utilization.
For waffle bottom work the Sippin' and Switchin' group in the mid west have put a "How to" together on their website.

"Tom is certainly a wealth of woodworking ideas, and I can say for sure that progress would be much slower here without his expertise in the mix! ![]() "
"
In the past, Tom Tee did not move the needle. Then I went to John's house to pick up some Fastrack he was selling and John mentioned him. Now, I understand and Tom now hits the "tilt." Mark
Seeing is believing. ![]()
@Tom Tee posted:It's neat working with you John. I make a mess, leave tools and sawdust all over the place then you clean up every thing nice and neat. My wife may just ask you to do the same here!
Kinda like going to play with the grand kids and leaving them all sugared up with a big mess around the house. ![]()
![]()
Seriously tho you guys make a good team. Thanks for sharing your tips and tricks John and Tom.
Base layer of fascia on, just have to wait for the PL3 to set and I can fill, sand, and paint. ![]()


One more step on a long journey, filled the remaining holes, sanded everything flat, masked off the wall and my protective J-channel for the bridge. Finally I slapped a coat of primer on the bare wood.


Looks nice and smooth, John!
WOW John, I am glad I got up early this morning as I am a slow reader. I just started at page one again and read to your last post just to find something I thought I seen here and course I found it in several places. I was looking for the type and thickness of facia board. found it somewhere near page 14 but just kept going LOL there is so much to learn for you and Tom on this build, along with everyone else's suggestions. Thanks for the wonderful 38 pages of reading!
Well, there's a lot to learn from Tom, and a little to learn from me! ![]() With the experience of doing the main board, I'm flying partially solo on the yard expansion. I'm installing the fascia myself, I had the benefit of Tom's expertise showing me how on the big table. Just finished painting it, when the paint dries, I'll put on the second layer of fascia, then all that's left is finishing the bridge section.
With the experience of doing the main board, I'm flying partially solo on the yard expansion. I'm installing the fascia myself, I had the benefit of Tom's expertise showing me how on the big table. Just finished painting it, when the paint dries, I'll put on the second layer of fascia, then all that's left is finishing the bridge section.
Tom brought up some neat locating pins, and since he's done these a bunch of times, I'll wait for the next visit for finalizing the bridge section and installing those, I want the lift-out to work well. A man's got to know his limitations! ![]()
Another step forward. ![]() Got the surfaces painted and the second layer of fascia on the main table extension. I have to take a trip to Lowes and get more Loctite PL3 adhesive to do the freight yard side.
Got the surfaces painted and the second layer of fascia on the main table extension. I have to take a trip to Lowes and get more Loctite PL3 adhesive to do the freight yard side.


Looks great John. I'm very jealous!
🤪🤪
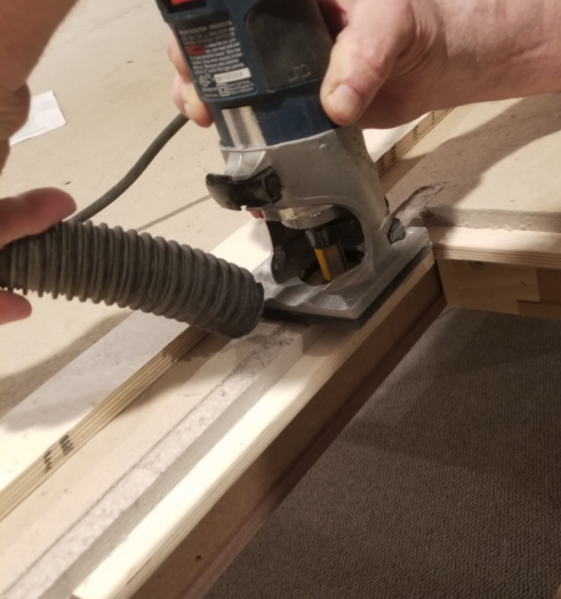
For the curious, this is the process of bending the fascia on the tight bends. I soaked the end of this in hot water for around five minutes, then it folded right around the point. I'll leave it to dry, and I'm going to have a fan blowing on it to hurry the process. Then I'll remove the formed piece and glue and clamp it in place permanently.

"Teach a man to fish"... and he will build his own layout. Great job there John!!
John, those engines look lonely sitting in the background. Time to get that yard laid. I notice you're coming up on a 4 year anniversary soon. Does it feel like it has been 4 years?
@turkey_hollow_rr posted:John, those engines look lonely sitting in the background. Time to get that yard laid. I notice you're coming up on a 4 year anniversary soon. Does it feel like it has been 4 years?
The fun is in the journey!
Dan, I do not believe any engine or any car from any importer could ever be lonely in John's cave! Reality is that one must turn and maneuver carefully when traversing his train room. Extremely broad collection of equipment, total eye candy.
@turkey_hollow_rr posted:John, those engines look lonely sitting in the background. Time to get that yard laid. I notice you're coming up on a 4 year anniversary soon. Does it feel like it has been 4 years?
It has been a longer than anticipated journey, but I'm looking forward to reaching a milestone. I'm not going to say the destination, we all know that's never reached. ![]()
![]()
@Tom Tee posted:Dan, I do not believe any engine or any car from any importer could ever be lonely in John's cave! Reality is that one must turn and maneuver carefully when traversing his train room. Extremely broad collection of equipment, total eye candy.
Just imagine when all those boxes and the closets are unpacked! I have to get that other wall of shelves up. ![]()
John, I have never been able to unpack all of the trains, there always seems to be just ONE more closet or nook with boxes, so your lucky if your room and shelves will handle your collection and let you peruse them with a cup of coffee and a remote in hand.
@gunrunnerjohn posted:For the curious, this is the process of bending the fascia on the tight bends. I soaked the end of this in hot water for around five minutes, then it folded right around the point. I'll leave it to dry, and I'm going to have a fan blowing on it to hurry the process. Then I'll remove the formed piece and glue and clamp it in place permanently.
Awesome John! Did you use door skin for this material?
Joe Gozzo
@Ron_S posted:John, I have never been able to unpack all of the trains, there always seems to be just ONE more closet or nook with boxes, so your lucky if your room and shelves will handle your collection and let you peruse them with a cup of coffee and a remote in hand.
I harbor no illusions that everything will be on the shelves, only that I'll be able to get a lot of stuff out. ![]() Of course, I'll have some of it parked in the new freight yard!
Of course, I'll have some of it parked in the new freight yard! ![]()
John, Your new yard extension has me sketching simple plans, I don't even know what my future train room dimensions will be yet and I know a large, maybe 2 yards are happening in the next iteration of my playroom. That and keeping possible expansion without major demolition are my priorities.
I'm just about out of room for "major expansion". ![]()
@Trainlover160 posted:Awesome John! Did you use door skin for this material?
Joe Gozzo
Door skin? What's that?
it's 1/8" plywood and the first layer is 3/8 Lauan plywood. Both are very flexible and will bend around a tight curve, especially with a little water in the mix. Tom calls it "wiggle wood". ![]()

John, Not even a little bit![]()
![]()
Well, you never know... ![]()
John, You still have a lot of room left! The entire other side of the yard room then under the landing, behind the mechanical units and into the back work room 180 degree turn and through the door then across your electronic repair area then reconnect to the main RR by the industrial chimney.
Trust me, I have lots of future plans for you!
@Tom Tee posted:Trust me, I have lots of future plans for you!
Yep, plans. Don't count on all of them turning into reality! ![]()
![]()
It sounds like Tom is running this project now John! Repeat after me, “Yes Tom, whatever you say. Yes Tom, whatever you say.” 😆😆
@Mark Boyce posted:It sounds like Tom is running this project now John! Repeat after me, “Yes Tom, whatever you say. Yes Tom, whatever you say.” 😆😆
You bet, I'm not an idiot! ![]()
![]() When the expert speaks, I listen.
When the expert speaks, I listen.
He told me to buy spring clamps, so I did. I even have leftovers! ![]() Good think they were on sale at Lowe's when I needed them.
Good think they were on sale at Lowe's when I needed them. ![]()


Here's the whole addition.

John, I really like the bottom photo. It shows our work quite well. Love the way it is turning out. Thanks for having me join you on this journey.
John is there space between the main layout and the wall? it appears that way or isit an illusion created by the bridge from main to yard?
@coach joe posted:John is there space between the main layout and the wall? it appears that way or isit an illusion created by the bridge from main to yard?
No illusion, that's why I need a lift-out bridge. That aisle is access to the window, dehumidifier, and my sump pump.
To paraphrase another saying, "The layout expands ro fill the available space." And then some.
Jan
Well, I'm trying to keep "some" space for other things. My wife slipped a "fridge" in my train room, but I can keep it stocked with beer, soda, and water for guests, so it's not all bad. ![]()
The main benchwork being done, I got to looking at my proposed yard track spacing of 3.5". OOPS! The last track hangs over the edge over half an inch at the end! That will never do! I cut my spacing blocks down 1/10" to make the track spacing 3.4" and tried again. Now the tracks all fit on the bench, and the spacing between the two locomotives in adjacent tracks is 3/4", looks good enough for me! ![]()


@gunrunnerjohn posted:The main benchwork being done, I got to looking at my proposed yard track spacing of 3.5". OOPS! The last track hangs over the edge over half an inch at the end! That will never do! I cut my spacing blocks down 1/10" to make the track spacing 3.4" and tried again. Now the tracks all fit on the bench, and the spacing between the two locomotives in adjacent tracks is 3/4", looks good enough for me!
We found that two bay window cabooses had the most overhang. Might be worth testing out. Looks great!
Ingenious way to keep them all spaced appropriately!
-Greg
Track spacing is simple enough on straight track but less so on curves. In John ArmStrong's TRACK PLANNING FOR REALISTIC OPERATION, he proposes that every layout builder create a table of standards for their layout and he give the formula or framework for each measurement--like distance between tracks under different circumstances. Creating that table was a valuable exercise for me. And it saved me from many mistakes. Worth your time.
Don
This was just a trial fit,I was curious if my 3.5" spacing was going to fit in the real world. Good thing I tried it, no go! ![]()
When I do it for real, I'll space them all out, put a couple of screws in them and then move up the table for the next set. The first three sections of track will be perfectly straight, when you get to the right hand side here, those will have some bends to mate up with all the switches.

@Don Merz 070317 posted:Track spacing is simple enough on straight track but less so on curves. In John ArmStrong's TRACK PLANNING FOR REALISTIC OPERATION, he proposes that every layout builder create a table of standards for their layout and he give the formula or framework for each measurement--like distance between tracks under different circumstances. Creating that table was a valuable exercise for me. And it saved me from many mistakes. Worth your time.
Curves here in the freight yard will be less critical than on operating tracks. Most of the curved sections will not be operated at the same time. Also, the intent of the yard is mostly freight cars. I won't try to park anything that doesn't fit in here.
As far as creating a table of standards, I think that ship has sailed for me, the track laying is done for the main platform. Whatever mistakes I mad (I'm sure there's one or two), I'll have to either live with or fix. One of the reasons for not rushing things like ballast is to get enough running to see if there are things that have to change before chiseling stuff in stone.
Miss by a hair breadth or a mile, it only matters that it works John![]()
![]()
@SuperChief posted:We found that two bay window cabooses had the most overhang. Might be worth testing out. Looks great!
I just won't park them side by side. ![]() I certainly want the ten tracks, so the exercise was really just seeing what spacing would work to fit them all on the table.
I certainly want the ten tracks, so the exercise was really just seeing what spacing would work to fit them all on the table.
Or you could leave the tracks at 3.5" spacing and make a stream washout scene over the fascia edge under that track at the front corner. ![]() You can still park a car there without a problem.
You can still park a car there without a problem. ![]() Put a few orange cones there and a PennDOT guy leaning on his shovel. You're all set!
Put a few orange cones there and a PennDOT guy leaning on his shovel. You're all set! ![]()
Are you using a snapped chalk line or the wall for the base line?
We could easily add a tapered filler on the side of the fascia at the end of the yard.
I think Tom might be on the right track (no pun intended).
The spacing between the wall and the first track might not need to be as great as the spacing between all the other tracks; especially if you use it to stage only your narrowest freight cars.
The extra space saved there could then be used to expand the spacing between all the other sidings.
@Tom Tee posted:Are you using a snapped chalk line or the wall for the base line?
We could easily add a tapered filler on the side of the fascia at the end of the yard.
Tom, this isn't the "final" fit, only a trial run to see if everything fit. It served it's purpose, I found out that the very tail end of the benchwork is a bit too narrow for the 3.5" spacing. I just put 1" blocks to push the track off the wall that far, when it's time to actually fasten down the track, I'll indeed do a chalk-line to make the starting line consistent.
No need for the filler, the 3.4" spacing still leaves plenty of space for any normal cars or locomotives, so I'll just go with that. Those tracks look so small there, hard to believe they're three feet long. ![]()
Note that all the clamps are gone, we have finished benchwork! ![]()

@Richie C. posted:I think Tom might be on the right track (no pun intended).
The spacing between the wall and the first track might not need to be as great as the spacing between all the other tracks; especially if you use it to stage only your narrowest freight cars.
The extra space saved there could then be used to expand the spacing between all the other sidings.
I couldn't cut the wall to first track spacing enough to make up the difference, I looked at that. I really do want a bit of extra room at the wall anyway.
Got it - that kick-out looks like it could be the perfect place for a yard tower.
@Richie C. posted:Got it - that kick-out looks like it could be the perfect place for a yard tower.
We'll think of a use for the extra space, that's for sure. ![]()
JOHN - Planning ahead is the way to make perfect use of that area.. Great use of your excess basement space. I hope you saved a little for storage.
Keep us posted on your progress.
Jim, the good thing about the freight yard is it will be storage under it, that's part of the attraction. ![]()
I'll also be putting display shelves on the 18 foot wall opposite the freight yard, that will give me around 250 feet of shelves. The display shelves over the freight yard will give me another 72 feet of shelves. That should allow me to get a bunch of stuff out and on display.
@gunrunnerjohn posted:
I would watch that light switch at the end John. A wayward sleeve or shirt cuff could catch a car on the outer track and send the string of cars to the floor. Loving the creative juices flowing on this thread.
Bob
@RSJB18 posted:I would watch that light switch at the end John. A wayward sleeve or shirt cuff could catch a car on the outer track and send the string of cars to the floor. Loving the creative juices flowing on this thread.
Good point, but that switch gets used about once a month. ![]() However, it's a valid warning.
However, it's a valid warning. 
Sharp eye Bob. That could cause a string line collapse of the whole siding. A Piece of acrylic can be used to guard cars. I use a band of it next to my engine tracks. Lowe's will cut handy sizes.
@gunrunnerjohn posted:Good point, but that switch gets used about once a month.
However, it's a valid warning.
An engine shed would work too ![]()
I'm an electrician so I always look at stuff like that.
I actually have a bunch of Lexan that I could break out to make guards if that's deemed appropriate.
Cut the fascia for the bridge section, but I think I have to wait until I come back from vacation for much more progress, soon! ![]()

Hinges, locating pins, and support structure added to my freight yard access bridge. After the adhesive dries, I will add the front fascia, fill all the screw heads, etc. and paint it. I'll finally be ready to start laying track on the yard for real!
Yes, my consulting carpenter was on the scene, who knows what I would have ended up with if that was not the case! ![]()


John, I forgot to mention...while you were upstairs I measured for the new engine servicing facility on the other side of the room. ![]()
My wife is wise to you Tom, the trip to LV is off! ![]()
![]()


@gunrunnerjohn posted:The bridge is done, ready to start laying track!
So what are you waiting for.......![]()
![]()
![]()
Catching my breath! ![]()
![]()
Really looking good, John. ![]()
George
I'm imagining it with track and 100+ freight cars on it! ![]()
![]()
Looks great! I still can't believe how well that room fits your layout. ![]() BTW, I'm going to borrow that j-channel idea for homosote edges.
BTW, I'm going to borrow that j-channel idea for homosote edges.
Well, the layout fits the room because the room was here first and I fit the layout into it! ![]()
The J-channel is working out well, and I really think that will keep the Homasote from flaking off. Note that you have to route a bit of clearance on the top so the J-channel fits around the Homasote and also doesn't extend above the level surface. Here's a shot of my lift-out hatch getting the J-Channel routing treatment. That allows it to slide right in. I also used a bead of the PL3 adhesive on the inside of the J-Channel so it was there for good!

Looks great John. Can't wait to see it full of freight cars!
FWIW, In addition to Homasote edging I use the J channel as a wire trough on a knee wall in my staging room.
 This is an oversize 3/4" J trough normally used for edging of exterior residential vinyl siding.
 The J channel collects ten feeder drops then forwards them individually to the sub panel block toggles.
Laid some track, all of this is straight stuff, so I just used a spacing board to space it out and screwed it down.

Now comes the fun part, doing all the flex track that curves to mate with all the switches! I'm just moving pieces on the chess board right now to see where the switches will be before I start laying track. I just use the O72 curves to make sure nothing I plan is a tighter diameter.
Tom will be happy to know that it looks like the left hand 101 switch fits better than the RH #6, so I'll probably use that in the configuration.

That looks great John.
Thanks Don, can't wait to see some cars on those tracks! ![]()
@gunrunnerjohn posted:Thanks Don, can't wait to see some cars on those tracks!
I really enjoy watching your progress (w/Tom's help, too?) and wish I could drop in and slow you down...
I'm pretty good about slowing myself down, probably don't need any help at that! ![]()
GRJ, given the size of the yard, I hope you have started the interview process for a yard master.
Yep, my 2 year old granddaughter is going to manage the yard, should be a hoot! ![]()
![]()
@gunrunnerjohn did you plan the lift out so the Ross 4 way would fit, or a happy accident? Looking good and can't wait to see the century of cars in the yard.
Been watching but quiet. Thats quite a nice layout and you are making great progress. When I was there to pick up a C&O engine you upgraded for a friend the layout was still a dream. Best of luck with it
@gunrunnerjohn posted:Laid some track, all of this is straight stuff, so I just used a spacing board to space it out and screwed it down.
Now comes the fun part, doing all the flex track that curves to mate with all the switches! I'm just moving pieces on the chess board right now to see where the switches will be before I start laying track. I just use the O72 curves to make sure nothing I plan is a tighter diameter.
Tom will be happy to know that it looks like the left hand 101 switch fits better than the RH #6, so I'll probably use that in the configuration.
WOW John, this looks great! Can't wait to see more progress AND a wiring diagram of those switches!!
John, I like your method of yard construction. I see many yards drawn up using software. Often times a huge complex of turnouts that yield only enough track to park 2 cars on some sidings. Putting the yard tracks in place first. Then visually laying out turnouts and getting a real life view in how it’s all going to work. Nicely done.
John, when you get down to scenicing the layout. A well paced mirror with maybe a highway bridge on top would make those yard tracks continue on.
@ScoutingDad posted:@gunrunnerjohn did you plan the lift out so the Ross 4 way would fit, or a happy accident? Looking good and can't wait to see the century of cars in the yard.
Actually, my early planning had a much smaller bridge. We decided on the larger bridge, that allowed me to move the two 4-way switches way back and add a lot of capacity to the yard.
@pennsydave posted:Been watching but quiet. Thats quite a nice layout and you are making great progress. When I was there to pick up a C&O engine you upgraded for a friend the layout was still a dream. Best of luck with it
Yep, some of it is still a dream, but it's slowly coming out of the fog to be reality! ![]()
@BCianci posted:WOW John, this looks great! Can't wait to see more progress AND a wiring diagram of those switches!!
Well, the wiring diagram is not going to be inspiring, I'm using manual ground throws on all the switches. So, the only "wiring" will be ten toggles to energize the individual yard tracks. Since the yard will be "attended" while moving stuff around, I couldn't see any point in going to all the trouble to have remote switching.
@Dave_C posted:John, I like your method of yard construction. I see many yards drawn up using software. Often times a huge complex of turnouts that yield only enough track to park 2 cars on some sidings. Putting the yard tracks in place first. Then visually laying out turnouts and getting a real life view in how it’s all going to work. Nicely done.
John, when you get down to scenicing the layout. A well paced mirror with maybe a highway bridge on top would make those yard tracks continue on.
Well, I'm glad I did draw it with software (actually a few times), as that allowed me to think about alternatives. As I said before, the narrow bridge from the main platform was a bottleneck that was really shrinking the effective track space. Once we went with an expansion of the main layout surface and a much wider bridge, it really opened up the possibility of moving the switches back to give much more yard space.
This is where I started, you can see how much of the main yard space I wasted. I also realized later that I could have ten tracks instead of nine. Initially, I had started out thinking of having eight tracks.

Moving the switches back onto the bridge and main table really gave me a lot more space. The escape switches are just an extra, they don't directly affect the capacity of the yard.
")

")
@gunrunnerjohn posted:I'm pretty good about slowing myself down, probably don't need any help at that!
Truer words, never spoken !
It's looking great, John! The exercise of fiddling with the software design certainly has paid dividends.
Got all the track laid on the main layout platform, and all the near bridge links added. Four sidings are complete, and I have to complete the remaining six. I cut all those tracks so I could test the bridge operation and make sure everything lined up again. I've never had ten tracks coming across a lift bridge section, it's gonna' be dense! ![]()
I can see it all now, dozens of cars with a place to park! 

Since there's no roadbed under the freight yard and leads, I still have to come up with a graduated pad that goes from 1/4" to level in about two feet, still thinking what I'll do there. I'll just slide this under the track as it leaves the first switch in the foreground.
The one track did get a bit close to the edge, but I don't see it as a real problem. In order to maintain at least O72 curves all the way, I had to compromise on my spacing from the edge. Probably should have filled in a bit more of the curve when we were adding the main bench extension.
John:
You probably already know this - one thing I learned with Ross turnouts is always drop power/ground on each end of the turnout no matter how close they are to each other.
Joe
It’s looking very impressive John. Do you have a spot picked out for a tower or yard office?
GRJ wrote “I still have to come up with a graduated pad that goes from 1/4" to level in about two feet, still thinking what I'll do there”
Would beveled pink board,(insulation),work? I’ve done that with hot knife and rasp.
Depending on the length, I use a cedar shake which is already tapered and vary in thickness.
A slight transition support can be achieved by filling in the properly suspended decline with ballast and soak it with diluted glue. Very common fix.
I used a pack of wood shims that I had laying around. Worked great.
I'm considering the ceder shakes, but they're only about a foot long, at least the ones I have, and they start out at 3/8" thick. I'm not ready to ballast it yet Tom. I was considering graduated shims, that may be what I end up with. I want the grade from 1/4" down to be about two feet which is roughly a 1% grade. That shouldn't affect anything moving through there.
I considered the pile of blue foam I have, but that would likely be messy. I also have some 1/8" basswood handy, that might be easy to work and create the ramp.
John.......it looks MAGNIFICENT!!!!
Peter
John- Home Depot sells a pack of shims that are about 1" wide. They are ideal for shimming doors. Take two and slide them under perpendicular to the track until you get the desired thickness. Add as many as you want to give the track proper support. Once it's ballasted you will never see them.
@Putnam Division posted:John.......it looks MAGNIFICENT!!!!
Thanks, it certainly fills a hole that my original design lacked, that being a decent amount of yard space! ![]()
@RSJB18 posted:John- Home Depot sells a pack of shims that are about 1" wide. They are ideal for shimming doors. Take two and slide them under perpendicular to the track until you get the desired thickness. Add as many as you want to give the track proper support. Once it's ballasted you will never see them.
I've seen those, that's certainly an option. Still considering how I can get clever and do it with materials on hand. ![]()
John , it's looking great !
Alex
Thanks Alex, how's your layout coming? Are you still in limbo and thinking about moving again?
Looks great John, I see where that outer track is right on the edge of the layout top. I know its ok as you guys on the east cost like to live a little on the wild side!
I am sure if you asked Tom Tee he would have something just laying around his shop. I have never met a wood worker that doesnt have scraps laying around for that just in case moment!
@mike g. posted:Looks great John, I see where that outer track is right on the edge of the layout top. I know its ok as you guys on the east cost like to live a little on the wild side!
Yep, since it's a yard track and it'll be slow speed operation with anything going down that line, I figured I'd shoot the dice. In order to keep the curves at O72 or larger on all the tracks, that's where the track ended up. I could have done even more ripping up to move it a little, but I decided it wasn't worth the trouble.
Access to this requires an OGR Forum Supporting Membership
