
I'd like to know how practical it is (or isn't) to repair this kind of damage.
Ali


|
|
I'd like to know how practical it is (or isn't) to repair this kind of damage.
Ali
Replies sorted oldest to newest
shipping damage?
Pretty easy repair if you have the pieces that fill those holes and just want to make it functional. A bit harder of you don’t have the pieces and/or want to make the repair undetectable.
Pete
Pete, I haven't done a full accounting yet but I have some of the pieces but some of the pieces are in pieces as well!
Ali
@NHVRYGray posted:shipping damage?
Not sure. Bought MTH Santa Fe 5-car set listed as new and 3 cars have this issue. The set is otherwise in great shape and the seller is offering partial refund or return so I'm trying to find a way to make it work.
Ali
I agree with Norton. If for any car, the broken-out section is in one piece, and still attached to the drive wheels assembly, then I don't see why you couldn't open up the locomotive or car, fit the broken section back in place under the chassis, , and place a flat piece of plastic (with the underside coated with epoxy ) down onto the top of the broken piece and surrounding area, to hold it in place. The underside would probably not look too bad.
If the broken out section is shattered into pieces, then remove all of the pieces, attach the wheels assembly to a square or rectangular piece of plastic, cut the ragged hole in the bottom of the chassis to a matching square or rectangular hole (so that your new square piece with wheels attached fits closely up in the hole), and then epoxy a large piece of plastic over top of the chassis and new chassis piece, to hold it all in place. Again, if you do it carefully, then the underside will not look too bad.
(I say to use epoxy, but if the work area is just plain plastic, a good quality airplane glue would probably be better.)
And, who really cares what the underside looks like anyway? The vehicles are no longer collectable, and you just want good runners.
Mannyrock
Ali, IF you use any adhesives let them cure for a few DAYS before you reassemble your cars as most glues will give off VOC ( volital organic chemicals) that could "fog" the car window plastic. Lionel had several sets of heavyweight cars where the mfgr used a type of superglue to attach the passenger figures. All resulting in fogged windows.
Any pics of the (top) of these passenger trucks? You stated they were MTH? Were they attached with a screw from the inside of the car floor to the top of the truck assembly? If so, I would try a strip "sandwich" approach.
Cut a piece of tin ( think coffee can strength), maybe 2" square , drill a center hole. This will go on the inside of the car floor. Piece of tape to hold in place. Cut another piece about as wide as the rails on the car underbody where the plastic broke out and maybe 2 " long to fit between the rails. Drill a center hole. You might need a longer truck mounting screw.
Run the screw from the inside of the floor thu the 1st tin piece, Thru the car floor, then thru the second piece of tin, and screw into the truck "bolster" (center of the threaded truck assembly).
I suggest using a metal ( sandwich) no matter how you attach the truck assembly. It will be stronger than any glue.
Most train mfgrs used sheet metal floors to support their truck assemblies. While zinc pest is the issue with the diecast side frames. And couplers. ABS plastic floors are prone to hairline fractures and subsequent breakage when bounced in shipping or dropped. Hoped this helped.
@Ali Maleki posted:I'd like to know how practical it is (or isn't) to repair this kind of damage.
Check this thread for a repair I did some time back, and read down because @Lehigh74 made an improvement to my original patch. It actually shouldn't be that hard to get them back on the rails. If you're wanting a repair that would be invisible when looking at the bottom of the car, that's probably not practical, but my repair was not visible when the car were on the track, that's all that's important to me.
This appears to be a pretty common issue; there's another MTH 20-6543 on Ebay with the same issues as mine!
I'm going to follow the great suggestions here and the thread John linked to.
Two of the five cars are in great shape.
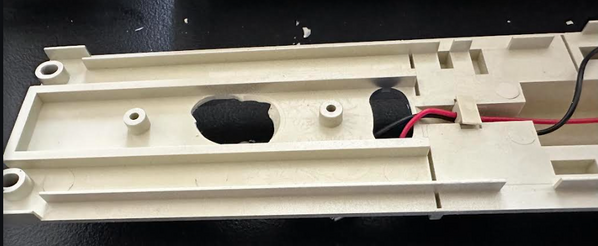
One is broken on one side and look like this (otherwise in great shape):
One car is broken on both sides (otherwise in great shape).
The luggage care is broken on one side and more parts broke off when removing screws:

Ali


If you see any cracks in the chassis of the remaining cars, I'd suggest reinforcing those as well while you're in there.
John,
You mentioned in your thread that you used 1/16" (0.0625). It looks like you used two (0.1250).
@Lehigh74 mentions that "John’s fix is pretty slick, but the .0625” styrene patch leaves the truck too close to the frame."
Did you use one or two?
Ali
J B weld will fix it stronger than original.
Charlie
Ali, it’s entirely up to you whether or not to repair. Many of us enjoy projects like this. It certainly can be done. If money is not an issue then go for it. On the other hand, you’ve got a nice seller willing to do a refund. Looking at the damage though I’d go for the refund.
JB Weld works miracles. Strongly recommend as Charlie said, too.
Always have some on your workbench!
Tom
@Ali Maleki posted:John,
You mentioned in your thread that you used 1/16" (0.0625). It looks like you used two (0.1250).
@Lehigh74 mentions that "John’s fix is pretty slick, but the .0625” styrene patch leaves the truck too close to the frame."
Did you use one or two?
Ali
Bob tweaked my repair to properly space the truck. I used 1/16" styrene for the initial repair, I think Bob may have just mis-spoke, or maybe that's what he used to space it up a bit for clearance.
@Norton @Mannyrock The pieces that fill the holes were shattered in small pieces and couldn't be used.
@romiller49 I considered returning the set but instead asked (and received) a partial refund. I haven't seen too many MTH 20-6543's in good shape for a decent price. A local store wouldn't sell me a used set for $300 because they hoped to get more on eBay.
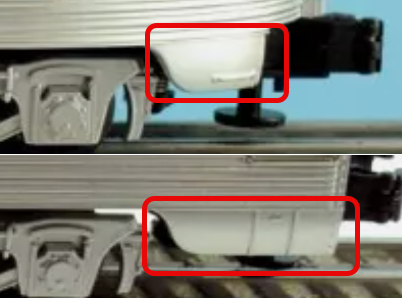
My original thought was to to create a wooden mold to replicate the bump (technical term) shown below and use it to mold ABS plastic.

In the end I tried to replicate @gunrunnerjohn's example and epoxied three layers of 1mm thick ABS with the bottom one being the widest and the top one being the narrowest:

Messy glue job shown below:
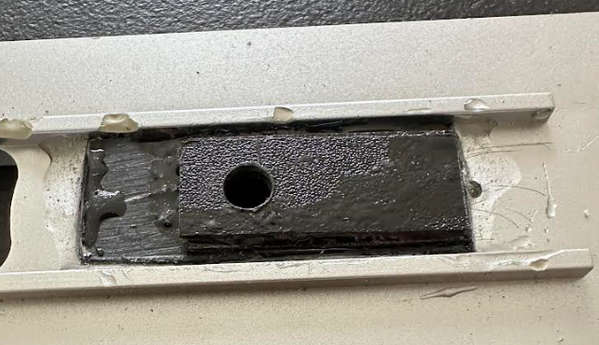

According to the JB Weld data cure time is 1 hour but I left it overnight before a light sanding and mounting the trucks.
Following @justakid's recommendation, I'm going to wait a few days before reassembling the cars.
Thanks for everyone's suggestions!
Ali


I'd do a trial fit and see if you have enough clearance or you need one more layer of thin stock for spacing. If you left it overnight it's strong enough to do that now.
I tested them and clearance is good.
Just so you know there is another variation of JB Weld, which is JB Quik which sets faster. I've used both and have no complaints.
Tom
Ali, nice job.
I purchased a new (never been out of the box) mth Santa Fe set from early 2000s a few years ago and had similar issues. I took them apart to detail the interiors and the plastic was very brittle (or had become over the years). I found this was happening on the chassis and also the interiors where I could see the plastic was discolored in sections. The full length vista dome seems most susceptible to this with its bigger trucks 3 axle trucks
It has me reluctant to buy streamlined Mth sets that are not local and have to be shipped as I believe the shipping forces are shaking the trucks and cracking them off the plastic chassis.
@Hump Yard Mike posted:I purchased a new (never been out of the box) mth Santa Fe set from early 2000s a few years ago and had similar issues. I took them apart to detail the interiors and the plastic was very brittle (or had become over the years). I found this was happening on the chassis and also the interiors where I could see the plastic was discolored in sections. The full length vista dome seems most susceptible to this with its bigger trucks 3 axle trucks
It has me reluctant to buy streamlined Mth sets that are not local and have to be shipped as I believe the shipping forces are shaking the trucks and cracking them off the plastic chassis.
MTH Heavyweights from the early 2000s also suffered from brittle plastic. Steps would break off if you breathed on them.
I ended up casting replacements for the ones that were missing.

Pete
@Hump Yard Mike posted:I purchased a new (never been out of the box) mth Santa Fe set from early 2000s a few years ago and had similar issues. I took them apart to detail the interiors and the plastic was very brittle (or had become over the years). I found this was happening on the chassis and also the interiors where I could see the plastic was discolored in sections. The full length vista dome seems most susceptible to this with its bigger trucks 3 axle trucks
It has me reluctant to buy streamlined Mth sets that are not local and have to be shipped as I believe the shipping forces are shaking the trucks and cracking them off the plastic chassis.
Mine is also Santa Fe (MTH 20-6543), circa 2020. I couldn't believe how brittle the plastic was when I trimming the broken areas.
It was listed as new and I believe it was but all five cars had partial breaks in at least one of the areas shown below:
Thankfully all of the pieces were in the box so I just had to glue them.
Ali

This set was made in 2000, not 2020, and if you look at current eBay sales, you’ll see this problem is evident. The repair is the best solution in that the original mount holes are very suspect.
As far as the price, I have seen most of these sets sell for less than $300 in eBay. So I’m not sure what you paid, but any dealer who turns down a $300 offer (for an original $250 set) knowing that truck mounts have been a problem isn’t reading the market well.
OK, I'm a bit confused.
Did you use JB Plastic Weld? If so, what type? I used the putty type once (comes in a roll), and didn't like it at all. But I have never used the two-part liquid syringe type.
Mannyrock
@Mannyrock posted:OK, I'm a bit confused.
Did you use JB Plastic Weld? If so, what type? I used the putty type once (comes in a roll), and didn't like it at all. But I have never used the two-part liquid syringe type.
Mannyrock
I've been using JB-Weld and JB-Kwik for years, and I love the stuff! The putty roll sucks, that's why you don't like it. Don't buy the syringe, buy the two separate tubes in a package. I get many uses out of a single package of JB.
@Jim R. You're right; Not sure why I thought it was 2020! After the partial credit I paid $150 + Shipping ($39).
Ali

Access to this requires an OGR Forum Supporting Membership

