Updated 2/2/2015:


You know?  Maybe I am experiencing Ground Hog Day all over again! 


I could swear I had done all this wiring logically before.  Anyway, I have (apparently) opened Pandora's Box by trying to simplify the wiring.  Here is what's going on:

  • For Power District 2 (the bridge), I have removed 5 of 9 track feeder pairs.  I will need to check these.
  • Because the labels have fallen off most of the remaining track feeder pairs, I will have to re-do them.  That's not going to be fun.
  • I've yanked a bunch of wiring out from under the Hidden Passing Siding and off the Eastern Power Distribution Panel.

Here's photo of the wiring changes in mid-stride.


DSCN0670


The Eastern Panel is a lot less cluttered right now.


DSCN0668

Lots more work to do.


George

Attachments

Images (2)
  • DSCN0670
  • DSCN0668

Updated 2/15/2015:


I don't have any photos, but a fair amount of work got done today.

  • All 7 feeder pairs for Block 8 (Weirton Steel Yard) were identified and re-labeled.
  • All 2 feeder pairs for Block 3 (Weirton) were identified and re-labeled.
  • Accessory bus wires for switches 8, 9, 10, 11, 12, 13, 14, and 15 were labeled.
  • Brackets were installed on the east edge of the layout to hold a masonite backdrop
  • General wiring clean-up took place - more cable ties were added.

I didn't get as much as I wanted done, but real progress was made.  The work isn't particularly photogenic.  It would hard to tell progress from the photos in the previous post, but it did.  I am on the verge of connecting the ends of Switch Bus #1 together.


George

I didn't get as much as I wanted done

George, that's the story of my own layout work in a nutshell.  As long as SOME progress was made, chalk up a win.  Wiring is definitely my own least favorite thing to do because it does take so much time and yet is invisible to anyone viewing the railroad.  You're doing a great job, just keep plugging along.

Originally Posted by Bob:

I didn't get as much as I wanted done

George, that's the story of my own layout work in a nutshell.  As long as SOME progress was made, chalk up a win.  Wiring is definitely my own least favorite thing to do because it does take so much time and yet is invisible to anyone viewing the railroad.  You're doing a great job, just keep plugging along.

Thanks Bob!  It's funny, but I really thought things were in better shape under the layout than they actually are.  I'm doing way too much wiring rehabilitation


I'm building a big list of lessons learned for the (God willing) next incarnation of the Panhandle.


George

Updated 2/17/2015:

I finished wiring up Switch Bus #2 (or so I thought) last night and tried it out. Nothing except some chattering and alternate light flashing from some DZ-2500 switch machines. Not quite sure what's going on. I disconnected Switch Bus #2 and tried again - Switch Bus #1 works perfectly. Disconnected Switch Bus #1 and connected #2 and tried again. This is even more strange - only a couple of pushbuttons are powered. Clearly something is mis-wired. I will have to examine this in the light of day and when I have a clear head.

George

Updated 2/26/2015:


I have a few things to report.

First, some progress has been made with Switch Bus #2. A bad crimp was isolated and power is now flowing to all DZ-2500a switch machines on Bus #2. We still don't have a functioning DZ-2001 signal to each, but we are making progress.  More debugging is planned.

Second, the bridge shoe components arrived yesterday. I am in the process of doing a test assembly. So far, things look really good. The parts are going to get painted a flat black tomorrow at my friend's paint booth. When I have one fully assembled, I'll post a photo.

I found the appropriate color for the yellowed concrete of the PRR bridge piers. The piers are going to get painted tomorrow as well. Then I plan to weather them with powder and apply Dullcote.


More when I know it.


George

Updated 3/25/2015:


  • Still debugging my Switch Bus.  Progress here is slow, but all switches except 1 are operating correctly via push-button.


  • Finished making and painting the floor for the top of each bridge pier. 


  • Painted both bridge piers using a color called Satin Strawflower.  The concrete on the prototype is old and has yellowed significantly.  As goofy as you might think it is, the color does closely approximate the real thing.  Here's a photo of the piers with my bridge shoes (test fit only).


DSCN0723

Still need to install the pedestals for the bridge shoes, red blinking warning lights, and railings.  But we're getting there!


George

Attachments

Images (1)
  • DSCN0723

Updated 3/29/2015:


I spent some time over the weekend trying to debug my Switch Bus issues without too much forward progress.  I probably have more than 1 switch machine malfunctioning.  To isolate the problem and to simplify things a bit, I decided to run each Switch Bus from its own DZ-2001. 


Yesterday, I made the wiring changes at the Western Distribution Panel.  Switch Bus #1 now works perfectly.  Its switches operate correctly from either their push buttons or the CAB-1.   Pretty happy about that; no more connecting / disconnecting bus wires when debugging.


Perhaps today, but certainly over the rest of the week I will focus on isolating the malfunctioning switch machines on Switch Bus #2.  We already know #14 is bad.  We suspect #9 is also problematic.  Interesting coincidence? that both machines are the first ones in cross-over pairs (9 & 10, 14 & 15)?  Hmm.


Anyway, I have gotten another lesson learned out of this.


Initially, the Western Distribution Panel was designed for DCS (TIU, AIU) and TMCC (Command Base).  There was enough room for these components back then.  When I changed to TMCC only, some space was freed up, but then quickly consumed by the larger number of ala carte TMCC components (TPC, BPC, AMC, ARC) and associated wiring paths. 


The Lesson:  make your panel as big as you think you will ever need, then double it!  From observing some of the panels in the toll industry, I've come to realize that laying them out efficiently and logically is an art.  Most of us experience the creeping incrementalism and direction changes that result in somewhat cluttered panels.  Anyway, I've got another lesson for the next incarnation of the PRR Panhandle.


George

Last edited by G3750

Updated 4/19/2015:

  • Attended the Strasburg O-Scale Show on Saturday. This is a terrific show.
  • Last week I started to cut lumber for additional ribs for the river bottom module. This module will hold the river bottom, the bridge piers, and the end piers and hillsides for the bridge. At the very rear, it will support the backdrop. Murphy's Law raised its ugly head: the miter saw blade needed to be replaced.
  • On Saturday, I found an inexpensive, better replacement (180 tooth / $12) at Lowe's.
  • On Sunday, I cut both additional ribs and started screwing them into place. The existing ribs will be moved about 0.75" to help support the bridge piers. I drilled holes for wiring in all the ribs.
  • Got my shopping list ready for York. Will attend a bandit meet for the first time on Tuesday.


George

Originally Posted by Pingman:

I continue to follow your progress and appreciate the updates.


Suggestion:  edit the thread's title with the date of the update; makes following the thread that much easier.


Thanks, again, for taking the time to allow us to follow along.

You're welcome, Carl.  I wish there was more progress to report, but I had the remaining eye operated on 2 weeks ago (cataract surgery).  It went great and I now have 20/20 in each eye and only need reading glasses!     I feel like a 20 year old again!!!  Between that, Orthodox Easter, and work, I haven't had much chance to work on the layout.  Hopefully that will change after York this week.


George

Last edited by G3750

Updated 4/26/2015:


As noted elsewhere, I had a pretty stellar York (although not quite as awesome as Fall 2014):


  • K-Line 18" PRR Spirit of St. Louis 4-car passenger set
  • Williams PRR B6sb (about to get TMCC / Sound / and F/R electrocouplers)
  • 2 Weaver PRR B60b baggage cars
  • 1 MTH R50b refer express car
  • 2 MTH N6b cabin cars
  • 1 Weaver TTX/REA TTOFC
  • 1 MTH Hot Metal Car
  • Some figures, detail parts, misc. pieces

If the Fall 2014 York was a grand slam for me (the PRR Panhandle bridge), this one was a 3-run homer.


George

Updated 5/6/2015:


Finally managed to get some work done on the layout:

  • Moved the original cross-members in the river bottom benchwork module.
  • Installed extra cross-members in the river bottom.
  • Procured regulated 12VDC and 5VDC power supplies to replace the unregulated power supplies procured from old computers.
  • Ordered 100' of Yellow/Black 16 gauge 2-conductor zip cord for use with the 12VDC power supply.
  • Ordered 100' of Red/Black 16 gauge 2-conductor zip cord for use with the 5VDC power supply.
  • Wrapped and suspended the wire bundle that goes behind the central backdrop (under the Hidden Passing Siding).

George


Last edited by G3750

Updated 5/8/2015:


Here are some photos to accompany the previous update.


First, the river bottom module and its new cross-members.


Wiring_21_

Wiring_20_

Next, the regulated power supplies.  5VDC on the left; 12VDC on the right.  Note that you can buy these new for very little coin.  They are much safer than using unregulated computer power supplies.


Wiring_25_

Wrapped and suspended the wiring bundle under the Hidden Passing Siding.  This looks a lot better to me now.


Wiring_24_

Wiring_23_

Wiring_22_

OK, now we need to make sure that the river bed module is actually level and properly positioned / attached to its legs (see Photo 1 for reference).  In order to have the backdrop and bridge piers fit correctly, we will need to have the module level left to right and front to back.  That's the logical next step.


George

Attachments

Images (6)
  • Wiring_21_
  • Wiring_20_
  • Wiring_25_
  • Wiring_24_
  • Wiring_23_
  • Wiring_22_
Last edited by G3750
Originally Posted by Mark Boyce:

George,

An absolutely first rate job.  Cable harness looks neat and tagged, the regulators look good, and the bench work for the river bed looks good, and you still plan to level and test fit.  If I was hiring someone to do my work for me, and you were in the business of building others' layouts, I would give you the job!  ;-)

You're too kind, Mark.  Unfortunately, all of this is remedial work.  I did the initial (bad) job hurriedly.  The good news is that I learn from my mistakes.  The bad news is that I have way too many opportunities for education. 


But thank you.


George

Originally Posted by G3750:
Originally Posted by Mark Boyce:

George,

An absolutely first rate job.  Cable harness looks neat and tagged, the regulators look good, and the bench work for the river bed looks good, and you still plan to level and test fit.  If I was hiring someone to do my work for me, and you were in the business of building others' layouts, I would give you the job!  ;-)

You're too kind, Mark.  Unfortunately, all of this is remedial work.  I did the initial (bad) job hurriedly.  The good news is that I learn from my mistakes.  The bad news is that I have way too many opportunities for education. 


But thank you.


George

George,

You're welcome!

I have a college degree in electronics, but 39 years in the School of Hard Knocks is where I really learned.  It is unbelievable how many mistakes I make in everything.  Those are the situations where I really learn!

Next, the regulated power supplies.  5VDC on the left; 12VDC on the right.  Note that you can buy these new for very little coin.  They are much safer than using unregulated computer power supplies.


And may I ask what is their amp rating? It appears a search on "Da bay" or Amazon the sellers state the volts plus amp ratings. which do you use for yours? Inquiring minds want to know!

Originally Posted by prrhorseshoecurve:

Next, the regulated power supplies.  5VDC on the left; 12VDC on the right.  Note that you can buy these new for very little coin.  They are much safer than using unregulated computer power supplies.


And may I ask what is their amp rating? It appears a search on "Da bay" or Amazon the sellers state the volts plus amp ratings. which do you use for yours? Inquiring minds want to know!

I'll have to look into that.  My EE friend warned me about the computer power supplies and the size and heat generated by the resistor that would be needed to regulate them.


I'll have to get back to you on that.


George


Updated 5/21/2015:

  • The 100' of 16 gauge Red/Black zipcord and the 100' of 16 Yellow/Black zipcord both arrived.
  • Someone posted a question about the use of the 5VDC power supply that got me thinking.  I was originally planning to use the Yellow/Black zipcord for that buss. But since I have no accessories for it, I'm going to use that wire on the 12VDC buss. That will help me identify accessories more easily.
  • I recently got a new job, which is very rewarding. Unfortunately, it's played havoc with my efforts on the train layout.  So the work necessary to mount the backdrop remains undone. And my backdrop artist is currently under the weather.


That's all the news today.


George

Last edited by G3750

Updated 7/1/2015:

Sorry I haven't posted in awhile.  My new job continues to eat into my hobby time. I haven't gotten much done, as I am too tired after 10-12 hour days to focus on the layout.

  • Found and ordered some 16 gauge Brown/Red zipcord for use on the 3 VDC bus. Should arrive tomorrow.
  • Did do some clean-up of the train room in preparation for getting back to wiring the river bottom module. The 12 VDC bus will pass under module floor and power the lights on the bridge piers.
  • Exploring ways to install the backdrop (yet to be painted by my artist friend who is having back problems).


George

Last edited by G3750

Updated 7/4/2015:

  • Decided that the floor of the river module will actually become the surface of the Ohio River. Originally, I was thinking about creating a 3" high level of "water" and sticking fish, weeds, junk, Nazi U-boats, etc. in it. Fortunately, the delirium passed and practicality reared its ugly head.  I don't really think I could have pulled it off and have it turn out presentably.
  • I did manage to get some very minor work done - installed terminal strips and a length of 12 VDC accessory bus between the pier locations. The leads for the slow flashing red LEDs are a bit short so I will have to attach pig-tails to them before connecting to the terminal strips. Here's a shot of the bus wiring for the piers.

Braxton_05_

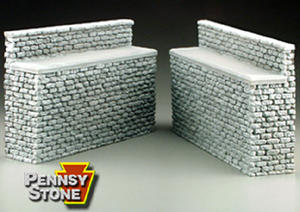
  • I am giving some thought to the end piers (bridge abutments). These are under consideration.

FL6311-A


George

Attachments

Images (2)
  • Braxton_05_
  • FL6311-A
Originally Posted by Mark Boyce:

Drat, And I was looking forward to seeing the Nazi U-boats getting pulled in by the river police. 


Seriously, I don't blame you for making things simpler.  I don't know how I would pull all that off either.

Yeah, I've been agonizing over that for awhile.  It's another case of my imagination outstripping my modeling skills. 


George


Updated 8/1/2015:


OK, I finally completed my revision of Accessory Power Supplies / Buses.  You might remember that I originally modified PC power supplies to provide 3VDC, 5VDC, and 12VDC for accessories.  Unfortunately, those were unregulated supplies (after removal from the PC cases).  That made them prone to overheating and to providing inconsistent voltage levels.  I decided that I did not need the risk or potential damage to devices.  They were replaced with commercial grade regulated DC power supplies.


DSCN0735


I procured a 3VDC 2 amp power supply (wall transformer) from Evans Design in order to power the lighted telephone poles (3VDC LEDs) and other 3VDC lights on the Weirton side of the layout.


Today, I finally got around to mounting all the power supplies on the wooden board that sits in the base of my transformer cart.


DSCN0757

The power supplies plug into a spike-resistant power strip.  Everything on the layout is activated by its On/Off switch.  Accessories are further protected by a fuse (as seen in the photo).  Left to right:  3VDC, 5VDC, and 12VDC.


Finally, we're getting something done!


George

Attachments

Images (2)
  • DSCN0735
  • DSCN0757

Updated 8/3/2015:


I’ve wrestled with the backdrop issue on the Panhandle for a long time.  Back when I started construction, I was interested in acquiring a rather large commercial backdrop from a vendor (who will remain anonymous).  The only polite description of the vendor's website would be "primitive", although several 4-letter terms come to mind.  However, the website's deficits were completely exceeded by the vendor's total disdain for and ignorance of the concept of customer service.  As a result, they missed out on about $600 of revenue.  Unfortunately, I also missed my window to acquire and install a nice backdrop.


Fast forward about 10 years.  Up until last fall, I had no real reason to worry about the backdrop.  But then I acquired my fabulous PRR Panhandle bridge from East Coast Enterprises.  To install it, I need a backdrop between the bridge and hidden passing siding behind it.  The backdrop's job is to hide that siding.


The original, and still operational, plan was to paint a backdrop on a sheet of 1/8" masonite.  I have hired an artist friend of mine to do that work.  But I have a remaining 10' of back wall to cover with something.  And there are also the side walls of the layout, 8' and 10' respectively.


I was thinking about painting the walls with sky and hills, but I've reconsidered.  Here’s my current thinking:


  1. I am beginning to think that painting a number of 4’x8’ masonite boards (1/8” thick) and placing them along the edges of the layout is the way to go.  This would take about 4 boards + the backdrop the artist is going to paint.
  2. I would use “L” brackets mounted on the bottom edge of the 1”x4” pine boards that form the perimeter of the layout.  These would create a channel that the masonite would slide into.
  3. Painting the boards in the garage (while they are lying flat) would permit me to do a more realistic sky, ala Bob Ross.  https://www.youtube.com/watch?v=YCZObxeLU58
  4. I absolutely dread trying to paint the back wall with a roller on an extension handle.  The benchwork prevents me from getting close enough to do a good job.  I don’t think I can get the corners very well and blending from a dark blue at the top to a lighter blue at the horizon with a roller is going to be impossible.  Working with spray cans might be slightly better, but who knows?  And of course, I would have to put down drop cloths everywhere to deal with errant paint.
  5. At the top, the backdrops would be fastened to the wall with double-stick Velcro.  This could be easily be removed when we move.
  6. The major disadvantages of this plan are:
  • Hauling the masonite backdrops down the basement steps (definitely a 2 person operation) without damaging them.
  • Sliding the backdrops into their slots along the back wall.


So, that’s my thinking at this point.  Anybody else got any ideas?


George

Last edited by G3750

Updated 8/8/2015:


I have several updates today.  Last night I got my transformer cart finished (or at least finished until something else comes along that requires a change).  Here's a look from the rear of the cart.  I have added more power outlets (another strip) and the Accessory Power Supplies are installed (3VDC, 5VDC, 12VDC).


DSCN0840


Acquired 4 white masonite panels 1/8" x 4' x 8' for painting backdrops.


Went to the Strasburg 2-rail O Scale Show this morning.  Picked up some items:

  • 10 Arttista figures (cheap)
  • Set of tools (picks, brushes, etc.)
  • A large stone wall casting
  • A large brick casting
  • Bunch of small plastic bags for parts


George

Attachments

Images (1)
  • DSCN0840

Updated 8/12/2015:


Over the last couple of days I have given much thought to how to model the surface of the Ohio River as it flows under my bridge.  Yesterday and today, I investigated custom glass vendors.  The plan is to:

  1. Use 1/8" masonite as a support for the river surface.  It will be painted a number of shades of brown (darker towards the middle of the river) to simulate the color of the water.
  2. Use Aquatex glass (I ordered the piece today) on top of the masonite as the surface of the water.  The glass will have two small holes at specific locations to permit the wiring for the pier lights to pass through. 
  3. Items on top of the water (row boat, inner tube) will be glued on.
  4. Foam will be created around the piers (still thinking about how to do that).


George

Updated 8/14/2015:

In the interest of finishing items related to the accessory power supplies, I have:

  • Ordered the 4-way traffic light and its power supply from Miniature Traffic Lights (they did the Weirton light for me). This will be installed at the intersection of Market Street and 4th Street in Steubenville, OH.
  • Acquired 10 grain of wheat bulbs (5VDC) for as yet undetermined purposes around the layout.


George

Updated 8/15/2015:

  • Not a lot new on the modeling front, but I've started a full-scale clean up of the train room and my office in preparation for working on the backdrops. I will need room to stage everything as the plan goes forward.
  • Built the plan (detailed checklist) of items for installing the bridge. This includes the backdrops, wiring, and all associated activities.
  • Spoke with the artist who will be painting the backdrop about depicting the river. She is going to help me with color selection and blending for a realistic look.


George

Add Reply

Post

OGR Publishing, Inc., 1310 Eastside Centre Ct, Suite 6, Mountain Home, AR 72653
800-980-OGRR (6477)
www.ogaugerr.com

×
×
×
×
Link copied to your clipboard.
×
×