


Rod, someone just suggested I need one of those to go from my station to the lower level. I didn't have anything that elaborate in mind, but Wow! What a great looking stairway!!
That’s a masterpiece Rod! WOW!!!
Got to work on the engine I selected to weather and I surprised myself by finishing it as well! The locomotive is a 1989 Reading T1 that I got a couple of years ago by a forum member. I purchased it because it was a great deal, and I wanted to weather it. To the member who sold me it, now you can finally see it weathered! I will post a video of it running soon!


Attachments
Images (3)
@romiller49, beautiful project and photos. Help us all with a thread on how you did it.
Thanks for the kind words everyone.
Carl, I needed a stairway for a high elevation. I didn’t want one long stairway but wanted something compact. I simply built as I went along using bass wood from my stock pile for projects. The most difficult items were the stair steps. I used 3/16 x 3/8 x 24 bass wood strips for the steps cut to 1-1/4” wide. Once they were assembled it was just a matter or orientation of the steps for a compact display. I like to use Elmer’s white glue. It’s easy to make adjustments if needed especially keeping the stair treads straight. I didn’t like the stairways sitting on a box so that’s where the garage doors came in handy. They weren’t planned but by luck the fit perfectly.
Here is a video of my T1.
Attachments
Videos (1)

Thanks for the response and info @romiller49.
Making lift out tunnels for my RR so as to have access to turnouts and track work in otherwise hidden locations.
Taking a stab at adding coal for my Railking hoppers. I used Black Diamond Coal Slag abrasive and a lot of wet water.


Attachments
Images (3)
Assembled a dozen @gunrunnerjohn-designed DIY regulators for LED strip lights for passenger cars
Continuing touch-up paint work before decaling last 4 of nine NP NCL cars. Also gathered the interiors and frames needed for final assembly.
Next up is installing LED's in the ceilings of four domes, and cutting the sheet Styrene for the mounting panels for the fore and aft LED strips in the dome cars.
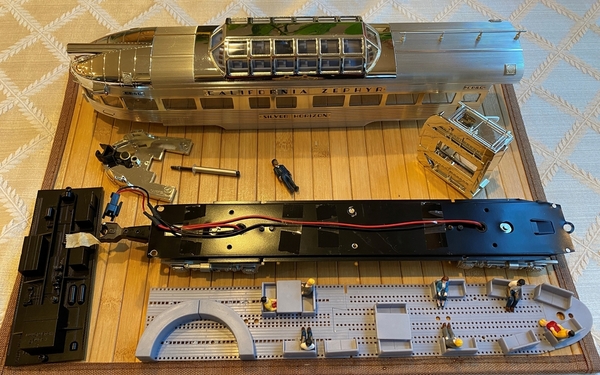
@WesternPacific2217 posted:I've had the K-line 15" WP California Zephyr for two weeks and decided I needed to fix the doors that didn't shut all the way. And while I was at it retrieve the conductor that had come loose and was stuck under one of the tables! I've named him Stuckey Wedgewood do to his unfortunate predicament.
These aluminum passenger cars are not easy to take apart. The metal frame is in a groove in the aluminum shell and has to be pulled out of the front of the car. It was resistant to being pulled out, and I had to spread the aluminum body out at the bottom to pull the chassis out. Can't wait to put it back together! LoL
Stuckey Wedgewood is seen in the middle of all the parts.
I don't like the perforated floor, I'm on the hunt for doll house carpet that might be similar to was was in the real Zephyr cars. Plus, more passengers are required. Updates later.
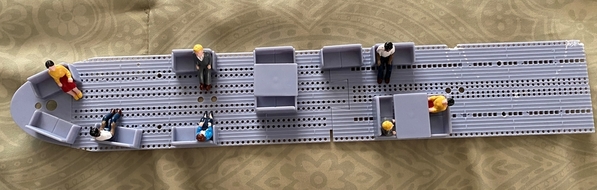
Here's an update on the progress so far on my K-Line Aluminum 15" Cal Zephyr passenger car.
Close up of after I had just disassembled the car. Plastic perforated floor, everything is gray:

Starting disassembly, removed half oval bar, then all the love seats and tables:
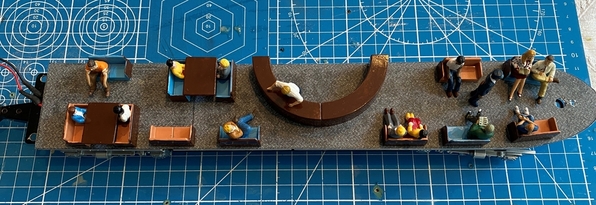
New carpet floor, printed on my Canon photo printer. Hand painted love seats, table tops, and half oval bar. Used the figures that came with the car and added some Woodland Scenics figures. I had to do major surgery on the bartender and Stucky Wedgewood removing a portion of their legs, they were too tall! I got the colors from a online photo of one of the California Zephyr Observation cars. The floor in the real car is darker, but the chairs and couches were pastel blue and peach. I used Testors paints.
It was very difficult to remove the steel chassis from the aluminum body during disassembly, so I took the opportunity to do some Dremel work on the chassis, and some filing on the aluminum body. Glad I did, the frame slides easily in and out of the body now! I was going to upgrade to LED lighting, but the original incandescent lighting works great and doesn't flicker. My track must be clean at the moment. I'll keep the lighting stock for now, until a light burns out.
The interior of body is just aluminum, plastic windows, and some sloppy factory glue. So my next project is to line the interior walls with printed photo paper in a very light pinkish color like the real Zephyr car. I'll have to cut out the windows in the photo paper, the measurements are critical. More updates to come.
Attachments
Images (4)


@WesternPacific2217 posted:Here's an update on the progress so far on my K-Line Aluminum 15" Cal Zephyr passenger car.
Close up of after I had just disassembled the car. Plastic perforated floor, everything is gray:
Starting disassembly, removed half oval bar, then all the love seats and tables:
New carpet floor, printed on my Canon photo printer. Hand painted love seats, tabletops, and half oval bar. Used the figures that came with the car and added some Woodland Scenic figures. I had to do major surgery on the bartender and Stucky Wedgewood removing a portion of their legs, they were too tall! I got the colors from a online photo of one of the California Zephyr Observation cars. The floor in the real car is darker, but the chairs and couches were pastel blue and peach. I used Testers paints.
It was very difficult to remove the steel chassis from the aluminum body during disassembly, so I took the opportunity to do some Dremel work on the chassis, and some filing on the aluminum body. Glad I did, the frame slides easily in and out of the body now! I was going to upgrade to LED lighting, but the original incandescent lighting works great and doesn't flicker. My track must be clean at the moment. I'll keep the lighting stock for now, until a light burns out.
The interior of body is just aluminum, plastic windows, and some sloppy factory glue. So my next project is to line the interior walls with printed photo paper in a very light pinkish color like the real Zephyr car. I'll have to cut out the windows in the photo paper, the measurements are critical. More updates to come.
Outstanding work Scott, I'm looking forward to the end results. So far your project is very impressive.
@WesternPacific2217 posted:
I was going to upgrade to LED lighting, but the original incandescent lighting works great and doesn't flicker. My track must be clean at the moment. I'll keep the lighting stock for now, until a light burns out.
The interior of body is just aluminum, plastic windows, and some sloppy factory glue. So my next project is to line the interior walls with printed photo paper in a very light pinkish color like the real Zephyr car. I'll have to cut out the windows in the photo paper, the measurements are critical. More updates to come.
The interior is looking good with that carpeting Scott.![]() No big deal about doing some surgery on some legs . I had to do some when installing sitting figures in my passenger cars.
No big deal about doing some surgery on some legs . I had to do some when installing sitting figures in my passenger cars.
Just one note about using combustible materials in the interior. THE INCADESCENT BULBS GET VERY HOT.
HAVE FUN.
Not the layout as such, but still:

Got this done today, for the Battalion COs herringbone twill top for my fictional Railway Operating Battalion on my layout. The collar insignia is for a Lt Colonel and Transportation Corps, both of which are WW2 vintage and correct for the branch and rank for a Battalion Commander.
I must be the first person in the hobby EVER to do this. Gonna put it on and have my wife take a shot of me standing in the layout room wearing this with an M1 helmet and pistol belt, holding either a carbine or a Tommy gun...
Attachments
Images (1)
@WesternPacific2217, really great progress on your project.
Question: how'd you remove items from the perforated floor?
Thanks for the photos and info.
Hi guys! Not much to report lately on the layout. Spring is here so more outdoor time is required.
Wonder what the CEO would say about a G scale layout in the yard...........![]()
I did get the holes filled in on my F3 shell. I still need to get matching paint.


@WesternPacific2217- 1000% improvement Scott. Looks great!
@Pingman- That train is going to be something special when it's done Carl.
@p51- The patch looks right at home on the sleeve of that shirt Lee.
@ChiTown Steve- nice work on the hopper loads.
Well...the grass ain't gonna mow itself........![]()
Bob
Attachments
Images (2)


Alot of great work here today. Nice going gentlemen!
@Pingman posted:@WesternPacific2217, really great progress on your project.
Question: how'd you remove items from the perforated floor?
Thanks for the photos and info.
Hi Pingman, I used a brand new box cutter blade, clamped the perforated floor to my workbench and sliced them off ever so carefully! Some of the couches had pins that went into the floor and some didn’t. The couches with the pins were only slightly more difficult. After I removed the couches etc. I sanded them flat on the bottom so they would adhere well on the new floor surface. I’ll post some more photos, I finished the wall paneling inside the passenger car last night and it’s time to put it back together.
Thanks for the description @WesternPacific2217.
Keep the photos and details coming -- terrific project.
The Burlington box car in the first picture had some small scratches that really showed because it's so shinny. I weathered it this morning. With a built date of 1956 it blends in better with my 1971 era looking a little worse for wear. I also changed the doors to Tuscan.


Attachments
Images (6)
For me, it was track cleaning day of the passenger train mainline. So, I prepared the track cleaning car to run behind the head end F7, but ran the train in reverse around the layout with the cleaning car behind it.
The first photo is before the run started. The second photo shows all the grime accumulated on the rotating disk. So, it was pretty dirty. But the track cleaning car makes the job fairly easy and done quickly. ![]()


Attachments
Images (2)
@RSJB18 posted:Well...the grass ain't gonna mow itself........
Bob
Well Bob..........I'm guessing your CEO doesn't find mowing the grass to be such a joy as my CEO does. ![]()
@WesternPacific2217 posted:Here's an update on the progress so far on my K-Line Aluminum 15" Cal Zephyr passenger car.
Close up of after I had just disassembled the car. Plastic perforated floor, everything is gray:
Starting disassembly, removed half oval bar, then all the love seats and tables:
New carpet floor, printed on my Canon photo printer. Hand painted love seats, table tops, and half oval bar. Used the figures that came with the car and added some Woodland Scenics figures. I had to do major surgery on the bartender and Stucky Wedgewood removing a portion of their legs, they were too tall! I got the colors from a online photo of one of the California Zephyr Observation cars. The floor in the real car is darker, but the chairs and couches were pastel blue and peach. I used Testors paints.
It was very difficult to remove the steel chassis from the aluminum body during disassembly, so I took the opportunity to do some Dremel work on the chassis, and some filing on the aluminum body. Glad I did, the frame slides easily in and out of the body now! I was going to upgrade to LED lighting, but the original incandescent lighting works great and doesn't flicker. My track must be clean at the moment. I'll keep the lighting stock for now, until a light burns out.
The interior of body is just aluminum, plastic windows, and some sloppy factory glue. So my next project is to line the interior walls with printed photo paper in a very light pinkish color like the real Zephyr car. I'll have to cut out the windows in the photo paper, the measurements are critical. More updates to come.
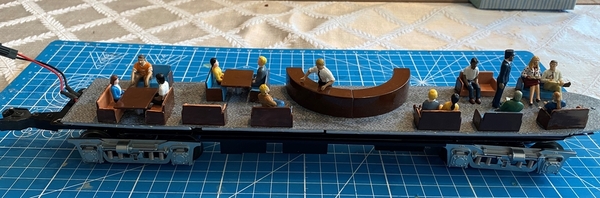
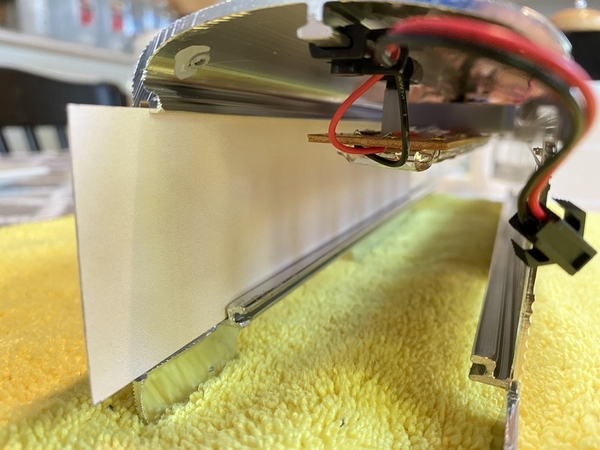
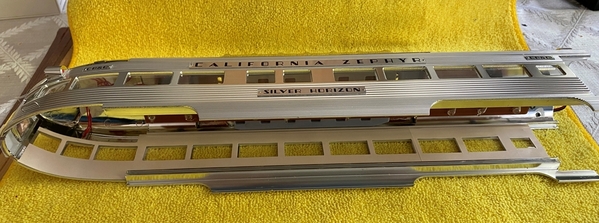
Update: Finished the interior paneling and installed them in the extruded aluminum car body. you can see the plastic window, glue and all without the paneling. Ugly! Just getting started in the photo below.
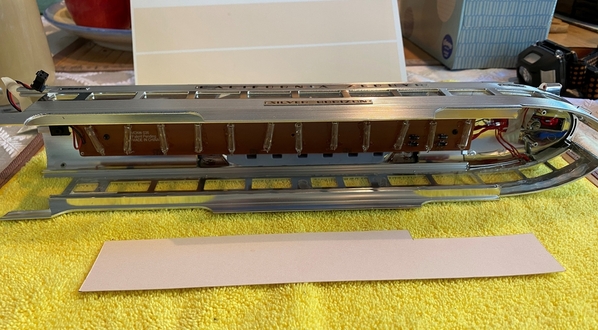
I used the already existing channels in the car body for the interior panels, just need a couple of dabs of glue. Notice how low in the car body the incandescent lights hang in the photo, more about that at the bottom of this post. The channels towards the bottom are for the chassis, it slides in from front to back.
Fitting the paneling printed on Canon Photo paper.
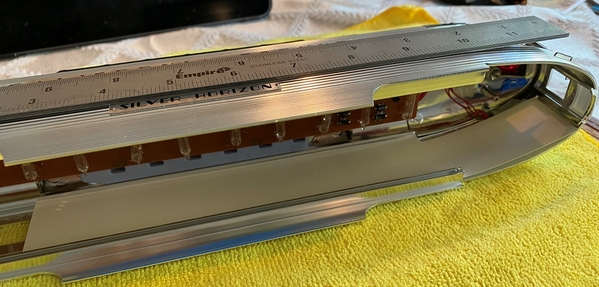
The photo below shows panel after the windows have been cut out. Time consuming process of cutting out the windows, about an hour each side! This photo also shows how low the incandescent lights are!

Paneling installed.
The plan was to reassemble the car today, but the incandescent lights are a problem and need to be remedied with LED strips before I can install the chassis with interior floor and figures. Both Stucky Wedgewood, the conductor, and the bartender will be decapitated if I install the chassis with the factory incandescent lights. I have the LED strips, but I'm out of DC regulators, so I'm placing an order for gunrunnerjohns regulators. I'll also need a couple of resistors and a 3 mm LED for the main taillight. I thought is was odd that they used LED's for the taillights on each side and an incandescent for the center taillight!!! Probably a week delay for shipping etc. as I'm on the west coast! :-( Hopefully my next update will be a completed project!
Attachments
Images (5)


Wow Scott, I'm impressed! You are a real craftsman. I can't even repair my own passenger cars and have to send them to gunrunnerjohn. So, I have to settle with whatever passenger car interiors I get, due to my ineptness at the work bench. As long as the interiors are finished with colors and painted passenger figures, I guess I don't mind. But, you the man!


Attachments
Images (2)
@Yellowstone Special Wow, I’m traveling via the Super Chief my next train experience 😊
@Seth Thomas posted:@Yellowstone Special Wow, I’m traveling via the Super Chief my next train experience 😊
Seth: If only we could. I was in my late teens during the twilight years when those name trains ran. But I miss seeing them and riding on them. 😉
@Yellowstone Special posted:Wow Scott, I'm impressed! You are a real craftsman. I can't even repair my own passenger cars and have to send them to gunrunnerjohn. So, I have to settle with whatever passenger car interiors I get, due to my ineptness at the work bench. As long as the interiors are finished with colors and painted passenger figures, I guess I don't mind. But, you the man!
Hi Vern, thanks for your kind words about my abilities, I do my best to satisfy my own expectations! LoL if others like what I’ve done that’s a big bonus!
I see you have your own set of aluminum Super Chief passenger cars that must look awesome being pulled by your #332 Warbonnet ABA F3 set. The interior details are great! Are those Lionel 21”? A video of the Super Chief would be awesome! 😁
Thanks, Scott. These are 15” cars, since I have only 036 curves on the layout. Can only take still photos, since I’m too inept to do videos. Perhaps eventually. 🤔
Scott, You are making great improvements!
Vern, your cars look great!
Thank you, Mark.
@WesternPacific2217, thanks for the additional photos and details on your project. It's progressing great.
I may undertake a very similar project hence my questions:
What are you using for "window glass" between the interior of the extrusion and your panels?
What did you use to cut out the windows from the panels?
How did you measure to create the notch at the rear of the panels?
Thanks, again, for an excellent project "how to" and for answering questions.
@Yellowstone Special, thanks for the photos; that's one of LIONEL's finest passenger sets.
@Pingman posted:@WesternPacific2217, thanks for the additional photos and details on your project. It's progressing great.
I may undertake a very similar project hence my questions:
What are you using for "window glass" between the interior of the extrusion and your panels? I used the windows that came with the K-Line 15" passenger car. I'm pretty sure it's Lexan.
What did you use to cut out the windows from the panels? I used a razorblade You could use and xacto knife or a box cutter, just make sure it's a new blade. Some sort of cutting board.
How did you measure to create the notch at the rear of the panels? I used a steel ruler that has 1/32 graduations (next time I'm using metric!), and a digital Vernier caliper.
Thanks, again, for an excellent project "how to" and for answering questions.
@Yellowstone Special, thanks for the photos; that's one of LIONEL's finest passenger sets.
Hi Pingman, answers are above in your post above.
List of the tools I used in the photo below.
Heavy Steel ruler - Note: If you don't have one, I recommend a flexible steel machinists ruler for measuring. I use the heavy ruler as a straightedge.
Digital Vernier Caliper
Razorblade - I find razorblades hold their edge better than an xacto knive. Personal preference.
Just a simple template I created out of construction paper. The cutout is a relieve for the wiring for the rear lights.

Attachments
Images (1)

Thanks for your comprehensive reply @WesternPacific2217 to my questions.
What did you use for "window" material? Did you reuse what K-Line installed or did you need to make a substitute?
Thanks, again, for the photos and info. Looking forward to you LED/regulator installation.
@Yellowstone Special posted:Thanks, Scott. These are 15” cars, since I have only 036 curves on the layout. Can only take still photos, since I’m too inept to do videos. Perhaps eventually. 🤔
What device do you use to do the photos Vern ? 🤔
@Pingman posted:Thanks for your comprehensive reply @WesternPacific2217 to my questions.
What did you use for "window" material? Did you reuse what K-Line installed or did you need to make a substitute?
Thanks, again, for the photos and info. Looking forward to you LED/regulator installation.
Sorry Pingman, my apologies for not pointing out that I reused the original factory windows. I’m not sure if it can be seen in the photos, but it’s one piece per side going almost the whole length of the car. As a matter of fact I didn’t even remove them at all. I didn’t think at the time I could remove the window material without breaking or damaging it. However, in hind sight, and with the next 3 K-Line passenger cars in the set, I will remove the windows and replace with new Lexan windows.
@Yellowstone Special posted:Thanks, Scott. These are 15” cars, since I have only 036 curves on the layout. Can only take still photos, since I’m too inept to do videos. Perhaps eventually. 🤔
Vern, I’m no expert and I use my iPhone or iPad Pro for almost all my video’s and very simple to use. The phone does most of the work for you, just point and shoot. It does help to have a tripod and a mount for the phone. It’s difficult to operate the phone and a cab1 or cab2 at the same time with two hands. And then just experiment with light and position of the phone.
I guess the trick is to upload the video to YouTube, which is what I do, and then put the link into OGR.
Hi guys, I just handed out a boatload of likes as some of you may have noticed I haven't been here for about 2 weeks! The CEO has me doing project after project to get ready for summer! LOL
I sure love everything that is going on with all the wonderful projects!
Bill nice tribute to your Son in Law! I am praying for him and his family!
Scott, your work on the interior of your passenger car is just Outstanding!
Nothing new from me as I still have more projects to take care of rain or shine! But I will try and check in sooner then 2 weeks! LOL
I hope you all find time to have fun with your layouts and trains!
Joseph: I just use my iPhone 13 pro max for the photos.
@WesternPacific2217 posted:Vern, I’m no expert and I use my iPhone or iPad Pro for almost all my video’s and very simple to use. The phone does most of the work for you, just point and shoot. It does help to have a tripod and a mount for the phone. It’s difficult to operate the phone and a cab1 or cab2 at the same time with two hands. And then just experiment with light and position of the phone.
I guess the trick is to upload the video to YouTube, which is what I do, and then put the link into OGR.
Thanks Scott. You've become a pretty good photographer then. I've taken short video clips of the trains on the layout. But I've never posted them on any of the forums. I haven't created a YouTube account yet. I guess that would be the next step. Thank you for the tips.
Scott, excellent project, sounds like a good article for OGR.
Andy
Hello Guys and Gals,
As usual inspiration comes when I look at some of the work that people have been doing recently. Here is a photo of some transmission towers I put together and painted. I forgot to take a picture of them painted but that is forthcoming along with the progress on this particular project. These are HO scale so stay tuned for how I utilized them on the layout...
Dave

Attachments
Images (1)

Add Reply
Sign In To Reply
