Making steady progress on my F3 wiring. Everything is terminated, next is to mach up all of the wires for the harness and load them into the JST plugs. I just wish I had more time to sit and get it completed.
Bob


|
|
Making steady progress on my F3 wiring. Everything is terminated, next is to mach up all of the wires for the harness and load them into the JST plugs. I just wish I had more time to sit and get it completed.
Bob
Trainmaster... looks great! I would like to see more detail on the track from the mine. Do you have mine cars? Why HO? How does it look from the other side? Thinking of something similiar.
@CR Cole posted:Trainmaster... looks great! I would like to see more detail on the track from the mine. Do you have mine cars? Why HO? How does it look from the other side? Thinking of something similiar.
I currently do not have any mine cars as of right now. I used HO since it is a close size to what I need, and because I had the track available. I will get a photo of the other side for you either later today or tomorrow.
This is a picture of my 1 year old new Wye to m 44 year old O27 layout. The Wye is last major track addition I have made in over 10 years and gives lots of operating opportunities. .

Photo below shows I am now able to route and reverse a train from the inside loop of the main train board to the left to outside loop of the new train board to the right

Last week I removed the old road that was of no use in the middle of the Wye.
Below is a recent picture of the center of the Wye with the old road removed and a hobo camp showing up. I was able to resurrect a little green paint from the bottom of the 44 year old can of enamel purchased in Jamaica where I built the original layout train board. I still has some Earth colored Life-Like Landscaping Material to add like the original.

Charlie
@Choo Choo Charlie nice and creative updates to an "ancient" layout.
I was able to run some trains this evening with my daughter. She asks almost everyday to go up to the train room, says beep beep and pounds on the door until I open it and let her in. This started about 2 weeks ago, she hadn't been in the train room for months and I thought she had forgotten about it (she is only 20 months old) and I was worried she would want to touch everything but she has proved me wrong. She stands/squats and watches the trains without touching, usually from outside the loops. Tonight she wanted to stand in the middle and she did really well.


I am so glad this is something I can share with her and something we get to do together that she enjoys as much as I do. She even runs the horn on the cab2.
Oh and I had a chance to unbox some new purchases


Haven't posted in a while but I have been following everyone's progress and projects and I just want to say great work everyone and keep the posts coming.

Was able to get more work done at the mine and finally made a semi detailed video on how my layout is set up.

Tonight Train Room Pam made me a special dinner to celebrate a special occasion. Broiled lobster, railroad style. 🚂

Gary ![]()

@RSJB18 posted:Making steady progress on my F3 wiring. Everything is terminated, next is to mach up all of the wires for the harness and load them into the JST plugs. I just wish I had more time to sit and get it completed.
Bob
Bob, you best get that F3 wrapped up now! If you wait until you're retired, you'll NEVER find the time.
coming from one who knows...![]()
George
@GeoPeg posted:Bob, you best get that F3 wrapped up now! If you wait until you're retired, you'll NEVER find the time.
coming from one who knows...
George
It's funny you mentioned that. I just turned 60 and we were talking with my wife's parents about the occasion and retirement. My M-i-L asked what would you do to keep yourself occupied.
I laughed and said, "have you seen the basement lately?" ![]()
Bob
A mentor, who was nearing retirement, offered me some very sage advice. He said, “Everyone plans for retirement financially, you also have to plan for it psychological”. Therefore Bob, you need a larger layout.
“I was able to run some trains this evening with my daughter. She asks almost everyday to go up to the train room, says beep beep and pounds on the door until I open it and let her in. This started about 2 weeks ago, she hadn't been in the train room for months and I thought she had forgotten about it (she is only 20 months old) and I was worried she would want to touch everything but she has proved me wrong. She stands/squats and watches the trains without touching, usually from outside the loops. Tonight she wanted to stand in the middle and she did really well.”
JStewart
Making memories for both her and you! You can’t put a price on the hard work and the hours spent when a child’s eyes light up!
I painted sidewalks, then streets, and planted more quick growing grass. I need to do some touch ups. I have the same problem I had before with this flat black paint. It’s shiny. The last time it was over plywood. The last time the lady in the paint store suggested using a large eraser to buff it. That worked. I thought maybe going over homasote might be different; but it wasn’t. I also have to cover the copper tape and repaint it. 


@WesternPacific2217 posted:Disaster strikes Paradise, what did I do on my layout yesterday, REPAIR!
This last Wednesday I was switching out locomotives and consists. I removed the Santa Fe Chief and F3 set from the layout and replaced it with WP 485 GS-64. I placed the WP GS on the outer siding getting it ready to move 3 freight cars so 485 could come back and get the Zephyr passenger cars behind parked behind the freight cars. I started up 485, backed it up and lashed up the 3 freight cars, everything looked good. I selected forward on my CAB-2 and started the consist moving slowly. As you can see from the photo below the siding is right on the edge of my layout and it's a 3-foot drop. When 485 began the first turn heading from right to left in the photo below, it rolled over on its right side and fell 3 feet to the floor, freight cars and all!!! I was just to the right in the photo and could do nothing about it! It was a jaw dropping moment! I guess I was in a moment of shock as I didn't think to take a photo of the mess on the floor (landing on the carpet and not the hard wood at least saved it from more damage than the locomotive and consist had).
Damage report and repairs:
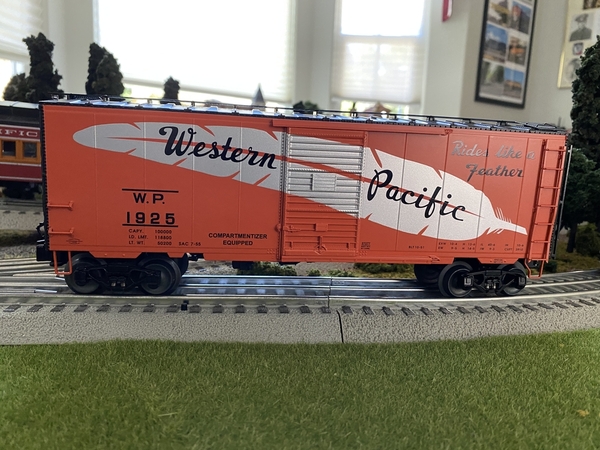
WP Box car - Broke the front truck and all the springs went flying, I could only find one. These are the flimsy sheet metal trucks, so I ordered the Lionel metal spung trucks and I'll replace both of the trucks. Also, the load inside the box car came unglued. I'll have to remove the top to replace the trucks anyway, so I'll glue it back in place. The metal sprung trucks are supposed to arrive today. As soon as I get the trucks it will be back on the track.
I was lucky! I still have no idea of what derailed 485, there was nothing on the track. The only thing it could have been is operator error! When I put 485 on the track, the front truck may not have been on the track completely! I've done it before, but never has it caused the locomotive to roll over on its side! Usually, it just shorts the track out. Lesson: Use my LED strap on forehead light to make sure ALL the wheels are engaged on the track!!!
Here's an update on the Western Pacific Paradise, CA disaster. Read the paragraph at the top if you haven't seen the above post.
The gondola and flatbed bulkhead cars had minor easy to fix stuff, nothing broken or twisted. The WP Feather box car on the other hand had severe damage to the one of the trucks, including bent sheet metal, springs and spring retainers went flying. I found just one of the springs and one spring retainer. This really nice box car had the cheap stamped sheet metal trucks, they're pretty flimsy. I chose to replace them with Lionel diecast sprung trucks.
On the left is the Lionel diecast truck, on the right is the stamped sheet metal truck (the good one less the springs)!

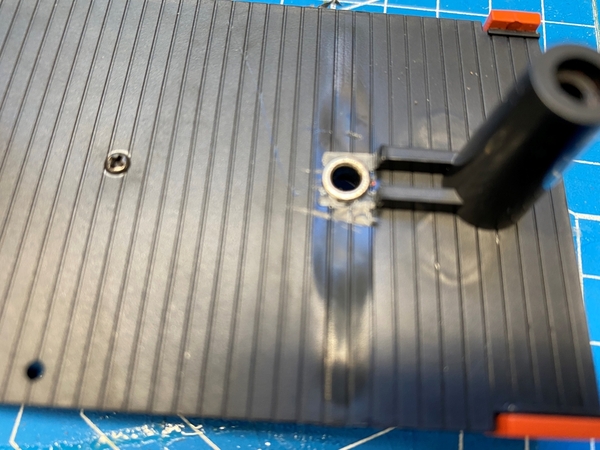
Since the diecast trucks mount differently, I had to do some modifications to the box car bed. Here's some photos.
I had to remove the protruding plastic and then drill the hole out to accommodate the bushing insert.

Then I had to cut away some molded in ribbing on the box car floor to accommodate the bushing and screw. I didn't really car what it looked like on the inside of the box car; you can't see it when assembled. Sorry, photo is not clear.
Just dab of blue thread locker on the threads of the truck mounting screws. There is no need to use RED thread locker on model trains, unless you don't want to take the thing apart again!

Trucks installed, I let the thread locker cure for about 3 hours before handling it.
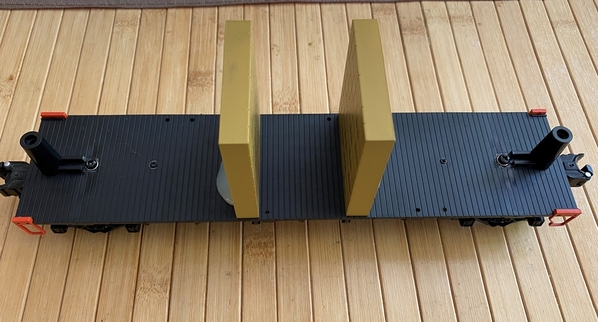
Truck installation complete and box car reassembled. Piece of cake! With the diecast trucks the box car does sit about 1/16" higher than with the original trucks, but I can't tell without measuring it.


Well it's been a long time since I've updated any progress.
Winter ice road business takes well......all winter. Get home and vehicle work and home maintenance takes time as well. Anyway, I was finally able to do some layout work.
One big hold up I had was linking one side of the layout to the other side. I needed to paint some backdrop.
I finally got the lightweight backdrop built now I need to paint it.
I'm sure many here are familiar with the Hamm's beer scrolling sign.
That's what I intend to paint for a backdrop. I'll need to expand the the scene a bit because I've got about 16 or 18 feet to paint so I'll have to add a bit of filler.
A couple of pictures of the layout and also a few of my backdrop ready for painting. Also a picture of a Bob Ross style painting I once did 


 after a few adult beverages.
![]()
Nice work Fast Freight. The painting is excellent!
Andy
Good evening everyone! Just got done from working a good while on the layout. Everything happened on Riese ridge and the mine. Speaking of the mine, I started there by finishing adding paper buns to the side and to tunnel three’s second tunnel portal. Next came the plaster cloth and paint. Once I completed painting I place ground cover on the mountain and the unfinished mine itself. I then took my attention over to the rest of the mountain. I continued my painting with the brown and grey paint, and topped it all of with some ground cover. I still need to cover more areas with cloth, paint, cover, and ballast the track, but things are coming along nicely.
Also, I was able to get a poster of UP 4018 hung.


Beautiful day.....so, I went outside until it got into the upper 80s and I moved inside.....


......now, back inside, and, this is where patience is a virtue......small delicate parts which will make up the stairwell.....


Have a great day!
Peter
@Putnam Division posted:Beautiful day.....so, I went outside until it got into the upper 80s and I moved inside.....
......now, back inside, and, this is where patience is a virtue......small delicate parts which will make up the stairwell.....
Have a great day!
Peter
I still have to put mine together Peter. In due time I suppose. Looks great so far.
We apologize for not being here sooner but things have been quite busy as we work to complete the engine service/Roanoke Shops portion of the layout. My job ends when track, ballast, etc are complete and things are ready for scenery, people, etc. Then Paula and Rich take over.
The section leading to the turntable via a 3-way Ross turnout is just about complete. Sand, coal, platforms, accessories, figures, lichen and grass, etc have been added by Paula.
Later this week, the road contractor is scheduled to pave Randolph Street, yard lights will be installed, and word has it that locomotives will begin to populate various Roanoke Shops buildings including the roundhouse. Paula said that 9 steam locomotives and 6 diesels are scheduled to arrive before Friday so it will be a busy week.
These photos are primarily of the turntable entry, exit, and steam service tracks, which are 80%+ complete. All buildings are lighted and have interiors. Lighting is wired to allow for different scenes depending upon time of day.
Many of the steam service buildings were built by Harry Hieke or are one of his kits. Most lighting is from Evan Designs.
Photo from front of layout

Left side includes Crescent Locomotive platforms, ash pit, water and oil columns, Weaver Sand and water towers.


Rear boiler house and stack, wreck train, Roanoke Shops #1, sand tower, fuel tanks, Lubritorium, and Randolph Tower. The Coaling Tower can’t be missed.


@Bill Webb posted:We apologize for not being here sooner but things have been quite busy as we work to complete the engine service/Roanoke Shops portion of the layout. My job ends when track, ballast, etc are complete and things are ready for scenery, people, etc. Then Paula and Rich take over.
The section leading to the turntable via a 3-way Ross turnout is just about complete. Sand, coal, platforms, accessories, figures, lichen and grass, etc have been added by Paula.
Later this week, the road contractor is scheduled to pave Randolph Street, yard lights will be installed, and word has it that locomotives will begin to populate various Roanoke Shops buildings including the roundhouse. Paula said that 9 steam locomotives and 6 diesels are scheduled to arrive before Friday so it will be a busy week.
These photos are primarily of the turntable entry, exit, and steam service tracks, which are 80%+ complete. All buildings are lighted and have interiors. Lighting is wired to allow for different scenes depending upon time of day.
Many of the steam service buildings were built by Harry Hieke or are one of his kits. Most lighting is from Evan Designs.
Left side includes Crescent Locomotive platforms, ash pit, water and oil columns, Weaver Sand and water towers.Rear boiler house and stack, wreck train,
Roanoke Shops #1, sand tower, fuel tanks, Lubritorium, and Randolph Tower. The Coaling Tower can’t be missed.
Just magnificent!!!!!!!!
Peter
@Bill Webb posted:We apologize for not being here sooner but things have been quite busy as we work to complete the engine service/Roanoke Shops portion of the layout. My job ends when track, ballast, etc are complete and things are ready for scenery, people, etc. Then Paula and Rich take over.
The section leading to the turntable via a 3-way Ross turnout is just about complete. Sand, coal, platforms, accessories, figures, lichen and grass, etc have been added by Paula.
Later this week, the road contractor is scheduled to pave Randolph Street, yard lights will be installed, and word has it that locomotives will begin to populate various Roanoke Shops buildings including the roundhouse. Paula said that 9 steam locomotives and 6 diesels are scheduled to arrive before Friday so it will be a busy week.
These photos are primarily of the turntable entry, exit, and steam service tracks, which are 80%+ complete. All buildings are lighted and have interiors. Lighting is wired to allow for different scenes depending upon time of day.
Many of the steam service buildings were built by Harry Hieke or are one of his kits. Most lighting is from Evan Designs.
Photo from front of layout
Left side includes Crescent Locomotive platforms, ash pit, water and oil columns, Weaver Sand and water towers.
Rear boiler house and stack, wreck train, Roanoke Shops #1, sand tower, fuel tanks, Lubritorium, and Randolph Tower. The Coaling Tower can’t be missed.
Bill,
Your layout is amazing! I primarily collect N&W and C&O steam. I would love to see more pictures of your layout.
Greg P
Good Evening,
Bill Webb all of the structures and details are one thing but when you add the lighting that just takes it over the top.
Lee I really like the photos in black and white. Definitely gives more indication of the time period of your layout.
Just working on an insert...more to come!
Dave

Bill, the engine facility is looking great!
Dave, the concrete work looks so relistic.
@luvindemtrains posted:Good Evening,
Bill Webb all of the structures and details are one thing but when you add the lighting that just takes it over the top.
Lee I really like that photos in black and white. Definitely gives more indication of the time period of your layout.
Just working on an insert...more to come!
Dave
Dave, speaking of over the top, your concrete work is fantastic! That slab looks like its been around for a 100 years.
Peter, great outdoor workshop. What a view! And the kit is coming along nicely.
Lee, the switch looks ready for use, and nice black and white pics.
Bill, wow! The scenes and buildings are amazing!
Dave, can’t wait to see the wall in what I’m sure will be an excellent scene.
Andy
Thanks everyone. This is the first time that a section of the layout has started to come together. After three years plus including two knee replacements, it is rewarding. We started knowing very little about constructing a layout so it has been quite a process.
Greg we have enjoyed seeing your u-tube videos. We want to learn how to do that. Maybe our grandkids can help. Are some of the photos taken on a club layout? Beautiful engines, etc.
Dave you got the concrete perfectly. Agree with you on lighting, it really makes a difference. It was late when we did the photos. Next time we want Alexa to turn the flood lights blue and then take photos. The bright floods disappear and the detail is muted for a quiet nighttime look.
Lee the black and white photos are a nice effect. What a great way to accent the time period.
@Putnam Division posted:
.....now, back inside, and, this is where patience is a virtue......small delicate parts which will make up the stairwell.....
Peter
Nice job Peter.![]() Looks like a fun project.
Looks like a fun project.
@Bill Webb posted:
Great look in these scenes Bill. Beatiful photos of the scenes too. ![]()
@Dallas Joseph posted:Nice job Peter.
Looks like a fun project.
Thank you.....it has been fun......these are great kits!
Peter

 Great pictures fellows and Bill Webb, amazing workmanship on you layout pictured above, it looks like it will be a fun to run railroad, very interesting, @Putnam Division, excellent workmanship on your recent creation, the beautiful station, so realistic looking, @P51 Lee, beautiful black and white photography, cool scenes, the Quanson Hut looks real, Wow, those were the good ole days, today I took a few pictures of the back side of my layout, Department 56 for review… Happy Railroading Everyone


Hi guys, its been a while as projects are still going on outside of the train room! I was able to get in here and try and get up to speed on what everyone has been doing as I have done something to my right knee and cant do anything till I see the Dr. tomorrow per the CEO. Oh well I needed a break anyways, just thought if I got one it would be to spend time in the train room!
I have to say you all are doing outstanding projects and I can't list you all, but there are 3 folks I really want to call out, well maybe 5 ! LOL
@WesternPacific2217 Scott, thanks for showing how you did the switchover on the trucks! Looks great. Where do you get the bushings and screws from? I have a lot of nicely made Lionel trucks in a bag that I would like to switch out with some of the cheaper stamped metal ones.
@Putnam Division Peter you doing a wonderful job on the building!
@Bill Webb, Bill for a layout that is only 3 years old you and your wife are doing an Amazing job and the attention to detail is Outstanding!
@luvindemtrains Dave, you always make things look so real! I wish I had that talent!
I got a question for you good folks, I know I should know this by know but I don't and who knows maybe there are others that do not know. I have some nice trucks like Scott did above with Lionel trucks, but how do I tell a 2 rail to a 3 rail axel?
I hope you all have a great week and I have a feeling I will be checking in tomorrow! Please remember to have fun with your layout and trains!
Thank you.
What a neat way to use D56 in a railroad theme. Have you changed the lighting away from the regular bulbs?
@leapinlarry posted:
Great pictures fellows and Bill Webb, amazing workmanship on you layout pictured above, it looks like it will be a fun to run railroad, very interesting, @Putnam Division, excellent workmanship on your recent creation, the beautiful station, so realistic looking, @P51 Lee, beautiful black and white photography, cool scenes, the Quanson Hut looks real, Wow, those were the good ole days, today I took a few pictures of the back side of my layout, Department 56 for review… Happy Railroading Everyone
Larry, photos of stuff I don't think I've seen before on your layout! Always something new. The hand painted rock of the Lionel logo is cool!
I like the ceramic buildings, I have some Lemax on my layout. Are your buildings Lemax, Department 56, or a mix of both, if you don't mind my asking.
Love & Peace Man! Like wow! ![]()
@mike g. posted:Hi guys, its been a while as projects are still going on outside of the train room! I was able to get in here and try and get up to speed on what everyone has been doing as I have done something to my right knee and cant do anything till I see the Dr. tomorrow per the CEO. Oh well I needed a break anyways, just thought if I got one it would be to spend time in the train room!
I have to say you all are doing outstanding projects and I can't list you all, but there are 3 folks I really want to call out, well maybe 5 ! LOL
@WesternPacific2217 Scott, thanks for showing how you did the switchover on the trucks! Looks great. Where do you get the bushings and screws from? I have a lot of nicely made Lionel trucks in a bag that I would like to switch out with some of the cheaper stamped metal ones.
@Putnam Division Peter you doing a wonderful job on the building!
@Bill Webb, Bill for a layout that is only 3 years old you and your wife are doing an Amazing job and the attention to detail is Outstanding!
@luvindemtrains Dave, you always make things look so real! I wish I had that talent!
I got a question for you good folks, I know I should know this by know but I don't and who knows maybe there are others that do not know. I have some nice trucks like Scott did above with Lionel trucks, but how do I tell a 2 rail to a 3 rail axel?
I hope you all have a great week and I have a feeling I will be checking in tomorrow! Please remember to have fun with your layout and trains!
Hello Mike, the screws and bushings come with the pair of Lionel diecast sprung trucks (PN: 6-14078). Per my somewhat limited knowledge of O scale 2 rail, the flanges are much smaller than the flanges on the 3 rail wheels/axles. I sure somebody in this forum knows for sure, or has some photos of both side by side.
Thanks to everyone who complimented my concrete insert.
Mike-I hope your doctor's visit yields good news with simple rehab on your knee. With this model railroad stuff I spend too much time bending and crawling on my knees and if I don't develop problems it will certainly be a miracle. It's funny and kind of crazy how knowing that I still continue with the hobby.
Larry-I agree with others that the D56 buildings look good and blend into the scene quite well. It was a really clever and fun way to use them, as too is the Lionel symbol.
Dave
Access to this requires an OGR Forum Supporting Membership


