


Myles, the mountain retreat looks wonderful, inside and out. What scene is it going to set in.
I relocated my custom Plasticville apartment over store building (it was displaced last week when I put my custom diner in its place) to be near an elevated trolley station:

For an unobstructed pic, and more on my custom Plasticville creations, click here: Unique Plasticville Buildings (warrenvillerailroad.com)
Attachments
Images (1)

John, those refurbished/remodeled structures are sensational. They really turned out great and look as if that’s the way they came. Excellent job and thank you very much for sharing.
Jay
@Tranquil Hollow RR posted:John, those refurbished/remodeled structures are sensational. They really turned out great and look as if that’s the way they came. Excellent job and thank you very much for sharing.
Jay
Thanks Jay!
AND, the best part, is that they are fun to make.
Water under the bridge. Now I need to find some lily pads.


Attachments
Images (2)
Thank you RSJB18 and Mark Boyce for your comments and interest in my latest project, '' the mountain retreat. '' After photographing trains all day along the Clanwilliam shore line it'll be great to relax by the BBQ and enjoy that cigar ! I placed the structure nestled in the trees along the layout edge for better viability. I'll add a wooden walkway leading toward the parking area and a hard surface road skirting along the shoreline. Here's a view. 
Attachments
Images (1)
Good looking, that's some fancy rock on the chimney.
@myles posted:Thank you RSJB18 and Mark Boyce for your comments and interest in my latest project, '' the mountain retreat. '' After photographing trains all day along the Clanwilliam shore line it'll be great to relax by the BBQ and enjoy that cigar ! I placed the structure nestled in the trees along the layout edge for better viability. I'll add a wooden walkway leading toward the parking area and a hard surface road skirting along the shoreline. Here's a view.
Myles, that is a perfect scene for the home!
Thanks guys ! It was a fun project. By the way Jim, the stone work on the chimney is just '' carved patterns '' on a thicker piece of balsa wood then painted with 5 various acrylic tube water colors . Here's a picture prior to carving the stone effect.....
My next project will be to start construction on my CPR #5 station. That'll get the works for interior details. ( Been in a few of those booking in and out on the train registers. ) lucky though it won't require scratch building. I highly recommend Ricks laser cut wood kits. Their a pleasure to build.
Attachments
Images (1)
Worked on some rock techniques. I'm trying out making rocks out of charred wood pieces from my fireplace. I was dumping the ash bucket the other day and took notice how many of the charred pieces looked like rocks. So hrmm.


Attachments
Images (3)
@T-Bone1214 posted:Worked on some rock techniques. I'm trying out making rocks out of charred wood pieces from my fireplace. I was dumping the ash bucket the other day and took notice how many of the charred pieces looked like rocks. So hrmm.
Great idea and good eye, very creative, those rocks look great!
Finished my new Triple Deck Bridge. This bridge is designed to span across the door way of my layout room. The bridge supports 2 tracks on three levels. It is 5 feet across, 3 feet tall and is 13 inches deep. This bridge was a challenge getting all three levels to match up to the layout levels. It is a lift out design. This bridge took about 6 and a half sheets of 4x8 material to build. There are over 250 individual pieces in this bridge.


Idea-thinker
Attachments
Images (4)
Beautiful !!
@idea-thinker posted:Finished my new Triple Deck Bridge. This bridge is designed to span across the door way of my layout room. The bridge supports 2 tracks on three levels. It is 5 feet across, 3 feet tall and is 13 inches deep. This bridge was a challenge getting all three levels to match up to the layout levels. It is a lift out design. This bridge took about 6 and a half sheets of 4x8 material to build. There are over 250 individual pieces in this bridge.
Idea-thinker
WOW! Absolutely incredible. ![]()
Bob
Absolutely great looking bridge. Quite a feat. Bill
@idea-thinker posted:Finished my new Triple Deck Bridge. This bridge is designed to span across the door way of my layout room. The bridge supports 2 tracks on three levels. It is 5 feet across, 3 feet tall and is 13 inches deep. This bridge was a challenge getting all three levels to match up to the layout levels. It is a lift out design. This bridge took about 6 and a half sheets of 4x8 material to build. There are over 250 individual pieces in this bridge.
Idea-thinker
Wow Idea thinker, I've never seen anything like this - fantastic!
Great design and work, thanks for sharing it!
@T-Bone1214 posted:Worked on some rock techniques. I'm trying out making rocks out of charred wood pieces from my fireplace. I was dumping the ash bucket the other day and took notice how many of the charred pieces looked like rocks. So hrmm.
Gee, T-bone I love "this from that" ideas like this! Great job.
Here are some of my freebie ideas: Free and Unique Stuff to Use: (warrenvillerailroad.com)
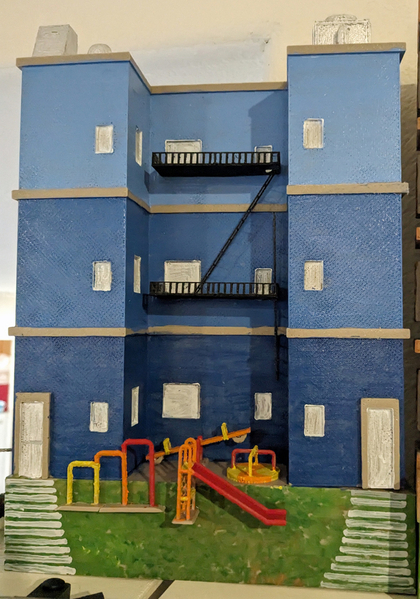
Put up my 3D kit-bashed apartment. Found it in HO, Scalled it up. Found that HO is not always 1/87, so scaled by the doorway height. , cut out 2 floors. Chopped down the back so it is a front display. Found some fire-escapes and scaled them to fit. Added playground equipment, a riser so it is visible on the overhead and my wife painted it.
Attachments
Images (1)

Epic bridge work! Did you laser cut them yourself?
@T-Bone1214 posted:Epic bridge work! Did you laser cut them yourself?
I designed the bridge in CAD and then Laser cut all of the parts.
Idea-thinker
@idea-thinker posted:I designed the bridge in CAD and then Laser cut all of the parts.
Idea-thinker
That bridge is a one of a kind! I never saw anything like it!
Nothing, I was working on taxes and blowing snow. If I wasn't doing that I'd be working on my new yard. I'm working on labeling the yard lanes. I'm going to have a 7 ft girder suspended over the yard identifying the lanes, 1-10. The identifiers are 7 segment displays which turn red/green depending on either lane power or occupancy. I haven't decided which. The yard is in another room from the layout and it's difficult to determine which lane is which from a distance.
Not the layout, but two locomotives. I added decals missing on my Lionel L1 and I1.
On the pilot beam of pre-war L1 I added EE EEH standing for Eastern region Eastern division. Enola Engine House.

The I1 is post-war lettered Eastern region Susquehanna division Harrisburg engine house.

I also added tender builders plates (minus the tiny letting because my hands are too shakey lol)

Attachments
Images (3)
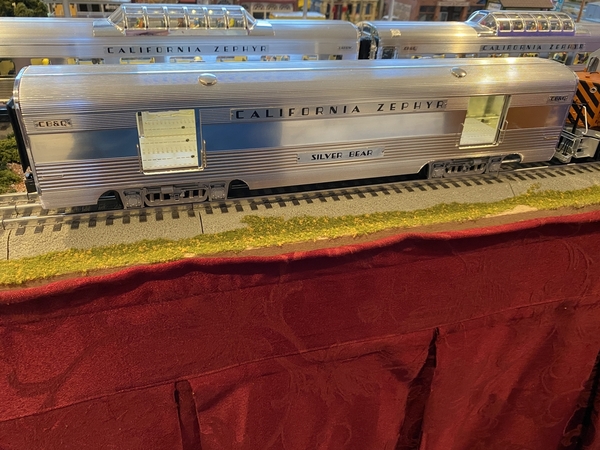
I did some upgrades to a new K-Line 15" aluminum California Zephyr RPO/Baggage car and posted it in it's own thread. I must admit it wasn't done in one day as this thread suggests. Here's the link for those that frequent this thread and haven't seen the post with photos of the work done.
That is so weird, not sure where the link went, but here it is below!!!
Still wiring…….north side momentary switches…..


 Have a great week!
Peter
Attachments
Images (4)
Did a bit of scenery for the church.
Dave


Attachments
Images (2)

@idea-thinker posted:Finished my new Triple Deck Bridge. This bridge is designed to span across the door way of my layout room. The bridge supports 2 tracks on three levels. It is 5 feet across, 3 feet tall and is 13 inches deep. This bridge was a challenge getting all three levels to match up to the layout levels. It is a lift out design. This bridge took about 6 and a half sheets of 4x8 material to build. There are over 250 individual pieces in this bridge.
Amazing work and such fine craftsmanship.
i see a feature article in your future!
Thanks for sharing.Idea-thinker
Well, once again I went on a posting Hiatus. I haven't had time to work on the layout much with school and work taking up a lot of my time, but I finally made a trip and got some good progress made!


FINALLY! Finished another cabinet for my trains under the existing one. I also made doors for them too; they look a lot nicer than the sliding doors I had before. I am starting to open myself to commission work if anyone wants something like this!

Besides the three beautiful Lionel Milwaukee Milk cars, I have begun work on forming the cliff side! Note the opening on the far left for a future road tunnel. More to come soon! This part of the layout will definitely be one of the first to be "completed"

It may not look like much, but I have brought the tracks in about 3-4 inches. I recently bought a Big Boy and a Mallet, neither of which would clear the wall on the outside loop. This issue has been fixed now

Speaking of fixing issues, I fixed the annoying S curve on the far back side of the layout! This was causing problems for Kinematic couplers on longer passenger cars, and just in general. Now, things run much smoother through here! I learned my lesson since last time: NO S CURVES! If you are curious to how it looked before, see the below picture
Happy railroading folks!
Attachments
Images (6)

The cabinets look great!
@Stinky1 posted:Not the layout, but two locomotives. I added decals missing on my Lionel L1 and I1.
On the pilot beam of pre-war L1 I added EE EEH standing for Eastern region Eastern division. Enola Engine House.
The I1 is post-war lettered Eastern region Susquehanna division Harrisburg engine house.
I had no idea the PRR had these markings on their steam locomotives! That is very cool. I have been educated. Nice work and thanks for sharing.
@Sams Trains posted:Well, once again I went on a posting Hiatus. I haven't had time to work on the layout much with school and work taking up a lot of my time, but I finally made a trip and got some good progress made!
FINALLY! Finished another cabinet for my trains under the existing one. I also made doors for them too; they look a lot nicer than the sliding doors I had before. I am starting to open myself to commission work if anyone wants something like this!
Speaking of fixing issues, I fixed the annoying S curve on the far back side of the layout! This was causing problems for Kinematic couplers on longer passenger cars, and just in general. Now, things run much smoother through here! I learned my lesson since last time: NO S CURVES! If you are curious to how it looked before, see the below picture
Happy railroading folks!
The cabinets look great Sam. At least you found and fixed the clearance issues before scenery is done. Good move to eliminate the S curves too.
Bob
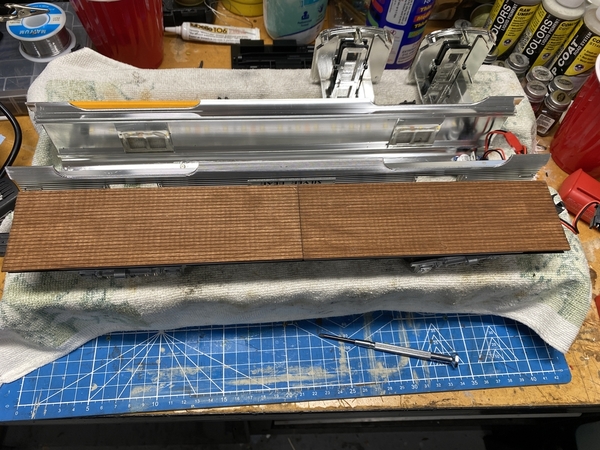
After completing the interior work on my California Zephyr Aluminum K-Line 15” RPO/Baggage combo car, I decided it was time to put a wood floor in my other 15” baggage car. The gray plastic floor with a bunch of holes in doesn’t look so good!
I had already updated the stock incandescent lights with LED strip lights and one of gunrunnerjohn's LED power supplies.
Disclaimer: This project started out as a simple wood floor installation and turned into something else!! This project took two full evenings and a trip to the model train store, it was not done in one day as this thread suggests.
This is my proof that model railroading can trigger brief, and even prolonged, episodes of insanity! The following will clearly show my level of insanity.
Here you can see the cheesy plastic floor.
Chassis removed from the body. This particular car the chassis slips out pretty easy, some are a pain!
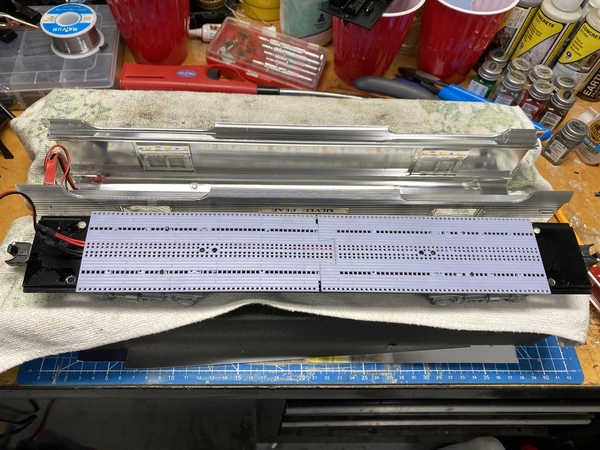
I already had the scribed siding wood 1/16" thick. One piece wasn't long enough to cover end to end, so I put the seam in the middle. Measure twice and then cut. Box cutter knife of razor blade works best.

I used Woodland Scenics Earth Tones paintfor the floor, its water based and easy to clean up. It also leaves an imperfect paint job which is what I was looking for. No mater what type of paint used on this thin wood it will warp without any support.

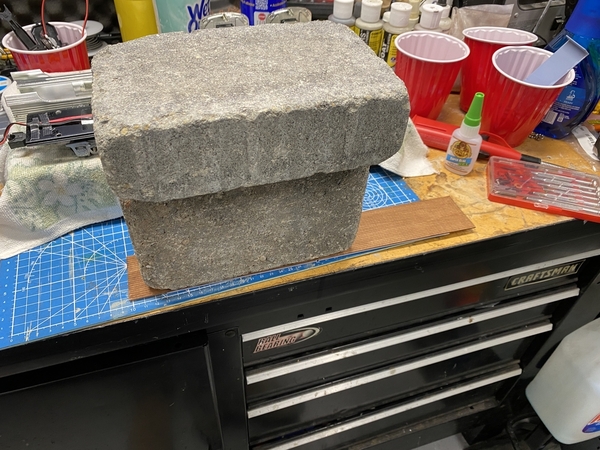
Applying the wood to the gray plastic subfloor I use some CA gel glue and bricks during the cure. The plastic is strong enough to maintain its shape and not warp. Plus, once the floor is attached to the chassis is will stay flat.
Reattached to the chassis nice and flat.
Okay, all is good, but this is where I loose it!!! Keep in mind that the only windows in most baggage cars are in the sliding doors!
I scratch built cabinets for the baggage and install them. These took some time.
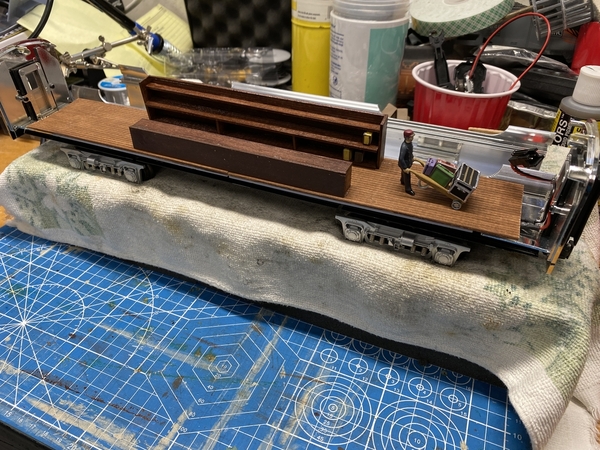
Gotta have some luggage and cargo too, right? I mean the guy has to put that hand truck somewhere. Figures always add live to a scene.
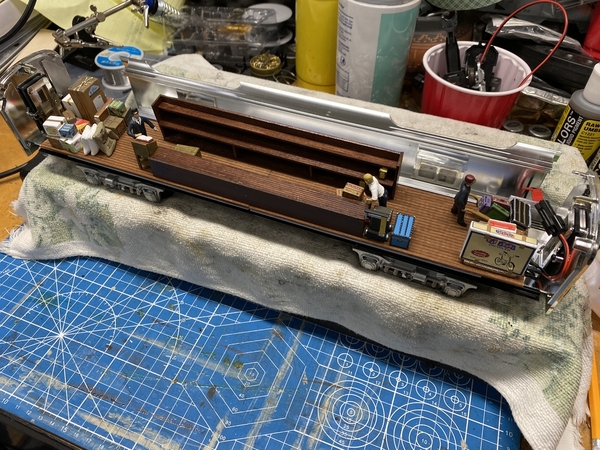
Finally, slide the chassis back into the car body, attach the wires, fasten the ends, put it on the tracks.
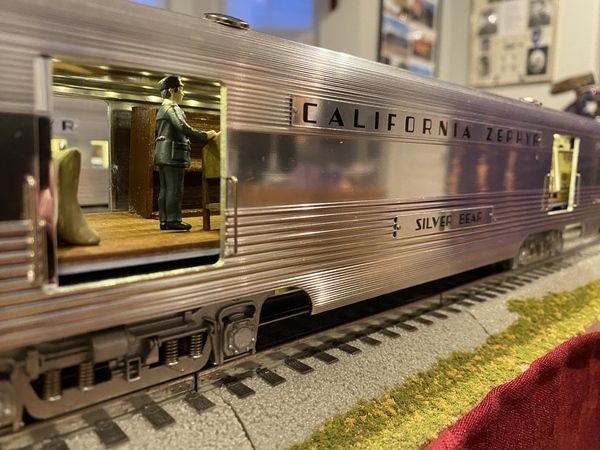
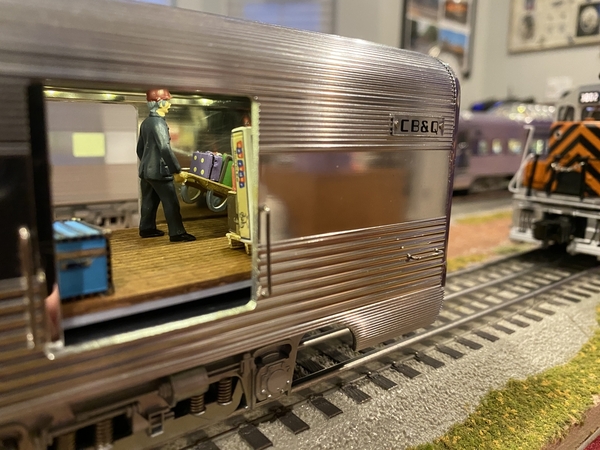

Of course with the doors closed ya can't see much of anything. LoL I'll admit, my episode of insanity was fun!
Attachments
Images (11)


Decided to do a little house keeping and then tried to fill up my lower yard. Not a whole lot of room left. I think I need another yard!!!

@Mark Boyce Mark another example of the use of color on a layout ![]()
Attachments
Images (1)

@WesternPacific2217 Scott, the baggage car really looks great! You are going to have to run it with the doors open I'm afraid! ![]()
@ScoutingDad Jeff, the first thing I saw, even before seeing my name, were all the neon bright cars!! There, I put on my shades! ![]() It is amazing how quickly a model railroad yard fills up! I did actually figure out where I could add another yard to my layout and I wouldn't need steep grades to do it, but...I have too many other projects going right now.
It is amazing how quickly a model railroad yard fills up! I did actually figure out where I could add another yard to my layout and I wouldn't need steep grades to do it, but...I have too many other projects going right now.
Here are two projects. First, filling a two story Brennan's Sanky Wanky Coffee Co building with paper boxes and crates. Box number one done; only umpteen hundred to go. ![]()


The other is my Idaho Hotel - Scenery Hill lift up using fiber/cotton batting painted over with brown paint and scenic material as seen done by @chris a and @ScoutingDad Not too bad for a very first try. I need to get more ground foam, replace a broken mist bottle and, make some trees.


Attachments
Images (4)
@Mark Boyce posted:@WesternPacific2217 Scott, the baggage car really looks great! You are going to have to run it with the doors open I'm afraid!
@ScoutingDad Jeff, the first thing I saw, even before seeing my name, were all the neon bright cars!! There, I put on my shades!
It is amazing how quickly a model railroad yard fills up! I did actually figure out where I could add another yard to my layout and I wouldn't need steep grades to do it, but...I have too many other projects going right now.
Here are two projects. First, filling a two story Brennan's Sanky Wanky Coffee Co building with paper boxes and crates. Box number one done; only umpteen hundred to go.
The other is my Idaho Hotel - Scenery Hill lift up using fiber/cotton batting painted over with brown paint and scenic material as seen done by @chris a and @ScoutingDad Not too bad for a very first try. I need to get more ground foam, replace a broken mist bottle and, make some trees.
Mark, wow, things are coming along! The Sanky Wanky Coffee Company building looks great! I like the floor, looks a little like my baggage car floor LoL I like the color, we seem to have similar taste in color. All the buildings in your post look incredible.
@WesternPacific2217 posted:Mark, wow, things are coming along! The Sanky Wanky Coffee Company building looks great! I like the floor, looks a little like my baggage car floor LoL I like the color, we seem to have similar taste in color. All the buildings in your post look incredible.
Scott, thank you very much!! I noticed the same thing about the colors we selected for our floors. I rubbed chalk dust into the flooring with my finger, and I can't even tell you what the color is. I refrained from spraying dull coat on it because in the past it has changed the color of some chalks substantially.
@WesternPacific2217 posted:Of course with the doors closed ya can't see much of anything. LoL I'll admit, my episode of insanity was fun!
I'm put in mind of the medieval stonemasons, who would always finish the out-of-view enclosed stonework in cathedrals because "God will see, even if no one else"! 😎👍
@Mark Boyce - Mark the buildings and the scenery on the lift out section are outstanding. Yes, I'd agree for your first time shot at the batting method, it came out really well, lots of texture, good color choices. Your skills on the buildings is excellent, both the mechanical assembly and the weathering/painting etc.
Well my latest "fixation" is PFE Steel Sided Reefers. Long story short, I acquired 7 MTH PFE R-40-23 reefers that someone started to 2 rail and then abandoned the project, I have completed converting 6 of them so far with the nice free rolling Lionel Steel Reefer Bettendorf Wheel trucks and Kadee's.
Then I purchased 6 Intermountain Railway Co. (IMRC) PFE Steel Reefers (these are the R-40-10's), they need some TLC and I am changing the wheels/axles over to 3 rail Lionel Wheelsets.... Fortunately, I managed to get all 3 PFE Logo Schemes, Double Logo UP & SP in both Color and B&W and I found 2 of the Single Logo, "UP Overland" on one side of the reefer, single SP logo on the other side.
With the Lionel Vision Line (R-40-23) set plus one single Lionel Car I already own, I'll have a 17 car PFE Reefer train when I am done with this project.


Attachments
Images (5)
Scratch built a gas station, with lighting to add to the layout.
Hope everyone is enjoying the weekend, where every you are rain or shine, sleet or snow!
Keep on keeping on and keep those trains running!
Attachments
Images (1)
With a bit of tweaking and the laser printer at work, an ordinary 2065 Hudson is transformed into Frisco 1066! ![]()

I will go back and properly decal this at some point, but 'twill do for now! ![]()
Mitch
Attachments
Images (1)
Add Reply
Sign In To Reply
