


Looking good Lee. I bet the corn is taking awhile to make? It should really make it stound out!


Because I have been cutting wood for tables in the basement I have a small pile of lumber from cutting. So I decided to head for the attic layout and measure for a shelve on the control panel to place my Z4000's under the top so I can use the top area for a panel for switch and uncoupling controls.............Paul

I was playing around with my cell.
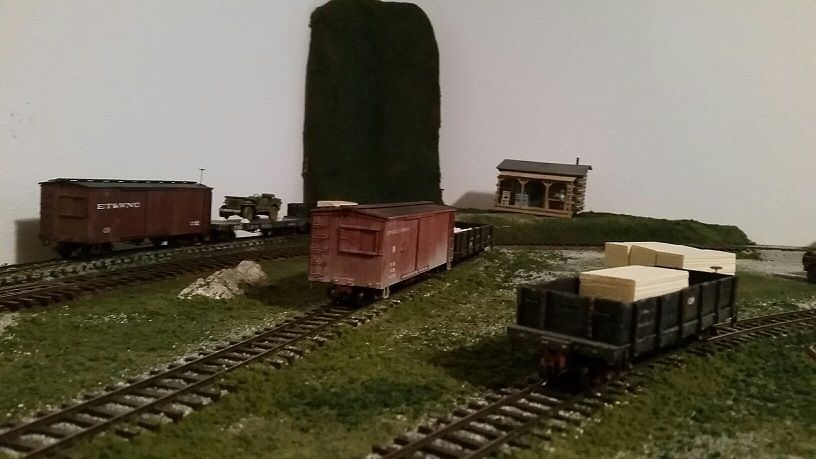
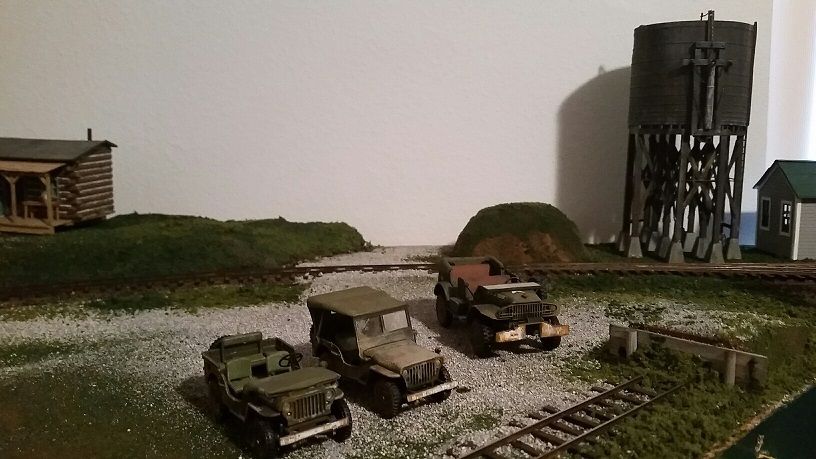
I put some 1/50 scale early WW2 era 2 1/2 ton trucks into the back corner for minor forced perspective.
Can't wait to see this scene with the cornfield in place, even though you won't then be able to see those trucks from this angle...
Fixed a turnout where the point rails were popping out where it meets the rest of the turnout. There are brass connectors there and they'd loosened up. With a little work with some needle nose pliers, and a little prayer I didn't break something, I think I got that fixed.
If I had to do it over, I wouldn't use micro engineering track. The stuff looks great but it's so fragile and finicky...
Attachments
Images (1)

 i
i
Attachments
Images (3)
c. lee colbert posted:
That's probably the purest model train photo I've seen in a long time.
Thanks, it runs real good, I also have a post war 2025 that runs great too!


p51 posted:Just had an op session, a good time was had by all.
Handsome vista, there, including the trains element, becoming a unified whole very nicely, sir!
FrankM.
Here's a Corgi Monkeemobile I restored this weekend. The car, new tires and new stickers were all sourced on eBay. Krylon White primer and Cherry Red gloss paint. Engine resprayed with Rustoleum American Accents metallic silver.
To be done: minor touchups, coat of gloss to protect the paint and stickers, source a Micky figure (who, I assume, is inside the Clarksville station at the moment waiting for the Last Train...)

Now to finish wiring the Clarksville station, glaze the windows and get it on the layout! ;-)
Attachments
Images (1)
DONE! Hallelujah![]()
![]()
![]() . Tom and I had struggled with trying to assemble this the other night for an hour and a half, and finally gave up. I'd even set all the pieces in a big box and taken up and placed it in my storage area- as I did not want to see it!
. Tom and I had struggled with trying to assemble this the other night for an hour and a half, and finally gave up. I'd even set all the pieces in a big box and taken up and placed it in my storage area- as I did not want to see it!
Today with both of my kids (ds 19, dd 21) here for Mother's Day, I purposely decided to step out of the mix and let Tom work with them on it. Still not good. Then, finally my son (who really should perhaps get a college degree in Mechanical Engineering, not Physics as he wants) sorted the directions out properly and with me holding pieces, got it assembled.
Track ordered for the center of this, need to get a switch for leading it off the mainline loop.

Attachments
Images (1)
Takes a man to git her done !!
Looks great Carey!
Cary.. The station looks great. I understand the instruction thing. We all been there.
Lee, the layout looks great. Like the idea of the forced perspective idea. It looks good.
For me I have been doing Kadee installs on my Lionel NP GP9s and MTH(3040)/ Lionel(2519) GN GP35s. I had used the GP9 kadee mounts that Mario sells on Shapeways. This was a rather straight forward install. For the GP35 on the other hand required modification to Mario's GP9 mounts and not so minor surgery on the trucks of the lionel GP35. Same for the GP30 mounts I used for the MTH GP35. Not so minor surgery on the mounts, but minor surgery on the trucks. The mounts are already shimmed for the right height and will work with the MTH pilots with out any additional shimming. Next are my CBQ GP30s


Attachments
Images (14)
suzukovich posted:Lee, the layout looks great. Like the idea of the forced perspective idea. It looks good.
Thanks! I loved the work you did on your GN and NP units, especially as I live very close to the mainlines of each RR (now BNSF everywhere, of course)...
P51 your layout is just looking great! I bet you had fun on ops night!, Mitchell the car looks like brand new, must of taken some time to get that engine out and replace the tires. Not to mention repainting the car. But then again it seams everything you redo turns out looking wonderful.
Suzukovich the Kadee couplers look great, not to many 3 rail people do Kadee's, IMO I think they look a lot better. I change everything I get to Kadee couplers, it takes some time but I feel it's well worth it.
mike g. posted:Mitchell the car looks like brand new, must of taken some time to get that engine out and replace the tires. Not to mention repainting the car. But then again it seams everything you redo turns out looking wonderful.
Thankee! Believe it or not, the stickers arrived on Wednesday, and the tires and car on Friday. This was all done over Friday night and Saturday. The process was actually fairly simple:
1) I drilled out the rivets and dismantled the car Friday night, then sprayed the body and chassis with paint stripper and let it sit for a couple hours before rinsing and scrubbing with dish soap to remove residue.
2) Saturday morning, I sprayed the body, seats and dash with white primer and allowed to dry for a few hours; in the meantime, I sprayed the engine with silver.
3) Saturday night, I masked off the roof and drag chute and sprayed the body and chassis red.
4) Sunday morning, I baked the enamel on the body and chassis in an old toaster oven at 250° for an hour, then let cool for an hour while I cleaned off the windshield and put the tires on the wheels.
5) Then I assembled the car, admired its magnificence for a few minutes, dashed off a happy snap and put together the before-and-after pic, doing a bit of research online for an appropos font to use. ![]()

Right now, the car is back on its painting stand (made from an old box from the Train Tender and some 1/4" stripwood stuck through the cardboard) for touchups and gloss clearcoat... ![]()
After I drilled the rivets out, I drilled 1/16" holes in the bosses; eventually, the car will be put back together with small brass screws. ![]()
Mitch
Attachments
Images (1)
I Love the step by step detail. Again looks great.
p51 posted:suzukovich posted:Lee, the layout looks great. Like the idea of the forced perspective idea. It looks good.
Thanks! I loved the work you did on your GN and NP units, especially as I live very close to the mainlines of each RR (now BNSF everywhere, of course)...
Lee and Mike thanks. The GP35s were some work but well worth it. I am finally starting convert my engines to Kadees which had been a long stalled project. Interesting thing about the Lionel GP35, road number is incorrect. It would be correct if it were a BN patch job. (BN2519 was GN3036) but road number on the side should be white number with small font BN underneath and no herald under the window of the cab. Or it a printing error and should be 3019. Not sure how I going to fix it.
This morning I took care of cutting the grass and getting it out of the way. Calling for rain later today and for that matter the rest of the week. This is going to turn out to be a good week working on the layouts. Hit the Home Depot this afternoon for more lumber, nuts and bolts. Going to try to knock off a lot things, hopefully............Paul

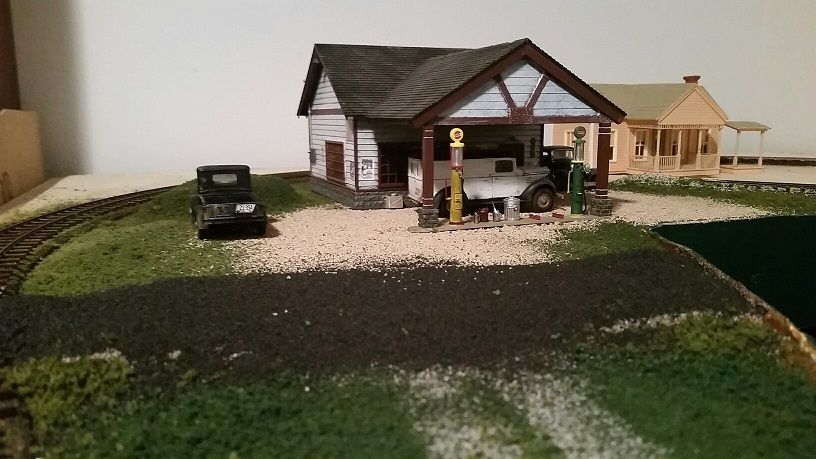
Test fitting a set of power poles. Going to weather them a little and string strings between them to suggest the lines continue in each direction, then run a line to the gas station on the left, as it already has a meter installed.
These are Wiseman cross arms castings on dowels.
Attachments
Images (1)
Lee - try a product called EZ Line from Berkshire Junction Model Railroad Supplies. It's much more realistic than thread or string and very forgiving. I'd suggest the green color for that aged copper wire look.
Thanks for the info on thar power line stuff, will look it up.
Just got done putting the frame work for table 5. It's 2' X 5'. It will be going through the opening I cut ion the wall. before I can put it in place I have to take down some old shelving on the other side of the wall. Breaking to go to a TCA lunch get together this afternoon. When I get back I'll cut the wood for table 6 getting that out of the way. Pic of the frame. It will go through that hole in the wall...............Paul
Attachments
Images (1)
yesterday: my orange/blue 342E R-T-R set arrived. Put together the Realtrax circle, set up the 318E engine with two of my Blue&Silver 300 series cars, and fired it up. What fun. This set has a hand held remote- have never had that before. Easy operation! This track and electric engine will be used on the Wedding Cake Table diorama on Sunday.
added a z-4000 to the store layout, getting ready to setup the tiu/handheld and have some DCS action in the store!
540 868 0025
joe@mariostrains.com - (email)
Tom is swapping out the USATrack for the MTH Realtrax that came with the 342E R-T-R set on the Wedding Cake train diorama board. Having the roadbed will look better for that purpose. I don't want to use it on the "real" layout. The USATrack 42 8-piece circle will go on the layout, possibly morphing into a small loop (straights are on the way). It will be up on Tom-built piers with a center display platform.

Attachments
Images (1)
The Detroit Model Railroad Club / Tuesday work day. Working on the staging area. In the basement drilling holes for the controls for switch machines. My other layout.


Attachments
Images (4)


This evening, we wired up the MTH/Lionel Realtrax 42 circle after having screwed the track down to the diorama board, just to make sure the 318E would be operational on it. Fires up fine and dandy![]()
I tried my hand at repainting the skintone on a few vintage Barclay figures, using recommended to me Testor "Cream" enamel paint. A better color than Delta Ceramacoat "Fleshtone" acrylic paint.
p51 posted:Working on my corn field.
Should be complete by tomorrow night as I only have to run a fence around it and put scenery in place around the furrows.
Anthony isn't around, is he?
![]()
Mitch
Looking good lee, don't forget the scare crow!
M. Mitchell Marmel posted:p51 posted:Working on my corn field.
Should be complete by tomorrow night as I only have to run a fence around it and put scenery in place around the furrows.
Anthony isn't around, is he?
Mitch
I couldn't stop laughing. Lee is in trouble now!!!!!!! Hate to see him turned into a Jack in the Box.


Attachments
Images (5)
mike g. posted:Looking good lee, don't forget the scare crow!
I haven't seen a good scale scarecrow yet, but yeah, I want one for this field. I'll make my own if I have to.
As for the Twilight Zones reference, it didn't occur to me even though I'm a big fan of that show.
Frankly, I wanted to plant a large tobacco crop as that's the most common plant in the area I model, but nobody makes a useable set of plants in that scale and hand making my own would take a literal forever. So, I went with these. There are almost 400 plants in that field, and though it's small, I 'planted' them close together to get the right look for a cornfield. Besides, it's 1943 on my layout, so a small crop like that wouldn't be unusual at all.
The Art Deco style layout table: Last night was analysis.
1) Looking into what would be best for this table's design aesthetic and layout "style" to raise a circle or loop of track above the mainline.
2) Tossing about ideas of "extending" the ends, and possibly raising the height of the viaduct, and how best to do all of this.
I'm very fortunate in that Tom can build me anything, just a matter of what.
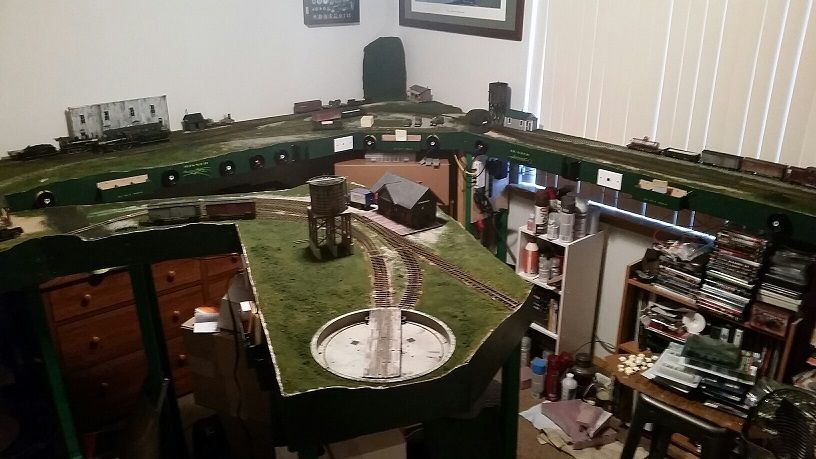
p51 posted:p51 posted:Big updates coming soon.
I didn't get to the backdrops, and a lift-out section of scenery in the back corner didn't get done, but I'm very close to having all the initial scenery done now. Next, comes the backdrops, then trees/bushes and scenery details, as well as completing the ballast (which I did most of the sidings already).
And, a panoramic of most of what I have done:


really nice. good work there.
Tom worked on the wiring for the Lionel whistle station and the Rail King RRXing light for the wedding cake diorama. My daughter did some face detail painting on a few of my vintage Barclay people. I started repainting a vintage Barclay lady with Testors enamel paints.
Great work Lee, Suzukovich, You guys make it look so easy!
Got the last of the table legs for the tables done. A lot of pieces of wood cut for finishing off tables. And back supports for the back drop screwed to the table at one end. Tomorrow will be a longer day of getting things done ..........Paul
Add Reply
Sign In To Reply
