@Tranquil Hollow RR posted:That’s a lot of impressive work for someone recovering from a food coma Bob. The intricate detail really enhances the scenes. Pour yourself some scotch; well deserved.
Went with Pinot tonight ![]() ......Thanks
......Thanks ![]()


|
|
@Tranquil Hollow RR posted:That’s a lot of impressive work for someone recovering from a food coma Bob. The intricate detail really enhances the scenes. Pour yourself some scotch; well deserved.
Went with Pinot tonight ![]() ......Thanks
......Thanks ![]()
My son and I finished, almost, the trim around the perimeter of layout .

@RSJB18 posted:Got back to detailing my passenger station and platform.
The MOW team had to cut back the edge of the platform to clear the trucks on my F3's. After they finished, some repair work was left for the next shift.
I made the cones from some caps from driveway sealer caulk and styrene sheet. Went with the old school red/ yellow colors, not bad IMHO.
Benches went in next. One more is still in fabrication and will be installed later.
I know people come in all shapes and sizes but Zeke here feels like a giant all the sudden.
The seated figures are from RMT, Zeke is WS. Both called O scale......
Now that the platform is open to passengers, the RR added warning signage
I also picked up some freight for the platforms and loading docks around the layout
I great way to recover from my food coma!
Bob
I wish I could recover from the " food coma as well as you have Bob. Nice work ( play ). 😉
I did put a couple of LEDs in a headlight for a ps2 RK dash 8 but thats all . Right now I only have recovered enough to keep a fire going in the fireplace. Really bitter outside this evening with the wind and snow.
A high-flying "accessory" ...
Years ago I purchased a COKE-decor blimp with Coke's iconic Polar Bear character riding in the cab/basket with a reindeer companion. No, it's not Rudolph!
This season, I prepared it for use on my layout with help from a hobby friend who is also a mechanical whiz kid. His backyard shop is filled with machine tools, and he custom-made parts for use with a 24-inches-high metal model of the Eiffel Tower, which suspends the blimp above the upper level of my layout at the SE corner and enables it to rotate. That entire U-shaped level is filled with DEPT 56 lighted porcelain buildings of the NORTH POLE VILLAGE series, so it's an appropriate Christmassy setting! Several of the Dept 56 buildings are animated, so it's an active area. There are three short trolley lines on that level; one Lionel, two MTH - all with Christmas décor.
The blimp is "close enough" to O-scale proportions to be believable. Its circular rotation around the tower is provided by a small three RPM motor at the base (originally intended to spin a disco mirror ball). The blimp soars above Santa's house. With onboard power from AA batteries inside the cab/basket, the blimp's propeller spins and its blinking lights flash. Fun for kids - of all ages.
I know, it's not a RR accessory, but it's ultra cool! Pix attached.
Mike M. LCCA 12394


Train Steve, the trim looks great. Really gives a finished look.
Mr. Ripp
What kinda grass are you using .
Seems or looks fairly easy to grow
Ugmm hmm I mean cut !!!
@RSJB18 posted:Got back to detailing my passenger station and platform.
The MOW team had to cut back the edge of the platform to clear the trucks on my F3's. After they finished, some repair work was left for the next shift.
I made the cones from some caps from driveway sealer caulk and styrene sheet. Went with the old school red/ yellow colors, not bad IMHO.
Benches went in next. One more is still in fabrication and will be installed later.
I know people come in all shapes and sizes but Zeke here feels like a giant all the sudden.
The seated figures are from RMT, Zeke is WS. Both called O scale......
Now that the platform is open to passengers, the RR added warning signage
I also picked up some freight for the platforms and loading docks around the layout
I great way to recover from my food coma!
Bob
Bob,The benches,loads and people really add life to the scene.
In all things Bob, we admire your versatility.
Thanks gents for the likes and comments.
Part II-
After dinner I finished up (for now), the platforms. Added the rest of the people, the MOW crew showed up to repair the platform edge, and some more freight arrived.
Having people on the layout does add life and an element of realism to the layout. I always admire everyone's scenes with well thought out placement of figures.

I decided to save the Woodland crew set for another day and went with the RMT and Bachman sets I bought.
I used the small seated figures on the rear-facing benches. They look fine from the front of the layout, and won't stay in their package this way. These two could pass for children, the other two are dressed in suits.


Didn't realize that the guy in the blue suit looks a little bit like Frankenstein until I took this pic. ![]()
I also cleaned up the glue at his feet. I used a hot glue gun. Interested to hear what others do to secure figures. The station crew figures are from the same RMT set. Their standing figures came with a small piece of clear plastic already glued to the feet. Made placing them easier.


Add I took this shot for today's SWSat. Didn't plan it but poof!

Bob


It’s coming together very nicely Bob and the photo between the consist is unique and impressive. Must have been the Pinot.
Didn't realize that the guy in the blue suit looks a little bit like Frankenstein until I took this pic.
I also cleaned up the glue at his feet. I used a hot glue gun. Interested to hear what others do to secure figures. The station crew figures are from the same RMT set. Their standing figures came with a small piece of clear plastic already glued to the feet. Made placing them easier.Bob
Bob, I also use hot glue. Easy to clean up and makes for easy repositioning. Great looking scenes!
Cheers, Dave
Nothing!
Went downstairs to the train room yesterday to run some trains and found a dead short on the mainline.
Five + hours later still can't find it! Going back down soon, gonna check wiring next. Odd, because I've had no problems here EVER, over 20 years for most of it.
@Lionelski posted:Nothing!
Went downstairs to the train room yesterday to run some trains and found a dead short on the mainline.
Five + hours later still can't find it! Going back down soon, gonna check wiring next. Odd, because I've had no problems here EVER, over 20 years for most of it.
John- maybe an insulator on a piece of track wore through or shifted. Have you inspected the track?
Good luck on the hunt.
Bob
Let us know how this unfolds John. Keep in mind that this effort will be enhancing your neuronal networks and further solidify your problem solving skills.
@RSJB18 posted:John- maybe an insulator on a piece of track wore through or shifted. Have you inspected the track?
Good luck on the hunt.
Bob
I have Bob, with a nice bright LED flashlight. Found one section that looked "iffy" but it turned out OK.
If not a wiring problem I'll have to start isolating large sections of track to find the issue. Hesitant to do this due to difficulty with ballasting, scenery and access reasons.
Gotta find it soon. Having 11 train guys over on the 4th - first time since Covid
I’ve been working my around my upper level viaduct.
Viaduct supports spray painted with flat black bbq paint.

I clamped down the supports.

Im planning to add gussets and beams for more detail.

I am 3/4 done. I hope to complete the final quarter this weekend.
Well I was not so much as what I did, but what Ryan likes to do. When he asks grandpa "can we run trains" he usually grabs a car, bus or truck and drives it around the layout. We usually lose a couple of tires in the process. One I still cannot find.
I use Gorilla Glue. They have a specialized micro applicator ideal for model railroading. Fair warning. Once you glue it down you are not taking it off 😀,
John, did you recently move anything into or from under the layout?
@RSJB18 posted:Interested to hear what others do to secure figures.
I've been using tacky wax with success. Holds well and allows repositioning later on. Have had instances where I've removed it months later after placement with a warm wet rag without issue.
@RSJB18 posted:Thanks gents for the likes and comments.
Part II-
After dinner I finished up (for now), the platforms. Added the rest of the people, the MOW crew showed up to repair the platform edge, and some more freight arrived.
Having people on the layout does add life and an element of realism to the layout. I always admire everyone's scenes with well thought out placement of figures.
I decided to save the Woodland crew set for another day and went with the RMT and Bachman sets I bought.
I used the small seated figures on the rear-facing benches. They look fine from the front of the layout, and won't stay in their package this way. These two could pass for children, the other two are dressed in suits.Didn't realize that the guy in the blue suit looks a little bit like Frankenstein until I took this pic.
I also cleaned up the glue at his feet. I used a hot glue gun. Interested to hear what others do to secure figures. The station crew figures are from the same RMT set. Their standing figures came with a small piece of clear plastic already glued to the feet. Made placing them easier.Add I took this shot for today's SWSat. Didn't plan it but poof!
Bob
Hi Bob, I use tacky wax to place my figures until I'm satisfied with the location, etc. then I use Gorilla CA glue for final placement. Happy Railroading!
Jrtains posted “I’ve been working my around my upper level viaduct.”
I am looking to make those exact supports. Are you using 1/2” basswood strips?
Rick
@WesternPacific2217 @Dennis Rosenthal @darlander @Penn Flyer
Thanks for the replies on gluing figures. I should have mentioned that I use fun-tak for temporary placement. I think I'll stick ( ![]() ) with the hot glue gun.
) with the hot glue gun.
Shifting gears once again, I installed the circuit breakers and TVSS diodes I bought months ago. Now that I'm running more command engines, it's more important than before. The diodes aren't installed exactly as recommended but it's better than nothing.
The breakers are panel mount type. I found that the plates I have for modular tel-comm jacks fit them perfectly. These are Leviton Decora plates- available at HD, Lowes, etc. I mounted the CB's under the front of the layout where I can reach them easily.

After this was done I ran a few trains to check things out. A car derailed and the breaker tripped within about two seconds. ![]()
I also read through the Cab 1 instructions and reset the momentum on my BEEP. It was responding very slowly to the throttle wheel. I changed it to the lowest setting and it works much better now.

Having a ball working on the layout this weekend.
Bob


Rixster…you’re close. I use poplar 1/2 & 3/8. Not the best economical choice but rather by availability. They come in 3’ sections at Lowes. As mentioned earlier, someone mentioned gorilla glue. He’s right. I ain’t moving when it dries. Use that.
That's a lot of excellent projects everyone. I haven't done much now that the Chief decorator has me putting up Christmas decorations. I did run a couple trains last evening for a bit. That's all.
 layout 11-27-21 (1)")
 layout 11-27-21 (3)")
A few days ago I decided to make some reinforcements for one of my tunnel ports, fitted it in place, now I'll remove it, stain it dark walnut and finish the landscaping around it.
 layout 11-27-21 (1)")
 layout 11-27-21 (3)")
Well after taking the entire summer and fall off from the train layout, my K Line Hudson arrived from Harmonyards....
My son came over for Thanksgiving and brought his 4K video cameras and shot a bunch of video that he then was so kind to edit and splice together.
The work Pat did on the Hudson exceeded all my expectations by miles and miles !!!
Here's a link to the 4K video of this fantastic engine running on the layout:
Chris,
Welcome back! Great video of the Hudson and your layout. I enjoyed it. It looked like you were "hiding" from the camera, lol.
Dave
Very observant Dave !!! Thanks for the kind words.
Yeah the "hiding" was kind of a reflex reaction, walked right into it, then figured Uh Oh !
I told my son, he was going to have to come back over the winter and we'll figure out how to increase the depth of field focus, probably add some more lighting to accomplish that.
Welcome back Chris. Been following the progress on your Hudson on Pat's thread. Enjoy!
Chris, the Hudson looks great on your layout! Pat did a great job!!! Glad to see you post again!
Excellent work guys.
Bob, nice work on the station, great scene. Chris, I enjoyed the video, the layout looks great.
Andy
Looks good John.
Andy
@Lionelski posted:Nothing!
Went downstairs to the train room yesterday to run some trains and found a dead short on the mainline.
Five + hours later still can't find it! Going back down soon, gonna check wiring next. Odd, because I've had no problems here EVER, over 20 years for most of it.
Man!! What a freak issue I spent at least 15 hours over the last 3 days trying to fix.
First I removed the trains from the mainline one at a time in case one of them was causing the dead short - nope
Then I examined the track for debris or track issues that might be causing the problem, I found one insulator that looked suspicious and replaced that track section. Of course, one needs to up root sections on both sides of it to do so. This section was on top of a 4 foot styrofoam viaduct I built. Its track ties were glued to the styrofoam - removing these sections caused damage to the top of the viaduct. Tracks replaced - not the problem.
I disconnected all the mainline wires to the transformer. Then went around the layout with a small transformer and a test light testing isolated sections between blocks and on passing sidings. No issues found this way.
I started to reconnect wires to the transformer, one at a time, leaving only those that were not producing a huge spark connected.
I then planned to re-wire connections to the sections of track that were dead without the sparking wires connected.
I started with the shortest, closest wires. These were going from the upper lever of the mainline to the transformer.
BINGO - these wires were melted together. Here is what happened. 15 or more years ago I disguised these wires by attaching vines to them with hot glue. These vines were on a thin wire base. Apparently the hot glue melted the wire coverings and, after all this time, they wore through. Four wires and the vines were melted together!
I replaced these wires and the mainline is back up and running.
Now all I have to do is clean up, repair the viaduct and repair scenery damage around the layout from this whole process.
Thanks again for your thoughts guys.
I'm gonna go braindead watching TV now.
@Lionelski posted:Man!! What a freak issue I spent at least 15 hours over the last 3 days trying to fix.
First I removed the trains from the mainline one at a time in case one of them was causing the dead short - nope
Then I examined the track for debris or track issues that might be causing the problem, I found one insulator that looked suspicious and replaced that track section. Of course, one needs to up root sections on both sides of it to do so. This section was on top of a 4 foot styrofoam viaduct I built. Its track ties were glued to the styrofoam - removing these sections caused damage to the top of the viaduct. Tracks replaced - not the problem.
I disconnected all the mainline wires to the transformer. Then went around the layout with a small transformer and a test light testing isolated sections between blocks and on passing sidings. No issues found this way.
I started to reconnect wires to the transformer, one at a time, leaving only those that were not producing a huge spark connected.
I then planned to re-wire connections to the sections of track that were dead without the sparking wires connected.
I started with the shortest, closest wires. These were going from the upper lever of the mainline to the transformer.
BINGO - these wires were melted together. Here is what happened. 15 or more years ago I disguised these wires by attaching vines to them with hot glue. These vines were on a thin wire base. Apparently the hot glue melted the wire coverings and, after all this time, they wore through. Four wires and the vines were melted together!
I replaced these wires and the mainline is back up and running.
Now all I have to do is clean up, repair the viaduct and repair scenery damage around the layout from this whole process.
Thanks again for your thoughts guys.
I'm gonna go braindead watching TV now.
I was gonna suggest that solution next ...... ![]()
My first attempt making a bridge from foam. The inside of the arch is brick.
Andy


Wow…..how did you get such a perfect curved cut on the foam? Looks great.
Rick
Thanks Rick, I made the shape of the arch on card stock, transferred it to the foam, then cut it out with a bandsaw.
Andy
Congratulations John on your successful seek and find. Just in time for your guests.
Doc Holden just about completed the second diesel building. Maybe now I can get my desk back.


@Lionelski glad you found the problem John. Too bad about the collateral damage tho.
Its always in the last place you look 🤣🤣🤣🤣
@Steamfan77 Nice work on the bridge Andy. 👍 Thanks for the comments on my passenger platform.
No train time for me today. The kitchen sink drain has been running very slow lately. Grabbed the bull by the horns today. Two trips to HD, new strainer, tail pieces, trap, later, it's fixed. 👍
I guess after all I did on the layout this weekend I was over due for a home repair.
Bob
@GeoPeg posted:I was gonna suggest that solution next ......
LOL!!
The Christmas Tree is up on the layout. Completed last night, posting today. Polar Express is out and running as well. Bay window blinds are open so anybody passing by while I'm running the trains can stop and watch from outside the window. The little kids go crazy, and sometimes don't want to leave when Mom and Dad do. That can turn into a hissy fit! LoL So I always tell the little kids the trains will be here for a long time, so come by again.
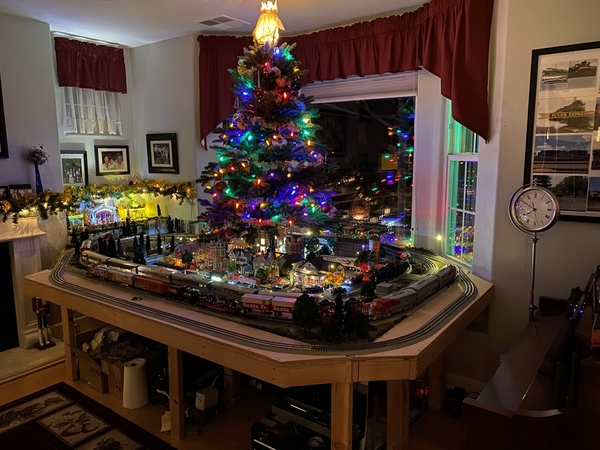

@WesternPacific2217 posted:The Christmas Tree is up on the layout. Completed last night, posting today. Polar Express is out and running as well. Bay window blinds are open so anybody passing by while I'm running the trains can stop and watch from outside the window. The little kids go crazy, and sometimes don't want to leave when Mom and Dad do. That can turn into a hissy fit! LoL So I always tell the little kids the trains will be here for a long time, so come by again.
Beautiful Scott!
@chris a
I’m right there with the rest and really enjoyed the video production. Depth of field is something I once knew about with the SLR lens, aperture, f-stop, shutter speed many years ago. Now appears that is all thrown out the window now dealing in the electronics. I still love the colors of your Pennsy brick.

@Dave Ripp. posted:Beautiful Scott!
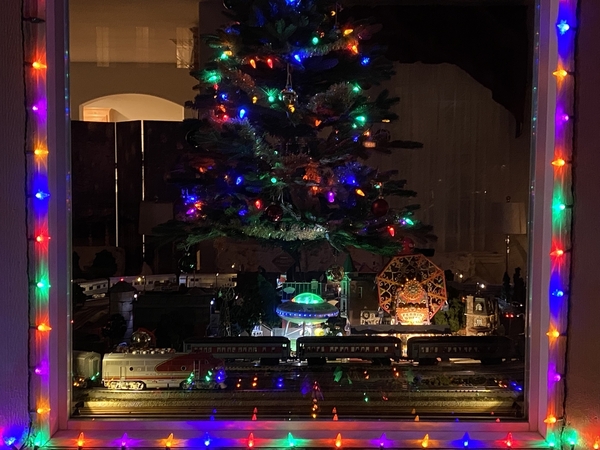
Thank you Dave! I forgot to put up the photos from outside the bay window, so here's a couple. What folks see from outside.


Very nice Scott.
Andy
Scott
That's a great view thru the window. Must be fun to watch the watchers!
I continued on the trestle by creating the abutments using foam, finishing the last couple of stringers to the abutments, installing the track by screwing it down to the blocking and glued in the remaining bridge ties. The walkway is next. I have to keep the railing way off the track to clear the overhang of the longest rolling stock.


Explanation for the previous 23 second video….The trolley is something I picked up at the Train show in Huntington WV this weekend.
I cleaned off the pickup rollers and did a test run on the layout this evening. Not certain where an how as yet but the trolley will become a part of the layout this winter.
The trolley reverse mechanism works but not the best with my thumbs as blocks. This particular trolley is transportation to Balboa Park which I understand is a real Park zoo…I am pleased with this Atlas colors and design.
The Interstate traffic was crazy and packed from Huntington to Charleston and back today. So I hope everyone’s family and friends reach their destinations safely this holiday weekend.
Very nice. Would love to see more of your layout, Seth. Does your bridge lift up for access?
Rick
@Seth Thomas posted:Explanation for the previous 23 second video….The trolley is something I picked up at the Train show in Huntington WV this weekend.
I cleaned off the pickup rollers and did a test run on the layout this evening. Not certain where an how as yet but the trolley will become a part of the layout this winter.
The trolley reverse mechanism works but not the best with my thumbs as blocks. This particular trolley is transportation to Balboa Park which I understand is a real Park zoo…I am pleased with this Atlas colors and design.
The Interstate traffic was crazy and packed from Huntington to Charleston and back today. So I hope everyone’s family and friends reach their destinations safely this holiday weekend.
Hi Seth, Balboa Park is in San Diego, CA. and the San Diego Zoo is just one of the attractions in Balboa Park. Within the park is a Balboa Park Miniature Railroad and the San Diego Model Railroad Museum and several other museums. There are several layouts including The San Diego 3-Railer Club with a O scale layout.
https://www.balboapark.org/explore
Happy Railroading!
Thanks for the info on Balboa. Makes the trolley trip more realistic and I will view the link on my laptop tomorrow. Another late night visiting the Forum….
And @Rixster one bridge is the Lionel Swing bridge which lifts up and rotates, but not on my layout. I duck, roll, pivot, squat under the two bridges while working on lightning and track power. Second bridge is Atlas’s double track bridge span…. I love it but as I assembled the kit years ago I used a crazy glue. Bad idea. I need to sort of re-assemble with a much better type more suitable for this plastic. The Atlas bridge is designed to lift out which works well, but I rarely do so…
Scott, the layout looks great! It's a wonderful view from the outside window!
Victor, the trestle looks great!
Bill, Doc did a great job on the engine house!
Bob, your station platform area is looking great!
John, nice run from the trolley! I'll bet there was a lot of traffic.
I finished wiring and testing the last two DZ1000 turnout control buttons. Now all the switches can be controlled via the remote or buttons. I wired and tested the first GarGraves uncoupler. All went well there. I still have to pull the wire for the other uncouplers.
@WesternPacific2217 posted:Thank you Dave! I forgot to put up the photos from outside the bay window, so here's a couple. What folks see from outside.
Looks great Scott.
@Lionelski posted:BINGO - these wires were melted together. Here is what happened. 15 or more years ago I disguised these wires by attaching vines to them with hot glue. These vines were on a thin wire base. Apparently the hot glue melted the wire coverings and, after all this time, they wore through. Four wires and the vines were melted together!
Congratulations! I could feel your frustrations and also the elations of the find!! Problem solving is a big part of this hobby and it can sometimes provide more joy than a new purchase! Well done!!
Cheers, Dave
Hi guys, its been a couple day since I have been here and wow a lot sure has been going on! I would love to mention everyone but when you have to go back a couple pages that means too many to list! LOL But I do love everything being done!
Chris A. It sure is nice to see you back, I almost called you to check if you gave up on trains and was just sticking with windows! LOL
So, guys between the Christmas lights, then the kids and grandkids visiting, I really haven't done anything in the train room/ I have got a few things from UPS, first off was a couple buck convertors, then I got 10 push button on/off buttons with no wiring diagram. Also, I got a watch dog generator form Gunrunner John. Now all I have to do is get them all wired up! LOL That could take a brick like me a year! LOL
The best thing that came by UPS was a Union Pacific 4-8-4 Steam engine from FarmerJohn. Of course, once I got it I had to check it out, first thing I did was put a BCR in it and added some smoke fluid! Let it sit for a little bit, then cranked it up! Man what a beautyful engine, I had to test it before I showed it to the wife and kids. That took a little time as I had to make sure I enjoyed it first! ![]()
Turned out the wife, kids and grandkids all loved it as much as I did. Here are a couple photos! Thanks again FarmerJohn!


@mike g. posted:Hi guys, its been a couple day since I have been here and wow a lot sure has been going on! I would love to mention everyone but when you have to go back a couple pages that means too many to list! LOL But I do love everything being done!
Chris A. It sure is nice to see you back, I almost called you to check if you gave up on trains and was just sticking with windows! LOL
So, guys between the Christmas lights, then the kids and grandkids visiting, I really haven't done anything in the train room/ I have got a few things from UPS, first off was a couple buck convertors, then I got 10 push button on/off buttons with no wiring diagram. Also, I got a watch dog generator form Gunrunner John. Now all I have to do is get them all wired up! LOL That could take a brick like me a year! LOL
The best thing that came by UPS was a Union Pacific 4-8-4 Steam engine from FarmerJohn. Of course, once I got it I had to check it out, first thing I did was put a BCR in it and added some smoke fluid! Let it sit for a little bit, then cranked it up! Man what a beautyful engine, I had to test it before I showed it to the wife and kids. That took a little time as I had to make sure I enjoyed it first!
Turned out the wife, kids and grandkids all loved it as much as I did. Here are a couple photos! Thanks again FarmerJohn!
Nice going Mike and Farmer John.
So glad to see this happen. ![]()
Dallas, me too! I just had to do a little trimming on one of my tunnel portholes to get the clearance for the front over hang.my 072 curves are just fine for it!
Chris A
Wonderful Hudson video and the scenery - WOW. Eye popping.
Thanks for posting.
I always feel motivated when I see what you all are doing, and for that, I am grateful!
Mike-Congratulations on the locomotive. It looks wonderful on your layout.
I'm continuing some scenery work as well as some other projects. Here's a few photos of a small deck trestle I've built and installed. So far I've done some rock work around it and begun the creek bed under it. There are three bents, two on the ends with bulkheads and one that will go in the middle (not pictured). I will say most of the detail will not be seen by the average viewer but it was fun to build.
Dave
")
")
")
")
Mike, the engine is a beauty.
Dave, outstanding as always. It may not be visible to all, but you’ll know it’s there.
Andy
@luvindemtrains posted:I will say most of the detail will not be seen by the average viewer but it was fun to build.
Dave
However Dave.......the detail will forever be out there in your photos. Great work. Keep the photos coming. ![]()
Dave. You're work on the trestle and rock work on the dry ditch is awesome. Are you going to add water or leave it dry. Some people may not notice the details but for the guys that are really into it will definitely appreciate your work and the time it takes to do it. I love it.
Got my new Weller Soldering Gun delivered Saturday and back to soldering jumper wires from one piece of Fastrack to another, plus feeder wires every six pieces of track and TVS Diodes across the Hot and Common at the track feeder connections to the Fastrack. About 80% done with the outer loop, still got to get under and get the buss wires and barrier strips in place for everything. I got sidetracked (no pun intended) and never got to it. Once I finish the outer loop, I'm going to get down there and get that all hooked up before starting the inner loop.
Andy-Thank you. You are correct, I will know it's there.
Dallas Joseph-Thank you. You are correct, the cameras pick everything up.
farmerjohn-Thank you. My plans are to add water. I guess when you start doing a lot of detailing it's easy to get carried away. There are several areas on
the layout with this "hidden" detail. Only in certain angles can you actually see it.
Dave
@Putnam Division posted:I fired up my new Railking New Haven Hudson.
I re-wired the inner loop at the far side of the layout (where I was noticing slower speeds).
I wrote down a plan of projects for the coming 6 weeks.....that is sure to be broken
at some point!
Peter
Wow!
I received a notification that Sitka "liked" this post (and, thank you!).
I didn't remember it......Wow ....8 years ago.....
An update......
1. The New Haven RailKing Hudson is still alive and well.
2. The list of projects was probably changed a thousand times.
3. The layout was nearly completed by late 2019.....some ballasting and signal wiring remained......and, I had an elaborate plan to detail that piece of "abandoned track" seen in the foreground.....
Then, life happened......work got intense during the pandemic and retirement that had been planned in 2016 for December 31, 2020, came.
The layout is now down (came down January 2021) and the attic is now the new train room......and, a new layout awaits........life moves on.......
Peter
I've really done nothing but I'm glad others are busy. I built this picinic table from scalecitydesigns . I don't recomend the table as these are fragile but they did end up giving me a full refund.

@Dave Ripp. posted:I've really done nothing but I'm glad others are busy. I built this picinic table from scalecitydesigns . I don't recomend them as these are fragile and the company ignores contact.
Looks like the benches I just built Dave. Different supplier but same results. The bench parts were fine but the legs all broke when I tried to remove them from the balsa sheet.


@RSJB18 posted:Looks like the benches I just built Dave. Different supplier but same results. The bench parts were fine but the legs all broke when I tried to remove them from the balsa sheet.
Yes the look nice but if you have to buy 2 to make 1 it's a little frustrating. Mine was so thin it broke more as I tried to repair it. I thank you for the review I now know 2 units not to buy.
@Dave Ripp. posted:Yes the look nice but if you have to buy 2 to make 1 it's a little frustrating. Mine was so thin it broke more as I tried to repair it. I thank you for the review I now know 2 units not to buy.
I wound up making new legs from balsa. This is what I had left when I finished attempting to cut the legs free.


@Dave Ripp. posted:I've really done nothing but I'm glad others are busy. I built this picinic table from scalecitydesigns . I don't recomend them as these are fragile and the company ignores contact.
Dave,
I unfortunately am going to have to agree with you on this one. I have purchased a couple of items from them and have tried to reach out to them several times with no response.
Dave
@luvindemtrains, Dave that is some outstanding work there! Your layout looks as real as I think it can get! Very Nice!
@Dave Ripp., Your playground area looks amazing! Sorry about the Picinic table problems. I thinkif and when I need one I will just try and scratch build it out of balsa wood that I have laying around! LOL Just because I am cheap! LOL
Well for me if I get a chance I hope to get out and mount 4 buck convertors I bought and mount the Watchdog generator I got from Gunrunner john. Then sometime today I have to go help my 93yo friend down the street.
I hope you all have a great day and find to have fun with your layouts and trains!
Making a layout for the grandkids for Christmas.
@Lionelski posted:Man!! What a freak issue I spent at least 15 hours over the last 3 days trying to fix.
First I removed the trains from the mainline one at a time in case one of them was causing the dead short - nope
Then I examined the track for debris or track issues that might be causing the problem, I found one insulator that looked suspicious and replaced that track section. Of course, one needs to up root sections on both sides of it to do so. This section was on top of a 4 foot styrofoam viaduct I built. Its track ties were glued to the styrofoam - removing these sections caused damage to the top of the viaduct. Tracks replaced - not the problem.
I disconnected all the mainline wires to the transformer. Then went around the layout with a small transformer and a test light testing isolated sections between blocks and on passing sidings. No issues found this way.
I started to reconnect wires to the transformer, one at a time, leaving only those that were not producing a huge spark connected.
I then planned to re-wire connections to the sections of track that were dead without the sparking wires connected.
I started with the shortest, closest wires. These were going from the upper lever of the mainline to the transformer.
BINGO - these wires were melted together. Here is what happened. 15 or more years ago I disguised these wires by attaching vines to them with hot glue. These vines were on a thin wire base. Apparently the hot glue melted the wire coverings and, after all this time, they wore through. Four wires and the vines were melted together!
I replaced these wires and the mainline is back up and running.
Now all I have to do is clean up, repair the viaduct and repair scenery damage around the layout from this whole process.
Thanks again for your thoughts guys.
I'm gonna go braindead watching TV now.
I repaired the viaduct.
FWIW, I made this years ago for free - salvaged styrofoam and a Tippi hot wire tool.


@Lionelski posted:I repaired the viaduct.
FWIW, I made this years ago for free - salvaged styrofoam and a Tippi hot wire tool.
WOW John, that looks Outstanding! Also you can't beat FREE!![]()
Well guys, I did get out to the train room for a little while today. I made 4 mounting plates for my 4 buck convertors. I use them to light all my Menards and other buildings, granted I like Menards power supplies but I got 4 of these for way less then the Menards ones.

After that I was able to get my Gunrunner John watchdog generator installed.

Thats about it for me today! LOL![]()
Tomorrow I hope to get a push button box made for my siding switches!
Mike,
Thanks for the compliment. I appreciate the use of the converters to light your buildings. Wiring is not my strength and I certainly would do things differently if I ever build another layout.
Dave
Dave Ripp, where did you get the playground equipment?
Dave, Outstanding work on the creek bed, the bents and the scenery work. Tell me more about the Arch Bridge ? Is that something you scratchbuilt. I'd love to see another photo and know more about it.
Thanks to all for the kind words on the video of the upgraded K line Hudson. I am soooo glad I hooked up with Pat (Harmonyards) and had him do the work.
Chris a

@Tranquil Hollow RR posted:Dave Ripp, where did you get the playground equipment?
PART 2: Making a layout for the grandkids for Christmas.
Not much I'm redoing the basement bathroom. I added a little more fence and I'm still in the figure out what looks best here. It's part of my little switching area I have a roughly 16 inch by 3 foot area with a dozen buildings to choose from.


Am learning how to make dozens and dozens of puffball trees. First install will have to be pulled, looks too orderly to be realistic. Also went weed picking. There is a particular plant, I have no idea what it is, that grows in some wet areas. Cut a bunch leaving Raritan center after the Greenberg show. With a bit of spray glue, some coarse turf and a spray of scenic cement they make great trees. Have to get more before the next frost knocks they all down.
Today I started to reclaim the train work area, not a pretty sight or site.


I also worked on the tunnel using shaper sheet and shaper plaster died with Rit liquid dye (chocolate brown).
Then constructed a table from an old counter top for more work space. No more running up to garage and back.
The plan is to get ready for winter by sorting out train and work area so better progress is achieved. We’ll see

@train steve posted:Today I started to reclaim the train work area, not a pretty sight or site.
That's really a great way that you made the incline to the bridge Steve. Looks nice.😉
Grandkids layout building (part 3).
Great stuff all around guys! I forgot how fast this thread can move at times. Like a raging river of creativity 😁
Andy
Today I started to reclaim the train work area, not a pretty sight or site.
I also worked on the tunnel using shaper sheet and shaper plaster died with Rit liquid dye (chocolate brown).
Then constructed a table from an old counter top for more work space. No more running up to garage and back.
The plan is to get ready for winter by sorting out train and work area so better progress is achieved. We’ll see
Steve, I like the topography of your layout, with tracks at different heights and levels on the terrain...nice job!
Built a new board for the headlights and markers on my BEEP. I tried to salvage at least the headlight set up but the board broke in my hand. The board is done and tested. The markers work but not the HL's. I need to check continuity from the plug to the board tonight.
Great work everyone.
Bob
Morning guys, I hope your all doing well!
Steve, your train table looks nice to me. I like the idea of the work bench, but I only have to walk through the door to the garage for my work bench. But what does suck is I have to walk from the house to the detached garage to get to the train room! LOL
Bob, Sorry the marker lights are not working, I know you will figure it out!
Well yesterday I got a little time in the train room and garage, I took a page out of Gunrunner John's book and built a switch panel for my track siding push buttons. Just a little advice if you plan on using a router in your train room cover more area then you think you need to keep things clean! LOL Here are a couple photos. I hope to work a little more on it today!


@RSJB18 posted:Built a new board for the headlights and markers on my BEEP. I tried to salvage at least the headlight set up but the board broke in my hand. The board is done and tested. The markers work but not the HL's. I need to check continuity from the plug to the board tonight.
Great work everyone.
Bob
Bob , I thought you had the BEEP lighting finished 🤔
What happened ?
I added a little grass at the top of the future industrial siding and a little between the rails.


@mike g. posted:Morning guys, I hope your all doing well!
Steve, your train table looks nice to me. I like the idea of the work bench, but I only have to walk through the door to the garage for my work bench. But what does suck is I have to walk from the house to the detached garage to get to the train room! LOL
Bob, Sorry the marker lights are not working, I know you will figure it out!
Well yesterday I got a little time in the train room and garage, I took a page out of Gunrunner John's book and built a switch panel for my track siding push buttons. Just a little advice if you plan on using a router in your train room cover more area then you think you need to keep things clean! LOL Here are a couple photos. I hope to work a little more on it today!
That looks like it's going to be nice Mike. I only have 4 turnouts so I'll probably just mount the MTH flippy flops.
@Dallas Joseph posted:Bob , I thought you had the BEEP lighting finished 🤔
What happened ?
I though so too. The marker lights in the short hood died. I had to rebuild the board. Not the worst job since I built it to be able to take it apart again. Just didn't expect it so soon. ![]()
Grandkids Christmas layout build (part 4)
videos.
Well it's not supposed to be over 60 degrees near Boston in December, but I took advantage of the warm weather for a some painting projects. Set up my temporary spray booth in the garage, then dull coated 6 freight cars so I can weather them with acrylic washes and pan pastels later this winter. After that, I decided to tackle the large Union Station Kitbash that I haven't worked on since last winter. Managed to get the base coats painted, and I also painted the "Arches" supporting the station platform. The arches are out out of 1 inch thick pink hard foam board insulation
First base coat was the "Sand" color from the Camouflage paint set, after about 5 to 10 minutes to I went back over it with the cheap flat white spray paint from Walmart, holding the can 2 feet away so the droplets almost 1/2 dry before reaching the model. It actually creates a very fine texture on the surface.
Now that I am reasonably happy with the color, I'll start washing all the window frames and decide on a trim color for windows/doors etc. I added one photo from the early spring, before painting.


Nice work Mike, can’t wait to see them in place.
Chris, wow! Outstanding job. Looks great.
Andy
Access to this requires an OGR Forum Supporting Membership


