
mike g. posted:

Paul 2, Thank You! Very cool I cant wait to see it with the flats up and in place! I am wondering if you plan on taking a little video of that area or even a bigger one of your basement layout? Great Attic layout photo's!

JD, Nice building! My kind of work and the price is perfect! LOL

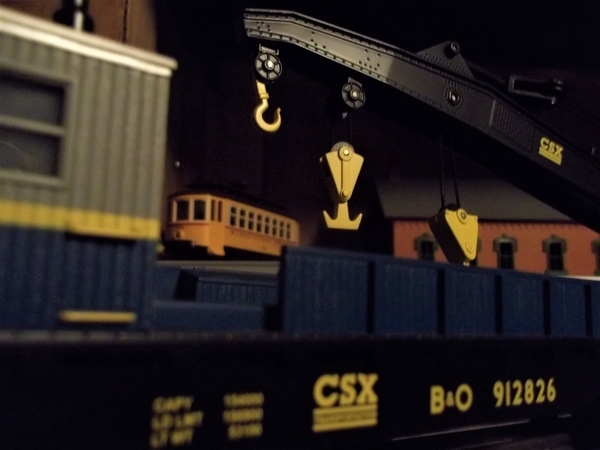
Vincent, Thank you! I hope it looks better once the rails are painted and ballast is done! I tried to watch your video but all I got was black screen with engine sounds!

Kevin, nice use of your free space! Better to have it on the floor then not have it at  all!

Richie, Nice work! I agree Steve is top notch!

Lew, That sure looks like a nice little switcher and what a wonderful story to go with it! Thanks for sharing!

So after laying in a tube for almost 3 hours, then work I was able to get one TSM mounted. No wiring or anything else, but its one less to do! LOL

I hope everyone had a great day and may there Wednesday be even better!

Mike- 3 HOURS!!!!! WOW!!!! So how does one pass the time? Can you bring a laptop or just take a nap.

Bob

Last edited by RSJB18
mike g. posted:

JD, Nice building! My kind of work and the price is perfect! LOL

So after laying in a tube for almost 3 hours, then work I was able to get one TSM mounted. No wiring or anything else, but its one less to do! LOL

I hope everyone had a great day and may there Wednesday be even better!

Thanks Mike. Actually, your BNSF building inspired me to make a building with the foam board I found. 

Hope everything went ok with the tube and it only has good news for you.

Bob and JD, thanks ! The tube is a different animal, Its a clear tube and all you can take in there is yourself that you were born with under a pair of scrubs of course! You lay in the tube getting 100% O2. My problem is that my left ear wont equalize so now I have to get tubes in my ears so they don't blow! LOL 

Bob they have a tv that sits atop of the tube you can watch or you sleep that's the choices! LOL

JD, thanks for the nice words about my BNSF Building. When you doing a layout on a low budget it what you have to do to get what you want sometimes! LOL

So today after my trip to the tube and work I was able to get another TSM mounted! I sure hope this it the hardest one cause it really sucked getting into place! But I only have 8 more to go! LOL I normally  don't take pictures of switches but I wanted to share the PIA it was to get this one into place! Enjoy!

Thanks to Dave AKA Darlander and his off set tubes he sent me I was able to get this done! Thanks DAVE!

Tomorrow should be a great day so everyone enjoy!20190501_17350320190501_173521

Attachments

Images (2)
  • 20190501_173503
  • 20190501_173521

Vincent. I understand was just hoping to see some O gauge action from you . 

Brian  great pics as always 

Mike. The car garage looks great keep going on that layout nice progress 

lew. I like that switcher 

Eliot. Take it easy and don’t over do it 

Been pretty busy doing other projects keeps raining and can’t do any paint but I’ll get something done  soon 

Ran trains last night before going to bed.  Did a little switching work exchanging locomotives between main lines.  Enjoyed the time and had fun!!


Mike G - good to know you go tubing!   At any rate your progress looks great!

Roman - widening curves means larger locomotives?  Yes?  It's always good to redo something on our layouts!   Thanks for the inspirational photos!  I need to do some track work on my layout and your photos help to motivate me!

Lee and Patrick thank you!

Dave, that one sure was a PIA! But I new I wouldn't have time today after work, so I got up at 4AM went to the Train room and mounted another one! Alot easier then the other! Only leaves me 7 more to do!

We'll everyone have a great day! Time for me to go tubing for a couple of hours!

trumptrain posted:

Roman - widening curves means larger locomotives?  Yes?  It's always good to redo something on our layouts!   Thanks for the inspirational photos!  I need to do some track work on my layout and your photos help to motivate me!

LOL. Yes my more scale stuff, which I really don't have much of, will look better on 042. I just wasn't pleased with how it was with Atlas 036 curves and 1 loop running. It stagnated for a few years and seeing Chris Esposito's photos in Weekend Photo Fun inspired me to go back to tubular and more of a Postwar display feel.

Last edited by Roman
Adriatic posted:

@CoastsideKevin I'm thinking a clamping seat for aluminum fishing boats might work out well for you. The backs often fold down, many swivel 360°, and moving it only takes a few seconds if it is a clamp style. C.list & garage sales (if you live near a marina that is. )

My other thought was using a big bean bag chair  

Great ideas, thanks! Bean bag is intriguing - I might have to learn to control the handles and switches with my feet! 

Well, I am sorry I haven't been on this topic since Sunday.  I had 59 messages in my inbox just now.  You folks are slipping!!    As I recall some Englishman say once, 'We haven't done a bloody thing on the layout all week!'  It was something like that I think!!  

I passed out 'likes' again like a new dad passes out cee-gars!  I am sorry I didn't comment more, but it would be another 4 days before I got through them all.  One of these days it has to let up a little!  

The last unfinished piece of surface area on my 10’-by-5’ layout is a strip at the rear about three inches in width and 5 feet in length. Part of this strip is covered by a scratch-built background building which overhangs the rear edge of the table. The surface itself is covered with taskboard. Today, I painted the surface and applied ground cover in the form of real dirt, dark brown ballast (fine and medium) and ground foam. So now, the table is 100% covered with track, roadbed, structures, and scenery. I plan to post some pictures when the glue dries and the building is back in place.

MELGAR

MELGAR_2019_0423_03_10X5_WEST_SIDEMELGAR_2019_0502_01_REAR_STRIP_UNFINISHEDMELGAR_2019_0502_02_REAR_STRIP_GROUND_COVER

Attachments

Images (3)
  • MELGAR_2019_0423_03_10X5_WEST_SIDE
  • MELGAR_2019_0502_01_REAR_STRIP_UNFINISHED
  • MELGAR_2019_0502_02_REAR_STRIP_GROUND_COVER
Last edited by MELGAR

Well it looks like everyone is taking care of little projects which is a great idea as it will free up room to make a bigger mess when you move on to the next project! LOL

Mel, the back side of your table turned out great! Very nice work! Now you can sit back and run trains!

Well its a little after 4 AM here and I am going to go out and see if I can get another TSM mounted before I go tubing! LOL 

I sure hope everyone has a great Friday and a wonderful weekend!

Hey y'all,

I love the black and white pics Brian.  I'll have to try that.

What I finished today at 11:00am began late Monday evening.  I was looking at my layout and realized I could move the area used for my turn around to the north end and gain more room on the south end for sidings.  I had to make more custom lengths.  I'm getting better at that.  I rewired all 10 switches and started testing.  Wednesday my favorite test engine (Texas Special #2011)  began it's work of finding track problems.  When the engine goes around well in both directions, I begin adding cars.  With no magnatraction or traction tires it pulls four light cars up the 15% grades.  Thursday morning was wasted on important domestic tasks.  By Thursday night I had my LC+ Mikado making a local freight run.  This morning my yard goat (ugly & beat) made up an eight car revenue train.  The 4501 is running from Odenville to Birmingham now.  

Breaking news:  The Bald Rock Mountain Railroad must relocate for the second time this year.  A portable utility building will arrive soon.  I will have more territory but …… the interior is exactly 8'x8' with the door closed.  

Y'all got a cool 8x8 track plan with room for a person?

It was a day for two short projects. First was replacing 54 022 switch bulbs with LEDs, one for each switch and two on each controller. As I have been adding lights and switches, I was noticing that my ZW was running pretty hot.

Anyone know how much wattage each one of those incandescent bulbs draws?

I figured that the LEDs would be a pretty big power savings and indeed the ZW is back to running cool to slightly warm. 

87A66FC4-94E6-4C8A-AC37-3A037DB11457

Next up was channeling my inner Impressionist and painting a tunnel. Sill have to do the road stripes, but here is how it looks so far. Now the road doesn’t just end. Fortunately the road crew had plenty of pickles to eat on the job!

31897CCF-2DD7-4A97-BB6F-B33ABED8C27E

Have a great weekend, all.

Kevin

Attachments

Images (2)
  • 87A66FC4-94E6-4C8A-AC37-3A037DB11457
  • 31897CCF-2DD7-4A97-BB6F-B33ABED8C27E

The new LED's look great Kevin. Nice job on the tunnel too.

Mike- TUBE ON!

Mark- I know the feeling....

Bill- love to see some pix of the new yard

Brian- great shots of your never ending fleet as usual.

Mel- the corner looks great. The building and short stub look great. Will that stub track go somewhere one day? (Did someone say layout expansion?)

John- happy prospecting. hope you get that window open soon.

ToledoEd posted:

I finished adding an "Evans Designs" police car LED kit to a 1:43 Road Champs Virginia State Police car. Officer is writing a ticket for speeding....the couple in the car is me and my wife.  After this episode, we sold the Z4.  Ticket

Ha, I laughed out loud at that one, Ed. 

I like how you did your track crossings with the road. Am trying to do something similar - could you share your method?

Thanks,
Kevin

Kevin, thanks for the comment.  Actually, we really did sell our Z4.  Had it for 14 years, but we needed a new car so we sacrificed it for a CR-V.  At 71, I need all the safety doo-dads they put in cars now.  As for the road, I used something called "Foamie"...its a very flexible material, instead of foam board.  i prefer the "Foamie Foam Sheets"  If you search Foamies on Amazon they'll pop up.  You can cut it with scissors which is nice and it will not warp when painted like foam board. No need to paint it on both sides. The road is 5" wide.  I painted it with an "Asphalt" acrylic.  The striping is pretty neat stuff, but, sorry I bought it a long time ago and can't remember from where.  I used very fine black ballast for the transition from the roadben to the grass/sand.  I cut some insulation foamboard to support the rise to the top of the Fastrack then filled in the sides with ballast. I'm ballasting my Fastrack with Brennan's better ballast.  Back to the striping. i also bought white and yellow paint markers. They work well once you get the hang of it. Good substitute for the commercial striping.  Another forum member asked me the same question. I'll look for my posting because I took pictures of the items I used.  Well, hope this helps. If you have questions don't hesitate to email me. 

CoastsideKevin posted:
ToledoEd posted:

I finished adding an "Evans Designs" police car LED kit to a 1:43 Road Champs Virginia State Police car. Officer is writing a ticket for speeding....the couple in the car is me and my wife.  After this episode, we sold the Z4.  Ticket

Ha, I laughed out loud at that one, Ed. 

I like how you did your track crossings with the road. Am trying to do something similar - could you share your method?

Thanks,
Kevin

Kevin, one more advantage to using Foammie: it’s only 1/8” thick so it fits in between the rails easily and is below the top of the rails. 

Apples55 posted:
RSJB18 posted:


Mel- the corner looks great. The building and short stub look great. Will that stub track go somewhere one day? (Did someone say layout expansion?)

I just thought it - you said it!!! Someone is being evil...

96F06820-3375-4C7A-A115-C9553809FECC

You fellows are not being helpful! Yes, there are two stub tracks which could be used for an expansion. I'm contemplating it but haven't made up my mind... However, I did design the bench work for an additional piece of table, but I'm trying to resist sending it to Mianne for production...

MELGAR

CoastsideKevin posted:

It was a day for two short projects. First was replacing 54 022 switch bulbs with LEDs, one for each switch and two on each controller. As I have been adding lights and switches, I was noticing that my ZW was running pretty hot.

Anyone know how much wattage each one of those incandescent bulbs draws?

I figured that the LEDs would be a pretty big power savings and indeed the ZW is back to running cool to slightly warm. 

87A66FC4-94E6-4C8A-AC37-3A037DB11457

Next up was channeling my inner Impressionist and painting a tunnel. Sill have to do the road stripes, but here is how it looks so far. Now the road doesn’t just end. Fortunately the road crew had plenty of pickles to eat on the job!

31897CCF-2DD7-4A97-BB6F-B33ABED8C27E

Have a great weekend, all.

Kevin

Kevin, that's one of the best night views of a lay-out I have ever seen.

Today we drove to Guadalajara and paid for another year of Mexican National Health Insurance: $1,160, including transportation and all fees, for both of us.

Then I purchased this Lego dead rail passenger train, along with extra tracks.

Then we stuffed ourselves with all we could eat at Sirloin Stockade (burp).

I'll be spending the next few days assembling this.SUNP0003SUNP0001

Attachments

Images (2)
  • SUNP0003
  • SUNP0001

Add Reply

Post

OGR Publishing, Inc., 1310 Eastside Centre Ct, Suite 6, Mountain Home, AR 72653
800-980-OGRR (6477)
www.ogaugerr.com

×
×
×
×
Link copied to your clipboard.
×
×