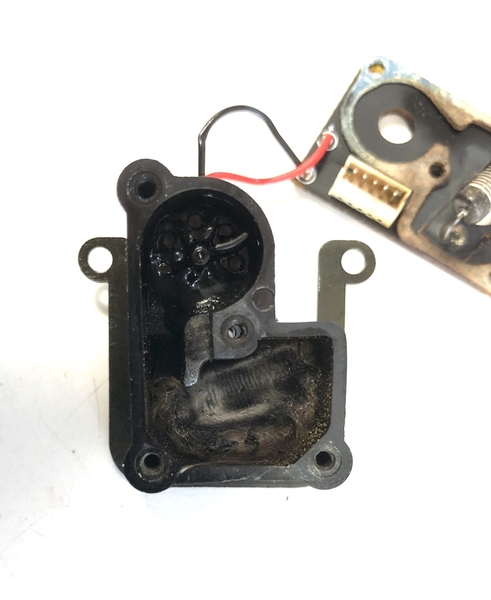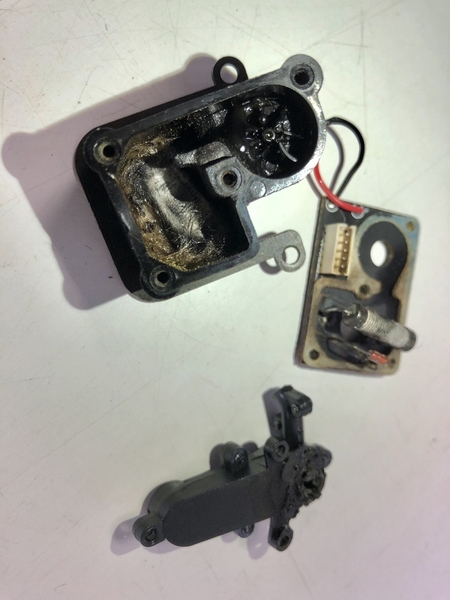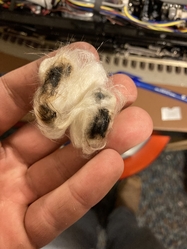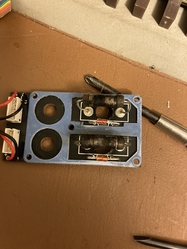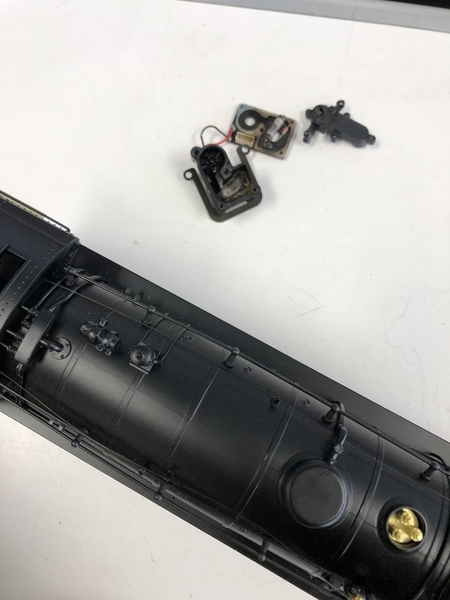
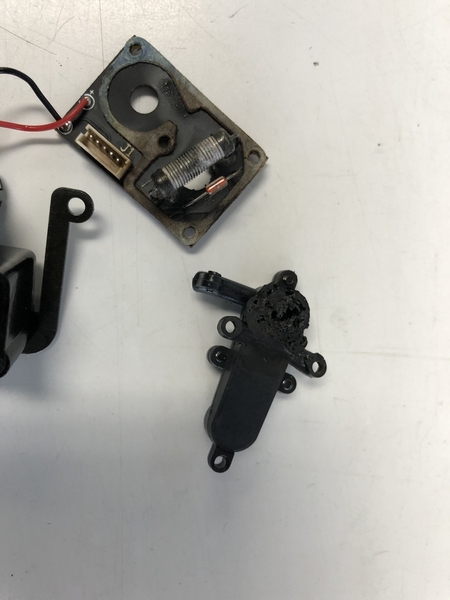
FAB136A0-BB13-4901-B69E-4688FF4049B55BE9D5A7-88F9-430E-96DB-5D2A75A92DD62E1B7C2F-B773-4B38-A415-4D5C2946457DA customer who bought a 3759 less than 3 days ago came back in with it today and the whistle steam smoke unit fan was not working. The heater is still working (a little too well).

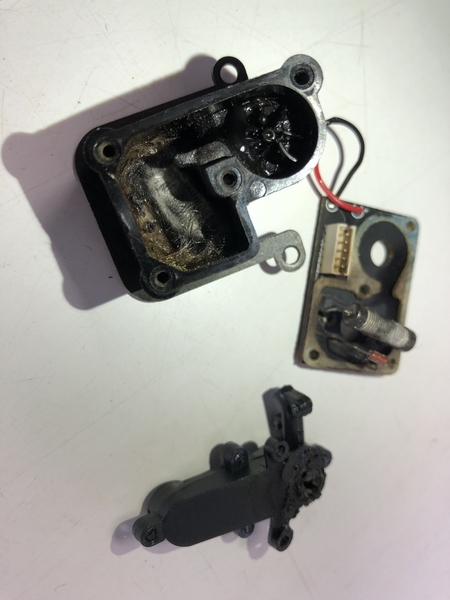
Opened it up and quickly saw why....

Heater got so hot it melted the fan and the wick, and funnel was ruined at the base.

Smoker was properly primed and he kept enough fluid in. Could it have been a board or software control issue? Told heater to run way hotter than it should have for too long?

Never seen one do this before. Awful.

Attachments

Images (3)
  • FAB136A0-BB13-4901-B69E-4688FF4049B5
  • 5BE9D5A7-88F9-430E-96DB-5D2A75A92DD6
  • 2E1B7C2F-B773-4B38-A415-4D5C2946457D
Original Post

Replies sorted oldest to newest

Had the main stack smoke unit on my 2014 Big Boy cook itself in a similar way as yours; batting burnt, resistor ruined, stack burnt, reservoir bubbled.  I replaced all components - batting, reservoir, stack, board complete with resistors and thermistors factory installed, new fans, all from Lionel parts.  I noticed that the thermistor on yours looks like it is a 1/4 inch away from the resistor.  Per fellas on the forum, they recommended that the thermistor be about 1.6mm from its resistor with the top of the thermistor at the same height as the top of the resistor and parallel to the resistor.  The best tip as per Jon Z is to simply ensure the element and thermistor use the wet wicking as a "pillow" to rest on and conduct heat as necessary to the thermistor.   The thermistor is monitored by the RCMC to control the resistor.

See https://ogrforum.ogaugerr.com/...opped-working?page=1 for some reading that will put you to sleep.

Last edited by RickM46

There were reports of a similar issue some years back when Lionel started using dual chamber smoke units with one side providing the whistle steam. Basically heat from the resistor on one side could melt part of the impeller, which then failed to spin properly or at all. I have a couple of engines with these units and you can see that there is smoke wafting out of the whistle port on startup as the unit heats up.

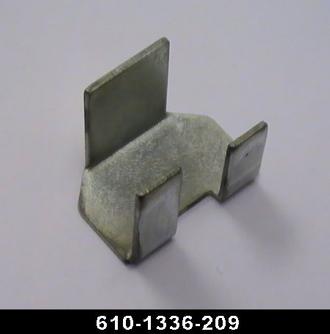
However I have not seen the plastic bowl of one of these units or one like the OP’s melt. At one stage and without any fanfare or explanation Lionel listed as a replacement part this reservoir heat shield insert - apparently designed for single plastic chamber smoke units like the OP’s:

AC8D06C5-0BF5-4FFE-A998-AFAF33B7DAAA

I never figured out how to install these in the units of that kind that I have. But in any case I have not had a meltdown of plastic smoke unit parts, which I would guess is something to do with settings or letting the engine sit idle on a powered track for some length of time. There will usually be power to the resistor in such a case unless you switch the smoke off and some heat generated.

Attachments

Images (1)
  • AC8D06C5-0BF5-4FFE-A998-AFAF33B7DAAA
@yankspride4 posted:

I recently bought the same loco. What I’ve noticed is that smoke wafts out of the whistle while running (when not blowing the whistle). To me this suggests the unit is indeed running hot. It looks great when you blow the whistle, but something seems off.

It's not abnormal for a bit of smoke to waft out of the whistle, all the locomotives with whistle steam keep the resistor pre-heated so there is instant response when you blow the whistle.  It is abnormal for them to burn up the smoke unit!

@RickO posted:

The thing I've noticed  lately is.

Many of the newer releases appear to have far more whistle steam than stack smoke.

Imo TOO much whistle steam.

Failure, design flaw,or reversed connections???? Who knows.

Hopefully Lionel will answer the phone so you can get the parts to fix it.

Rick,

   Take a look at this video of PRR K4 1361 back in 1987. Too much whistle steam? Never enough.

       https://youtu.be/mTVjbeRBWWk

JohnB

@RickM46 posted:

Had the main stack smoke unit on my 2014 Big Boy cook itself in a similar way as yours; batting burnt, resistor ruined, stack burnt, reservoir bubbled.  I replaced all components - batting, reservoir, stack, board complete with resistors and thermistors factory installed, new fans, all from Lionel parts.  I noticed that the thermistor on yours looks like it is a 1/4 inch away from the resistor.  Per fellas on the forum, they recommended that the thermistor be about 1.6mm from its resistor with the top of the thermistor at the same height as the top of the resistor and parallel to the resistor.  The best tip as per Jon Z is to simply ensure the element and thermistor use the wet wicking as a "pillow" to rest on and conduct heat as necessary to the thermistor.   The thermistor is monitored by the RCMC to control the resistor.

See https://ogrforum.ogaugerr.com/...opped-working?page=1 for some reading that will put you to sleep.

I think Rick is on to the problem. The thermistor or whatever they are using to measure the temperture is too far away from the resistor.

What this means though, it you want to avoid the smoke unit from burning itself up is when you get a new engine you have to open it up and verify the sensor is close enough.

We all want to do this, right?

Pete

Well kids, I did take the shell off my new Legacy Big Boy 4005 just to have a look - sacrilegious no doubt - may have incurred the wrath of the gods; but, I have had experience doing the same to my VL Big Boy.  Was easy since there are only 4 screws holding the shell on; used my Bowser foam cradle to protect it and paid attention to wiring; I was impressed by the build quality of the Legacy version and wiring placement and protection; however, I did not look at the smoke unit.  Mine does smoke like crazy but did not notice any bad smell.

Zachariah, you might want to check the health of the resistors.

Per Jon's advice, I put a True RMS meter on the components of the smoke unit board and got the following results:

Smoke 1 - left side of smoke unit - rear stack - still working: Resistor has 8.5 ohms, thermistor 49.6k ohms.

Smoke 2 - right side of smoke unit - front stack - not working: Resistor has 12.8 to 13.5 ohms, thermistor 50.5k ohms.

Per Jon, the Smoke2 resistor is not in spec. and why it flashes an error code.

@RickM46 posted:

Zachariah, you might want to check the health of the resistors.

Per Jon's advice, I put a True RMS meter on the components of the smoke unit board and got the following results:

Smoke 1 - left side of smoke unit - rear stack - still working: Resistor has 8.5 ohms, thermistor 49.6k ohms.

Smoke 2 - right side of smoke unit - front stack - not working: Resistor has 12.8 to 13.5 ohms, thermistor 50.5k ohms.

Per Jon, the Smoke2 resistor is not in spec. and why it flashes an error code.

Rick I did double check the resistors they where good don’t think I check the thermistors because I had nothing to go by. If I remember correctly we both had our run ins with the vision line big boy.

Something to add to the pool of thought, if my memory is correct I think Dave said something about them using a new type of smoke unit that produces more smoke. If they did, could the problem be within what Lionel changed?
Also, I am a victim to a burnt out smoke unit. I was giving the locomotive it’s test/break in run and making sure was nothing wrong. Sadly, this was not the case. After a good while of running I started smelling an awful smell and the whine of a smoke unit fan. So, I stoped the locomotive, gave it a few more drops of smoke fluid, thinking it went dry, and then it dyed. After about an hour of running the locomotive met an very early grave. After reading a few comments I would have to say what is going on here happened to me as well.

Sorry Rick yes it still smokes like crazy no bad smell anymore. I did all that back in July when it delivered. I don’t recall intentionally moving the thermistors but probably Did to get in and clean up those resistors. A little off topic but I also had to fix a ground light wire that the factory smashed when putting the shell on

Attachments

Images (1)
  • 9C6545A1-1C42-498F-8064-ADF93B57F472

What I do is make the resistor mostly accessible and take a dremel tool with a small wire brush wheel and run it with the windings of the resistor. If you go the other way you’ll probably short the resistor out. I learned this from a service tech 4 years or so ago. As far as getting it outs pretty simple pull the screws and it comes right out. No little hose to get pushed back on like with the 2010 VL challenger

Last edited by zhubl

Thanks Z; got off my lazy butt and did a search on 'resistor cleaning' and found this thread: https://ogrforum.ogaugerr.com/...64#66751584497552664

In that thread, found you are in good company on the subject; GRJ  - 'When you're cleaning off exposed wirewound resistors, make sure you go in line with the turns, not perpendicular to them to avoid damage.  I use a Dremel wire wheel and gently wisk the crud away.'

AND

Ted Bertiger - 'After you take the wicking off the resistor, I have sprayed the bare resistor with WD-40 which cleans off the gunk and lightly, gently clean it with a toothbrush or wire brush. Lightly, gently so you do NOT break the Nichome wire. The wd-40 will burn off once you use the units.'

Good info!!

Nowadays, I've found an easier way to clean the resistors.  I find a 5W wirewound resistor of the correct resistance rating in the square ceramic package.  What it really is inside is a 2W wirewound resistor with lots of heat sinking.

I put it diagonally in a vise and tighten until the outside shell shatters (use safety glasses).  Once that falls away, you can very quickly brush off the soft powdered ceramic that's inside the resistor shell and you have a perfect smoke resistor.  Cuts the time way down for creating nice smoke resistors.

Attachments

Images (1)
  • mceclip0

A friend just got a Legacy RI Northern (ATSF 3751 class in RI paint) with a similar issue. Within 5 minutes of running the cab light would blink the whistle smoke issue code. When he was blowing the whistle there was so much smoke that it would come out under the boiler in addition to the whistle. He asked me to take a look at it vs. sending it back to Lionel (full disclaimer: we both knew opening it up voids the warranty, and he was ok with it). Popped the smoke unit open. Damage wasn't near as bad as the OP's unit. The funnel just started to deform but was salvageable. Big issue was the wicking and thermistor. Whoever packed the unit really smashed the wicking into the bottom of the smoke unit. It was barely touching the resistor. The second issue was the thermistor was sitting higher than the resistor and about 1/4 inch away, almost touching the side of the smoke unit body. I repositioned the thermistor to be closer to the resistor (about 1.5-2mm away) and level with the bottom of the resistor. I also repacked the wicking. Put it all back together and it works just fine. Produces the appropriate amount of whistle steam as well. I'll do the same to my ATSF 3759 when I pick it up from the LHS. Well and also replace that Cannon motor with a Pittman while I'm in there . I'll take pictures of the fix whenever I open up my ATSF 3759 to do the same thing to the whistle smoke unit.

Last edited by Lou1985

Nowadays, I've found an easier way to clean the resistors.  I find a 5W wirewound resistor of the correct resistance rating in the square ceramic package.  What it really is inside is a 2W wirewound resistor with lots of heat sinking.

I put it diagonally in a vise and tighten until the outside shell shatters (use safety glasses).  Once that falls away, you can very quickly brush off the soft powdered ceramic that's inside the resistor shell and you have a perfect smoke resistor.  Cuts the time way down for creating nice smoke resistors.

Where did you find these John?...

Pat

@Lou1985 posted:

A friend just got a Legacy RI Northern (ATSF 3751 class in RI paint) with a similar issue. Within 5 minutes of running the cab light would blink the whistle smoke issue code. When he was blowing the whistle there was so much smoke that it would come out under the boiler in addition to the whistle. He asked me to take a look at it vs. sending it back to Lionel (full disclaimer: we both knew opening it up voids the warranty, and he was ok with it). Popped the smoke unit open. Damage wasn't near as bad as the OP's unit. The funnel just started to deform but was salvageable. Big issue was the wicking and thermistor. Whoever packed the unit really smashed the wicking into the bottom of the smoke unit. It was barely touching the resistor. The second issue was the thermistor was sitting higher than the resistor and about 1/4 inch away, almost touching the side of the smoke unit body. I repositioned the thermistor to be closer to the resistor (about 1.5-2mm away) and level with the bottom of the resistor. I also repacked the wicking. Put it all back together and it works just fine. Produces the appropriate amount of whistle steam as well. I'll do the same to my ATSF 3759 when I pick it up from the LHS. Well and also replace that Cannon motor with a Pittman while I'm in there . I'll take pictures of the fix whenever I open up my ATSF 3759 to do the same thing to the whistle smoke unit.

Nice work Lou!...

Pat

@Paul Kallus posted:

For those of us who have the new Legacy Northerns and have not put them through the paces as of yet and not comfortable taking them apart, is there any advise on what to do? I can only think of running until it fails and then request an RA? It seems ridiculous to ponder given the price of these.

That's about all you can do if you're not comfortable opening it up. Remember that opening the thing pretty much voids the warranty.

I myself have worked on the smoke units in my 2014 VL Big Boy loco and the 2018 VL Niagara tender.  I lean toward working on the smoke units myself rather than the risk of shipment to and from Lionel; although, I have had excellent service from Lionel techs on smoke units of yore and a short in my E6.

Before removing the shell to get at the smoke units, I consult with the fellas on the forum to find out where the screws are and to get any tips.  I have the appropriate JIS screwdrivers and a Bowser foam cradle and a magnetic bowl to retain the screws.  I have a bunch of wicking that I ordered from Lionel parts.  I also rely on Lionel parts in case I mess something up.  In short, if you can handle a screwdriver, you can recondition a smoke unit; pay attention that you do not stress any wiring.  As far as thermistors go, see my comments above.

My 2 cents.

Add Reply

Post
This forum is sponsored by Lionel, LLC

OGR Publishing, Inc., 1310 Eastside Centre Ct, Suite 6, Mountain Home, AR 72653
800-980-OGRR (6477)
www.ogaugerr.com

×
×
×
×
Link copied to your clipboard.
×
×