
Hello all, I just inherited a complete 1947 Lionel 2125WS train set with some extras. It has been in storage for around 70 years, and I am quite excited to start an adventure in model trains with it. I've attached a few photos of what I found when I unpacked it.

I'm a retired technical guy (50 years in the powersports industry) so I have some skills and engineering background.

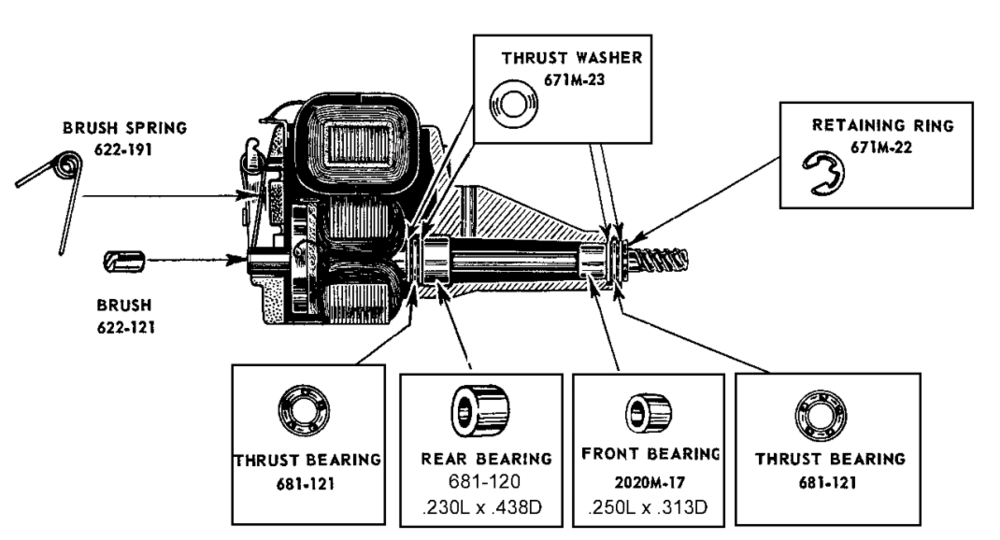
My conundrum is the locomotive lacks power and was a bit erratic. I have studied everything I could find and even bought Greenberg's manual. I have overhauled the motor (it was missing the upper thrust bearings and only had 5 balls in the lower). It spins freely and smoothly and runs up to speed when not engaged with the driven worm gear on the axle. I have replaced all the axle bushings and the driven worm gear, and the wheels turn easily by hand or when the chassis is pushed on the track. The E unit was cleaned and works properly.

But when I install the motor, following all the tips I have read, everything binds. Even if I loosen the motor to loosen the gear mesh the wheels won't turn and the motor is stalled when power is applied.

Can anyone here give me a suggestion on where to look?

IMG_4603IMG_4570IMG_4579IMG_4580IMG_4589.

Attachments

Images (5)
  • IMG_4603
  • IMG_4570
  • IMG_4579
  • IMG_4580
  • IMG_4589
Original Post

Replies sorted oldest to newest

OH BOY!  Fresh Meat!  WELCOME and NICE FIND!

Here's a handy Lionel Manual from '65... yes, 20 years later but extremely useful as it covers many maintenance items and many accessories as well that should be pertinent to your set.

and,

https://www.tandem-associates...._trains_671_loco.htm

https://www.tandem-associates....trains_671r_loco.htm

Attachments

Last edited by Dennis-LaRock

I would say if the chassis turns freely and properly without the motor. And the motor does run, until you put it back in the chassis. Then there is most likely an issue with the thurst washers and bearings. Possibly not in the correct order, missing or damaged. I took all of my Post War locomotives apart within the last year. My 746, 736, 681, 779 and many others. I got careless with my 779, when I serviced the motor, one of my thurst washers was still in the solvent when I put the locomotive back together. I put it on the track, and it ran a few inches and binded up. After I realized what happened, and took the locomotive and motor back apart. After I put the bearings and thrust washers back in the correct order, and re-greased it again. It runs like new.

671

Attachments

Images (1)
  • 671

Thanks for the welcomes and all the information. The photos you see are before I replaced the axle bearings, and i don't think the wheels had ever been off before.

I'll take some more photos of where I am at the moment.

Pretty sure I got the thrust bearings in correctly. Here are photos of the balls in place with white lithium grease prior to installing the outer "race" or washer. I did have to add a second thrust washer under the c-clip to reduce the axial movement. Perhaps it is tight?...although it spins easily in the hand and under power.IMG_4618IMG_4617

Attachments

Images (2)
  • IMG_4618
  • IMG_4617

The right hand side drivers should lead the left by 90º on just about any loco except for on the PRR, and oddly enough, Lionel did use the left-hand lead on the PRR outline Turbine & B6 locos(0-6-0 & 0-4-0), but not the (K4)675/2025 series, which have the right-hand lead like every other postwar loco I'm aware of(except the 1862/1872/1872). I have never looked at the PRR Torpedo outline locos to check those, though.

Well I know that my locomotive ran before I took it apart. And leaving one tiny thrust washer out of it, caused it to bind up. So I would say that the proper placement and spacing of the washes and bearings, and the correct amount of them is critical.  To have the worm gear and helix gear properly aligned, for the locomotive to run smoothly. I would look at the diagram, and tear the motor back down. And be sure that everything is correct. Good luck

This is an example of servicing one of my post war locomotives. As E-Unit-79 pointed out, the commutator plate and brushes may need to be properly cleaned as well. Maybe something you have not thought of doing yet. Regards Nick

746 Norfolk And Western from 1957. Sitting in Display case for years, and didn’t want to run properly anymore. Removed body, un soldered brush plate and marked motor brushes with a fine nail. Marked left motor brush at top left and marked the right motor brush at the top right side. So that the brushes can be put back in the proper position. This is very important because they are worn in and seated to the motor in this position.  Removed brush plate and motor brushes, cleaned commutator plate with a green teflon scrub pad, cleaned  brushes and brush journals with lighter fluid and Q-tips. Locomotive still did not run properly. Took locomotive back apart again.

Removed motor, removed C-clip behind worm gear, thrust washers, thrust bearing. Cleaned all the old grease out and then cleaned washers, thrust bearings with lighter fluid. I used a sewing needle to clean old grease away from the ball bearings in the thrust bearing race. Lubricated motor shaft from under motor windings towards worm gear, lubricated from lubrication hole in motor casing. Then turned motor upward and lubricated motor shaft from behind worm gear towards windings. Pushed motor shaft up and down with finger tips, turned back and forth to make the oil flow down the full length of the motor shaft and shaft bearing. Re greased thrust bearings, washers and worm gear, helix gear and put motor back together. Lubricated all wheel bearings, linkages, and wheel trucks. Then the locomotive ran properly. Removed Tender body, oiled top motor shaft (sparingly), so oil does not get on commutator plate or motor brushes. And oiled bottom of shaft, moved motor to get oiler between motor windings and to get a clear view of bottom bearing, oiled wheels and axle shafts.

Sometimes when you rebuild a turbine or Berk motor, and replace the worm wheel, you then have to change the pitch of the motor. This is outlined somewhere’s in the service manual, ( can’t remember where) it even recommends a part number for the particular shims to use,…..sometimes you have to pitch them up, sometimes down. Usually if I find one shimmed, the shims are stacked ( or single ) on the alignment pin the motor sits on…..but I’ve found them under screws, under the front of the motor, and everywhere in between…..

Pat

The gear is a perfect match for the one I am replacing...It isn't really bad, I just figured it would be wise as long as I was in there. I've read about shimming to get the correct engagement and will check that.

Brushes appear fine. I did clean the armature. 13 balls fills the space perfectly. Armature shaft spins smooth and free. I never saw a situation where you would use fewer balls than would fit in a thrust bearing like this in all my previous experiences. I guess I could remove a few but it goes against my engineering background.

I have realized that in my ignorance I didn't "quarter" the wheels properly. Never saw that explained in my reading. So I will go back and correct this. .... and go through the motor again to review the thrust bearings.

I'll report back once all this is done.

Thanks to everyone for all the helpful advice. Glad I found this forum.

Last edited by esqz'me

OK... corrected my mistake in quartering the wheels on installation. Also removed (still feel this can't be right) 3 balls from each of the thrust bearings. Now there are 10 in each... and gaps. I confirmed correct washer installation according to the diagrams. I had replaced the lower bushing (upper bushing was not available anywhere I searched, but seems to be OK). I did have to add washers (per the instructions) to reduce end play to 0.010".

The gear on the axle is centered and does not touch the chassis in either direction. Wheels are fully installed on axles and do not rub the chassis or the center overlapping wheels at any time.

The wheels turn smoothly by hand or when pushed along the track. The motor spins smooth and free when in my hand, but when I install the motor the wheels will not turn.

Now here is the interesting part. I installed the motor without the brush holder and when I turn the armature by hand it will drive the wheels easily. So the wheels will not turn the motor, but the motor will turn the wheels (by hand).

I have decided to replace the brushes and so will not reassemble the motor until they arrive. Then I'll see if the motor can drive the wheels under power.

But every video I watch shows the wheels easily turning by hand after assembly. So I must be missing something??? I do love a puzzle.

More photos of my conundrum 671IMG_4619IMG_4621IMG_4622IMG_4625

Attachments

Images (4)
  • IMG_4619
  • IMG_4621
  • IMG_4622
  • IMG_4625
Last edited by esqz'me

Thanks Chuck ... I've been frustrated by videos of guys servicing the same locomotive and showing them easily spinning the motor running the wheels over their hand or on a track. I keep thinking mine would do this before I started working on it.

The reason I decided to do an overhaul was the erratic performance and low power. I found NO upper thrust bearing at all when I took it apart, just a single washer. And only a few balls in the lower.

As soon as the new brushes arrive I shall reassemble and give it a test under power. What you say does make sense as I can turn the armature and the wheels will turn with it, just not the other way araound.

Cheers

Last edited by esqz'me

OK, I’m hearing a lot of things here, but this is what stands out to me:

  1. Motor now turns freely by hand when not installed
  2. Chassis rolls freely by hand when not installed
  3. Things bind up when the motor is installed in the chassis

To my ear, it sounds as if your bearings are not an issue. Certainly proper quartering of the drive wheels is an absolute must on this engine, but it sounds like you have now done that, and no change. I would be very surprised if new brushes made any difference in the drag/binding you are experiencing.

To my way of thinking, the likely remaining issue is the mesh between the motor’s worm and the worm gear on your rear axle. Your worm may not be sitting deeply enough, or too deep. OR….. clearly you are not the first person to have been inside this engine – as you said earlier, it was missing the upper thrust bearings and only had 5 balls in the lower. Therefore, in my mind, anything goes with regard to what parts may have been installed or swapped in your engine. In looking at the 1947 726 Berkshire service manual (uses the same 671M-1 motor as yours), they stated the following:

Capture

I think you need to count the number of teeth on your worm gear. If it is 25, then Lionel stated that you will need shimming to avoid binding ‘tween the worm and the worm gear. If it is 25, and you have no shims, that would certainly suggest you might want to try adding some. The shim that Lionel said to use is very hard to find, p/n is 726-127. I was never able to find one for my Berk, so I used some 671M-19 shims instead. That said, no matter how many teeth your worm gear has, I would still suggest experimenting with some shims

Just as an FYI, I found through experimentation that it IS possible to backdrive this motor by pushing the engine along the track by hand – it’s sometimes not easy, but it can be done. The gear mesh between the worm and worm gear HAS to be correct, and the grease used needs to be nice n’ slippery. I used a new (automotive) cam installation type grease, something like white lithium. It has NO staying power, but it sure is slick!

George

Attachments

Images (1)
  • Capture
@bmoran4 posted:

Proper 671 gear specs were shared earlier, but not explicitly acknowledged or verified by @esqz'me :

I guess I wasn't clear, but the gear is definitely 23 teeth and .5724 OD

This train set was originally my son's Grandfather-in-law's. He would have been around 7 years old when he got it new and I will guess he boxed it up around the time I was born. He's the only one who ever did anything with it, unfortunately I can't quiz him.

I think I may have set the lower bushing a little too deep, and that's the reason I needed to add shims to reduce end play to .01"  So I may adjust that.

I know the brushes aren't my problem, but as long as I have it apart I think I may as well replace them. One spring is different length and I have no idea what the wear limit is on brush length. Haven't found that spec anywhere yet.

Wish I could find a 671M-20 upper bushing. Then I would have all new parts (other than armature and field). Cheap stuff compared to the high performance ICE engines I play with.

I really do appreciate all the advice you guys are giving this novice train engineer.

One other remote possibility is you said when you opened the motor there was ball bearings and washers missing. So the motor has been taken apart. Lionel used a couple of different armatures that look similar but the pitch of the armature worm is different (early 726, 2332 GG1, 681 turbine), Any chance the armature has been replaced over the years?

If the motor runs well under power when not mounted and the wheels now turn well without binding, then it may be the motor alignment.    The  brushes shown look good, just make sure they have been cleaned.

When the motor is mounted loosely now, does it still bind?

When the motor is installed, can you turn the armature from underneath.  Does it turn easily?  Turn it enough that the wheels do 1 revolution to check for binding.  If it is stiff or binding,  you may need to shim under the motor mount to adjust the worm gear to motor gear interference.

Normal paper is about .003 thick.  will a strip of paper run through the gear interface when turned by hand or does it bind?

Make sure the motor pin holes are clear and nothing is preventing the motor from seating correctly.

In rare occasions shimming the engine may be needed. If the Engine ever got dropped and the back end bent, even a small amount not noticed, the motor alignment may need to be adjusted with shim stock.  Paper as shim stock can be used for testing.   

OK...Dr Tinker (David) has turned out to be my "Go To Guy" now. He had the upper bushing and more !!! Thanks for that referral !!!

So..to make it clear.... Wheels are properly quartered and spin freely with no motor installed. Motor spins freely when not installed and spins like crazy when power is applied. Yes, I cleaned the armature commutator segments and grooves.

With the brush holder off, and the motor installed, I can use my fingers to turn the armature and it will turn the wheels. Forward and reverse. No binding.

So I am thinking this is normal and I am driving myself crazy. As soon as the replacement parts arrive I will reassemble the motor and give it a try. Meanwhile I have other items to tinker with like the 3520 Searchlight car.

I will report back in January once the post office delivers. Thanks again to all the great members here who have offered suggestions and advice and knowledge.

OK....Got my upper bushing from Dr Tinker and new brushes and springs.

(Great communication, service and prices by the way !!)

Dr Tinker shows 9 balls per thrust bearing (18 total) in his replacement parts list. So I have new upper and lower bushings, new thrust washers and 9 balls in each, new brushes and springs, a clean armature face and grooves, proper end play (less than 0.010"), and the motor spins freely by fingers and under power.

I have wheels installed with proper quartering on new axle bushings, and the wheels spin freely by hand or pushing on the track.

Installed the motor and confirmed a tiny amount of lash between the shaft and drive axle spiral gears, so the gear mesh is not too tight or loose.

The wheels will not turn the motor, at all, period. And the motor will just barely move the wheels under full power, or it stalls and will not run at all.

Before I pack it up and get it to a real Lionel repairman, would anyone like to add new insight or suggestions? Shorted armature windings? or field? incorrect assembly?

Is there an ohm spec for the windings? Guess I need to check the armature winding insulation....just thought of that.

Add Reply

Post

OGR Publishing, Inc., 1310 Eastside Centre Ct, Suite 6, Mountain Home, AR 72653
800-980-OGRR (6477)
www.ogaugerr.com

×
×
×
×
Link copied to your clipboard.
×
×