I am a pretty handed guy but my attempts as using 3 rail O flex track were abysmal. I am really clueless with this procedure. Can anyone please guide me?
Thanks
John Sherwood
Peyton, Colorado


|
|
I am a pretty handed guy but my attempts as using 3 rail O flex track were abysmal. I am really clueless with this procedure. Can anyone please guide me?
Thanks
John Sherwood
Peyton, Colorado
Replies sorted oldest to newest
I'm Not sure what your trying to accomplish. My experience is that using the flex track for any kind of curve is a waste of time, money and effort. The only way I can see it working is to slightly curve one way then back the other. I tried to make various curve diameters - any where from 054 to 072 and it is a complete waste. my advice is that if you want a curve - buy one - don't try to make one out of flex track.
One advice would be to bend around some form. In my case I used a water heater tank. Any kind of preformed shape. The ties will never line up. Once you try to bend - it will never be straight again. Couldn't even begin to tell you how many pieces I ruined trying to use the flex track.
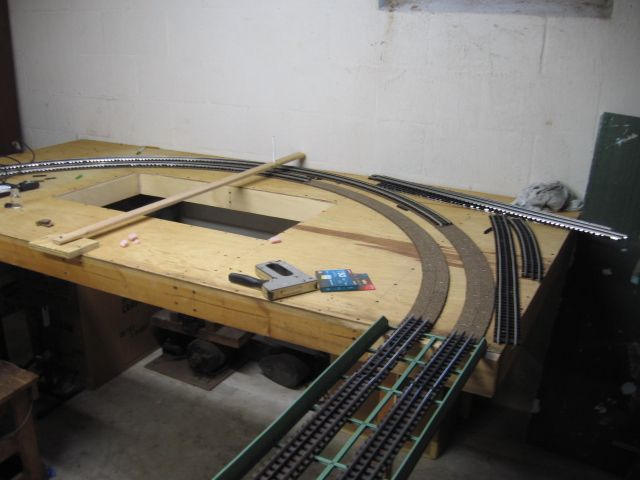
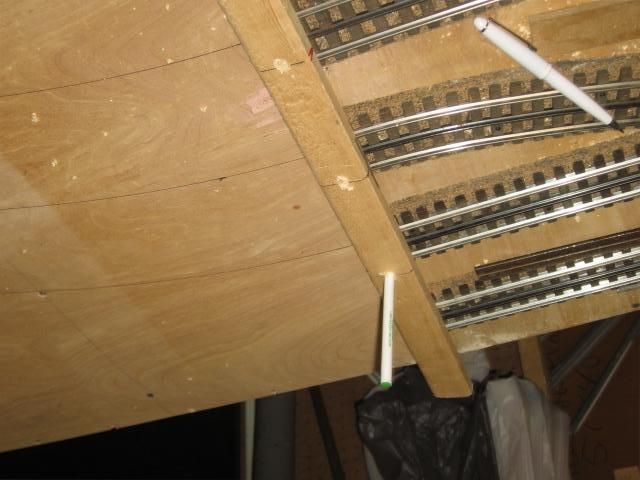
To bend gar graves a lot of guys build jigs out of plywood to bend the track. This layout I am building now I have bent the track by hand because to curves are the same radius. Where possibly and I know the curve I want I may buy the preformed curves. But here are a couple of pics where I bent it by hand in one pic and in the pic going into the opening I actually bent that using my stomach but doing it very slowly to prevent kinking............Paul
 I bent as I laid the track
 I used my stomach on these
If you buy a box of GG track you'll get a sheet of bending instructions with the box. These instructions are the BEST. I looked at magazine articles, other web sites, only to find the manufacturer's instructions to work out the best. A plywood bending jig or similar is highly recommended. I use a Dremel to cut my track. Don't buy those cheesey Dremel cutoff wheels though. Use the Gyros brand ones that Gargraves reccomends:
http://www.gyrostools.com/Cut-...forced/c5/index.html
I use the HT style wheels, and have found them to last a good long time.
Gargraves also has a short vid on their web site.
The trick is to make curves with no kinks at the joints. Much easier than it sounds.
These were 1/2 circles. Easy enough to make a large compass. Pen point on the center rail. Track screws applied every 3 or 4 inches. All the track and switches pictured were re-purposed from layouts that were dismantled.


I found the secret to bending gargraves flex track was: 1. Never buy old used dried out track. The ties have to be able to move freely. 2. Use your stomach to start the curve. After each slight bend reposition the ties so they are equally spaced. Then bend some more and repeat. Use a dremel cut-off wheel or zona saw to trim the uneven lengths. Remember to always wear safety glasses when using a cut-off wheel. Pre-drill the ties and fasten over Midwest cork roadbed with 3/4 inch #4 flat head wood screws. If you follow the above you can easily master making your own layout specific curves. Also, use Ross custom switches with Tortoise switch machines which last for decades and never allow the switch points to be picked.
LOTS OF GOOD ADVICE HERE. ONE OTHER THING IS IF YOU CAN, GET HELP THIS PROCESS GOES A LOT EASIER IN TANDEM ESPECIALLY FOR THE NOVICE
There is a video on the Gargraves website on how to bend it. While everyone....including myself...has some variation thereof, it's a proven technique.
I found that, using RRTrack for my layout design, if I could use fixed, available pre-formed radii, I would purchase the same....to avoid the waste and frustration of bending ALL the curves. That only left the special, blended curves for which flex track is a god-send. I couldn't be happier with the results doing so. I would highly recommend it. You know, the K.I.S.S. principal?????
That said, were he yet alive, my Uncle Bruno....butcher and purveyor of meat in Wisconsin when I was a kid...would've been the perfect diameter for a lot of my 'wide' radius curves. But, since he was about 1,000 miles from home at that time, it would've been rather inconvenient.![]()
Gargraves and Ross....two iconic, superlative AMERICAN manufacturers that have made this an enjoyable hobby!!
IMHO, of course.
KD![]()
Doctor,
I think you should purchase all ready formed curve track from Ross.
I find GG easy to use. After building a few large N scale layouts with flex GG is easy. I do have a plywood template for O-72, if I need larger I use the 72 and un-bend some.
paul 2 posted:I actually bent that using my stomach but doing it very slowly to prevent kinking............Paul
I bent as I laid the track...I used my stomach on these
Me too. It's the best way I know of...
Get the shape you want and then square the ends with a chop saw. Easy peasy......
Long time no see, Johnshorse. Contrary to your statement my recollection of your posts back in history are that you are not very handy. So maybe you should use the pre-bent stuff.
My whole layout is Gargraves Flex Track. Best there is. I wrote a primer on how to lay it. The best method is to bend and screw it down as you go, preferably on cork roadbed. And, always straighten the ties as you go.
Dennis


I bend gargraves tinplate using two methods, the first is the same method the AMCDAVE mentioned, using a scroll jig saw I cut radiused( 38in., 36in., 34in., 32in., & 30in.) templates from 1/2 inch plywood sheet, as Dave mentioned lets say you want a 39in. radius bend the track around the 38in. template, bend the track around this template then release for a 39 in. radius. Initially I used this method even with Midwest cork roadbed.
I had an idea to try, the gargraves track and the Midwest cork roadbed centerlines are identical, regardless if a straight or radiused sections, following this logic I set the curve using the roadbed. For example, you have a straight track connected to a radiused track, secure the straight tracks through the roadbed to the plywood deck using screws, I use the gargraves phillips head black screws 3/4 inch long, 5 per full length track section. I typically set the screws the 2nd tie from reach end, then the 14 tie inboard(facing the track center) then the center tie, screws staggered left to right.
The same method for the radiused track, connect the track to be radiused to the straight track, using your hands start bending this track to match the roadbed centerline. Observe while bending that the three track pins are connected to the straight track, if the outboard rail pin is not connect, use a pine wood block lightly tap with a hammer the opposite rail end to make the pin connection, once a three pins are connected and a sectional length of the radius track is coincidental with the roadbed center drill a 1/8 inch hole through the second tie, roadbed and plywood deck from the end and install screw.
Now return to bending the track, if you have alignment lets say at the 16 or 17 tie from this end drill the tis on the opposite side from the first screw location. For a full length track apply this procedures three additional times and stagger the screws. Note as the track is radiused the ties move, maintain the gap between the ties before drilling and screwing down the ties, may times you will have to remove some ties from the radiused track based on the radius. After the track is screwed down, lightly tap the three free rail ends for a butt joint connection of the opposite rail ends with the straight rail track segment. While this radiused track is still screwed down, the three fre rail ends must be marked for a square straight cut. I use a magic marker to mark the three rails for the cutting line, Remove the track screws, gently remove this radiused track, clamp the track to a tabletop and cut the track, I highly recommend a Dremel tool or substitute with cutoff wheel, a well lite work area and a steady hand for making this cut. Once the track is cut, check it for correct fit with the radiused roadbed. If you are going to paint the track or solder track feeders now is the time to do it before screwing down in assembly. This sounds as a difficult procedure but once its done a couple of time its easy but requires time.
You may think your not too handy at laying track but you should give it a try using the manufacturers guidelines I bet you'd be surprised at what you can accomplish with a little time and patience.
Here's Gargraves video.
Our current club layout is the second that I've used Gargraves Flex track. We have a combination of new, old and used track. The recommendation to use new track makes it easier to work the track.
I made a trammel ( big compass) to mark the track centerlines on the layout and 1/2 plywood forms for the various diameters (072 to 105). The curve of the form is made so the radius of the track is to the center of the track. On the trammel, the rail center is the "zero" point and locate 1 1/16 inch on either side of the "zero" for the tie location (and drilled so a pencil can be inserted in these holes) and the various radii are marked (and drilled for a wallboard screw) along the length. Mark the center location and location of the tie ends on the layout (I didn't use cork roadbed and laid the track directly on the surface).

The radius of the form is made to the inside curve of the track and is 1 1/16 less than the radius to the center of the track (ties are 2 1/8 long). For an 072 curve the radius of the form is 36 inches less 1 1/16 inches for a form radius of 34 15/16 inches. When cutting the form, try to cut the plywood close to desired radius but being a "little" off won't hurt. Make sure that the arc length (the length of the plywood form that the track lays against) is at least 6 inches longer than a section of track.
Screw the track radius form down aligning with the inside tie position. Leave 6 or so ties free at the end of the track. You can prebend the track with a smaller radius if desired, though it may not be necessary.

Trim the ends of the track even (use a Dremel with a large diameter cut-off wheel - Dreme makes them and can also be bought at Harbor Freight). Prebend the next piece of track and trim the mating ends so they will match the installed piece (inner rail is shorter, middle rail is slightly longer than the outer rail. When the rails of both pieces are put together, install a small "lever" block and push inward to remove the "spring back". Install screws along the track and then tap the free end of the newly installed rail with a piece of wood to bring the rails of the two sections of track together (a piece of hard wood is best since the rail won't imbed itself in the wood). Then put 4 to 6 screws to fasten the joint.


Plan your track installation so the outer track is installed first for a multi-track mainline.
This is one way to install Gargraves Flex track. There are many good suggestions in this thread.
Here's a pic of OCSMR's O-gauge track plan.

You can follow the progress of our layout at:
https://ogrforum.ogaugerr.com/...-to-our-new-location


Dr John do it the way Dennis said.![]() This is the same method I use and have never experienced any difficulties. One thing I do first is to spray each length with WD-40. This makes it much easier to reposition the ties as you go.
This is the same method I use and have never experienced any difficulties. One thing I do first is to spray each length with WD-40. This makes it much easier to reposition the ties as you go.![]()
Go slow. If you rush at it, you're doomed. Moving ties eats time, but it is the key. You may loose a few ties to cracks, use more care at those gaps to avoid kinks the ties help avoid, and insert them later with the slot tops cut to a clean square and sharpie/stain on fresh wood. Belly bending can be hard on the belly, jigs are easier imo and you needn't make one for each size, usually just the tightes turn. The learning curve isn't that hard. I did it pre-teen, except for the tightest where I didn't have the gusto yet (<60") We trashed 6 sections out of about 250'+ of curve the first time. Maybe three some years later....'cause we rushed.
Flex is smooth and quiet. A different sound, without all the click-clack of traditional sectional.
Yes, one of the keys to using Gargraves, as Wild Mary suggested, is to spray it first with WD-40. I stand several sections against my basement wall with cardboard under and behind it and give it a good soaking. Let it stand for a day before you use it. Gargraves comes dirty from the factory and WD-40 is also a good cleaner. Wipe it down with an old cotton tee shirt, and it will be good to use.
Dennis
Good Afternoon Doctor,
Have you made any progress with your layout? I still believe Ross track is the way for you to go. Already bent.
"I still believe Ross track is the way for you to go. Already bent."
Taking nothing away from the excellent Ross products, Gargraves also sells preformed sectional curved track in lots of choices for radii.
I made the Ross/Gargraves choice for my own layout. I worked from an RRTrack plan, using preformed curves wherever possible. I decided to use Ross switches exclusively and Gargraves straight, flex, and curves for an aesthetic reason.
Since Gargraves has the flex track, which is indispensable for custom gradients, transitions, curves, as well as for straight/tangent track, I considered that it does not have 'spikes' showing, as do Ross products. So, when incorporating preformed curves, I thought it would provide a more consistent track appearance to have spike-less curves, too.....IOW, Gargraves. So that was my choice.
And because Ross' switch products do have spikes showing throughout, it tends to 'celebrate' (as Norm Abrams would say!) their fine products. After all, prototype track switches/turnouts have more complicated features showing to provide rail support.....so why not use this Ross design feature in a similar manner?? And, believe me, my 280 double cross-over with the long switches having a plethora of spikes showing REALLY stands out in a positive way!![]() ...as do the ladder of switches leading into the yard areas, and the several siding turnouts.
...as do the ladder of switches leading into the yard areas, and the several siding turnouts.
But, it's really a TEHO issue. Both fine products. Both having exceptional merit. Both American made!!![]() Both having ready availability at all times/seasons. Both competitively priced. Both using quality materials. Both run by dedicated-to-the-hobby owners. Both sponsors of the forum. Both demonstrating a best-for-the hobby-and-America symbiotic business relationship. Etc., etc., etc..
Both having ready availability at all times/seasons. Both competitively priced. Both using quality materials. Both run by dedicated-to-the-hobby owners. Both sponsors of the forum. Both demonstrating a best-for-the hobby-and-America symbiotic business relationship. Etc., etc., etc..
BTW, I'm so sorry for you HO folks!........Neither of these giants has anything to offer you!![]()
![]()
Lucas Gudinov
Lots of good information here already. I can only add this:
When bending track, do not pay attention to what you are doing. Pay attention to what the track is doing.
It so often happens when we follow instructions. We go through the steps carefully, paying attention to each one. And the result is bad, because we paid all the attention to our process and little or none to what was happening to the piece under our hands. Pay attention to the track, so you can see when you need to make a fine adjustment or tweak, and you'll get a good result in the end.
I have had good luck bending Gargraves by putting one end of the straight, flexible track into a vise with a block of wood over each jaw. The purpose of the wood is to keep the vise from crushing the head of the rail from the pressure. Then I bend the whole section into the rough, desired shape and work it until you have the exact shape you need. Sometimes a light spray of WD-40 type lube can help let the ties adjust to their new locations. Be sure that you allow a length of the track to shape to a gradual transition from curve to straight or vice versa. this "transition" entrance to a curve is really the reason for using flex track rather than the sudden change from curve to straight of sectional track. And it's prototypically correct.
Back to the bending in the vise, technique: When you handle the track this way, only one end of the track section becomes uneven and you only have to saw or grind that end off. You actually save on track and end up with a better "joint" in the track that doesn't require much finishing .
One last thing: Don't ever "screw" your track down to the roadbed. The screws remain visible and destroy any attempt at realism. I use black, 1 inch paneling nails which become nearly invisible, hold the track in place as much as necessary, are easy to remove for change in the track pattern and only require a tiny hole as a guide for the nails. These nails transmit less noise than do screws because they just penetrate the tie, the cork roadbed and the 1/2" Homosote. Very quiet operation.
Paul Fischer
Access to this requires an OGR Forum Supporting Membership


