


That's a cool story, thank you for sharing! I have a soft spot in my heart for industrial designers. I went to Michigan State specifically to be an industrial designer. They had a program that "featured" automotive design. I was accepted at 3 other art schools, but MSU was my choice for that reason. As it works out, I was a jerk, (immature) and missed a pre-registration notice, skipped a pre-requisite and ended up getting into a tiff with the professor. Next thing I knew, I was out of the major and floundering around my first term of my JUNIOR year. It was a difficult time in my life. Ended up switching to industrial arts education. Became a shop teacher, then industrial trainer, then training manager and so on. Made lemonade. But I still really love good design and good industrial design.
Just to close the loop:
In addition to amazing bentwood office furniture, the Eames's are also known for a series of incredible short films. One of them is a 1957 short entitled "Toccata for Toy Trains". It is hypnotizing. You can watch it on YouTube:
I will seek it out.
I got all the wiring complete to the new track section.
For track power I screwed in a 2-position screw type barrier strip under the place where the new track sections pigtail will lie (I drilled a hole through the subroadbed at that spot) and tied a heavy 2 conductor line back to the last jumper spot on the (then) stub track. The track's pigtail was already soldered onto the piece of scrap O-88 curve that I used for the last little bit to complete the curve. This new section will be an extension of the block so I won't need another toggle switch.
For the new switch my long, spliced three-conductor cable was actually a bit too long and I hacked off about 2'. I then attached a 3-conductor junction block under the hole drilled to carry the new switch's Z-1000 switch motor wires. These are Euro-style connectors and I use compression ferrules on the wire ends. They're a neat way to terminate wires with good reliability. I have a professional crimper for these. It wasn't cheap, but I've probably completed 1,000 terminations with it. You can get all this from Ferrules Direct.com
I also have another tool that's terrific for under-platform wiring. It's an Arrow model T2025 staple gun with the semi-circular anvil and drives a curved-top staple that is perfect for clinching wires.
After running all the leads I tried the switch and it worked. The first pic is the new switch controller powered up. It's the AA switch. I'll have to put on a prettier graphic to match it to the rest of the panel. That's the trouble with clear panels with the graphics on the back. Very hard to modify. The second is the new switch with the LED indicating the divergent path. The switch is not fastened down, not painted and was removed for painting after the test was completed.


My older Z-1000 Ross switch machines didn't have the pigtails pre-fastened to the little internal circuit boards. They had set screws that pressed the wires down onto a solder pad on the circuit board. Getting the wire to seat just right was a challenge and they did let go periodically. Now the three wires are soldered to this board and are long enough to splice into the system wire. I run all field connections to junction blocks so pieces can be removed, fixed, etc., without cutting wires. The field wire has the 14 VAC feed and the panel switch has the ground. I have all of this occurring in the control panel. The ground line goes to a ground bus, and the 14 V (red) lead ties into a 14 VAC bus on the panel contact plane. I then run the 3-conductor leads to each switch in the field. The red wire splices to the red wire from the switch machine.
Attachments
Images (2)


I woke up thinking about support all the cardboard strips on the mountain's large surface area. I realized that in addition to the vertical profile line, I needed to establish the horizontal profile. So I thought of using horizontal sheets of cardboard supported at various places and at various levels. Before getting into it, I decided to finish up the track by painting the edges rail brown. This time, and especially since I'm painting the track at the workbench and not when its all glued down, I used some Tamiya grey primer as a first coat and then the Joe's Paint rail brown. It gave me much better coverage and very even coloration. I masked the track pins and the switch machine, but let the spray go where it will for the rest.

After painting and when it was mostly dry, I go over the rail heads with an alcohol dampened rag to remove all paint. After using the dampened part, I got back with a dry rag wrapped around a finger to remove the remaining film. The rust on the ties looks normal, and the little that gets on the center rail looks okay too. I know I posted this a long time ago, but there is an extant example of real track with a center rail. Some of the U.K.'s regional rail has track with a black (and hot) center rail. Rail looks really good painted.

Here's that 3rd rail. I took this out of a train window in London when there in 2000. I really couldn't believe what I was seeing. It made having three rails much less troublesome. My arrow is pointing at the wrong rail. Notice it's held off the cross-ties with insulators.

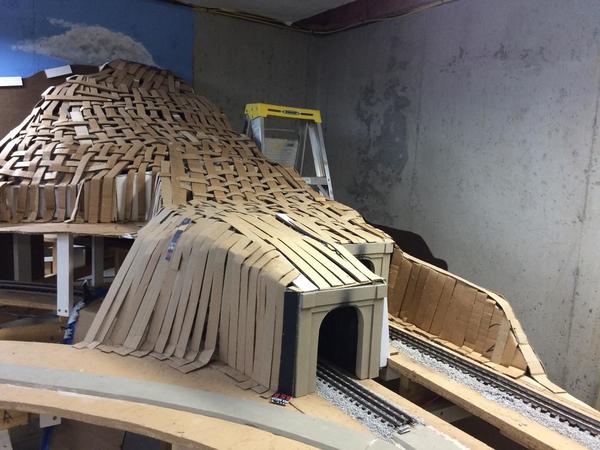
Now onto the mountain. I'm putting the cardboard that wrapped the Eames Chair to good use. I've been collecting cardboard for a while just for the mountain and right end terrain work. I started on the right side and made some standoffs to support the contour sheet.

And here's the piece laying across. I will use a staple gun to fasten the cardboard to the standoffs. As I was doing this I realized that I didn't need all that depth. I only need cardboard at the contour face and enough behind it to provide some stiffness. I had originally cut a gigantic wedge to go all the way into the corner. I hacked off that back part, but needed to leave what's there to tie into those uprights. On the left side I will be more judicious in my positioning of the supports and use less cardboard.

One layer is not enough so I'll put a second and third layer. These will be supported by styrofoam blocks instead of lumber to reduce complexity and keep the whole thing lighter. I just has to support some hardshell plaster work and maybe some rock castings. On Monday I'll add more cardboard hopefully reaching the point when I can start weaving in the strips and then plaster. I've also been holding onto some styrofoam for a long time just for this eventuality.
Attachments
Images (5)


Back to Eames for a second. It stands to reason that a person that can design one of the coolest chairs ever, would also love toy trains. I wish I had met him. In fact, I'm sitting in that chair right now as I'm writing today's report.
After another long hiatus which included a road trip over the 4th, and then a week to decompress and spend more time playing guitar, I got into the shop and made some progress on mountain building.
Just one more digression. I have two very nice guitars and am finally getting some skills back after the finger surgery, and I just discovered something totally cool. My MacBook Pro came with Garage Band included. It's a program that lets you record music in very complex and complete ways. I tried doing some guitar work using the computer's built-in mic, but it was terrible so bought a digital converter to take the guitar signal directly into Garage Band. That opens up infinite possibilities since there at least 40 amps simulated in Garage Band with almost any effect imaginable. But that's not the cool part.
After messing around trying to record some original music, I found out that if I played a tune on iTunes, I could simultaneously play my guitar through Garage Band. Both sounds are excellent. This enabled me to directly play with a selected song and even match the exact tone of the guitars in the recording. It's amazing. I've actually started learning things from the 1970s. How bold can you get?
Now, back to the mountain.
Instead of continuing to use lumber to support successive tiers of cardboard formers, I chose some styrofoam packing blocks that I've been saving for this project. They don't weigh much, won't have to support much and I was able to cut them to shape using my MicroMark heavy duty hot knife.


Here's the cutter. I had to increase the heat setting so it would get through the thick stuff. It creates a little styrene smoke which is not so good on the eyes (experience talking). It cut fast and pretty straight and leaves no copious amounts to those annoying beads.

I used Loctite Foam Panel Adhesive to hold the blocks in place. I'm using a hot glue gun to hold all the cardboard to cardboard joints. Thank goodness for hot glue. It makes a difficult and messy job pretty easy and quick. I added a couple of wood standoff to better support the back edges of the cardboard which was pretty floppy. Once all the basket weaved strips are in place, that floppiness probably won't matter too much.
I only did the formers on the right side and then wanted to start putting in some cardboard strips. I did this for two reasons: I wanted to get an idea of how it would go, and the formers needed some stabilization on the right side before I started adding them on the left. I wanted the woven strips to provide this stability and I believe it will work.

I'm bending a tab on the strip's bottom that hooks under the horizontal former and gives me a place to put the hot glue. Even with this small amount done, it's already getting much more stable.
 s
s
To expedite cutting a gazillion strips you really need to have one of these.

I got this for free when a publishing office was breaking up shop in town. It's not particularly sharp, but it's okay for my purposes of cutting strips and occasional paper cutting. Next session I'll keep cutting and adding strips. I only have three long sticks of hot melt adhesive so I'll be heading to Lowe's to get some more.
Attachments
Images (7)


Hot glue. The model scenery builder's equivalent of baling wire ![]()
Just what did we do before they invented that stuff? I know what I did. I made a mountain on my first layout in 1957 out of chicken wire and paper mache. It stunk up the basement for a week while it dried. It's so much better now.
I never liked hot glue much. I might have plugged them all in(4 counting the cordless), maybe a dozen times total in twenty years ![]()
Since I started my layout scenery, I've used nearly a pound of sticks on it ![]() . I bought two boxes on clearance sale for a buck each back in the early 1980's.
. I bought two boxes on clearance sale for a buck each back in the early 1980's.![]()
You know I had a Blonde recliner die on me a while back when a side frame split. It must have taken a jig to hold it and then glue it properly at the few areas with glue, an "all at once" assembly with no chance at getting right without total disassembly of some glued parts, and that just resulted in more splinters, and a broken handle on my favorite rubber mallet when I broke an arm and the handle with a simple miss![]()
![]() Into the giant garbage can it all went
Into the giant garbage can it all went ![]() .
.
Still it was 60 years before those leg angles took their toll on the grain, and the original owner, my other Grandfather was a very big man, like 6'8"-6/9", 260-280. It died under a relaxing 220lb "Vernor's Knome".![]()
My pal looks like a tall Vernor's mascot ![]()
I've used window screen, and everything in the basement closet![]() . Woodfilller , spackle, plaster, and even paper mache with wallpaper paste.Weighs a ton
. Woodfilller , spackle, plaster, and even paper mache with wallpaper paste.Weighs a ton![]()
I molded a brick wall on hardboard using latex woodfiller and a "food grade" brick mold before too. About 5 years old now with no issues.
Exercise day and wanted to hear the Presidents speak at the memorial service in Dallas so I didn't get downstairs until 3:30. That being said, it wasn't a wasted day. Cut and glued in some more cardboard strips as I was working down the right side. I also needed to build some support on the existing platform to support my weight as I need to access other parts of the mountain. It is surprising how the woven structure begins to firm up sufficiently to support all the plastered towels which will follow. That little cardboard wall in the foreground is just another form of support for the strips. I'm going to add some more of these as I move across that broad, shallow area at the lower levels.

The towels will not hide the cardboard weave pattern. They will just build the overall shell. It will be up to Sculptamold and rock casting to finish out the topography in a more realistic manner. I may have to use paint brushes taped to a pole to paint this beast once all the plastering is done.
In the next pic, you can see a piece of OSB that just fit nicely between the mid-wall former and the two new 1 X 2" vertical supports I added today to give more support to the overhanging (and floppy) horizontal cardboard former. With this piece of OSB I will be able to kneel or sit on that portion of the layout without worrying about anything. I will also use this support of the left side when I start working on that.

Sitting under the OSB is a piece of cardboard to protect the existing track that it's all sitting on. I find that if you spread the load, Ross track can take some loading without damage. Tomorrow will be a longer work session and I will hope to get the right side stripped and start on the left. Depending mostly on cardboard, I don't think I'm over-engineering this.
Attachments
Images (2)
Hi Trainman, Good work, as always. I just wanted to give a plug to www.bragdonent.com for their rock molds. They were a bit expensive and I used 3 different molds to mix it up.
I have also seen videos from Lex Parker where he would make his own molds... Something you would do.
Thanks! I've looked seriously at Bragdon for the reasons you've given. At the moment I'm holding off spending too much on the rocks since I'm also working with Terry Christopher of Custom Signals to design the signaling system for this large pike. It's going to cost a ton of money depending on how complex and complete I end up going. I don't want the mountain to sap too much of that.
I've actually put out a feeler to Lex Parker to rent molds that he's not currently using. I have not received any response to this request. This mountain will be the last big rock job that the railroad will need so the cost of buying molds just doesn't make that much sense to me. I would love to just rent them (or borrow them...hint, hint). As to making them. If you've read what Lex went through to make his molds, you'd realize that most of us aren't in the geographical location to do that nor can spend the time doing it. I did make some latex molds for my curb cuts and it took a week to do it.
I got a lot done today! The right side is only hours away from having all its cardboard base completed. I made some more standoffs to support the strips over the longer runs using both styrofoam blocks and cardboard creations. They don't need much strength and they get stronger when a ton of strips are hot glued to them. For the cardboard standoffs I made a shallow cut with the utility knife to facilitate bending and then added some square reinforcements in back to hold them together. Hot glue used everywhere.

Here's the whole raft of them glued in position. I gauged their height based on the height of the fascia boards.

With them in place I started adding strips. This time I found a way where I could sit on my "seat" with my legs hanging down into the layout and was able to work pretty comfortably only bending 90 degrees at the waist. I did all I could from that position and then moved to the ladder on the right side to do the rest. It's not strong enough to sit on, but it's sure strong enough to hold up plaster soaked paper towels.

Boy! That's a ton of cardboard and I'm not even half done. That being said, the under support would have to be much more robust if I was going to use screen or chicken wire. The cardboard exerts very little stress on the supports. I will grant that using wire would be faster. This process takes a lot of time.
One reminder: I wear leather gloves when working with hot glue and don't get burned. Period!
You'll notice that there's a blank spot in the middle. That's intentional. I mocked up the "Frenda Mine" that I'm going to create for the mountain side and set the height and depth of this ledge to fit this future model. It was much easier to build this in, than to do a drastic cut after the whole deal's done.

Amazingly, the tipple falls right at the track location. That's totally luck since I didn't really measure that when I laid down the roadbed. The mine shaft will go straight back to the mountain and there's space for that.
I shaped the cardboard around the far right portal. The wall will be created as rock cut using Sculptamold as I did with the ravines. I also added cardboard on the extreme edge which will blend the mountain into the fascia board.


I stepped away to look at the construction and realized that I would have to do the plastering of the upper and middle reaches before finishing the cardboard work at the lowest level, IF I still want to have the luxury of using my "seat" to comfortably reach those areas. If I were to cardboard all the way to the bottom, I'd have a heck of time working on those slopes. I need on of those MicroMark ladder thingies with the platform you can lay on over the layout. But I don't have one of those. If I was going to spend that kind of money, I'd buy a spray booth. I will plaster down to within a couple of inches to the lowest cardboard edge and then without needing a ladder finish the lowest level cardboard and plastering. These thoughts had not entered my mind until I was able to really see the size and scope of what's being created.
I also need to pay attention to when to install tunnel lining behind the portals. I probably should have put them in before covering them over with any cardboard.
Attachments
Images (6)


Thanks for all of you work posting this up, Myles.
It's a very interesting read. ![]()
Cheers
Thanks Max! It also fun to build all this stuff.
While I exercised today, I got to it early enough to actually get some quality shop time. Or... that was the plan. I needed to go to THD to replenish my hot melt glue supply and buy some more strip lumber. Again, my Acura's battery was dead. It was dead when we got back from the July 4th trip and I had to jump it from the Buick. It had a Die Hard battery that was just 3 years old. I took it to Sears and they found nothing wrong. So... I bought a trickle charger to keep it charged when we're on long trips. That was the solution until today when it was totally dead again. Again I jumped it with the Buick and took it back to Sears. This time they found the dead cell and I got $87 off due to the pro-rated warranty. While waiting for the car to be serviced I bought the aforementioned hot melt refills AND a new shop vac. My daughter borrowed mine several days ago and I wasn't very happy with it. It had a smaller than usual hose diameter which plugged easily and it was noisy. Each generation of shop vac I've had is quieter than the previous. I actually turned this model on at Sears to hear it. It's not bad, although my wife contends it's still very loud. It's a 6 hp model and had a 2.5" hose which is standard.
So... when I finally got downstairs it was almost 4 p.m. and didn't do a heck of lot. I did try out the new vac on the sawdust around my chop saw. It really sucks... literally!
So all I did get done was this little bit of transition near the coal mine area. The standoff directly in front of the hot glue gun was also added to support that long run.

I really need to do the tunnel liners before I go any further or I won't be able to get to them. I don't want to make a big deal project out of it. I just want it to be black so you can't see the structure when you casually glance into the openings. From the control panel, the tunnels are far away and you really can't see into them. I though about carving them out of styrofoam, but then I'm thinking about just using cardboard. I know that folks have used crinkled aluminum foil and there are casting molds (in HO of course) to cast realistic tunnel liners. Some folks use outdoor corrugated rubber drain pipe cut in half, but I don't think I can find it with enough height to accommodate my enlarged portal openings without be simply huge. So ... any thoughts?
Attachments
Images (1)

The mountain is shaping up nicely. For tunnel liners, I used scraps of blue Styrofoam and temporarily put strips of black duct tape I had for another project. It's too shiny that is for sure, but better than open spaces. For a permanent solution, I have thought of the crinkled foil, also, I have thought of putting in a carved plaster wall near the portals to represent the same stone the portals would be made of. Kind of Pennsy style cut stone look.
I am of the crinkled aluminum persuasion. You really only need it where your sight-lines require it, which more often than not means only one side of the track. I have always found that it gets plenty dark inside the tunnel without getting compulsive.


Attachments
Images (4)


Thanks for the input. I went with the crumpled aluminum foil. I woke up this morning thinking about building them out of plaster, styrofoam planks glued together and carved, and finally the foil. All the other methods just seemed to elaborate for a component that supports no load, is practically invisible and only has to look dark.
As usual, I tend to over-design and over-build, but the whole project just took an afternoon. I used Reynold's Heavy Duty foil folded over a couple of times and then built some cardboard framing. This added enough stiffness to make the whole deal work.
I first just folded and then crumpled the foil to see how it would work in the tunnels. I made no attempt to put a ceiling on the liner since it would be invisible to anyone other than someone driving the train.

When the size looked right, I started to add the cardboard framing. I traced some of the Ross curves I'm using and cut the cardboard inside and outside curved reinforcements. These were hot glued to the foil. I used three longitudinal pieces and some cross pieces to form the frame.

On the outside curve, I had to trim some of the frame to clear the wing wall that will be in place on the outer tunnel.

For the two tunnels on the right side I made liners for both sides since a view can walk over to that area and see the other wall. However, on the left side tunnels there's no way to view the near side wall so I didn't need to make liners for them.

After they were all framed and shaped properly, I took them outside and primed them with Krylon Gray. It was hot out and the paint dried very fast, so I was able to bring it inside and air brush Tamiya Nato Black (like a weathered black) for the final color. This too dried quickly so I was able to get them installed on the layout again using hot glue. The results met my expectations and got the job done swiftly so I can get back to cardboard strips. The crinkled foil certainly looks rock-like.


I didn't install the tunnel liner on the lower left portal. In fact, I unscrewed that portal and set it aside. When I laid my work plank across the track to reach that back portal, it became very clear that access to that part of the mountain to do stripping, plastering, painting and landscape will be challenging at best and very difficult at the worst, and I'll be able to reach more to the back without that portal installed...yet. So... I'm going to stage the mountain building even more than on the right side.
That being said, I stared at the left side and realized that because all those little white blocks are facing in the right direction, I can use a different method of framing up for the stripping. Here's my attempt to draw what I'm describing. What you don't see are the stiffing ribs vertically glued under the cross pieces. I think I can stiffen cardboard sufficiently so I don't have to use hard board. Cardboard is so easy to work with being cut with a utility knife versus a very noisy saber saw. The only hitch is each piece needs to curve outward with a mountain-like contour. When I first drew this I had them as straight planks and realized I wasn't making a mountain... I was making a pyramid! This idea still may not work. I try it out and see. Otherwise I have to go back to adding vertical wooden supports to hold up the contoured cardboard layers.

Tomorrow's Saturday so no more work. Monday I have a checkup (routine) and probably won't get anything done till Tuesday. Y'all have a nice weekend.
Attachments
Images (8)


Yes I think it looks great! Simple but very effective.
Very smart idea for the walls... I wish I thought of that. I did molds and Hydrocal.
" I made no attempt to put a ceiling on the liner since it would be invisible to anyone other than someone driving the train."
Consider a ceiling if you intend to do videos.
There will be videos, but there still won't be a ceiling. Once you're past the first 10" or so they'll be no walls or liners of any kind so those first few inches don't bother me. I can't take credit for using foil, but I think my method of reinforcement using the cheapest material there is—cardboard from all the stuff we get delivered—is rather novel.
I'm still building this mountain in my mind to see how I'm going to manage getting all the levels of cardboard framing in place, and, more importantly, how the heck am I going to get the plastered soaked towels to all those levels. I can't reach the far reaches from the platform's edge without actually being on the layout and that means I have to do it in stages, including the framing and the plastering. This will me some obvious joints between fresh plastered towels and those that have set up while I'm putting in more cardboard strips. I'll make it work.
Perfectly timed article. I am just at the stage of building a tunnel and realized I needed a liner. Your approach works for me.
Al
I know exactly what you are going through, I had a way different design in my head before my mountain was done. My problem was to drop the track one foot at a 4% grade. That is about 25 feet of track on a small table with a 48 inch curve..
I also had a much longer tunnel to start with, then my wife said "who is going to see the train in a tunnel?" A good point so I made it way shorter... Maybe you need to talk to your wife? :-)
Attachments
Images (1)

Oh... my wife says that about the entire railroad. "What did you have to make it so big for?" I tell her, "Size does matter in diamonds and other things, especially model railroads." And if I complain about the amount of work she says, "It's your hobby... stop complaining!" She's actually pretty good at cutting through the BS and telling it like it is. That's why I married her 48 years ago.
I've held all the grades on the RR to less than 3%. Even with that, I've got problems with tender couplers on two of my 3rd Rail big Pennsy engines uncoupling with the passenger train in tow as it crests the grade. My MTH diesels have no such problem and I frankly haven't worked on a solution yet. My grades are truly shallow and the couplers should work.
Trainman2001 posted:I've held all the grades on the RR to less than 3%. Even with that, I've got problems with tender couplers on two of my 3rd Rail big Pennsy engines uncoupling with the passenger train in tow as it crests the grade. My MTH diesels have no such problem and I frankly haven't worked on a solution yet. My grades are truly shallow and the couplers should work.
The problem you are describing isn't due to the grade per se, but rather the transition between grades. The transition has to be gradual or it will cause constant headaches.
Could be. I did make sure that the grade's apex was not at a rail joiner. I also pre-bent the best I could the Ross track so the transition from grade to flat was a smooth curve. I also think there's something wrong with the coupler mounting. Right now the engine's sitting on the shelf. After this monster mountain building project is finished maybe I'll spend some time getting to a solution.
Got back in the shop today. I spent yesterday at Scale Reproductions buying the Revell 1:48 B-17 kit for my protege. I also purchased a Verlinden Photo etch and resin upgrade kit, AND an Eduard highly detailed radial engine and cowl set which is resin and photo etch. I'll build this model while plaster is drying on the mountain project. Having more projects than time is my idea of heaven.
So today I finished putting cardboard strips on the right portal area. So the right side of the mountain is as complete as I can get it before plastering. As I noted before, I have to be able to put my work platform in place to reach the flanks. Once that's plastered, I strip and plaster the remaining portion at the bottom.


I started to do the left side working on the top first. I found out that I can reach over pretty far from the ladder to frame and strip the summit. For the rest of the slope I can reach it from my work platform. The platform was cantilevering too far out into the layout and was getting unstable, so I fastened a temporary leg below the extremis and it keeps it nice and steady. The more I'm working on this, the larger this mountain seems to be. It didn't seem so humongous when I drew it into my RR Track initial plan, but it really is a beast.
As I note on my last post, I am running the cardboard "Beams" across from on attachment block to its opposing one. To make the beams, again I turned to double layer box cardboard (this one from the new shopvac) and then gluing reinforcing ribs underneath to stiffen them so they'll support the strips and plaster.

Working from the ladder I hot glued the top three cross braces. I needed to do some light clamping to keep stuff in place until the hot glued set.

It's going to look very much like my Illustrator sketch.

I was able to strip the top two braces. It's an odd angle working from the ladder and after a short while my back started to kink up and I called it a day. I suspect this sides' framing down to where I need to hold off before plastering should be done in less than a week.

I took this shop from the other end of the layout which shows the mountain's depth. From this view, I probably should bite the bullet and paint sky and clouds on that bare concrete end wall. Not right now though... You'll notice that one tunnel portal is removed and sitting on the opposite platform. I need it out to the way for the work platform. Once those uppers areas are complete, I'll reinstall the portal and finish up the bottom.

Attachments
Images (7)


I am really jealous. The point you are at is my absolute favorite phase of layout-building. Once you start plastering, the whole layout magically transforms from work-area to terrain. I also love the scale you are working at.
I hope you don't mind if I kibitz just a little:
In this part of the scene
I don't think you are going to like the final result. I think it will look like the jutting arm of the terrain was built to justify the portal rather than the reverse. No real tunnel would be built that way. If it were me, I would build out the steep contour in the foreground a bit and turn it into a cut right up against the foreground track. Just my $.02
You're right. It looked that way to me too. It's just cardboard and I can change it quickly. I sort of got myself in a conceptual trap when I ran the strips to the portal's top. I will extend that portion out and do a cut just like I did on the other side of the railroad. Much better to find these things when it's just a bunch of paper products and not a plaster wall.
So based on Pete's input, I ripped out that wall next to the front right portal and redid it to make that portion a "rock cut". It required extending the cardboard support plate and then applying the strips to fill it all in. Before attempting to reconfigure this area, took an engine with a huge overhang, my 3rd Rail Pennsy S-1 and drew a clearance line around it. That's the "no-pass" line for the subsequent terrain. Speaking of terrain, has anyone see the new W-S foil terrain base. It's very clever and if my mountain weren't so freaking big I would like to try it. It's a very heavy duty foil backed by some form of fabric. You bend the foil any way you want to form a landform and then apply plaster cloth to the fiber backing to form the hard shell. The aluminum replaces all this cardboard. The downside: for 18" X 72" cost about $20. For a small HO mountain that wouldn't be so bad. For a massive O'scale affair, I would need 6 rolls of the stuff. So over $100 just to get the landform... no plaster, no paint, no ground cover, no trees. For small jobs it would be terrific.

Here's the piece of heavy board support by triangular cardboard deals that are packing directly from a shipping box that held my shopvac and cut to length. Everything as usual is hot glued. I'm using a ton of hot glue, I hope the fumes aren't too toxic. I find that the double layer board like this that held an LG flat screen TV, is good for structural stuff but less agile when doing the stripping.

Stripping was straight forward. I put in an intermediate strip behind to add some stability. I used some clamps for a minute or so until the hot glue melts.
Here's the completed "rock cut". The unfinished open area behind this is where my scaffold plant will go when plastering the middle reaches and will need a different contour because of the coal mine.

Back again to the left side. I finished stripping the top most portions that I could reach from the ladder, and then added two more tiers of cardboard framing. The bottom most has a vertical drop component since the block on the right is lower than that on the left. I just didn't want the cardboard plank to be a flat (boring) slope. This meant making a more complex cardboard assembly and lots of hot glue.


Here are those two in position. Next session I'll strip this and move on down the mountain. With the scaffold plank I can sit with my with my legs hanging down into the openings in the open grid layout framing and comfortably strip this part of the mountain. I'll have to do just a little bit sitting on my knees (UGH!) to reach the upper level. Plastering all this isn't going to be easy. I also used some staples on the ends on the blocks since I didn't trust hot glue alone to do the job. These are stressed joints and would be a disaster if they let go. I may also add a vertical support to the center if it ends up drooping too much.

With all the reinforcement ribbing, those cardboard planks are pretty stiff and will hold the plaster up until it sets. I wouldn't want to stand on it. And the price of this pile is $0.00 plus the price of the hot glue (Sears 20 sticks for $7.95)
Attachments
Images (7)


You can add strips to two rows if you're only working on the project for an hour. I had to paint our great room's walls with four different shades of light browns to pick the one that's going to be used before we replace the carpeting that we've just bought. And then the HVAC guy came to replace the condenser fan which had developed an imbalance. So I finally got downstairs at 4:00.
For the left side I'm simplifying the stripping since the cross pieces are wide enough to provide a lot of support without having to weave too many horizontal strips. I will probably be able to get one more row down before I have to start plastering. I will also strip the area by the back portal since I don't need to put my scaffold platform inside that area.

The little bit of weaving was just to add some rigidity in an area with a larger span.

Next session I will finish up all I can before starting to plaster the upper reaches. I still have to mask all the track underneath and get drop clothes on the floor since my last plaster job made the floor a holy mess since I was using newspapers and they tended to get out of position. I also have to devise a clever way of supporting the plaster tray and toweling so I can do it while standing on a ladder or sitting with my feet hanging inside the layout.
As I look at this colossus, it reinforces my concept of using those large Masonite profile boards as a starting point. They keep me on track as to where the general slopes go so as I stare at this sea of cardboard strips it's really easy to fall into a "forrests and trees" scenario. I generally like the contours that it's following and the plaster and sculptamold will make it more realistic.
Attachments
Images (2)


Believe or not, that Pennsy S-1 is not the engine that has the greatest overhang in my stable. After gluing a bunch of strips today, I decided to try my 3rd Rail H-8 Allegheny on that spur and guess what? I have to make more modifications. The front just cleared the cardboard, but the cab didn't. And that's without any plaster or sculptamold.

The front didn't actually touch, but the rear actually pushed into the cardboard.

This will necessitate another rework session. I need to move this wall back at least a half inch if I'm going to get any terrain into the area. Again, it's just cardboard. It's best to find all this out BEFORE any plastering.
I got all the tracks masked. Putting tape on the track that's already buried in the mountain was a challenge having to do it from underneath blind, but I got it done. With open, L-girder benchwork there is sufficient access to all that trackage except for the what's at the immediate tunnel openings.
I got another cross member in and then started framing the far left edge and the left, rear tunnel portal. I'm grinding trough lots of cardboard, but I believe that I'll have enough to finish the monster. Before I do any plastering, I'm also going to attempt to do some mural painting behind the mountain making some mountains receding into the distance. The point of view will probably be at the control panel. I will take pictures from there and do some design studies before attacking the wall. This needs to be done in that area now or else I really won't be able to reach it.

I didn't like the way the mountain approached the portal so I added an extra layer. Otherwise, I was going to have to fill the whole area with plaster to build it out. Filling with cardboard is much easier to do this with.

This cross member was the last one that will span the entire width. It took a lot of ribbing to make it stiff enough to bridge the gap. Beyond this point, the design will change. I need to add another vertical former or two to build the contours between these two portals. It will not be just the mirror image of the right side.

Tomorrow, I may or may not be doing a mural. I do hate to cover over my happy little clouds.
Attachments
Images (5)


Ouch! We normally are looking to clear low objects and don't often mention the cab's roof on most steam actually kicks out even further up high. Forcing the model rear to shift to the outside and the nose to the inside, then the opposite directions, is a good idea too as they don't track exactly the same on each pass either. While your discovery is "larger", mine was deeper into being finished, consider yourself lucky ![]() .
.
I also found my diesel handrails stuck out more than I thought at a medium height too. SW; not even big! But they tick each lap. On the next loop I ran every loco. I "only" had 18 at the time, not a big deal. More like a night of fun to rest up ![]()
Mural? What are you considering? I like the little clouds too ![]() A lot! Sky like that and a mountain made me fall in love with NC and Penn. both. I'm a bit disappointed already
A lot! Sky like that and a mountain made me fall in love with NC and Penn. both. I'm a bit disappointed already ![]() Maybe adding a drawn horizon for more depth?
Maybe adding a drawn horizon for more depth?
It was an afterthought to try the Allegheny in that spot since I had to reassemble that track again to test it. But I'm really glad I did. I've had trouble with the H-8 before. When I used Ross O-88 and O-96 at their natural 4" track spacing and ran long 18" (passenger) cars on the outer loop and the H-8 on the inner, the H-8 made kissey face with the car sides. It was one of the factors that forced me to widen my track spacing on curves to a minimum of 5" (and wider). The impact zone was even worse when a full-length, 21" passenger car. We modelers have the same challenges the 1:1 railroads do regarding track clearances.
Imagine finding out the hard way 1:1 !
I'm sure your mural will be fine, but I was having fun watching the mountain changing under the sky for a change instead of the reverse ![]()
Today was a mural design day. I'm a frustrated artist and not a very good one at that. In retirement I've had thoughts of going to classes to learn to do nice paintings. I tend towards realism, but I have a soft spot for American Impressionism especially Edward Hopper. That being said, I'm not foolish enough to start painting my walls without at least trying some ideas out.
My first three attempts were very amateurish and didn't reflect my mental image of what I wanted. In order of completion here's what I did. This first one had three sequential lumps that didn't represent anything. This was an inkjet print that I used acrylic paint to do the design. Even though it may look like it, I didn't paint this on the wall.

I took another crack at mountain shape. This wasn't as bad, but it still didn't do what I wanted.

Number 3 had larger hills, better palate control and showed the idea of having my high tension poles receding into the distance.

I showed this to my wife to see if it worked for her. She thought the mountains were too big. I agreed. So then I decided to do a bit of research. I went on Pinterest and searched out Appalachian Mountain vistas. I found two that really had the palate I was imagining. It showed me that the colors change as they recede in the distance, BUT they don't just get lighter green/gray. They turn blue/gray.
This one was a National Geographic cover.

And here's another one.

So using the first image's palate, I cobbled together this mockup. I drew the vista on another piece of paper, cut it out and pasted it on one of my previous failures. It's still crude, but I think I'm onto something and my wife agrees. This would look better when the model mountain is covered with something other than cardboard strips.

I'm still not happy with the colors. I will work to grey and tint more blue to the distance hills. I also like that it's not just one lump receding from the first one, but has overlapping hills with differing shapes and distances. I may have to buy latex wall paint to cover the area. I'm using cheap acrylic tube paints. It may be enough, but I'm not sure. The mountains tend to lighten at their bottoms due to the haze lying at lower level. I attempted to do that on the green one in the foreground. Another concern I have is the large quantities of foliage I'm going to need to cover the model mountain. I've been to Bob Bartizek's layout and he has tons of foliage covering his wonderfully rendered Central Pennsylvanian mountains.
While I know I don't have to ask, your input would be greatly appreciated at this time.
Attachments
Images (6)


What about putting the layers on 1/2 inch foam board to add 3 dimensional depth?
I think your color progression / shadow vs light looked best on #3, but your shape has improved each time. For the haze, washes on a big wide brush for house painting.
I'm more a pencil/ink guy, and didn't do a whole lot of painting. I always watched Bob Ross for a refresher on how to approach different subjects whenever I could. If nothing else I'm at peace when the shows over, lol.


Not trying to "hyjack" the thread, but Pete, where did you get your background?? Looks like the real thing!!
Woodson posted:Not trying to "hyjack" the thread, but Pete, where did you get your background?? Looks like the real thing!!
Partly hand painted, but the part you probably are asking about was printed from a panorama image I downloaded from Wikimedia. Here is a recent thread on that topic:
Avanti posted:Woodson posted:Not trying to "hyjack" the thread, but Pete, where did you get your background?? Looks like the real thing!!
Partly hand painted, but the part you probably are asking about was printed from a panorama image I downloaded from Wikimedia. Here is a recent thread on that topic:
Many thanks for the information and the link!!! I've been following the thread.. Amazing what I'm learning!!!
I didn't mind the hijack. Having the images printed instead of hand painting is a very practical approach. So far, the mountain has cost practically nothing except for $4.00 worth of lumber and $8.00 worth hot glue sticks. Getting printed backdrops will not be inexpensive. We don't talk too much about budgets on this Forum (or any other), but most of us have to manage our hobby expenses very tightly. I'm looking to adding some signaling, and depending of how sophisticated I get, it could cost a small fortune. So, I'm taking the cheap way out on the mountain project.
only my thoughts but personally I would sacrifice some signaling and have this mural printed up it looks natural! and will compliment the mountain your building now.
your road and your nickle but after all the effort your putting into the mountain in that area now why skimp? only my 2 cents so do what makes you happy right.

Attachments
Images (1)

I think I'll attempt to strike a happy medium. In fact, I'm now leaning away from an integrated signal system and go with something simpler and more cosmetic. I am working with Terry Christopher of Custom Signals, but he's selling the business and it would cost thousands of dollars to realize the design he's developed for me. Instead, I'm looking at Z-Stuff for Trains signals. They look nice, are completely self-contained and can be daisy chained to make them work interactively. They contain the sensors, the relays and look relatively prototypical.
Onto the mountain:
#2 grandson slept overnight since his parents took #1 grandson and a friend to a Cold Play concert at the Yum Center. So... I actually had an agile helper to spend some time on the platform doing some cardboard stripping with the hot glue gun. He, like his older brother, is a smart, good worker, who takes instruction beautifully AND has good problem solving skills. The first thing we did was to modify that errant rock cut. After he carefully took off the strips maintaining their attachment to the center strip, I cut away about 1/2" from the cardboard support piece, and then he re-glued the strips in their new position. We re-tested the Allegheny and clearances were good.

While he was doing that, I was cobbling together a "table" upon which I can put the plaster tray up on the mountain so it will be convenient when I'm hard-shelling the upper reaches. Again, my material of choice is cardboard. I got it glued up relatively level (based on the actual spot on the mountain I placed it). It was sliding down the mountain and I suggested that I would tack hot-glue it to the spot and then move it when needed. He suggested making some form of pin that would engage into the cardboard weaving. GOOD IDEA! I cut some cardboard to do that trick and it worked.

After putting a pin on the other side, I had my elevated plaster table. (This pic was before the 2nd pin was glued on)

I penciled in the "mountain range" on the wall in prep for the mural painting. I'm printing out the mountain pictures and either using it to mix my own colors or to have it color matched at the paint store. The size of the area to be painted isn't much and probably can be done with the tube paint that I have.
#1 Grandson is 15 now and I will see less and less of him. Younger brother just turned 12 so I still have some more build time with him. He and I were reminiscing about how weird it was that at one time the OSB was just laid out on the floor so we could "see how big it would be." When we started this project he could walk underneath without ducking. Not any more. It's really fun to do this kind of stuff with young people.
Attachments
Images (3)


The plaster table is brilliant!!
That was handy to have the agile helper today! Yes it has come a long way!!
Thanks Mark. Plaster table was another "just as I get up in the morning" ideas. I used to use that time to come up with creative solutions at work. Now retired, "work" is building cardboard mountains. Life is good! Grandsons are going with parents to visit other grandparents in California. When they return school will start shortly afterwards. Here in the "South" (L'ville is a half mile from Indiana; the Mighty Ohio) school starts in the middle of August. So... I won't get much more time with them. Older grandson already is in soccer practice.
You know we're in a different age. All four of my grandkids (son's two girls and daughter's two boys) have all of their grandparents alive and vital. It's makes for an interesting dynamic as we all vie for attention. In my day, I had one living grandparent, and most of my friends were in the same situation.
By the time most (men mostly) were in their 60s, they were old men, and many didn't make it out of their 50s passing through "heart attack alley". If you did have a heart attack, all they could do is give you digitalis and bed rest and hope your heart recovered. Many didn't, and even if you did the threat of another loomed large. Cancer was even worse. Almost anything you got could kill you. And it didn't matter if you had health insurance or money. Get cancer or heart disease and there wasn't much they could do for you.
Today! I have two brother in laws who both had either stents or multiple bypass surgery. They're both in their 80s and both still working. One of the other grandparents had atrial fibrillation corrected with ablative surgery. Another had prostate cancer cured. My wife also had cancer (cured so far). Another had hip and knees replaced and spinal fusion. She would have been confined to a wheel chair without it. One of the same brother in laws had a lens subluction in one eye. It's when the lens falls out of the capsule and literally falls back into your eyeball. Modern ophthalmology removed the lens and replaced it with one that's sewn to the back of the iris opening. 20/20 vision. Then he had a cataract surgery in the other eye that went very wrong since that eye too was prone to the same problem of the first eye. Again, eye surgeons at U of P Shea Eye Institute did a sutured lens. Again 20/20 vision. At any other time in history he would have been a blind man.
This age is the first time in human history that longevity and vitality is the direct result of a person's ability to pay. Even Steve Jobs, if he would have acted sooner, may not have died from pancreatic cancer. Makes you think, doesn't it.
Enough pontificating!
After a stop at the LHS, I bit the bullet and painted a mural. I used the photos to approximate the color tones and was able to mix them using the sky blue latex I painted the walls with as a starting point and then added green, and black for the foreground mountain, and then taking this mix and adding white and gray to create the background hills. Results ain't great, but they're passable. They'll look better (I think) when the "real" mountain is terrain, colored and landscaped.

Here's a wider angle shot showing the whole mountain. I also finished adding the last strips on the tail end at the left. Instead of moving my work platform, I was actually able to wriggle myself up through the joists so I could stand next to that spot. It took a bit of contorting, but I was able to do it without hurting myself or the layout. It's too back I got that wiring and outlet box right there. It's very important since the wire on the lower left is the one powering the entire layout. It's a switched outlet with the switch on the opposite wall.

I believe I am at the point where I should start laying down hard shell plastering on what I've formed so far. I might be able to cobble a bit more together on the left side, but I think it can wait until this part is finished. I may have missed something, but most folks do not discuss the access problems when building big structures on O'gauge layouts. Without real scaffolding, access can really be a problem.
Grandson had another idea yesterday which I may adopt. He suggested putting some netting underneath the track runs in the mountain to catch major derailments from leaving the layout and hitting the floor. His reasoning was that normally, you can see a derailment before it devolves into a catastrophe, but if something happened in the tunnel we may not catch it in time. Like I said, this is one sharp 12 year-old (like his brother) and I take what they say very seriously.
Attachments
Images (2)

I'm with you, both grandfathers passed away before I was born, and I was the oldest grandchild. One grandmother passed away while I was a child. I have already outlived one grandfather by 3 years, and if I live to collect full social security, I will have outlived 3 of the 4.
The mural will look much better to you once the sceniced mountain is finished.
Great idea your youngest had, and sound reasoning! I think you are ready to get messy with the mountain! :-)
Yup! It's time to get messy. To just add one more example to our discussion. I relayed my comments to my son. He just turned 41 and is an ophthalmologist. His spinal stenosis was so bad in his lumbar region that he was reaching the point where he couldn't stand for more than 20 minutes. He had spinal fusion surgery two years ago and now is able to play golf. He said, "If I was in this shape at 39, imagine my shape in my 50s. I would be in a wheel chair." He also had his 2nd kidney stone. It was a bad one and wouldn't pass. They went in with a laser and disintegrated it. That would have possibly been fatal a generation ago. Again... no money... no treatment without either wealth or insurance.
I always take the kids advice when they give it, especially when they back it up with sound reasoning.
Today was my 71st birthday so we went to the movies and saw the new Star Trek Flick. Great CGI and special effects, but a formulaic plot with too much (and stupid) hand to hand combat. The fight scenes were overdone and lasted too long. You had to suspend a lot of judgement on the degree of banging around they took and still got up to fight another day. I mean, seriously, crashes of air vehicles into ground and walking away...really? The new cast does a commendable job of carrying on the Star Trek patter. Chris Pine is a very believable young James T. Kirk and Zachery Quinto has got the younger Spock down as well too. I like all of the cast, but I think the plots could be a bit more unique.
Plastering will start on Monday.
Looks great!
Peter
Grand kids are really a blessing. Your mountain scenery will be outstanding as is everything you've created on the railroad. I truly enjoy your work.
Ron H.
They sure are! They're away for the week so I had to put up all these plaster soaked paper towels by myself. I'm using Gypsolite for one reason, it has a very long set time. In fact, it won't be hard until tomorrow or later. Gypsolite has perlite mineral particles in it. This product is used as a base coat for plaster lath walls. The grit gives the top coat more to grab onto. Of my purposes, I could take the grit or leave it, but the working time is a real asset since plaster of paris or hydrocal sets up in minutes rather than hours.
I got one layer (heavily overlapped) placed on all the cardboard areas leaving a bit of cardboard exposed as a jumping off point for the rest of the strips that I'll apply after this phase is completed. I may also put a second layer of plaster/towels depending on the set and how tough it seems. I'm going to add a lot of Scultamold which will also add to strength. The plaster/towels only are a base for the Scultamold.

Remember: all those gaping holes are going to be mountains once all the high reaches are completed.

It's messy, but all of this went on in one afternoon.

I ran out of Gypsolite so I'll have to buy more tomorrow. I did finish everything I wanted to in this first phase. In order to do the last little bit under that outlet box, I wriggled up between the joists. I had the tray of plaster siting on the adjacent joist. I thought I'd clear it. Of course I didn't and it landed upside down on the floor. It was the last plaster I had so I got down on my knees and using cardboard, scraped up as much as I could and saved the day. It was a gross mess! My tray holder did work for the mountain.
Attachments
Images (3)


Thanks for sharing your railroad, excellent craftsmanship and design. 'Cool'
Gary
Thanks Gary! It's my pleasure.
The first coat is dry and some areas were quite week. I also need to do more plastering around the portals to seal them into the land. So started a campaign with the newly purchase Gypsolite I bought at a local sheet rock distributor. A 50# bag is $19 and change. It's a very inexpensive product when bought in bulk bags. Instead of hauling a 50# bag down to the basement, I used my empty 5 gallon pales left over from all the roofing granules I bought and off-loaded the product into said pails. It filled 2.5 of them. I was then able to easily carry it downstairs without hurting myself or making a mess.
In some places where the Gypsolite soaked towels didn't have much plaster in them, they looked like just paper towels. What happens in this instance is the water is evaporating off the towels before the plaster cures. Gypsolite is a slow curing product and if it gets dry before it sets, there's no strength. I started to slather on a stiffer mix of pure Gypsolite onto these areas. I pre-wet those areas with a spray bottle so the towels again wouldn't absorb too much water.
I then realized that I probably should also complete the edges along that big side fascia board AND work all the areas around the portals. I did this for about an hour. I really have to do the whole mountain this way to strengthen the plaster and destroy the "paper towel" look. I also decided to re-check that critical clearance with the H-8 now that I added more plaster to that rock cut. There's still some space left to add more texture.

Speaking of texture, I bit the bullet and ordered three rock molds from Bragdon Enterprises to simulate layered strata for these vertical cliffs.
Here's the portal area with the land tucked tightly onto the portals. I used an acid brush and water to wash the excess Gypso of the portals. Plastering the entire mountain with this method is going to take some time, but it should help. It is much less expensive to use Gypso instead of Sculptamold for these large areas. I'll use Sculptamold for more selected areas especially those that I can't use rock castings.


Attachments
Images (3)


Just a quick Saturday update. The Gypsolite that I started to apply on Thursday cured solid by this morning and it's very strong. Taking this mountain apart will probably require a jack hammer. I did notice some thin places that didn't cure. You must apply Gypsolite in a thick enough layer so the water doesn't dry by evaporation. So anywhere where I tried feathering it out where the plaster meets the layout base, it's edges didn't cure. I added water with a spray bottle and checked later and some of these spots did actually set up. You need to keep this in mind if you're going to do this method. If I was using Hydrocal or Plaster of Paris, it wouldn't be as much of a problem since it sets quickly before the water leaves by evaporation, but Gypsolite takes 24 hours or longer to set up and thin sections will dry before setting. It's why I got the soft spots with the soaked towels. Anywhere that the solids were too thin, the towels dried before curing and are only as strong as a plain paper towel. I have to think about whether I'm going to plaster over all the surface areas or add a second layer of plaster-soaked towels. When it's cured Gypsolite looks like a good concrete color, when it's not it's white like raw plaster as seen here. It's one of the reasons why you can get it off the floor. A splat is too thin to cure before drying so it's still just raw plaster.

My Bragdon Enterprises rock molds came today which is perfect timing. I think they're going to work great and save me a lot of carving time with the Sculptamold.
Attachments
Images (1)
Happy Monday! In 2.5 hours I was able to slather an entire layer of pure Gypsolite. It was actually easier to layer this stuff on than to add another layer of plaster soaked paper towels (PSPT). Reason: You can trowel on plaster with one hand while supporting yourself or holding the plaster tub with the other. With PSPT, you need two hands so reaching out too far becomes impossible on the back. I made sure that I have at least an 1/8" or thicker so it will cure, not dry. I also was judicious in applying the water spray. You need to pre-wet the surface since any lightly plastered towels so they don't absorb too much water before the plaster sets.
After using a 1" putty knife to pile the plaster on, I went back with a bristle paint brush to smooth the surface and remove all the trowel marks. This method worked pretty well and left a nice, regular surface to add the next steps to, including rock castings and landscaping. This mountain is going to be very strong and will probably support a hand leaning on it. I can't say that now since some parts of the PSPT were so weak, you could easy puncture it with just a bit of pressure.

The Gypsolite's granularity definitely makes for a great surface upon which to add terrain.

I added another temporary support to hold up the inboard end of my work platform so I could get closer to the left extremis of the mountain. This removed the need to climb up into the structure to get to that far end. I will also facilitate adding rocks and painting that end which is very visible. I also finished up the area around the rear, left portal.

I'll give this a good two days to set up. Meanwhile, I'll start evaluating and making rock castings using my existing W-S molds and the new Bragdon products that came on Saturday. I was surprised that this 2nd coat took much less time to apply than I thought. I mixed my plaster in larger quantities. I'm using the plastic container from Cascade Complete that you buy at Costco. There's no chance for the Gypsolite to set up in the container since it takes hours not minutes to cure.
Attachments
Images (3)


Love all the work you do, I sometime get in trouble with Momma cause I reading your post and its either dinner time or bed time. LOL But thank you so very much, with you and so many others on here it's like going back to school for an old guy like me.
Old guy? I ain't so young either. Just had my 71st birthday last weekend. Never too old to learn and try something new... within reason. I'm definitely not going to try bare rock climbing or sky diving. (maybe not bungee jumping either).
And I bet you could both outrun me, even backwards, despite age, so smile big and boastfully about being "experienced" ![]()
Besides neither of you act your age lol. You've both had me guessing badly at times.
I'd skydive before bungee jumping regardless. If something happens I wouldn't want to tell the story lying in traction ![]()
That's. Looking like an Application mountain now.,.
Boy this auto correction is killing me.
That's looking like a Blue Ridge fountain now........forget it, I'm giving up.
I think the amount of humidity in the air is the amount of haze we see too. Some days seeing across a valley is hard, others you can see for many miles. Thinking about driving right into the clouds as they hit the mountain sides is what made me remember this. I still have polaroids I took from my third visit where the haze is a wall of mist. The first photo is clear as day, and the cloud is about 20 yards from the road. The last photos are white haze; a fog. The visibility suddenly drops to about 20 feet as we entered a tunnel. The other side you could only see 10' tops. It was as bad as a white out blizzard. We crept to a roadside stop and ate lunch IN the cloud, till the cloud passed AROUND the peak and the sun came out again, then showered in a waterfall I knew would be gushing nearby in about 15 more minutes. That one doesn't really need rain to be more active. Condensing mist boosts it's flow lol.
That is a great plastering job. The shape of the mountain is really nice. I did a lot of mountains until 6 months ago. I just had quadruple bypass surgery in March. I've built my last mountain. I'm 86 now, so no more layouts. I never heard about Gypsolite. I always used Hydrocal.
Thanks! Hydrocal is a casting plaster made for the ornamental plaster industry. It sets quickly and is very hard. Gypsolite is a plaster meant for troweling onto wood lath walls. It's the first coat in a traditional plaster wall construction followed up by a smooth top coat plaster. It has "perlite" in it which is a quartz mineral that is very gritty. The grit provides an excellent surface for the finish coat. It will also provide a good surface to hold my rock castings that are next up on this mountain. Another name for Gypsolite is "Structolite". Same product, different manufacturer. Hydrocal sets very fast (20 minutes or less) while Gypsolite is very slow (at least 24 hours). It's slowness is a good thing when doing hand troweling and plaster soaked paper towels.
As of late this afternoon, the plaster was not fully set so no work was done today.
Thanks for the how-to on mountain building. I am picking up some important tips for my yet to be built layout.
These are my favorite types of topics. Keep them coming. Thanks again.
Sean
![]() did trainman plaster himself into a deep valley? pun intended miss the weekly updates
did trainman plaster himself into a deep valley? pun intended miss the weekly updates
Nope! I'm experimenting with the Bragdon molds trying to figure out how to get the sedimentary layer onto my mountain cuts.
And... I was in OKC this past weekend visiting with the keyboardist and vocalist from my 1960s Michigan State Band, the Sounds, who is fighting lung cancer. He's the first one of us four who's fighting a serious illness. It would be our 49th reunion. The Sounds was #1 on campus from 1965 thru 67 based on two factors. First, while 39 bands did mostly British rock, we chose to do R & B and Motown. Our lead singer had the ability to sound like Ray Charles or James Brown. Considering he was from Oklahoma City that was quite remarkable.
Then there was the Sondettes. We were one of the few non-studio bands in the USA in 1965 that was a band comprised of four white guys and three African American women. They were students too. And they were spectacular. Pat, Kat and Martha. Patty Burnette was one lead vocalist and could sound like Diana Ross or leads from Phil Spector's Rosettes and Crystals. Kathleen Wilson (now Kristy Love), had a more soulful sound and did the rest of the leads and sounded like Mary Wells. Martha Taylor did backup. Patty was the first black women in MSU history (at that time) who was selected as Miss MSU, and Martha was finalist for the Miss Black America contest representing Minnesota in 1970. Kat, however, had the deepest professional career and for 10 years until it was razed a couple of years ago, was the female vocalist in the Platters, Coasters and Drifters Review at the Sahara Hotel in Las Vegas. I had a chance to see her perform in 2008 and she was terrific.
As a result of the draft and Viet Nam the band was unable to stay together after graduation. I was the only member who didn't continue with serious playing, but I did continue to play guitar and have kept my skills up. Roger Edwards, who we went to visit, is a bachelor. His "dining" room has two Hammond A-100 organs and Leslie Speakers cabs, a Fender Rhodes electric piano, and Kurzweil and Yamaha electronic keyboards. He also had two very large PA speakers. He had a set of drums too so Ron, our drummer, only had to bring some drumsticks. Bryant drove from Albuquerque and was able to bring his Fender Bass and amps. Ron and I flew so I brought my Fender Strat on the plane with me. I flew Southwest and was able to get a low seating number for all legs so the guitar was safely in the overhead and suffered no ill treatment. It never left my sight.
Next year is our 50th reunion and if everyone's healthy we're going to do this again. This time we'll try to get the girls to join us. Possibly up at MSU's campus... maybe.

This picture shows the then and now and what 50 years will do to you. The picture on the left (I call it my "Beach Boys Picture") was taken at Bryant's house in early September 1966. We built our own "Altec Lansing Voice of the Theater" system and learned all of the top 40 R & B songs that were playing that summer. It made a big impression when we hit campus the following week. We played our fast numbers very much up-tempo and Ron was the only drummer we knew that could keep up with us for a three-hour gig.

From Left to right Patty Burnette, Martha Taylor and Kathy Wilson. I was able to find four reel-to-reel tapes of the band and get them digitized. I did some sound engineering on them to bring back the fidelity and then made a 4-CD set of all of our songs recorded in four different venues and distributed copies to all members. I'm trying to upload some songs onto Facebook and YouTube, but it's been rejecting my attempts (so far).

I also came back with another cold which makes working with plaster distinctly less fun. My grandson suggested putting the semi-set Bragdon molds up against the rock cuts so it will conform to the contours without fracturing. I'm going to try that the next session (probably tomorrow or Friday).
Attachments
Images (3)


Back to the railroad...
It's been a while since I got sloppy with plaster. Didn't have much time today, but grandson #2 was finishing up his summer project for school and I tried a different approach to get the plaster strata rock onto a non-flat wall. My grandson suggested placing it before the plaster is fully cured and when it's a bit flexible. I tried this today. After letting the hydrocal setup enough to permit handling the very floppy mold, I pressed it up to the wall which I had just coated liberally with medium viscosity Scupltamold. It mostly worked. It wasn't big enough to cover the wall's full height so it would require another piece.

While this was setting up, I adhered some of the really hard rock castings to the wing walls flanking the right outside portal. Again I slathered a liberal quantity of Sculptamold to fill in the undulations and got to stick pretty well.

And then I stuck rocks on the other wing wall. This casting stuck way out at the end and I tried to simply break it off. Big mistake. It broke in all the wrong places. I re-adhered the pieces to the wall and will use a cutter to trim it after it's fully hardened.

I was running out of time and wanted to get the second casting on the long wall, but I rushed it. I didn't give the Hydrocal sufficient time to set up and when I placed it on the Sculptamold bed, it just fractured into a zillion chunks that preceded to end up on the railroad's road bed. I shoveled it all away and will try again next time. Of course all of this will look completely different when painted, tinted, aged and landscaped.
Attachments
Images (3)


Still looking great!
Thanks Mike! I checked today and the plaster was not dry. It was setting, but very damp and I decided to give it one more day. Didn't have much time anyway so I didn't want to mix up any batches. I'm running out of Hydrocal, but I'm not sure I want to invest in another 50 pound bag since I'm getting to the back end of the major landscaping/rock forming. I might revert to smaller packages of plaster of paris to make more rock molds. I took a hack saw blade to trim the overhanging rock. A little more sculpting around the portal will be needed to finish it up before painting. The Bragdon Enterprises latex molds, while difficult to fill with plaster without it running out over the low sides, do make convincing rock faces. I can't wait to see what they look like when painted and weathered.

Attachments
Images (1)

With my cold finally subsiding, I felt like doing some more plaster work. I again attempted to get the Bragdon strata rock to stick to the upper part of that substantial rock cut. This time I hit it just right, that is, cured enough so it stayed put in the mold, but still weak enough so it would conform to the slight curve of the substrate. After spraying with some "wet water" I liberally applied sculptamold to the substrate and slapped the mold with its plaster onto the wall. It held! I then let it fully set up before peeling the mold from its plaster.

The rocks stuck way up over the wall, so I took a bare hack saw blade and cut it off flush. By doing this before the plaster was fully cured the sawing went quite quickly. While there are some gaps between the two rock layers, I think it's a good start and I'll either carve the Sculptamold or add some pieces of strata. I've got lots of pieces of strata as noted by the pile at the base of this wall.

I cracked is some places, but this just makes it look more realistic in my estimation. I then started applying rocks to the area that the coal mine will go. In this instance I used various pieces from my W-S rock molds. Turning them and angling them hides that fact that they're only a couple of different actual styles. Before anyone comments, in real life, you'd probably not find limestone strata and granite blocks side-by-side in the same geological structure, but noting about this railroad is real life. Besides, there was absolutely no way to get those Bragdon rocks to curve into that niche unless I wanted to hand carve them all. While I did that for the ravines, I didn't feel like doing it here.

Again, liberal layers of Sculptamold helps these flat-backed rocks to a curved and rough Gysolite surface. I then ran out of Hydrocal. I thought I had a half gallon of W-S plaster of Paris, but couldn't find it. I'm reluctant to buy another commercially sized bag of Hydrocal since I'm seeing the end of most of the rock building activities. But, it's the best material for this process AND it's not expensive. It will just mean that I'm have a pail of the stuff lying around for a long while.
Attachments
Images (3)


TRAINMAN 2001, looking good to bad about the cold. I was thinking maybe you were trying to create a chord on the guitar that would add rocks plaster and do all the finishing touches to this massive mountain!
I know we all will be pleased to see the final results but something tells me you will be happy when this is completed.
side note did your rewire of the swing gate work as you wanted so power is turned off so no engines taking a swan dive to the hard floor.
Thanks and yup! You're right. Messing with the plaster is not my favorite part of building a railroad, but it's necessary. I'm really not looking to cleaning up that floor.
Re: the gate. I couldn't find the glitch, even with all new relays, but I made it simpler. I just interrupted the two main feeds coming into the panel, so instead of just shutting tracks off adjacent to the gap, I shut off power to the entire layout when the gate is open. This is probably how I should have done it the first place. It's also a good safeguard when I go to DCS. If I was running two trains on the same track, I could envision where a train was stopped at the block at the gate, but the rest of the track being energized and the 2nd train running into the back of the standing one. Now that can't happen.
I purchased some large thin Latex molds from another supplier at last year's Big E show in Springfield.... The vendor at the show had a great suggestion which was to fill a shallow container larger than the mold with play sand then set the mold in it. The sand supports the mold in whatever bias you want, slightly curved and deeper, or very flat and thin... I didn't have play sand around, so I substituted the absorbent material for soaking up spills in the garage, as I had the remainder of a 40 pound bag of that laying around. It has worked quite well, and definitely stopped the spillover issues. I picked up one of those inexpensive large, shallow clear plastic containers at Walmart for less than $5.00, and I just put the lid on it and store it in between molding sessions.
That's a great idea! I may have to cast some more for the large flat back wall adjacent to the left rear portal. That technique could prove very helpful. On the front rock cut, the thickness of the appliqué must be thin because of the clearance problem with that H-8. Just got back from Pittsburgh where my wife and I got our Global Entry Trusted Traveler clearance. Tomorrow, I should be back in the shop.
Between building plastic models, I did a couple more rocks today and cast some more. I'm preparing the rocks for the back rock cut next to the rear left portal. I also added more where the coal mine is going. When I finish those rocks I'm be ready to paint and ground cover the mountain that's built so far. Then I'll be able to close up that hole in the front and finish up the lower reaches.

I'm going to put the mine shaft in the blank area between the rock formations. Again, I'm got igneous and sedimentary rocks existing side-by-side. Any geologists out there, please look the other way.

Attachments
Images (2)


I got the last of the rocks placed for this first phase of mountain building. It is a mosaic of about 8 pieces of rock castings, held with a lot of Sculptamold. After laying it all up, I went back and filled many of the gaps and then tooled the Sculptamold with the edge of a putty knife and a stiff bristle brush to blend the rocks, continue the strata and get rid of hanging bits. After coloring I think it will work. It was touch and go for a while since I couldn't cast any rocks as big as that wall in on go.

Attachments
Images (1)

Like everything else you have built, the mountain is really good.
Thanks Ron! Nothing to report today... waiting for scultamold to dry thoroughly so I can start painting. Maybe tomorrow. Meanwhile, I'm keeping busy building a 1:48 B-17 for an old friend.
That's nice you are building the B17 for your friend. Is he a WW2 veteran? I built one for my late father in law who was pilot of "The Dead Engine Kids" flying 35 missions over Germany. His B17 was shot up over Germany and they crash landed it in neutral territory.
Trainman2001 posted:And... I was in OKC this past weekend visiting with the keyboardist and vocalist from my 1960s Michigan State Band, the Sounds, who is fighting lung cancer. He's the first one of us four who's fighting a serious illness. It would be our 49th reunion. The Sounds was #1 on campus from 1965 thru 67 based on two factors. First, while 39 bands did mostly British rock, we chose to do R & B and Motown. Our lead singer had the ability to sound like Ray Charles or James Brown. Considering he was from Oklahoma City that was quite remarkable.
Then there was the Sondettes. We were one of the few non-studio bands in the USA in 1965 that was a band comprised of four white guys and three African American women. They were students too. And they were spectacular. Pat, Kat and Martha. Patty Burnette was one lead vocalist and could sound like Diana Ross or leads from Phil Spector's Rosettes and Crystals. Kathleen Wilson (now Kristy Love), had a more soulful sound and did the rest of the leads and sounded like Mary Wells. Martha Taylor did backup. Patty was the first black women in MSU history (at that time) who was selected as Miss MSU, and Martha was finalist for the Miss Black America contest representing Minnesota in 1970. Kat, however, had the deepest professional career and for 10 years until it was razed a couple of years ago, was the female vocalist in the Platters, Coasters and Drifters Review at the Sahara Hotel in Las Vegas. I had a chance to see her perform in 2008 and she was terrific.
Next year is our 50th reunion and if everyone's healthy we're going to do this again. This time we'll try to get the girls to join us. Possibly up at MSU's campus... maybe.
From Left to right Patty Burnette, Martha Taylor and Kathy Wilson. I was able to find four reel-to-reel tapes of the band and get them digitized. I did some sound engineering on them to bring back the fidelity and then made a 4-CD set of all of our songs recorded in four different venues and distributed copies to all members. I'm trying to upload some songs onto Facebook and YouTube, but it's been rejecting my attempts (so far).
Now that is not only a great story, it is also what "makes" the forum. Members sharing their expertise with any aspects of model railroading and themselves.
Are the guys young to older 1=3, 2=1, 3=2, 4=4?
I agree. These forums introduce each other as people with interesting lives (including our love for trains and miniature things).
Let me answer the first note first. No, this person is not older. He's a 50 year-old that watched me build models in my garage at our PA townhouse. He and a bunch of other little guys living on our cul-de-sac used to spend lots of time watching my craft and it stuck for some, this fellow specifically. For his 50th he got a ride in the "Yankee Lady" one of the several extant flying B-17s. He went out and bought the Revell kit, but quickly realized that he'd never get around to build it and decided to get a "Myles Original" He was willing to pay me a commission, but my wife and I thought that wasn't necessary. Since he's in Philly and we're in L'ville, I suggested he return his kit and I'd re-buy it here. I also bought PE and aftermarket engines for it. It will be a good build. I'm blogging it daily, like my railroad, on another couple of forums including this one if you're interested.
http://cs.finescale.com/fsm/mo...1907123.aspx#1907123
As to the second. All of us "Sounds" are 71 and our birthdays are within months of one another. If the health of Roger Edwards (vocals and keyboards) holds up, we're planning on doing some 50th extravaganza maybe on Michigan States Campus next year. There's a lot of "ifs" in this scenario including getting some additional funding to get all the members, equipment, venue, etc in place. I'm looking at options. It really depends on Rog beating cancer.
If any of you know about Gary Kohs and Fine Art Models, he's officially stopping the manufacture of his world-leading museum-level models. He's been at it for 25 years and producing masterpieces by artisans all over the world. You may know about George Kohs and his staggeringly detailed brass O'scale equipment. George is Gary's brother. Fine Art Models now has a museum dedicated this his craft in at the Mariner Theater and Galleries in Marine City, Michigan. He bought this old theater and completely restored it. The models there are both FAM manufactured and from Gary's personal collection. I'm putting it on my bucket list. I visited Gary's business twice when he was in Birmingham, MI. I first saw his work at a showcase at Detroit's Metro Airport. It was when he first got started. I had to find this guy and on one of my Michigan business trips called him and went for a visit. Of course they didn't manufacture there, but they did inspect, repair and re-ship his products. His office was a modeler's Mecca, but what lay in the next room blew me away. It was a large room filled with amazing models that Gary had been collecting. It wasn't for the public, but it was awesome in the most literal meaning of the word. It did inspire awe in me. There were trains, ships, live steam, engineering models... everything.
I then visited again some years later and saw their 1:192 rendition of the Battleship Missouri. I was in love. It's price was $8,500 and I put my name on the waiting list. That was until my wife found out about it. My name promptly came off the list. We couldn't afford $8.5k for a 50" museum model. We didn't even have a place to display it. Needless to say, if I took my $30k+ that I've invested in O'gauge trains over the years, I could have owned several FAM models. But that train, as they say, has left the station. I'm not a rich man and can only handle one vice at a time.
Anyway, Gary is closing down because the artisans are dying off or retiring and there are no apprenticeship programs anywhere in the world to replace them. That is very sad! It speaks volumes about what is valued today, and, more importantly, the impact technology is having on the creation of engineering prototypes. In WWII you had to build scale ship models (1:48 masterpieces from Gibbs & Cox) for the process to continue. Today, you can do this digitally, and you can 3D print what you need if you need physical objects. There are still some models made, but the numbers are way down. I entertained going into the architectural model business years ago when I was a shop teacher. Those too have been greatly supplanted by 3D drafting programs and rendering engines that do the job much faster, cheaper with less labor. These skills have disappeared because they're no longer needed widely in industry. They won't come back and it's our responsibility as modelers to keep it alive if that's at all possible.
If you haven't ever looked at what Fine Arts Models has accomplished, check it out here.
http://www.fineartmodels.com/Welcome.html
Even though I can't afford them, I can admire them. I can't afford a Rembrandt, but I can sure admire them.
The Yankee Lady is an awesome thing to see. She comes to my town's airport in Port Clinton, OH several times a year. Amazing sight to see her flying over our house, and I have taken my kids to walk through her a few times. Haven't gone up in her, but my father-in-law has.
The flight costs a lot of money, and it's not on my list. That being said the B-17 is famous due to its numbers and impact, but not because it was a particularly great airplane. It was designed in the mid-1930s with 1930s technology. It had one thing going for it... it was rugged. It had an old design very-low-loaded wing (unlike the more modern B-24) that was able to keep flying after taking substantial damage. It was under-powered, non-pressurized, and very slow. Its cruising speed was 187mph which is why they were sitting ducks against the German fighters until the advent of our superior fighter support in the likes of the P-5, P-47 and P-38. But we made a gazillion of them and as fast as they could be shot down we'd build two more. When the B-29 was created it flew outside of the range of Japanese fighters and at a speed that made it much harder to track. It will be a neat model.
Believe it or not, I actually, finally got to do some painting of rocks. I needed a bigger block of time to start the painting process. I got one cliff face done and two others started. I needed to do a little patching where the rock castings met the substrate which prevented me from starting the last face.
I used W-S tinting pigments plus some acrylic tube artist colors. I'm attempting to add some different color strata using an earth brown, slate gray and black. I then sealed it with W-S Scenic Cement spray to seal the first coats (as per their instructions). When it was dry, I did a black wash and then did some highlighting with lighter grays and white tube colors. On the top edge I used earth toned acrylic wall paint and then sprinkled on some ground cover.
Here's the base coat.

And with the finish coats in place.

The top will get some more vegetation including some draping down over the rocks. Those Bragdon molds are impressive once the finish goes on.
Here's the other two faces with their base coats on.


Here's the patched area.

There won't be any more work for a little over a week. We're taking a vacation to Barcelona and Madrid. I'm attempting to learn some Spanish using Duolinguo. It's a pretty nifty way to learn a new language painlessly. If I can learn anything it will be a small miracle since learning a new language is not recommended if you're 71. You can use it on your PC and your cell phone and it syncs with both so you can pick up where you've left off. When we get back mountain painting will continue and then I'll be able to close up that front face.
So until then, hasta luego.
Attachments
Images (5)


Very nice, Myles. ![]() I'm trying to figure out how to have some on my wharf.
I'm trying to figure out how to have some on my wharf. ![]()
![]()
Hasta manana.
Great looking work, I think the different layers work well! Have a fun vacation!
Your painted rocks look great! Looks geologically correct!
Have a great trip!!
Hey gang! I'm back. The trip to Spain was wonderful. I don't know why people don't talk about Spanish food like they do about Italian and French. The food, the people and the things we did were spectacular. We spent 3.5 days in Barcelona, took the AVE (Alta Velocidad) train to Madrid and spent 3.5 days there until flying home.

The train was running at 300 KPH for much of the ride (almost 190 mph) and covered the 320 miles in 2.5 hours. The picture shows the speedometer readout in the first class cabin which is in the lead car. Train was manufactured by Talgo. Tickets were $70 Euro/person and that included a beautifully served hot breakfast.
I simply don't understand why Americans aren't clamoring for high speed trains. I know all the reasons why Americans are married to slow trains, annoying airplanes and our highways. I know that to truly install such trains you need dedicated, new infrastructure which little or no grades, and very large turns. And I know that installing new right of ways runs directly against the NIMBY folks who simply want nothing to change. That being said, the thought of being able to go from New York to Chicago, city-center to city-center in 5 hours, which sitting in perfect comfort, eating good food, doing work, or just relaxing is really something good. I believe the biggest problem is that most Americans have never traveled on an AVE, TGV, ICE or Bullet Train. Once you've been in one you don't want to travel any other way. We also walked a lot, I gained 3 pounds and lost 2 of it already.
Now, back to the mountain building. Finished painting rocks, and painted and grassed the existing mountain. As a result, I'm just about ready to start adding cardboard strips and plastering the remaining front slope. Right now the mountain is a grass-covered mound. I need to do more with this terrain, including some trees and shrubbery. But I'm not quite sure what I want to do. Meanwhile, I want to get it buttoned up so I can start running trains again.


I was able to use sample paint left over from picking the paint for our family room redo. Painting the Gypsolite requires a lot of dabbing and care to get into all the crevices. I ran out of the first shade of grass I was using and changed colors to a darker green. I spread the darker over the lighter to blend the two colors and hide the difference.

I also colored the rocks in the mine area.

The remaining plastering will go pretty fast. I still have to design the actual topography for the incomplete areas. There are some complicated transitions between the completed areas and the remaining space. Regardless, it won't be a problem.
Attachments
Images (6)


Welcome home. ![]()
Welcome back. I have to say, your terrain is looking stunning. ![]()
Thanks all! Glad to be back.
Another good work session today. I got the profile pieces installed for the mountain's front face. At first I was going to use the cardboard form boards as templates to cut Masonite, but after reinforcing the cardboard I decided to go with more "Cardboard Engineering". I also used some strange cardboard packing material that's a thick honeycomb which has some good stiffness. I used this to both stiffen the contour panels themselves and to tie them into the structure and to each other. I was inspired to do this since the all-cardboard structure supporting the left side of the mountain is doing the job quite well once the two layers of Gysolite's there to stabilize the whole deal. I can put some modest weight on that part without having much deflection. And it's really cheap using up all the boxes and packing that I've accumulated for this project. The most expensive part of this mountain was the rock molds.

To do this, I held up the cardboard to their respective surface and marked the contact points. I then drew the contour curve to blend into the existing structure. I had to adjust some of the shapes to give good transitions. I spent a lot of time at the front where the mine's going to go. I ran into a problem. My enlarged drawing of the "Frenda Mine" had the coal chute way too low (about 1.5"). I had to quickly adjust my paper mockup to raise the bottom after bringing in a track and a hopper car. This will require a change in the angle of the lower tipple's floor to make it less oblique. I'll change the formal drawings on Illustrator when I ready to build this. RMC has been running a new article on building this small coal mine. The original article was from 1978. I want the mountain's contours in that area to be right so the model will drop right in.

You can see how I used that cardboard dunnage to stabilize the formers side-to-side. It's surprisingly stiff and will work well when all the cardboard strips are in place (with lots of hot glue). The transition between the rock cut on the right and the rest of the front face will be an interesting and not-very-natural one, but nothing about this mountain is actually like a real one.
I also used the dunnage to space the wing walls away from the portal. I didn't do this on the left side rock cuts and had to taper the plaster back to connect to the portals. Using the spacers will give me some more leeway. Notice that I reinstalled that last portal.

Tomorrow I'll probably be able to install all the cardboard strips and get plastering underway by Friday at the latest. There much less surface area here to cover than the rest of mountain, so finishing it won't take too long. Big mountains take a long time to build when you're doing it alone. Grandkids are back in school, although they're going to have a couple of days off this week so maybe I can get the younger one to lend a hand. Older grandson's working on the Carrier Yorktown and will probably want to build that in the shop if he has the time.
Attachments
Images (3)


Started laying in the cardboard strips in the foreground first. I was making good progress up to about 3:00 p.m. I was attempting to use the big staple gun to tack in a heavy cardboard cross-piece to support the strips that will go into the wide pie-shaped space at the front corner. I was pushing the gun with pressure across my body with my right hand and heard and felt a "pop" in my right shoulder. It felt like it popped out of the socket temporarily. It didn't really hurt right away, but it did feel weird. I tried to use it, but it was painful when lifting and pushing any load, so I quit, went upstairs, took some Advil and sent a message to my orthopedic surgeon son in law. It's not hurting when I'm not doing anything (including when typing this) but it is very hard to lift the laptop off my lap. Hopefully, I just tweaked something and my layout work will continue. I've never had a shoulder injury before other than occasional bursitis. I'm hoping this isn't anything bad. Here's what I got done today. The cardboard piece that I was attempting to staple is just at the lower left edge of the picture.

Attachments
Images (1)
It kind of reminds me of basket weaving. At any rate, as you cover it, the mountain scenery comes to life!
It's basket weaving for us guys... I may have a bicep tendon tear which is something that can happen to us old guys. Great! More crap that breaks down when you get old. I was able to work in the shop today if I took it easy and I got the lower front face fully encased in cardboard. The harder parts are up next since I have to lay them in bending over in funny ways. I'm thinking that I'm going to pad out the left hand slope a bit to round out that shape. Now it's just a flat slope (boring) and doesn't transition correctly to the tunnel cut that lies right behind. It's really an exercise in networks showing how a relatively weak substance (corrugated box cardboard) can be structurally sound when interlinked and combined with a strong rigid membrane. It's similar to aluminum ribs and skin in a air craft. Individual they don't have much strength but together... Also metal studs and sheetrock walls.

The cardboard here is a from a Samsung LED TV box. I'm finding that the hot glue doesn't adhere well to the glossy ink side and it's requiring me to scrape some of it off. It holds better that way, but adds a bit more work. Uncoated board would be a better choice.
I'm seeing my orthopedic son in law tonight and will find more about this shoulder business. And to think, I blew it out attempting to use a staple gun. I'm using saws, cutting tools all the time, and am climbing on top of and underneath the layout at all kinds of angles, and I get injured using a freaking staple gun! For crying out loud! That ain't fair... is it?
Can't wait to get the plaster on top. There will also be more opportunities for interesting rock work on that front face.
Attachments
Images (1)
I'm certainly sorry to read of your bicep tendon tear, but glad your son-in-law is an orthopedic! Though I'm 10 years younger, I understand how we can injure ourselves doing the simplest things. My wife laments that she is falling apart.
On to the mountain base. Yes, yours will be able to support anything you want to put on it!!
Thanks Mark! My son in law doctor thinks that the tendon didn't tear, but it may have popped out of the groove in which it sits. It did feel like it popped out and then back, but to do that it does tear things up a bit which is where all the pain and lack of mobility is coming from. He said to not use the right hand much, lift the arm with the help of the left hand to keep it flexible, and we'll evaluate in a week. It will probably curtail mountain building for a while since the remaining work is going to require a lot more reaching and arm lifting. I'll be working on the B-17 project in the meantime since it requires very little arm movement.
Good news! The B-17 sounds like a good thing to work on in the meantime
Trainman,
Your mountain is looking good. I am sorry to read about your injury. I have followed you down the road with the trigger finger ( I got my second shot two weeks ago and it seams to be working), but I am drawing the line there. I cannot afford any further injuries. Get well and complete that mountain.
Alan Graziano
Thanks Al! I could probably plaster the front part that I've finished adding strips, but would have trouble doing the flank since I'd have to raise my right arm above my shoulder and that doesn't feel so good. Today did feel better. Last night my son in law explained that whatever I did to the bicep tendon, it probably won't actually heal. It could stop hurting and would let me use it normally, but it doesn't heal in the true sense of the word.
Hopefully, your second shot will work, but be prepared that it may not work permanently. The surgery is a pain, but it's completely successful. I have complete mobility, no pain, my wedding ring fits as it used to. So if you need surgery you'll have a couple of weeks of discomfort, but it's a very high success rate.
The fact I injured my arm just using a staple gun at a funny angle instead of when climbing around over and under the layout and using some serious tools, is very ironic and very annoying.
TRAINMAN2001 hows your arm doing? hopefully getting better
Thank you for asking. It has resolved itself to a classic proximal biceps tendon rupture. My som in law says I will be fine. He's right. I have a new lump on my old biceps and it's still sore, but I can move it in all directions. So when we return from this trip we're on, I think I'll be back on moutain work. I need to get trains running again by Thanksgiving when the granddaughters arrive.
Meanwhile, I finished and delivered the B-17 "Yankee Lady" that I built for an old friend. The wing stripe decals were home made.


Attachments
Images (2)
Just an update to let you all know what's going on...
Apparently, I did something permanent to my shoulder by having a "Proximal Biceps tendon rupture". I ruptured the long-head tendon on my right bicep. It won't actually heal, but it will stop hurting (as it already is) and, according to son in law, you can live perfectly well with half of your bicep disconnected. It ultimately reduces biceps strength by about 20%, but will not stop me from doing anything. If I was younger and an athlete, they would surgically re-attached the tendon to somewhere at the top of the shoulder, but it's a long recovery and not a particularly successful surgery. Since I'm neither of those categories, surgery will not happen. I may so some limited physical therapy, but in the last weeks I've gained full use of my right shoulder, can do almost anything with my right arm as long as the load is reduced from what I'm used to. I've yet to have it re-examined by son in law so I'm not certain of the path forward. Right now it just a sore part of the top half of my right bicep.
That being said, I plan to start working on the mountain again and see how it goes. attaching cardboard strips and plaster is not too rigorous now that I can raise my right arm above my head and do something useful with it. Thank goodness this happened after all the real heavy work is complete on the railroad. I couldn't have handled that hammer drill putting in the anchor bolts for the back cantilevered braces if my arm was injured then. And if it happened to my left hand (even though I'm right-handed) would have jeopardized my ability to play the guitar since left hand grip and wrist flexing is critical for fretting notes. There's always a silver lining.
I'm sorry it can't be surgically repaired, but certainly am glad you can continue on model making and guitar playing!! Thank you for the report!
Thanks for all the thoughts. I don't need surgery since the arm is functioning well enough that I successfully tried some mountain building. Hooray! I would have even worked longer than I did, but I first cleaned up the shop from the B-17 project, and then did mountain work. I stopped at 4:00 since I also seemed to have caught a cold somewhere on our trip back East and it slowed me down a bit, but the arm didn't. It really worked well.
Here's a rarity... my shop where you can actually see some open work surfaces. Unlike other modelers, I am not a neat worker. Never had been. When I taught shop, I had two rooms to manage: metals and power technology. My classes seemed to alternate between the two and I would often be engaged with the kids and miss the first bell, so clean up often didn't happen. I always thought I was a lousy teacher because of that. I found out from alumni, that the kids had a completely different impression.

I continued today working in cardboard on the front face. I wanted to improve the contours of the slope coming down to the tunnel portal so I first added some perpendicular cardboard formers to add a hump to the profile and then covered these with lateral strips.

I'm finding that the coated cardboard stock rejects hot glue somewhat. It's a Samsung TV box that I cut up. It's double thick. I'm having to scrap and rough up the surface to give the hot glue some texture upon which to stick.

I also put in some strips flanking down the front tying the mountain into the subroadbed. With this part down I have two more bays to strip and then it's onto plastering.

I'm going to build some lateral contour into these bays also following the patten that I used in the portal one.
So cardboard will be done in a couple of days and I expect that plastering will commence this week. I need to get this whole deal finished before Thanksgiving when my granddaughters come for a visit. The arm got functional just in time. It's quite weird that you can detach one half of your bicep and still have a functional arm. Luckily, the short-head tendon rarely if ever breaks. It probably evolved this way just so you had some redundancy.
Attachments
Images (4)


My younger brother called me a "neat-nik" (a takeoff of beatnik) when we were growing up. 40+ years of employment have shown me I am in the minority! Whatever it takes to get the job done!
The cardboard slope looks realistic, and the forms behind the track look like that slope will be too. Yes, I can see where hot glue may not stick well to the coated cardboard. Where there is a will, there is a way.
I don't recall you mentioning the granddaughters before. How old are they? It's great the arm came around in time. I too am surprised your arm can function the way it is now. Good!
The granddaughters live in State College, PA. who we visit multiple times a year, but they only come to us (and my son's sister) on T'giving. Both girls (ages 8 & 11) are very talented with singing, dance and piano going well. The older one sings the National Anthem at many PSU sporting events and is a regular at the minor league baseball games. They perform in children, student and adult plays and are truly impressive. Both are also very technically literate, not from their dad, but from they super-tech-savvy mom. So they really appreciate the trains and when I've done with them. If you're interested, send me a private note and I'll friend you on Facebook and you can see them perform. I've even coached the older one on how to do some things on SketchUp which she was using in a school program.
Wait a minute! I have seen them on Facebook, as we are already friends there. I guess I didn't remember since OGR was out of context. Yes, I have watched the singing! Very good!.
Our younger daughter is similarly gifted. Didn't get it from me. She now has a degree in music, sings in the Mendelssohn Choir in Pittsburgh, gives private voice and piano lessons, and plays harp and sings for weddings. She also performs in an occasional play or musical. She is 23. The big thing is she is a go getter; she auditions for anything, even things she doesn't think she can qualify. I'm not bragging, I'm amazed and too laid back to have the nerve to do what she does. If your granddaughters want to pursue their talent as a career, they will have to continue getting every opportunity they can; and it looks like they are off to a fine start.
Mark, it's nice to hear about your daughter! You're allowed to brag. My son was a stellar performer in school, but never told anyone about his grades or success, so I took the job of bragging about him. Two years ago Anna auditioned for Mathilda on Broadway. She made it to the 3rd round, but really didn't have the acting experience needed for such a heavy lift. Since then she's been in lots of performances and her talent continues to grow. She really loves it. I mean, seriously, standing on the ice in front of 20,000 people and nailing the Star Spangled Banner. A lot of pros have trouble with that.
Harp eh? I have a harp story. One of the VPs at a company I used to work said that his daughter plays a $750,000 harp. The harp cost $10,000. Then the van he needed to haul it cost $40,000, and the new house with a music room to hold it cost $700,000. It was very funny when he told it.
As manufacturing jobs continue to disappear and the creative ones keep increasing it's good when the kids have talent. The hard part is making a good living at it. There are so many talented people out there, but so few make it big (similar odds for high school sports athletes turning pro). So much depends on happenstance, being there, being discovered, getting the big break, paying your dues, handling rejection, etc.
After playing in the band in college, my wife didn't want me to pursue music at all. She really didn't like the life style that it entailed. Even though it might have been fun (for a while), it was the right decision.
Good for Anna! Yes, Holly started singing the Star Spangled Banner at high school basketball games, she played in. Folks were surprised she did so well, then pretty soon they were asking her to do it every home game. Once she was in college, they couldn't believe a 5' 4" pixie played basketball, until the next year when her high school's star player joined the college team and corroborated the story.
I like the story about the expensive harp! Holly's grandmother bought the harp before her death. We hauled it in an old Dodge mini-van and it sat in the corner of the living room of our small house. Now we can unload the worn out van, as Holly's husband has an SUV, but no one carries the harp but Holly.
I'm very encouraged. I actually used the staple gun in my right hand without freaking out. "When you fall off a horse, get right back on." I only have 3 square feet let to pave with cardboard strips and that should be done tomorrow, which means plastering will commence Friday.
Again, I put in some intermediate formers to add some more contour on the front face, and add more lateral rigidity to the main formers to better support the plaster ops. In doing this today, I closed off the last bit of space where I could dangle my legs and face forward when working. Once I closed it up, I had to side sideways and work bending at the waist which wasn't comfortable.

To get better adhesion, I glued the cap strips on top of these formers BEFORE gluing them into place. This enabled me to put more uniform pressure on the strips while the hot glue set. Hot glue is funny... once a joint breaks loose and you put on more glue, it just gets worse. Glue doesn't stick to glue very well and things can go from bad to worst very quickly.
A tip: I find that when you're getting near the end of the hot glue stick and you're ready to insert another one behind it, it works best if you put a dab of hot glue on the end of the new rod and glue it to the back of the one that's in the gun. It improves the feed from one stick to another.

Here's another cascade of cardboard strips. I like how the contours worked out with those intermediate forms. I used the staple gun to tie the loose ends of all these strips when I saw that they were pulling up before the glue set. I also glued up longer strips so I could go from top to bottom in one go. It provides a somewhat smoother transition. I also lined the sides of the tunnel cuts in preparation for plastering and some more rock work. Again, the staple gun was used to tack the bottoms of these pieces to the subroadbed.

Tomorrow I'll finish up the stepping (finally) and get going on plastering this massive undertaking.
Attachments
Images (3)


I think the progress you have made is wonderful! Are you sure your not a teacher for the rest of us up and coming students of this hobby. You just like some other have so much to teach and with your post you are teaching more then most would ever think about. Please keep up the great work and keep all of us students posted!
Great tutorial you've been presenting here. I could have used this 20+ years ago when i built my mountains and had to rely on the HO mags for how to ideas. I have had a love/hate relationship with hot glue for many a year. I finally started using good old construction adhesive (Liquid Nails) as an alternative; the little extra set up time beats the frustration of hot glue.
Congratulations on using the staple gun. I agree about the good tutorials. As I recall from reading Model Railroader many many years ago, they made the woven web much looser (not as many cardboard strips per foot). I did that, and it was too wimpy.
I really enjoy sharing the information. I too would have liked this much input years ago. It's really no problem for me to capture all this stuff. I kind of like re-reading it every once in a while, since it's easy to forget just how much work it is to create this stuff. When it's all finished, all the work is hidden from view.
Mark, I actually don't have a clue about how much structure to build. I just it want to be able to support the plaster load and an eventual misplaced hand. I've leaned on the finished part to work on this stuff today and it didn't budge. Model Railroader is always working in HO, and frankly there aren't many HO pikes that build 7 foot mountains. That being said, if anyone has ever visited Northlandz, in Flemington, NJ, you'll see HO mountains that are 15 feet high. I don't know what they used in their construction. My entire family has seen Northlandz and, while they were impressed with the scale of the landscaping, they were unimpressed with the actual railroad aspects. A much more impressive pike is the one sponsored by BNSF at the Chicago Museum of Science and Industry.
I think that using structural adhesives is precluded due to the need to clamp all those cardboard pieces in place. Most of the time, the hot glue holds quick enough that clamping isn't necessary. When it is I just attach some of those cheap Chinese spring clamps to secure the troublesome spot for a minute or so and then move on. Hot glue in this application is similar to using CA in flying model aircraft where you can glue up a wing as fast as you can move instead of waiting 24 hours for old style solvent cements to dry. CA too has it's problems if the joint doesn't make properly the first time.
I didn't work on the mountain today, but that doesn't mean that I wasn't doing any "train stuff". First I have to regale you with a very sad story.
The main reason for heading back East two weeks ago was to go to York for the TCA show and then onto Philly to visit family ending up at State College, PA to visit son and his family. It was going to be a long, 12-day trip so my wife asked if we could cut it short one day by going to York on Saturday instead of our usual Friday. I said, no problem since the show runs from Thursday to Saturday.
We left our motel in Frostburg, MD and arrived at York just before 1:00 p.m. I was surprised how close we were able to park to the Orange Hall. When got in, the concession area was very quiet and we decided to have some lunch. At 1:15 we went into the "Show". I put "show" in quote because, at 1:30 p.m. on Saturday the show is effectively over. I wanted to meet with three vendors. River Leaf Models, Sunset 3rd Rail and DHS Model Construction Equipment. Of the three, only Andre Garcia of River Leaf was still there. 3rd Rail had left after Friday, and DHS' booth had one box sitting on an empty table. To say I was disappointed was a very big understatement.
I did get a new MTH catalog for my troubles. And in it was the reissue of their Premiere EMD Santa Fe F-3s and since I sold my Lionel unit last year I've been longing to replace it with one without magna-traction. So after discussion with the CinC, I decided to put in the order at our local train store, Roundhouse Trains. I went there today all set to put the wheels in motion to get a $1,200 loco lash-up. While discussing the order with the proprietor, I noticed an older PS-1 F3 set that was in beautiful condition. I inquired at the price for the A-B-A model and was told $200.00. $200.00!!!
(I just checked in my pile of old MTH catalogs and found this engine in the Volume 1, 1997 and it listed for $600.00)
How the heck could I justify spending another $1,000 for an engine that differed from this one in a few ways: (more detail on the Blomberg trucks, opening doors, LED lighting, spinning roof fans, and the more prototypical freight pilot), chrome plated sides to more reflect the shiny stainless on the real one and PS3. While that's a big deal IF I WAS RUNNING DCS. I ain't, so the PS-3 option doesn't reflect my needs. I called my wife on the phone and asked if it made sense to order the new one or save $1k on the used one. You know what her decision was.
While getting all this packed up, I saw an Atlas SW2 switcher in the case. It was in BNSF livery which wouldn't be a problem since I have the skills to re-color it and it was just $95.00, but after putting it on the test track, the electronics were compromised. I then saw a RailKing SW2 cow and calf set in my colors (UP). It was also pristine like the F3s. The price for the pair was $175. I offered $350 for both engines and the deal was made. I also picked up a beautiful MTH Premiere Centerflo Hopper for $35.00. So for a total of $408 I got two nice engines and a great car. So who needs York??? That will teach them about shutting down at 2:00 on Saturday.
Here's the F3s in front of a mostly-Santa Fe passenger train.


The two new engines side-by-side.

Both engines have battery eliminators installed which Roundhouse does for all their used MTH engines. I'm in the process of upgrading to BCRs in all PS1 and QSI equipped engines. With these new two I'm up to 7, with 10 more to go.
Tomorrow I'll be back building that mountain.
Attachments
Images (3)


Well you made a great deal indeed! They look great!
A sad story, but with a happy ending at least. Why 17? With deals like that, round it to twenty. That way you can have a yellow bonnet, and a blue bonnet, on it? ![]() I hear its better that way.
I hear its better that way. ![]()
Andre still being there is pretty cool, but not totally surprising. He strikes me as committed and courteous. It's nice to know your right about things like that. If you would have made a guessing game out of this I would have beat the odds easy.
Any business that closes early even fairly regularly loses my business all together. If the hours on the door say 9-5 I had better be able to walk in the door at 4:59 and do 5 minutes worth of business. And that's if you're rushing to leave. Otherwise, buy a new sign that says 9- 4:30 and stay open "late".
A show is only slightly different. I don't know where some of these folks today got their work ethics but "not worth it" means you shouldn't bother signing on to begin with. If you need to skip a day, fine, don't advertise yourself as being there or be specific about your hours, signs at a table about it and all.
I know of two shows where if you leave early, you can't reserve space in the future. You can only show up and hope there is room. Tit for tat, lol. That policy is a good one. Especially if folks are paying an entrance fee. Not at a train show(yet) but I've demanded my money back at auto parts swaps and comic book shows when the place was emptying at noon, but scheduled till 3. "I didn't pay to watch folks pack". I don't like mornings or morning crowds so "get there earlier" is asking me not to attend, and I'll abide, and you'll sell that much less. Fine, but change the sign; false advertising.
OK pictures above are loaded....except the last one. When I'm scrolling its there, if I stop, the frame goes black. And FYI other posters, the attachments at the bottom have been near usueless for viewing since June or July, you can't zoom them and the picture is smaller than "medium", please check off "insert full size". This applied to a PC and 2 androids so it must be aimed at Mac users. Don't worry they can still use it unless you " collapse attachments", that hides them. ............OK half hour to fourty minutes to load the Chief hunting a buffulo and calf at dusk (with a cannon), kinda worth it ![]() . Nice snags TM.
. Nice snags TM.
And to pour salt in the wound, it may have cost both missing vendors a sale. I was prepared to pre-order the 3rd rail PAs in Santa Fe livery, and am always interested in buying some construction models from DHS. I like to see them in the flesh before buying. Since they were gone at 1:30, I spent my money at my local train store. In retrospect, it's better to buy from my local train store since it's the only one left in Louisville, and they're doing a nice job.
Once I got to a show within the last 2 hours because I had trouble finding it. This was decades before GPS for the public. When I entered, the man at the door told me a few vendors were packing up, so he would let me come in and browse for free. I don't remember how many were still selling or if I bought anything, but I did think they did right by not charging. If they had, I may have just gone home.
I spent my money at my local train store. In retrospect, it's better to buy from my local train store since it's the only one left in Louisville, and they're doing a nice job.
I wish I had a "local train store"!! I say: "Good for you".. I have to rely primarily on the bay and the Forum.. I'm going to a train show toward the end of the month in Charleston, SC.. It's about 100 mi., I hope it is worth the trip..
Woodson,
Great point! For new I like to buy at a local hobby shop, but a lot of what I buy is used. In fact, besides the Hallmark Santa train I bought for my wife last Christmas, the only other engine I own that I bought brand new is an MTH Premier F unit. I have bought many cars, track, and my DCS and Z4000 from LHS. I have never bought an engine at a show, most have come from Forum members right here. Kind of like I don't mind buying a foreign car, since I buy used and have never paid more than $10,000. I realize, the next used car will cost me more than 10 grand, but I have digressed too far.
The real benefit of buying local was the ability to put the engines on the test track. I may have purchased that Atlas SW2 if I hadn't seen the trouble with the electronics. Cosmetically the engine looked okay. They had a lot of other nice engines too. They lean towards Lionel, but have a good MTH representation. The store used to be tiny. Then in 2011, the small publishing company that had adjoining office space moved out, and Roundhouse absorbed all of their space. Now it's this labyrinth of connected rooms filled with goodies. It's really fun to visit since you don't know what's around the corner. They just bought out a huge estate of trains that besides being in the house, filled an entire storage container.
Well being in Detroit during the slow fall of the auto industry I have a tendency for being loyal to local businesses. The loss of one local dollar leads to the loss of the next. When I bought cars new, they were and still would be American. But the air cooled VWs were too interesting to pass up for looks, concept, history, and assembly. I bought 73 and older and surprisingly enough, most replacement parts could be had with a "made in the USA" label on the box. I had no guilt spanking Ford Mouse-thangs out of the hole in my ratty bugs.
For an extra few bucks, I keep it local without thought. If I don't, I'll be handing it out the window of my car to feed him anyhow. ![]() The world economy begins at the bottom of your porch steps, why venture to its extremes.
The world economy begins at the bottom of your porch steps, why venture to its extremes.
Despite great product, those folk missing in action must not be hurting for any business or they would have stayed IMO. I never left a comic show early good or bad, never closed the funnel cakelcaeed The whole deal was dealt by karma it seems. Count t
Useless composer won't let me change anything above, cursor lands at the en dddd repeatedly , sorry...
I couldn't agree more! We have a really nice train store here and a terrific full-line hobby shop (Scale Reproductions Inc.) and I really do my best to keep them here.
Today's production was very good. The arm is working better each day and often I forget that it was even injured. Sitting and kneeling/leaning over the mountain probably did more to pull my back out of shape than hurt the arm. I got all the cardboard in place and even got most of the first coat of plaster soaked paper towels onto the mountain.
I brought the strips down below the land line so the terrain leading up to the mountain will merge nicely with that front lip.

The contours work pretty well and make the effort to pre-install all those curves worthwhile. For the remaining terrain, I'm going to go back to window screen since it relatively flat with gentle curves to which the screen will conform decently. I chose not to use screen for the mountain for two reasons: 1) it doesn't form compound curves well without buckling, and 2) you need solid support to which to staple it. That would have necessitated using lots of lumber to build the skeleton. Cardboard did the job much better.
I mix my Gypsolite to be about the consistency of thick Pea Soup. It's a sloppy, messy job, and I put a drop cloth under the layout to catch most of the drips (even though the floor's a complete wreck from the previous work). I used nitrile gloves to keep most of it off my hands. BTW: I use heavy leather work gloves when using hot glue. It's really easy to get that stuff on your hands and it will burn you! I find that as I use the plaster, the consistency changes since the paper towels suck out some of the water. I have to spend more time working the plaster into the towels as this consistency changes. It's also where the skimpy plaster towels seem to come from.
Before doing any plastering, I put some masking tape on the tunnel portals. I should have done this with the right side since it made mess of the portals which took a lot of cleaning up.

I added a couple of extraneous rock casting to that small vertical surface on the left. I just scooped some plaster to the back and stuck it to the wet paper towels. I never did it this way before and we'll see how well it works.

It was dinner time and I finished up my second tank of plaster so it was time to stop until Monday. I did lay out the last of the my paper towels on the remaining areas and cut another 6 pieces to fill out the space. (I just realized that I can enlarge the pics on this forum.... doh!) The areas covered by the towels are it for the mountain.

I'll have this remaining plastering done in about an hour on Monday. After a couple of days of drying I'll add the second coat. Coloring and rock work will start the end of next week. After that's finished I'll remove the track masking, and re-ballast all the disturbed areas.
When the mountain's done, I get into action and do the terrain work on the remaining open areas on the right side. As I noted above, with screen wire substrate, the plastering work will go quickly. Trains could be running during this work.
It's fun to note how this "real" mountain compares with my artist rendering that I did five years ago. When I drew this I was thinking about buying the B.T.S. Cabin Creek Coal Mine. I've lowered my sights on this and will build a much smaller operation. The bigger models all require multiple tracks under the tipple. Since I only have a single track passing that point, a smaller mine was in order.

Attachments
Images (5)


I agree on the cardboard over screen. It looks great, just like the tunnel approaches were dug out of the mountain side!
Thanks Mark. Did you have a nice Birthday?
I'm a God in reverse. God makes the mountains and the railroads punch holes in them. I make the railroads and build the mountains on top of them.
Birthday? ![]() I keep missing these national holidays.
I keep missing these national holidays.![]() Good thing a new calendar gets bought soon, this one was left blank the last few days.
Good thing a new calendar gets bought soon, this one was left blank the last few days.![]()
Trainman2001 posted:Thanks Mark. Did you have a nice Birthday?
I'm a God in reverse. God makes the mountains and the railroads punch holes in them. I make the railroads and build the mountains on top of them.
Adriatic posted:Birthday?
I keep missing these national holidays.
Good thing a new calendar gets bought soon, this one was left blank the last few days.
Myles,
Yes I did; easy day at work, went out to eat with my wife, daughters, and sons-in-law, they stopped at the house for cake, and my mother-in-law came in for cake. So that was all good.
Yes the tunnel making is in reverse of real life.
Adriatic,
Yes, Nov 3rd is my birthday. I turned 60 this year, but no one made a big deal about it. Just another birthday. Every so many years my birthday is Election Day, but I would call that an anti-holiday. Thank you for commenting however!
Sorry dude, but 60 is a big deal. All those decade birthdays are a big deal. It means you can't die of a heart attack in your 50s. Five more years and you can have Medicare and cheap movie seats. In Philly, you can get an Amtrak ticket to NYC from Trenton for $7.00. So some birthdays are definitely worth celebrating. I'm 71 so I am no longer going to die in my 60s. It's kind of macabre, but I like looking at it like that.
On the arm topic... according to son in law, medical people aren't even sure why you need the long head bicep tendon. They think it may help stabilize the shoulder joint since it threads over top and fastens behind it, but you can function perfectly well with just the short head doing the work and they, apparently, never break. He said I was lucky that it actually fully detached. If it doesn't, it continues to hurt forever. They go in and surgically cut it. It retracts back into the arm and the pain goes away. If you're going to wreck your shoulder, this is probably the best of the worst things that can happen. It's one of those rare instances that "rupturing something" is actually a good outcome.
Re: Montjuic... I was going to cheat and not put rock detail on the wing walls facing away from the viewer, but then I considered what the train-mounted GoPro camera would see entering and leaving the tunnels. So here's how I'm going to try and handle it since painting the rocks in situ would be difficult. I'm going to pre-mold/pre-shape the rock walls, and then color them off the mountain. After plastering them in place, I'll just have to touch up the joint areas. The forward portal wouldn't be too bad, but the rear-facing wall is very hard to reach while lying on the layout.
Trainman2001 posted:I'm 71 so I am no longer going to die in my 60s. It's kind of macabre, but I like looking at it like that.
I'll join your decade in March and I don't think it's macabre at all. Some years ago I made a list of how long my parents, grandparents and in-laws lived. I then figured out the day and year I'd surpass them in longevity. So far I've passed my father in 2004 (he died young) and my paternal grandfather in 2015. Next up is my maternal grandmother in 2023. Ever since our granddaughter was born, just turned 10 on the 1st, I've had this "thing" about my mortality and what I'll probably miss in her life. That didn't happen when the older grandsons were born, but I wasn't retired then and didn't have a lot of time on my hands to think about things. My maternal grandfather lived to be 103, so I doubt I'll get too close to that. ![]()
Myles and Dave,
LOL!!!
Interesting ways to look at aging! I have realized I have outlived one grandfather by 4 years, and by 65 would pass my other grandfather and a grandmother, but don't think much of it. My main thought was to see our daughters marry and get on their own. Marked that off two months ago. I would like to retire and be able to share my trains with grandchildren, but if I don't see that, oh well.
Interesting on the shoulder. As ong as you can use it and it doesn't hurt, that's great!!
Reading back a few pages, Mark and I were conversing about how my generation has outlived our parents and grandparents generation. It's probably the first time in human history where my grandchildren have all of their grandparents on all sides living and functional. And almost all because of modern medicine, not any longevity genes. It's why I'm not taking the joy for granted of spending time will all of the grandkids and imparting whatever wisdom, encouragement or skills that I can. I wish I had grandfathers who could have done that for me.
I agree! Both my grandfathers passed away before I was born and I was the first grandchild. Yes, they both probably would have lived longer if today's medical advances had been available. Also, it is quite possible if I hadn't had that one little statin pill each night for the last 20 years, that I would not be here typing this message right now.
I agree also, Mark. None of the men in my family have made it past 75 - some earlier.
I've got 5 years to go to break the record. ![]()
I take my statins - although my cardiologist tells me that a new study shows they work better if they are interrupted occasionally, so I stay off them on the weekend. It seems to be working, so far . . .
Back to the subject - it's all going along well, Myles. I'm with you every step. ![]()
Being alive is definitely a plus. And... being alive and well enough to build a model railroad is like the best of the best.
Well... the mountain has its first coat of plaster finished. I took more care in ensuring good plaster mass in the paper towels, as a result, the work that did Friday cured rock-hard and can support my hands pressing on it. Today I did the remaining areas. After laying it all down, I went back with additional plaster to cover any obviously thin areas and to refine the seams between towel layers. In this way I've precluded the need to add another 1/4" of Gypsolite as a second coat. This just bought me about 3 days of production time.

There's a little hint of the underlying cardboard, but it's really not noticeable (IMHO) and I'm pretty sure I'll be able to paint and landscape on what you see here. I also cleaned the plaster off the roadbed on the future track in the foreground.

I went over the whole deal with some more Gypsolite on the previous work to fill in any obvious holes and lumps. I also chipped away excess that was fouling the track next to the masking tape. I then made some templates of the wing walls. As I noted in my last post, the idea is to pre-make the wing walls even as far as coloring and then apply them to the mountain. Here are the three templates.

I then put masking tape on the Bragdon Rock Mold to delineate an area to add the plaster. In this way I "Near-Net-Shaped" the part reducing the plaster cutting that would be needed.

This really worked better than I thought it would and created a pretty well shaped piece. There was just a little bit to be trimmed with a hack saw blade. Here was the piece fitted to the rearward facing wing wall at the back portal. That hole at the bottom and the fit on the left edge will be handled with scultamold (which I will pre-stain something more rock like to reduce painting.)

I poured another mold before quitting today and will pour the last one tomorrow. I'll be ready to start painting everything on Wednesday.
Attachments
Images (5)


There are a couple of milestones in the building of a layout when magic happens. You are in the middle of one of them. ![]()
![]()
You've got that right. When done work today I'm looking at it and saying to myself, "I'm building a freaking mountain!" it was a large space to cover and very daunting. So... you've just got to start. Once you start it becomes less threatening. The goal is to have everything running again by Thanksgiving. That goal is quite reachable now. I've got little kids waiting on it.
The wing wall castings look great! I think the mountain will look great, and you will have everything cleaned up in time.
My family has been back pedaling from 80-102+ since the late 1700s - 1800s to 50 -80 for those born in the last century. Each generation dying sooner since 1912, the year my last living grandfather was born. Half his children died before he did. Its the industrial city life IMO. I'll be lucky to to reach actual retirement age it seems. Things started breaking and popping in my forties. Younger cousins dying before me. Those my age dropping like flies in the cold. How old? Well, I dont recall the Kennedy's but turned on and watched the Apollo in B&W and for the first moon step I was all alone. I remember Curt Russel doing spy toy commercials and my first crush was a pretty nun on a motor scooter. Then soon after I cried with my Grandfather at the thought of Lionel going bankrupt ![]() .
.
The mountain? I'm too busy watching it grow. When I'm "quiet" I'm often at full attention ![]() A fan of overkill , my only thought has been I hope its still thick enough for a good bump or off balance lean if you skip that layer of gypsolite.
A fan of overkill , my only thought has been I hope its still thick enough for a good bump or off balance lean if you skip that layer of gypsolite.
Well... the things do start happening in your forties, first you lose close vision, then if you're heading that way, the blood pressure and cholesterol start showing up as problems. Then you start having joint problems. That being said, the BP and LDLs are controllable. My numbers are better now than they were then even with meds in both cases. And regarding the joints and stuff, that sort of levels out to a tolerable level of annoyance. So you kind of get into an "aging groove" which barring catastrophe, you can keep going for a while. My model work is superior or equal to what I did 40 years ago.
Back to the mountain. I did find some soft areas when I put some extra weight on my hand. Instead of slathering on more Gypsolite and wasting more drying days, I just laid on a layer of Hydrocal which I brushed into smoothness. This did the trick and the mountain is secure. I poured more wing walls. In one case, a couple of pieces broke off and I was able to repair them. In another, I de-molded too soon and it broke into many more pieces. So I abandoned using the masking tape on the mold. Instead, I just took a fat marker and traced the wing wall template. When I did the pour I just steered it around the lines.
When I de-molded, the marker lines amazingly transferred to the molded rock. This enabled me to scribe the lines with a utility knife and snap off the excess giving me a well-shaped rock wall. Again I had a couple of repairs to make which I did with a combination of Aleen's and CA. It only has to stay together long enough to plaster it in.

After trimming this is what it looked like. The notch at the point is to clear the protrusion on the tunnel portals.
 \
\
Here's the other remaining wing wall after gluing on the errant piece.

And here's what they look like when laid in their ultimate resting place.


Tomorrow I'll pre-paint these walls and install them into place using a full load of Scultamold behind them.
Attachments
Images (5)


Besides having a miserable cold and being up most of the night due to the elections I had a very productive day. I'm doing another multi-tasking project with mountain building, and while plaster hardens, building another nice model aircraft; a Trumpeter 1:32 ABM Avenger. This ones for me and I'm going to add a lot of bells, whistles and crazy details.
Today, I got the wing walls painted and installed.
As planned, I painted them off the layout to reduce the contortions I would have to endure in doing this on the layout. As it is, I will have to do touch up painting, landscaping and ballasting in those positions.
Again, the rock painting followed W-S's guidelines. I used their tinting colors first with a yellow ocher band surrounded by slate gray.

When this dried I sprayed it with W-S Scenic Cement to fix the colors and then used an India Ink/Alcohol wash followed by a earth toned wash and lastly hand brushing acrylic grays to highlight the strata. Here's the finish product.

To imbed these castings into the mountain, I mixed up some Sculptamold with some added India Ink to tint it gray to make touch up easier.

It took two full batches to get everything in place. Where parts of the casting broke off, I was able to fill the gap with Sculptamold. After getting everything set in, I went back with a wet (old) paintbrush and smoothed out all the interfaces. Here are the three wing walls in place.

Where the Sculptamold over laps the castings I scribed some strata and when touch up painted, you won't notice the transition.


I definitely think that preparing, cutting and painting the castings off the layout was the way to go. Notice that I tilted the strata which is quite often the case in the Appalachians. In fact, one of the identifying aspects that you are, indeed, in the Appalachians is the tilted strata that is so prevalent.
By tomorrow (I hope), the STM will be set and I will be able to paint the new mountain terrain and get on with the removing the masking tape (which has done a yeoman's job) and finishing up ballasting and tie cleaning. By next week, we should have trains running through the tunnel.
Attachments
Images (6)


It looks great already. Like a winter scene.
I'm very impressed with the color shades you make!
Congratulations !
Trainman2001,
Absolutely love the way the rocks turned out, to my eye you nailed it! I've been trying to model Silver Creek in Southern Indiana which has predominately shale banks. So far I've been less than happy with the results. I'm going to give your methods a try, so thank you very much for the post!
bd
Adriatic posted:It looks great already. Like a winter scene.
Yeah. Reminds me of the time I modeled a ski area with snowmaking machines:
https://ogrforum.ogaugerr.com/t...46#37611053597842846
![]()
Thanks guys. I'm not really into winter scenes. Today I didn't do any mountain work since the thick slabs of Sculptamold are not dry yet. I find large sections of that stuff seem to dry in two stages. first the plaster of paris hardens in minutes, but the fibrous portion can take days. Since I want to paint this ground color, I must wait until the plaster is dry or the paint will seal in the moisture. So... until it fully dries I'll be working on the aircraft kit. Here's the engine being built. It's a Trumpeter 1/32 ABM Avenger. Thats a Wright R-2600 radial. The Trumpeter model is well engineered.


Oh... and one more thing. I bought 3 more BCRs to put into some more of my older QSI/PS1 engines. That will make 8 conversions with 4 more to go. They're expensive, but they eliminate so many operational annoyances.
Attachments
Images (2)


It's Saturday so no train work, but I was downstairs checking on the drying Sculptamold (it is dry BTW), and noticed a natural notch that would be a terrific beginning for a spring fed "natural" stream going down the slope and ending in a pond that will be built in the open area between new and existing track.
Here's the path. I'll have to add some Sculptamold to build up the terrain at the bottom so the "water" would flow to the pond and not over the (or under) the track.

I'd put some strategic rock casting at the starting point with the water coming out of them. It could add some more interest to this expanse of plaster. The pond would be on the lower left out of the picture and right up front which would facilitate doing some nice vignette work around it.
Attachments
Images (1)

All the Sculptamold (STM) on the portals is dry, but instead of starting the painting today, I contoured the stream bed adding lots of STM and various rock shapes that I had lying around. Now... I don't really know if any geological formation actually would appear like this, but in order to get the flow to bend to the right so it would end in the pond that will be created, I had to make the stream bed.
Notice: My pre-coloring the STM didn't really make it that dark. It would take a lot more pre-color to darken the STM so it wouldn't need much paint. Therefore; I didn't add India Ink to this new STM project.
So here was the before:

And here was the after. I added a strata rock face up top from which the water will emanate, a series of rock was of the right side (looking at the mountain), and rock ledge over which there could be a small water fall, and then a rock-lined channel getting the water down the mountain. I added a couple of rocks in the middle of the stream for interest. It's hard to visual this with it all being white, but when all the coloration is added it could work.

It took a lot of plaster to reshape the mountain and blend the rocks believably into the existing contours. The rocks don't show up without painting, but they will.

I mixed the plaster with a bit less water than I used when setting in the portal wing walls, and I'm hoping that it will cure faster since I need to get cracking on the painting and landscaping.
Attachments
Images (3)


Today was a big day! The plaster was dry enough to do the painting and landscaping. Lots of crawling around on the layout and bending at funny angles. I left the very front area where the mine's going without any terrain since I'm not sure how it will sit and don't want to forego any options in its installation. It's not a show stopper since all the track and trains can run while I'm building that. Meanwhile a train did run today.
All the rocks around the stream bed are now colored, but the stream bed itself is unpainted. I'm going to do a little research on how best to do this.
Here's look directly down showing both portal areas and the stream run. I put a small rock ledge in the flow so I could have a little waterfall. There's also some rocks in midstream to add interest. This pic was taken before ballasting was completed on portal tracks. Masking the tunnels was the right thing to do, even though it was a bit challenging to separate it from the thick plaster at the edges, but I persevered. The unfinished areas in the lower left is where the next terrain will tie into the mountain. That's coming up next.

I started to glue down the new track beginning with the critical switch. I first had to trim about a 1/16" off the switch's track edge so it wouldn't impinge with the track on the swinging door. I'm using Liquid Nails to hold the track down to the Flexibed and then weighing it all down till it cures. I need to buy more Liquid Nails before continuing. I'll get it tomorrow.

So here is the mountain which I'm calling Montjuic after the big hill in Barcelona Spain. It translates as Jewish Mountain so it's kind of appropriate. The Super Chief ran the tunnel with it's "new" engines leading the way without any mishap. This picture was shot with the EOS and a 71/210mm lens and using Zerenstacker photo stacking depth-of-field software. It was shot at medium telephoto and took 15 images to get all of it in focus.

This picture too was shot the same way with less telephoto. It took 8 exposures.

I was thinking of the pond to lie in that triangular gap between the two tracks in the foreground, but there's a bigger space lying beyond, so now I'm thinking to let the stream drop a bit more and put a stone-arch bridge over it with the pond in the larger space. Thoughts?

While I want to get onto the remaining terrain work, the floor is an absolute mess and I think I'll clean that all up before any more work. The family's coming for Thanksgiving and I don't want them seeing that floor.
Here's that Avenger engine after finishing it up yesterday, in case you're wondering. I can almost hear the whine of its started motor. I'm an equal opportunity model builder as you can see. If it's small, I like to build it.


Attachments
Images (7)


The scene is really coming together nicely! I like the stream falling down and through a stone culvert idea!
Thanks Mark! It will give me something to work on in case I run out of things to do.
With errands to be done today, only had time to glue down the rest of the new spur.

All went well, but I noticed a gauge misalignment with the new switch and the track on the swing gate. It appears that the left hand rail on the switch is not in gauge since the center and right rails line up perfectly. Ross rails are spiked and glued so moving that rail might be difficult. I may just grind that part that's sticking out a bit so it aligns better and doesn't snag any equipment. The two sets of tracks also didn't align vertically, but I fixed that by slacking off the riser holding the subroadbed on the swing gate, raising it up about a 1/32" and then re-tightening. It's one of the advantages of using L-girder. Things are easy to adjust.

Just before the left front tunnel portal is switch "L". It's one of the original switches that ties the back passing siding into the inner main line loop. It stopped working, and the problem was tracked to the old model Z-stuff switch machine's terrible lead attachment method. The set screws press the wire to a contact spot on a small circuit board and it's flexible. Contact is easily lost. The new models have pigtails soldered directly onto said board, and I think I'm going to take that machine apart and solder the pigtails myself. I did get it working, but it needs a double tap on the push button controller. I have a ton of those early versions. BTW: that's a pretty closeup shot of the roofing granules ballast, and they look pretty good. Their size is just about perfect for O'gauge. Just don't get Magna-Traction near them. They're slightly magnetic.
Attachments
Images (2)


That's a long way out, Myles. ![]()
I agree about the granules. Have you thought of staining a few of them and mixing them in?
I have used dark alcohol/India Ink wash to tone it down in some locations.
Today, I was going to ballast the new track, but got side-tracked on a futile mission. Before I get into that, I took a movie of my MTH Veranda pulling a train on the new spur. The misaligned switch track didn't cause any trouble in this run. I'm going to try and re-gauge that one piece of track.
Switch L, one of the older Z-Stuff 1000 switch machines (which I briefly discussed in last post) was bugging me and I thought (wrongly) that I could disassemble it, remove the set screws pressing the wires again the printed circuit pads and replace them with soldered pigtails like in all the new versions. I was getting poor connectivity and erratic operation. That switch is now partially hidden by the tunnel's wing walls and I didn't want gimpy operation in that remote location. So I took the switch machine off and disassembled it at the bench. I was so concerned about not losing any of the small screws that I neglected to pay attention to the mechanical arrangement.
These switch machines work with a small permanent magnet motor and spur gear, applying torque to a bevel gear which connects to the switch throw. The complication comes in with a cam that operates a microswitch that shuts off the drive and illuminates the red or green LED position indicator. Soldering the new wires to the circuit board was the least of my problems.

I then attempted to put it all back into the housing. The board was hard to get seated down properly because the gauge of the yellow wire was just to fat to handle the bend. I replaced that with a black 24 gauge solid conductor wire. Then the red lead to the motor broke off at the motor. I couldn't easily strip that tiny lead so I removed it entirely and replaced it with a new lead. The the brown wire broke off at the circuit board. As I was manhandling it back in place the blue wire broke off. You starting to see a pattern developing here?
When I got it all in place, the motor was bound up. I had the cam on the wrong side and it was pressing against the pinion gear. Took it apart again and re-aligned all that, and it was still stiff so I took it apart again and rearranged the wire runs which were pushing the motor out of position. Then the pinion gear came off the motor shaft. When I started to CA it back on, smarter brains prevailed and I stopped since I didn't want it on the gears or motor bearings.
When I finally got it all together and back onto the layout, it moved a couple of times and then the motor was spinning free since the pinion let go again.
Bottom line! I need to buy a new switch machine. I'm going to order two since I need a space since these things are really difficult to repair. Meanwhile, I'm pulling one of least used ones off the railroad yard and putting it back next to the tunnel since it's one mainline. I replace the yard switch motor when the new ones arrive.
Normally, when I attempt to fix something, I actually make it better. This was one of those rare times when things got worse.
Hopefully, I'll get the ballast down on Monday and clean up the mess all over that end of the basement (including the floor) since it just plain awful and don't want guests to see it.
I've taken thousands of pictures with my iPhone and never realized until tonight that even after holding your finger on the screen to set the aperture and focus, you could continue to change the exposure by sliding the light symbol up and down. Doh! So I took two pictures that show stuff in a different way.
The first is the interior (rarely seen) of the Victorian Station.

The second is the substation with the lighting more subdued looking more like it does to the eye.

Attachments
Images (3)


Nice run on the video, and the mountain looks great! The lighting and exposure makes the interior look great, and if I didn't know better, I would think that was 1:1 substation!! You will be in good shape for Thanksgiving!
1
Thanks Mark! Speaking of which; everyone have a happy and safe Thanksgiving. Careful on the highways and careful deep frying those turkeys. It's the one time of the year that all four of our grandkids are together.
Well... a rare Saturday session since I really needed to get that switch fixed and wanted to put the finishing touches on this phase of mountain construction. The next time I'm in the basement it will be to clean up the floor.
First thing I did was ballast all the new track. Typical process:
- Pour ballast between the rails and spread it forward with an old paint brush
- Pour ballast on the edges over the roadbed and brush and shape so roadbed is hidden and tops of the ties are clean
- Spray area with "wet water" which water/alcohol and a few drops of dish detergent
- Soak area with W-S Scenic Cement out of a small nozzle.
- Let dry overnight and go back and secure any loose areas.

Where the mine's going to go I added some dark stuff to the mix since that area will be covered with spilled coal.

Lastly I did the new switch. Notice, I do not ballast in the area where the points are.

Next I realized that I needed to add the missing fascia so I quickly did that. It really finishes it off. It will be painted the forrest green (of course), but that will happen another day. When I built all the existing fascia I used Masonite splice plates held together with screws and nuts. It was overkill. In this case I just put some Titebond glue on the joint plates and temporarily clamped till set. There's little or no stress on the fascia so I use very small Phillips head #2 screws. Space on the right will be fully landscaped in the next phase.

I added another piece that finishes off the yard end. Look closely and you can see that horrendous floor.

So here's all the work completed so far with all the extraneous crap removed. The three yard tracks in the foreground are where the large engine house is going. I'm working on the final planes for that. Still not sure if I'll have it laser cut by Andre or use some other method. It's going to be quite big, have a ton of windows and I want it to be brick. That 2 X 4 you see sticking up in the background was that extra support I installed to stabilize the working board I was relying on to reach the difficult parts of the mountain. Hard to believe that beast is just cardboard.

While all this was drying, I got back to work trying to make a working Z-1000 switch machine for the switch that's just in front of the left front portal. Since I was having so much trouble getting it back together I thought I take a fully functional machine from a little-used yard switch and install it back there since that's a critical location. Seemed like a prudent way to go and then buy a new machine to replace the one in the yard. Remember what Clausewitz said, "Strategy is over the minute the first shot it fired." This strategy was over when I tried to pull the three-wire pigtail out of the hole in the layout and ripped all three off the circuit board in that yard switch machine. It seems that all three wires were plastered solidly into the hole in the platform since the plastering in the yard was all done after track was installed. I almost had to chisel the remains of the wires out of the hole. Hydrocal is very strong and hard when fully set.
So now I had two defunct switch machines. I knew that the one in my hand was a good one so all I had to do was re-solder the wires back onto the board. Hmmm.... seems like I was at this same place yesterday. This time I was going to be smart by photographing the guts before removing anything.

It was a brilliant idea to take this picture. Too bad I was too stupid to refer back to it. In looking at it now I realized that I, a) had that white motor wire reinstalled from the bottom up instead of how it's here exiting the board out of the top, and b) I think I have the microswitch upside down so the lever is on the bottom instead of top as it is here.
That's why after screwing around with it for a half hour, it still worked poorly when on the railroad. And this was a good one.
As it did the last time, at least four existing wires broke in simply handling all the parts. The white motor wire broke off the board. And the wires on the microswitch also broke. Their little, short wires and are very hard to re-strip. I believe these wires are breaking since they are cheap, 2-strand Chinese wires that are too brittle. The wires I'm using to replace them have at least a dozen fine strands and are very flexible. In the motor wire's case I made a new one, but I soldered it into the board from the bottom. This caused trouble getting the wire out from under the board. I should have realized something was wrong—and checked this stupid picture—when I couldn't get the green LED back in its socket because the green wire was running directly beneath the holes. I moved it out of the way, but still had it coming from the wrong way. The other clue was not having enough room for the LED current limiting resistor since with the microswitch upside down, that resistor was now right next to the motor and there wasn't much room for it. I think I'll put that machine and rearrange stuff correctly. I'm slowly getting good at this, but it's a very painful learning experience.
More troubles happened when the connecting spring from the machine to the throw bar disappeared into the quantum rift. But luckily, Ross had sent me a bag of these puppies years ago when I had lost one. For the now missing yard switch, I installed a Caboose Industries ground throw so at least the switch can be maintained in a specific direction.
Oh... and I lost a green LED from the machine when I forgot to remove them and popped the circuit board up. When that happened the LEDs went out forcibly. I found the red one, but the green is not in this dimension any longer.
I don't give up easily and am going to try and secure that pinion gear on the other machine and rebuild it correctly and see if it will work. New one cost $26 plus shipping. While it's not a bad idea to have a spare or two around since they're so critical, I'd like to need them because they wore out, not that I've broken them.
All in all, the mountain looks great, but the rest of the day was an exercise in frustration.
Attachments
Images (7)


Thanks for posting, Myles. An interesting read. ![]()
I feel your pain. ![]()
Overall work looks great! I too feel your pain over the switch machines!
On placement of the "pond", why not "ponds"; two.? You've got the grade. A full sized one to the rear and a small shallow flood basin closer; the trestle bridge or culvert crossing splitting them. It would even allow a rocky and/or marshy version of either too; wade in with pants rolled or dive.
I think that's a splendid idea. I checked and there's a clear shot under the subroadbed where I can narrow that section and build the stone arch bridge. That's another advantage of L-girder in that you can do things like this after the railroad is constructed.
We're having family over for the holidays, so the first part of the day was spent scrubbing the upstairs bath and cleaning spaces that aren't used very much. Then I did get downstairs and did a couple of big things.
I made a 'tool' to both scrap the plaster splatters all over the floor and vacuum up the powder at the same time.

This gizmo let me scrap and clean a lot of floor very quickly without crawling around on my hands and knees and got the piles of plaster removed and sucked into my very strong shot vac. I then actually washed the floor. It probably needs it again since it kind of splotchy, but it's sooooo much better and it's at least presentable.
I then quickly painted the new fascia and the large one that borders the mountain. This really dressed it up.

I then got back to that errant switch machine realizing that the wiring could be improved so all the wires from the board coming out the top. Even the factory-fresh one didn't have all the wires this way and it puts a lot of stress on the bends and leads to breakage. I had to cannibalize from the other machine for a new motor since one of the metal contact pieces broke off the motor due to too much force when installing because the wire was coming from the wrong direction. I also had to get the other microswitch since this one started to separate into two parts. I also used the pinion gear from the "good" one for the motor from the one that had the slipping pinion.
When I finally got all the new wires installed, everything routed from the right place, the microswitch oriented properly and all buttoned up and on the railroad, it worked perfectly. No hesitation! The only thing I had to do was reverse the red and green LEDs so they represented the correct track direction.
So now I had one completely rebuilt and other that was total trash. I then called Steve at Ross Custom Switches and ordered two new Z-1000 switch machines. One will be re-installed in the yard to replace that manual throw and the other will go into inventory in case another one fails.
I then wanted to show all this great stuff to my wife. I first found that something is fundamentally wrong in the wiring. Whenever I turn on the right throttle or left, both go on. I will have to trouble shoot this tomorrow since it makes running two trains impossible. The other thing I found was the Veranda kept derailing when it went over my front grade crossing. After a cursory look I found that the Bristol Board was completely delaminating from the foam underneath and was catching the turbine's pilot and derailing it. I glued it back down and added weight to keep it there until dried.
Using Bristol Board over green foam was the worst decision I made on the entire build. It has been a maintenance headache almost from the start. It would have been better if I used plaster directly over the foam. Or if I used the 3M high strength spray adhesive...
When not working on the layout, I was doing this on SketchUp 2017. It's the same engine house I've been noodling for a couple of years, but I'm getting closer to the point where I have to build it. This was a SketchUp/Podium rendering and then superimposed on the layout using GIMP photo editing software.

Here's a fun shot of the interior. It's not finished yet. I still have to develop a roof truss system and doors and round window. Even though I drew inspection pits, they will be difficult to execute since I've got hydrocal poured between the tracks to give me a "level" railroad yard look which will require "demolition" to remove. Actually in order to implant this large building into the layout all of that will need to be cut out. Of course inspective pits with 3 rail track are always sub-optimal. Both the GP-38 and that neat overhead crane were downloaded directly from the SketchUp Warehouse. Amazing! I designed it will massive concrete pillars separated by brick walls. I'm thinking of making a silicone mold and casting the pillars of our Hydrocal.

That was yesterday. Today, I solved all the operating problems. There was a train shorting out the system which was making both throttles alive when you opened on. I don't know how or why, but it got solved. I had to reverse the switch machine position since Z-Stuff machines on the outside of a curve get hit by my big engines. They must be on the inside. This was discovered when I attempted to take the H-8 on its first run through the tunnel and it came to an abrupt halt when it HIT that switch. Of course this was not as simple as it seems since it meant breaking out now-hard ballast, drilling new holes for the wiring, and finding that the pigtails were now to far from the junction block under the platform and having to move that to a position and closer to switch. The red/green lights needed to be switched on the machine and the button since the throw is not reversed.

I re-ballasted the switch and then another area feeding into the far right portal that I had left undone. I then cleaned off the work table where all the plaster and cardboard mess was created. It's the first time I saw the whole table in months. That's the old engine house mockup I made.

Lastly, the H-8 also didn't clear the rock cut wall. Even though I moved it back a inch, after putting all the rock work on it, there are some high spots that were kissed by the pilot. I will do some sculpting to remove those spots. Meanwhile, like real life, that monster will be confined to mainline track leaving the tight spots to smaller engines. That white spot didn't exist before the collision.

So... everything is running in time for my son and family to arrive tomorrow including two very savvy granddaughters.
Attachments
Images (7)


I just love this thread.
Some day I need to drive down and see your creation!
The scraper-sweeper is a great idea! The mountain looks great! I like the drawings for the enginehouse. It will be another focal point of the layout! You have earned a great family get together this Thanksgiving! I wish all of you a great Thanksgiving!!
Today was the last day to get everything in ship shape before guests so I decided to run all the equipment through and around the tunnel, and Boy! am I glad I did. First there was the H-8 kissing the front left tunnel portal. While the portals were wide enough, I should have mounted them a little to the right to give more clearance on the outside of the curve.

That was bad, but not critical. Then I tried running the big Baldwin Centipedes and that was critical! The front unit cleared the portal and the front edge of the rear unit crashed right into it. Stopped it dead!

This could not stand! It meant that I had to perform in situ surgery on that portal. I can't remove the portals. They are literally part of the mountain now. So I did the next best thing. Got the Dremel with a carbide router blade, taped the portal so I had a cutting line and went at it. This is the rig I use.

And here's the result. Crude, but I'm in no position to mess around here. I painted the exposed green foam and trimmed that poor curve with a sanding drum before painting.

Here was the now-not-so-pretty portal. From the layout front, you can't tell and now everything passes through the tunnel easily. I really couldn't test this before since all the track was covered in masking tape and trains couldn't run.

Then it came to test the new outside mountain track. The H-8 kissed it too, a little too heavily I might add. So I took an heavy duty Xacto handle and blade and chopped off the obvious high spots till it cleared. Whew! I thought that was it. Then I tried the Centipedes. More collisions and more critical. So I chopped more high spots off, but this time I had to hit the knife with a soft-faced hammer. Finally got it to clear. Then I brought out the Coal Turbine. I thought that the middle unit had similar geometry as the Centipedes, but I was wrong. More kissing...serious kissing, and more chiseling.

So here's how much plaster I needed to remove before everything cleared.

And here's what it looks like after repairing it. Since it's all "rock" it just looks like rock again. Amazing. After this picture, I re-did all the ballast that got disturbed and then ran all the trains around and around for about a half hour.

Oh... and one more thing. I decided that the way the trains were running indicated that my track was dirty. Boy! Was it filthy! The trains ran much better and the horns didn't blow unexpectedly. The kids just arrived so I'm signing off. Happy Thanksgiving!
Attachments
Images (8)


Myles, Good job on your emergency surgery. Glad you got it sorted out. Thanks for sharing the pics. Happy Thanksgiving!
Tom
Nice work!! Have a Happy Thanksgiving!!
Gobble!
Hope everyone had a great holiday. We did! My granddaughters were here and Anna, the 11 year-old, tech savvy, budding photographer took close to 300 pictures of the trains including several videos which I've posted on Facebook. She had an interesting approach and was much more artistic than I am. Here's some of her pictures.


She agreed to do this again next year when most of the layout will be finished. She's a very neat, talented kid! Sings and dances pretty well also (plus piano, acting, writing). Whew!
Speaking of the layout, I did get to work filling in the open areas in front of the mountain. This time, instead of messing around with piles of cardboard strips, I resorted to trusty aluminum screen wire. This went very quickly. I finished putting the screen in place. The final decision about the ponds is this. The small pond will be in the front and will drain through an stone arch structure out of the layout through the fascia board. I chose not to build another pond in the back area primarily because it's so hard to get at. I'm going to just terrain that section with more rock and slopes to add interest. The other problem besides access was how deep I would be able to go with the waterway, and having to cut the subroadbed panel to narrow it for a RR bridge. This may be a cop out, but I really wanted to do the detailing where I could reach it from the aisle and not on the board on top of the platform. Every time I put that piece of OSB onto the railroad and climb all over it, I disturb more ballast.


Here's all the screen in place

Now I understand that a triangular shaped gulley is very unrealistic, so after the Gypsolite cures, I'm going to add more contours with Sculptamold and make it a bit more natural. The pond is going to be sitting at the bottom of a considerable gulch which again, may or may not be realistic. It will be more like a deep puddle.
After all the screen was in place I started plastering right away, but this time, I really covered the exposed areas with more protection (including the floor).

And then the plastering began. The most annoying thing about this, besides the general mess, is that the Bounty towels I'm using are two-ply, and the plies separate sometimes in the plaster dip. When this happens, the strength disappears and it starts falling apart. It seems worse if the plaster solids are too high and the weight of pulling the towel out of the bath is too much and it tears. In some cases, I'm able to use the pieces, otherwise I have to trash it.

I almost got it done by dinner. There's just a couple of areas of the pond that need finishing. Tomorrow I'll finish this first coat and maybe start working on the area by the swing gate. The plastering is such a mess, I might as well get it all done at the same time.
My grandson came over yesterday to work on his USS Hornet model. He had an interesting suggestion about what to build on the swing gate area. I'm thinking about putting something like the Howard Grain Elevator kit by B.T.S. there. Grandson suggested that I build the building right across the gap and when the gate's open the building interior will be visible. Like I've said, he's very creative. I may do something like this... maybe.
Attachments
Images (9)


I really like that idea of the building being exposed when the gate is open, that is very creative. Better make sure your power cutoff is in good working order as you show it off!
I also disagree with you on the triangle pond. After all the pond got formed because the RR built up the roadsides and the water only had one way out.
Thanks for the updates!
Twenty years ago or so when doing scenery on my railroad i used Bounty paper towels dipped in slightly diluted joint compound and never had any problems with it tearing. Perhaps the quality has changed. Instead of Bounty you may want to try Scott blue shop towels available at NAPA and most other auto supply stores. They are stronger than Bounty.
I may have enough Bounty left to finish all the terrain. If not, I'll take you up on your suggestion.
Re: the pond. You're right. The pond's there as a result of the railroad's messing with the natural lay of the land. It's great when you're master of all you survey.
Trainman2001 posted:Hope everyone had a great holiday. We did! My granddaughters were here and Anna, the 11 year-old, tech savvy, budding photographer took close to 300 pictures of the trains including several videos which I've posted on Facebook. She had an interesting approach and was much more artistic than I am. Here's some of her pictures.
She agreed to do this again next year when most of the layout will be finished. She's a very neat, talented kid! Sings and dances pretty well also (plus piano, acting, writing). Whew!
Speaking of the layout, I did get to work filling in the open areas in front of the mountain. This time, instead of messing around with piles of cardboard strips, I resorted to trusty aluminum screen wire. This went very quickly. I finished putting the screen in place. The final decision about the ponds is this. The small pond will be in the front and will drain through an stone arch structure out of the layout through the fascia board. I chose not to build another pond in the back area primarily because it's so hard to get at. I'm going to just terrain that section with more rock and slopes to add interest. The other problem besides access was how deep I would be able to go with the waterway, and having to cut the subroadbed panel to narrow it for a RR bridge. This may be a cop out, but I really wanted to do the detailing where I could reach it from the aisle and not on the board on top of the platform. Every time I put that piece of OSB onto the railroad and climb all over it, I disturb more ballast.
Here's all the screen in place
Now I understand that a triangular shaped gulley is very unrealistic, so after the Gypsolite cures, I'm going to add more contours with Sculptamold and make it a bit more natural. The pond is going to be sitting at the bottom of a considerable gulch which again, may or may not be realistic. It will be more like a deep puddle.
After all the screen was in place I started plastering right away, but this time, I really covered the exposed areas with more protection (including the floor).
And then the plastering began. The most annoying thing about this, besides the general mess, is that the Bounty towels I'm using are two-ply, and the plies separate sometimes in the plaster dip. When this happens, the strength disappears and it starts falling apart. It seems worse if the plaster solids are too high and the weight of pulling the towel out of the bath is too much and it tears. In some cases, I'm able to use the pieces, otherwise I have to trash it.
I almost got it done by dinner. There's just a couple of areas of the pond that need finishing. Tomorrow I'll finish this first coat and maybe start working on the area by the swing gate. The plastering is such a mess, I might as well get it all done at the same time.
My grandson came over yesterday to work on his USS Hornet model. He had an interesting suggestion about what to build on the swing gate area. I'm thinking about putting something like the Howard Grain Elevator kit by B.T.S. there. Grandson suggested that I build the building right across the gap and when the gate's open the building interior will be visible. Like I've said, he's very creative. I may do something like this... maybe.
Great pictures and great progress, It is coming along nicely. I like the grandsons idea also. I don't always comment but always check in to see how you are doing and as always it is wonderful to see how things look! Again great job!
Thank you! I definitely like when people check in so I know I not sitting here writing all this stuff for 3 people. It's hard to believe that this project is well into its fourth year, and at least one more to go. It depends on how many structures I can get next year. I'm planning out my build (and buy) schedule, and it may be more than a year's worth.
Today I finished up the base Gypsolite coat on the pond area and started working on the subterranean stream bed. I then did another un-covered area with screen and Gypsolite. Definitely moving along.
I changed my plastering routine. Previously, I was mixing the plaster in a container and then transferring three batches to a shallow container for dipping. I was getting a lot of waste since the water was gradually leeched out of the mix and the stuff at the bottom no longer soaked the paper towels properly. This time, and since I was needing a smaller quantity, I did the mixing and dipping the same container. It's the plastic box that Cascade Complete Tabs come in. It's the right depth and has straight sides. I marked the water line on it and with four cup full of Gypsolite, it gives the correct viscosity for dipping. Instead of dragging the towels across the surface, I just submerge the towel in the soup and turn it over and get it fully saturated. It seemed to work better AND I wasn't getting the torn towel problem.

After finishing the remaining layers in the pond gulch, I started working on how to get the water out to the layout's edge. I cut an opening in the fascia to line up with the opening in the gulch. A stone portal will dress this out when I build it.

I then used screen to form the creek bed that will carry the "water" out to the river that apparently runs down the opening in the middle of the layout. I formed, cut, reformed, cut more and folded the screen until it approximated the channel I wanted.

I realized quickly that it would be next to impossible to apply the plaster towels while the screen was inside the layout so I paved the channel with them while outside and then attempted to put it inside. It was a total mess and did not work at all. So I went to plan B. Plan B was forming the tube outside the layout, letting it cure and then inserting it into the space. I set up some 2 X 4s on my plaster table, held it with some spring clamps and, hopefully, this will cure hard enough to manhandle into the space. Also, it all needs to be water tight so the resin doesn't all end up on the floor. If it works, I'll only have to apply more plaster to the mating edges.

I'll give this two full days to cure. While this was curing I started working on the next area needing terrain. When you put screen across such a large span and load it with heavy plaster towels, it sags pretty bad and it needed some support, so I quickly assembled a pile of scrap foam and other stuff all held in place with Lo-temp foam hot glue. It will still sag, but it will have more natural undulations.

Again, I masked and protected all over and had to come up with a nice way to hold the screen to the fascia board. It's been a long time since I had to do this on the left-hand end of the layout. In this case, I decided to clamp the edge of the screen between a couple of layers of Masonite strips. I clamp the strips about 1/4" below the fascia edge, and pilot drilled for small screws. I loosened all the clamps holding the strips loosely by the two end screws. I bent the cut screen at a right angle, put it between the fascia and the first strip and tightened all the screws. It really worked.

Here was the screen in place ready for some more plaster.

And in a short time, here it was all covered with wet plastery paper towels. Yesterday's work was curing nicely and will be rock hard tomorrow. I'm also going to do the area on the swing door, but I have to think about that since I'm planning on putting structures there so too much undulations will be unwelcome. I will have to match the land shape in the area where the swing door and this part of the fixed layout merge. I want the gate to be almost invisible when it's all done.

Attachments
Images (8)


You mentioned that you appreciated people checking in so you would know if you were just posting to 3 people. I am still a great fan that follows your thread. Your dedication is amazing, your skills are remarkable and the buildings are wonderful. Your project has inspired me to redo my layout even though it is nowhere as neat and polished. My skills take me only so far, but your work shows that you are a problem solver and that you are not afraid to experiment. Thanks for keeping us updated.
3 people? I bet its more like 30 regulars and 30 more occasional readers. Backtrack and revisit names sometime, double that count and I bet your close to the count on regular readers. Eg I lurked on the forum for a year or two before I joined, and even then only joined to ask a question of GRJ. Then NQDY Nichole's freindly, encouraging, posts, about friendly encouraging posts, inspired me to post more often. I sure miss her being around. Exposure to that type of attitude keeps me extreamly well grounded all day....anyhow more than three readers for sure ![]()
I like the arch. Overlaping scenery onto to the sides "where it doesnt belong" strikes me as a little world, uncontainably spilling over into our own.
Around my mine, I almost painted strata and loose mineral layers onto the sides, like a cutaway view from a textbook. The idea really struck me when some dirty oil got spilled by a room border on my grandfathers benchwork and he didnt even bother to clean it, let alone tell me and appoligize (evicted eventually). So anyhow Im cleaning up oil with.... Bounty paper towels, lol, and realised it happened right where the operating oil rigs used to sit... Click clack.... Click clack.... Had they still been there, the side would have looked like a cutaway of the oil deposit. It was hard not to smile then, so I did. Later, I not only didnt smile, I winced from not smiling.... Ever yell lots with a torn chest diaphram? FYI, I advise you to skip that little adventure. Lol.
The big puddle actually seems prototypical to me. I know of a few areas along the tracks that may be dry or waste deep at times and natural ponds that are just as shallow but never dry and had no visible feed. A creek flood stocked the ponds with bluegill one year too. They lasted for about 5 years in the big one till a solid freeze up came along. I was so bummed; no more ultralight fishing, and the snapping turtles moved on again too ![]()
Hey, a few visible fish is a good idea too. ![]()
Good ideas on the tube and the facia attachment! I think it will all look great!
I am also still watching, I am learning and just don't usually have much to add. I also appreciate you taking the time to document everything for the rest of us that are trying to learn how to do all this stuff. Please keep the posts coming.
When scrolling down to hit reply, I just noticed there are 51 likes and almost 58,000 views so I think there are quite a few of us silent watchers out here.
I read it everytime you post I have never done the paper towel thing I always used the plaster cloth rolls maybe I should try the paper towel route. do you use regular plaster of paris or joint compound.
With all the positive reinforcement, I will keep writing. 58,000 hits is pretty good, but remember, this thread's been running since April 2013 and there was a thread that preceded it that started a year before that. But, what I'm really happy about is the reaction from readers which is exactly my intention. I am always learning and always experimenting and you can too. The problem is when I finally get it perfected, I don't need to do it anymore. Case in point, plaster paper towels. So to answer the question, I use Gypsolite undercoat plaster. It has a lot of texture, dries very slowly and has long working time. It's downside is that it's very lumpy and if you're looking for a smooth surface, you have to overcoat it with something (Sculptamold) which is more work. It's also very inexpensive. I would be broke if I used plaster cloth for this much area. If I was doing a little job I would choose plaster cloth every time. Gypsolite costs $19.00/50 pounds. You get it from commercial sheet rock or building supply houses. I don't believe THD or Lowes has it. Plaster of Paris, like plaster cloth, is very expensive when bought in Hobby Shop sizes. The W-S display at my LHS is strictly for the small HO project, not an O'gauge goliath.
Today, I finished enclosing all remaining open areas on the layout's right end. Instead of paving the swing gate with screen wire I enclosed most of it with OSB. I did this for a couple of reasons, most importantly, I'm going to put a structure on that gate so flat won't be a problem, and I'm running out of Gypsolite and don't want to buy another 50 pound bag since I'm basically done with it. I did have enough left for a small part on the left end that is an elevation transition to the plaster fixed portion next to it.

I used my standard L-girder risers and cleats with 1X3 and 1x2. It took four sets to support this piece solidly and I fastened it to the fascia board. I also made a new fascia board which fits the space more precisely. There is a piece of 1X2 supporting the tail since it was drooping a bit at that spot.

I needed to add an end support on the left end for a place to fasten the screen. I didn't want it to wrap over the edge since there is a clearance challenge on this end which could prevent the gate from closing completely and causing track gaps. I made a cross piece to provide this location for stapling. At first I had it flush with the structural piece below it, but this placed it too close to the fixed jamb. So I added a couple of pieces of 1/8" Masonite scrap between it and the gate structure to offset it about 1/4" and this worked.

I have a small pair of tin snips that were my dad's that work well for cutting aluminum screening, and I wear heavy leather work gloves since this stuff can get nasty. I used a medium Sharpie to mark the screen, cut and stapled it in place.

I was ready to mix up some plaster and I realized that there's a couple more places to pack out before plastering. These were at the transition between the outer loop coming down the grade and the inner loop. For the larger gap, I returned to cardboard strips since I was able to hot glue it on the OSB's edges and not have to staple screen on the surface.

For the transition gap on the gate, strips were not needed so I used a bit of this and that to fill the space. It just had to support the Sculptamold until it cures. Again, hot glue is the adhesive of choice.

As before I used a lot of masking to protect existing things. I then mixed up a small batch of Gypsolite and paved the screened in area, and then mixed up some Sculptamold.
I lathered on the Sculptamold on both places. The upper one has enough contour to allow me to engrave some layered rock. The gate area was pretty mundane so I just scratched a little bit for some interest. I'm happy to have that area finally complete. I left it for last. Notice I masked the tunnel portal too.


So here's all of today's work.

Oh... and one more thing. I took advantage of Walther's sale and bit the bullet. I ordered the Plastruct Chemical/Refinery kit. This will eventually go on the last unfinished area of the layout. I didn't finish it because I wasn't sure of the build width of this project. It can be built in different configurations so I'm going to make it longer and narrower.

I've also gotten the estimate for the second rebuild of the Berheim Distillery from André. After seeing my completed distillery the owners of Heaven Hill are more excited about having this building for their visitors center here in Louisville. After building that I will build the refinery.
I'm planning out next year's build schedule. I want André to cut my engine house design, and the Nighthawk's Cafe. Both of these will be 2017 projects. I am also noodling B.T.S's Howard Grain Elevator. That's a pretty ambitious list.
Attachments
Images (10)


I think the reasons why you chose what method to use when are very instructive.
That's a very interesting lineup you have for next year! Looking forward to it!
Thanks Mark! It really helps to have future goals to shoot for. Again, I really can't imagine what retirement would be like if I didn't have these engrossing and interesting things to do. In fact, I've decided—after watching that new series "Mars"—that I want to be alive when man reaches Mars. The show has that in 2033 which is in 16 years, so I'll be 87. That could be reachable unless something crumby happens, like falling down the cellar steps and smacking my head into the concrete wall at the bottom.
Today was a good example of finally figuring something out when I'm almost done using it.
I first applied a layer of Scultamold (STM) onto the stream bed tube. This will be the final layer of stuff to form it up. I needed it too since it was still flexing too much and the stream bed had cracked. The STM will strengthen and seal it so I can paint it in prep for the resin. I fit it back into the hole and it will work. There will be some creative plastering at both ends to blend and seal it into the framework, but it should work. Before the STM set up I added some tallus rock to make it more interesting. This picture was shot reverse angle aiming to the layout's perimeter (and my flannel shirt).

I had excess STM which I slathered on the pond's bottom. There will need to be more than this to finish it up and ensure it's sealed.
I started fitting rocks to the gulch walls trying to fit various chunks I had left over, but didn't like the results so I decided to cast some new ones. This time I made a sensible and workable support structure so the molds didn't leak all over the place and make an incredible mess like they did the first time I used them.
I had more of this strange honeycomb paper packaging material that I hollowed out a bit smaller than the perimeter of the molds.

The resulting casting was very good and complete. The weight of the plaster was sagging the middle a bit too much so I carefully lifted the filled mold and stuck a chunk of foam to support the middle. It worked.

Here's the resulting casting.

I also used this same method on the taller/narrower mold. It even worked better on this one. A little bit was leaking out the side so folded piece of cardboard lifted it enough to stop the leak.

Fitting to the space was trial and error. I marked the upper line once I was able to slip the rocks into position. That required trimming the bottom and sides until it fit the space. I used a bare, coarse-toothed, hacksaw blade to cut and score the plaster to let me fracture it on the line or cut it through completely.

The stream will cascade over the rocks on the right end. I will built up the lip so it will create a little waterfall for more interest. Kathy Millat has a video on making falling water that looks like something I can pull off. You first make the cascades with clear silicone caulk on Saran Wrap, pulling out the streams with a tooth pick. You transfer the cascades to their location and again adhere them with the caulk. After letting the resin penetrate through to dry brush white to add foam. You really won't be able to see the reverse angle view unless it's from the GoPro camera on a run-by video, so I might not use rock casting, but rather will sculpt my own strata old school.
This is another subtle reason to use L-girder and ribbon roadbed. You end up with open spaces where you can make interesting topography without resorting to using a saber saw to cut into a flat table top. My RR is a combination of flat areas and those with contours and curves due to this construction.

Two additions to my car fleet arrived today from American Excellence Trading. The fist is a 1975 AMC Pacer which I had, and the other is a 1956 Cadillac Eldorado which is one of favorites of all time being the first big-finned car on the road. I was a completely different car from the rest of the line and was actually the predecessor of the 1958 Caddie which had a similar rear end. I wrote about it in more length on the 1:43 thread earlier tonight. Pacer was interesting and the worst car we ever owned.

Tomorrow, all the Gypsolite will be hard and I'll finish up adding all the STM. By the end of next week, I think all this new terrain will be landscaped and the trains will be running again.
Attachments
Images (8)


This thread is very addictive, Myles. ![]()
Max, it's like that for me too.
More plastering today and it's almost done. I finished up attaching the stream tube and sculpting the un-seen rearward-facing slope. I attached the two long faces of strata rock and also added the last bit of rock detail to the grade embankment. I did some finishing up details while this was starting to dry and went to work making the master for some plaster random-stone walls.
First up was attaching the stream tube now that its STM was hard enough to handle. In this case, instead of using Gypsolite-soaked paper towels I used Hydrocal-soaked paper towels. I did this because I wanted the smoother surface detail and faster curing. Within a half hour the tube was secure and apparently water-tight. As you can see, I then added a load of STM and carved the strata rock.

Now... after looking at this picture, what comes to mind?
You've all heard the aphorism, "Painting oneself into a corner", how about a corollary "Plastering oneself into a tunnel." Only after all of this plaster dried hard, did I realize that I hadn't painted the inside! Doh! I'm now going to have to color the insides as it sits on the layout. I'm going to have to be creative again and make a right-angle paint brush. Again, it proves my point, "I am not patient, only persistent."
While piling on the STM, I adhered and shaped getting the long rock walls in place. Rather than fill the upper large gaps with piles of STM (and wasting a valuable resource), I filled the space first with some construction green foam, and then topped it off with STM.
Other than the "unnatural" sharp corner, they look pretty slick. "Water" will cascade over the edge in the lower right in this picture.


Before cleaning up the mess I added some more rock castings on the rear embankment. This was a much more conventional application: wetting all surfaces first, slathering STM on the backs of the castings and to the wall, and sticking them on. Using a putty knife and a wetted gloved finger, I smoothed all the joints and contours.

There was a large gap where the new OSB panel fits to the existing roadbed which I wanted to fill. In this instance I used light-weight spackle to fill the gaps. A light sanding next session will make it ready for landscaping.

Now all of this has to dry rock hard before painting and ground cover. While the drying began I peeled off layers of plaster on the putty knives handles and put on a new layer of masking tape. Previously, I put masking tape on them and after peeling it off, had a perfectly clean handle.
Yesterday, I started to make some random stone castings based on a commercial piece of Chooch rubber rock face. It has a self-stick backing which was going to make this easy... yeah...right! I stuck the piece onto a piece of plate glass and built a nice Lego barrier around it. I was all ready to mix up the silicone mold material and found that the Part B of Smooth-On 00M00 25 silicone mold material had exceeded its shelf life and was almost a solid. It should be a nice smooth creamy consistency. So I had to stop and order more.

This was a fortuitous occurrence. When I awoke this morning and thought about this casting I realized that the thickness of the Chooch wall was only about 1/8" thick. If I would have proceeded making the mold, the resulting plaster cast would have been too thin to be usable. Hydrocal is strong, but it is friable in small cross sections. My wife thinks I should plan ahead a little better for this and the tunnel tube.
So, after all the plastering, I went about making this model thicker. I added three layers of chip board to the back making it about a 1/4" thick which should hold together in plaster.

After carefully trimming the various cardboard layers, I soaked the edges with thin CA to harden them and then added a layer of Squadron white filler to give a more suitable surface for silicone mold making. My plan is to use this random rock sheeting as a basis for the surrounds of the subterranean stream and other building foundations. But, I may not do anything at all. I may have the stream come out of the layout as if we made a geological cut and found an underground stream. I'm even thinking about faking a water fall off the opening in the fascia board.

Tomorrow, I sand a positive relief angle onto these edges so I will de-mold more easily.
Weekends are no work in the shop, and on Monday I have to go to THD and Michael's to get some supplies including some more white, gray and black acrylic tube paint, so the painting can commence.
Attachments
Images (8)


I don't know where you find the time to write such fulsome descriptions, Myles - but keep it up. We're reading every word. ![]()
MaxSouthOz posted:I don't know where you find the time to write such fulsome descriptions, Myles - but keep it up. We're reading every word.
I agree with Max. Thank you!
Thanks fellas. Actually, I sit with my MacBook Pro on my lap while watching mindless drivel about Trump et. al. on MSNBC. I wish there was a way to turn all this writing energy into money, but I'm content that it has its intended affect on my followers. As I've said countless times before, the act of capturing all this stuff is helpful to me because it gives me new insights. I also enjoy re-reading the whole saga because when you see the finished products you forget how much effort it actually takes, and it's good not to forget that.
In wrestling with the best way to make my own random stone walls, I actually dreamt of a way this morning. This wasn't one of my "Laying in bed in the morning building stuff in my head" things. This was an actual dream where I carved the master in clay before making the mold. Eureka! I bought clay carving tools last year to make figurines, but cab also use it to carve stone walls for masters. The mind works in mysterious ways.
Next week I'll give this a try. While making multiple plaster copies of something is cheap, the $30 for a couple of pounds of silicone mold material definitely isn't. I also have W-S liquid latex which is much less expensive, but many, many days slower to produce a mold. As usual, you always pay more for speed. Carving these walls will give me the opportunity to make some nice scale-looking stone foundation walls for some upcoming buildings.
Sounds like fun, its always nice to make something of your own!
I have dabbled with plaster castings from time to time, but I have come to the conclusion that it is just as easy (and much cheaper) to just carve originals from pink foam for whatever I need. I find that after a little practice, I can make quick progress on any given style of stone or brick. Plus, this technique ensures that everything is truly unique and gives much more variety to the layout.
A few examples:


Attachments
Images (5)


Avanti,
I would say your practice has paid off big time! Painting too. Thank you for sharing!!!
Trainman,
That is cool about your real life dream! You will do a great job! Yes, after seeing what money and effort goes into making molds and casting that my daughter did in making parts for her dolls, not to mention the scrap material, I do not want to tackle the casting process myself. Now the next guy will swear by the mold and casting method! There are many ways to skin a cat, as they say!
Myles,
It looks great. Everything you have done is top notch. I can see that you have enjoyed every minute of building this layout.
Alan Graziano
Myles,
Great work and adjusting. I'm even more so glad to see that I am not the only one who makes these kinds of errors. You made my day!
Good! Glad to know I'm not the only person who does stupid stuff now and then. Always said, I show the good, bad and very ugly.
No building since it's Sunday, but woke up thinking about upcoming projects. It's nice having a basically un-stressed life so most of my thoughts are about creativity related to model trains. Life is good!
I was going to build a Rick House for the distillery. It's a multi-story building housing thousand of racks holding Bourbon in barrels for the required number of years for proper aging. From the outside they are a big box with lots of windows. Air flow through the building is essential to ventilate the aging barrels and remove alcohol vapors.
Here's what I was originally going to construct on the bare space next across the street from the boiler house.

But this building is boring! So I thought, "What about making it under construction. They build them inside out, by putting in all of the rack structures and then skinning the outside. This would add interest and give my construction equipment something to do. I've contact Buszick Corporation who is the company in Bardstown, KY that builds these things for the whiskey industry. Then I contacted my Heaven Hill patron for whom I'm building another Bernheim distillery and he sent me many pictures of their new Cox Creek warehouse complex development. These building are huge and they're building 8 of them. Each holds 60,000 barrels of Bourbon.


And here's some of the construction.

Construction is not difficult, just very repetitive. I'm hoping to get some working drawings from the contractor to give me more specifics about lumber sizes and placement. It looks like 12" X 12"s for the verticals, 8 X 8s for those cross beams and 2 X 12s for the horizontal members and floor boards. Foundation is not complex either.

I'm not planning on building and entire floor, but part of a floor and part going vertical to show how it all goes together. A lot of Mt Albert scaled lumber could be in order. BTW: Heaven Hill has sent Andre the money to cut the Distillery so it will be next up on the workbench once Andre clears his schedule. I also see a lot of NBW sets.
Here's a view of the first barrel in place. The rick racks run across the building as you can see by the foundation footings sitting underneath. The ricks are on a slope so the barrels roll to the aisle for unloading.

Here's the site plan showing the extent of this project. Heaven Hill already has almost 1.5 million barrels in storage. Bourbon is a big deal world-wide and distillers are adding as much capacity as they can. Trouble is, you don't get any product for at least 4 years. The good stuff is aged 12, 18 or even over 20 years. Hard to predict who's going to drink what 20 years from now. I'll keep you posted on what's going on.

Attachments
Images (7)


Mmm. Bourbon. Now I see the real attraction. ![]()
I have to find a way to have the smells of the warehouse in the room...
The Plastruct Refinery "kit" came today. I put kit in quotes since, as some have said, it's really a scratch-build project with some drawings and rudimentary instructions. At least I don't have to decide what size tubes to order.

I will be able to change the configuration to fit into a different part of the layout. I was originally going to put it in one spot, but if I stretch it out, it will fit nicely between the back yard tracks. So... instead of this:

I'm thinking about putting it here:

I'll have to see how long some of the horizontal vessels are. I would be a good spot since there's a lot of linear, straight yard track for the tank car loading dock. It could almost fill up this entire space.
For the other space, I'm thinking about the B.T.S. Howard Grain Elevator. That could work out well in this space. It obviously needs some additional framing and support.

If you move the office location, the footprint is about 13" wide. So that space would work well.

After hitting THD and Michael's today for more supplies I really got into ground cover on the right end. But the first thing I did was start to prepare the "falling water" effects using the Kathy Millatt method. This involves clear silicone caulking put onto some Saran Wrap and then drawn out into strands with a toothpick. After it cures, you cut the Saran Wrap with the strands and adhere to the rocks with some more clear caulk. Each strip is measured to the rocks to which it's going to attach. I will also use W-S Water Effects material once the epoxy is cured. You pour the epoxy directly through the strands to homogenize the whole thing.

I got a lot of ground cover done. After painting with the earth colored paint, I laid down coarse green and off-green ground covers and then fine green turf over the wet paint. I then spray with "wet water" and spray W-S scenic cement. After a while it's pretty secure.
I did the swing gate, and the stationary portion. I did next to the tracks and colored those little bits of rock outcroppings. Finally, since there was a very noticeable depression in the fixed area, I colored that to be an impromptu pond or retention basin. I'll install some tall grasses and then pour in the Envirotex 2-part, epoxy bar top coating and let it seek its own level. I believe it is all water-tight. Perhaps I'll test it with real water to see where it actually goes before wasting the expensive epoxy.

There's a lot of undeveloped property here that some sharp real estate guy's going to make some moolah on it. My wife thinks there should be some run-down housing based on it's location near the rail yard and away from downtown. Sounds like a good idea to me. I always take her ideas when offered.


The last thing I did was color the stream bed. Colors used were the earth colored wall paint, acrylic raw umber and acrylic mars black. I blended the colors with a brush soaked with plain water. Kathy Millatt mixed her epoxy with some Tamiya olive drab to tint the water slightly green. It looked pretty good and I'm going to try that also. The darker center will add some simulated depth to the water.

It's very satisfying getting the bare OSB covered with something that looks "natural". And it goes pretty fast once you've reached this point.
Attachments
Images (10)


I've never heard of a bascule bridge over a road.


The Kathy Millatt method looks like it will be very effective! I have never seen this method, so it is good you are sharing it with us!
Smells? A snifter comes to mind ![]()
The glass, not the locomotive part ![]()
Decided to take a risk today by actually putting water into the pond and down the stream and see where it goes. I felt that regardless of the outcome, I wanted to know where the resin was going to go. Boy! Glad I did that because it would have been a freak'n mess!
Here was what happened with the meadow pond. There was a low spot on the right edge and then even more low areas beyond that. Sorry about the reflection of the overhead florescent light.

So I got out the STM and filled the low spots and made a new berm to hold water...literally. The water did not leak through the surface, which was a good thing. When this sets up in a couple of days, I'll paint it and grass it, then I'll be ready for the resin pour. I will put some long grass in place before pouring resin.

When I poured water down the stream similar things happened. It didn't track well over the first falls, then it pooled in the middle and lastly never made to the final falls, but instead took a left turn into the track ballast next to the stream and finally through some porosity onto the floor below. So I had to do some major "Army Corps of Engineering" stuff. After this too sets up, I'm going to pour more water down it and check to see if I got the flow I'll need with the expensive resin. Once the resin goes on there's no turning back.

I then turned to that back embankment, by finishing up the rock painting and laying ground cover on the whole deal. I should have done this end of the layout 3 years ago when I was younger. It's not fun for me to sit indian-style on top of the layout bending this way and that working on those back reaches. But I prevailed.

I also did work on the pond gulch (I have absolutely no idea what to all this geological anomaly). I painted the rocks like I have in the other strata areas with dark gray top and bottom and some yellow ochre in the middle, then with a black alcohol wash. I then painted the basic the raw umber and black mix. The rest of the surface will be the earth tones which will kind of a wash area. obviously "rain water" will come down that slope from that direction as well as the waterfall on the right end. I darkened the rock where the waterfall will actually be. This pic also shows more grass in that inter-track area to the left. At that point I ran out of two out three of the W-S ground cover products I was using. I need to get more and also some more bar-top epoxy.

I almost wish I hadn't done any ballasting since so much gets disturbed in all this work that I have to do a lot over again. Luckily, I still have a substantial amount of roofing granules and probably won't have to get more. You can see many spots with bare Flexibed showing through. Once the scenic cement lets go, you have to vacuum it all up and lay down new stuff. I am saturating it more with cement that I did when I first installed it.
When I ran out of ground cover that ended the field work for the day, so I started working on the casting master for the stream outlet. I'm using the special, tin-free clay that I use for making silicone molds. You need to use this clay since it doesn't affect the silicone's curing. It's harder than I thought and I may turn to the "Carving green foam" method.
First I needed to create a 1/4" blank of clay upon which to carve the stone shapes. I used some 1/4" styrene square rod to set the depth with my "rolling pin" (a piece of brass bar).

After trimming to the drawing underneath, and making a cap strip, I marked the surface with a divider and then started carving the mortar lines. I used a tool to create some texture too. The difficulty comes when dealing with the little bit of clay that's displaced when one groove crosses the perpendicular groove. It's finicky work and makes you appreciate the work in making masters for the likes of Scenic Expresses urethane castings. If it doesn't look right, I'll scrap it and do it over. The other choice would be to make individual "stones" and apply them to a clay base. While that might take a bit longer, the results could be better. You have to remember that everything you see in the master is going to show up in the plaster copy. The curvature of the arch almost exactly matched the diameter of a roll of 3M Blue Tape. You don't need to worry too much about draft angle (that positive slope away from the mold's front so it can release from the mold material) since the silicone can stretch.

Tomorrow, I'll buy more ground cover and then get back to this mold master.
Attachments
Images (7)


Today was a day to solve some problems and change direction a bit. I woke up thinking that I'd forgotten how to do the resin water. You really don't actually fill any volumes with it. The resin is simply too expensive. You create a flat surface and simulate depth by coloration. While I was getting the coloration right, I didn't have a smooth surface, nor a level one. So first thing this morning, I mixed a thin bath of Hydrocal, wet down the various water ways and surfaces and let the plaster find its own level. I let it run right out of stream outlet and put a pot on the floor. The end result was relatively smooth and level surfaces that should take resin well.


I then went to the train store and got the ground cover that ran out. I then saw a nice HO W-S random stone tunnel portal that would be just the right size to be at the stream outlet on the fascia. It was $11. I still wasn't sure about my sculpting a clay portal that would be the made into a silicone mold and a plaster cast, and, being a big mold, would cost probably $25 worth of silicone mold material AND I was only going to make one of them. So I bought the portal.
It looks much better than what I was trying to create and it's more the right size.

While the plaster was still curing I did more ground cover to the right of the gulch.
I opened up the fascia gap to better accommodate the filler piece that I was going to use. I needed to have enough material on both sides without interference so I could glue backing pieces to hold the new piece in. I traced the outline of the portal onto this piece and traced the gap size. I then did a trial fit of the unpainted portal. When it looked right, I painted the portal and aged it with alcohol wash.

I needed to paint the tunnel, and came up with a simple solution; a foam paint applicator with a dowel extension handle.

So I then painted all the new surfaces, including inside the tunnel. I redid rocks on the stream bed since some were now buried in the new hydrocal surface. I redid the ground cover next to the pond as well.

The water will now flow down the bed and into the gulch as it should.

I used a small brush and painted the dark "Wet" raw umber. I darkened the area under the "falls", and attempted to blend the apparent different depth levels in the "water".

I have to fasten the portal to the tunnel's mouth and I have to tie the tunnel outlet to the lower fascia piece. I want this all tight and sealed so the resin goes straight out without running out other places. When that's all firm, I'll paint the remaining bare area in the front. I'm also holding off any further ground cover until the resin's in place and fully cured so any grassy stuff won't mess anything up. Once the portal's on I'll do the resin. I'll also redo any bad ballast areas. And one more thing; I'm going to add some tall grasses around some of the water ways before adding the resin. Almost done.
Hi Myles, the rift stole your pictures.
I'm not sure what you're referring to. The pictures are showing up when I just opened the site.
That is so interesting. I can't see them right now, but you can.
No joy here, either.
Add Reply
Sign In To Reply
