Smoke ALA George Jetsons spaceputter?
Oh my gosh, John! It looks like you're having too much fun. You'd better check on the legality of so much enjoyment! ![]()
I've been following along and getting excited about documenting my near-future layout build. That was until I saw the perfection you are achieving. Now anything less than what you and Tom have done would be a disappointment for me. I feel like just taking all my trains out to the yard, pour gasoline on them and set them all on fire and call it a day! ![]()
![]()
![]() Congratulations on a fine build. I hope to get to see it live someday, but until then I'll anticipate some great video.
Congratulations on a fine build. I hope to get to see it live someday, but until then I'll anticipate some great video.
I have a question about the homesote. I have zero experience with it, which is why I ask. I've read numerous suggestions about needing to paint both sides of the homesote to seal it from any warping. Did you feel it was unnecessary to paint both sides?
Traindiesel posted:I feel like just taking all my trains out to the yard, pour gasoline on them and set them all on fire and call it a day!

Congratulations on a fine build. I hope to get to see it live someday, but until then I'll anticipate some great video.
I'd rather you just drop them off here. I'll even pay the shipping. ![]()
![]()
I have a question about the homesote. I have zero experience with it, which is why I ask. I've read numerous suggestions about needing to paint both sides of the homesote to seal it from any warping. Did you feel it was unnecessary to paint both sides?
I think all the screws that are in my Homasote will prevent it from doing anything but behaving! ![]() The idea of painting the bottom was floated, but I decided that it would be a PITA and take a lot of work as I'd have to let it dry and then position it again. I've seen Homasote down for years with only a handful of screws and it wasn't warping. I'm also in an all year around climate controlled space, which is also going to make a significant difference.
The idea of painting the bottom was floated, but I decided that it would be a PITA and take a lot of work as I'd have to let it dry and then position it again. I've seen Homasote down for years with only a handful of screws and it wasn't warping. I'm also in an all year around climate controlled space, which is also going to make a significant difference.
Thanks John. That's good to know about the Homasote. At the Mianne booth at York it was recommended to me to use Sound Stop to cover the plywood. It seems to be a fibrous material, maybe similar to homasote. You can see it at the top of the picture on the right.
I would ship my trains to you, but I'm way too lazy to pack them all up. In fact, I'm too lazy to drag them all out to the yard and set them on fire. I guess I'll just build my layout the best I can so everyone could have a good laugh! ![]()
Attachments
GRJ: What is your table height?
Traindiesel posted:Thanks John. That's good to know about the Homasote. At the Mianne booth at York it was recommended to me to use Sound Stop to cover the plywood. It seems to be a fibrous material, maybe similar to homasote. You can see it at the top of the picture on the right.
I would ship my trains to you, but I'm way too lazy to pack them all up. In fact, I'm too lazy to drag them all out to the yard and set them on fire. I guess I'll just build my layout the best I can so everyone could have a good laugh!
Soundstop looks similar to Homasote, but I think the weight of Homasote may be better at supporting whatever is on the layout. I'm walking around on the Homasote to finish up on top, and it's holding up fine. Soundstop is also more expensive. ![]()
I'm sure you'll build a great layout, you've already done one! ![]()
Dan G posted:GRJ: What is your table height?
The legs are 40", and the two 1/2" sheets (plywood and Homasote) make it 41". Of course, that's at the high spot in the floor, there is almost a 1 1/2" runout on the floor surface as it turns out. So, some of the table is around 42 1/2" high. ![]()
So Tom's leveling blocks and the leveling legs were able to take up an inch and a half?
Yep, the leveling legs have over an inch of practical travel (1.5" long). The leveling blocks are almost an inch thick with the base and all. We used different height leveling blocks as well, where we didn't need that much lift, they were thinner blocks. The floor was all over the place.
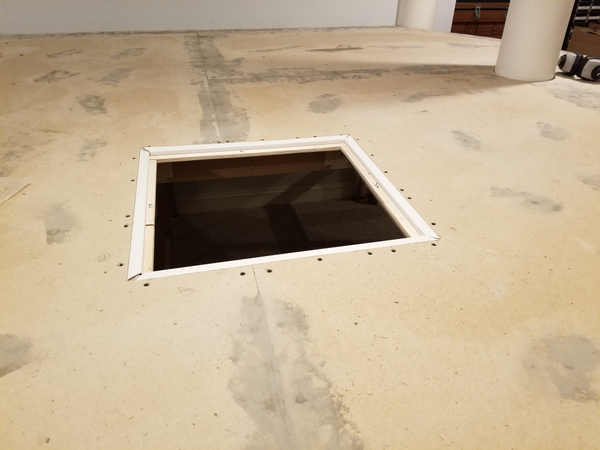
Moving forward, after the first sanding pass, I installed the J-Channel on the lift-gate and the pop-out panel. That also allowed me to add the final sprinkle of screws that were waiting until I slid the J-Channel under the Homasote. Next will come another round of fill for the new screw holes and all the ones that didn't get fully filled. I can also cut the pop-out panel out of the 1/2" birch and have it ready to paint with the rest of the table, the size is fixed. ![]()
This should keep the Homasote from getting beat up over the years on the edges. All the edges should be covered when we're done.
Attachments
The J-channel is a great idea for protecting the edges. No uncovered bases around here, they are all very well covered indeed!
I feel like the turtle in the race, slow and steady. ![]() I wanna' run some trains!
I wanna' run some trains! ![]()
![]()
A word of advice, John: Don't complete your track laying until some of the scenery, buildings, and other details are in place. A number of years ago when I put in the "golden spike" on the Not-So-Great Eastern Railway, I stopped even thinking about scenery, structure building, and detailing. For a little over a year all I did was run trains. Running trains after a period of deprivation can become addicting!!!![]()
John, with all due respect I disagree. Run dem trains! What Jackson said it very true, however unless your HOA has layout inspections enjoy the sounds and smells. Let her rip. Fill up the right a ways and haul ***. A while ago I got most of my lines running and fired the work crew, I do not even see the unsceniced benchwork, the trains give me tunnel vision.
It's not like these are Half O scale sized miniatures, Hefty 0 scale trains are a scenery element all there own.
Yep, while I'm thinking about some scenic elements, I'll be running trains as soon as possible, I'm tired of not having a place for them to stretch their legs (or wheels). ![]()
Last step of the day, cut out the hatch and dropped it into the hole.
Attachments
gunrunnerjohn posted:Moving forward, after the first sanding pass, I installed the J-Channel on the lift-gate and the pop-out panel. That also allowed me to add the final sprinkle of screws that were waiting until I slid the J-Channel under the Homasote. Next will come another round of fill for the new screw holes and all the ones that didn't get fully filled. I can also cut the pop-out panel out of the 1/2" birch and have it ready to paint with the rest of the table, the size is fixed.
This should keep the Homasote from getting beat up over the years on the edges. All the edges should be covered when we're done.
Looks great John, Where did you get the J Channel?
Joe Gozzo
I bought it at Lowes, it was cheap. The only fly in the ointment was we had to route out a channel because of the rolled edge to make it flat with the rest of the table top. I put a bead of glue on the bottom lip before I slid it in.
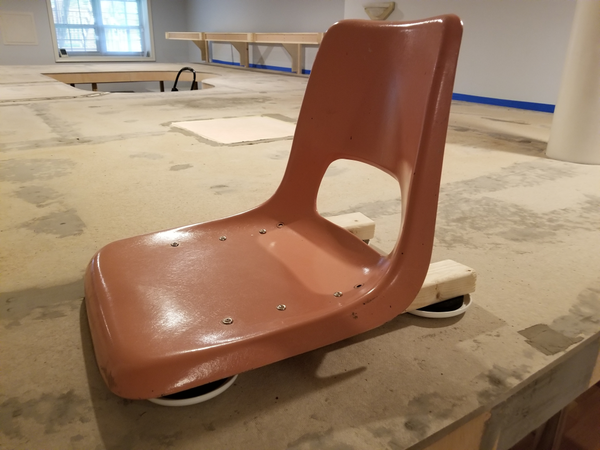
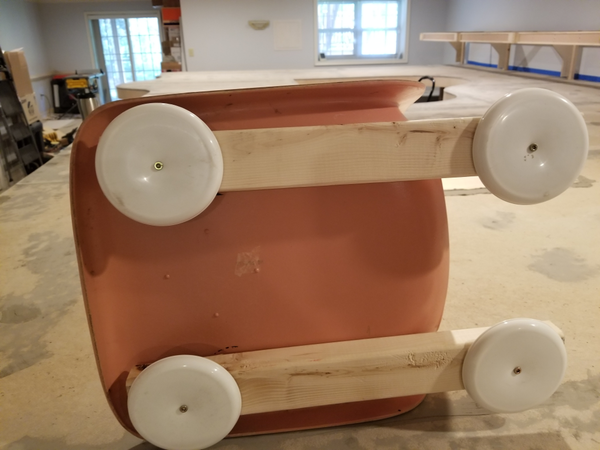
Since I'm coming up on spending time under the layout, I figured it was time to get this project out of the way. It's always hard to strike a balance between comfort and accessibility for working under the layout, here's my entry in the sweepstakes. ![]()
I had some old fiberglass molded chairs that I've had for about 50 years, and several were living in the attic. I was going to toss them, glad I didn't. With some carpet glides, a bit of 2x3 lumber, and some screws, I have a layout work chair. When I sit in it, my head just clears the beams by a little over an inch, the perfect height. I have back support so I won't be cramping up after a couple of minutes working under there.
Attachments
gunrunnerjohn posted:Since I'm coming up on spending time under the layout, I figured it was time to get this project out of the way. It's always hard to strike a balance between comfort and accessibility for working under the layout, here's my entry in the sweepstakes.
I had some old fiberglass molded chairs that I've had for about 50 years, and several were living in the attic. I was going to toss them, glad I didn't. With some carpet glides, a bit of 2x3 lumber, and some screws, I have a layout work chair. When I sit in it, my head just clears the beams by a little over an inch, the perfect height. I have back support so I won't be cramping up after a couple of minutes working under there.
Absolutely brilliant!
John, my solution was a garage creeper with a lift back, it just makes the corners and being on a hard surface, allows me to slide back and forth as well as side to side, yours has a much better back support!
Since I have to relocate between the lower I-Beams, I figured the chair made more sense. Of course, I'm also on carpet. I do have a creeper that I haven't unpacked, but after evaluation, I'm not sure how useful it would be.
gunrunnerjohn posted:Since I have to relocate between the lower I-Beams, I figured the chair made more sense. Of course, I'm also on carpet. I do have a creeper that I haven't unpacked, but after evaluation, I'm not sure how useful it would be.
My platform is quite a bit lower. It was built for my son when he was 4 years old and is only 2 feet off of the floor. I use a creeper to move around under the platform There is carpet on the floor. In addition to what little leg strength I have left, I also use my hands and arms to pull myself along. It is not as easy as if the floor was hard, but, it works.
I did think about a lower platform, but then I thought about having to work under it. Also, I want to have storage under there, so I decided to go with the "standard" 40" legs. I also find it much easier to work sitting upright than laying on my back.
gunrunnerjohn posted:I did think about a lower platform, but then I thought about having to work under it. Also, I want to have storage under there, so I decided to go with the "standard" 40" legs. I also find it much easier to work sitting upright than laying on my back.
John:
I fully agree. If I had it to do over, my platform would be much taller. But, It was originally built so the my son, when he was very small, could walk up to it and run trains.
I like the sliding chair idea. My creeper didn't work well on my carpet. One try and it was gone. Thanks John for sharing the sliding chair idea. I'll try it.
I have yet to actually press it into service, but I did sit under and check my reach and the comfort. It was way better than laying down, which was the object of the exercise. ![]()
gunrunnerjohn posted:I have yet to actually press it into service, but I did sit under and check my reach and the comfort. It was way better than laying down, which was the object of the exercise.
Space, the final frontier! ![]()
At times you have to love Harbor Freight
Tom, as you know, I have carpet, so I figured to just "slide" around. ![]() However, if I were on hard floors, that would be perfect for a 40" height. Is that a commercial product?
However, if I were on hard floors, that would be perfect for a 40" height. Is that a commercial product?
Well, the chair was new many years ago. Picked it up in a resale shop. As Ron infers, the frame was a HF furniture dolly sectioned and lowered.
I knew not to being it to your house because of your deep cushioned carpet. I would really like to know how the furniture sliders work for you!
My low rider is OK for the lower benchwork but for my higher benchwork I use an office swivel chair fully depressed. I also use another office swivel chair for scooting under a couple of arch bridges.
I had been thinking about my wife's very large wheeled garden stool. Not really what one may consider safe thinking.
Well, with my fat butt on it, it doesn't slide that easily, but actually that's a good thing. It's pretty easy to move around, and it's the perfect height. It's also very stable when I lean back and put a little pressure on the seat back, like drilling holes or the like.
OMG - you cut up a mid-century modern Henry Miller designed Bauhaus plastic chair for underneath your layout that I saw on Antiques Roadshow - I guess cost really is no object. ![]()
I have more, I'm selling them for $500 for the orange ones and $750 for the black ones. ![]()
![]()
Since there were from a defunct computer school in the early 70's, I doubt they're all that valuable, but if anyone wants one... ![]()
John, you should put some padding in that seat so you last longer while under the layout![]()
The "Stadium Seat" with carpet glides is a good idea John. I had one for years (not quite as large and comfy as yours) that saved me from many cases of train neck and trainback.
Ron_S posted:John, you should put some padding in that seat so you last longer while under the layout
Can't afford any padding, my head is pretty close to the beams now. I made the seat as low as I could.
gunrunnerjohn posted:Ron_S posted:John, you should put some padding in that seat so you last longer while under the layout
Can't afford any padding, my head is pretty close to the beams now. I made the seat as low as I could.
Didn't you infer that you had your own personal built-in padding? I read that somewhere. ![]()
RoyBoy posted:gunrunnerjohn posted:Ron_S posted:John, you should put some padding in that seat so you last longer while under the layout
Can't afford any padding, my head is pretty close to the beams now. I made the seat as low as I could.
Didn't you infer that you had your own personal built-in padding? I read that somewhere.
Yep, can't afford any more. ![]()


