@Aegis21 posted:

Mark, totally agree on needing to change around TT and recheck spacing. This is a first draft so to speak and a starting point.  I have started another topic only dealing with benchwork. not sure if that was a good idea to split things up or not... As for drawing it on scarm, well the track is on the floor and the supports are in the air! LOL

Yes, that is the kind of thing I struggles with as well!! 

Again, John Armstrong does a great job on explaining the variations and relationship of  TT and RH.  His work is well worth a read to better understand the why and wherefore of so much of what we do.

As far as "L" girder construction vs flat deck I do not see it as a either / or but the need to use which ever format that best serve the situation.

Another consideration is the flex nature of the building material to be selected.   I have built layouts with 5.5 mm Meranti and they have survived for decades.  I have seen layouts built with 3/4" CDX which turned into potato chips within one year.  1/2" Pine decked layouts which became shallow hammocks.

Here is an inverted example of a 5.5 mm waffle bottom module:

Walk in add on waffle module bottom & top view 006

So it is not just the thickness but more so the quality of the material and the techniques used in assembly.

One of the more recent products available to us today is Advantech by Huber industries.  I have used this successfully for over a decade without incident.

I mention this because one of my Millhouse TTs is sitting in an Advantech hole on two partial fingers with out any additional support elements since 2010.

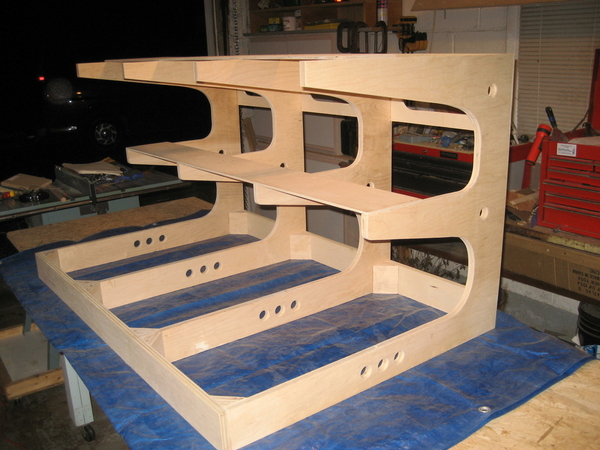
Here is the triple bunk bed style module upon which one of my Millhouse TTs are mounted.  Nothing fancy, overbuild or girdered.  Just a pair of fingers.  TT is on the top tier.

3 level module 002

The only support is a pair of short recessed fingers, one of which is vaguely seen half way down the right  frame edge.   The sandwich of Advantech and Homasote is very sturdy.  I thought it to be about time to apply a fascia so blocks are mounted ready to go.

IMG_9712

A side suggestion for mounting these Millhouse TTs.  I found that 1/4" threaded T-nuts recessed into the Advantech deck then covered with Homasote is a real clean firm method to pick up the tabs plus it makes it real easy to use a socket and extension or a nut driver to fine tune the bridge track  to the radial rail heads as opposed to multiple nuts and wrenches with a drop through screw.

Attachments

Images (3)
  • Walk in add on waffle module bottom &  top view 006
  • 3 level module 002
  • IMG_9712
Last edited by Tom Tee
@DoubleDAZ posted:

John, here's a version with the everything raised 1" above the bench work. The way to do it is to hide the bench work, then select everything else and use the Height Shift tool in the Toolbox to increase the height to 43" (or whatever you want).

test2

Dave, This is wh you are the scarm wizzard! How do I get the green bbaseboard up to that height, or do I put in other polgons and raise those up for terrain?

John, to get the baseboard up to the height you have to draw a transparent polygon around the baseboard and select "snap to grid". However, as you can see, that covers up your bench work. So, it's best no to select "snap to grid" and select a color for the polygon. In this case I chose yellow and placed it on the Decking layer. As you'll see when you open the file, the decking covers almost everything and prevents you from selecting a lot of objects while making changes, so you have to turn off that layer.

test1

test2

Attachments

Images (2)
  • test1
  • test2
Files (1)
@DoubleDAZ posted:

John, to get the baseboard up to the height you have to draw a transparent polygon around the baseboard and select "snap to grid". However, as you can see, that covers up your bench work. So, it's best no to select "snap to grid" and select a color for the polygon. In this case I chose yellow and placed it on the Decking layer. As you'll see when you open the file, the decking covers almost everything and prevents you from selecting a lot of objects while making changes, so you have to turn off that layer.

test1

test2

No Doubt you are the Wizard of Scarm!

@DoubleDAZ posted:

John, to get the baseboard up to the height you have to draw a transparent polygon around the baseboard and select "snap to grid". However, as you can see, that covers up your bench work. So, it's best no to select "snap to grid" and select a color for the polygon. In this case I chose yellow and placed it on the Decking layer. As you'll see when you open the file, the decking covers almost everything and prevents you from selecting a lot of objects while making changes, so you have to turn off that layer.

Hi Dave,  I see that the turntable is a millhouse 28" 36 position 10 degree The round house footprint, is that based off of a 3 stall Korber RH? And is it positioned up against the TT or set back some distance for clearances? Since I have neither TT or RH, it would be great to keep options open. Ross is the other TT I have "looked" at and Altoona, Brennen, and Korber make nice roundhouses. All with pros and cons.

Thanks John

John, thanks to your question it looks like the Atlas RH mated to the 28" Millhouse TT was indeed placed too close to the TT, though it wasn't touching. Whoever created the RH object in SCARM added a floor that extended past the front. You could see it wasn't touching when viewed in 3D. However, it was still too close, so I moved it further away and reconfigured the floor so it didn't extend past the RH.

I've spent much of the day fiddling with specs, drawings and photos for both brands. Here's what I've been able to put together for the Atlas on the top and the Korber on the bottom. Atlas says their RH is supposed to fit inside a 40x40" box butted against the TT, while Korber says their RH is supposed to fit in a 30.0x28.5" box and be 16.2" from the TT, so that's what I've done, you can see the outlines.

The top left is Atlas RH with 28" TT.
Top right is Atlas RH with 34" TT.
Bottom left is Korber 3-stall with 34" TT.
Bottom right is Korber 4-stall with 34" TT.

From what I can tell the Korber model someone created in SCARM does not match the outline, so I had to create a footprint for both the 3-stall and 4-stall models. What's missing is the Big Boy expansion kit that Korber makes. Dealing with manufacturer specs and photos of their roundhouses is a very frustrating exercise, they all provide specs differently. The bigger frustration is that people want to see models of the roundhouse and not just the footprint even though all they need is the footprint to see whether it will fit or not. I'm finding that footprints are accurate, the models folks have created for SCARM may not be.

Anyway, as you can see in the top photos, the box touches the TT and the RH fits inside. The 34" configuration needs to be moved up 3" and to the right 12.4" to fit the space and will increase the depth of the bench work in that area. You can see where the TT would be located in the bottom photos.

You can also see how the Korber model doesn't fit inside the box properly, so it needs a little more space than expected. Korber did provide enough specs for me to create the footprint diagrams and place them 16.2" from the TT. AFAIK, that should be correct. Unfortunately, Atlas was not so forthcoming. Here again I don't know if the RH is accurate. Atlas says the track from the TT to the rear wall of the RH is 37.25". If I place the RH in the photos so the track touches the 37" track, it will touch the TT instead of the rear wall. I don't think Atlas means the "rear wall" literally and I think I have it in the right position and it's about 3" from the TT. Trouble is their photo shows it a lot further from the TT than 3", so I'm lost. If you look at the model, the front and back corners touch the sides of the box, so I think it's accurate. The whiskers are 15° just like Atlas says and appear to be properly aligned inside the RH. I hope you can see how difficult it is for me to say with certainty that things will fit. I'm fairly confident with the footprints, just not the SCARM models.

test4

Attachments

Images (1)
  • test4

Hi Dave, Sounds like I opened landlord's boxes. You certainly dig into things for sure. I also was on a similar garden path today, although it sounds like you got some answers. Everything you said makes sense and is technically sound. Not sure if putting in a 34 or 33"  TT is worth the extra space and added reach hassles. Alll comments welcome. I don't anticipate getting a Big Boy loco within the next 50 years. Btw I'm going to be 68 next month. I know "never say never"  At this point my thoughts are for more stalls for RH 5 max and 28" or 27" TT

Can see how uncertain things are for fitting. Foot prints that are vague or specs that differ from RH mfg. To TT mtg do not lend themselves to instill confidence in anyone. The box concept for RH is shared by Altoona RH at this point I think they measured box from center of TT. Like 60" x  35" I'll do some more research tomorrow . One other note, RH mtg did not mention TT angle of at least I did not see it.  I did not look at Atlas RH which you said was 15° Now that is not only accurate info but useful too!

Again many thanks  john

John, no worries, just a little frustrating that all manufacturers don’t define their footprint the same way, at least not on their websites. Altoona seems to be the best. They measure from the center of the TT and appear to have 2 models; 55” with 26” walls and 60” with 32” walls. Both have capability for 3” extensions to extend the walls to 29” and 35”.

They say the 55” is for use with 26-30” TTs and show the 1” difference in distance from TT to front wall between 28” and 30” TTs. This suggests another 1” for the 26” making the distances 14, 15 and 16”. They don’t say it can’t be used with larger TTs, but I suppose the assumption is that if you need a 34” TT, then you need a longer RH.

Then they show the 60” with the 34” TT, but say nothing about smaller TTs, so I don’t know for sure if you simply add 1” for a 32” TT or if it can even be used with smaller TTs, though I see no technical reason it can’t.

To muddy things more, they go on to show a 15-stall model with a 34” TT that appears to use the 55” version because it mentions the 26” wall and 60” to the rear wall. However, they don’t show how far is it from the TT. So they make you guess by subtracting the 26” wall and the radius of the TT (17”) from the 60” to end up with the RH 17” from the TT. How hard would it be to include those dimensions?

Now, by turning off the track outline and turning on the center rail in SCARM, I’ve been somewhat successful creating roundhouses as long as they provide a footprint box. It takes a lot of trial and error because they never provide the degree of offset. Korber does the best job of explaining what happens if you try to place the RH closer to the TT, but Brennan carries this further by discussing the use of curved leads to the RH. Unfortunately, they don’t mention engine clearance, or at least I didn’t see it. The key is extending the straight track outside enough so the engine will clear regardless of the curve, but they don’t even hint at that, so it becomes trial and error. I suppose most folks who buy this stuff contact the manufacturers to get the information and they have large layouts. I get frustrated because I can’t definitively tell someone if something will fit or not. I’m pretty sure I understand things, but so far no one has validated that understanding other than Bob from Altoona when I was asking all these questions for anther layout.

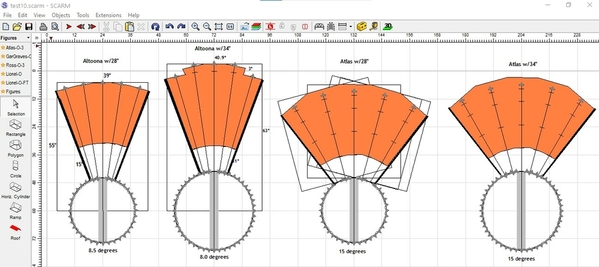
Here’s what I’ve gone through with Altoona and Atlas 5-stall RHs and 28”/34” TTs. The Altoona took the longest because of all the trial and errors to figure out the angles. The Atlas took about 10 minutes because the provided the angle. Once I figured out the angled, it was just a matter of rotating the RH that many degrees and adding the whisker tracks. To get the walls it’s just half the angle and drawing a line to the edge of the box. The Atlas was a bit more involved, but it was just a matter of rotating the box 15°, then 7.5° for the sides. However, I don’t know the length of the sides, so I just guessed at about 28”. The main thing is the size of the box and you can see how much wider the Atlas is compared to the Altoona. The Atlas doesn’t have the Big Boy extension, so it appears shorter than the Altoona, but it won’t be. It’s obvious the Atlas takes up the most room, especially width.

Not sure what this all means, but maybe it’ll help you figure out what the next step is.
F3D8872C-F03F-452A-8359-A1C986CBB856

Attachments

Images (1)
  • F3D8872C-F03F-452A-8359-A1C986CBB856

Hi Dave,

It is beginning to look like a 27" or 28" TT and a three or four stall RH, With all the input and considering finances, I am leaning Towards a 3 or 4 stall Korber RH with Ross 27" TT    Just looking at the space reality and $  Nothing is set in stone until there is a good indication on the best physical fit for both. I think this RH on scarm is close to Korber RH. This was the best I could do with sifting through the pile of data. LOL

And of course you have been a huge help with everything. ThanksJohn 2020-11-30 daz

Attachments

Images (1)
  • John 2020-11-30 daz
Files (1)
Last edited by Aegis21

Hi John,

Not to belabor this issue, but if you're leaning toward the Korber and Ross combo, I feel it's useful to get as close as possible to the real thing., So, I redid the footprint for Korber 304 model RH with 4 stalls and mated it to the Ross 27" TT. While looking for photos of the actual model, I found 2 threads related to the RH and included the links just FYI. I don't know why I didn't think to check with Mike CT, I consider him an expert on roundhouses and turntables, but I didn't know he's built at least 2 of these kits. I'm going to ask him to take a look at this thread, at least this last post.
https://ogrforum.ogaugerr.com/...ll-korber-roundhouse
https://ogrforum.ogaugerr.com/...s-and-build-problems

Anyway, the photos I found lead me to think I found out why the Korber model I have for SCARM doesn't look right. It's because I believe it includes the Big Boy extension. The 4-stall RH is supposed to fit in a 30.7"x38" box and the one in SCARM doesn't. It also has to be 16.2" from the TT and it's not. So, I replaced it with what I think is close to the real model (lite gray) and added 4 extensions (dark gray). Now, the extensions aren't needed for your use, though you could add just 1 on the 1st (lowest) whisker track where a large engine could go straight into the RH without having to be turned on the TT. That's one way to future-proofing a change of heart at some point and you decide to purchase a large engine.

I also redid the whisker tracks outside the RH to make sure the curves were O-72 or greater.


test

Attachments

Images (1)
  • test
Files (1)
@DoubleDAZ posted:

Hi John,

Not to belabor this issue, but if you're leaning toward the Korber and Ross combo, I feel it's useful to get as close as possible to the real thing., So, I redid the footprint for Korber 304 model RH with 4 stalls and mated it to the Ross 27" TT. While looking for photos of the actual model, I found 2 threads related to the RH and included the links just FYI. I don't know why I didn't think to check with Mike CT, I consider him an expert on roundhouses and turntables, but I didn't know he's built at least 2 of these kits. I'm going to ask him to take a look at this thread, at least this last post.
https://ogrforum.ogaugerr.com/...ll-korber-roundhouse
https://ogrforum.ogaugerr.com/...s-and-build-problems

Anyway, the photos I found lead me to think I found out why the Korber model I have for SCARM doesn't look right. It's because I believe it includes the Big Boy extension. The 4-stall RH is supposed to fit in a 30.7"x38" box and the one in SCARM doesn't. It also has to be 16.2" from the TT and it's not. So, I replaced it with what I think is close to the real model (lite gray) and added 4 extensions (dark gray). Now, the extensions aren't needed for your use, though you could add just 1 on the 1st (lowest) whisker track where a large engine could go straight into the RH without having to be turned on the TT. That's one way to future-proofing a change of heart at some point and you decide to purchase a large engine.

I also redid the whisker tracks outside the RH to make sure the curves were O-72 or greater.


test

Hi Dave, You are not belaboring this issue at all. Great work as always on scarm and even better detective work! My leaning towards the 27"TT and Korber RH is based on fit and how to reach that back corner for scenery/track work and then after completion, maintenance could be an issue with access. Note, I did not say easy access. That being the case, in your opinion, would trying to fit in a 33" or 34" TT be too much?  It appears your RH/TT combo fits well and the one straight thru stall being deeper, is you showing off your forward thinking ability. That does sound like the best of both worlds. However, since I am a complete novice, my wants maybe unreasonable or worse, too conservative. Please all comments are welcome from everyone.

Thanks

John

John, writing on just the information here and your roundhouse topic, it seems to me the Ross-Korber combination would work best for you.  The Atlas combination would eat up too much room.  Millhouse turntables are great, but expensive as one would expect for the quality and features.  Again, I have no practical experience on the topic, just hashing through all the great information everyone has posted in reply to your questions.

John, I’m not sure trying to fit a 34” turntable gets you anything. I don’t how big your largest engine is, but I suspect it will fit on the Ross 27” model. My largest is a 4-6-0 with tender and it’s only 17”. That leaves a whopping 10” for something bigger.

My biggest concern is how far you already are from the double-crossover. You can still reach it from the corners of the RH area, but expanding that area simply increases the potential difficulties dealing with derailments, etc. I don’t foresee problems with the curves or landscaping in the lower left corner once they’re done unless you decide to renovate at some point, but dealing with a renovation once every few years or so is quite different than perhaps having to deal with a pesky switch every time you run trains.

I’ve given you a way to store a large engine in the RH. However, since that might limit that stall’s use, I changed some other things around to provide an option to park it outside the RH between the 2 yard leads. The other thing is that unless you plan to have several large engines, there’s just no need to use 37” tracks for all the whisker tracks.

Anyway, here how I’d do it. The gray whisker tracks are optional and depend on how much reach you want to give up. They only impact the purple tracks and right end of the double-crossover. If I had that many engines, I’d deal with the reach issues. BTW, the outline is where the original RH and TT were.

john 2020-12-01 daz

Attachments

Images (1)
  • john 2020-12-01 daz
Files (1)
@DoubleDAZ posted:

John, I’m not sure trying to fit a 34” turntable gets you anything. I don’t how big your largest engine is, but I suspect it will fit on the Ross 27” model. My largest is a 4-6-0 with tender and it’s only 17”. That leaves a whopping 10” for something bigger.

My biggest concern is how far you already are from the double-crossover. You can still reach it from the corners of the RH area, but expanding that area simply increases the potential difficulties dealing with derailments, etc. I don’t foresee problems with the curves or landscaping in the lower left corner once they’re done unless you decide to renovate at some point, but dealing with a renovation once every few years or so is quite different than perhaps having to deal with a pesky switch every time you run trains.

I’ve given you a way to store a large engine in the RH. However, since that might limit that stall’s use, I changed some other things around to provide an option to park it outside the RH between the 2 yard leads. The other thing is that unless you plan to have several large engines, there’s just no need to use 37” tracks for all the whisker tracks.

Anyway, here how I’d do it. The gray whisker tracks are optional and depend on how much reach you want to give up. They only impact the purple tracks and right end of the double-crossover. If I had that many engines, I’d deal with the reach issues. BTW, the outline is where the original RH and TT were.

john 2020-12-01 daz

Yes I Totally agree on the reach for the double cross over. Since the yard entrance is relatively some distance from the DBX Since the grades aren't too steep yet, the DBX can be moved to the right some distance, so as to not reach over the RH to deal with the derailment issue of the DBX

Your thoughts?

@Mark Boyce posted:

John, writing on just the information here and your roundhouse topic, it seems to me the Ross-Korber combination would work best for you.  The Atlas combination would eat up too much room.  Millhouse turntables are great, but expensive as one would expect for the quality and features.  Again, I have no practical experience on the topic, just hashing through all the great information everyone has posted in reply to your questions.

Good to hear your thoughts on this as your opinion is certainly valued! I am hoping a four stall RH will fit.

Thanks again john

John, if you lower the bridge to 6", here's what things look like. I evened out the switches on both sides of the river, so that section is now flat. I also changed the 2 switches on either side of the town to an even 2.5" and 4.0". That put the left switch 6.5" below the 9" outside mainline. Your steepest grade is now 2.5%.

John 2020-12-01b daz

Attachments

Images (1)
  • John 2020-12-01b daz
Files (1)
John 2020-12-02b daz@DoubleDAZ posted:

John, if you lower the bridge to 6", here's what things look like. I evened out the switches on both sides of the river, so that section is now flat. I also changed the 2 switches on either side of the town to an even 2.5" and 4.0". That put the left switch 6.5" below the 9" outside mainline. Your steepest grade is now 2.5%.

John 2020-12-01b daz

@DoubleDAZ posted:

John, if you lower the bridge to 6", here's what things look like. I evened out the switches on both sides of the river, so that section is now flat. I also changed the 2 switches on either side of the town to an even 2.5" and 4.0". That put the left switch 6.5" below the 9" outside mainline. Your steepest grade is now 2.5%.


Great job as always Dave! Looks like things are shaping up nicely. Now I need to fit in buildings, scenery and benchwork. Dave if you do any more enhancements, please use this file as I think I have made all track tinplate and not stainless. It will help me in the parts listing to get a general idea of the quantity of track this project will require. Thanks

Attachments

Images (1)
  • John 2020-12-02b daz
Files (1)
Last edited by Aegis21

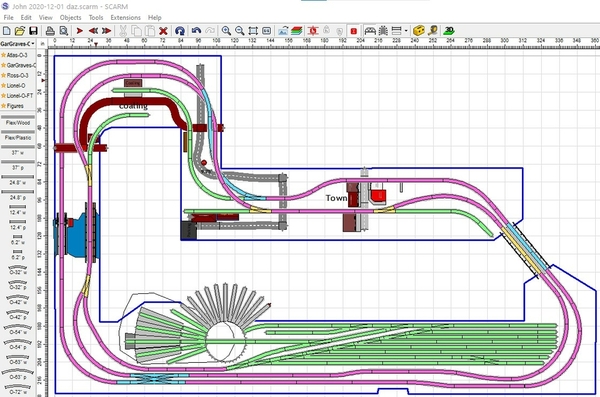
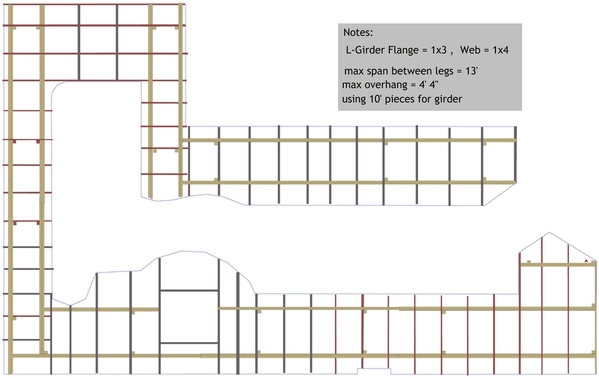
With everyone's help, comments, suggestions, knowledge, especially Dave, Mark and many others . Here is the present state of the design with first attempt at bench work.  If anyone sees any faults or improvements with the bench work or track plan, please shout out. Even if you suggest starting over, all comments are welcome. I almost, never take offense and try to keep an open mind. Again Thanks to everyone!BenchWork_12_04John 2020-12-04John 2020-12-04a

Attachments

Images (3)
  • BenchWork_12_04
  • John 2020-12-04
  • John 2020-12-04a
Files (1)

This has been my favorite thread to follow since it's inception. It's a testament how lucky we ORG Forum members are to get support from this awesome community. Shout out to Dave D who never gets tiered of helping others and Mark B for always encouraging. I look forward to this layout coming to fruition.

Last edited by Dave Ripp.
@Dave Ripp. posted:

This has been my favorite thread to follow since it's inception. It's a testament how lucky we ORG Forum members are to get support from this awesome community. Shout out to Dave D who never gets tiered of helping others and Mark B for always encouraging. I look forward to this layout coming to fruition.   

I TOTALLY agree on ALL the help and effort put into these projects by everyone. Cannot thank Dave and Mark enough and everyone else on this forum.

THANKS!

John

John, Thank you very much!!  I don't know if a 13-foot maximum span between legs is too much.  I would have shortened that since where I see the long spans, there are shorter spans right beside.  I also wonder if it would be good to have legs close to where the turntable will be.  Maybe they won't help and would just get in the way.  These are all questions.  I hope someone who has built a layout of this size will offer some practical answers.

Mark,
I couldn't find any 13' sections, so I don't think John updated the Notes after adding legs above the river.

John,
Since your L-girder rails will be constructed using 10' lengths of 1x material, you won't have a span greater than 10'. I haven't found any standards on how far apart legs can be placed. Using 10' as an example, if you place them 1' in on each end, you'll end up with an 8' span and a 1' overhang.

I put my spin on it. First I changed the grid in SCARM to 16" and aligned the main joists on them. I spread out the 2 joists around the river, so you don't have a joist in the middle of the river and can make the river as deep as you want. I'm not sure why the staggered girder setup that I circled in the lower left corner, but I didn't change it. I also didn't change the different length girders under the river, but I would if it were me.

Mark mentioned the legs near the turntable frame, but I didn't move them because I don't know if it will make a difference.

Just a note. Since I see you drew some L-girders, I want to make sure you know the 1x2 (or 1x3) flange goes on top of the 1x4 girder, not alongside.

As always, these are just my $.02 and food for thought, I've never used L-girder. Most modelers keep their joists (and crossmembers) somewhat symmetrical, like 16" on center, or 24" like Mianne, so that's pretty much what I did.

John 2020-12-04 daz

Attachments

Images (1)
  • John 2020-12-04 daz
Files (1)

Dave, yes I read it from the notes.  I made my joists on top of my metal wall brackets 16” centers, one per wall stud.  Yes the Mianne part is 24” centers.  It doesn’t seem to sag.  
That’s a good move, putting the l-girders on either side of the river.  If I hadn’t planned for it, I would be moving my river when I started building it!  LOL

@Mark Boyce posted:

John, Thank you very much!!  I don't know if a 13-foot maximum span between legs is too much.  I would have shortened that since where I see the long spans, there are shorter spans right beside.  I also wonder if it would be good to have legs close to where the turntable will be.  Maybe they won't help and would just get in the way.  These are all questions.  I hope someone who has built a layout of this size will offer some practical answers.

Lumber yard had 10 foot 1x 4's and 1 x 6's . The 1x6 I ripped into two 1x3's for the flange of the l-girder

Going from Lin Wescott's book the longest span for that I-girder is at least 14 feet I'll double check in morning. Although the longest wood I have is 10 feet so that should be good

I'll move the legs away from the TT to allow more floor access under the TT

Thanks

@DoubleDAZ posted:

Mark,
I couldn't find any 13' sections, so I don't think John updated the Notes after adding legs above the river.

John,
Since your L-girder rails will be constructed using 10' lengths of 1x material, you won't have a span greater than 10'. I haven't found any standards on how far apart legs can be placed. Using 10' as an example, if you place them 1' in on each end, you'll end up with an 8' span and a 1' overhang.

I put my spin on it. First I changed the grid in SCARM to 16" and aligned the main joists on them. I spread out the 2 joists around the river, so you don't have a joist in the middle of the river and can make the river as deep as you want. I'm not sure why the staggered girder setup that I circled in the lower left corner, but I didn't change it. I also didn't change the different length girders under the river, but I would if it were me.

Mark mentioned the legs near the turntable frame, but I didn't move them because I don't know if it will make a difference.

Just a note. Since I see you drew some L-girders, I want to make sure you know the 1x2 (or 1x3) flange goes on top of the 1x4 girder, not alongside.

As always, these are just my $.02 and food for thought, I've never used L-girder. Most modelers keep their joists (and crossmembers) somewhat symmetrical, like 16" on center, or 24" like Mianne, so that's pretty much what I did.

John 2020-12-04 daz

Dave, Thanks for checking drawing for 13 sections My scare skills are beginner at best, so I could have unintentionally drew a 13 footer. I think the longest span Linn Westcott has listed is 14 feet I'll check in am  Thanks for the clean up and making grid 16 inches shows why you are the wizard of scarm! Staggered legs was to keep under table access open. That set up should be more than adequate for stability. If not I'll adjust during build.

Thanks a ton

John, I could be wrong, but I think Mark was saying he wasn’t sure if the legs should be closer to the turntable section for stability, but I get your point about access. However, I don’t think you need to move them any further away. In fact, if you do put all those whisker tracks there and store engines on all or most of them, that’s going to be quite a bit of weight. Tom Tee might be able to shed some light on leg placement in that area. BTW, I believe most people put angled braces in the corners of the square for the turntable creating an octagon inside.

Regarding the area I circled, I have no problem with the leg arrangement, I was just curious why the rails were staggered and why the inside rail going up/down stopped short of the wall?

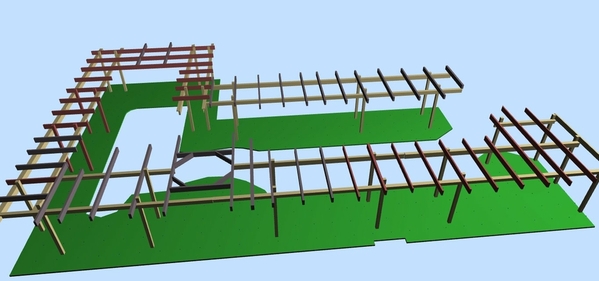
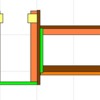
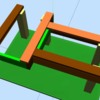
Here are 2 ways I envision rails being joined. One way (Photos 1&2) is with (yellow) sister cleats across the outside of the rails. The other way is (green) end caps butt-joined to each other. Use of end caps also allows  a set of L-girders going in one direction to be butt-joined to a set going in the other direction (Photos 3&4), like in the lower left corner and the upper corner to the left of the town in your design. Of course, you can screw through the rails into the ends of the connecting rails, but I think using end caps gives a strong joint and I think Photo 4 is stronger than staggering the L-girders and doesn’t affect placement of the legs.

Just more food for thought. Like I said, I’ve never used L-girder and the photos I’ve seen don’t show joints.

l-girder

l-girder 3d

l-girder joint

l-girder joint 3d

Attachments

Images (4)
  • l-girder
  • l-girder 3d
  • l-girder joint
  • l-girder joint 3d

John 2020-12-05 dazOf course great ideas Dave. As for specifications for benchwork, these are from Linn Wescott's book how to build model bench work second edition page 35 fig.2

  • The longest span between two sets of leg supports is 13 feet with 1x4/1x2 L-girder       
  • The longest L-girder over hang is 4'-4"  so longest L-girder is 21'-8" (I cannot transport lumber that long LOL)
  • The longest canterliver for joists measuring 1x4 is  30"
  • Support girder distance is 7'-6"

So these are the parameters I tried to follow.

I did put corner braces in the TT "box" that did not show on pics. not sure why???

Thanks a ton Dave for the great graphics and joinery ideas for the girders. Also the load on the whisker area you pointed out could be large (if I only won the lotto and had that many loco's) So I will revisit that and make some calculations based on Linn's book.

Thanks Mark & Dave for being so diligent and helpful!

Attachments

Images (1)
  • John 2020-12-05 daz
Files (1)
Last edited by Aegis21
@Mark Boyce posted:

Dave is right on what I wondered about the legs by the turntable.  I don’t think they should be moved farther away from it.   It has been so long since I read Westcott’s book I don’t recall at all what his recommendation is.  I generally over do my building

Hi Mark, It is ALWAYS better to over build than under build! The distance between supports is one of L-Girders huge advantage. 1x4's do not have huge moment of deflections within 8' and cantilever strength is 30" My mechanical engineering professor explained safety factor - If you are building a walkway over a two foot culvert safety factor could be as low as 1.01 When you design the cables for the elevators in the empire state building it should be a little more (tongue in cheek)  Safety factor always determines how much you over build something. It is not a case of, if you should over build, it is a case of how much you should over build.  So like you I have always over built. 

Thanks John

Add Reply

Post
The Track Planning and Layout Design Forum is sponsored by

AN OGR FORUM CHARTER SPONSOR

OGR Publishing, Inc., 1310 Eastside Centre Ct, Suite 6, Mountain Home, AR 72653
800-980-OGRR (6477)
www.ogaugerr.com

×
×
×
×
Link copied to your clipboard.
×
×