Updated 8/21/2018:

The big accomplishment today was the use of the laser level and shims to adjust the height of the WV side of the bridge. Last week the effort to obtain the correct difference between the River Route and height of the bridge resulted in some adjustment of the main bench work.

First thing we did was to bolt together tables 7 & 17.
Benchwork_184_

Then we detached the tables from the wall.
Benchwork_183_

Next we shimmed the table to the correct height.
Benchwork_186_

Finally, we checked the height with the laser.
Benchwork_187_Benchwork_188_

More when I know it.  

George

Attachments

Images (5)
  • Benchwork_183_
  • Benchwork_184_
  • Benchwork_186_
  • Benchwork_187_
  • Benchwork_188_

Updated 8/23/2018:

I ordered the 4100K dimmable BR30 LED bulbs for both the workshop and layout.   Including spares, that is a total of 34 bulbs.  It's time to get those installed before more tables make that difficult.

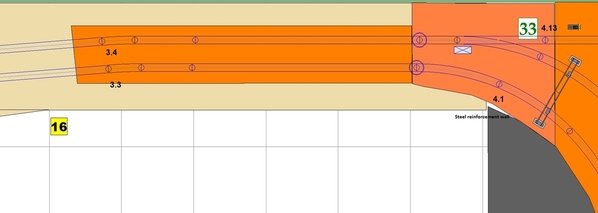
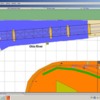
I am working on one of the areas (Table 16) where table height will determine the look of the terrain.  The RR-Track diagram below shows the parallel tracks that approach the bridge (out of sight to the left).  Those tracks reside on a Pennsy fill (3:2 ratio - width to height).  They will sit on a piece of cookie-cutter sub-roadbed 9.5” wide on risers.  Right now I am measuring and determining the exact dimensions and placement of the risers and cookie-cutter sub-roadbed.

Eastern Approach

In front, from right to left:

  • The black / dark gray area is Standard Slag, a large pit lined with rusty steel reinforced walls.
  • As we move left (west) towards the river, the terrain will have 1-2 drainage culverts running perpendicular to the track.
  • Farther right (above the #16), the track will move onto the stone arch and then onto the bridge itself.


At the back of the layout against the backdrop from right to left:

  • Right above the two circles on the track (RR-Track block separators), I will place a culvert parallel to the tracks.
  • A drainage ditch will occupy the center of that narrow area between the track and backdrop; it will run all the way to the river.
  • Line poles (Panhandle line poles typically had 5 cross-arms) will populate the upper slope of the ditch.


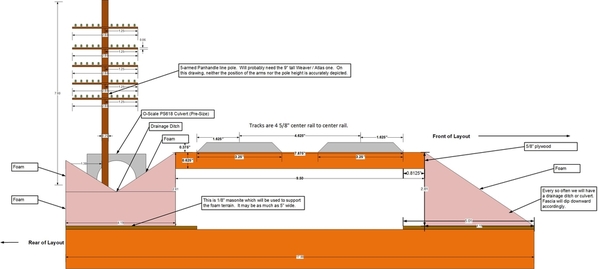
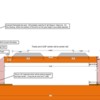
See the diagram below (VERY PRELIMINARY) for a cross-section of the area. 

Table 21 - Pennsy Roadbed Cross-section

Thoughts on construction:

  • A length of 1/8” masonite on either side of the riser will be used to create the base of the fill.
  • Ballast (not shown) will cover the tracks and Vinylbed roadbed. It will be Pennsy mainline limestone (white / gray).
  • Weaver / Atlas line poles will march towards the bridge; I expect to need 3 or 4.
  • I may be looking for a much smaller culvert as it seems a bit oversized for the area.


More when I know it.  

George

Attachments

Images (2)
  • Eastern Approach
  • Table 21 - Pennsy Roadbed Cross-section
Steamfan77 posted:

Hi George, 

I’m enjoying the build. Great work, keep it up!

Andy

Thanks Andy!  I am glad to hear that.  

This time around, the build doesn't seem to have attracted the following or viewership of the five previous Panhandle 1.0 threads for some reason.  Which is odd because to me (hardly an unbiased observer ) we are moving at a much faster clip and making serious advances almost every week.  But then, it's hard to watch the football game from inside the ball.  

Thanks again!

George

Last edited by G3750

Things are slowly coming together there George, looking great. About that saw, my grandfather used to say, "if it ain't broke, don't try to fix it". He had tools from I don't even know when. We had been working outside and I asked him what something was, he explained what it was and that he'd been using it for a great number of years. He had a bunch of things like that, though some in disrepair. If it works, awesome, if not, well what can you do.

Dave NYC Hudson PRR K4 posted:

Things are slowly coming together there George, looking great. About that saw, my grandfather used to say, "if it ain't broke, don't try to fix it". He had tools from I don't even know when. We had been working outside and I asked him what something was, he explained what it was and that he'd been using it for a great number of years. He had a bunch of things like that, though some in disrepair. If it works, awesome, if not, well what can you do.

Thanks Dave.  We're trying to push forward methodically.

I was having a discussion of old tools with a friend just a few weeks ago.  I inherited my grandfather's tools and my father's tools.  Four years ago, when we moved my parents household goods to my sister's house in Erie, I went through a bunch of those tools.  Some of those tools, particularly my grandfather's, I simply couldn't identify or figure out what they did.  Wish I had asked him about them.

George

Writing of tools, we went through my grandfather’s tools this summer.  He passed on 6 months before I was born. Dad took over the homestead, and we used many over the years.  Some I never saw Dad use because grandpa was a plumber and had some tools for monstrous pipes and fixtures that haven’t been in use for many decades.  I have the better tools Dad had, but grandpa’s went to a dealer.  Hard to know what they were worth not knowing what they really are.

Updated 8/25/2018:

I decided it was a good time to try test fitting the bridge onto the layout. 


 Benchwork_193_Benchwork_195_Benchwork_196_

 The bridge sections are held together with screws whose head accommodate 3/32” hex keys.  I have an entire storage bin full of old allen wrenches.  Do you think I had one that fit?  So it was time for a detour to Harbor Freight for that and for an LED headlamp (my old battery one corroded).

To support the bridge on the piers, I realized that I needed all my bridge shoes. For Panhandle 1.0 (when the bridge was smaller), I only needed 4 bridge shoes. But with the prototypical approaches in place, that number became 18. That turns out to be 2 at the western abutment, 4 at the pocket-pier, 2 at the mid-river span, 2 at the other mid-river span, 4 at the pocket pier, 2 at the “shorty” pier, and finally 2 at the eastern abutment (stone arch). I had the parts cut awhile ago, but never put them together. Here are some of them in the paint booth.

Benchwork_197_

And here they all are after getting a coat of flat black.

Benchwork_201_

More when I know it.  

George

Attachments

Images (5)
  • Benchwork_193_
  • Benchwork_195_
  • Benchwork_196_
  • Benchwork_197_
  • Benchwork_201_

Updated 8/28/2018:

Haven't gotten a ton done over the past couple of days. Yesterday I managed to get through a retina exam without any laser surgery repairs!   

I spent some time gluing the Chooch Large Cut Stone segments (allegedly peel-n-stick   back onto the stone arch.

Benchwork_203_

I also reworked the RR-Track plan of the river area to show the bridge piers and widen the river. For Panhandle 1.0, I used a rippled (tempered) glass sheet (approximately 6' wide) for the river surface. The new, more prototypical and more accurate size of the river (8') means this is isn't going to fit. I am likely to try selling it. I expect it will make a good river or lake for some layout somewhere.

Bridge Area

More when I know it.  

George

Attachments

Images (2)
  • Bridge Area
  • Benchwork_203_
Last edited by G3750
rtr12 posted:

I like the bridge/water changes, it will look really nice I think. I agree that some of the 'peel-n-stick' stuff is a bit lacking in the 'stick' department.

Anymore, any doctor or dentist visit where no repairs are required is a really good one!      Keep up the good visits!!!

Thanks!  The changes reflect the prototype.  I want to replicate this as accurately as possible.

3550_11157473405799_1234195720PhotoShoot_038_PhotoShoot_028_

George

Attachments

Images (4)
  • 3550_1115747340
  • 5799_1234195720
  • PhotoShoot_038_
  • PhotoShoot_028_

Updated 9/3/2018:

The man with the soldering skills (my younger son) was in town with his family over this Labor Day Weekend. So I made him labor!   

He fixed some broken wires on one of the Lionel Industrial Smokestacks that I had cannibalized to make two tall stacks. I now have 2 tall stacks and 2 short stacks. All have lights that flicker and all smoke (somewhat anemically in the typical Lionel manner). I suppose that if they produced smoke prototypically, all attendees to the layout would have lung cancer and not be able to see 3' in front of themselves.   

Smokestacks_001_Smokestacks_002_Smokestacks_003_Smokestacks_004_

More when I know it.  

George

Attachments

Images (4)
  • Smokestacks_001_
  • Smokestacks_002_
  • Smokestacks_003_
  • Smokestacks_004_

Updated 9/5/2018:

Quite awhile ago, I had decided on dimmable 4100K LED light bulbs for both the workshop and the trainroom. I placed the order for them about 10 days ago. I hadn't heard from the supplier so I called them. Turns out they had misfiled the order under some horrid (not the usual) butchering of my name. Eventually, they found the order. Turns out it was short as well. I'm expecting to pick up the full order next week.

The battle with the peel & stick stone facing continues. Today I managed to get one of the faces of the arch covered. Copious amounts of E-6000 were required. Here are two photos - the first showing the weighted facing and the second showing the finished facing.

Benchwork_203_

Benchwork_204_

I also examined the LEDs that will be used for the pier navigation lights. The leads are long enough to get through the piers.  I will extend them once they are sticking out the bottom.  The photo shows (top) one of the lights in its test fitting.  At the bottom is the Evans Design LED I am using.

Benchwork_206_

More when I know it.  

George

Attachments

Images (3)
  • Benchwork_206_
  • Benchwork_204_
  • Benchwork_203_
Mark Boyce posted:

I would say the stone arch is worth the trouble getting it to stick.  The pier will look great with those lights.

Mark,

I think it will as well.  Regardless of how easy or hard it is to get them to stick, we're committed to finishing it.

Yes, the lights do enhance the pier.  And they are prototypical.

DSCN0155DSCN0157DSCN0158

George

Attachments

Images (3)
  • DSCN0155
  • DSCN0157
  • DSCN0158
Last edited by G3750
G3750 posted:
rtr12 posted:

I like the bridge/water changes, it will look really nice I think. I agree that some of the 'peel-n-stick' stuff is a bit lacking in the 'stick' department.

Anymore, any doctor or dentist visit where no repairs are required is a really good one!      Keep up the good visits!!!

Thanks!  The changes reflect the prototype.  I want to replicate this as accurately as possible.

3550_11157473405799_1234195720PhotoShoot_038_PhotoShoot_028_

George

You know what?  Screw this realism, I've decided to go for this...

Joke

LOL.               

OK, maybe not.  

Seriously, I am working on bridge pedestals at the moment.

George

Attachments

Images (1)
  • Joke

That could make an interesting scene! It does make it look neat with the water mist and maybe even some crashing water sounds. Kind of adds some excitement even or the feel of it maybe?  

But, OTOH, I kind of liked it the old way, I think...I'm old and the calm, gently flowing waters are more soothing to the old tired eyes, body and brain. I could picture myself out below the bridge, down by the water (nice and quiet) just sitting (or maybe laying down) and just relaxing on a nice sunny day. Maybe even throw a line in the water (no bait on the hook, of course...that would prevent fish, which would in turn make me have to get up, ruining my nice afternoon of relaxation ).

Actually, I think which ever way you choose it will look great, it's a really good looking bridge and scene to go along with it. Going to be really nice either way.

rtr12 posted:

That could make an interesting scene! It does make it look neat with the water mist and maybe even some crashing water sounds. Kind of adds some excitement even or the feel of it maybe?

Uh, I'm not really doing that.  That was a joke.  

But, OTOH, I kind of liked it the old way, I think...I'm old and the calm, gently flowing waters are more soothing to the old tired eyes, body and brain. I could picture myself out below the bridge, down by the water (nice and quiet) just sitting (or maybe laying down) and just relaxing on a nice sunny day. Maybe even throw a line in the water (no bait on the hook, of course...that would prevent fish, which would in turn make me have to get up, ruining my nice afternoon of relaxation ).

Actually, I think which ever way you choose it will look great, it's a really good looking bridge and scene to go along with it. Going to be really nice either way.

I really enjoyed my boat trip with the photographer to get the shots for the backdrop.  The Ohio does flow pretty gently and that day it was absolutely smooth as glass.  It was warm, and it was all I could do to not jump into the water.  It was that inviting!  

George

I thought you might be kidding there, but it could have also made a nice, interesting scene. However, I didn't think that was what you were aiming for. (And your layout would be really nice either way too.)

I bet that boat trip was really nice and enjoyable. Sounds quite appealing to me as well! Probably fascinating going along and looking at the underside of the bridge too. I enjoy studying old structures like that and imagining the people working on it and what they had to go through back then to construct it (spent my life in construction). I also think it's pretty cool that you took the time and put forth the effort to take the trip to get the pictures. I would call that going the extra mile (and enjoying it!). 

I think I am finally at the point in my life where stopping to smell the flowers (so to speak) or looking at the structures is becoming much more important than getting somewhere in a hurry or meeting a deadline or whatever else used to seem so important during ones working life. I am sensing that you are possibly about at that point too. Retirement is just wonderful, time to really enjoy life as we should. Looks like you might be doing that too!

Last edited by rtr12

Updated 9/15/2018:

It's been a rough week. About 9 days ago, my Outlook email client program began acting up - creating duplicate messages and not permitting deletions.     I have been working with a data recovery product to rebuild the file used by Outlook to store emails, contacts, and calendar settings (outlook.pst).  That file is approaching the size limit handled by my old version of Outlook.  Unfortunately, a ton of information is stored within that I don't want to lose.  Saving the file is a long process that has involved several rebuilds.  It is still on-going.  I've been using the web e-mail interface in the meantime.

Despite being preoccupied by this event, I have managed to make a few color samples for the piers.  Once again, the value of photographs of the prototype is being demonstrated.  These photos prevent me from speculating as to the correct colors of the piers or relying on my not-so-perfect memory.  When in doubt, refer to the prototype!  I plan to experiment with a few more color samples.  My first target is the "shorty" pier on the WV side. It was re-used from the previous (2nd) bridge and is probably close to 130 years old.  It is darker in color than the newer piers.  I'm thinking about applying a dark gray wash to it.

The "pocket" and mid-stream piers date from the mid-1920s.  They're newer, only about 90-93 years old.    I am thinking about creating and applying some washes that are lighter in color - white, vanilla, or flesh - with some rust.  All piers will get a dark gray (concrete) coat on their upper ring.

Finally, my order of dimmable 4100K LED bulbs came in at the store.  I picked up and installed all of them last night.  The difference is amazing! :shock:  My workshop is much brighter.  The train room looks like it is being bathed in sunlight. I am very happy with this decision.  

More when I know it.  

George

Updated 9/18/2018:

This update is a real mixed bag.

Finally, I think the Outlook disaster is over.   I am now running Microsoft Office 2016, including new versions of Word, Excel, Outlook, and PowerPoint.  I must say that it is much slower than the previous version (why am I not surprised?).  Anyway, most of my e-mails have survived intact.

I took my shot at weathering the "shorty" pier.  I didn't like how it turned out and have since removed the weathering powders.  I am studying my photos and will try again.  I might even take a photo expedition to get a closer view.

PeirWeathering_001_PeirWeathering_002_PeirWeathering_003_

I also built a couple of bridge pedestals.  I'm actually going to need a few more (maybe 5).

Pedestals_001_Pedestals_003_Pedestals_005_

Next, I took a stab at weathering the bridge shoes and pedestals. I'm much happier with this effort.

PeirWeathering_004_

And finally, I installed the new light bulbs. Here are a few photos under the new lights.  The 4100K bulbs are more like sunlight than the standard 2700K lights.  I like the effect.

NewLighting_001_NewLighting_002_NewLighting_004_

George

Attachments

Images (10)
  • PeirWeathering_001_
  • PeirWeathering_002_
  • PeirWeathering_003_
  • Pedestals_001_
  • Pedestals_003_
  • Pedestals_005_
  • PeirWeathering_004_
  • NewLighting_001_
  • NewLighting_002_
  • NewLighting_004_
Mark Boyce posted:

George, Remember that cataract surgeries I had last fall?  Well with better vision because of it, coupled with the 4100K lights, I had to put my sunglasses on to see your room photographs!  

It is good to see progress in that train room of yours!  I'm always glad to follow along.

I’m glad the cataract surgery had the desired results.

Outlook 2016 is the gift that keeps on giving- it’s painfully slow and my calendar was wiped out (I am rebuilding my appointments).

I’m debating uninstalling it and reverting to 2007.

George

Mark Boyce posted:

Ouch!  That is bad!  I can see you may want to go back to Outlook 2007.

Well, the problem is two-fold.  First, the real cause of the issue was the corruption of the PST file.  That was caused by repeated importing of e-mails from the server (think 13,000 messages repeatedly loaded).  That drove the size of the PST file past what Outlook 2007 could handle.  The file got corrupted.  Attempts to repair it were cumbersome, time-consuming, and ultimately successful.  However, there were casualties - like the calendar.  Calendars and e-mail messages are kept in separate PST files.  I didn't even know the calendar PST was damaged.  Anyway, my entries for the next 3 months (maybe longer) are just gone.  I've got e-mails for things in 1969 (didn't know about them  ) and a reminder to file my PA taxes in 2743!  

Second, Outlook 2016 just seems to be very slow.  A video I just saw comparing 2010 and 2016 shows that significantly larger amounts of resources are consumed by 2016.  Wish I'd seen that on Monday.

The bottom line is that the damage has been done.  Even if I de-install Outlook 2016, I really need to shrink the PST file and update the calendar.  My hope is that performance will improve.  If not, then I need to pray that a reversion to Outlook 2007 will go smoothly and yield a running e-mail system.  It's a tough call.

And all of this is really keeping me from doing much, if any, modeling.    I really didn't count on doing my IT support in my retirement.

OK, I'm done venting now.  

George

I was thinking about that.  What is gone is gone.  2007 won't help there, but I do hate buying a computer and the updates make it obsolete before its time!  I know, I'm tired of IT support too!  Vent away!  We are with you!

One good this is you won't have to worry about forgetting you 2743 State Income Taxes!  Those bums in Harrisburg want to collect in advance I guess!   

Updated 9/20/2018:

Finally, some answers.  Due to the large number of deep puddles, my wife and I hiked into the area just short of the former Weirton Junction location.  Crossing over the tracks, we went south parallel to the river bank.  We couldn't get very close because of swampy conditions, poison ivy, and dense growth.  However, we did get enough close-up photos to learn that the short pier is made of poured concrete, just like the pocket and mid-stream ones. 

Bridge3_003_Bridge3_006_Bridge3_007_Bridge3_013_Bridge3_016_Bridge3_018_

We had just hiked back to the car and were changing our shoes when 2 Norfolk Southern pick-up trucks rolled by on their way to Weirton Junction.  They parked next to the tracks and these men were soon joined by some sort of track maintenance equipment on the track.  As we had an appointment, we didn't stick around.

George

Attachments

Images (6)
  • Bridge3_003_
  • Bridge3_006_
  • Bridge3_007_
  • Bridge3_013_
  • Bridge3_016_
  • Bridge3_018_
Mark Boyce posted:

Are you going to model it in a more pristine condition, just weathered but without the crumbling concrete and bushes since you are taking us back in time with the Weirton Steel and city scenery?

Yes, the piers will be in much better shape.  In 1953 the majority of them were only 28 years old.  So no crumbling concrete.  No bushes growing out of the tops of the piers.  There will be weathering and the effects of dirt, flooding, soot, and air pollution.  PRR track maintenance was in full effect.  That means manicured right of ways and raked ballast with straight lines (no mechanical ballasting machines scattering rocks everywhere).

George

Last edited by G3750

Updated 9/22/2018:

For reference purposes, here is my pine paint board.

IMG_2048

Regarding the piers (West to East), here are my current thoughts and intentions:

  • Western abutment:  The prototype actually has an abutment built into the hillside and a short pier in front of it (see photo), but I'm invoking modeler's license and putting them together.  I am also using stone (peel-n-stick PITA stuff) on the wall behind the abutment.

WesternPier_001_

  • Pocket Pier (OH side): This pier is on land and as such is much dirtier than those in the river. I am planning to paint it with the Desert Bisque textured paint. The top ring will get a concrete color (wash). The rest will receive weathering, rust, and enhancement of the seams between the rings. Final thing will be a shot of Dullcote.

WesternPier_002_

  • Mid-stream Pier (OH side): This is the westernmost pier actually in the river. The top ring will get a concrete color wash (#2 on my pine board). The rest of the prototype pier is lighter in color, more of a washed out, bleached concrete color. It will get the light gray (#1 on my pine board) wash. Vertical runs of rust will also be applied with weathering powder. Dullcote will fix everything in place. 

IMG18

  • Mid-stream Pier (WV side):  This full-sized pier is also in the river. It will receive the same treatment as the other mid-stream pier.

WesternPier_004_

  • "Shorty" Pier (WV side): This is the first WV side pier that sits on land.  As the photos proved the other day, it is also constructed using poured concrete rings.  However, like the Steubenville pocket pier, it is darker in color (dirty).  It has been painted with the Desert Bisque textured paint (see photo below).  The top ring (currently masked with tape) will get a concrete color (wash).  The rest will receive weathering and some rust.  Finally, I will hit it with a spray of Dullcote.

WesternPier_005_

  • Eastern abutment:  This is the stone arch bridge that dates from at least the 2nd bridge on the site (maybe it is part of the 1st, I don't know).  The photo below shows the arch on its end being test fitted with a piece of the truss bridge.  This was taken prior to putting the stone facing on it.

Benchwork_126_

More when I know it.   

George

Attachments

Images (8)
  • WesternPier_005_
  • WesternPier_001_
  • WesternPier_002_
  • WesternPier_003_
  • WesternPier_004_
  • IMG18
  • Benchwork_126_
  • IMG_2048

Updated 9/22/2018 (PM):

After seeing how well the "shorty" pier turned out, I've decided to paint the OH side pocket pier the same color, although I will add more of a darker wash to it afterwards. But before I could paint, I needed to do some prep work.

First, I installed the navigation warning lights (Evans Design U3TR - slowly flashing red 3mm LED bulb). The light is supported by a short piece of shrink wrap and taped in place on the pier. The wires go down through the hole in the pier and emerge below it. Eventually, I will extend those wires. When the pier rests on river bench work, I will drill holes through the river panel, and connect the wires to the 12VDC accessory bus.

PierWork_001_

Next, I glued the spacers in place. They will support the floor of the pier, which in turn will support the bridge pedestal and bridge shoe.

PierWork_003_

The floor lays on top the spacers.

PierWork_004_

This photo shows both of the completed navigation light installations. Note the wires at bottom of the pier (indicated by the craft sticks).

PierWork_003_1

Finally, I masked off the top ring of each arm and the lights. 

PierWork_004_1

Now we're ready to paint.

More when I know it.  

George

Attachments

Images (5)
  • PierWork_001_
  • PierWork_003_
  • PierWork_004_
  • PierWork_003_1
  • PierWork_004_1

Updated 9/24/2018:

I applied a coat of Desert Bisque to the pocket pier. This is the one on the Steubenville side of the river, near the gravel / sand yard. It is right next to the C & P River Route, so it should be the dirtiest of all the piers.

PierWork_001_

I still need to apply the gray to the top ring.  And scatter some grimy black weathering powder on it.  After that, it will get some Dullcote.

PierWork_002_

More when I know it.  

George

Attachments

Images (2)
  • PierWork_001_
  • PierWork_002_
briansilvermustang posted:


                    https://historicbridges.org/br...llerr2/#photosvideos


Yep, I am well aware of that website and the article in Railway Age (April 2, 1927).  The article was the basis of my design of the piers and, indeed of my early design that was passed to Custom Model Railroads as a starting point on their product.

Bridge-jpeg2Intermediate Bridge Piers v007 specs - 9Bridge Sideview3

George

Attachments

Images (3)
  • Intermediate Bridge Piers v007 specs - 9
  • Bridge-jpeg2
  • Bridge Sideview3

Updated 10/4/2018:

I did apply some additional weathering to the Steubenville pocket-pier and made one change.  As I looked at the photos, I realized that I had incorrectly installed navigation lights on a pier that sat on the ground.      I took them out.  Here's the pier at this point.  I am a bit tired of it and a little frustrated with its appearance.  I'm going to ignore it for 3 weeks and start on the other piers.  These are located mid-stream and are much less weathered.

This is the side facing the river.

Piers_002_Piers_003_

This side is next to the C&P River Route, so it gets more dirt from steam locomotives and mineral trains.

Piers_004_Piers_005_

More when I know it.   

George

Attachments

Images (4)
  • Piers_002_
  • Piers_003_
  • Piers_004_
  • Piers_005_
Mark Boyce posted:

Sorry about the lights.  The weathering is hard to replicate.  Setting it aside for a while is a good idea.  You will get it sooner or later.

Thanks Mark.  The lights miscue is not a big deal.  I fixed that pretty easily.  And this weathering effort is really my first, so this kind of thing is to be expected.  I will sort it out.

I took a good hard look at the photos of the other, mid-stream piers.  Those should be easier to do accurately.

George

A friend inquired about my use of the term "pocket" pier in reference to the bridge supports.

Not knowing what else to call it, I've used that term.  I have no idea if that is what it is actually called.  That led me to revisit the April 2, 1927 Railway Age article, which refers to "pockets" within several of the piers needed to carry the 2nd bridge while the 3rd (current) is erected.  I was motivated to re-read the article and hence forward, I will refer to the piers accurately by their correct designations. Those are (proceeding east to west):

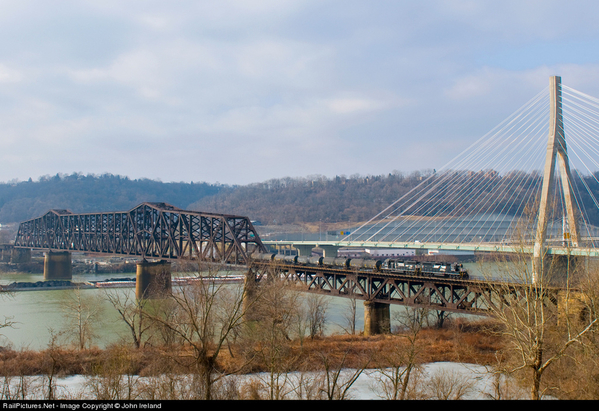
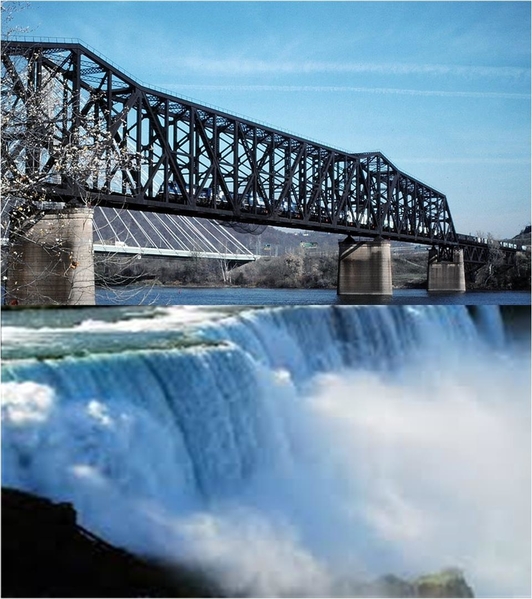
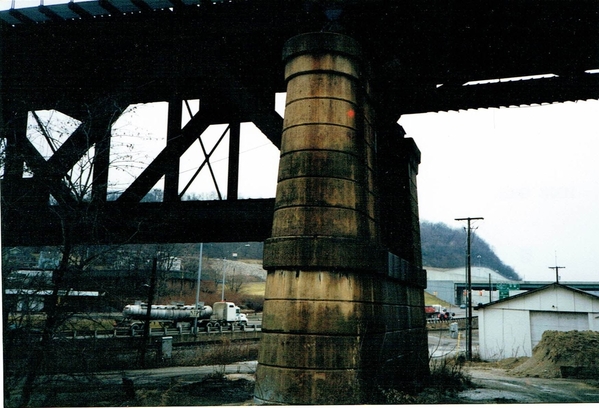
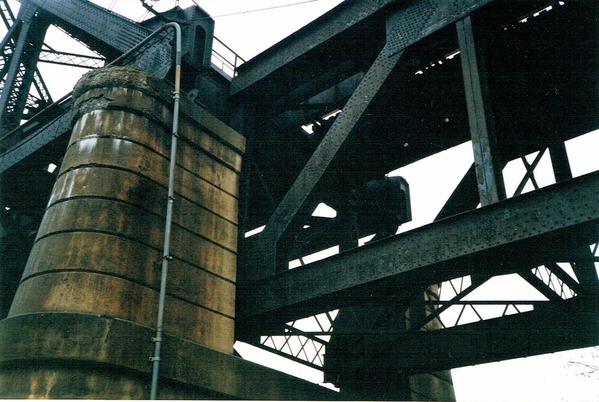
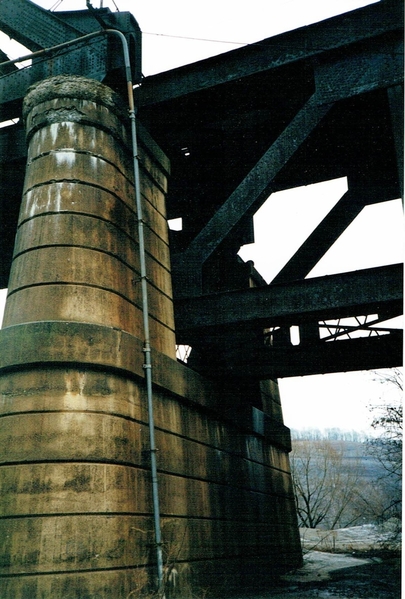
  • Pier 1, the "shorty" pier. The different appearance as well as the photograph below leads me to believe that this pier as well as the stone arch are part of the second bridge (1888). Heck, the arch might even be part of the first bridge, which dates from 1868.

Panhandle RR Iron Bridge

  • Pier 2, a "pocket" pier.  The article refers to this as "New Pier 2", indicating that it was replaced in the building of the current bridge. 
  • East Channel pier, which I have referred to as a "mid-stream" pier.  This was a new pier required for the current bridge.
  • West Channel pier, which I have referred to as a "mid-stream" pier.  This was also a new pier required for the current bridge.
  • Pier 7, a "pocket" pier.  The article refers to this as "New Pier 7", indicating that it was replaced in the building of the current bridge.

Bridge-jpeg1

In cutting over from the 2nd to the 3rd bridge traffic was only disrupted for 8 hours.

George

Attachments

Images (2)
  • Panhandle RR Iron Bridge
  • Bridge-jpeg1

Updated 10/6/2016:

My work on the East Channel, West Channel and Pier 2 continues.  I am using a Sharpie to inscribe lines on these piers.  I am also in the process of installing lights in these piers.  Here's a photo showing the installation of the navigation light as well as the supports for the pier floor (Pier 2).

Bridgework_001_

It's also time to start test-fitting the Steubenville truss (Span #8) to the main span.  First let's look at the main span sitting atop Pier 7.

Bridgework_002_

Bridgework_003_

Here are both spans being supported by Pier 7.

Bridgework_004_

This is a shot from beneath the bridge. Note the bridge shoes / pedestals supporting the truss in the middle of the "pocket".

Bridgework_005_

I must say that I am pretty happy with how this turned out. Even the coloration and weathering of the pier looks pretty good to me.

More when I know it.  

George

Attachments

Images (5)
  • Bridgework_001_
  • Bridgework_002_
  • Bridgework_003_
  • Bridgework_004_
  • Bridgework_005_

Updated 10/9/2018:

I'm working on a few things:

  • I painted the tops of the three mid-stream piers (East Channel, West Channel, Pier 7) and top of the "shorty" pier (Pier 2).  These got an aged iron textured paint that reflects the soot and cinders covering the tops of the prototypes.
  • I've studied the photographs of the three mid-stream piers and decided to simply accent the rings with a Sharpie, apply a gray wash in certain areas, and accent with a rust wash (#13).  I'm hoping to get to those later today and tomorrow.
  • I took a friend's advice about the C&P River Route having lots of bi-directional traffic and decided to:
    • Add a long passing siding inside the tunnel to store a 2nd train.  Trains will run in both directions on this loop.  Yes, I know I am violating one of my lessons learned.    And yes, there will have to be easy access and / or a way to see or know the positions of trains. 
    • Signal the route in both directions.  I am also considering how best to indicate occupancy of the siding and turnout positions.
  • I conducted a physical inventory of my old switches from Panhandle 1 (most of which I am reusing) and the new Ross Switches I've acquired in the past year.  I have identified a pair that I am selling (Curtis RH 11 degree turnouts with DZ-2500 switch machines).  BTW, these two switches are on the For Sale Forum.  I also identified two others that I need to get.  Even though we are probably months away from laying track, I have staged the switches below the west (Steubenville) end of the bench work.  All switches were compared against the track plan and received their number (a blue sticky note).

Switches_001_

More when I know it.  

George

Attachments

Images (1)
  • Switches_001_
MNCW posted:

Hi George,

  I looked at an earlier post from a few days ago and the pier you showed came out really nice. Congratulations! 

Tom 

Thanks Tom.  The pier surprised me a bit.  When I looked at it standalone, I wasn't particularly happy with it.  But when I put it in place, it looks much better than I expected.  I hope the others come out as well.  

Are you heading to York?

George

Updated 10/10/2018:

For all intents and purposes, Pier 7 (the Steubenville side “pocket” pier) is complete.  I have it sitting on the layout holding up the point where the deck truss meets the main span.  Eventually, I will move it and the bridge spans approximately 3” to the left (west) to mate up with the western abutment.  That exact geometry is yet to be finalized.

Yesterday, I painted all the pier tops with Rustoleum #223535 Aged Iron.

Today, the remaining piers (West Channel, East Channel, Pier 2) finally got all their rings delineated with an Ultra-Fine tipped Sharpie.  Then I sprayed the underlying color, Rustoleum #249065 Satin Strawflower, into a small paper cup and touched up the mistakes with a brush.  Once these get their gray wash (dirt) and rust spot markings, I don’t think the minute imperfections will be noticeable. 

Here are the West Channel Pier, East Channel Pier, Pier 2, and Pier 1 with accompanying photos of their prototypes.

Piers_040_Piers_041_Piers_042_Piers_043_

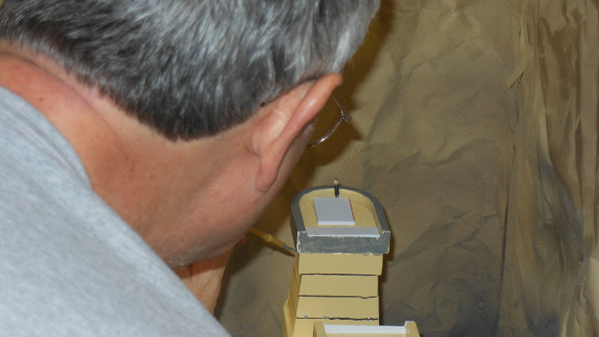
Using the camera's timer and a tripod, I managed to get an over-the-shoulder shot of touching up the ring on a pocket pier.
Piers_046_

Here’s Pier 1 (the shorty) with its ring painted gray. This was applied with a spray can – Krylon #53574 Matte Deep Gray.  Pier 2’s top ring was brushed with Darice #10120 Dark Gray. Pier tops are not yet fitted in place, but the lights have been installed.

Piers_053_Piers_052_

The East Channel Pier had its top ring painted with Ceramcoat #02543 Rain Gray.  The pier top is being test fit.  Navigation lights have yet to be installed.  The West Channel Pier also had its top ring painted with Ceramcoat #02543 Rain Gray.  Same state for the pier top and the navigation lights.

Piers_050_Piers_051_

I hope to get to the gray wash and rust for the piers tomorrow.

More when I know it.  

George


Attachments

Images (9)
  • Piers_040_
  • Piers_041_
  • Piers_042_
  • Piers_043_
  • Piers_046_
  • Piers_050_
  • Piers_051_
  • Piers_052_
  • Piers_053_

I worked on Pier 1 today.  Early on, I started applying white (vanilla) splotches on the pier ends to match the prototype.  I got a little carried away on the sides, but fixed that with a spray of Desert Bisque.  I think it turned out OK.

Piers_048_Piers_049_

I also mixed up some gray wash and applied it to Pier 2, but it was too light.  I'm going to need either a few more coats or a slightly less watery mix.  I'll hit that tomorrow.

More when I know it. 

George

Attachments

Images (2)
  • Piers_048_
  • Piers_049_
Dave NYC Hudson PRR K4 posted:

Everything is looking great. I have been playing catch up George, sorry about not popping back here since last month. Been offline mostly only popping in on a few things when I could(goes for FB as well). Hard playing catch up.

WUT?  You have been letting the real world and your responsibilities get in the way of model railroading?  

I'm shocked.  Shocked, I say!!!    


George

Updated 10/12/2018:

I think I'm to the point where Pier 2 is just about done. 

I started by masking off the pocket and darkening it. All that soot, cinders, and grime has to go somewhere, right?

Piers_050_Piers_051_Piers_052_Piers_053_

Then using the photos of the prototype, I applied stains and rust.

Piers_054_Piers_055_Piers_056_

Comparatively speaking, the piers in the middle of the river will be much cleaner than those on land.  I think this fits the bill.

More when I know it.  

George

Attachments

Images (7)
  • Piers_050_
  • Piers_051_
  • Piers_052_
  • Piers_053_
  • Piers_054_
  • Piers_055_
  • Piers_056_

Add Reply

Post

OGR Publishing, Inc., 1310 Eastside Centre Ct, Suite 6, Mountain Home, AR 72653
800-980-OGRR (6477)
www.ogaugerr.com

×
×
×
×
Link copied to your clipboard.
×
×