Mine is only 24", and the absolute biggest thing it can handle is the Vision Line Hudson, it just fits with the coupler hanging over. ![]() I do have one articulated locomotive that fits, the Vision Line 0-8-8-0 PRR CCS, it's a bit over 23" long.
I do have one articulated locomotive that fits, the Vision Line 0-8-8-0 PRR CCS, it's a bit over 23" long.
Consider building and buying within the space and budget that will be comfortable. Things go nuts when you lack comfort.
When desiring large style engines you may want to examine the MTH Rail King line. The large style engines in that grouping have the essence of the large style locomotive in more of a traditional presence.
Case in point: I crammed in two three rail stretches of track with eased 031" reverse loops on an already existing 2 rail layout so I needed to compromise. Desiring a large style engine I picked up a MTH Rail King 2-8-8-8-2 Triplex. 'taint no way a scale locomotive however it still has the busy driver blur and would fit on a 21" TT bridge, Easily work on an 24" Atlas and it turns on 031" curves without crazy overhang.
Overhang is a large concern with articulated engines. A scale Big Boy can readily require you to rearrange your scenery or it will do it all by it's self.
MTH had the Big Boy, Challenger and cab forward in their Rail King line. I believe all Rail King equipment will work on 031"
Lionel also has a slightly downsized comparable line of locomotives.
Additionally, concerning full scale sized articulated locomotives You may want to look at the Lionel USRA C&O 2-6-6-2. Overhang is minimal for an articulated yet it's proportions are decent, pulls good and is a smooth runner. I have 2 of these in two rail and it will just squeeze on a 24" TT with the two rail flanges and close coupling. In three rail it should fit on a 26" TT.
@Tom Tee posted:Additionally, concerning full scale sized articulated locomotives You may want to look at the Lionel USRA C&O 2-6-6-2. Overhang is minimal for an articulated yet it's proportions are decent, pulls good and is a smooth runner. I have 2 of these in two rail and it will just squeeze on a 24" TT with the two rail flanges and close coupling. In three rail it should fit on a 26" TT.
I just measured my USRA 2-6-6-2, and it's 25" long exclusive of couplers and 26" long with the couplers included in the measurement. I know it doesn't fit on my 24" TT. ![]()

However, it is a great puller, it's the one that is pulling my 54 car tank train, it handled it effortlessly, grades and all.
Attachments
I do think @DoubleDAZ has done a fine job pulling this together. All in all a fun thread to follow.
@ScoutingDad posted:I suppose the above comment may seem a bit snarky, but at what point does lending help to a fellow modeler become pro-bono design services? Seems to me, we are hurting the guys who provide design services for a fee. We do not like to see local hobby shops close or manufacturers go out of business - isn't this effort kind of the same thing?
I don't see it that way at all. I provide lots of guidance on electronics in these forums which happens to be my field of expertise. I've even posted schematics and finished board layouts for products that I produce and sell! I think there's room for both types of activity here. I have way more business than I can handle, so clearly my giving away designs and advice isn't impacting business much. ![]()
@gunrunnerjohn posted:I don't see it that way at all. I provide lots of guidance on electronics in these forums which happens to be my field of expertise. I've even posted schematics and finished board layouts for products that I produce and sell! I think there's room for both types of activity here. I have way more business than I can handle, so clearly my giving away designs and advice isn't impacting business much.
A nice reply John. Mine was a bit snarky so I decided not to post.
@gunrunnerjohn posted:I just measured my USRA 2-6-6-2, and it's 25" long exclusive of couplers and 26" long with the couplers included in the measurement. I know it doesn't fit on my 24" TT.
However, it is a great puller, it's the one that is pulling my 54 car tank train, it handled it effortlessly, grades and all.
Nice i want one of those now lol !
@ScoutingDad posted:You all remember this started out as an 11x12 layout? And the wish to avoid a $2500 charge for design services? 7 pages later look at it now! A fine example of scope creep. Looks to me as if there are way more than $2500 in billable services. Since the expansion space is now bigger, why not modify the dividing wall and rethink the entire layout and not do a compromise layout?
I suppose the above comment may seem a bit snarky, but at what point does lending help to a fellow modeler become pro-bono design services? Seems to me, we are hurting the guys who provide design services for a fee. We do not like to see local hobby shops close or manufacturers go out of business - isn't this effort kind of the same thing?
I do think @DoubleDAZ has done a fine job pulling this together. All in all a fun thread to follow.
Doubledaz has done a fine job and i do appreciate it. At any time doubledaz could have cut me off and he continued to help which i am thankful for. This is in no way cutting anyones profit or a local business out. As a matter of fact this will help them because i am purchasing over 3k in track because of doubledaz. If i had to pay $2500 for design services this would have never happened so what’s worse get help here and the local shops get my business or i don’t do it at all and they get nothing? As a matter of fact i support my local shop. I could cut them out and order from ross track directly but no i am going to my local shop and it’s a little bit more money but they get the sale and they are a ross dealer. That’s how i make sure i support the local shop. I am also a supporting member of this forum which helps as well.
The design services i mentioned that make track plans are all. “E Commerce” business and the ones i have consulted all do online only sales and track planning so that’s not a local business.
I also made sure doubledaz was ok and i didn’t over stay my welcome here. At any time all he had to do was say that’s all he wants do provide but it’s like @gunrunnerjohn john said this is basically what the forums are for to help each other out and support each other.
If @DoubleDAZ wants payment for his help i have no problem paying him i just didn’t think $2500 was reasonable for what i am doing maybe much bigger layout but not this. I just want to out that out there that i would pay dave for his help that way no one feels like they are being “used”
@davehall83 posted:Nice i want one of those now lol !
It's actually a really nice locomotive, scale sized but not an overpowering locomotive. It has whistle steam, great smoke, great sound, and obviously plenty of pulling power. What's not to like? ![]() This was actually a chance purchase, I got it for $600 like new a couple of years ago, couldn't pass it up!
This was actually a chance purchase, I got it for $600 like new a couple of years ago, couldn't pass it up! ![]()
@davehall83 posted:I also made sure doubledaz was ok and i didn’t over stay my welcome here.
You have nothing to apologize for Dave.
Hi John, My measurements were not overall length. I was just measuring necessary TT rail distance needed between the small scale flanges of the last wheel at the rail head of the tender to the front most leading flange at the rail head.
How does my scale Lionel measurement compare to the standard Lionel three rail distance between flange edge/rail head?
***A work around that can be done on many turntable bridge designs is to slightly extend the TT track beyond the bridge. On my 31" TT, I installed a 32 1/4" length of track which extends 5/8" beyond both bridge ends.***
Not exactly Kosher but I needed a 32" capacity TT in my staging area.
In my experience GRJ has the heart of true o gauger who desires to pass along professional knowledge and experience even in the headwinds of those who disagree.
Dave, I agree that I wouldn't buy track yet, unless you are certain about the first room that already has the layout benchwork. I went through this same process as you and finally bought $600 of GarGraves track and Ross switches. Even after laying out everything on the floor, I ended up changing twice before settling on the basic plan for the layout I have finally built. I had to buy more track, this time bought as I built, and have some of the original track left over. I did find a use for some of the track on our new club, but I have enough 042 track for two full circles that I'll get rid of eventually. Turntables are cool, but I gave up on ever having one. ![]()
@Mark Boyce posted:Dave, I agree that I wouldn't buy track yet, unless you are certain about the first room that already has the layout benchwork. I went through this same process as you and finally bought $600 of GarGraves track and Ross switches. Even after laying out everything on the floor, I ended up changing twice before settling on the basic plan for the layout I have finally built. I had to buy more track, this time bought as I built, and have some of the original track left over. I did find a use for some of the track on our new club, but I have enough 042 track for two full circles that I'll get rid of eventually. Turntables are cool, but I gave up on ever having one.
Boy, I only wish the Ross switches had cost $600! The three cases of Gargraves track was $1200, and the 33 Ross switches came in close to $6,000! I also had a bunch of Ross O72 curves, still got some of those. I may have to offer those for sale, get a little of my money back... ![]()
Mark, you shouldn't have given up on the TT, even though it's a little one, it's a lot of fun having the 24" TT.
There’s nothing that says I and others can’t do for free, for donations, for whatever, what others think they can do for a fee. I heard that same argument when SCARM was in beta and there was no fee. I believe X-TrackCAD was around before any of the programs and it’s always been free. I can only imagine how many layouts have been designed by members over the years that otherwise might not even exist.
Don't stop what you're doing Dave, I think it's great you can do all this layout work.
@gunrunnerjohn posted:Boy, I only wish the Ross switches had cost $600! The three cases of Gargraves track was $1200, and the 33 Ross switches came in close to $6,000! I also had a bunch of Ross O72 curves, still got some of those. I may have to offer those for sale, get a little of my money back...
Mark, you shouldn't have given up on the TT, even though it's a little one, it's a lot of fun having the 24" TT.
John, my original plan had 4 manual switches I believe, and 3 circles of 042 track and a few 37” straights. 😉
Every so often I look at it and wonder. A 24” turntable would be big enough. Who knows, maybe I will come up with Revision 7 to my Plan D layout some day! 😄
Thanks, John, I don’t intend to.
@Mark Boyce posted:John, my original plan had 4 manual switches I believe, and 3 circles of 042 track and a few 37” straights. 😉
Every so often I look at it and wonder. A 24” turntable would be big enough. Who knows, maybe I will come up with Revision 7 to my Plan D layout some day! 😄
And here I though I was doing a modest layout... I had a bit if sticker shock when I made my first order of switches, little did I know more orders would follow. ![]()
@gunrunnerjohn posted:And here I though I was doing a modest layout... I had a bit if sticker shock when I made my first order of switches, little did I know more orders would follow.
Yeah i think with everything if i add my altoona roundhouse, turntable, all track and switches that is on the plan @DoubleDAZ made up for me i probably am close to $10k. But i have heard folks that have spent way more than that on larger layouts. Obviously this stuff is acquired over time but my main train room will be done first then i will move to the next room. I don’t mind spending a few extra on the ross track and switches to get stuff that works well or at least to give me the least amount of issues which is what i want.
I think you'll be able to make $10K pretty easily, remember you need to build the benchwork first! ![]()
![]() My Mianne benchwork was close to $3K, and then there's the Baltic Birch Multi-ply and the Homasote. The numbers just keep going cha ching...cha ching...cha ching...
My Mianne benchwork was close to $3K, and then there's the Baltic Birch Multi-ply and the Homasote. The numbers just keep going cha ching...cha ching...cha ching... ![]()
![]()
@gunrunnerjohn posted:I think you'll be able to make $10K pretty easily, remember you need to build the benchwork first!
My Mianne benchwork was close to $3K, and then there's the Baltic Birch Multi-ply and the Homasote. The numbers just keep going cha ching...cha ching...cha ching...
🤣Your probably right i got about $1400 in benchwork from sievers in my train room and yeah i am probably going to get a carpenter like you did to make the office benchwork since it’s going to be an odd shape unless i can get mianne or sievers to get these shapes i their sectional benchwork.
Andddd i haven’t even added up transformers for conventional use , i just preorder the lionel base 3 controller that was $499 and i still need the powerhouse bricks lol.Scenery and buildings aren’t even figured yet lol. The trick is i have to buy it in small amounts like maybe 1k here then 3 k thee etc so my wife doesn’t catch on to the total amount lol. I feel a broomstick 🧹 coming my way
Oh, gosh, I didn't count in anything on the power distribution panel, four bricks, Legacy, MTH TIU, two WiFi modules, four CSM2 modules, etc.
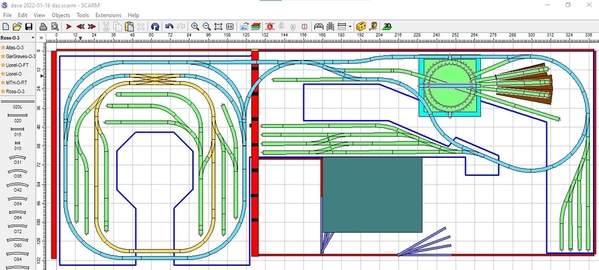
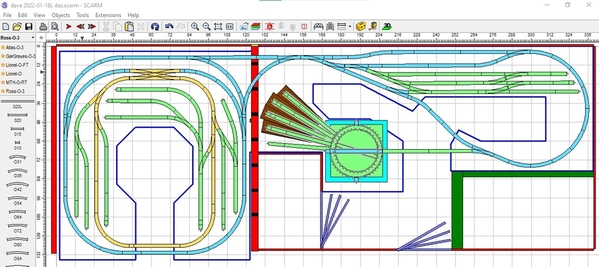
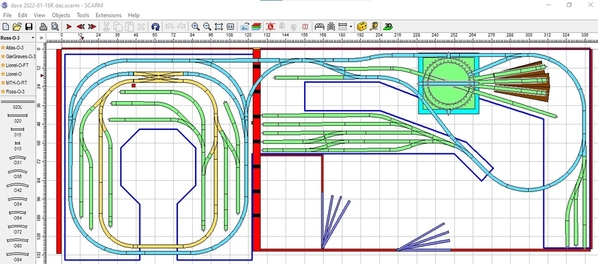
Ok, here are what I see as the 3 choices to this point. In all 3 I added both the 27" and 33" turntables. The blue outline is the 39" assembly. Since Ross added 3" all around the 33" model, I assumed they would do the same to the 27" model, so the green outline shows the difference in the amount of space required for each, though the whisker and lead tracks are still set for the 27" model. As you can see in Photos 1 & 3, the 39" model would force everything to be reconfigured lower to allow space for the mainline to pass. You can also see what that will do to the aisle, basically forcing the conversion of the aisle into a duck-under hatch on the left, not a walk-thru, and forcing the mainline to be reconfigured, which not be that easy. The hatch would be the rectangle above the yard. I hadn't consider that, but looking at it now, it might be worth trying and dealing with the potential inconvenience.
Photo 1 is the original version with the TT on the right.
Photo 2 is the original version with the TT on the left.
Photo 3 is the alternate version with the TT on the right and the loop enlarged.
Attachments
John, you mean you just spend money like it grows on trees!!! ![]()
@Mark Boyce posted:John, you mean you just spend money like it grows on trees!!!
Isn't that what the hobby is all about. ![]()
@DoubleDAZ posted:Ok, here are what I see as the 3 choices to this point. In all 3 I added both the 27" and 33" turntables. The blue outline is the 39" assembly. Since Ross added 3" all around the 33" model, I assumed they would do the same to the 27" model, so the green outline shows the difference in the amount of space required for each, though the whisker and lead tracks are still set for the 27" model. As you can see in Photos 1 & 3, the 39" model would force everything to be reconfigured lower to allow space for the mainline to pass. You can also see what that will do to the aisle, basically forcing the conversion of the aisle into a duck-under hatch on the left, not a walk-thru, and forcing the mainline to be reconfigured, which not be that easy. The hatch would be the rectangle above the yard. I hadn't consider that, but looking at it now, it might be worth trying and dealing with the potential inconvenience.
Photo 1 is the original version with the TT on the right.
Photo 2 is the original version with the TT on the left.
Photo 3 is the alternate version with the TT on the right and the loop enlarged.
@Doubledaz its saying the image isn't there.. can u repost it?
Dave, not sure what happened, but should be fixed now. I'll post the separate rooms for 16R with parts lists tomorrow.
Thanks i see it now. Are you thinking the layout with the 16R Turn table on the right is the preferred way to go? I see you loose some rail yard on the right side of the room but you can a spur on the left so probably equal amount of spurs not a big deal either way. But i also see if you dont enlarge the loop the spurs still there just a bit more space tkaen for the turn table which is probably fine. I guess one has to consider as well , most poeple with these turntables have more tracks around them than i will which i have to consider does having 3 or 4 stalls make it worth having i think someone else mentioned this. Sure i could widen the benchwork mroe and add more stalls but then you get into that reach issue which is a bad thing
Hard choices here lol, whats the survey say?
@gunrunnerjohn posted:Well, my scale T1 Duplex 4-4-4-4 isn't an articulated locomotive, nor is the PRR S-1 6-4-4-6, but I know for sure those won't even come close to fitting on a 27" TT.
The Legacy M1a with the long haul tender is 30" long...
I have the 28" because when I measured my big locomotives, they all ran about 27 1/2" to 27 3/4" from front pilot axle to last axle on the tender. How close each was to just under 28" surprised me, and these included Lionel T1, Lionel J1a, 3rd Rail 6-8-6 Turbine, 3rd Rail Q1, and MTH Q2. My other larger engines, the decapod, M1, and N1, are shorter.
There is lots of overhang on some of the engines, so I will have to be careful when mounting the turntable.
Dave, I don’t have a real preference other than 16R seems to offer more of what you want. However, they all need more work if you want the 33” TT. I’ve got medical procedures scheduled in the morning, then a birthday lunch with my wife, so I’m not sure what I’ll get done.
@DoubleDAZ posted:Dave, I don’t have a real preference other than 16R seems to offer more of what you want. However, they all need more work if you want the 33” TT. I’ve got medical procedures scheduled in the morning, then a birthday lunch with my wife, so I’m not sure what I’ll get done.
No worries at all it can wait. Family comes first i can wait and this is something that doesn’t have to be completed anytime soon. It’s one of those things if you have time cool if not table it lol!
@CAPPilot posted:There is lots of overhang on some of the engines, so I will have to be careful when mounting the turntable.
The problem with locomotives with a lot of overhang is dependent on the design of the TT, they can hit things when rotating.
@gunrunnerjohn posted:The problem with locomotives with a lot of overhang is dependent on the design of the TT, they can hit things when rotating.
Concur on the design. I know the Atlas turntable allows very little, if any, overhang. The one I got mounts flush so no issue there.
Looking at the Ross turntables on their site, they don't appear to have any obstacles, so as long as the wheels fit, the engine can be turned.
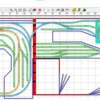
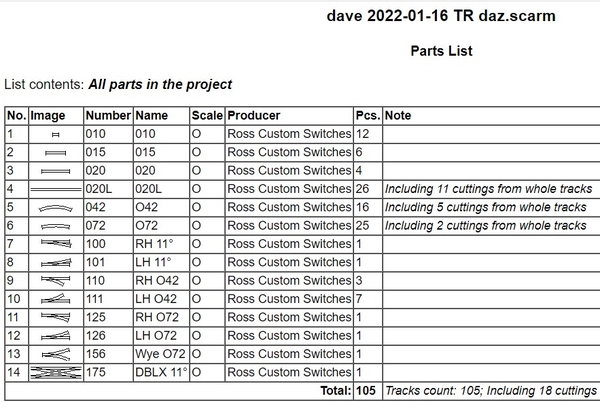
Dave, I think this is the final design for the Train Room side of the layout, so I'm posting the photo, parts list and separate SCARM file. The clear white tracks are the ones that need to be cut to fit. There's a very small cut track by the red square. Its length is .10", so I doubt it will be needed for the actual build, but it's needed to make all tracks connect in SCARM.
You already know the drill on the switch pointing at the stud and the green spurs that you might decide to reconfigure to make room for buildings. The 24 count for the 20L tracks doesn't take into account that 1 track can be cut more than once to fill more than 1 space. I'll leave it to you to figure out how you want to do the order. You might want to cut based on tie spacing and not simply length, so you might not get as many fitters out of a single 20L, but if you order all 24 pieces, whatever is left over can be used on the Office Room side of the layout. Also, you'll see when I post the Office Room side that I included the Wye through the wall in both files, so don't order those tracks twice.
Also, bear in mind that wherever the track actually gets laid in the Train Room will affect how close the mainline comes to the upper wall in the Office Room. Right now the center rail of the blue track at the top in the Train Room is 7" from the wall to allow for a 3.5" distance in the Office Room. As John has said, his Big Boy clears the wall at that distance, but I make no promises. However, thinking about it now, since you've agreed to move the desk or buy a new one, we might be able to just keep running that track straight along the wall the entire length through the Office Room. I'll have to look at that when I move on to the Office room next.
Assuming the dimensions are correct, the top stud is 3" from the track center rail. That should be okay as long as the stud is where it's supposed to be. One thing I'm not clear on is how do you expect to monitor trains in both rooms without being able to see through the wall? I really think you should consider an opening from the top wall to halfway past the 2nd stud rather that try to build 2 enclosed tunnels (Photo 3). Then if you still want to cover the opening, you could cover each side of the opening with a piece of rigid foam with 2 tunnel portals on it remembering that the ones for the curve on each side would need to be angled to match the angle of the curve. And if you want the tunnel sides dark, you only need to hang some black material, like a piece of cloth, through the wall. If you want more realism, you can sculpt rock wall inserts. The point is is you make the opening full size, then you can operate trains while you decide how to make tunnels.
Attachments
When you are tight on real estate consider going both up and down. Just like the steps in the average residential home, the descending ramp can be positioned directly below the ascending ramp.
Turntables really need to be of a specific size to handle your locomotives so if it or they could be on a different level that will free up a drastic amount of platform space. Other items for a lower level would be on track storage of cars in waiting.
The Ross TTs I have worked on have their mechanism off to one side. The Millhouse TTs which I use have their mechanisms all below the TTs.
Another consideration, for an engine to approach the TT and RH it will not be pulling a train. That fact will free you up to use a much steeper grade than normal due to no drag/load movement. A 4 to 6 percent grade will allow a larger separation than normal for access and visual appeal. Maybe a TT at 36" height, main deck at 46" then an elevated portion at 53". You could also have a dedicated subway on the 36" level just running the 36" level perimeter. Three levels of fun.
Hang around, I will help you spend your money...
@Tom Tee posted:Hang around, I will help you spend your money...
And I can assure you, Tom is very good at his job! ![]()
![]()
Once again thanks so much for this. I agree with you on this and making a way to view the other room which is something that i need to consider. This does look really good. The studs and measurements are really accurate on the scarm drawing as i actually used a stud finder to get the center of the stud and i also considered the center measurements and spacing on each individual stud, i went up to the wall found them and measured them so that i could get it 99% accurate but if i run into an issue the carpenter i use will cut it for me. If i have to buy extra track to make those cuts i will just figure in some extras and like you said, it can be used just about anywhere so no issues there and its not too expensive anyway. Your right i agree the train room is pretty much complete. Anything else i will end up figuring out small minor changes i can always post those just so you know how im progressing. After the long duration of how this pans out i can come back to look for upper levels and things later but i would make those levels separate tracks not tied into this at all that way i can run more trains at once lol ![]() . The sculpting rock on the walls actually sounds fun i am going to look into that, thats a good learning opportunity of building my first tunnel wall and rock features. I think some foam and a hot wire foam cutter could be a good piece for that and rock molds.
. The sculpting rock on the walls actually sounds fun i am going to look into that, thats a good learning opportunity of building my first tunnel wall and rock features. I think some foam and a hot wire foam cutter could be a good piece for that and rock molds.
@Tom Tee posted:When you are tight on real estate consider going both up and down. Just like the steps in the average residential home, the descending ramp can be positioned directly below the ascending ramp.
Turntables really need to be of a specific size to handle your locomotives so if it or they could be on a different level that will free up a drastic amount of platform space. Other items for a lower level would be on track storage of cars in waiting.
The Ross TTs I have worked on have their mechanism off to one side. The Millhouse TTs which I use have their mechanisms all below the TTs.
Another consideration, for an engine to approach the TT and RH it will not be pulling a train. That fact will free you up to use a much steeper grade than normal due to no drag/load movement. A 4 to 6 percent grade will allow a larger separation than normal for access and visual appeal. Maybe a TT at 36" height, main deck at 46" then an elevated portion at 53". You could also have a dedicated subway on the 36" level just running the 36" level perimeter. Three levels of fun.
Hang around, I will help you spend your money...
That sounds cool tom ![]() I am always ready to spend it too this hobby always has holes in my pockets money goes in and gets out quickly lol. Just like at train shows i go there with a pretty nice stash of cash and it gets spent usually lol, there are just some things i cant resist and trains is one of them
I am always ready to spend it too this hobby always has holes in my pockets money goes in and gets out quickly lol. Just like at train shows i go there with a pretty nice stash of cash and it gets spent usually lol, there are just some things i cant resist and trains is one of them


