
Originally Posted by Mark Boyce:

Five workbenches!!  The only one the ladies will let me have is the sawhorses and old door I set up outside on the patio when the weather is nice.  My wife and grown daughter have so much stuff, that when I clear off a space to work, I come home to find more junk on it.

I forgot this one, just took this photo • Six Work Benches for Model Railroading.

Two Saw Horses for Weathering & Painting.

     I forgot, I do have this set up in the garage for weathering and spray painting model structures. I am not allowed to spray paint in the house. Do all my painting and weathering in the Spring, Summer & Fall. Like to use spray lacquer to dull the plastic in the weathering process. No door, just a piece of old plywood.

See Photo

  Click photo to enlarge.....

Two Saw Horses for Weathering and Painting

Attachments

Images (1)
  • Two Saw Horses for Weathering and Painting
Originally Posted by trainroomgary:
Originally Posted by Mark Boyce:

Five workbenches!!  The only one the ladies will let me have is the sawhorses and old door I set up outside on the patio when the weather is nice.  My wife and grown daughter have so much stuff, that when I clear off a space to work, I come home to find more junk on it.

I forgot this one, just took this photo • Six Work Benches for Model Railroading.

Two Saw Horses for Weathering & Painting.

     I forgot, I do have this set up in the garage for weathering and spray painting model structures. I am not allowed to spray paint in the house. Do all my painting and weathering in the Spring, Summer & Fall. Like to use spray lacquer to dull the plastic in the weathering process. No door, just a piece of old plywood.

See Photo

  Click photo to enlarge.....


Gary,

Glad I made my comment.  Yes, that is similar to what I have.  Not much get done in Western Pennsylvania winters, however.  

5 work benches I have a hard enough time with one. well did some more work on the ol layout tonight one day I am gonna have to come up with a name for it but that's another day. today I made a hill/mountain not sure what you would call it I was slinging plaster cloth is all I know . here's the results of the endeavor.

20150512_212705

20150512_212713

20150512_212726

20150512_212737

20150512_212754

20150512_212802

20150512_230003

20150512_230013

Attachments

Images (8)
  • 20150512_212705
  • 20150512_212713
  • 20150512_212726
  • 20150512_212737
  • 20150512_212754
  • 20150512_212802
  • 20150512_230003
  • 20150512_230013

Very slow progress on kitbashing GW's #60 from a Lionel 0-8-0.  Tonight I used Dremel and large drill to grind very prominent smoke box hinges off the Lionel smokebox door.

I had made the air tank that goes under the smokebox, but am not happy with that,

and am mulling it over before installing it on the pilot plate.  I would rather have a

brass one, but have no tubing the right size. And, tonight, I did, what I have had

difficulty getting in the habit of doing, I took pictures of it in progress.  Most of my

projects I only get around to photoing when finished.

Originally Posted by Moonson:
Originally Posted by paul 2:

Finished the coloring of the areas around the bridge. Just have to add some grouind foam and a few trees in spots. Some pics................Paul

DSCN1710

DSCN1711

DSCN1712

DSCN1713

DSCN1714

IMHO, excellent!

FrankM.

I have been watching your progress on this bridge abutment and rock formation. You did a superb job of painting the rock formation!!!! Bravo!

Originally Posted by TrainsRMe:

A bunch of unlicensed vehicles on my layout have now received tiny license plates.  It's just a small detail that adds to the overall effect.  I did the autos and trucks that are most visible, but may do the rest when my eyes uncross!  

IMG_6253

gee Daryl, think of all the extra revenue your local PD could have made on all those unlicensed cars!!

Originally Posted by TrainsRMe:

A bunch of unlicensed vehicles on my layout have now received tiny license plates.  It's just a small detail that adds to the overall effect.  I did the autos and trucks that are most visible, but may do the rest when my eyes uncross!  

IMG_6253

Great detail, one which few people do anything about.

If you build them up on photoshop as I did (and know how to change stuff like that), all you need are good photos of a few real plates, then you can extract the right numbers to get what you need.

And a little research into county codes and how the plates look in your layout's year, really make for a cool detail that people will notice...


Working on my very lightweight modules again: https://ogrforum.ogaugerr.com/t...-lightweight-modules


I cut two new 7.5 x 80 inch straights, sanded and painted one side of each.


The day before yesterday, I put down track on an O45 / O54 dual track semicircle. Also picked up more cable ties, was running out.


Before that I picked up an O54 circle and more straights.


Just a little bit here and there.


I need more green paint and one more sheet of Luan to cut two more 7.5 x 80 straights.

Originally Posted by M. Mitchell Marmel:

I've proven that old beat up Scout gondolas CAN be useful! 


Remember, SCROUNGE! 


Mitch

Actually, considering I'm working with a former 6805 Atomic Energy Disposal car, I came up with a clever use for the holes normally containing rails:


GEDC1442

Even more elegant!


Mitch

looks much nicer that way Now you gave me an idea I have a bunch of the flat car stackes or whatever there called a few well placed holes and I should be good


Originally Posted by Stirling R. Callahan:

I actually just finished getting my newest BLOG video on my youtube channel which has the first real look at the layout im starting on. 

Here is the link if anyone is interested. 

https://www.youtube.com/watch?v=WsoCc6WwUDI

Stirling, there is a thread that could use a picture, or link to the Bicentennial trailer & flat car of yours (16+min in the video) 

  https://ogrforum.ogaugerr.com/t...80#41975971223778080

I cleaned up the floor on the layout, something I had not done since the bench work was done. I moved everything still pending to places under the benchwork to leave the aisles as open as they can be, and vacuumed up the room.

My wife came in and said, "wow, there's actually room in here." Then she started nagging me to get started with scenery. All this time, she only cared how much time this was taking me from stuff she wanted me to do and how much it costs, now it almost seems more important to her for me to get the scenery going/completed as it is for me (which of course, is a big thing for me as it's the only thing left for the overall initial 'completion' of the layout in that it'll look like there isn't a heck of a lot of stuff pending...)

My nephew is in the area, on temporary duty at the local Army post, and he's coming out to our place to stay in the guest room tonight. Nobody from my brother's family has ever come out to see us (his parents live in Virginia, his sister is in college in Florida, and he's in the Army just like his uncle did) so this'll be the only time anyone from my family has seen the place other than my parents one time.

Ever notice how some people are the ones who are expected to go see people and nobody ever comes to see them? That's my wife and I for my family as we live so very far from everyone else.

Anyway, someone from my family will finally see my layout. He's been to the area I'm modeling several times and will get my overall concept. I'll even hand him a throttle if he wants to run a train...


Oh, I also completed the first few numbered passes I made. I have a 1930s number stamper, so they all have their own unique number. Mom and Dad get pass #s 1 and 2 (my wife couldn't care less for such things), the two guys coming over on Sunday for my first-ever op session get 3 and 4, my best friend back in Florida gets # 5. Their names have already been typed on a 1939 typewriter in my collection, just like a real one.

None of them have a clue they'll be getting one...

Last edited by p51
Originally Posted by trainroomgary:

Had a new furnace and hot water tank installed in the utility room. Setting up my second of five work benches. Train Room, Utility Room, Darkroom, Garage and Shed. This room I have to share with the wife. This project is an example of, The best tool in my tool box is my check book.

     Still working on the peg board. Debating the who's who of space on the peg board. See photo below. Click to enlarge.

New Work Bench in New Furance Room trainroomgary

 Gary, when working with volatile glues & paints, please keep in mind your pilot lights on the water heater & hvac are "right there" now. The chances of fumes reaching the pilot in a flammable concentration are much better 


Oh, I also completed the first few numbered passes I made. I have a 1930s number stamper, so they all have their own unique number.


Mom and Dad get pass #s 1 and 2 (my wife couldn't care less for such things),


the two guys coming over on Sunday for my first-ever op session get 3 and 4, my best friend back in Florida gets # 5.


Their names have already been typed on a 1939 typewriter in my collection, just like a real one.


None of them have a clue they'll be getting one...


Class act idea there Lee.


Larry

Glacial speed...but I made running board extensions to the cast-in Lionel ones, to

make this boiler look more like GW's Alco #60.  Also got new pilot plate to smokebox

hand rails cut and shaped, and mounting holes drilled.  (Original ones will be cut off, but still extend the length of the boiler).  Need to shape a perfect 3/4 circle of wire for, and drill, the smokebox front for a handrail on the Alco not found on the Lionel 0-8-0.

The two smoke box handrails, on the loco, as delivered, precluded having to fabricate

more elaborate steps and handrails added by GW shops later in its career.  #60 has

a step up in her footrail on both sides of the boiler that the 0-8-0 did not have.  I am still mulling over how to handle that....cut out the cast foot rail section, or leave it in,

since an exact model is not obtainable...

Originally Posted by Adriatic:
Originally Posted by trainroomgary:

Had a new furnace and hot water tank installed in the utility room. Setting up my second of five work benches. Train Room, Utility Room, Darkroom, Garage and Shed. This room I have to share with the wife. This project is an example of, The best tool in my tool box is my check book.

     Still working on the peg board. Debating the who's who of space on the peg board. See photo below. Click to enlarge.


 Gary, when working with volatile glues & paints, please keep in mind your pilot lights on the water heater & hvac are "right there" now. The chances of fumes reaching the pilot in a flammable concentration are much better 


I never use flammable glues or concentrates in the utility room.  The darkroom, train room have exhaust fans. The other photo showed me doing all the spray painting in the garage.

Thanks for the tip, all under control.

I am a retired shop teacher after 35 years, I always follow the safety rules.

     Even put solvent soaked rags in a safety can in the garage.

Cheers from Michigan

Thanks

Gary


Hi All


To day, goofing off.


I received a new old stock UP TMCC LionMaster 4-6-6-4 Challenger.


It has been an exceptional month for me to put new  steam in my train room. I don't have many nice Steam engines.


I also received this month a old new  Clinchfield TMCC 4-6-6-4- Challenger and the old new  UP Lionmaster Legacy 4-8-8-4-Big Boy.


Sure has made up for all the honey doo's I been stuck with.


Pictures are on one of my side track that's just for firing up new engines.


Larry.


PS  You all are being very energetic for this time of the year


DSCN3975

DSCN3964

DSCN3866

Attachments

Images (3)
  • DSCN3975
  • DSCN3964
  • DSCN3866
Last edited by Larry Sr.
Originally Posted by fl9turbo2:

I have not done much lost my brother n law to cancer 2 weeks ago he helped me build my train room and layout so this weekend I am going back to doing what he would want me to do continue to finish this layout I will update as soon as possible  

I'm very sorry to hear this.

You'll get back to it when you're ready to do so, I'm certain of that.

Originally Posted by fl9turbo2:

I have not done much lost my brother n law to cancer 2 weeks ago he helped me build my train room and layout so this weekend I am going back to doing what he would want me to do continue to finish this layout I will update as soon as possible  

sorry for your loss. I lost my Uncle Jim last week to a stroke. Took the wind out of my sails on a lot of things we shared.

Success!  I laid the golden wire today, and ran old forum member Walt Cameron's trolley around the track of the Bark and Spiders Outdoor O gauge layout.  Running conventional right now, I pulled an old Williams FM Trainmaster that has not run in 20+ years out and ran it around.  I id'd a couple of areas that need some more work, but next job is hooking up the TMCC, TCU and Legacy.  I may have to ask a couple of noob questions as I reconnect those units after so many years.

Originally Posted by dischler:

Success!  I laid the golden wire today, and ran old forum member Walt Cameron's trolley around the track of the Bark and Spiders Outdoor O gauge layout. 

Hoorah!  I've also got trolley news!  I took delivery of a new streetcar offa eBay this week! 


GEDC1443

It doesn't have third rail shoes, and it has a little trouble clearing the giraffe telltale, though. 


Mitch


(PS:  If anyone has a spare Bachmann G scale trolley truck, please let me know; the motor in this one is shot!  Thanks!)

Attachments

Images (1)
  • GEDC1443

Did alot today had help from my wife. She tried her hand at weathering i gave her 4 chessie hoppers i worked on scenery. I cut out the rough area of where a river is going to go added 2 bridges over it then touched up the paint on the bridges. then painted the mountain/hill area  then put down some ground cover and some rocks and trees. then thought I want to see what the facia would look like black so I painted that.


20150516_22361120150516_22362320150516_22365920150516_22372720150516_22373720150516_223749

20150516_223611

20150516_223623

20150516_223631

20150516_223643

20150516_223659

20150516_223705

20150516_223710

20150516_223714

20150516_223727

20150516_223737

20150516_223749

20150516_223803

20150516_223813

Attachments

Images (13)
  • 20150516_223611
  • 20150516_223623
  • 20150516_223631
  • 20150516_223643
  • 20150516_223659
  • 20150516_223705
  • 20150516_223710
  • 20150516_223714
  • 20150516_223727
  • 20150516_223737
  • 20150516_223749
  • 20150516_223803
  • 20150516_223813
Last edited by Jhainer

Working on the last corner under the upper mainlines. Still working out how I want to finish the corner with just one long cliff or one long and a couple of short ones on either side of the long one and the side running down from that corner I ordered some backdrops from scenic express to work into that are. So today will be finishing the cliffs and plaster wrapping them...............Paul 

I had my first ever op session scheduled, but both of the guys back out yesterday... For the second time.

So, the next invite goes out to all the local guys I'd be okay with coming over. They've had their chance.

But in a positive note, I completed this truck conversion. I added a wood floor and weather it pretty extensively.

Got the 6-14005 operating coal ramp (that I purchased from a fellow forum member) hooked up and ready for operation.  Also attempted to hookup the 6-14005 operating coal loader, but when power was applied, there was a cloud of white smoke and a burning smell. Emailed the LHS where purchased for further instructions on how to handle.

Worked on my G scale outdoor track between rain drops. Added more track and switches. Now have a rectangular loop about 52 ft. long and 12 ft. wide. An inside loop plus  a long siding on the outside also a short cut between the long sides will keep it interesting. All resting on gravel with weeds, twigs and acorns for fun. Run my truck and rail bus but negotiating the return of an LGB steam loco. Still have the cars.

Born under a bad sign, I been down since I began to crawl..


I should have stayed in bed, one thing after another. Gave up on the day early, and decided to work on the trains.


Result? I did a bunch of "work" I didn't need to, and did it poorly  


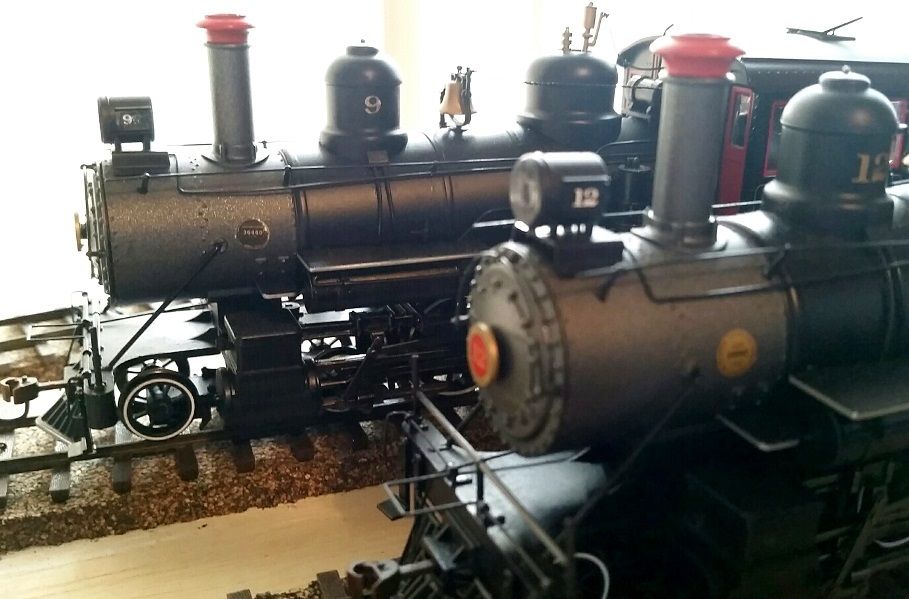
My Martian rocket had stopped smoking.

 Or I should say, "It smoked but the fan stopped working".

  I took it apart, snapping the legs on the led's for the rocket engines nozzle, and doing some wire damage 

Took a reading at the regulator, and got I nothing. So I took it to the other layout for repair, and replaced it, the led board, the wires, and the 5v regulator. Then re-glued some weight that came loose with hot glue. And then soldered the 2 wires, and reassembled it... without the brush I removed for testing(no neutral)

 So I take it apart, and another power wire snaps, and I see the weights have shifted and it, and hot glue are now one with the nosecone lighting base! It wasn't cool enough even after two solder points were done. I can only hope the bulb heat will allow it to droop back during a log run, otherwise once the bulb burns out, no more glowing red War Bonnet. At least not easily.

 So, I do get it together, and I do test it, and it works....till I get to the living room then it stops. I go back to the other room & it works again. I go to the living room its dead again.

 Then it takes me about two minutes to figure out in my head, that while moving things around the living room, someone had accidently knocked the wires off, and then reversed the leads from the 12vdc 4amp 1970s Radio Shack power supply I use in the living room . The diode is blocking the current in "that direction" 

 Reversing the wire polarity brings it to life again


It cost me a regulator, and about two hours of frustration. Its ready to be full of fluid again, and I'm ready to fill the room with some smoke

See ya later! .


Originally Posted by EscapeRocks:

I finished painting/weathering the Fastrack on my "Simplicity in 6x8" living room layout.


My postwar milk platform sitting in my modified operating track

w5


w4


My "coffee table"


w1


Test running the just painted outer loop to make sure no paint on rail tops

weathered4

Very realistic. Sure makes Fastrack look a whole lot better.

I have continued work on my crossing gate project. Today I placed some wood planks and tried to stain them to look like an old wood crossing deck. There is still lots of scenery blending to do to blend in the track with the rest of the scenery module. I tested the track to make sure the inside wood plank does not interfere with train travel. The planks on the inside of the outer rails are just slightly lower than the others to allow for the trains.


IMG_0359 [1)

Attachments

Images (1)
  • IMG_0359 (1)
Last edited by N5CJonny

For what ever reason back about 8 years ago Rail-King made some nice PRR passenger cars except the bottom including the trucks was this awful green color ( pic 1) well I took one complete set ( 2 trucks ) off and dissembled them and painted them and put back together and put on the passenger car ( actually took these off like 6 months ago and painted just got to putting these on another car yesterday but you can see the difference) plan to paint any thing green you can see when train is sitting on the track also 


DSCI0492

DSCI0493

Attachments

Images (2)
  • DSCI0492
  • DSCI0493
Originally Posted by N5CJonny:

I have continued work on my crossing gate project. Today I placed some wood planks and tried to stain them to look like an old wood crossing deck. There is still lots of scenery blending to do to blend in the track with the rest of the scenery module. I tested the track to make sure the inside wood plank does not interfere with train travel. The planks on the inside of the outer rails are just slightly lower than the others to allow for the trains.


IMG_0359 [1)

Very nice! Please post another photo when you have completed the scene.

I was shooting photos of trains along the BNSF/UP/Amtrak main and caught 5 trains in less than an hour yesterday afternoon. Man, I like living here this time of year! I also found two very thin slides of rail, one was not much thicker than sheet metal, no idea how they made that. I have a nice collection of rail slices and it was nice not to have pay for more!
 
I also played with my new Bachmann builder plate changes. Note # 9 to the left has one of my Baldwin plates made off photoshop and 12 to the right has what comes with them. I really think 9 is a big improvement. This week I'll be adding them to all my locomotives and will clean 9's up a little from what you see in this shot:
 
 
Originally Posted by Larry Sr.:

guys back out    I understand. I have a few invites left and that's it. I'll watch the trains by myself. Don't have much interest around here about toy trains.  


Originally Posted by jmiller320:

Lee, sometimes you just have to invite the three friends that will show up.  Me, Myself and I.  If they do train open houses out where you live, get yourself on the schedule.  You might get some people that are interested. 

The thing is that there's a pretty large community of operations guys around here and an active NMRA region where I am. In fact, on Saturday, there was an invite-only layout tour of layouts in the area of the nearest major town to where I live (Olympia, WA). Lots of people showed up and every layout I went to, I didn't see any familiar faces other than the owners of the layouts and 2 other guys. To me, that says there's a big community of that here.

What kills me is that Sunday was the last free day I had which didn't conflict with another model RR event for a while. I was going to do something on the 6th or 7th but just realized there was a NMRA regional event that weekend. The weekend of the 13th is the only time I have until after the 4th of July.

I have the emails of all the guys I'd be okay with coming over (all have layouts I have been invited to operate on, or I've talked with and think they'd 'get' my layout concept and size) and will have 3 open slots. 3 people in there will be a tight fit, but I think it's doable. It'll also give me the buffer if one backs out. I'll be honest with them and say that one will probably just be running an occasional passenger train, or I could flip people around so everyone gets a chance to do some switching.

Originally Posted by Dennis GS-4 N & W No. 611:

I visited Wild Bill's Trains to get info on replacing my Celebration Series ZW with a new Lionel ZWL.  As always, my favorite LHS was very helpful in evaluating the plusses and minuses of making this change.  Dennis

Dennis sent you an E-mail

 Well tried to but got returned mail-DEAMON

Email me at rtraincollector@yahoo.com

Last edited by rtraincollector

Third day of operation on the Bark and Spiders Outdoor O gauge.  Today I pulled out an Atlas SP SW9 in Black Widow livery and an MTH Kodachrome SP caboose. The Railsounds in conventional mode completely captivated the 20 lb. terrier who was running back and forth completely intrigued with this non-squirrel invader of her environment.  Hilarious, my wife was giggling and filming.

Originally Posted by Jdevleerjr:

  Forum member david1 gave some great advice, and said work on the layout every day, if it is only for 10 minutes or 3 hours.  It doesn't matter just do something. 


This is an excellent strategy that I need to utilize more frequently.  I have often found that a short amount of work will yield great results over time.  Additionally, just getting started by committing to " just one-half hour" frequently is enough motivation to spending even more time when actually available.


I have to do some dismantling of my layout to add two duck-unders -- a task that I'm not totally comfortable accomplishing.  Today I will set a goal to at least take some final photos and videos of the layout before I start dismantling some track work.


Thanks for the excellent topic!


Cordially,


Dennis


Note to Bill:  Sorry for your difficulty in emailing me, as I had not updated my e-mail on the Forum.  I did send an e-mail to you last evening.  Dennis


Also attempted to hookup the 6-14005 operating coal loader, but when power was applied, there was a cloud of white smoke and a burning smell. Emailed the LHS where purchased for further instructions on how to handle.


News on above operating coal loader was not favorable from either Lionel or LHS.  Seems this item was manufactured in 2000 so no warranty was available as it was over the 3 year limit.  Then the LHS was just as helpful as they refused a return, but did offer to attempt a repair.  The offer did not hold much weight as none of the parts were available per the Lionel service desk and when asked, the LHS did not have parts needed as well. Oh well, live and learn!!??!!


Did manage to hookup a few more accessories and screw down some track this afternoon.


I re-set the date for my first op session. On Saturday, June 14th, I'm running trains. It's the nearest weekend when I don't already have something scheduled.

This time, I sent a mass email to everyone who's layout I've run on already as well as two guys who's layouts I've already seen and I think will understand running on a small layout very well. I also added the two guys who I promised would be invited to the first ever op session for all their help on the wiring. But they're not alone in the invite as they've backed out on me twice before.

Originally Posted by southernrr:

Also attempted to hookup the 6-14005 operating coal loader, but when power was applied, there was a cloud of white smoke and a burning smell. Emailed the LHS where purchased for further instructions on how to handle.


News on above operating coal loader was not favorable from either Lionel or LHS.  Seems this item was manufactured in 2000 so no warranty was available as it was over the 3 year limit.  Then the LHS was just as helpful as they refused a return, but did offer to attempt a repair.  The offer did not hold much weight as none of the parts were available per the Lionel service desk and when asked, the LHS did not have parts needed as well. Oh well, live and learn!!??!!


Did manage to hookup a few more accessories and screw down some track this afternoon.


Its kind of simple really. I wouldn't be surprised if it could be repaired easily with other parts. Its just electronic magnets. Where did the smoke come from?  

Originally Posted by M. Mitchell Marmel:
Originally Posted by Adriatic:

I tried to run the garden train, but a mole wrecked 15ft of ballast.

Don't think of it as wrecked ballast, think of it as a new tunnel for your railroad. 


Mitch

 Your a genius. I've trying to think of a way to run track across the drive, and onto the neighbors property without them noticing.

 Then again, if the mole is related to Stewart Little, I could end up in deeper "dirt".

Anyone got a Patrick Swayze Express diagram? 


Finally got tired of working on the show car and decided to hit the layout today.  Need to do a wholesale battery charging and lube up Kyrian's Four Aces so I can get it broken in.  Also unpack my 2626 which arrived back from 3rd Rail.  Still need to unpack the fuel rack installation Crescent Locomotive Works build for the CL&W; the diesels are running a little low on fuel ... :-)

Originally Posted by Adriatic:
Originally Posted by southernrr:

Also attempted to hookup the 6-14005 operating coal loader, but when power was applied, there was a cloud of white smoke and a burning smell. Emailed the LHS where purchased for further instructions on how to handle.


News on above operating coal loader was not favorable from either Lionel or LHS.  Seems this item was manufactured in 2000 so no warranty was available as it was over the 3 year limit.  Then the LHS was just as helpful as they refused a return, but did offer to attempt a repair.  The offer did not hold much weight as none of the parts were available per the Lionel service desk and when asked, the LHS did not have parts needed as well. Oh well, live and learn!!??!!


Did manage to hookup a few more accessories and screw down some track this afternoon.


Its kind of simple really. I wouldn't be surprised if it could be repaired easily with other parts. Its just electronic magnets. Where did the smoke come from?  

The problem appears to be the power control board.


Originally Posted by southernrr:

The problem appears to be the power control board.


 So it likely could be rebuilt(the board) or even replaced with other things that would function in the same basic fashion. Its being pretty simple, cost shouldn't be outrageous either. The post war version didn't use a board and there really shouldn't be too much difference as simple as they were The magnets being good would be the main issue, the rest could be winged.

 It would likely suck up allot of room here, but if you want to start a thread asking how you might go about it, I'm sure you'll get some good input, and maybe better ideas from others.(If you do start one, please throw me an email so I don't miss it)

The light at the end of the tunnel is closer.  I have sand lines on the boiler, as well

as extended walkways, and have the railing and the #60 decaled on a plate on the

front of the smokebox.  Boiler shell with cab is painted, but there are touchups to do,

where all the modifications, new domes, etc. were done.  I do have to put a cylindrical

tank on the pilot plate after the boiler shell goes back on the chassis.

Now that we finally have some nice weather, it is time for spring cleaning on our main layout. We sure have a lot to do. Items that were brought back from the October and April York Meets have to be placed and installed on the layout.


With events planned this summer, the layout has to be in tip top shape.

Add Reply

Post

OGR Publishing, Inc., 1310 Eastside Centre Ct, Suite 6, Mountain Home, AR 72653
800-980-OGRR (6477)
www.ogaugerr.com

×
×
×
×
Link copied to your clipboard.
×
×