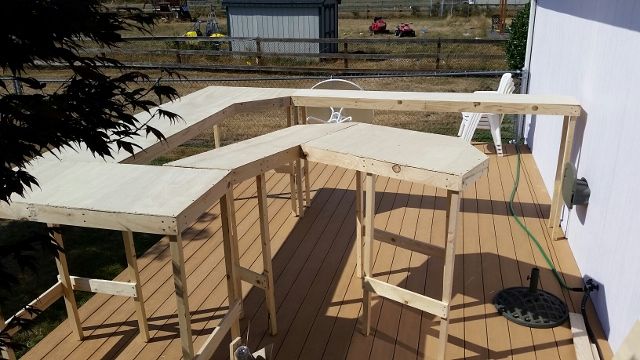
DennyM posted:

I built a extension for my layout. My layout is a 6x8 with a 4x5 'L'. I added a 3x4 and a 4x5 end table to accommodated a O48 horseshoe.  I'm really bad at explaining this so just look at the pictures. This is a big accomplishment for me because I have nerve damage from a motorcycle accident so I'm taking my time. I just need to paint it, add grass or ballast and get more track. I still need to wire for accessories, lights and maybe buildings. I mainly want to make a longer train yard, but now I'm seeing more possibilities. I made a few little goofs, but I can work around them.

100_2313100_2314100_2316IMG_20160714_213759

I finished screwing down the plywood and painted it. I sprinkled a little grass on the wet paint just for character. There is a auction at the local hobby shop tomorrow and one of the lots is used Fastrack. I'll look to see what kind of shape it's in before I bid on it. If I don't like it there are some passenger cars I have my eye on. Maybe I'll bid on both.


100_2318100_2319100_2320100_2323100_2324100_2325100_2326

Attachments

Images (8)
  • 100_2318
  • 100_2319
  • 100_2320
  • 100_2321
  • 100_2323
  • 100_2324
  • 100_2325
  • 100_2326

Yesterday was a train day for my mailman, as he both dropped off and picked up choo-choos...

Someone in Albany wrote me out of the blue wanting a Marx 666 loco and cars, so I sent out a consist with track and transformer.  At the same time, I took delivery of three Lionel steam engines: 

GEDC2491

Three Pennsy beauties!  The two LLC jobs are, I think, pulls from "Pennsylvania Limited" train sets.  The 2020 is a rare bird indeed:  Original 1946 build with the light bulb smoke unit (still working!) and the plug-controlled E-unit (a tad sticky, but I cleaned it up and got it working fairly well)... 

Just to keep things on topic, the package also had a trolley (seen here with its Corgi PTC buddy, in the process of being powered): 

GEDC2492

Since I already have a Christmas trolley, this may get a respray into Razorback Traction or Giraffe Express livery.

Also, since there's a shocking lack of trolley pole, I may install a pantograph or bow collector for that Euro look:

GEDC2493

Even with no trains running, Shop Supervisor Norma Bates Kitteh finds the train room relaxing:

GEDC2490

Mitch

Attachments

Images (4)
  • GEDC2491
  • GEDC2492
  • GEDC2493
  • GEDC2490

Over the last 2 days finished another 7 4x8 areas of main line; plan is to finish the last 4 tomorrow.  Goal is to have main line wired and running by Thursday as my nieces and nephews will be staying over as they are back from Germany (sister and brother in law are in the military) for the summer and they were really disappointed when I told them I had to tear down the old layout.  I am hoping to surprise them by having subway and main line running when they come over.

DSC_0868[1] 

Also I had to make a modification to the swing bridge that I bought at April York.  I was told that the clearance could handle modern auto carriers well it doesn't by about 1/8 of an inch because of this metal tab that really doesn't do anything.  So I had to get in there and grind out a passage way.

DSC_0873[1]

Attachments

Images (2)
  • DSC_0873[1]
  • DSC_0868[1]

nada the last couple of days, and also this weekend. Have had to knuckle down to do school work for my two very intense University summer school classes. Spent much time, cleaning and organizing a small area in my now sitting room (formerly used as a bedroom by my college age daughter), to bring down my antique writing desk to create what I call and "ADD school kid" (me) grown- up study space in the house. Set up against a mostly blank wall, except for a large wall clock now over the computer. Everywhere in this house and gardens has too many districting things to take up my artttention, including the trains! Focus is very hard for me sometimes, but I've got to plug through and pass both of these classes with at least a "B".

IMG_2472


Attachments

Images (1)
  • IMG_2472

Worked on this park today.  It's not yet quite complete, however, close.  Planted a few trees here and there on my layout too.  Went to hobby shop to get a background piece.  Took a photo of my Lionel switcher at the grade crossing. My good friend Randy is coming tomorrow to help me with the layout.  The park will be named the Charles L. Whitehead Freedom Park in honor of my Dad who landed on Omaha Beach June 6,1944.  The park will include authentic stones from Omaha Beach, which I brought back, when my brother and I accompanied my Dad back to Normandy in 1999. This park also has an authentic  piece of the Berlin Wall.  And thats the latest news from Patsburg!IMG_0177IMG_0178IMG_0180IMG_0171

Attachments

Images (4)
  • Freedom Park: Patsburg, Md.
  • Freedom Park
  • Freedom Park
  • Lionel Switcher: Free State Junction Railway.
Last edited by trumpettrain

Mitch-liked the photo of Norma Bates Kitteh taking a much needed break from supervising your shop workers.  Went to the Greenberg Show today and, although not the biggest, I had a good time. Brought back a few treasures. The hard core model railroaders were there at 10 but by  1, when I left, Mama and the kids were taking over.  Certainly looked like a family affair.  Picked up a couple of "projects" such as an Ives Standard gauge engine 3235, needs work but runs. Also got a Lionel Standard gauge  514R refrigerator car.  I have wanted one but were always pricey. This one is complete but dirty. I can deal with dirt. Also delivered two engines to different repairmen for work I didn't want to tackle. A lot of layouts were set up and running.  The Pgh. Hi-Railers were there and watched several current production trains run-the modern stuff. Wanted to see what I am missing.

I probably walked right past you Jim.  :-) I always love seeing the Pgh Ind. HiRailers too.  Yes I saw a new UP 844, the NS 911, a great military train.  Missed the Aerotrain.  Had a good time talking to the guys.  I got a new in box 2005 hot box car for less than half the price of the new ones.  Tried it out on the Ceiling Central, and it works good.  Kids will like it.  I also got a modern Borden operating milk car and platform and a rodeo/horse car.  Ha, everything I got were things I hope kids will like.

Added a 4' sliding sheet of lexan to stop dust getting on some trains down low. I took two 1/4 round moldings and attached them, near back to back to form a channel, along the bottom right edge of the layout frame, in front of those shelves.  The lexan sheet is lightly tinted and looks good with trains behind it. Free from an old projection tv I tossed. It's cracked corner actually made it fit the length from table end to a switch. From there it hides, and slides away nicely.

A "dry run", I might do a hanging roller set up for it if I still like it in a week.

Mark Boyce posted:

... I got a new in box 2005 hot box car for less than half the price of the new ones......  Kids will like it....

...  I also got a modern Borden operating milk car...

...and platform and a rodeo/horse car.

 Ha, everything I got were things I hope kids will like.

 Yep they will. It may get to you after a bit, but I run mine all the time lights on, sound off, smoke off, and wait for guests to notice to it show off

The milk car will get used most successfully by "The Button Mashers".

   I think I had about every PW horse car open fence-to- bobbing-to-operating stockcars. There' got to be new ones too. Which one?

Ok, just keep horseing around, and telling yourself that


Adriatic posted:
Mark Boyce posted:

... I got a new in box 2005 hot box car for less than half the price of the new ones......  Kids will like it....

...  I also got a modern Borden operating milk car...

...and platform and a rodeo/horse car.

 Ha, everything I got were things I hope kids will like.

 Yep they will. It may get to you after a bit, but I run mine all the time lights on, sound off, smoke off, and wait for guests to notice to it show off

The milk car will get used most successfully by "The Button Mashers".

   I think I had about every PW horse car open fence-to- bobbing-to-operating stockcars. There' got to be new ones too. Which one?

Ok, just keep horseing around, and telling yourself that


 Ha, everything I got were things I hope kids will like.

Ok, just keep horseing around, and telling yourself that

I didn't say whether the kids are 6 or 60. 

The horse car looks to be from the '70s, but it came with no box, and doesn't have a built by Lionel date.  It would take a bit of research.

Today (after several week's worth of work) I finally finished gluing down all of my "paved" roads and set two sidewalk areas, a parking lot, and several delivery access areas in place.  This has been a lot more work that it appears and has been quite a good learning experience.  I owe a lot of thanks to various posters on OGR that have offered different ways of creating roads, sidewalks, and parking lots.  This is my first attempt at creating these items.

The roads still need to be weathered and sealed.  They are made from 2mm black foam sheets with acrylic paints and automobile pin striping (I decided not to use the Durham's water putty due to unsuccessful tests with trying to apply a very thin layer to the foam).  Pin striping tape will not stick to the painted foam without applying a thin layer of clear glue over the tape.

The parking and delivery areas are 2mm black foam sprayed with two coats of Rustoleum "aged iron" paint.  These have not as yet been glued in place which will get rid of the seams visible in the photos.

The sidewalks are 3/16" Gatorfoam painted with acrylic paints (brush and sponge).  Lesson learned:  I should have waited until all buildings were purchased and set in place before painting the sidewalks as it is not really possible to match the exact paint formula when painting at different times days (or weeks) apart.

Actually I think that I will be very pleased with the final product once I add a bit of weathering powder to the roads.

Howard

Attachments

Images (7)
  • IMG_4960
  • IMG_4961
  • IMG_4962
  • IMG_4963
  • IMG_4966
  • IMG_4967
  • IMG_4969
HMorgan125 posted:

Today (after several week's worth of work) I finally finished gluing down all of my "paved" roads and set two sidewalk areas, a parking lot, and several delivery access areas in place.  This has been a lot more work that it appears and has been quite a good learning experience.  I owe a lot of thanks to various posters on OGR that have offered different ways of creating roads, sidewalks, and parking lots.  This is my first attempt at creating these items.

The roads still need to be weathered and sealed.  They are made from 2mm black foam sheets with acrylic paints and automobile pin striping (I decided not to use the Durham's water putty due to unsuccessful tests with trying to apply a very thin layer to the foam).  Pin striping tape will not stick to the painted foam without applying a thin layer of clear glue over the tape.

The parking and delivery areas are 2mm black foam sprayed with two coats of Rustoleum "aged iron" paint.  These have not as yet been glued in place which will get rid of the seams visible in the photos.

The sidewalks are 3/16" Gatorfoam painted with acrylic paints (brush and sponge).  Lesson learned:  I should have waited until all buildings were purchased and set in place before painting the sidewalks as it is not really possible to match the exact paint formula when painting at different times days (or weeks) apart.

Actually I think that I will be very pleased with the final product once I add a bit of weathering powder to the roads.

Howard

Howard, 

I like the pavement cracks - photo #6 shows it best.  Did you draw those in?   Very nice.  

Dave

Did some playing around on my HCD over the weekend.  Cleared off the table and set up some 2x4’s to create a raised upper level for temporary subway diorama look.  Used a 6-car Metro North M7’s running below the surface for the transit.  Threw together backdrops of Crown Heights and Bedford Stuyvesant in Brooklyn that I printed from Google Maps for the effect.  Looked very nice so I thought I would share it here on OGR.

All I need now is to buy one of the MTH subway staircase entrances to place on the surface along with getting a subway station backdrop.

M7 Subway Setup 1M7 Subway Setup 2M7 Subway Setup 3

Here is short video of it on YouTube. 


Attachments

Images (3)
  • M7 Subway Setup 1
  • M7 Subway Setup 2
  • M7 Subway Setup 3
Amfleet25124 posted:

Did some playing around on my HCD over the weekend.  Cleared off the table and set up some 2x4’s to create a raised upper level for temporary subway diorama look.  Used a 6-car Metro North M7’s running below the surface for the transit.  Threw together backdrops of Crown Heights and Bedford Stuyvesant in Brooklyn that I printed from Google Maps for the effect.  Looked very nice so I thought I would share it here on OGR.

All I need now is to buy one of the MTH subway staircase entrances to place on the surface along with getting a subway station backdrop.

M7 Subway Setup 1M7 Subway Setup 2M7 Subway Setup 3

Here is short video of it on YouTube. 


WOW!!! Very cool and impressive!!!

My friend Randy came to help me on the layout today.  Much appreciated and lots of fun!   Got the scenic backdrop up.  Planted some trees along the back ridge of the layout in front of scenic backdrop .... this give the backdrop and even more dramatic effect. Spread ballast along the rear main tracks and a siding off the outer main loop. A good days work resulting in substantial progress.  

Amfleet25124 posted:

Did some playing around on my HCD over the weekend.  Cleared off the table and set up some 2x4’s to create a raised upper level for temporary subway diorama look.  Used a 6-car Metro North M7’s running below the surface for the transit.  Threw together backdrops of Crown Heights and Bedford Stuyvesant in Brooklyn that I printed from Google Maps for the effect.  Looked very nice so I thought I would share it here on OGR.

All I need now is to buy one of the MTH subway staircase entrances to place on the surface along with getting a subway station backdrop


Kevin;

Your scene reminds me of that series a few years ago, Cities of the Underworld, where they took you under the streets to see all the fascinating things that were underground. And the Google Streets backdrops are really cool. As someone who was born and raised in Brooklyn, and who rode the subways for over 50 years and Metro-North for about 7 or so, the only place I can think of where you would go down a subway entrance and hit Metro-North is 42nd Street at Grand Central. Not sure if MTH makes one, but if they do, that would be perfect (even if it ain't in Brooklyn!!!).

trumptrain posted:
Amfleet25124 posted:

Did some playing around on my HCD over the weekend.  Cleared off the table and set up some 2x4’s to create a raised upper level for temporary subway diorama look.  Used a 6-car Metro North M7’s running below the surface for the transit.  Threw together backdrops of Crown Heights and Bedford Stuyvesant in Brooklyn that I printed from Google Maps for the effect.  Looked very nice so I thought I would share it here on OGR.

All I need now is to buy one of the MTH subway staircase entrances to place on the surface along with getting a subway station backdrop.

M7 Subway Setup 1M7 Subway Setup 2M7 Subway Setup 3

Here is short video of it on YouTube. 


WOW!!! Very cool and impressive!!!

Apples55 posted:
Amfleet25124 posted:

Did some playing around on my HCD over the weekend.  Cleared off the table and set up some 2x4’s to create a raised upper level for temporary subway diorama look.  Used a 6-car Metro North M7’s running below the surface for the transit.  Threw together backdrops of Crown Heights and Bedford Stuyvesant in Brooklyn that I printed from Google Maps for the effect.  Looked very nice so I thought I would share it here on OGR.

All I need now is to buy one of the MTH subway staircase entrances to place on the surface along with getting a subway station backdrop


Kevin;

Your scene reminds me of that series a few years ago, Cities of the Underworld, where they took you under the streets to see all the fascinating things that were underground. And the Google Streets backdrops are really cool. As someone who was born and raised in Brooklyn, and who rode the subways for over 50 years and Metro-North for about 7 or so, the only place I can think of where you would go down a subway entrance and hit Metro-North is 42nd Street at Grand Central. Not sure if MTH makes one, but if they do, that would be perfect (even if it ain't in Brooklyn!!!).

Thanks.  It was a lot of fun this weekend working on both the subway diorama and my model airport which are both on HCD's only 4 feet from each other in my designated hobby area .

BROOKLYN - Ah yes, Brooklyn. One of the backdrop photos was of Nostrand Avenue and St. John's Place (my old stomping grounds when I was in high school and started college in the early 1980's before I left NYC for Fla-ri-dah in 1986) and the other was of Fulton Street and Nostrand Avenue, which of course is a block or two north of Atlantic Avenue where the other MTA M7's run on the LIRR elevated tracks.  Sold my Lionel LIRR M7 years ago and regretted it ever since.  Not willing to pay inflated prices right to now to get one back. Can't justify the expense either on the actual subway train units (R17, R142's, etc) so I'm happy running the M7's.

Last edited by Amfleet25124
 
Apples55 posted:

Kevin;

Your scene reminds me of that series a few years ago, Cities of the Underworld, where they took you under the streets to see all the fascinating things that were underground. And the Google Streets backdrops are really cool. As someone who was born and raised in Brooklyn, and who rode the subways for over 50 years and Metro-North for about 7 or so, the only place I can think of where you would go down a subway entrance and hit Metro-North is 42nd Street at Grand Central. Not sure if MTH makes one, but if they do, that would be perfect (even if it ain't in Brooklyn!!!).

Thanks.  It was a lot of fun this weekend working on both the subway diorama and my model airport which are both on HCD's only 4 feet from each other in my designated hobby area .

BROOKLYN - Ah yes, Brooklyn. One of the backdrop photos was of Nostrand Avenue and St. John's Place (my old stomping grounds when I was in high school and started college in the early 1980's before I left NYC for Fla-ri-dah in 1986) and the other was of Fulton Street and Nostrand Avenue, which of course is a block or two north of Atlantic Avenue where the other MTA M7's run on the LIRR elevated tracks.  Sold my Lionel LIRR M7 years ago and regretted it ever since.  Not willing to pay inflated prices right to now to get one back. Can't justify the expense either on the actual subway train units (R17, R142's, etc) so I'm happy running the M7's.

Kevin;

Kinda familiar with the area... went to H.S. on Nostrand and Carroll in the very early 70's and my family had a brownstone on Pacific off Bond, not far from the Atlantic Ave. Depot. The area has REALLY changed since those days. Too bad about the LIRR cars, but since I am not a rivet counter, one M7 looks pretty much like the next (but I do prefer the MNR blue scheme to the LIRR yellow).

dischler posted:

Third day of operation on the Bark and Spiders Outdoor O gauge.  Today I pulled out an Atlas SP SW9 in Black Widow livery and an MTH Kodachrome SP caboose. The Railsounds in conventional mode completely captivated the 20 lb. terrier who was running back and forth completely intrigued with this non-squirrel invader of her environment.  Hilarious, my wife was giggling and filming.

Worth a thousand words per frame

My Standard gauge track rests on Homosote that is on the carpet under my O gauge layout. I have been puzzling how to get it up and out somewhere to really enjoy it. The basement is too humid or cold, the LR/DR area is occupied mostly with the O gauge but I might have found the place !!  The bedroom!   I wish I could get rid of the queen size bed but not in a mood to spend $$ on a bed and bedding. But I think there is room between the bed and the wall/ceiling for a long narrow loop of Standard gauge track. Will have the surveyors out today checking it out. No Queen in my place so I rule !!

No photos yet, but I did a lot of small detail work on the layout last night. I built a Bar Mills “Insta-fence” wood fence almost 3 feet long (real feet, not scale feet), which will be used to hide the seam between the horizontal level and the vertical backdrops along the far wall. I didn’t use the kit's horizontal pieces, instead using two long pieces of square wood stock about the same size to make a long single unit that couldn’t break apart easily. I’ve decided not to cover it with posters like many modelers do, as when you look at period photos you really only see that on walls of buildings and in cities, not on a wood fence in the country.

I also made several bushes, experimenting with some techniques I recently read about, using poly material covered in ground foam. I think I have that figured out, and soon there’ll be bushes everywhere. Trees will come next.

Lee, at major crossroads you might see some advertising bills in nowhere-ville, but basically your right.

Jim, only go as high as you need to, reaching up and ladders, gets old sometimes. I could have done mine as a dogbone, 4ft lower, and been happier, but went above the doors for loops instead.

  Hey, there's always under the bed storage too. As a kid, I had an 0-27 track set up for years like that. Roll out, roll in, it was always ready. I even ran it under the bed in daylight hours to simulate night running (my fav.).

Adriatic posted:

Lee, at major crossroads you might see some advertising bills in nowhere-ville, but basically your right.

During my planning and later, the build for my On30 layout, I did a lot of historical research on what you'd find in the real rural WW2-era America. As I've spend the greater part of my life researching the WW2 era, it wasn't that big a stretch. But along the way I've found staples of layout scenes almost everywhere that have very little basis with real life. One only has to look at photos from the era you have in mind to see what was and wasn't common. I'm lucky that there was a massive WPA project for photographers to record daily life in America during the 30s and early 40s. These photos can be reviewed in several places and a few books of them have been published.

But yeah, a fence along a narrow gauge railroad (and nowhere near a road) in northeast Tennessee during the war? No way would you find posters. You might find some small hobo marks (and in the case of the RR I model, highly unlikely as the line didn't go anywhere a hobo would wanna go) and maybe some patriotic "V for victory" scribbles, but very little else.

I ran my "Valley of Bridges" Atlas O Century Track layout I designed with minimum O-72 curves, and it actually ran without incident.   I have been very depressed with all the new engines (15 now) I have sent to Lionel for warranty work this year.  My first of two Vision Line Big Boys #4014 and my Conrail #4133 SD70MAC (Big Blue Set) ran smoothly.  The Big Boy pulled 22 Atlas H21a Hoppers and a caboose.  The Conrail pulled seven of my detailed NYC Empire State Express cars with Preiser figures inside. The lights were off, and the engines looked great triggering the Atlas O signals along the track.  Last night after boxing three Legacy engines, two 990 Remotes and four sparking passenger cars to return to Lionel, I emailed a couple of friends that I was ready to quit.  I am glad I gave it one more try.  Sincerely, John Rowlen

Attachments

Images (4)
  • DSCN0973: No New work for two months. Been dealing with warranty repairs
  • DSCN1062: Painted seats, bar, and Preiser people bring the car to life.
  • DSCN1066: All Empire State Express cars have same interior, except baggage-Lounge & Observation
  • DSCN1071: Empire State Express Observation looks great at night.

John,

I see why you call it valley of bridges.  It looks great!  Do they lift up or out to give you easy access?

On another note, I'm sorry to read of the problems you have had.  I hesitate to write this, but my locomotive and MTH TIU problems were self induced or factory resets were all it took, except for bad component on a warranty TIU fix.  Not knowing the nature of your problems, I am sorry you have had a lot of trouble.  It is no fun.

Kerrigan posted:

Read this thread and started feeling guilty I've not worked on it in a month.  Been busy trying to get the line of dead locomotives repaired.

Then, you've been working on the layout. Maybe not the stuff on the benchwork, but working on rolling stock or motive power is, to me, working on the layout as you're working on stuff used there.

Kerrigan posted:

Read this thread and started feeling guilty I've not worked on it in a month.  Been busy trying to get the line of dead locomotives repaired.

They aren't all down are they?

    You and John R seem to be having a heck of a time. I have to wonder about static charges wreaking havoc. The tvs in each loco would shine there. Filtering, and an earth grounding with it is about all you can do there to help with the train circuitry. But regular use of "Static Guard" spray for laundry works wonders on glitch-y coin-op video games. Unplug, open up, spray liberally, let dry as needed. On real stubborn cases, I've nearly soaked boards. General misting takes seconds to dry. I don't feel it promoted any corrosion on terminals, and I've not seen it react to carpet colors, but testing is always wise. I'm betting you could mist the grounds on a layout for years without damage. 

It sounds like you might need a short 5-10 min running of something?

A quick floor loop in the kitchen while you cook her pancakes kind of thing

A quick wheel cleaning session to some good music?

Plant a tree, drive those cars around, run a sale at "that shop"

Why feel guilty anyhow? You thought about it; it's the thought that counts

The "Valley of Bridges" bridges do not lift out. I have enough problems with keeping wiring secured. ( All track wires go to MTH 1014 Blocks. Why don't they have resistors to help reduce damage?)   I crawl under, it keeps my knees limber, but just in case, I moved the control panel to the end of the layout by the steps.  The Center Single Pratt Bridge has the landing pads for making it look like a Swing Bridge. I will take plywood and screw it to the bottom of the 2x4 layout supports to create a 3-1/2 inch drop for the river surface and bridge pedestal on either side of the bridge.  The single bridge nearest the steps will be a static bascule Bridge.  I have pieces of another single Pratt Bridge I will kit-bash with plastic sheeting. The Double Pratt Bridge will be a static Lift Bridge with more Kit-bashing using a spare Double Pratt I purchased.  It might look like heck in daylight, but when the lights are off, the Nano warning Lights and Bridge river navigation lights are on, it will create a nice effect. ( I have three Lionel Tugboats to add to the 21-foot river.) The river moves upstream to the "Village of Deichman, named for Ann and Len who have been my major suppliers for Atlas track and Bridges. The little village depot will therefore be: "Deichman's Depot".

Attachments

Images (3)
  • DSCN0241: Landing pads for Center Swing Bridge. It ain't pretty yet, but give time.
  • DSCN0474: Deichman's Depot, Village of Deichman, "Valley of Bridges" layout.
  • DSCN0478: Waiting for the trains. Every building has interiors, lighting adding a depth of field beyond the building's outside.

Bryan, first chance I got to see how far you have gotten. Quite far to say the least. Are you sure you did not clone yourself to work this fast. Anyways it is sure looking good. That was a nice shot of the overall layout. When are you going to get your Atlas bridges. With Charlie's viaduct that is going to be a sweet picture taking area. I would not be surprised to see scenery going in next week...............Paul

paul 2 posted:

Bryan, first chance I got to see how far you have gotten. Quite far to say the least. Are you sure you did not clone yourself to work this fast. Anyways it is sure looking good. That was a nice shot of the overall layout. When are you going to get your Atlas bridges. With Charlie's viaduct that is going to be a sweet picture taking area. I would not be surprised to see scenery going in next week...............Paul

Thanks Paul although you almost inherited a large collection today as I just spent 5 hours trying to fix a problem and the thought of burning it all down crossed my mind.  I started wiring the outside line of the main and I have it broken up into blocks.  Gave it a test try.  No engine test track message.  Okay track might be dirty cleaned it...same message.  Maybe need another feeder line or two; added them....same message.  Replaced all older pieces with brand new pieces from inside main line....same message.  Researched the forum for an hour but the solutions people had I've already tried.  Maybe it was the engine so I got out 5 different engines PS2, PS3, diesel, steam, and subways....same message.  Reset TIU....same message.  Changed channels on TIU....same message.  Then it hit me on my old layout I had the fixed in facing the transformers but on this one I have it the other way.  Stupid me I had the transformer going to the fixed out and the fixed out going to the terminal block.  A 1 minute switch and as you can guess added engine perfectly and have all 10's around the outside main line.  Now time to have a drink in celebration and stay up all night wiring the other 3 main lines, passing sidings, and yard.

As for the Atlas bridges I ordered 2 of them from Charles Ro but I guess they are backordered everywhere.  Also I am thinking of picking up 3 more of the MTH steel arch bridges to give me 5 going across the elevated line where it is a nice 15 foot straightaway over the main and the outside subway tracks.  On the picture above you can see the 2 already and how much room there still is to the right.  


Bryan,  I started buying Atlas O supplies six years ago before beginning the construction in October 2015.  The "Valley of Bridges" layout came together quickly.  Then I started playing with the layout and construction dramatically s-l-o-w-e-d, stoppppped.  I recommend you run only large diesels as you test run the layout.  A Big Boy to check clearances is also good.  Steam Engines are great when the layout is finished.  It is the steam engines and their smoke units that have given me the greatest number of repairs. Stay with diesels and stay sane.  I checked my suppliers for the 6921 Double Pratt Bridge: Deichman's Depot, High Country Hobbies, Discount Trains, and Petersen Supply are out.  There are 6921 Double Pratt Bridges that are completely built on Ebay.  The Pratt Trusses do come loose, even on new-in-the-box disassembled bridge kits.  Glue puts them back in place. Weathering and dust cover repairs over time. I would not be afraid of buying an assembled bridge if it is packaged with fill peanuts around the structure....but what a mess coming out of the shipping box.

Attachments

Images (1)
  • DSCN0978: Double and Single 40 " Atlas O Pratt Bridges

I started putting accessories on the extension. It's all wired and now I can add things as I get them. I also decided to put a fishing hole there since I put in a bait shop. The bottom picture is just to show the whole thing. I moved some buildings around and next week I'm putting a road in.

100_2334100_2336100_2337IMG_20160719_173447100_2324

Attachments

Images (6)
  • 100_2334
  • 100_2336
  • 100_2337
  • IMG_20160719_172608
  • IMG_20160719_173447
  • 100_2324
Last edited by DennyM

Hi Bryan,

I found this in another thread. I hope it helps.

Greetings,

Can anyone furnish me the dimensions of the Atlas O 3 rail dbl Pratt Truss bridge. I need the overall width (10 1/16"), rail length 40", height approx. 9 7/8"  , and the distance from the outside to the center rail (Closest rail 2 13/16", other rail 7 5/16" , and the distance from center rail (track 1) to center rail (track 2) (4 1/2"). Thanks  a lot!  Ray

mike g. posted:

John, Bryan, and Lee. Your guys work looks great. I hope to be able to join this thread one day. So I can post and get input. Just waiting on the building addition. Please keep up the great work and posting it for us who are learning!

Mike,

I'm honored to be included in that list, but as for me, I'm for sure learning, too.

Don't forget, this layout I'm working on right now is the first real layout I've ever built.

Being laid up recovering for a week (had a bit of cardiac roto-rootering done), I was musing over my lack of Frisco motive power.  Since I recently acquired an LTI 0-8-0 in Pennsy lettering: 

GEDC2494

I decided to make it into a freelance Frisco switcher using laser-printed labels I designed:

GEDC2495

This depicts a mythical 3900 class 0-8-0 switcher which never existed.  3939, of course, is a shoutout to my favorite old time radio comedian, Jack Benny...  ;-) 

I do like how this came out, and I'll probably go back and redo this using proper decal paper... 

Mitch

Attachments

Images (2)
  • GEDC2494
  • GEDC2495
M. Mitchell Marmel posted:

Being laid up recovering for a week (had a bit of cardiac roto-rootering done), I was musing over my lack of Frisco motive power.  Since I recently acquired an LTI 0-8-0 in Pennsy lettering: 

GEDC2494

I decided to make it into a freelance Frisco switcher using laser-printed labels I designed:

GEDC2495

This depicts a mythical 3900 class 0-8-0 switcher which never existed.  3939, of course, is a shoutout to my favorite old time radio comedian, Jack Benny...  ;-) 

I do like how this came out, and I'll probably go back and redo this using proper decal paper... 

Mitch

Very nice job Mitch!  Sorry you had to get the cardiac work done, but I'm looking forward to seeing it helps you be with us for a long time!!

M. Mitchell Marmel posted:

Being laid up recovering for a week (had a bit of cardiac roto-rootering done), I was musing over my lack of Frisco motive power.  Since I recently acquired an LTI 0-8-0 in Pennsy lettering:...

Mitch

Wait a minute, Mitch. You had cardiac work done, which no doubt included people and equipment wandering around inside of you, at the very center of the Mitch (as opposed to the other end, for example, in the plumbing), and you have been musing about a "lack of Frisco motive power"!? That tells me you are one playful guy, full of the light of life, and one courageous dude, for sure! I tip my hat to you (for real, I have one and just did), sir, and wish you the absolute very best.

FrankM.

My grandsons are coming over this Sunday for a cookout at the beach.  When we get back they like to hang out in the train room.  Their favorite store is Kroger’s.  They like going to Kroger’s with grandpa and grandma. So I am going to put this trailer and flatcar that I made today, on their train, just behind the locomotive. Hope they notice.  I made a paper decal with an ink jet printer. I used an Avery, Acid-Free Glue Stick to adhere the decal.

If I get a cool photo, I will post the photo on this thread.

Kroger Trailer on flat car Soo LineCheers from Train Room Gary Pan 2 View

Have a great weekend and stay cool in this one-hundred degree weather.

Attachments

Images (2)
  • Kroger Trailer on flat car Soo Line
  • Cheers from Train Room Gary Pan 2 View

Ran an op session this evening, and took this photo of my wood caboose model to replace one on my website that was taken back before there was any scenery on my layout...

It's the first laser kit I ever built, and quite frankly, it shows. But for now, it'll do. I might be getting another one of these kits, doing a better job of it, then selling this one...

p51 posted:

Ran an op session this evening, and took this photo of my wood caboose model to replace one on my website that was taken back before there was any scenery on my layout...

It's the first laser kit I ever built, and quite frankly, it shows. But for now, it'll do. I might be getting another one of these kits, doing a better job of it, then selling this one...

It looks good from here. Why aren't you happy with it?

bigtruckpete posted:
Amfleet25124 posted:

M7 Subway Setup 1


Kevin, That is some great work!!! My next layout will most definitely have a subway so I enjoy seeing how others model them. 

Where did you find the garbage truck?

In your video the train runs nice and quiet on the rails. What are you using for underlayment?


Thanks Pete.

The garbage truck is a 1:43 Swedish Scania truck that I purchased on FeeBay.  My plan is to only use 1:43 vehicles on my layout (I still have some holdovers for fillers) and I wanted my trucks to have an additional variety to just the New Ray Freightliner and Kenworth models.  Just search "Scania 1:43" on FeeBay and you'll see a bunch of various styles of trucks, etc.

Regarding the track, the Atlas O is just laid straight on top of indoor/outdoor carpet that's sitting on the blue foam from Lowe's.  As it's sitting on a HCD I thought it would be louder, but it isn't.  Track noise is very quiet, which is why I still love Atlas O even with all of my multiple track changes $$$$ over the years .  To make it even more quiet (which is required by the Land Grant Commission  for the Christmas layout) I eventually plan on placing all of my Atlas O on Ross Roadbed which I've read great things about.

Just received my new Pennsy Aerotrin from Patrick's Trains. I bought the train and three add on cars (so 3 cars have the number 301). The train looks better IMHO pulling 6 cars instead of 3 cars. The real train pulled 9 cars but at $55 per car I had to draw the line somewhere.  I spent some time gluing in passengers and and engineer and fireman, replacing the diaphragms with the larger ones that come with the cars and oiling the set. I will post pictures after I bring them down to my club on Wednesday night.  

Adriatic posted:
p51 posted:

It's the first laser kit I ever built, and quite frankly, it shows. But for now, it'll do. I might be getting another one of these kits, doing a better job of it, then selling this one...

It looks good from here. Why aren't you happy with it?

Handrails aren't formed correctly, the glue is obvious in several spots.

Not horrible for my first laser kit ever, but I can do better now.

AGHR Howie and I have been attacking the "beveled" corners of the bench work in favor of rounded for better scenery aesthetics. This particular corner has been somewhat of a sore spot but we finally got the sections made. This will allow us to add a siding and spur to serve the Bullshippers CoOp (Walthers Sursweet Feeds building kit). We got the concave upper and lower panels cut and should have the extension pieces completed next weekend and the fascia boards installed the following weekend.

2016-07-23 18.04.16

Attachments

Images (1)
  • 2016-07-23 18.04.16
p51 posted:
Adriatic posted:
p51 posted:

It's the first laser kit I ever built, and quite frankly, it shows. But for now, it'll do. I might be getting another one of these kits, doing a better job of it, then selling this one...

It looks good from here. Why aren't you happy with it?

Handrails aren't formed correctly, the glue is obvious in several spots.

Not horrible for my first laser kit ever, but I can do better now.

Hi Lee, I think it looks wonderful! But do I have a deal for you. I have this.

http://www.yeoldehuffnpuff.com/images/695.GIF

If you would like it for free, just postage its yours so you can do another one. It doesn't go with the way my layout will go and I don't have the skills or more the patience to build it.

Attachments

Images (1)
  • 695[1]

Yesterday my good friend Randy Harrison came over and brought me a mirror, which he cut to size, for one of my streets that dead ends at a wall.  After installation of the mirror, the street now appears to continue and adds great depth to the layout.  This new improvement to this street has the merchants and residents who do business and live there worried, because they think this mirror improvement will be "reflected" in their tax bill.  ( sorry I couldn't resist )

 I also created some new streets using asphalt roofing shingles.  They really look great!!  I added some shrubs too.

 Im putting final touches on the layout in preparation for the photo shoot.  My layout is going to be featured in one of the upcoming issues of OGR Magazine!  

 Good morning all. As usual some great work being done. A couple of things first.. 

Mitch, Glad your doing better although at first shocked that you called the plumber ( roto-rooter man) . But after thinking about it , who better to call to clean out the pipes since they both (Doctors) charge and arm and a leg.  At least the work is guaranteed.

Lee: the waycar looks good despite what you think and the fencing came out good as it helps blend in the back drop.. Layout is getting better each time you post. 

For me this was a last second decision as I needed to clear my mind. Jumped in the van and drove out to my source for back drops and trees.  Finally fixed the gap in my back drop that had been bugging me for a long time on one section of the layout and replaced the final three sections with new mats. No more yellow snow or bare wall..

1-DSCF5053


1-DSCF50541-DSCF50551-DSCF50571-DSCF50591-DSCF50601-DSCF5061

Attachments

Images (8)
  • 1-DSCF5054
  • 1-DSCF5055
  • 1-DSCF5056
  • 1-DSCF5057
  • 1-DSCF5059
  • 1-DSCF5060
  • 1-DSCF5061
  • 1-DSCF5053
suzukovich posted:
 

Mitch, Glad your doing better although at first shocked that you called the plumber ( roto-rooter man) . But after thinking about it , who better to call to clean out the pipes since they both (Doctors) charge and arm and a leg.  At least the work is guaranteed 

Now that's funny! 

But if that jingle is in my head another day I swear you'll both pay double .....

Lee: the waycar looks good despite what you think and the fencing came out good as it helps blend in the back drop.. Layout is getting better each time you post.

Artists are their own worst critic. No matter what "something" is " wrong"  

I bet he'd trade for a new kit just to try again.

With the heat, I've done nothing. My transformers add 5°temp. to the room and I'm trying not to run the air conditioning this year. I almost ran them at lunch, but the cool morning breeze gave way to a breeze that could have been coming out of a space heater. It changed in just seconds when the sun moved. In all it had me dreaming about snow angels after seeing your photos.

Call me Nanook, even the yellow snow would be tempting.....oh great, now I want pancakes...too hot


1-DSCF50541-DSCF50551-DSCF50571-DSCF50591-DSCF50601-DSCF5061

mike g. posted:
p51 posted:

Handrails aren't formed correctly, the glue is obvious in several spots.

Not horrible for my first laser kit ever, but I can do better now.

Hi Lee, I think it looks wonderful! But do I have a deal for you. I have this.

http://www.yeoldehuffnpuff.com/images/695.GIF

If you would like it for free, just postage its yours so you can do another one. It doesn't go with the way my layout will go and I don't have the skills or more the patience to build it.

Mike,

Thanks for the offer but the RR I model never used refer cars, so I'd rather this car go to someone who'd be able to run it in trains.

p51 posted:
mike g. posted:
p51 posted:

Handrails aren't formed correctly, the glue is obvious in several spots.

Not horrible for my first laser kit ever, but I can do better now.

Hi Lee, I think it looks wonderful! But do I have a deal for you. I have this.

http://www.yeoldehuffnpuff.com/images/695.GIF

If you would like it for free, just postage its yours so you can do another one. It doesn't go with the way my layout will go and I don't have the skills or more the patience to build it.

Mike,

Thanks for the offer but the RR I model never used refer cars, so I'd rather this car go to someone who'd be able to run it in trains.

Sounds good Lee, it's open free to anyone who wants it.

mike g. posted:
p51 posted:
mike g. posted:
p51 posted:

Handrails aren't formed correctly, the glue is obvious in several spots.

Not horrible for my first laser kit ever, but I can do better now.

Hi Lee, I think it looks wonderful! But do I have a deal for you. I have this.

http://www.yeoldehuffnpuff.com/images/695.GIF

If you would like it for free, just postage its yours so you can do another one. It doesn't go with the way my layout will go and I don't have the skills or more the patience to build it.

Mike,

Thanks for the offer but the RR I model never used refer cars, so I'd rather this car go to someone who'd be able to run it in trains.

Sounds good Lee, it's open free to anyone who wants it.

I'd sure like to give one a shot Mike, if it's still available. I'm going to try to e-mail you if you have one listed. If not, mine is.

Regardless, it's a nice gesture.

It’s hard to believe, but on this day 2 years ago, it was a weekend and I had started cutting plywood and 1X4s to build the bench work for the layout. By August 2nd, it was looking like this:

Now, compare this shot with one taken almost exactly 2 years later:

I plan on running some trains on those days, as I’ve made quite a bit of progress on this project. The one local guy who helped me out with the track and wiring has pointed out that I’ve made more progress in 2 years than most other modelers would make in a decade. From the other local layouts I’ve seen, I know he’s right about that.

Add Reply

Post

OGR Publishing, Inc., 1310 Eastside Centre Ct, Suite 6, Mountain Home, AR 72653
800-980-OGRR (6477)
www.ogaugerr.com

×
×
×
×
Link copied to your clipboard.
×
×