Note sound exits front of speaker and holes are directly below, see markings.  Given the size and shape of the tender, it's probably about as good as they could do.  This is the standard configuration for 3rd Rail Vanderbilt tenders of that era.  It actually doesn't do at all bad...

John, do the boards come with TVS protection, or is that something you add during installation?

George

@RSJB18 posted:

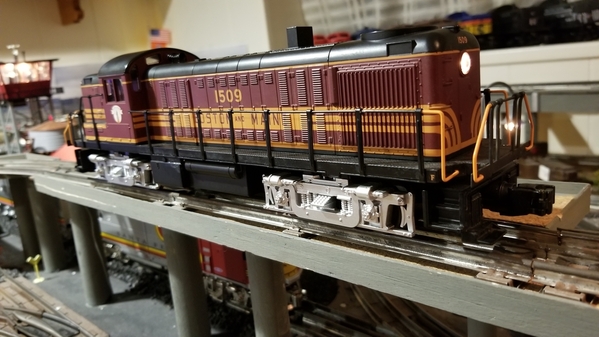
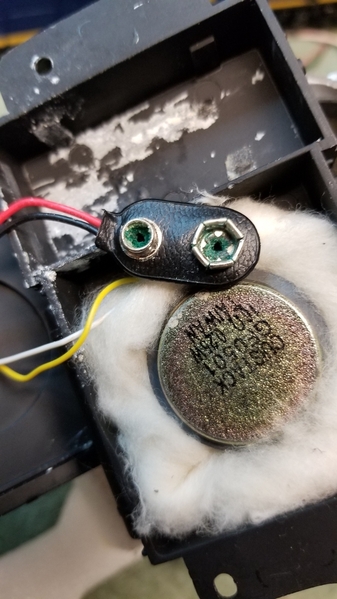
Putting a new to me MTH RS-3 w/PS2 through a full maintenance. First step is always the battery. Discovered that I have a flaking speaker too. Parts are on order with @GRJ. Once the power and sound are tested, I'm going to add figures and cab lights.

2022-08-05 22.12.532022-08-05 21.08.112022-08-05 21.11.25

Bob

Nice looking engine Bob.   Love the idea of using smoke unit batting for a speaker baffle (at least I think that is what you used).

John

Bob, what you are undertaking with your engines is very impressive. It’s cultivating the idea that I should learn the process. Although, I lack your electronic insights.

Jay

Jay- As a licensed electrician, I am very comfortable with wiring and troubleshooting. I'm not skilled enough with electronics to do some of the work that the guru's on here can, but I won't shy away from replacing components if given the proper direction.

Reminds me of my first car, I wasn't much of a gear head growing up but when faced with repairs I couldn't afford, I figured it out with a little help from my friends. Paul McCartney had it right....

Thanks

@Tranquil Hollow RR,

I’m with you on that. I’m reminded of my favorite Dilbert cartoon where he’s standing over a new, confused employee who’s typing at a PC and says ‘Go ahead, you can’t break it’.  The next frame shows a big explosion, and the final frame has them all disheveled and the PC ripped open and Dilbert says ‘Well, in my defense, that hardly ever happens’.

@RSJB18 posted:

The batting was there when I opened it up. First time I've seen it so it must have been added by the previous owner.

Thanks

Inside the tender of the Lionel 0-8-0 there is no room for the paint spray caps people recommended for a baffle, styrofoam cups aren't sold anymore, and nothing else seems to work because the tender narrows above the speaker (where the coal load is located).  The batting looks like a great solution.

I'll use the smoke unit "ropes" I have or one can even use the wicks from a TIKI torch.

John

Last edited by Craftech
@Craftech posted:

Inside the tender of the Lionel 0-8-0 there is no room for the paint spray caps people recommended for a baffle, styrofoam cups aren't sold anymore, and nothing else seems to work because the tender narrows above the speaker (where the coal load is located).

I have thin wall 2" PVC pipe from a built-in vacuum system.  I cut it to size on the bandsaw and then add a styrene top cut to size and glued on.  That means I can make a custom height baffle that will fit in most places.

@Craftech posted:

Inside the tender of the Lionel 0-8-0 there is no room for the paint spray caps people recommended for a baffle, styrofoam cups aren't sold anymore, and nothing else seems to work because the tender narrows above the speaker (where the coal load is located).  The batting looks like a great solution.

I'll use the smoke unit "ropes" I have or one can even use the wicks from a TIKI torch.

John

One cheap trick I use is to buy a small pack of Dixie cups, like the ones sold for mouthwash, etc. They can be cut down to size with a pair of scissors and then glued to the back or front of a speaker. Being just paper I didn't think they would work well, but surprisingly, they do a pretty fair job as a baffle!

George

@GeoPeg posted:

One cheap trick I use is to buy a small pack of Dixie cups, like the ones sold for mouthwash, etc. They can be cut down to size with a pair of scissors and then glued to the back or front of a speaker. Being just paper I didn't think they would work well, but surprisingly, they do a pretty fair job as a baffle!

George

Good to know George.

Thanks

John

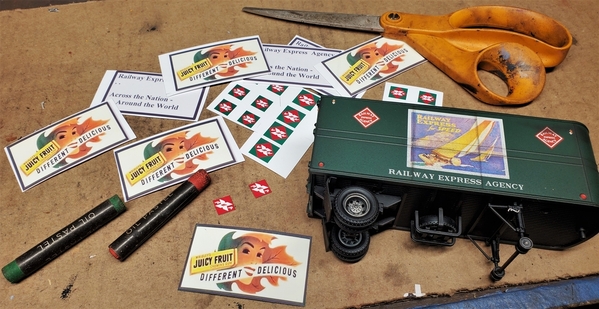
Re-painted an old Athearn 1:50 scale Ford C W.P. box van, no longer made. Found a Boars Head sign on the net, re- sized it using excel. Printed out on photo paper. Covered with matte clear spray. Applied Loctite spray adhesive. Did an REA truck and MTH pup vans the same way.

Attachments

Images (1)
  • REA LIONEL PUP TRAILER for PS-4 ebay 4-7-22 (8)
Last edited by SIRT

Still working on the bench and have completed all 16 side chutes and door detail for the Hart hoppers.    

IMG_1445

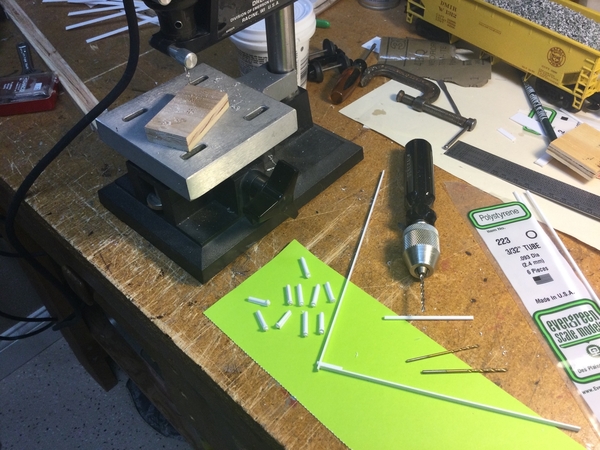
Began working on the activation lever detail.  In order to produce a sizable hole in a narrow strip of styrene, it required four separate bits to reach the 3/32 hole needed for the tubing.      Started with a small pilot hole using my Dremel drill press, gradually increased the hole size using three more bits with the pin vise to reach the required size.     I found this method was helpful and increased my success rate to about 80%.  The trick was getting it centered and not trying to remove too much material with each bit.   Broke a few pieces of styrene along the way.

IMG_6890IMG_6892IMG_1450

Today I worked on the corner bracing for the chutes.    My salvaged supply of copper “box staples” became very useful.   It is hard to find 1/16” flat copper strips.       

DSC09120

I made a little jig for cutting a groove with my track saw to help produce a sharper bend at the foot of the brace.

IMG_6903

Cut them to size using a scale drawing and secured them in place with some two part marine epoxy I had in supply.

IMG_6902

Now waiting for the 24 hour cure.

IMG_6904

Will finish the other two early next week and begin the center bracing and activation levers.   The activation levers will be made from strips of copper that I will solder to a copper rod that slides into the 3/32 tubing.

IMG_6893 2

Cheers to all and have a wonderful weekend!

Dave

PS:  I'm so impressed with you people who jump into the electronic and mechanical fixes!   Tackling that would scare me to death!  

Attachments

Images (9)
  • IMG_1445
  • IMG_6890
  • IMG_6892
  • IMG_1450
  • DSC09120
  • IMG_6903
  • IMG_6902
  • IMG_6904
  • IMG_6893 2
Last edited by darlander
@SIRT posted:

What do you think, LOL!    How's this? - https://steves3roscale.shutterfly.com/pictures/22153

That's what I expected but I had to ask.  I remember seeing you post during the build of that one.  The "Empire Carpet" didn't sink in until I just noticed the billboard on the roof.  That gave me a chuckle.  Love that Fender Guitar billboard.  is the "sign" off an actual guitar and what kind of screen did you use for the framework.  I can't say that I'm familiar with that wavy wire.

I just finished replacing the main smoke fan in my VL Hudson 700E.  I'm editing a video of the entire adventure now.  One funny thing happened. I isolated the main smoke fan motor as the problem  but, like a doctor removing the wrong organ, in my enthusiasm, I  removed the whistle smoke motor before I realized I "removed the wrong fan motor"   Well, I'm ready now when that one fails!

Hudson shell off

Attachments

Images (1)
  • Hudson shell off

This 70-ton Air Slide covered hopper is from an American Standard kit from the 1990's.  American Standard is best known in O scale/gauge for its well detailed heavy weight passenger car kits and later light weight streamline kits a well.  Yet they also fielded some freight cars, this being one of them, as well as a modern (for that time) Rail-Gon being the other.

The 70-ton Air Slide covered hopper was not a common O scale car back then, other than a few expensive brass imports. The kit is styrene with some cast plastic parts - car sides, hoppers, end vents, shaker castings, bolsters, ladders, running board, roof end platforms, car steps and underframe ends.  All else is styrene sheet and strips. Many of them, all inventoried on the instruction sheet, which has diagrams drawn and printed to 3/16"/ ft scale for this 1/4" /ft scale model.  Deft handling of a scale ruler helps a lot. No couplers or trucks are provided.

I thought I might sell this kit. However, I probably not get anything near its original $ 19.90 cost from 30 odd years back. Even at $10 plus postage would be a price few would be willing to pay.

And it's not an easy kit to build. All the angle stock needed for car end bracing and roof ribs must be glued up from styrene strips to make the needed "L" shapes.   The underframe center sill too, is built up with styrene strips.  Further, it builds out to be a very light weight car in O scale, about 7 oz with Kadee couplers and Athearn "Symington" trucks under it.  So, I put in an 8 oz block of wood to bring it up to a more road-able 15oz. But therein lies a tale.

I detailed the brake rigging underneath and added air brake piping as well. All was ready for the final part, installing the brake wheel with is rod and chains at each end, to connect with the brake cylinder below.   Oh, I nearly forgot to say that its light weight also relates to its construction and details being rather fragile!  Also, that added built-in weight can be a liability when handling this model.

The two photos below will give you some idea of what the car is like and the unfortunate accident I had when grabbing it as it was rolling off the workbench a few days ago.   Other than those very fragile corner ladders that split down the middle of each rung on both sides, it is indeed quite repairable.
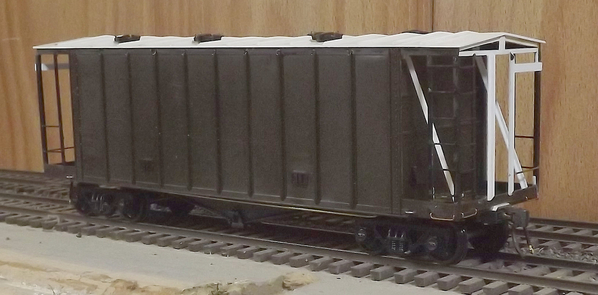
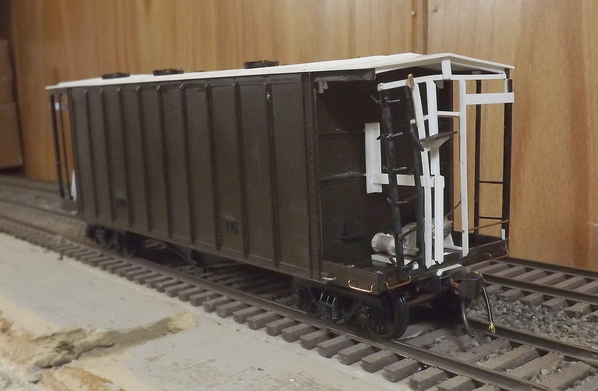
AirSlide 01


AirSlide 03

Later.

S. Islander

Attachments

Images (2)
  • AirSlide 01
  • AirSlide 03
Last edited by S. Islander
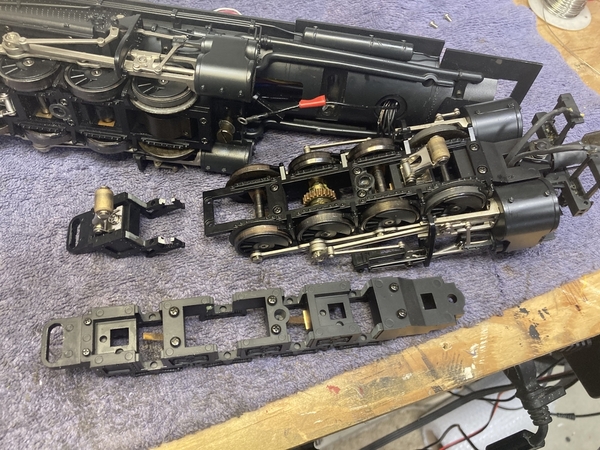
Installed the center bracing to one car tonight.  The thin center brass strip will become the activation lever holder.  Had to solder it in place before epoxying the bracing.   The weather has been so nice the past few days it's been hard to find time to sneak down to the bench.    IMG_6913

Life is good!

Cheers, Dave

Attachments

Images (1)
  • IMG_6913
Last edited by darlander

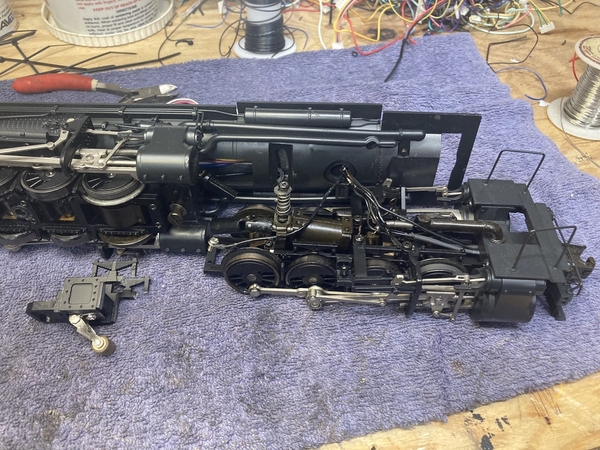
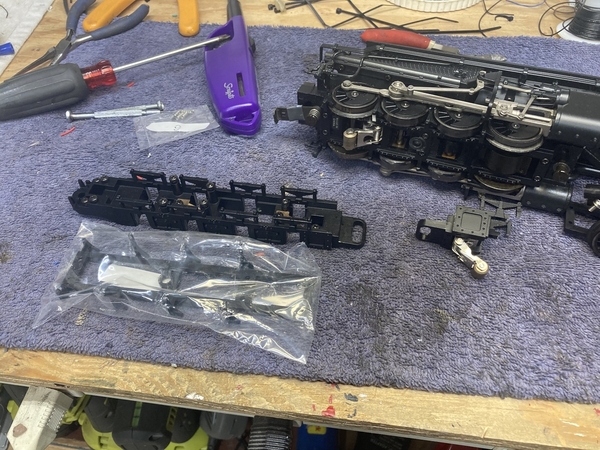
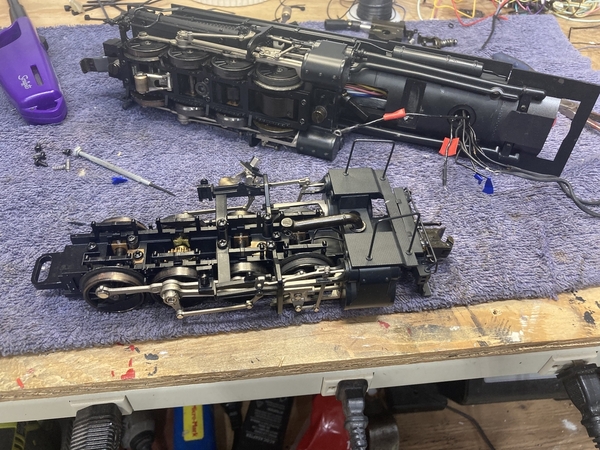
Ok ill bite, why do you need a front frame? Did the loco "take a dive" or zinc pest?

Hi Mark

The rear of the front frame snapped off , you can see the part that snapped off in the first picture. Another repair guy had this loco for almost a year , customer decided to get it back because he was tired of waiting for it, I Received it like this so I’m not sure how it broke. I do not see any signs of zinc rot.
Thanks, Alex

                                   12 GGD Battleships to decorate today.


20220822_095700

20220822_100038

20220822_100052

thumbnail

                                                                Easy day!

                                                  Off to the blaster first...

Attachments

Images (4)
  • 20220822_095700
  • 20220822_100038
  • 20220822_100052
  • thumbnail

After finishing replacing the main smoke motor in my VL Hudson 700E, I've turned to the last of my collection needing attention.  The Acela set.  I'm starting with the non-powered engine #2029.  Pantograph motor does not run.  Either it has settled on a 'dead spot' Gunrunner John identified, or I need to replace it. Fortunately I have a motor and motherboard for that unit. 

Acela #2029 Pantographs

Attachments

Images (1)
  • Acela #2029 Pantographs
@ToledoEd posted:

I just finished replacing the main smoke fan in my VL Hudson 700E.  I'm editing a video of the entire adventure now.  One funny thing happened. I isolated the main smoke fan motor as the problem  but, like a doctor removing the wrong organ, in my enthusiasm, I  removed the whistle smoke motor before I realized I "removed the wrong fan motor"   Well, I'm ready now when that one fails!

Hudson shell off

Ted, here's a video of the project:

Last edited by ToledoEd

Add Reply

Post

OGR Publishing, Inc., 1310 Eastside Centre Ct, Suite 6, Mountain Home, AR 72653
800-980-OGRR (6477)
www.ogaugerr.com

×
×
×
×
Link copied to your clipboard.
×
×