More great advice in this thread!  I would add to Scott's comments that you may be able to fit the next size up of Tang Band speaker - TB1931s - in the fuel tank if you cut the end tabs off. Well worth it for th extra 50Hz of bass imho. In my latest Atlas install a put the TB1931 facing up in the fuel tank and cut away the chassis above the speaker to let the air move.

Regarding decoders, I'm not sure if there's an add-on sound board that works with a D408SR. Back in the day I used Soundtraxx DSX I think. But sadly that combo won't run or sound anwywhere near as good as a LS5 DCC L decoder.

The starting off and slow running is hard to do well with the Atlas dual-motor drive.  The D408SR does OK at this, but the LS5 DCC does a far better job of smoothing out the cheap can motors in these locos imho. Here's my first LS5 DCC in action in a consist after some tuning. Atlas C424 chassis on the left:

    And here's the sound from the LS5 DCC.  The C424 prime mover fires up first .  Both locos have the TB1931s.   


Last edited by Pete M

There are no "sound boards" for the NCE D408SR.- the old Soundtraxx sound only DSX's are no longer offered.  The D408SR is a very rugged no-sound decoder - (4 amp continuous, 8 amp stall rating) .  One option would be to install it in a older locomotive that you don't particularly want or need sound in.  The other option is to sell it on-line (check out the no fee O Scale Yard Sale) and apply the proceeds toward purchase of a full function sound decoder.

I wired my AtlasO "China Drive" Erie Built" FM's in series for smoother starts.  They are drag freight units on my railroad so I didn't mind giving up some top end speed for smoother starts. 

Last edited by Keystoned Ed

I do wire my dual motor drives in series. This gives better starting and slow running.  But it reduces pulling power for heavier loads as one truck can spin its wheels before the other as load increase and take all the power, stopping the loco. 

I use LS HO decoders because I found I can get away with it having no grades and max 15 cars per loco. Plus I have become totally obsessed with smooth starting, slow running and sound quality. 

That's why I replace the Pittman can motors found in some older locos with smaller coreless Maxon or Faulhaber gearheads. 

The LS5 DCC "L" is a great all-round choice for O scale, and one advantage over the LS5 DCC HO is that you get a built-in keep-alive.  And because the KA is LS' own version, you can program it on Lokprogrammer or DCC programming track without having to disconnect it.

Last edited by Pete M

I wire the motors in parallel. I wired them in series first but found that a lot of the speed steps were redundant and the locos were in run 8 before they got to about 25 smph. After about speed step 80 the speed curve increased exponentially before a loco would top out around 40-45 smph at speed step 126.

Parallel wired can motors still give stellar low speed performance albeit not spread out over as many speed steps, I'm not too concerned about my locos increasing speed in 0.6 or 0.7 smph increments when moving from a dead stop. My locos top out at a more prototypical 60-65 smph when they are wired in parallel but then again I don't run a switching layout where more finite control is desired.

Bottom line is that a good decoder, and my experience is limited to ESU LokSound L's and XL's, will clean up the slop from a cheap DC can motor. My locos usually smooth out at speed step 4 or 5 in 128-speed step mode with the motors wired in parallel and that is certainly good enough for my running preferences.

@Keystoned Ed  No sound needed on everything...since I got a free board I will use it on something!  Thanks for the information.

@Pete M  I won't have any grades right now either...I assume even with an HO decoder you are using a larger speaker?

@catnap  This engine won't be used for switching since it is a fairly large engine...so maybe parallel will be better for this one and in series will be better for smaller switching engines in the yard.  Great info!


Andy: Yes, one reason for swapping out motors so I can use "HO-sized" decoders is to fit even bigger speakers as well as getting better starting and slow running.

For example this P&D F7B chassis which is basically a Tang Band 1942s with a truck at each end  

  I don't run my locos this loud for ops sessions but the extra bass still gets one's attention. 

Last edited by Pete M
Mike CT posted:

There were a few MTH O scale locomotives, that were set-up, (3-2).  Primarily 3 rail, but had a switch, bottom of tender (3-2), and the wheels, though large flanges, were insulated/isolated, to allow the removal of the third rail pic-up, power from the Left and Right rail.   Russian Decapod is (3-2).    Click on the underlined phrase to link pictures of the Russian Decapod.   DCS units were designed for both AC and DC operation.   The large flange, O gauge wheels, would require Code 200+ rails and switches. 

Interesting manufacturing system, designed to streamline production of both two rail and three rail models, IMO  ???   Mike CT. 

There were MTH Scale Wheel locomotives that were Proto 2. The locomotive pictured above is indeed Proto 2. You can tell by the polarity switch. Proto 3 does not have a polarity switch. Also Proto 2 doesn’t have DCC capability. Only Proto 3 has DCC. 

Last edited by Hudson J1e

Pete M  very interesting drive on this B unit. could you tell me more. is it commercially avalable  or is this something you built. I have replaced some of my gear towers with the 360 engineering ones and this is a good improvement but I like the idea of smaller motors like yours , my layout is a branch line so i never have much of a load on the locos.   Rick

Yes, you can change the sound file at any time; however, you need to invest in a LokProgrammer (~$150) to do so (or know someone that has one to do it for you).  You cannot use free software, such as JMRI, to upload a sound file on ESU decoders.  However, JMRI freeware can be used to adjust CVs for the sound file that is currently installed in the decoder.  

https://tonystrains.com/produc...-53452-lokprogrammer

Scott

Scott Kay posted:

Yes, you can change the sound file at any time; however, you need to invest in a LokProgrammer (~$150) to do so ...

Does the LokProgrammer only make changes to aftermarket ESU Loksound decoders? Or, can it also be used  to make changes … change the prime mover package, etc … to the decoders that come factory installed in Atlas locomotives? Such as whenever Atlas ships new SW and MP15 switchers

Thanks

EBT Jim posted:
Scott Kay posted:

Yes, you can change the sound file at any time; however, you need to invest in a LokProgrammer (~$150) to do so ...

Does the LokProgrammer only make changes to aftermarket ESU Loksound decoders? Or, can it also be used  to make changes … change the prime mover package, etc … to the decoders that come factory installed in Atlas locomotives? Such as whenever Atlas ships new SW and MP15 switchers

Thanks

Someone can give a better answer than I can for sure, but I was watching a video this morning after I read Scotts reply...and to my knowledge if it is an ESU 4, 5, or select decoder whether you buy it aftermarket or it came in the loco, you can change prime mover, sounds, and set up functions for the engine/decoder.  So short answer Yes (unless someone smarter than I knows differently)

Last edited by roll_the_dice

Here's my unerstanding so far:

Loksound V4, Select and LS5 allow users to upload ESU sound files as well as firmware updates. Some loco manufacturers use proprietary sound files but not all are available on the ESU site. 

Generally you can write a soundfile downloaded from the ESU site onto a Loksound V4, Select and LS5. But if you over-write a proprietary sound file you can't get it back if it's not on the ESU site and the loco manufacturer won't share it with you. That's because ESU doesn't allow the sound portion of files to be saved from a decoder onto your computer, just the CV settings portion. That's to protect their sound recording IP.

Some manufacturers used an "Essentials" version of the Select which lacked some features but I think this was mainly in HO.

All LS versions have all CVs adjustable by the user. As well Loksound V4 and LS5 decoders offer the capability to edit and write your own sound files. Select does not.

Loksound V4 and Select are now the previous generation.

Today ESU offers just the LS5 range in two variants:  LS5 DCC for North America and Australia, and LS5 for Europe and other markets. The LS5 DCC version supports only DCC protocol and has a few changes to better align it with US manufacturers such as Soundtraxx and TCS, mainly in momentum, braking and speed matching. 

There is no LS5DCC version of the "XL" but there is for the "L" and smaller sizes.

The LS5 supports other protocols such as Motorola, M4 and Selectrix not commonly found in North America and Australia.

All LS5s have the sound file editor capability.

I hope I'm on the right track here, anyone please LMK if not! So far the above has been borne out by my own experiences with LS at least.

Last edited by Pete M

OK, as I wait for my DCC system and engine to be delivered...I am contemplating a shelf switching layout in the 12'x2' variety...maybe 14'x2' (30" max width).  I have been looking at turnouts and read many posts about them.  Mainly I have looked at Signature Switch and Oscale Turnouts...any preference of one over the other?  Pros and cons?  

I have also read things about turnouts being dcc ready?  What does that entail?  And do I care?  Thanks!

Andy, what follows is purely my opinion based on my own experience.  

I think you can have a lot of fun with a switching layout in O scale.  I sure do! 

Regarding switches: I would say Signature Switch Co. are robust, accurate, consistent and reliable. As well they are "DCC friendly" out of the box which I will expand on below. I have several in Code 148 rail including regular #6 LH and RH and as well as 3-way curved which I use to increase siding capacity in staging.  They can be had in a range of standard sizes and custom one-offs as well.

However they lack the finer detailing parts and visual accuracy of O Scale Turnouts. 

I don't own any O Scale Turnouts switches but I understand they are made using fine scale components including highly detailed frogs, switch rails, guard rails, tie bars etc. which result in an almost "P:48-like" scale accuracy (except for the gauge of course).    Visually superb with options for how much detail you prefer and work you want to do.  I do have some turnouts built from these components (just not as accurately because I lack the skills)  and they look amazing. These can be made DCC friendly with a little work.

The only slight concern I have is that some of the coarser 2-rail wheel profiles with deeper flanges may not run quite as smoothly through them because they are so accurate.  This is not the fault of the turnouts. They are perfect with closer-to-scale-profile wheels such as NWSL .145. 

As for DCC friendly, this generally means turnouts where all rails and the frog are powered in such a way that there's no possibility of power loss or short circuit as equiment rolls through. 

The links Scott posted are a great help.

In pracitice it means that the frog is isolated and powered correctly for the selected route from a Tortoise switch, a Frog Juicer or similar.  As well closure rails are powered the same as their adjacent stock rails, and switch rails (if hinged) have their own flexible feeders. This way they don't rely on pressure against the stock rail or a power path through their hinge.

The Signature Switch Co turnouts have one-piece switch rails and closure rails so there's no need to feed them separately. They're DCC friendly because power is carried to all the right areas by the PCB ties that are gapped appropriately which also isolates the frog.  You just need to power the frog separately.

I am not certain about how O Scale Turnouts are wired except to say that the frog would be isolated ready to be powered. I just found out the switch rails on these are one-piece also which is good. Not sure if the closure rails may need to be wired to their stock rails,  I think not after a bit more reading.

Summary (opinion again): If you want the best accuracy and realism go for O Scale Turnouts but you may need to add some feeders, plus limit your choice of wheelsets a bit.

If you want bullet-proof running for most wheelsets and maybe a bit less wiring, but less accurate details, then go with Signature Switch Co.

Last edited by Pete M

When I converted from 3-rail to 2-rail while still using 3-rail wheels, I asked Signature Switch to make #6 switches for 3-rail size wheels.  The switches work fine and mate nicely with code 148 Atlas and Micro Engineering track.  I think Brad modified the depth and width dimensions of the frogs so the 3-rail wheels would work and so far I have had zero problems.

I bought a load of 2-rail wheel sets a while back and attempted to convert some of my rolling stock to 2-rail only to find they will not work going thru the frogs of the  custom #6 switches.

 I converted 6 cars and will be converting them back to 3-rail for now. I’d rather have trouble free operation than wheels with smaller flanges that keep derailing. When the trains are moving it’s hard to tell anyway. I don’t think simply shimming the frogs will fix it so I can use 2-rail wheelsets.

Pete M posted:

Andy, what follows is purely my opinion based on my own experience.  

I think you can have a lot of fun with a switching layout in O scale.  I sure do! 


Pete,

Would it be possible to post your track plan here on OGR if you have one?  If not, maybe a couple of photos?  Is your empire basement sized or bedroom sized?  Thanks.

@Scott Kay  Thanks for the links...I am a research nerd and will enjoy reading those and learning more.

@Pete M  Opinion or not...I appreciate your insight on the matter.  That was a good read.  Right now, I am looking more for bullet proof than anything else.  I don't know enough about wheelsets and what not to make those discerning choices yet.  I figure once the track/switches are ballsted 99% of anyone will not notice the details.  Do these use the Atlas rail joiners as well if I use Atlas or ME track?  @Amfleet25124 beat me to it...I was going to ask if you had plans of your layout or an overhead shot?  Also...dimensions.  

I think I can get a 14'x2' shelf layout fairly easily in the space I have.

Andy, the rail joiners are usually specified by the rail code.

"New" Atlas flex track and switches are Code 148. That's roughly equivalent to modern main line rail. There's also Code 125 flex track made by ME, and years ago Old Pullman which you can still find used sometimes. That equates roughly to older mainline and modern branch line and siding tracks.  As well there's code 100 rail that you'd use to hand-lay your track for steam era and light rail trackage into the Diesel era.

O Scale Turnouts and Signature Switch Co can make turnouts with Code 148, 125 and 100. I suspect they make mostly Code 148 for the modern era modellers and Code 125 for Steam an early Diesel era.

So you'll want to get rail joiners for Code 148 or 125 accordingly.  Atlas offers some slightly clunky "fake joint bar" joiners for their Code 148.  ME I think offers their more discrete ones in Code 148 and 125.   You can find them at the well-known 2-rail vendors.  As well you can get very nice cast scale joiners in both sizes from Right-O'-Way.      

My layout plan is below.  Click on the attachement for a clearer view.

I am very fortunate to have a basement about 39ft x 25ft less the garage.  It's bascially a freelance shortline having a small central yard with one switching area to the east and two to the west.  There's staging at each end to connect to the "rest of the world".

But if you look at each switching area separately, I think they could each be shelf layouts in their own right.  Might need to add a switching lead for headroom, maybe on a narrow drop-down or lift-out section.

Because it's modern era, I have one or two larger industries with multiple spots in each area rather than several smaller industries.  But each spur may have up to 6 spots, each of which may require a specific product/car type in a specific spot. Plus not all cars are ready to be pulled every session so sometimes cars have to be moved and re-spotted.

As well there may be off-spot cars stored in a siding that need to be switched first before the industries. So each area can take more than an hour to switch with a 2-person crew.     

Here's a few clips of the switching jobs:

https://www.youtube.com/playli...pWGXAKZmSQ1c-zvvdOnz

I hope this is helpful. Happy to share more if of interest of course.

Attachments

Images (1)
  • GHR Feb 2020
Last edited by Pete M

Thank you Pete M.

With the exception of my holiday themed rolling stock, I've been gravitating towards scale-sized equipment (not 2-Rail though) the last year. or so  As I don't have a current layout, I'm only able to run trains at my multi-gauge club, where the O is 3-rail and there is a lot of support and assistance if needed (very important IMO).  I've been hesitant to try 2-Rail because then I would have nowhere to run the trains.  I'm into post 1970's equipment and long 70+ foot freight and passenger cars, so it restricts the radius and type of layouts that I can think about conceptually.  

BTW, I just subscribed to your channel 

Last edited by Amfleet25124

Kevin, thanks for subscribing!

You might find that radius isn't too much of an issue.  The curve around the end of the peninsular on my plan is 36" radius. I run only 4-axle Diesels but I also have 73ft Centerbeams and an 80ft business car with 2-axle trucks. Everything gets around that curve with no issues. I did have to make "fine adjustments" to a couple of my brass locos.

To be fair it would be hard to couple or uncouple on that curve. But it's is mainly hidden by scenery and a view block so it's not an issue.  The rest of the visible layout is 48" radius and above. Manual coupling and uncoupling works great with Kadee 8xx and 7xx series couplers.

Thank you Andre!  I'm a big fan of your layout build which I follow on MRH. 

I do find O scale is good at the "in your face" feel of railfanning switching operations. The down side is that it's really hard to model distance or a sense of running a train in open country between towns. Well, unless one's wallet is a lot larger than mine!   

Last edited by Pete M

Andy:

Do you have a trackplan yet? 14' x 2' (30" max) ought to make a pretty neat urban/industrial layout in O 2r.

PeteM:

Thank you on the kind words about my layout build. No layout construction is taking place right now as I'm enjoying operating with my friends. (So no updates to my build thread at MRH.) However, I will start "Phase 2" once the weather is too hot to do fun stuff outside. "Phase 2" will be to install/seal/smooth/paint blue the backdrop boards, installing overhead LED strip lighting on the upper/lower levels including valance for same, and adding front fascia to all benchwork. I figure this will take most of the summer, so train running will be nixed until Phase 2 is accomplished.

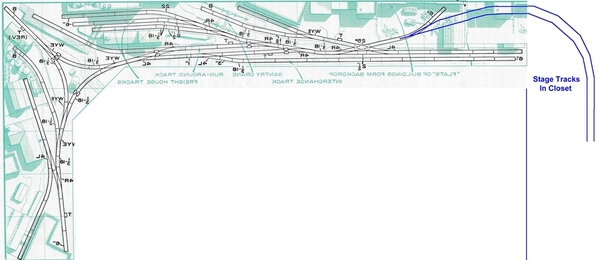
Also looking forward to the day that I can start my little L-shaped shelf urban/industrial Kansas City "West Bottoms District". I love little end cab switchers in the big city and I love road/road switcher powered trains battling the Ozark Mountains. The two weren't compatible, so having two manageable layouts was my answer! I already have a "Definite Maybe" starting point for a trackplan:

CustomLine_L_Revised

Of course, the above won't be built exactly as illustrated, but I do like the basic components including the wye in the corner. Okay, enough of me interupting Andy's thread. I encourage you to stop by over at one of my MRH threads and share input.

Andre

Attachments

Images (1)
  • CustomLine_L_Revised
laming posted:

Andy:

Do you have a trackplan yet? 14' x 2' (30" max) ought to make a pretty neat urban/industrial layout in O 2r.

...

Andre

Andre...I don't have a plan yet.  I just came up with the idea of the switching layout.  I did measure this morning and I think the size will have to be 12'x2', but I think I can definitely get my feet wet with 2 rail this way.  We are only going to be in this house for about another 1 1/2-2 years.  We are moving once my daughter starts college.  So I am not sure what I will get done with landscaping the layout, but I would like to have it operational anyway.

Any help designing/ideas would be appreciated!

Oh, I think I have decided to use the Signature Switch turnouts...now I just need to start the layout design.

Last edited by roll_the_dice

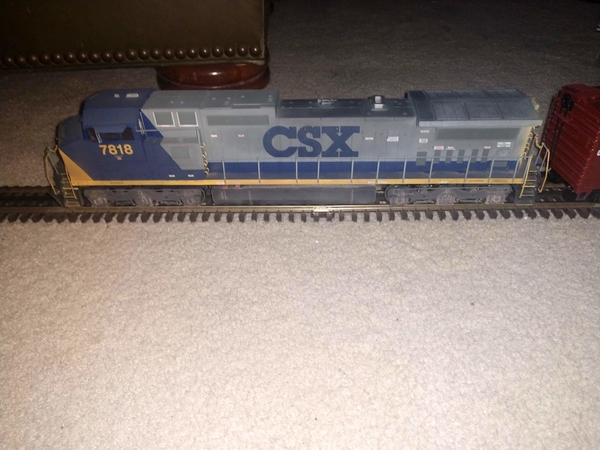
I received my Atlas Dash 8 engine today.  It is a beast...pictures don't do the size justice.  I think it is 18" long.  I don't have 2 rail track yet, but I couldn't resist testing it.  I ran it on 3 rail track with an old DC transformer I had lying around.  It ran well.  I also like it since it was already weathered lightly.

I only have one 2 rail freight car so far and it is very light.  I am about to add some weight to it to get it to NMRA standards.  I am waiting on some Atlas trucks and some kadee couplers to convert a few of my 3 rail freight cars over also.

I also got my NCE DCC system delivered a few minutes ago...so I am about to open that up and start reading.

IMG_20200304_140417404

Attachments

Images (1)
  • IMG_20200304_140417404

It was advertised as DC only...but it does have a speaker.  I am going to open it up this afternoon to double check.  Would be great if someone installed a decoder already.   I do have the NCE decoder that came with my NCE system, but I may sell it and go ahead and buy the Loksound decoder.  This engine is so big, I don't know how well it will do on a switching layout.  May have to park it on the layout and save it for a future layout...it could sit in an engine house and occasionally stretch its legs.

I have heard different answers with this...can the NCE system run a DC only engine?  I have heard both yes and no...but only 1 engine at a time.  If no, then I may install the NCE decoder just to be able to run DCC.  I am looking at a few other engines so I want to be able to test the system soon.

Last edited by roll_the_dice
roll_the_dice posted:
laming posted:

Andy:

Do you have a trackplan yet? 14' x 2' (30" max) ought to make a pretty neat urban/industrial layout in O 2r.

...

Andre

Andre...I don't have a plan yet.  I just came up with the idea of the switching layout.  I did measure this morning and I think the size will have to be 12'x2', but I think I can definitely get my feet wet with 2 rail this way.  We are only going to be in this house for about another 1 1/2-2 years.  We are moving once my daughter starts college.  So I am not sure what I will get done with landscaping the layout, but I would like to have it operational anyway.

Any help designing/ideas would be appreciated!

Oh, I think I have decided to use the Signature Switch turnouts...now I just need to start the layout design.

Hi Andy,

As a O scale rookie (didn't have any O scale until last year, and never had or built any layout in any scale) I certainly can't give advice in building a layout. However, since I'm also looking at building a point-to-point switching layout due to space limitations, I've found a couple of resources helpful.

The first is a website called shelflayouts.com; it features the work and philosophy of a guy named Lance Mindheim. While Lance works primarily in HO and N, his ideas translate well into any scale. His website has lots of great information on building realistic (mainly) industrial switching shelf layouts. It includes FAQ's, a blogpost with his ideas and tips, as well as information on common mistakes and things to avoid, as well as things to consider when building a layout. Most of his modeling is modern i.e., post-transition era modeling in 70's to current day. Another bonus is track plans to get you thinking and show what can be done in different spaces.

The other resource I've found helpful is Tony Koester's current 4-part series in Model Railroader about building an O scale sectional switching layout. While the theme is specific (Nickel Plate Road in 1950's Wingate, Indiana), again there are basic design features and ideas which can translate into anything you want to do. The series began with the January 2020 issue and ends in April.

While neither resource is a step-by-step guide on "how I did it", both are good resources for ideas on helping you (and me, for that matter, when I get around to it!) think about how to go about building a layout. Keep in mind that both stress historical research or field reconnaissance in what you want to model, even if you're only borrowing ideas from a particular place, railroad, era, or setting.

Good luck with your layout plans and look forward to seeing how you progress!

Kyle Evans


roll_the_dice posted:

It was advertised as DC only...but it does have a speaker.  I am going to open it up this afternoon to double check.  Would be great if someone installed a decoder already.   I do have the NCE decoder that came with my NCE system, but I may sell it and go ahead and buy the Loksound decoder.  This engine is so big, I don't know how well it will do on a switching layout.  May have to park it on the layout and save it for a future layout...it could sit in an engine house and occasionally stretch its legs.

I have heard different answers with this...can the NCE system run a DC only engine?  I have heard both yes and no...but only 1 engine at a time.  If no, then I may install the NCE decoder just to be able to run DCC.  I am looking at a few other engines so I want to be able to test the system soon.

That locomotive is equipped to take an ESU LokSound Select L decoder. It’s as easy as removing the shell and dummy plug on the motherboard and plugging in a LokSound Select L.

You can either program the decoder with a LokProgrammer before installing or program it on a test track after it has been plugged in.

roll_the_dice posted:

I have heard different answers with this...can the NCE system run a DC only engine?  I have heard both yes and no...but only 1 engine at a time.  If no, then I may install the NCE decoder just to be able to run DCC.  I am looking at a few other engines so I want to be able to test the system soon.

I think the opposite is true. If you put a DC engine on the DCC live tracks, I'm thinking the engine is going to take off like a bat out of ****. I'm not going to test it.

But you can run a DCC decodered engine with conventional DC. I do it often by mistake. I have toggles to run the railroad between DCC or DC. It isn't only one engine at a time that will move on DC. Any engines that are on the live DC tracks will move just like conventional DC, all forward or back as you apply power. I have all of my yard tracks isolated on toggles to prevent engines I don't want powered from running in this state. Basic DC setup.

Add Reply

Post

OGR Publishing, Inc., 1310 Eastside Centre Ct, Suite 6, Mountain Home, AR 72653
800-980-OGRR (6477)
www.ogaugerr.com

×
×
×
×
Link copied to your clipboard.
×
×