Thank you Al, Lance, Lew!

Lance, welcome back to the hobby.  If it wasn't for my eyesight, I probably would have stayed with HO instead of switching to O back in 2012.  Have fun!

Lew, Yes, the yellow portion roughly represents a lift-out, swing up, or swing down section for access to the middle.  I have made no decisions on that at all.  That area will probably be my Golden Spike area.  

Al, so you are suggesting having two single track swing sections I take it.  It would certainly be lighter and easier to maneuver than a whole sceniced section a foot or more wide.  I think that would be easier to construct as well.  One going up and one going down would work.  Thank you.  I am thinking of something simple like Lew's which is not much more than track on a board.  

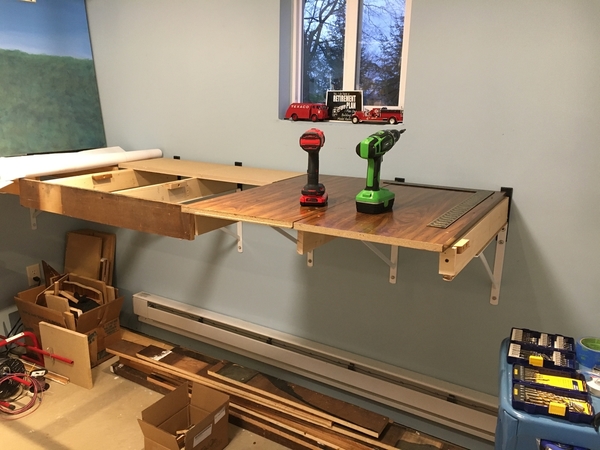
Yesterday, I put in more cleats to fasten risers, tabletop to.  I was hoping to keep it an open grid with risers if I am making it in modules that I could move off the metal brackets when and if we move.  I'm in a bit of a quandary of how to build it with my limited carpentry skills, so I may just put down a flat tabletop and put in risers from that for the elevations.

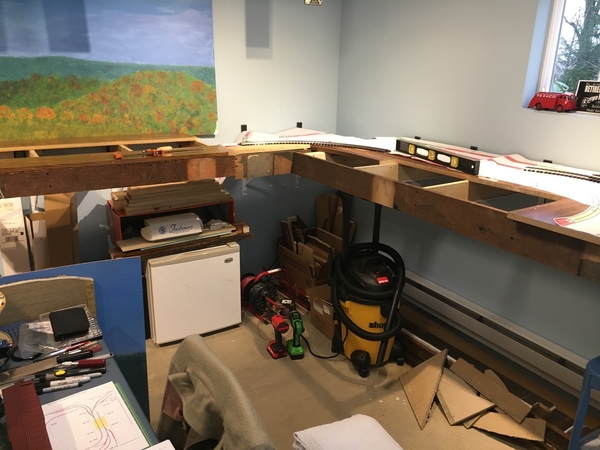
I decided to go ahead and mount boards to the cleats.  These will support the track with risers on top of them.  I'm building them in 32" wide sections that can be unscrewed from the cleats below and lifted off if ever needed.  On the other wals it seems I can go with 38" sections where the track work isn't as complicated.  I'll have the terminals for the wires to disconnect for each module.  Track joints are close to the edge of these.  I'll just cut through the track pins if I ever need to move it.

Here is today's work.  The tan board will support the 6" high end of the passing siding.  The shiny boards will support where the two tracks cross over each other and the end of the sidings to the town on the hill.  

2020-03-21 19.35.14 

Attachments

Images (1)
  • 2020-03-21 19.35.14
Last edited by Mark Boyce

Mallard, Thank you for the advice!!  I have been questioning in my mind how these boards will hold up.  The tan board is leftover from building my Ceiling Central also supported on 16" centers, and I haven't had issues, but....   I did lean on the brown boards yesterday, but that is not the same weight for an extended period of time.  I wish I had the funds to go out and buy the best, but I don't, so I'm trying to make do with what I have.  It's a precarious juggle I must admit.  

Al, George, Dan, Phil, Thank you!!

Mark Boyce posted:

Mallard, Thank you for the advice!!  I have been questioning in my mind how these boards will hold up.  The tan board is leftover from building my Ceiling Central also supported on 16" centers, and I haven't had issues, but....   I did lean on the brown boards yesterday, but that is not the same weight for an extended period of time.  I wish I had the funds to go out and buy the best, but I don't, so I'm trying to make do with what I have.  It's a precarious juggle I must admit.  

Al, George, Dan, Phil, Thank you!!

The sag can take months or years.

One option is to take some 1x2 and use them on edge like girders to reinforce the boards.  Attach them on the underside with glue and screws (countersink the holes and screw from the top).  If the underside does not have the faux wood on it, use carpenter's or Elmer's white glue; otherwise, use gorilla glue.  

And don't ask me how I learned this stuff.

Last edited by Mallard4468

Lew, You are correct!  I mentioned that way back on page something-teen, so I don't blame you for not seeing it.    Most of it came from a deep, 6-foot tall bookcase.  The rest was from a rear projection television my late father-in-law had that the projector blew out.  What a monster that thing was when I tore it apart.  

Mallard, I won't ask how you know, but I do have a lot of material I salvaged from my dad's shop last fall before we sold the place, and I can buy some more 1x2.  I will attach bracing.  I have always used carpenter's glue, but I am starting to like Gorilla glue.  Thank you!!!  

Lance, I have not seen any cons other than the holes in the wall which could be easily patched.  It is nice and solid.  These brackets came from Lowes, are 20:long, and they claim they will hold 1000 pounds.  Oh, one con is that they are a few degrees over 90, so the table wouldn't be quite level.  Once I discovered it, I backed out the top lag bolts a quarter inch, slipped in the black composite shims that I had cut a slot in for the lag bolt, and tightened back up.  After that, I just drilled a big hole in the shims to accept the bolt.  I like the method a lot.

Mark,  I'm a firm believer in L-girders.    An L-girder across the front would give improved support in addition to giving you the advantage of attaching the platform boards from below.   A 1x4 fascia board and a 1x3 or 1x2 top would make a nice girder.    The span on my layout is 4' between wall supports using a 1x4 & 1/2 L-girder front and a 2x4 & 1x3 L-girder plate against the wall.   The platform is 3/4 OSB that I reclaimed from construction dumpsters in our area and topped with 1/2" Homasote.  It has proven to be very stable - 6 years to date.   Nice to see your progress!

Cheers, Dave

DSC04893DSC04909DSC06138DSC06203

Attachments

Images (4)
  • DSC04893
  • DSC04909
  • DSC06138
  • DSC06203
Last edited by darlander

Nice to see your progress. I also have built my benchwork from leftover bits and pieces. I found some 1x4 wood I had saved about 40 years ago. It has worked out just fine. I think the suggestion of some underside, glued/screwed 1x2 or larger wood is a good idea. No chance taking a chance on sagging in a few years.

I like that you are taking your time on the benchwork. My spare-room benchwork has been under construction for 3 years. Remember, you really can not fix shoddy benchwork easily in the future. so, it is good to catch any problems now. Keep up the good work and keep posting for us procrastinators.

Jeff

Mallard, Thank you for picking up the discussion again.  I love the term "The Sagulator"   I tried it out just now on a rough guess on what I am using, and it gave me an "Acceptable"  reply.  Nevertheless, I have been spending a couple hours each day since my last reply disassembling the tabletop I put on the first wall two years ago and making sure all my brackets are level; front to back and side to side.  To do that, I moved a bunch of stuff I don't need right now off the first tabletop and distributed it elsewhere.  I am at the point where I will make a decision on what bracing to use on the front and underneath.  The rub is I want to make the top in modules no longer than 48", when or if we move.  That is all dependent on my mother-in-law's health.  She lives across the road from us, is only 84, but in good health.  We only plan to live here until she either passes on or has to go to a home.  The rate she is going, we will be old ourselves by that time!  

Dave, Thank you for all the photographs!  Your benchwork looks great!  I like the narrow shelf below.  Yes, I see the L-girder.  I have used L girder before on a free-standing layout.  I see you made good use of the 2x4s as well.  I have a bunch of 2x4s I brought home from my Dad's that I can use where practical.

Jeff, I have a bunch of used wood some old and some not so old.  Good advice as Mallard is saying you can't fix bad benchwork after you get so far.

Jim, The grade is to accommodate the passing siding switches being flat.  Actually, the grade is quite similar to my favorite prototype, the Western Maryland's Blackwater Canyon grade that I want to model the feeling of some of the scenic features of the town of Thomas at the top of the grade, Parsons at the top of the grade, and some scenic features in between.  Early on in this topic, I tested all my engines pulling reasonably length trains up a simulated grade, and they worked okay.  Once I get to that point, I'll be testing again before anything final is put down.

Bob, thank you too, and thank you everyone for the suggestions and encouragement!!

I envisioned the PER would be an around-the-room shelf layout and originally thought to use shelf brackets--as a matter of fact almost identical to yours, Mark. I even ordered a few from the A-place.

But upon consideration I worried about the stability of the knee-wall studding. A lot of the finishing work in this old place was done by someone I think of as "the do-it-yourself-er" and not meant in any charitable way. As an example of his "craftsmanship", the guy installed one of those [then newfangled] fiberglass bathtubs and instead of nailing a 2X4 to the wall to rest the back edge of the tub on he simply hung the tub from nails driven through the [thin] fiberglass lip of the tub. When we bought the house the nails had broken the fiberglass lip and the tub floor was an inch off-level, sloping downwards toward the wall. 

So, not trusting those knee-wall studs to support a cantilevered large shelf bracket system I decided to use L-girders supported by posts and blocks screwed into studs. This is how it turned out:

         IMG_0584

I prefer shelf-brackets when possible though. For example, we were short on cash (selling one house AFTER buying another) so used the cheapest stuff for the laminated floor....and it probably won't last. I'm gonna' need a sky-hook to support the layout while the posts are removed to redo the floor. 

Attachments

Images (1)
  • IMG_0584

Lew, I know the kind of do-it-yourselfer you encountered.  Our house in Virginia was like yours.  It was a small Cape Cod, four rooms and a bath downstairs and originally unfinished attic, that the previous owner divided into bedrooms.  That wasn't too bad, but he did a lot of rewiring and re plumbing, and all of it was messed up.  I fixed what I could, and hired professionals to do what I didn't know how to do.

News Flash!  In the time between my last post and now, Pennsylvania Governor Tom Wolf announced more counties to the Stay Home List, and Butler County was added to the list.  So, now I can't go buy lumber or hardware for the foreseeable future.  I knew it was coming since our county borders Allegheny County which initially was the only Western Pennsylvania county on the list.  Oh well, it is for the best.  Kim just told me one of our church members who is a few years older than me is in the ER.  He experienced a cough, fever, and shortness of breath, prompting his doctor to sent him to the ER.

I need to use up some of this old lumber anyway, so I'm going to do some figuring.  I can rip some of these wide boards into more manageable dimensions.

Lance, that is what is so great about following topics on this Forum.  I get a lot of ideas and information by discussions others are having.

As others have stated, the bench work is the foundation of your layout and functions the same as the foundation of your home.   Easy to fix before but difficult and expensive to fix in a retroactive manner.    My goal was to maintain floor clearance and minimize legs.   Therefore, allow me to share a few more pictures.   PS:  I tend to over build!

Cheers, Dave

DSC04876DSC04901DSC04898

Attachments

Images (3)
  • DSC04876
  • DSC04901
  • DSC04898

Mark, sorry to hear your on lock down, as we are also. but that's ok like you I have plenty to keep me busy here! The funny thing is I can still order lumber or whatever I need from Lowes and they will deliver it to my home.

I am glad to see things are moving along with your layout build. I also used the L girder method and it works great! Gives me plenty of room under the layout and supports my 180Lbs when I crawl on top of it!

Either way I hope your having fun with your build!

darlander posted:

As others have stated, the bench work is the foundation of your layout and functions the same as the foundation of your home.   Easy to fix before but difficult and expensive to fix in a retroactive manner.    My goal was to maintain floor clearance and minimize legs.   Therefore, allow me to share a few more pictures.   PS:  I tend to over build!

Well done.

"I built it too strong" is near the top of the list of things that nobody ever says.

I made some more progress.  I installed the front facia boards from old wood as can be seen.  Now the whole framework is rock solid.  I can't shake it or move any of it even a smidgen.  I extended the boards on the next side that will support the risers and roadbed.  Supported every 16 inches and on one side they should work.  I did not make the special cut for the back curve in the corner because it started raining, and I had to bring the saw and horses inside.

2020-03-30 17.35.25

2020-03-30 17.35.43

I did this rough mockup to show how my concept is planned to work.  It is easiest to show here because there will be just one track going up left to right, and one going down left to right.

2020-03-30 17.32.10

This photograph will represent one 3x4 foot module.  The three longer 2x4s represent stringers to hold the module together if or when I remove the few screws from the bottom that hold it to the basic framework.  I will have risers up to the rear plywood roadbed only wide enough to support the track and attach the scenery base.  The front track will have trestle bents at every 12" track joint so that where the front track is higher than the rear track, you can still see through to the track and scenery.  I did not make any effort here to show the correct grades.

To answer why I didn't just make a complete tabletop, I want to do as much wiring as possible standing up.  I will run the wires above the brackets that are on 16" centers and tie them in to the sides of the flat baseboards, so that after disconnecting the wiring between each module, the module will lift off the wall brackets with all wiring coming with the module.  It's hard to mock up, so we will wait until I get to that point.  I'm pleased with the progress.

Attachments

Images (3)
  • 2020-03-30 17.35.25
  • 2020-03-30 17.35.43
  • 2020-03-30 17.32.10

Add Reply

Post
The Track Planning and Layout Design Forum is sponsored by

AN OGR FORUM CHARTER SPONSOR

OGR Publishing, Inc., 1310 Eastside Centre Ct, Suite 6, Mountain Home, AR 72653
800-980-OGRR (6477)
www.ogaugerr.com

×
×
×
×
Link copied to your clipboard.
×
×