Been a few crazy days.  Two 16 hours shifts in a row.  I am beat, but I did accomplish something on the layout.  

1) I purchased some passenger cars from ebay last week.  4 cars from the same set, but 2 different sellers.  1 seller was selling just the baggage car, so I purchased it.  The other seller was selling 3 coaches, so I purchased them.  I decided I didn't need an observation car since I was modeling a small town and those trains typically wouldn't have them.  

Well what do you know.  When they all arrived on Monday I received 4 observation cars!  All 4 I purchased were miss-shiped and they sellers sent me all observation cars.  I can't believe it!  

Both sellers are working with me for to send me the correct cars.

2) A really beautiful seed and feed building arrived today that I got for a steal on ebay.  It was scratch built, a ton of detail and weathered, and I was the only bidder so I got it real cheap.  Took it downstairs, placed it on the layout where my future siding is going and was going to call it a night.  

Put the kids to bed.  Poured me a nice Scotch on the rocks

20170314_204440

and was gonna sit down and watch a show.  But the missing siding kept bugging me.  So I headed down to the layout room at 10pm and was just going to place some track where the siding will be.  Figured I would cut the turnout in tomorrow or later in the week, but then I saw the Dremmel, and remembered where I put the Gargraves bumper I need.  Next thing you know I was cutting out part of the main, and putting the turnout in place.  Need to get a switch machine for it soon because it is on the other side of the layout. 

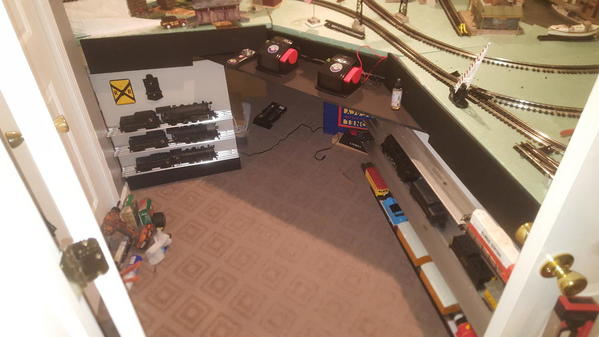
An hour later it was done.  Here is the finish siding along with the new building and the grain silo.   

20170314_225424

Then I noticed my watered down scotch I had only one sip of.  What do I do?  Ran trains while I sipped on it.


Off to bed.  Way past my bedtime and I have to be at work at 7am.   


Attachments

Images (2)
  • 20170314_204440
  • 20170314_225424
Videos (1)
Runing Trains
Jdevleerjr posted:

Been a few crazy days.  Two 16 hours shifts in a row.  I am beat, but I did accomplish something on the layout.  

1) I purchased some passenger cars from ebay last week.  4 cars from the same set, but 2 different sellers.  1 seller was selling just the baggage car, so I purchased it.  The other seller was selling 3 coaches, so I purchased them.  I decided I didn't need an observation car since I was modeling a small town and those trains typically wouldn't have them.  

Well what do you know.  When they all arrived on Monday I received 4 observation cars!  All 4 I purchased were miss-shiped and they sellers sent me all observation cars.  I can't believe it!  

Both sellers are working with me for to send me the correct cars.

2) A really beautiful seed and feed building arrived today that I got for a steal on ebay.  It was scratch built, a ton of detail and weathered, and I was the only bidder so I got it real cheap.  Took it downstairs, placed it on the layout where my future siding is going and was going to call it a night.  

Put the kids to bed.  Poured me a nice Scotch on the rocks

20170314_204440

and was gonna sit down and watch a show.  But the missing siding kept bugging me.  So I headed down to the layout room at 10pm and was just going to place some track where the siding will be.  Figured I would cut the turnout in tomorrow or later in the week, but then I saw the Dremmel, and remembered where I put the Gargraves bumper I need.  Next thing you know I was cutting out part of the main, and putting the turnout in place.  Need to get a switch machine for it soon because it is on the other side of the layout. 

An hour later it was done.  Here is the finish siding along with the new building and the grain silo.   

20170314_225424

Then I noticed my watered down scotch I had only one sip of.  What do I do?  Ran trains while I sipped on it.


Off to bed.  Way past my bedtime and I have to be at work at 7am.   


AHH- Train insomnia.....love it.

Nothing better than sipping scotch and watching trains.

Mark Boyce posted:
Thaddeus posted:

Had a great time at the Toledo Train show wit my son.  Found some great deals on a new MTH hopper, and old C&O coal hopper, and a MTH NS 5 car passenger set.  T also found a Cat die cast excavator that was not a good deal, but he is happy to add another model to his collection.  

The cars look great!  I have some Norfolk and Western cars that look similar.  Mine are 15", are yours 18"?

Thanks Mark, the bodies are 17 1/2", total length of the set is 95"

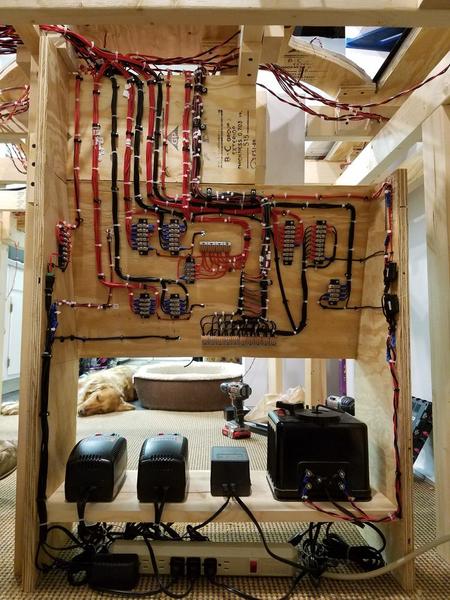
I put this in my own build thread yesterday, but seeing that I added a million pictures of my wiring in this thread, I figured I'd add another.  I finished running all of my wiring.  Last night I soldered (yes I'm soldering to Realtrax) 14 of my 16 power drops and hopefully tonight I'll finish the other two along with starting figuring out the mess of wires inside of my control panel.

20170314_002512

Note: My helper is present in the background.

Attachments

Images (1)
  • 20170314_002512

Been taking care of some squawks from last Saturday's display:

-The MTH K4 started blowing burned-smelling smoke, so I figured repacking was in order.  A bit of Lionel wicking later, the smoke unit is smogging up a storm!

-The longer 5" contacts on the FastTrack brakeman actuators improved reliability markedly, but we're still getting brakemen not always popping up when they should be.  I'm going to go with 10" full-length contacts. 

Took delivery of some new equipment over the past week or so; photos to follow.

Mitch

Still working below the layout. The past couple of days have been working on rerouting the drain hose for the furnace so I don't keep tripping over the hose. Hope to wrap that up today but then will be taking a few days to head to Michigan to spend time with the grandkids but making sure I am home in time to go to the Kirkland Ohio show this coming weekend. Two day show but I'll be there on Sunday. Hopefully finding things of my bucket list.....Paul

645 posted:
cmscanuck posted:

Finally finished putting up shelves and got the trains on them!!!

IMG_0929

You must have felt Old & Weary after putting up those shelves / placing equipment on same.   Nice work there!

Haha, love it... It was a process! Everything is screwed in 16" on center, went through just shy of 200 screws. Having to measure out the holes, drill the shelving, pre-drill the wood, and then mount it all was certainly time-consuming. Around the 2/3 mark, I started wondering why I got myself into this! I have a couple more small panels to install on a third wall and then do all the trim work.

Last edited by cmscanuck

My custom-made drawbridge arrived, and I did a test-fit yesterday. It's going to span the opening of my around-the-room layout. Before the bridge, I made a temporary span out of wood, which enabled me to work on building the layout / running trains while the bridge was under construction. Even without tracks going through it, it really changes the look of our layout. 

The builder is Jim Ballmann, owner of Stainless unlimited; great guy to work with and a very sturdy bridge. 


bridge3bridge4

Attachments

Images (2)
  • bridge3
  • bridge4
Last edited by BlueComet400
BlueComet400 posted:

My custom-made drawbridge arrived, and I did a test-fit yesterday. It's going to span the opening of my around-the-room layout. Before the bridge, I made a temporary span out of wood, which enabled me to work on building the layout / running trains while the bridge was under construction. Even without tracks going through it, it really changes the look of our layout. 

The builder is Jim Ballmann, owner of Stainless unlimited; great guy to work with and a very sturdy bridge. 


bridge3bridge4

Very interesting!! Please keep us posted on your progress!!

BlueComet400 posted:

Mycustom-made drawbridge arrived...Even without tracks going through it, it really changes the look of our layout. 

The builder is Jim Ballmann, owner of Stainless unlimited; great guy to work with and a very sturdy bridge. 


bridge3

Hi BlueComet400, I join you in your enthusiasm forJim Ballmann's Stainless Unlimited bridges. I have several from him.

Four of them I had him bake-on a black paint finish. The others, I could not resist leaving their stainless glow present on the layout as a significant feature. Besides, my wife took a real liking to the biggest one, as is, so it has definitely stayed unpainted and shiny.

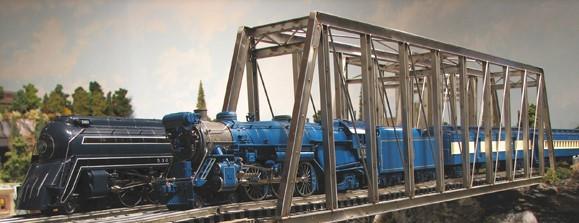
And regarding the spans being sturdy, the one shown here bearing the Blue Comet traveling it, I tripped, on one occasion, when I was dismounting the layout, and began to fall. I reached out, instinctively, for the nearest support, which was this bridge (also, second photo, bridge on the right; fourth & fifth photos). It took my weight without any damage to either of us!

(And I'm no light-weight.) Now, that's sturdy!IMG_10942b3bbluTrainsxFIMG_0493

FrankM, Moon  Township, USA

Attachments

Images (5)
  • IMG_1094
  • 2b
  • 3b
  • bluTrainsx
  • IMG_0493
Last edited by Moonson

Here's a beloved member of my roster, Lionel's E6 from 1999.  A recent ERR upgrade cured it's rather balky performance and improved it's pulling ability.  S

It's dated level of detail was in need of an upgrade too.  Slapping on some DGLE and Dullcoat took care of all that shiny plated metal and black plastic parts.  Rather than black, I chose to use the same green, albeit darker than the Lionel finish, on the wheels and chassis.   I might return later to weather all my equipment, but for now this level of detail will suffice.


The tender deck received a primer coat, the same lower deglossing, and even restricting chains on the trucks.  One last mod was to shorten the drawbar and give the scale Atlantic a realistic tender to loco gap.  Sometimes, these simple little projects help maintain enthusiasm for the hobby, and bolster confidence while moving forward.

Bruce

Last edited by brwebster
brwebster posted:

Here's a beloved member of my roster, Lionel's E6 from 1999.  A recent ERR upgrade cured it's rather balky performance and improved it's pulling ability.  S

It's dated level of detail was in need of an upgrade too.  Slapping on some DGLE and Dullcoat took care of all that shiny plated metal and black plastic parts.  Rather than black, I chose to use the same green, albeit darker than the Lionel finish, on the wheels and chassis.   I might return later to weather all my equipment, but for now this level of detail will suffice.


The tender deck received a primer coat, the same lower deglossing, and even restricting chains on the trucks.  One last mod was to shorten the drawbar and give the scale Atlantic a realistic tender to loco gap.  Sometimes, these simple little projects help maintain enthusiasm for the hobby, and bolster confidence while moving forward.

Bruce

Interesting Catenary


Moonson posted:
BlueComet400 posted:

Mycustom-made drawbridge arrived...Even without tracks going through it, it really changes the look of our layout. 

The builder is Jim Ballmann, owner of Stainless unlimited; great guy to work with and a very sturdy bridge. 


bridge3

Hi BlueComet400, I join you in your enthusiasm forJim Ballmann's Stainless Unlimited bridges. I have several from him.

Four of them I had him bake-on a black paint finish. The others, I could not resist leaving their stainless glow present on the layout as a significant feature. Besides, my wife took a real liking to the biggest one, as is, so it has definitely stayed unpainted and shiny.

And regarding the spans being sturdy, the one shown here bearing the Blue Comet traveling it, I tripped, on one occasion, when I was dismounting the layout, and began to fall. I reached out, instinctively, for the nearest support, which was this bridge (also, second photo, bridge on the right; fourth & fifth photos). It took my weight without any damage to either of us!

(And I'm no light-weight.) Now, that's sturdy!IMG_10942b3bbluTrainsxFIMG_0493

FrankM, Moon  Township, USA

Frank, those are gorgeous bridges. Yours look much more "to scale" than mine, but I needed something that would carry both Standard Gauge and O-Gauge. When you run mostly tinplate, the idea of scale pretty much goes right out the window.  Jim has been a real pleasure to work with and making sure his customers are satisfied is clearly his #1 priority. 

John

Not much going on but did make a device for tracing out my plywood for the elevated loop platform. Just lay the track as I want it on the plywood push this device over the track and cut the plywood. I think it will work fine for the curve sections. 

I added the fast angle wheels sets to it and it works great. Tracks very well down the middle of the rails.  So now I need more wood. Will be using 5 ply 1/2" plywood for the platform.  So when I go to pick up the grand kids on Saturday I will get a few more sheets. Also some square stock to make the supports for the section of straight I want to do on top of the MOW bump run.


Attachments

Images (2)
  • mceclip0
  • mceclip1
Last edited by KRM

Another victim fell prey to my upgrading frenzy.  When a forum member offered the "guts" out of a Legacy B unit, it was too tempting to turn down.  Thanks, Rich! 

There never was a clear idea on what to install the components into, so I did a little triage for a few days, deciding on the best candidate on hand.  An MTH H10-44 switcher with conventional internals seemed best suited.  The first job was to remove the flywheel and associated cruise circuitry from the guts and install them onto the front MTH motor, along with wiring to the rear motor.   Simply swapping motors wouldn't work, as the final drives differ so much as to be totally non-interchangable.  Of course, 2 electrocouplers were installed.  Sorry about the lousy pics.

Much cursing and brainstorming later, roughly 3 days, the component layout was finalized.   There was no way to know if installing the smoke unit would be possible until I got to this stage.  As you can see, it's position over top of the R4LC is precarious.  I plan on adding a shield between the 2 for protection from smoke fluid spills.  The entire Legacy wiring harness was utilized

I modified the F unit smoke plenum to align with the exhaust ports in the FM body. 

I added more depth to the fuel tank.  It now rides about 3/16" off the rail tops.  The air reservoirs were enlarged and piping added.


..........and back on duty

Bruce


Last edited by brwebster

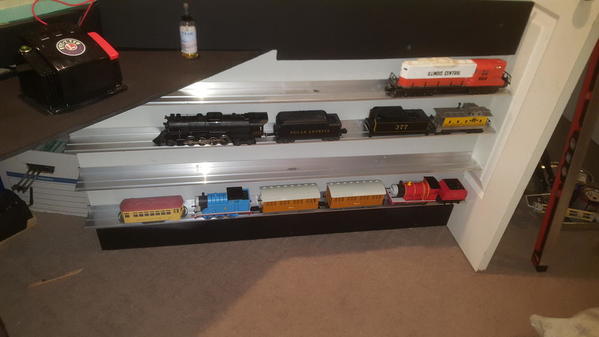
Finished with the facade.  I painted it this afternoon, put up the Railrax, and now I have a place to store my locomotives and rolling stock.  

Its not the most professional looking, but it gives the layout a finished look, something my old layout never had.  I am far done with the scenery, but really wanted a finished look to it.  

I will add a skirt under the transformers, but wanted to leave it open to access under the layout.  

20170316_20563420170316_20564520170316_205702

Attachments

Images (3)
  • 20170316_205634
  • 20170316_205645
  • 20170316_205702
Last edited by Jdevleerjr
brwebster posted:

Another victim fell prey to my upgrading frenzy.  When a forum member offered the "guts" out of a Legacy B unit, it was too tempting to turn down.  Thanks, Rich! 

There never was a clear idea on what to install the components into, so I did a little triage for a few days, deciding on the best candidate on hand.  An MTH H10-44 switcher with conventional internals seemed best suited.  The first job was to remove the flywheel and associated cruise circuitry from the guts and install them onto the front MTH motor, along with wiring to the rear motor.   Simply swapping motors wouldn't work, as the final drives differ so much as to be totally non-interchangable.  Of course, 2 electrocouplers were installed.  Sorry about the lousy pics.

Much cursing and brainstorming later, roughly 3 days, the component layout was finalized.   There was no way to know if installing the smoke unit would be possible until I got to this stage.  As you can see, it's position over top of the R4LC is precarious.  I plan on adding a shield between the 2 for protection from smoke fluid spills.  The entire Legacy wiring harness was utilized

I modified the F unit smoke plenum to align with the exhaust ports in the FM body. 

I added more depth to the fuel tank.  It now rides about 3/16" off the rail tops.  The air reservoirs were enlarged and piping added.


..........and back on duty

Bruce


Nicely done Bruce!! I thought about doing something similar when I saw the parts available.. I've got too many unfinished projects going on already, as I'm sure most of us have!!

Woodson posted:
BlueComet400 posted:

My custom-made drawbridge arrived, and I did a test-fit yesterday. It's going to span the opening of my around-the-room layout. Before the bridge, I made a temporary span out of wood, which enabled me to work on building the layout / running trains while the bridge was under construction. Even without tracks going through it, it really changes the look of our layout. 

The builder is Jim Ballmann, owner of Stainless unlimited; great guy to work with and a very sturdy bridge. 


bridge3bridge4

Very interesting!! Please keep us posted on your progress!!

Here's progress. Meet Arthur, who decided to help me last night. 


arthurbridge1arthurbridge2

Attachments

Images (2)
  • arthurbridge1
  • arthurbridge2
Last edited by BlueComet400
BlueComet400 posted:
Woodson posted:
BlueComet400 posted:

My custom-made drawbridge arrived, and I did a test-fit yesterday. It's going to span the opening of my around-the-room layout. Before the bridge, I made a temporary span out of wood, which enabled me to work on building the layout / running trains while the bridge was under construction. Even without tracks going through it, it really changes the look of our layout. 

The builder is Jim Ballmann, owner of Stainless unlimited; great guy to work with and a very sturdy bridge. 


bridge3bridge4

Very interesting!! Please keep us posted on your progress!!

Here's progress. Meet Arthur, who decided to help me last night. 


arthurbridge1arthurbridge2

Cool bridge and cat!    Can you tell us how long the bridge is?   And about how much something that cool costs???  I'm interested in a two track bridge .

Jim

carsntrains posted:
BlueComet400 posted:
Woodson posted:
BlueComet400 posted:

My custom-made drawbridge arrived, and I did a test-fit yesterday. It's going to span the opening of my around-the-room layout. Before the bridge, I made a temporary span out of wood, which enabled me to work on building the layout / running trains while the bridge was under construction. Even without tracks going through it, it really changes the look of our layout. 

The builder is Jim Ballmann, owner of Stainless unlimited; great guy to work with and a very sturdy bridge. 


bridge3bridge4

Very interesting!! Please keep us posted on your progress!!

Here's progress. Meet Arthur, who decided to help me last night. 


arthurbridge1arthurbridge2

Cool bridge and cat!    Can you tell us how long the bridge is?   And about how much something that cool costs???  I'm interested in a two track bridge .

Jim

29" long, 8" inside height clearance, 15 3/4" inside clearance and roughly 16 1/2" overall width. This bridge will carry the 3 mainlines on my layout (1 Standard Gauge and 2 O-Gauge). As for cost, I'd rather not disclose that here as Jim does custom-pricing for each bridge. The price he quoted me at the start is what he charged when he finished--no surprises at the end. What I will say about the cost is this: given the quality of the construction, the way it's going to enhance my layout, and how easy Jim is to deal with, it was worth every penny. 

FINALLY (I think) purchased the last materials we needed to complete the enhanced plan for the Cabin Lake & Western Railway.  Now it's a summer of painting track, layout it all out, wiring, and then .. finally, some scenic work.  A lot of fun working on it now that Kyrian has retired and helps.  Four hands make quick work of a lot of tasks.  And she LIKES trains!  Has many Milwaukee items.  One of those Eastern gals.

BlueComet400 posted:
Woodson posted:
BlueComet400 posted:

My custom-made drawbridge arrived, and I did a test-fit yesterday. It's going to span the opening of my around-the-room layout. Before the bridge, I made a temporary span out of wood, which enabled me to work on building the layout / running trains while the bridge was under construction. Even without tracks going through it, it really changes the look of our layout. 

The builder is Jim Ballmann, owner of Stainless unlimited; great guy to work with and a very sturdy bridge. 


bridge3bridge4

Very interesting!! Please keep us posted on your progress!!

Here's progress. Meet Arthur, who decided to help me last night. 


arthurbridge1arthurbridge2

Now all you need is a Giraffe. 

brwebster posted:

Another victim fell prey to my upgrading frenzy.  When a forum member offered the "guts" out of a Legacy B unit, it was too tempting to turn down.  Thanks, Rich! 

There never was a clear idea on what to install the components into, so I did a little triage for a few days, deciding on the best candidate on hand.  An MTH H10-44 switcher with conventional internals seemed best suited.  The first job was to remove the flywheel and associated cruise circuitry from the guts and install them onto the front MTH motor, along with wiring to the rear motor.   Simply swapping motors wouldn't work, as the final drives differ so much as to be totally non-interchangable.  Of course, 2 electrocouplers were installed.  Sorry about the lousy pics.

Much cursing and brainstorming later, roughly 3 days, the component layout was finalized.   There was no way to know if installing the smoke unit would be possible until I got to this stage.  As you can see, it's position over top of the R4LC is precarious.  I plan on adding a shield between the 2 for protection from smoke fluid spills.  The entire Legacy wiring harness was utilized

I modified the F unit smoke plenum to align with the exhaust ports in the FM body. 

I added more depth to the fuel tank.  It now rides about 3/16" off the rail tops.  The air reservoirs were enlarged and piping added.


..........and back on duty

Bruce


Bruce the surgery came out great.  Other then the fuel tank sits lower you cant tell it was modified. Thanks for the inspiration.

Mark Boyce posted:!

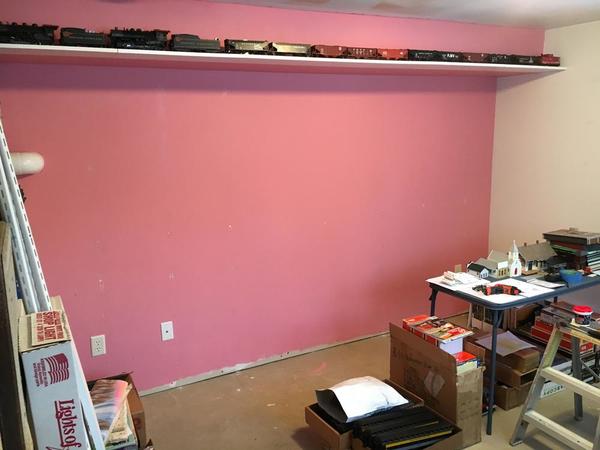
I worked this afternoon on taking down the shelves my daughter left, and spackling all the holes.  Next will be to paint over that awful pink with a nice light blue!  I am going to keep that one shelf on the bulkhead where the furnace vents go to exit the house.

2017-03-11 17.37.14

How did the light blue come out.  Personally It would take guts to leave it and draw an out line of a Caddy. Then again Mary Kay pink doesn't weather to well.  

Did some catching up on threads I follow. As usual some great work being done. Finally starting to finish Kadee upgrades to some rolling stock and engines. Last night preassembled 9 sets for upgrades. 2 GN GP35 that arrived 2 weeks ago and 3 GN GP30s.  2 RS11s NP and SP are the main push.  

and this is what has consumed my time and money for the last 5 months and delayed my new layout build.  My M1028 CUCV,  Wiring Harnesses and fuse box repaired( Had a short and the truck would not run)main reason for going into the shop!!!! On inspection it was found that the front end was shot, so begins the money pit and restoration. rebuilt the suspension front and rear including Axles, New steering box, power steering pump , Rear Main and oil pan seals, Black out drive switch panel reinstalled, New spin on fuel filter, Electronics in Steering column replaced, upgraded Glow plug card controller and relay, Upgraded starter and relays, at this point the alternators are charging but volt meter is just in the green  in a week or to. so plan on replacing them too. Why not what's another 400.00.  After that it just cosmetics, unit markings,  and interior panels. Haven't decided if I repaint it CARC Tan or tricolor woodland camouflage as of yet.  The great part is the truck is running again and I don't have to drive my wife's van unless I need to now..   Ok I got it. Its not a 67 Mustang.

1-DSCF63811-DSCF63821-DSCF63831-DSCF6386


Attachments

Images (5)
  • 1-DSCF6381
  • 1-DSCF6382
  • 1-DSCF6383
  • 1-DSCF6385
  • 1-DSCF6386

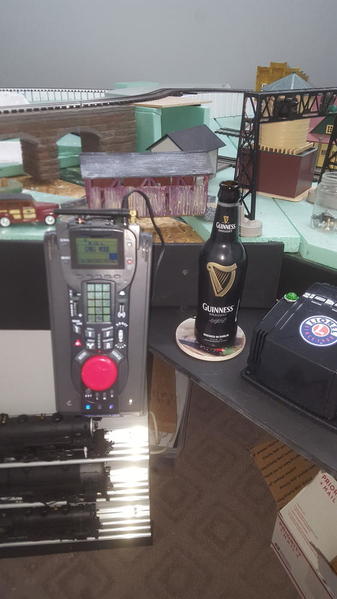
Opened up a Guinness and celebrated St Pattys Day running some trains.  I also mounted my Cab2 base to the layout.  I didn't like the way it sat on the "desk area" next to the transformers as it overhung the end a lot.  I mounted a board at about a 65 degree angle and mounted the base to it.  

Ran some trains and played with my TMCC crane car.  

20170317_210822

Attachments

Images (1)
  • 20170317_210822
suzukovich posted:

and this is what has consumed my time and money for the last 5 months and delayed my new layout build.  My M1028 CUCV,  Wiring Harnesses and fuse box repaired( Had a short and the truck would not run)main reason for going into the shop!!!! On inspection it was found that the front end was shot, so begins the money pit and restoration. rebuilt the suspension front and rear including Axles, New steering box, power steering pump , Rear Main and oil pan seals, Black out drive switch panel reinstalled, New spin on fuel filter, Electronics in Steering column replaced, upgraded Glow plug card controller and relay, Upgraded starter and relays, at this point the alternators are charging but volt meter is just in the green  in a week or to. so plan on replacing them too. Why not what's another 400.00.  After that it just cosmetics, unit markings,  and interior panels. Haven't decided if I repaint it CARC Tan or tricolor woodland camouflage as of yet.  The great part is the truck is running again and I don't have to drive my wife's van unless I need to now..   Ok I got it. Its not a 67 Mustang.

1-DSCF6381

Nice CUCV! Someone tried to sell one of those to me a while back, and I almost bought it. But my wife made it really clear that I only had room for one military vehicle, and there's no way I'm getting rid of my Jeep for something like that.

That said, I did use those things when I was active duty, and if I ever got my hands on one I have to paint it up like one of the ones we had.

Add Reply

Post

OGR Publishing, Inc., 1310 Eastside Centre Ct, Suite 6, Mountain Home, AR 72653
800-980-OGRR (6477)
www.ogaugerr.com

×
×
×
×
Link copied to your clipboard.
×
×