
darlander posted:

My weekend project:  My trolley station had a serious safety issue that was mitigated this weekend.  The retaining wall needed some kind of obstacle to prevent impaired passengers from wandering off in the wrong direction and doing a full or half gainer off the wall.  Solution - build a fence.  I first had to make a profile pattern to determine angles and post spacing.  Next I transferred the spacing to a wood strip and proceeded to construct a fence using 1/16 x.014 Sq brass from Precision Metals.  I had to make three sections and then join them together.  All that is left is to clean up the joints with a file, insert mounting pins, prime & finish coat and install.  This ought to get OSHA off my back!

Unfortunately, I was again able to ignore the Pink and Blue mountain calling me for another weekend.

Dave

Since this piece did not have an end post, I added a temporary wire keeper for support while soldering to the other section.

the keeper was removed after the two sections were joined


Keeper gone!


Finished except for inserting mounting pins (the square tubing has a hollow core).


Test fit.  Tomorrow its clean up some solder joints, add mounting pins, prime, finish coat and install. 

DSC09987

Maybe next week - the mountain!!!!!!!!!


I have a similar issue on my layout. Thanks for the inspiration and detailed photos.

Bob

Mark Boyce posted:
Kittytrain1969 posted:

I'm just trying to figure out if I should keep building, or just take it down and start over again , I mean how many foam mountains can you put on a flimsy 6x11 train board without it collapsing? :&gt

If you want it to last, I think you need a solid foundation.

I'm really bad at building anything with wood, I can't even cut a straight line. That's why I use plastic shelving units as a base for my sectional layout. Someday I'd like to buy a good quality saw and at least try to make a sturdy foundation. I also have a tendency to move a lot, so that's an issue as well.

Kittytrain1969 posted:

I'm really bad at building anything with wood, I can't even cut a straight line. That's why I use plastic shelving units as a base for my sectional layout. Someday I'd like to buy a good quality saw and at least try to make a sturdy foundation. I also have a tendency to move a lot, so that's an issue as well.

FWIW, I use plastic folding tables from Wal-Mart as the base for my show layouts.  Four of 'em side by  side gives you a 6 x 10 table space.  Cover that with grass carpet from Lowes, put down FasTrack and away you go... 

Mitch

M. Mitchell Marmel posted:
Kittytrain1969 posted:

I'm really bad at building anything with wood, I can't even cut a straight line. That's why I use plastic shelving units as a base for my sectional layout. Someday I'd like to buy a good quality saw and at least try to make a sturdy foundation. I also have a tendency to move a lot, so that's an issue as well.

FWIW, I use plastic folding tables from Wal-Mart as the base for my show layouts.  Four of 'em side by  side gives you a 6 x 10 table space.  Cover that with grass carpet from Lowes, put down FasTrack and away you go... 

Mitch

I have my 4x8 Christmas layout on a heavy duty folding table.  The kind they use at church and the fire hall.  Solid as a rock!

Jdevleerjr posted:

Not a lot done but I snuck down to the layout for about 45 minutes tonight and added my inner harbor along with a Lionel Drawl Bridge.  

Tomorrow I will finish added the "Railrax" along the front of the layout to store extra rolling stock and locomotives.  


20170305_22220620170305_222216

I will look forward to seeing your railrax completed.  I will want to store extra rolling stock under the layout.  Although I have so little space for it, someone suggested drawers underneath.  I would buy something if I go that route.  Building drawers is beyond my ability and tools.

darlander posted:

My weekend project:  My trolley station had a serious safety issue that was mitigated this weekend.  The retaining wall needed some kind of obstacle to prevent impaired passengers from wandering off in the wrong direction and doing a full or half gainer off the wall.  Solution - build a fence.  I first had to make a profile pattern to determine angles and post spacing.  Next I transferred the spacing to a wood strip and proceeded to construct a fence using 1/16 x.014 Sq brass from Precision Metals.  I had to make three sections and then join them together.  All that is left is to clean up the joints with a file, insert mounting pins, prime & finish coat and install.  This ought to get OSHA off my back!

Unfortunately, I was again able to ignore the Pink and Blue mountain calling me for another weekend.

Dave

Since this piece did not have an end post, I added a temporary wire keeper for support while soldering to the other section.

The keeper was removed after the two sections were joined

Keeper gone!

Finished except for inserting mounting pins (the square tubing has a hollow core).

Test fit.  Tomorrow its clean up some solder joints, add mounting pins, prime, finish coat and install. 

Maybe next week - the mountain!!!!!!!!!


Dave, Great looking work! The finished product sure shows skills and talent! It also show the time you have put into your layout as a whole. Just wonderful!

Mark Boyce posted:
Jdevleerjr posted:

Not a lot done but I snuck down to the layout for about 45 minutes tonight and added my inner harbor along with a Lionel Drawl Bridge.  

Tomorrow I will finish added the "Railrax" along the front of the layout to store extra rolling stock and locomotives. 

I will look forward to seeing your railrax completed.  I will want to store extra rolling stock under the layout.  Although I have so little space for it, someone suggested drawers underneath.  I would buy something if I go that route.  Building drawers is beyond my ability and tools.

Mark

I have all my railrax mocked up and attached.  I will be removing them soon so I can paint the plywood behind them.  

They make a great spot to store locomotives and rolling stock.  


Today I also started working on the harbor scene.  I installed my dock and some bulidings for my "Fishtown"

Tomorrow I hope the baby takes a good long nap so I can start on the scenery on the other side of the layout. 

20170306_15033020170306_150746


Attachments

Images (2)
  • 20170306_150330
  • 20170306_150746

After waiting for Menards to release their next offering today Mr. Brown dropped off a package. Was not sure what was in it. I knew what I had on order but it is always a surprise to open it up and found out what came. This time it was my command control crane with sound shed. I placed the crane on the gantry track to see how it and the shed look in the scrap iron yard. Also a few packages of transformers that I want to add to some flat cars I have after I repaint them. On a side note I just ordered the Lionel train repair building with the idea of making it a transformer plant that I remember seeing in Tonawanda NY by the 290. It was a GE plant. Anyways pics............Paul

DSCN0200DSCN0202DSCN0204

Attachments

Images (3)
  • DSCN0200
  • DSCN0202
  • DSCN0204
Mo985 posted:

The local service provider worked through the weekend to get the juice flowing to the newly installed Cell site. Now the folks of Linglestown won't be dropping calls, and can stream till their heart is content!

All scratch built.

DSC_0302DSC_0303DSC_0304DSC_0305DSC_0306DSC_0307DSC_0308DSC_0309

Mo

Nice build. Saw what you used for fencing in later post. Nice out of the box solution.  The danger high voltage sign is a nice touch.  Its good to know that the little people have cell phone  service now but, more importantly if any of us ever wind up at your house, our cell phones will have a strong signal now.  

All I can say is a lot of great work being done. Of course My eyes and head started hurting with the wiring stuff especially  what Tom Tee posted with Panel 3 of 6:

On the accident investigation of March 3rd. I am glad the findings were published and confirmed what we all knew as the cause. Those loose nuts will get you every time. 

  The last couple of weeks not much train or layout activity been real busy with family stuff, Managed to get a train show in, Some purchases including a some what rare Atlas GN GP35s that showed up on the bay. the big news to me and my main focus for the last couple of months. My truck(M1028 CUCV) finally is out of the shop and running. Main electrical issue was finally resolved with the total rewiring of the engine harness, Harness under the dash, Fuse box harness, and all other wiring that needed to be replace along with glow plug relays and controllers. Talk about eyes hurting and getting a headache. Also rebuilt was the drive train(front suspension and axle, Rear axle, brake lines, steering box and other parts that needed to be replaced.)  Best part was the unexpected. All weekend long my kids were fighting over who was riding in the truck with me. Even better was when the truck was dropped of Friday night ( We were celebrating my wife's birthday at the time) neighbors kid started getting into the truck when I was going to do a quick test drive. His dad who has a lifted 4wheeler and I both couldn't believe it and my son was ****ed. My son of course got in but was a Kodak moment  when my neighbor's kid to his dad that my truck was cooler then his.  So now its time to finally get back to train stuff.  OK cool for me.

p51 posted:

A photo of mine just appeared in rival Model Railroad Hobbyist magazine (I didn't even submit it, they asked to use it).

With this and my article on the layout in the upcoming On30 Annual, I’m very happy with the reception my photos have gotten.

Congratulations Lee!  Great picture, layout and wonderful story.  I have always been impressed with your tie to history in your modeling.  Thanks for alerting us to the photo article.  

Dave 

Jdevleerjr posted:
Mark Boyce posted:
Jdevleerjr posted:

Not a lot done but I snuck down to the layout for about 45 minutes tonight and added my inner harbor along with a Lionel Drawl Bridge.  

Tomorrow I will finish added the "Railrax" along the front of the layout to store extra rolling stock and locomotives. 

I will look forward to seeing your railrax completed.  I will want to store extra rolling stock under the layout.  Although I have so little space for it, someone suggested drawers underneath.  I would buy something if I go that route.  Building drawers is beyond my ability and tools.

Mark

I have all my railrax mocked up and attached.  I will be removing them soon so I can paint the plywood behind them.  

They make a great spot to store locomotives and rolling stock.  


Today I also started working on the harbor scene.  I installed my dock and some bulidings for my "Fishtown"

Tomorrow I hope the baby takes a good long nap so I can start on the scenery on the other side of the layout. 

20170306_15033020170306_150746


Ah ha!  There's more Railrax!  Looks good!  I have never seen them except for photos.  Will they hold the trains in safely if you bump into them?

The harbor mockup looks very good too!!

Hahaha! Today I spent about two hours modifying an O scale die-cast flat-bed truck, the very long bed of which has bugged me for several years now. So I finally decided to shorten it. After two hours of hack-sawing, riveting, mill filing, finger burning and cursing, I finally got all the pieces together. Because of the way the model is constructed (which put limitations on where I could or could not saw/remove), all that effort and consternation resulted in the bed being only about three #!&%* scale feet shorter. This is one case of where the old motto “If it ain’t broke, don’t fix it” applies in spades. If the end result doesn’t warrant the time/effort spent, it’s kind of a waste of time. I’d show a photo but the truck needs to be repainted and it’s 2:45 a.m. right now and I have other things to get done before getting to bed. Tomorrow I’ll get to more productive model railroading on the Ironbound. Yeh, sure ; )

I did even more wiring.... and will do even more once my delcity order arrives tomorrow.  All of my wires are labeled on the opposite side of the wood in the picture and also intermittently through some of the bundles.  I also have a schematic where I am keeping track of what position on each terminal block goes to and each hole drilled trough the frame/benchwork is labeled so I can trace each wire.  The 3 position Wago snap connectors are double-face taped to the wood to keep them neat instead of dangling.

While I'm waiting for more wire, I started on the control panel.  I initially had some designs that I was going to put on it under the white paint, but after tracing them, I realized there was a chance that it wouldn't turn out properly.  At $31 for the Lexan, that wasn't a chance I was going to take.  I followed the steps that Laidoffsick has in his video and at the moment the white paint on the back of the panel is drying.  The pictures were obviously taken before the white paint.20170305_19412120170306_20593920170306_224059

Attachments

Images (3)
  • 20170306_205939
  • 20170306_224059
  • 20170305_194121
Last edited by mjrodg3n88

Wired 2 of 6 Woodland Scenic buildings using the Just Plug system.  WS makes 4' extension cables and 4' hook up cables to reach distant buildings.  One thing abut the plug & connectors, they really lock together  It makes it difficult to plug & unplug in order to verify lights in buildings all work.  Also the little PCBoard in the buildings all have brightness controls on them, but are difficult to access.  On my department store building, one of the lights in the side display window isn't working and one of the front display widows acts like a fluorescent bulb flashing, can't notice in the picture.  Also don't push to hard when plugging into light hubs.  I need to buy one more light hub and when I do, I will take the one I have now and take it apart to check out/replace sockets on the PCB.  The 1st pic is of Ethyl's Gas  Station (lighting is a bit dim, hard to adjust PCB access. Light hub is turned all the way to max),  and the 2nd is of the Department Store. Using the stand alone lights (earlier posting) was much easier and I'm glad that I started with them.

IMG_0644IMG_0645

IMG_1568IMG_1569

Attachments

Images (4)
  • IMG_0644: Ethyl's Gas Station
  • IMG_0645: Department store
  • IMG_1568: Daylight Dept Store on Left Gas Sta on Right
  • IMG_1569: Daylight Ethy's Gas
Last edited by decoynh
mjrodg3n88 posted:

I did even more wiring.... and will do even more once my delcity order arrives tomorrow.  All of my wires are labeled on the opposite side of the wood in the picture and also intermittently through some of the bundles.  I also have a schematic where I am keeping track of what position on each terminal block goes to and each hole drilled trough the frame/benchwork is labeled so I can trace each wire.  The 3 position Wago snap connectors are double-face taped to the wood to keep them neat instead of dangling.

While I'm waiting for more wire, I started on the control panel.  I initially had some designs that I was going to put on it under the white paint, but after tracing them, I realized there was a chance that it wouldn't turn out properly.  At $31 for the Lexan, that wasn't a chance I was going to take.  I followed the steps that Laidoffsick has in his video and at the moment the white paint on the back of the panel is drying.  The pictures were obviously taken before the white paint.20170305_19412120170306_20593920170306_224059

Once again I look at your wiring and my head spins. It looks so neat and clean, I hope mine will turn out like that. I like the new control panel, looks like its going to turn out wonderful!

decoynh posted:

Wired 2 of 6 Woodland Scenic buildings using the Just Plug system.  WS makes 4' extension cables and 4' hook up cables to reach distant buildings.  One thing abut the plug & connectors, they really lock together  It makes it difficult to plug & unplug in order to verify lights in buildings all work.  Also the little PCBoard in the buildings all have brightness controls on them, but are difficult to access.  On my department store building, one of the lights in the side display window isn't working and one of the front display widows acts like a fluorescent bulb flashing, can't notice in the picture.  Also don't push to hard when plugging into light hubs.  I need to buy one more light hub and when I do, I will take the one I have now and take it apart to check out/replace sockets on the PCB.  The 1st pic is of Ethyl's Gas  Station (lighting is a bit dim, hard to adjust PCB access. Light hub is turned all the way to max),  and the 2nd is of the Department Store.  Using the stand alone lights was much easier and I'm glad that I started with them.

IMG_0644IMG_0645

Its coming together there Matt! things are looking good, a few more and then you will be ready for night life!

Mike and Matt,

Good wiring can make a layout!  Mike, I sure like neat, well labeled, well documented wiring! At work I sure hated it if someone before me took shortcuts!  Yours is looking good!  Matt, I have a few WS buildings (Mike-one is Ethyl's from Patrick's layout). I did not know they have brightness controls.  I will have to look.  I'm glad I have a desk job now.  When I started out 41 years ago, I could handle hard to reach, hard to fasten connections.  Now I'm lucky if I can get a plug in and out of a common AC outlet!  ;-)

I finaly got my overhead lights hooked up!  They were the 1st thing I installed even before I started benchwork, but I never got around to running the wires up the wall to hook them up.  Man it was a PITA doing it from behind the layout.  I wish I did it before hand! 

I also relocated the station.  I had it between 2 tracks but I have since decided I didn't like where it was.  

I will be cutting foam this afternoon to start the scenery on the left side of the layout.  I hope tonight to start working some plaster cloth on that side of the layout.  

darlander posted:
p51 posted:

A photo of mine just appeared in rival Model Railroad Hobbyist magazine (I didn't even submit it, they asked to use it).

With this and my article on the layout in the upcoming On30 Annual, I’m very happy with the reception my photos have gotten.

Congratulations Lee!  Great picture, layout and wonderful story.  I have always been impressed with your tie to history in your modeling.  Thanks for alerting us to the photo article.  

Dave 


paul 2 posted:

Lee, just looked at the pic. Congratulations. You got the eye of an eagle when it comes to doing scenes. Great job...................Paul

mike g. posted:

Very Happy for you Lee, I know you have been putting a lot of hard work and you earned it! Congratulations!

Woodson posted:

Bravo, Lee!!!

suzukovich posted:
p51 posted:

A photo of mine just appeared in rival Model Railroad Hobbyist magazine (I didn't even submit it, they asked to use it).

With this and my article on the layout in the upcoming On30 Annual, I’m very happy with the reception my photos have gotten.

Wow. Lee that's great!!! nice pic and storyline.  

Thank you all very much. I earlier noted that MRH is a competitor to this magazine, but barely so. Their focus rarely ever covers O scale in any format, and never anything 3-rail.

I don’t consider it ‘getting published’ as such, as it’s a website. That said, it’s a commercial website and I’m going to get paid for the photo. Not bad for just emailing the photo and writing up a simply caption, huh?

The big thing for me is when the On30 Annual comes out. THAT, I’m really looking forward to.

I submitted another photo to Model Railroader (they were the only publication that shot down my layout article idea, citing they had enough O scale narrow gauge articles in the pipe already. That means they have maybe one of two for the next decade) but never heard back from them. I’m told that’s normal and years can go by before you hear about a submission.

Now, some might wonder why I didn’t pick O Scale Railroading for that upcoming article? I did seriously consider submitting to this magazine (and a feeler I put out at RMC got an immediate and enthusiastic response), but in the end I thought the On30 Annual was a far better fit, is read religiously among those On30 crowd, and those issues are kept instead of tossed out (look on eBay, you routinely see back issues selling for decent amounts).

In a year or two, I’ve been thinking of an article on operations, showing photos of the layout that look like they were taken in 1943, as if it was a historical document on a railroad long gone. It’d be written as if I’d found the notes and photos in an old footlocker from a WW2 solider who’d been in the area during the war. I’ve never seen anything like that before in a model train magazine. Maybe it won’t be OSR’s cup of tea, but I will pitch it to this magazine when the day comes.

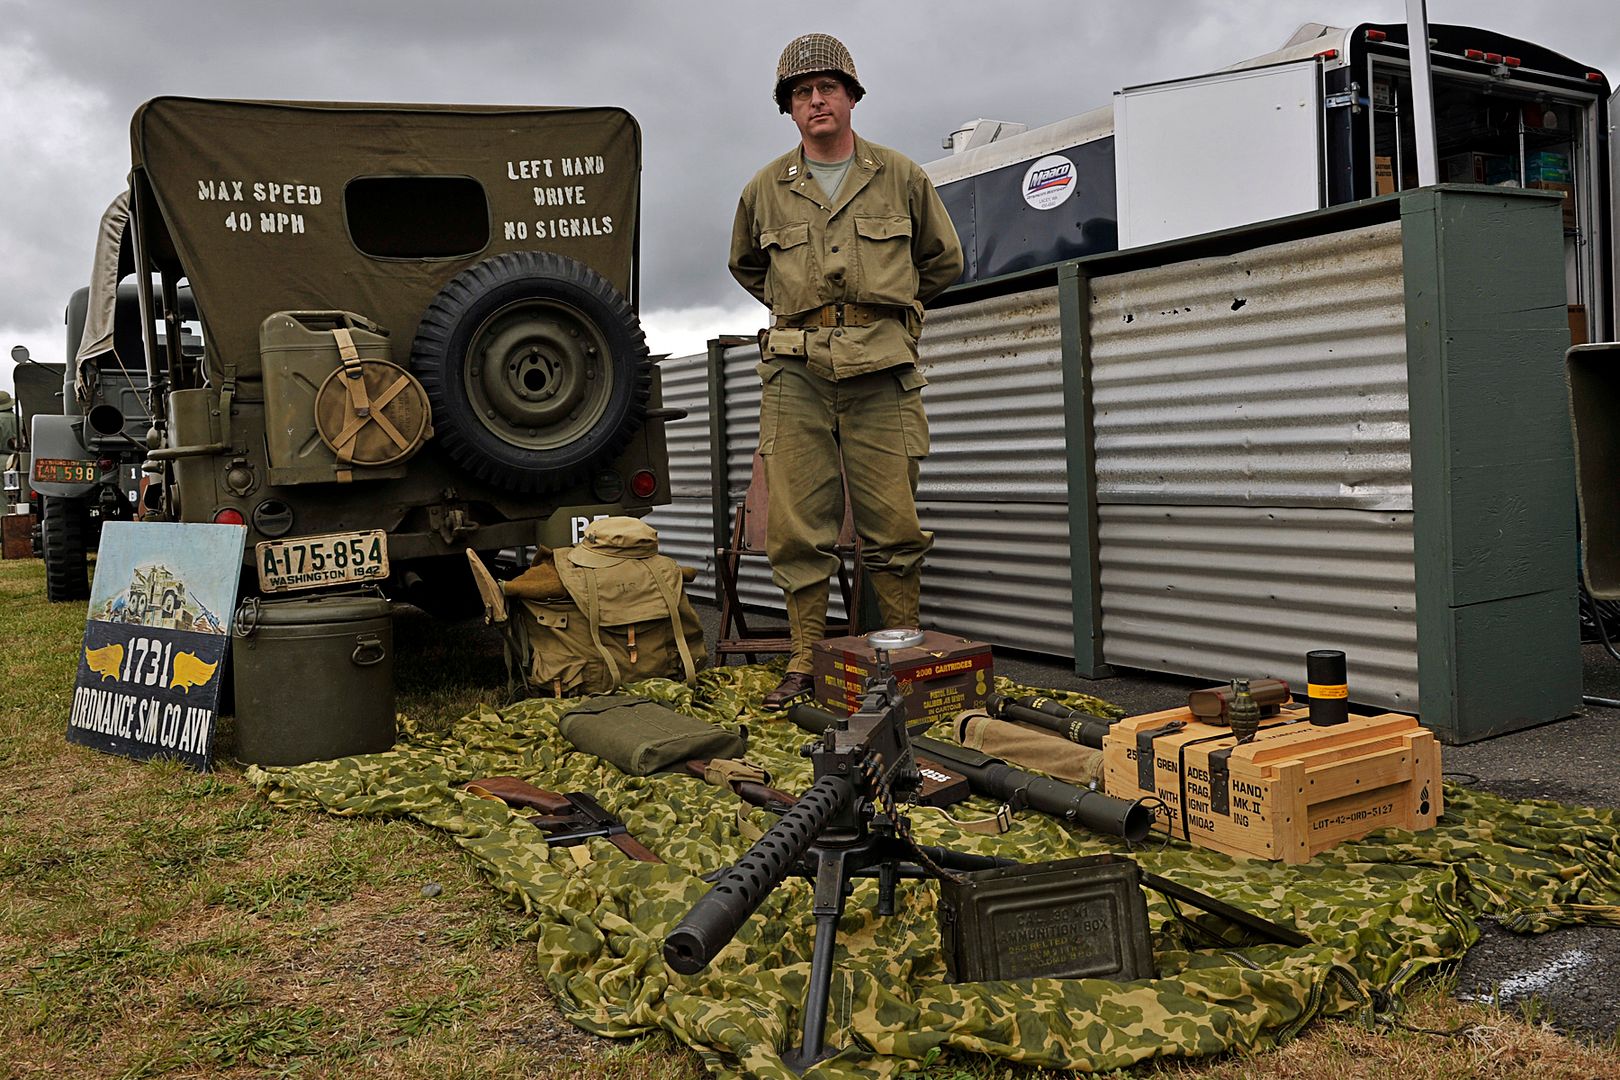
As for my connection to history, my layout is a simple extension of my interest in the 1940s. I’ve been a WW2 living historian since the 1980s. In the photo below, I was displaying my 1944 Willys Jeep and weapons collection at a local airshow. Every little detail is accounted for, down to the seals on the ammo crates and safety switches on the weapons (almost everything in this photo is original). Only the civilian 1942 license plate on the Jeep is incorrect, but I have to have a plate to drive the thing on public roads (so it’s better than a modern collector’s class plate).

My layout is an extension of my love for history, attention to detail and the love of my parents, as the layout takes place right where both of them grew up (Dad was 7 years old in the summer of ’43, Mom as 6). I’m lucky enough to have them still around at this time, so I’ve asked them countless questions about the things you’d never find in books. The breeds of cows people had there? Did anyone own tractors then? Were fences mostly wood, barbed wire of something else? What did mail boxes look like there/then? What kinds of wildlife were common? What colors were most houses painted in? Without them, I wouldn’t nearly have the level of correct details I have today as I was set to do several things that I found through them wouldn’t be correct.

So the renovations in the Den are moving along. Demo of some damaged ceiling is done and new sheetrock is up. Tape and spackle is ongoing. All the wall paper is down too (A big Thank you to the Misses ). Managed to squeeze  a little bit of Train work in.... I was mixing up a batch of plaster (yea, I have plaster walls in my house), for the ceiling and had a thought- why not pull out the Woodland Scenic rock molds and make a few rocks. Can never have enough and don't need to make a second mess with the plaster. Sometimes I impress myself

Bob

Jdevleerjr posted:

Ok the baby decided to take an extra long nap so I took the opportunity to work on the layout more. 

I started the plaster cloth.  Man I hate this stuff.  It is so messy but it is the easiest way of getting the look I want.  

I only did one small section but it looks great to get some scenery up!  

20170307_133911

I used Shaper Sheet by Woodland Scenics with good results.  I combined it with plaster sheets + hydrocal plaster.  You have to work fast with plaster as it sets up fast.  Good work.  You're going fast!

decoynh posted:
Jdevleerjr posted:

Ok the baby decided to take an extra long nap so I took the opportunity to work on the layout more. 

I started the plaster cloth.  Man I hate this stuff.  It is so messy but it is the easiest way of getting the look I want.  

I only did one small section but it looks great to get some scenery up! 

I used Shaper Sheet by Woodland Scenics with good results.  I combined it with plaster sheets + hydrocal plaster.  You have to work fast with plaster as it sets up fast.  Good work.  You're going fast!

Matt

I will have to check that product out.  I used Scenic Express' plaster cloth on my old layout and it wasn't as messy, but I bought a few 5lb rolls of this stuff on Amazon for only a few bucks a piece.  The price savings along is worth using it.  

I only plan to paint over it after.  I will paint it earth tones 1st, and then mostly white after to make it look like it has snow on it.  I want the earth tones 1st because I plan to leave some "bare spots" like under the trees.  I will use woodland scenics snow to sprinkle on top of the white paint before it drys.  

I am moving fast but next week will be super busy for me at work and I will have almost no layout time.  One good thing is I have a job interview next week also, and maybe it will lead to a job where I am not doing 6-7 days a week at 12 hours at a time! 

Didn't do anything to the layout but worked on top of the layout. I started putting together the die cast bridge from Lionel. I wanted to get an idea of the foot print I am going to need when I install it. Once I pieced all the pieces together I found it will be 60 inches in length. Tomorrow my cork is suppose to arrive and I can then get back to laying more track..........Pics of the bridge.............Paul

DSCN0205DSCN0206DSCN0207DSCN0208

Attachments

Images (4)
  • DSCN0205
  • DSCN0206
  • DSCN0207
  • DSCN0208

I got this reproduction 1939 poster yesterday in the mail from the Avery County Museum in NC. It dropped right into the Wal-Mart frame I bought this morning with ease, and it was up on the wall in a few minutes. Note the certificate to the lower right, that's an original stock certificate from the Linville River, a ET&WNC subsidiary.

0307171954-1_resized

Attachments

Images (1)
  • 0307171954-1_resized
M. Mitchell Marmel posted:
Kittytrain1969 posted:

I'm really bad at building anything with wood, I can't even cut a straight line. That's why I use plastic shelving units as a base for my sectional layout. Someday I'd like to buy a good quality saw and at least try to make a sturdy foundation. I also have a tendency to move a lot, so that's an issue as well.

FWIW, I use plastic folding tables from Wal-Mart as the base for my show layouts.  Four of 'em side by  side gives you a 6 x 10 table space.  Cover that with grass carpet from Lowes, put down FasTrack and away you go... 

Mitch

Hey, that's a great idea, thanks !  I might have to try that with my next layout.  I've always made sectional layouts, like the kind you see at a train show, don't know why, just do. One reason, I suppose is it's easier to transport pre-cut 2x4 pieces of plywood and foam, rather than a 4x8 piece, unless you have a full size pick up truck. Thanks for sharing !

Nick

Big_Boy_4005 posted:

I finished the plywood roadbed for a 3 track yard this week, and have started to lay track. This yard wasn't in the original plan, so it was more difficult to work on. I'll be happy to have this project done.


train room - chicago 2012 2013-01-02 002

train room - chicago 2012 2013-01-02 004

WOW, now that's the kind of layout I would like to have someday! Of course I can't even cut two boards the same length, so it would be a challenge to say the least:>  You sir, are a master carpenter!

Add Reply

Post

OGR Publishing, Inc., 1310 Eastside Centre Ct, Suite 6, Mountain Home, AR 72653
800-980-OGRR (6477)
www.ogaugerr.com

×
×
×
×
Link copied to your clipboard.
×
×