
Hi Lew, I don't think there is a adjustment for the motor, but I will look again!

Ray, that looks Amazing!

Mark, good idea on letting it melt! If you have a problem with the crane SELL it to Lee! He enjoys fixing and redoing things! LOL

Lee I couldn't resist!

Johan, what a great scene! You always post something just wonderful!

Well I got out to the train room this morning before my HOA meeting and got some work done on my parts I painted lastnight. I painted the white edge on the steps and uncoupler bars. Then I cut off the bolsters the use to be there for the old claw couplers! Couple of photos for your enjoyment!IMG_20200208_070332001IMG_20200208_070301239IMG_20200208_070316089

Attachments

Images (3)
  • IMG_20200208_070332001
  • IMG_20200208_070301239
  • IMG_20200208_070316089
mike g. posted:

Hi Lew, I don't think there is a adjustment for the motor, but I will look again!

Ray, that looks Amazing!

Mark, good idea on letting it melt! If you have a problem with the crane SELL it to Lee! He enjoys fixing and redoing things! LOL

Lee I couldn't resist!

Johan, what a great scene! You always post something just wonderful!

Well I got out to the train room this morning before my HOA meeting and got some work done on my parts I painted lastnight. I painted the white edge on the steps and uncoupler bars. Then I cut off the bolsters the use to be there for the old claw couplers! Couple of photos for your enjoyment!IMG_20200208_070332001IMG_20200208_070301239IMG_20200208_070316089

Mike. You're welcome. I am glad you like it. 👍

Johan

I am painting leftover figures from my pervious passenger car detailing.  I have seven partial boxes of 36 left to go.  (Not pictured in addition to what is pictured.) 

Then I start the twelve new/unopened boxes of 36 Preiser 65602 Seated figures.  I came up for air and to walk around after sitting at the kitchen table for two hours.

Six Canadian Pacific 21" passenger cars are supposedly on their way to me.

Have a good weekend.

Sincerely, John Rowlen

I post to verify my existence.  

IMG_1507

Attachments

Images (1)
  • IMG_1507
mike g. posted:

Hi Lew, I don't think there is a adjustment for the motor, but I will look again!

Ray, that looks Amazing!

Mark, good idea on letting it melt! If you have a problem with the crane SELL it to Lee! He enjoys fixing and redoing things! LOL

Lee I couldn't resist!

Johan, what a great scene! You always post something just wonderful!

Well I got out to the train room this morning before my HOA meeting and got some work done on my parts I painted lastnight. I painted the white edge on the steps and uncoupler bars. Then I cut off the bolsters the use to be there for the old claw couplers! Couple of photos for your enjoyment!IMG_20200208_070332001IMG_20200208_070301239IMG_20200208_070316089

That’s gonna look nice Mike

as long as the price is around Free or flea market price I’ll take it to fix up lol

with all the great work going on here in this thread, its inspiring to keep at it. So back up to the layout room this morning for another turn at the plaster cloth. The area we are working on is on the left side of the water feature and the terrain  should slope to the water . There are track bridges at three levels. 

IMG_4991

I used a combination of solid white foam pieces, some pieces on a slope and newspaper to stuff the openings and help with the slope. The confined area  made it a bit difficult to work with the wet cloth. I found out that you could also wet the area and then apply the cloth as it would absorb the moisture. A paper towel with some moisture in can also aid wetting the cloth in theses area. 

IMG_4996 - Copy

IMG_4993 - Copy

IMG_4994 - Copy


I was liking the ideas that Bob RSJB18 had with using printed materials. I had a similar application for the Bridge supports on my water feature area . So managed to print some stone and apply it to the 1 by 4s that were the bridge supports before today. 

IMG_5004


IMG_5011

IMG_5009

IMG_5005

The scene is coming together now. These two photis step back and give the overall effect


IMG_5015IMG_5016IMG_5017

Attachments

Images (11)
  • IMG_5004
  • IMG_5011
  • IMG_5009
  • IMG_5005
  • IMG_4991
  • IMG_4996 - Copy
  • IMG_4993 - Copy
  • IMG_4994 - Copy
  • IMG_5015
  • IMG_5016
  • IMG_5017
Mark Boyce posted:

Mike, I'll let it melt. 

Mike, Lew, Lee, I got out my gantry crane and have to apologize.  It is not the postwar, but is Lionel 6-12700 from 1987.  I'm going to set it up on the workbench, because I think there was one function I had trouble with.

Ray, the real parts mockup looks great!!  It is just like we were discussing at of all places my Thursday morning breakfast-Bible study.  We get on a variety of topics while waiting for the food and when we start eating.  One was about one of the guys mentioning being in New York, and driving a steer and the elevated line seemed to go on forever.  I have never been to NYC or Chicago, but I have been to Philly once back in the '80s and saw theirs.  Anyway, the remark was made about the residents and hotel guests having to listen to the trains right outside their windows.  Your mockup is like what they were talking about.

yes ..Mark and Lew, these were terrible if you stayed at a hotel near them or worse had to live by one, I only remember New York way back, very noisy and rough riding.

But in '67 was in Montreal when they first had their rubber tired Metro, what a difference and very clean and quiet. I haven't been back so don't know how they have held up over the years.

Mike g, the flats are O gauge. They are alittle pricey but I think they are worth the price. They come on paper so I glued them to foamboard using 3M adhesive spray. Directions said not to use white glue.

Today I started playing with the new building flats. Adding the silos to the one flat and just placing the others along the wall to see what works. The PVC pipe I had left in shorter heights I put along a siding on another table. Also started to add washes to the walls of the machine shop. Looks like what I really wanted to do with the area left is difinately not going to work. So as they say.......back to the drawing board..Pics.....Paul 2

DSCN0032DSCN0033DSCN0034DSCN0035DSCN0036DSCN0037

Attachments

Images (6)
  • DSCN0032
  • DSCN0033
  • DSCN0034
  • DSCN0035
  • DSCN0036
  • DSCN0037
LIRR Steamer posted:
 

I was liking the ideas that Bob RSJB18 had with using printed materials. I had a similar application for the Bridge supports on my water feature area . So managed to print some stone and apply it to the 1 by 4s that were the bridge supports before today. 

IMG_5004


IMG_5009

IMG_5005

The scene is coming together now. These two photis step back and give the overall effect


IMG_5016IMG_5017

Looks good Happy to share my tips and tricks.

I like the whole scene! Really starting to shape up.

Bob

Mike, I took some pics of a "spare" 282 motor to show the gear-lash adjustment.


Notice the taper of the motor mounting pad (motor is upside down):

       IMG_0307

Again from the other side:

       IMG_0308

And the slotted mounting screw holes to allow the motor to slide on the pad that is machined into the crane metal baseplate:

IMG_0309

So because the motor (and thus the worm) is tilted wrt the mounting pad, as you move the motor back-and-forth the worm gets closer/farther from the worm-pinion and the lash becomes less/more. The question is, does the 182 motor do the same thing or was this a design improvement between the 182 and the newer 282 Crane?

Attachments

Images (3)
  • IMG_0307
  • IMG_0308
  • IMG_0309
paul 2 posted:

Mike g, the flats are O gauge. They are alittle pricey but I think they are worth the price. They come on paper so I glued them to foamboard using 3M adhesive spray. Directions said not to use white glue.

Today I started playing with the new building flats. Adding the silos to the one flat and just placing the others along the wall to see what works. The PVC pipe I had left in shorter heights I put along a siding on another table. Also started to add washes to the walls of the machine shop. Looks like what I really wanted to do with the area left is difinately not going to work. So as they say.......back to the drawing board..Pics.....Paul 2

DSCN0032DSCN0033DSCN0034DSCN0035DSCN0036DSCN0037

Paul:

I have looked at the same buildings before on Trackside Scenery's web site. Now that I see them as you display them on your layout, I am going to purchase one for an area in which I was going to make my own building flat. The really are nice.

LIRR Steamer posted:

with all the great work going on here in this thread, its inspiring to keep at it. So back up to the layout room this morning for another turn at the plaster cloth. The area we are working on is on the left side of the water feature and the terrain  should slope to the water . There are track bridges at three levels. 

IMG_4991

I used a combination of solid white foam pieces, some pieces on a slope and newspaper to stuff the openings and help with the slope. The confined area  made it a bit difficult to work with the wet cloth. I found out that you could also wet the area and then apply the cloth as it would absorb the moisture. A paper towel with some moisture in can also aid wetting the cloth in theses area. 

IMG_4996 - Copy

IMG_4993 - Copy

IMG_4994 - Copy


I was liking the ideas that Bob RSJB18 had with using printed materials. I had a similar application for the Bridge supports on my water feature area . So managed to print some stone and apply it to the 1 by 4s that were the bridge supports before today. 

IMG_5004


IMG_5011

IMG_5009

IMG_5005

The scene is coming together now. These two photis step back and give the overall effect


IMG_5015IMG_5016IMG_5017

Very nice and the print is very convincing good job 

Mike, the painting is looking very good!

Lee, I do not have a steady hand anymore, and even by bracing it on something it seems paint goes everywhere.  Your car looks better now than when you started.

LISteamer, the scene is really coming together!  The printed piers are great!

Paul, Your buildings are looking great!  As long as it doesn't snow a bunch next Saturday, I plan to see them first hand!!

Well what I found on the '87 crane is that the magnet works and both motors wonk but they don't turn anything.  I see the coupling between the plastic motor housings and the gears must be little square end shafts, and they both are missing.  I took all the cardboard filler out of the box, but don't see them there.

In this photograph, I have removed one of the motor housings from the base.  I had a dickens of a time getting light to shine where I wanted it, but the two circles with the line between them shows where the square shaft should go from the easy to see hole on the motor housing and the hard to see gear.  The single circle shows where the other motor housing is still mounted on the base and it is missing the shaft also.

If anyone sees where my observations are wrong, let me know.  I never saw one of these before.

Inked2020-02-08 17.16.24_LI

Attachments

Images (1)
  • Inked2020-02-08 17.16.24_LI
Last edited by Mark Boyce

WOW John, your quite the baby or should I say people making machine! Your going to be busy till summer now!

Lee D, Your doing a great job on the wood reefer! The addition of your parts from Scale City really make the car come to life! But then again you always do a wonderful job on all the cars you do!

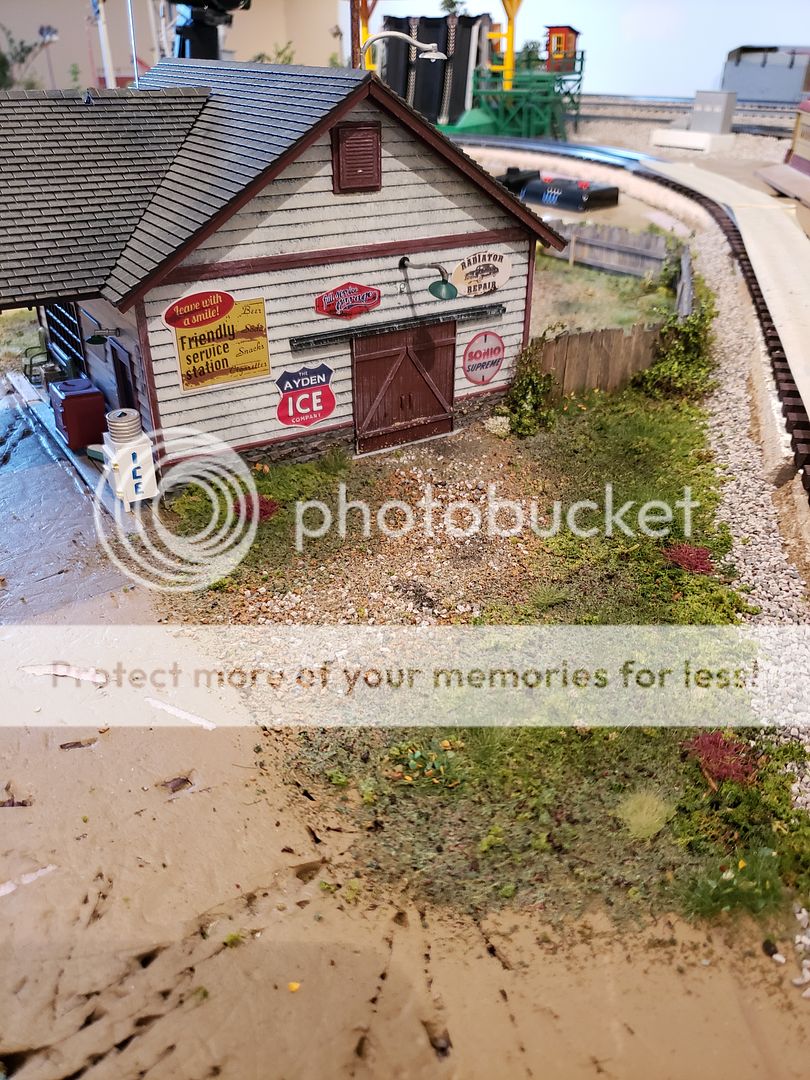
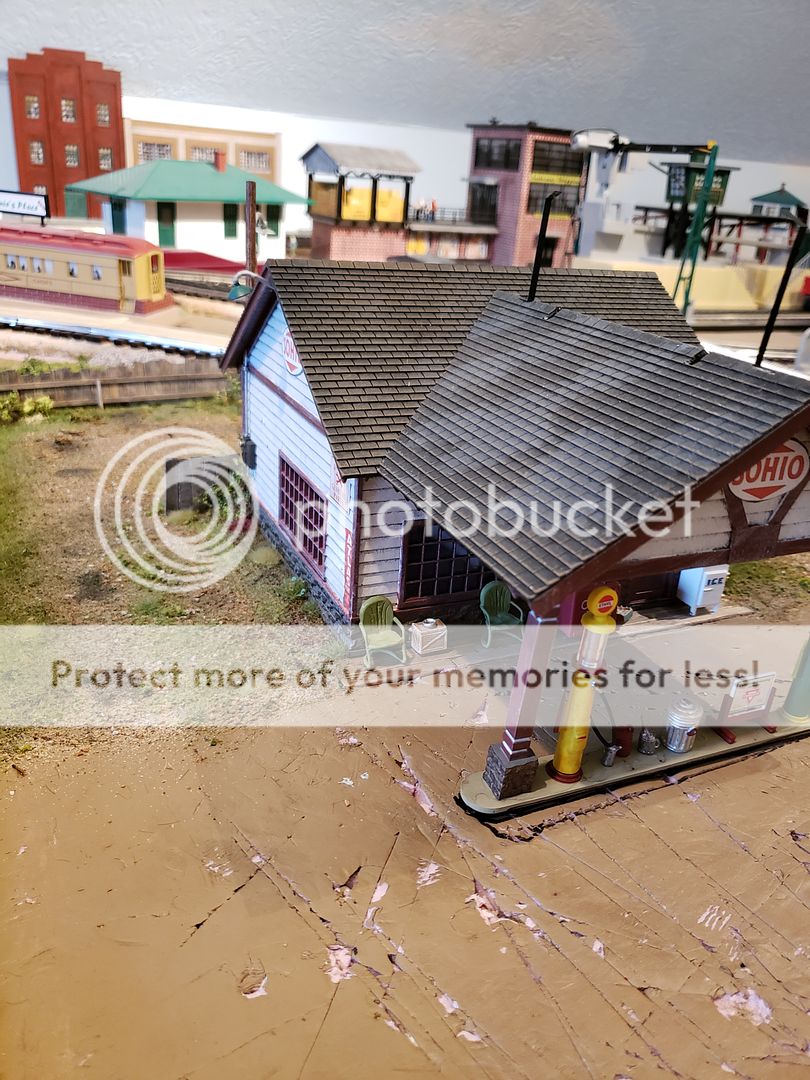
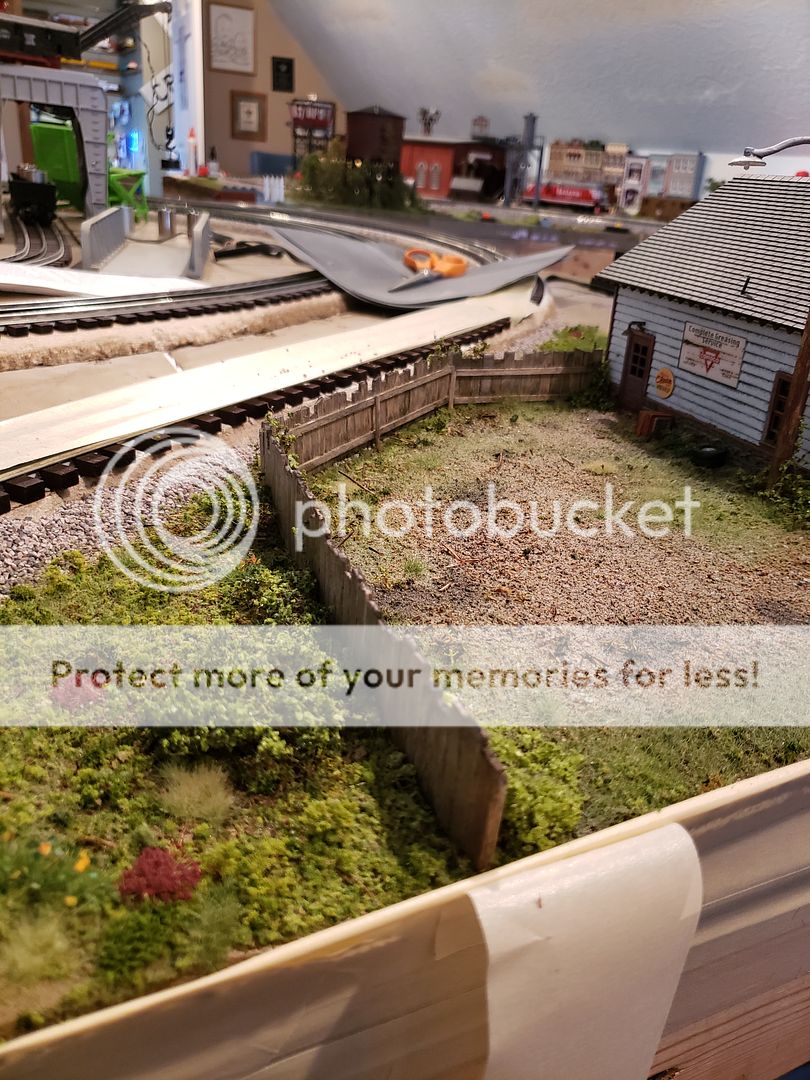
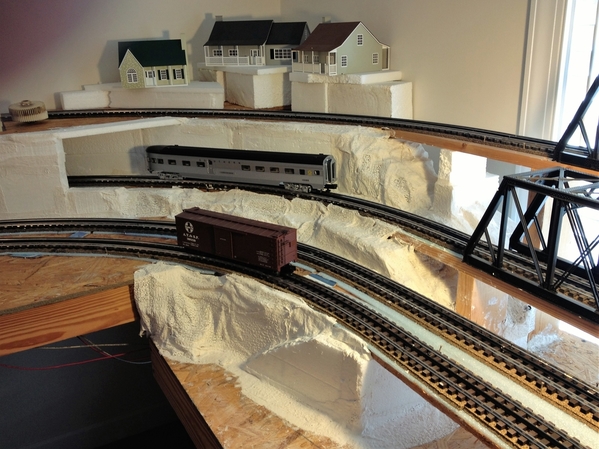
LIRR, Your plaster work is coming right along! I like how everything is making your scene come to life!

Paul 2, Thanks for the information! Your buildings are looking great! Don't worry about going back to the drawing board, its better then taking track back up again! I know, just don't ask how! LOL

Hi Lew, The 182 does not have any adjustment, looks like the 282 has a big improvement. But it makes me think I can make my own shims!

Mark, Thank you sir! I am sorry your missing some parts for your crane. If you cant find them give me the measurements and I can try and build you a couple!

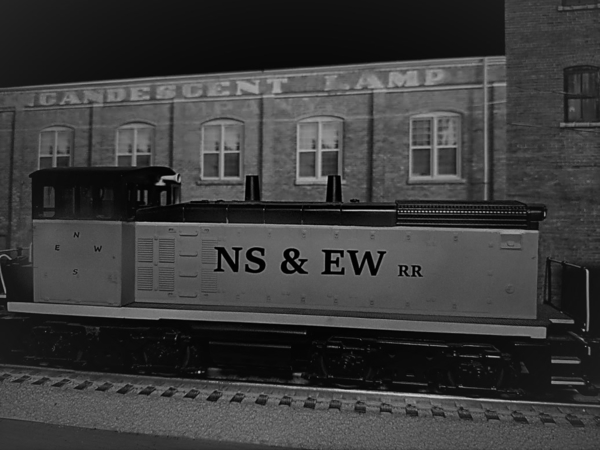
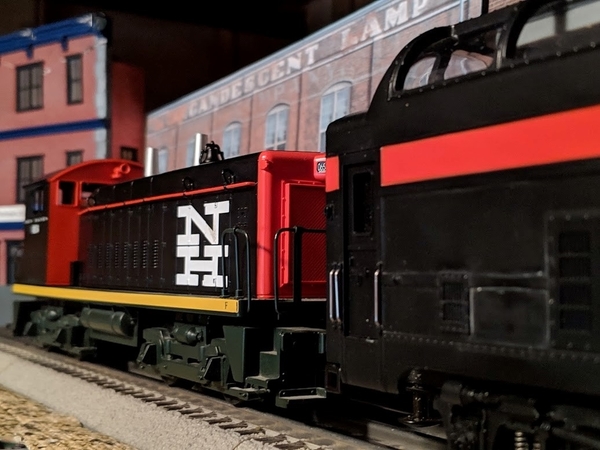
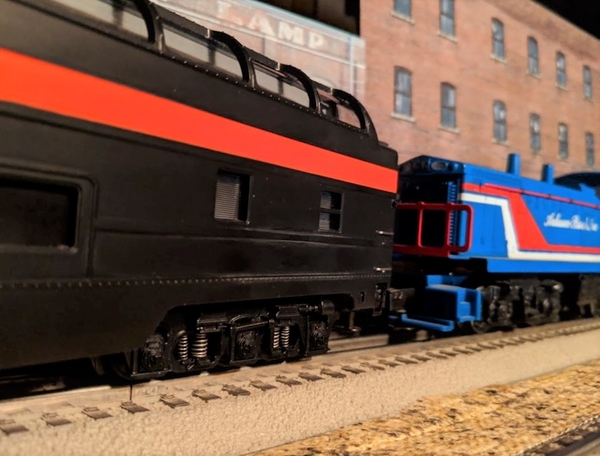
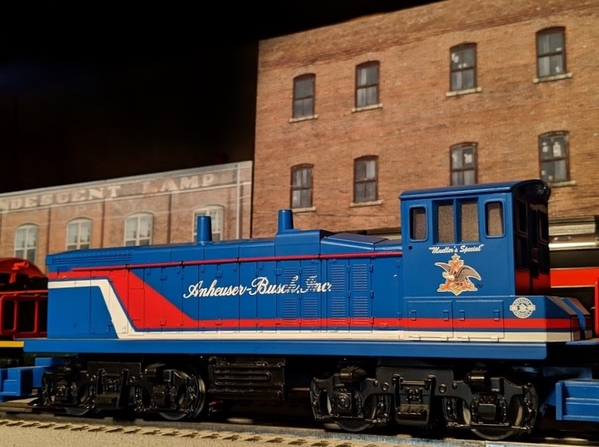
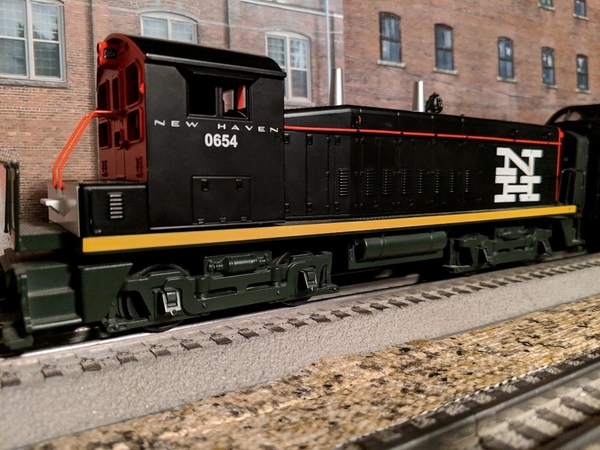
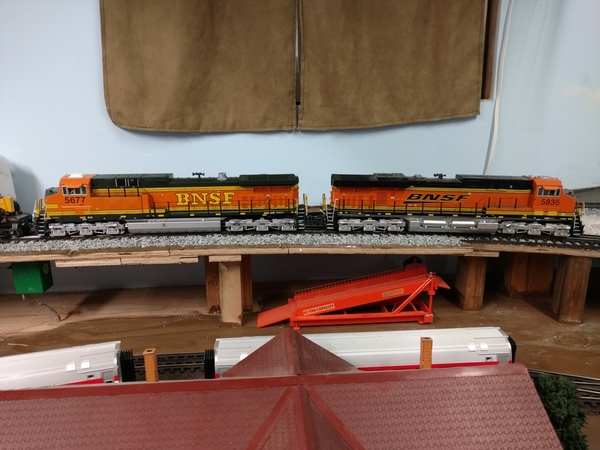
Well after the HOA meeting I went back to my fixed pilot project! Things were going well then I busted the air hoses on one end. So one end only has 1 set of hoses. The rest is coming together, I got the shell mounted, the Kadee coupler mounts installed. All that is left is to make up the couplers and mount them, then put it back on the track. I have included a couple photos. I don't think it will happen tomorrow as I need to work on the house a little!IMG_20200208_143600129IMG_20200208_143617398IMG_20200208_143608527

Everyone have a great night and I will check back in before bed!

Attachments

Images (3)
  • IMG_20200208_143600129
  • IMG_20200208_143617398
  • IMG_20200208_143608527

I need to read this thread more often.  Too many good projects on hand to count or comment on.

Here is my entry for today.  Finally got around to repairing the windows on the Bachmann G Scale Coach that I purchased off of feeBay for my Christmas layout.  It arrived with the windows cracked as such and one of the wheels by itself in the box.  The coach was poorly packaged to be insulated from damage so the USPS was innocent here.

20191206_171854

20191206_172006

20191206_171913


So today, I decided it was time to glue the window pieces back together (the wheel set was put back on, and I ran the coach on the Christmas layout)  so that I now can place it in storage.

20200208_181302  

Attachments

Images (4)
  • 20191206_171854
  • 20191206_172006
  • 20191206_171913
  • 20200208_181302
Last edited by Amfleet25124
lee drennen posted:
Mark Boyce posted:

Lee, I understand it is hard to describe.  My hands, especially the thumbs hurt with arthritis too.  I had some trouble just today taking the gantry crane apart to see what is going on.  

You need to keep that crane and I know the feeling my fingers are getting more crooked every day. 

That is probably all that is wrong with it, other than it wasn't built like Mike's postwar version.    I was trying to think, but nothing happened.  I don't remember when or where I got it.  Also, it is missing on my inventory spreadsheet, so I don't even know what I paid for it.  Definitely an oversight on my part.  I thought I had everything on that sheet.  I'll get it going sometime, and it should be a good item if we ever have grandchildren.  

Mike, bummer the air hoses broke.  You will get it going well though.  Thank you for the offer on those little parts.  I'll see what I can do first. 

Kevin, it is a shame how poorly some folks pack stuff they ship!  The car looks great though as you got it fixed!!

Last edited by Mark Boyce
John Rowlen posted:

I am painting leftover figures from my pervious passenger car detailing.  I have seven partial boxes of 36 left to go.  (Not pictured in addition to what is pictured.) 

Then I start the twelve new/unopened boxes of 36 Preiser 65602 Seated figures.  I came up for air and to walk around after sitting at the kitchen table for two hours.

Six Canadian Pacific 21" passenger cars are supposedly on their way to me.

Have a good weekend.

Sincerely, John Rowlen

I post to verify my existence.  

IMG_1507

Great job on the people painting John.

CGWforever posted:

First pair of block signals hooked up and working today with Azatrax relay. Their purpose to protect westbound train on westbound track while eastbound train enter westbound track. Same when westbound train enter eastbound track. 3 pairs to go! It was fun and easy project.
18B56325-FBAF-4585-BDF9-2F083DE54A4FE1D2FDE6-4C2F-4CE2-AC7C-642C2AB42475908BCED1-B53B-489C-A55A-CC5B485CE71CDCAC925D-527C-4C6F-9801-BCDB4DBB42F93E0FE0A6-DA19-48A2-B8B5-7C1B0E5BA176Patrick 

They look great!  Fun and easy are my favorite words!!  

Kevin, Nice to see an easy fix! Job well done, It should look great on the Christmas layout next year!

Patrick, Nice Job! Looks clean and very nice! I really like the stuff John form Azatrax puts out! Top notch equipment. I see from the pictures you have the sensors under the table shooting up. Was wondering how they are working for you! I had to put mine on my old layout at an angle.

Well its Sunday, no football, no racing yet, so I guess I will work on the house long enough to make the CEO happy than  hope to get to the train room and put my Kadee couplers on my dummy engine so I can call it done! LOL

I hope everyone has a great day and finds time for there layout and trains!

Nothing on the layout but I bought some supplies yesterday. A local arts and crafts store is closing so the prices were right. Really exciting stuff too, paint, Elmers glue, Testors glue for my building kit. I did find some small chain in their jewelry dept which I can use for securing loads on flatbed cars. I was looking for Testors dull-coat too but they didn't have it.

Hopefully I can get started on the building kit today.

Another busy Saturday on everyone's layouts.

Mark- can't tell from the picture but would some 1/4" square basswood dowel serve the purpose? Evergreen Models probably has what you need.
Mike- My fat fingers break small plastic parts all the time
Patrick- the signals are very nice.
Lee- It's all about the details. That car is going to look great.
Kevin- I hate when people don't pack things securely. My wife sells on "dabay" and everything she ships is packed like we're shipping the Mona Lisa.
Paul- the new area is coming together even if its in a re-design now.

Happy Sunday!

Bob

mike g. posted:

Bob, good luck on the building kit! Remember, take your time and have fun!

Scott the building platform turned out nice! Wonderful job on the building and the  wall art! Where did you find it?

Mike,

  I was looking at "Ghost Signs" of Baltimore, and saw one for Hunter Rye so just searched for the logo and printed it on decal paper. 

Thanks- Scott 

B&O Fan posted:

I've gotten the base completed for the last section of the city and  started figuring out the building locations. Nearing the end of an Altoona model build and printed a nice decal for some wall advertising. Have fun.

Scott 

20200209_09042420200209_09034920200209_035853

Scott:

Your city scene is shaping up to be GREAT. I love urban scenes. Is the brick building in the second photo a kit? if so, what is it and where did you get it?

Thank you.


Randy Harrison posted:
B&O Fan posted:

I've gotten the base completed for the last section of the city and  started figuring out the building locations. Nearing the end of an Altoona model build and printed a nice decal for some wall advertising. Have fun.

Scott 

20200209_09042420200209_09034920200209_035853

Scott:

Your city scene is shaping up to be GREAT. I love urban scenes. Is the brick building in the second photo a kit? if so, what is it and where did you get it?

Thank you.


Randy,

It's the ABC Brewery office kit from Altoona models. 

Thanks for the comments. 

Scott 


    Mike, your engine looks great !

    Scott, really like your city scene !

    Lee, reefer car is looking really good !


                 shortly after taking delivery of a NH full dome car,

                           which will become part of my  Anheuser- Busch dinner train...


    I started removing all the New Haven lettering from the car...

               next a red & white stripe will replace the orange stripe that is on the car...

       that will match the stripes on the engine....

                  an Anheuser Busch's Adolphus business car will also be part of this train...


Attachments

Images (3)
  • mceclip0
  • mceclip2
  • mceclip3
Last edited by briansilvermustang

Johan, what kind of car is that? I have never seen one before! Sure is sharp looking along with your great scenery!

Scott, Thanks for the information. I to would also like to have the brewery, but then again I also want to stay married! LOL

Brian, Looking good and sounds like you have a great plan! Good thing you have that New Haven switcher to help you out!~

mike g. posted:

Johan, what kind of car is that? I have never seen one before! Sure is sharp looking along with your great scenery!

Scott, Thanks for the information. I to would also like to have the brewery, but then again I also want to stay married! LOL

Brian, Looking good and sounds like you have a great plan! Good thing you have that New Haven switcher to help you out!~

Mike. Thank you. That is a B&M Doodlebug rail car. 20200208_145920

Johan

Attachments

Images (1)
  • 20200208_145920

4AA540BB-8FD1-4F77-A008-34AFCDC38741F8F726A9-73A3-49E0-909E-AECD66D63F10CF74A02A-EE23-4562-BB22-FBCAE4CC039C2E15B2E8-13FA-47B3-9322-40D3CB63C7649914612F-5D27-4E72-BC47-C2A1BECA66144AE090FF-7590-4732-89CA-223A81AD4F2D7812245E-E372-4C55-A8EA-89D9717078910BE43B8E-C6FD-47AD-A535-286994BCA82D9B540193-52B6-491F-9A14-6DDB28F25CEEDDDB96E1-1150-463E-8D93-3F64E6DDC2D0F4297295-8B8E-471C-AEB8-05D68133A56DWell this morning I was back at it on this Reefer car. I put the trucks and Kadee couplers on added some more details including Scale City Designs stirrups and the ladders were to long for the car so I cut them off and save the excess to make the side door reefer steps. Then I decided to go out on my comfort zone and put a brake wheel and rod on it I have two handrails to put on it then it will be finished I’m gonna let things set up then I’ll finish painting 


Attachments

Images (11)
  • 4AA540BB-8FD1-4F77-A008-34AFCDC38741
  • F8F726A9-73A3-49E0-909E-AECD66D63F10
  • CF74A02A-EE23-4562-BB22-FBCAE4CC039C
  • 2E15B2E8-13FA-47B3-9322-40D3CB63C764
  • 9914612F-5D27-4E72-BC47-C2A1BECA6614
  • 4AE090FF-7590-4732-89CA-223A81AD4F2D
  • 7812245E-E372-4C55-A8EA-89D971707891
  • 0BE43B8E-C6FD-47AD-A535-286994BCA82D
  • 9B540193-52B6-491F-9A14-6DDB28F25CEE
  • DDDB96E1-1150-463E-8D93-3F64E6DDC2D0
  • F4297295-8B8E-471C-AEB8-05D68133A56D

Steve, Sure beats a flashlight! LOL Nice work!

Johan, thank you, Looks Great and now I know what a Doodlebug car is!

Lee D, You are doing a KILLER job on the reefer car! Just wondering how much of your rolling stock have Kadee's?

Well the CEO let me go out and play a little so I was able to get the Kadee's put on my dummy engine and put back in the fleet! Here are a couple photos! Who knows I might even get a little more done like clean the darn room! LOLIMG_20200209_125149488IMG_20200209_125258498

Attachments

Images (2)
  • IMG_20200209_125149488
  • IMG_20200209_125258498

Bob, I was thinking similar to you.  1/4" square basswood dowel is too large.  The caliper measures it as .130 inches, slightly larger than 1/8".  I could get 1/4" and sand it down.  I don't know how much torque it would be on basswood to wear it down and get sloppy.  Maybe it would have to be metal, but I don't know if it is too tight it could crack the plastic.  I can try something and see.

Scott, the town is going to look great!  I too, like the Altoona building with the round turret!

Johan, I agree, that is a great scene with the doodlebug and the cars on other tracks behind!!

Brian, that car will look nice with that paint scheme!

Steve, the LED lights under the layout are great!  You just can't have enough light when we get older.

Lee, the reefer is looking tremendous!

Mike, the engines look great!  Also, the room doesn't look bad.  Lew is right, you move the dust around and get natural weathering!

Ross, the control panel looks pretty snazzy.

Spent the day pointing brick......

Well not really but I did take a stab at white washing the mortar lines on the machine shop. I used white acrylic and mixed in some light brown to tone it down a little. If you look closely at most brick buildings, the mortar is as far from white as you could get. Even on new buildings. Not disappointed with the results at all. Once I paint the doors and trim I think it will be just fine. I'm going to do the window and door lintels to look like sandstone so I thought a beige mortar would match best.

I cleaned up the pieces first and washed all the parts too.

2020-02-09 12.33.002020-02-09 16.35.082020-02-09 16.35.382020-02-09 16.35.44

I'm going to add a floor on the second floor, the model doesn't come with one. I want to do some lighting and interior details too. The footprint is only 6X6 so can't do too much.

I also settled on a couple of smaller size prints of the two buildings and cut them out and glued them to some thin cardboard. Once dry I'll cut them out and figure out where to place them later.

2020-02-09 16.59.58

Bob

Attachments

Images (5)
  • 2020-02-09 12.33.00
  • 2020-02-09 16.35.08
  • 2020-02-09 16.35.38
  • 2020-02-09 16.35.44
  • 2020-02-09 16.59.58


           Bob, your building is looking great !!


"Brian, Looking good and sounds like you have a great plan! Good thing you have that New Haven switcher to help you out!~" 

      thanks Mike...   really like it...


     your BNSF engines look great together !

                  are you going to have an auto-rack siding...

                            to be able to use your ramp for unloading vehicles ?


Attachments

Images (2)
  • mceclip0
  • mceclip0
Last edited by briansilvermustang

Lew, I didn't clean, but I did try to run trains. I founfdd out I have some wiring to trace and track to clean. Trains run, go threw switches and die! It has me scratching my head, so I am going to retrace all the wires for the sidings!

Ross, Nice control panel!

Mark, Thank you! If you would like I can cut you some thick Plexi Glass to close to size and you could still sand it to fit!

Bob, Nice Job on the white/Tan wash! Plus the printed buildings are going to look great on your layout! Your right there fallowing in Paul 2 feet!

MikeG. Thanks this has been really fun Brian the Silver Mustang sent that Reefer to me as a gift out of nowhere. I like that ramp and you trains look very good. About half of my rolling stock is Kadees. I’ll get some pics of my Rolling stock with Kadees. 

Lew. Thanks I appreciate your complement 

Bob. I just watched a video today on YouTube of Mr. muffins white washing and mortaring brick buildings you’re doing a fantastic job

Johan great pics as always 

Mark. thanks for the complement 

Brian. Nice switcher 

Ross. I second that nice panel very impressive 

Mark Boyce posted:

Bob, I was thinking similar to you.  1/4" square basswood dowel is too large.  The caliper measures it as .130 inches, slightly larger than 1/8".  I could get 1/4" and sand it down.  I don't know how much torque it would be on basswood to wear it down and get sloppy.  Maybe it would have to be metal, but I don't know if it is too tight it could crack the plastic.  I can try something and see.

Scott, the town is going to look great!  I too, like the Altoona building with the round turret!

Johan, I agree, that is a great scene with the doodlebug and the cars on other tracks behind!!

Brian, that car will look nice with that paint scheme!

Steve, the LED lights under the layout are great!  You just can't have enough light when we get older.

Lee, the reefer is looking tremendous!

Mike, the engines look great!  Also, the room doesn't look bad.  Lew is right, you move the dust around and get natural weathering!

Ross, the control panel looks pretty snazzy.

Mark. Thank you. 🤝

Johan

lee drennen posted:

MikeG. Thanks this has been really fun Brian the Silver Mustang sent that Reefer to me as a gift out of nowhere. I like that ramp and you trains look very good. About half of my rolling stock is Kadees. I’ll get some pics of my Rolling stock with Kadees. 

Lew. Thanks I appreciate your complement 

Bob. I just watched a video today on YouTube of Mr. muffins white washing and mortaring brick buildings you’re doing a fantastic job

Johan great pics as always 

Mark. thanks for the complement 

Brian. Nice switcher 

Ross. I second that nice panel very impressive 

Lee. Thanks. 🤝

Johan

Brian, thank you sir! As for the Auto-rack siding I am still working on it. I have 2 auto-rack cars that's why OI built the ramp. I even built one for Cabinet Bob! It even made the back of the last Menards train catalog!

Lee D, Amazing work! Looking wonderful. One has to ask what's next when your done with the reefer car?

I hope everyone has a wonderful Monday and finds time for your layout and trains!

EricaAnn posted:

It's not so much what I did for my layout today, but what I did for someone else's layout. Working on 3 locomotives for a client. The two A units were originally Lionel 2032 Erie Alco's, circa 1952-1954. The B unit is from Lionel's MPF days. The two A units were "artistly" repainted by someone using a brush trying to stay away from the decals. Same with the truck side rails. Guess they wanted to update the color scheme. 

I was able to strip away the brush applied paint job as well as Lionel's original decals, black paint & yellow side strips. These shells have now had time turned back about 67 years and all of lead based paint is gone! 

After stripping a number of older Lionel cars my stripping solutions has enough lead in suspension to probably offer some limited radiation protection. 

IMG_0413IMG_0419

A couple weeks ago I shared a few photos of the stripped ALCO shells I was working on. Well, I thought I'd share a photo or two of the completed locomotives before I deliver them to my client. The "old girls" got quite a facelift!

IMG_0457IMG_0460

Attachments

Images (2)
  • IMG_0457
  • IMG_0460

As a result of wanting to display one of my recent finds I did some work on the PER's scenic backdrop.

I put together three pics from a mid-'50s Shawmut excursion:

        IMG_0328

The left photo is of a pair of Shawmut SW9s with B&O Fs idling in the background. This would have been at Brockway where the Shawmut and the B&O interchanged and was surely the end of the Northbound leg of the trip.

Dad took the top photo in the morning on the B&O high bridge over the Allegheny River and the Shawmut RR.

         IMG_0329

The bottom photo was in the afternoon with the excursion train Southbound now passing under the B&O high bridge.

I also changed things a bit on the West wall, trying for perspective-filled shots to go with the D&RGW up-the-mountain pic:

        IMG_0330

I feel like I done good work.  :

        IMG_0331

Attachments

Images (4)
  • IMG_0328
  • IMG_0329
  • IMG_0330
  • IMG_0331

Over the weekend I weathered my fleet of ore cars and my 0-6-0 tank engine. 20190511_14282120190511_14284720190511_142631

First I attacked the bodies with acetone to dull the finish and lighten the lettering.  The next step was a coatiing of Dullcoat.  Then I  brushed brown oxide powder all over, followed by a second dullcoat spray.  Finally the B&LE  cars got a wash of gray. 

20200208_15532620200208_15503520200208_154939

 On the tank engine, I first removed the US  STEEL logo with 91% ISOPROPYL Alcohol followed by an initial coating of dullcoat. US steel switcher

The next steps included brush painting the loco with acrylic paints, grimy black, dirt,  oily black,  and white.  It also got some brown oxide powder on it. 20200208_16030720200208_16035520200208_160246

Hope you like them.

Attachments

Images (10)
  • 20190511_142821
  • 20190511_142847
  • 20190511_142631
  • 20200208_155326
  • 20200208_155035
  • 20200208_154939
  • US steel switcher
  • 20200208_160307
  • 20200208_160355
  • 20200208_160246

Erica Ann, Those Alcos look great!!

Lew, your collage of prints looks great!  You cover quite a bit of territory all the way from the Allegheny River to D&RGW country!

Bill, the weathering looks superb!  Yes the B&LE cars that traveled through Butler County looked that way.

JLM1973, If it keeps him enjoying the layout, then by all means!  I think it looks great!

third rail posted:

Over the weekend I weathered my fleet of ore cars and my 0-6-0 tank engine. 20190511_14282120190511_14284720190511_142631

First I attacked the bodies with acetone to dull the finish and lighten the lettering.  The next step was a coatiing of Dullcoat.  Then I  brushed brown oxide powder all over, followed by a second dullcoat spray.  Finally the B&LE  cars got a wash of gray. 

20200208_15532620200208_15503520200208_154939

 On the tank engine, I first removed the US  STEEL logo with 91% ISOPROPYL Alcohol followed by an initial coating of dullcoat. US steel switcher

The next steps included brush painting the loco with acrylic paints, grimy black, dirt,  oily black,  and white.  It also got some brown oxide powder on it. 20200208_16030720200208_16035520200208_160246

Hope you like them.

Great work on the tank engine!

Mark,  I know I ran into this year's ago...  I would shop for some "Shaft Key Stock"....  It tends to be available at a good old style full service hardware store.   It's square steel stock made for keyways in drive shafts and mating hubs to prevent slipping....  

It's still or at least was fairly common hardware, find it on lawnmowers, snowblowers etc.....  If my memory serves me right it comes in common US standard fractional dimensions  3/16 sq.  1/4 sq etc.....

I think I re-installed mine with some acrylic latex caulk like DAP230 to keep it from falling out again. 

Sorry I am many days behind getting on the forum, went skiing with my daughter Saturday in NH>....   


mike g. posted:

Brian, thank you sir! As for the Auto-rack siding I am still working on it. I have 2 auto-rack cars that's why OI built the ramp. I even built one for Cabinet Bob! It even made the back of the last Menards train catalog!

Lee D, Amazing work! Looking wonderful. One has to ask what's next when your done with the reefer car?

I hope everyone has a wonderful Monday and finds time for your layout and trains!

Mike I have a few ideas 

Mark Boyce posted:

Erica Ann, Those Alcos look great!!

Lew, your collage of prints looks great!  You cover quite a bit of territory all the way from the Allegheny River to D&RGW country!

Bill, the weathering looks superb!  Yes the B&LE cars that traveled through Butler County looked that way.

JLM1973, If it keeps him enjoying the layout, then by all means!  I think it looks great!

I second that everything Mark said great work everyone 

EricaAnn posted:
EricaAnn posted:

It's not so much what I did for my layout today, but what I did for someone else's layout. Working on 3 locomotives for a client. The two A units were originally Lionel 2032 Erie Alco's, circa 1952-1954. The B unit is from Lionel's MPF days. The two A units were "artistly" repainted by someone using a brush trying to stay away from the decals. Same with the truck side rails. Guess they wanted to update the color scheme. 

I was able to strip away the brush applied paint job as well as Lionel's original decals, black paint & yellow side strips. These shells have now had time turned back about 67 years and all of lead based paint is gone! 

After stripping a number of older Lionel cars my stripping solutions has enough lead in suspension to probably offer some limited radiation protection. 

IMG_0413IMG_0419

A couple weeks ago I shared a few photos of the stripped ALCO shells I was working on. Well, I thought I'd share a photo or two of the completed locomotives before I deliver them to my client. The "old girls" got quite a facelift!

IMG_0457IMG_0460

Very nice always enjoyed your work on these you have some great ideas 

chris a posted:

Mark,  I know I ran into this year's ago...  I would shop for some "Shaft Key Stock"....  It tends to be available at a good old style full service hardware store.   It's square steel stock made for keyways in drive shafts and mating hubs to prevent slipping....  

It's still or at least was fairly common hardware, find it on lawnmowers, snowblowers etc.....  If my memory serves me right it comes in common US standard fractional dimensions  3/16 sq.  1/4 sq etc.....

I think I re-installed mine with some acrylic latex caulk like DAP230 to keep it from falling out again. 

Sorry I am many days behind getting on the forum, went skiing with my daughter Saturday in NH>....   


Chris, Thank you for the good idea!!  Don't worry, it is so easy to get behind on this topic of 888 pages and counting!

Been a busy little beaver today...

https://ogrforum.ogaugerr.com/...p5-to-ep4-conversion

https://ogrforum.ogaugerr.com/...ights-using-12v-leds

Haven't done much on my layout of late. 

The layout at the JRM museum, on the other hand, is a much different story...

Here's the layout back in 2018: 

0625190934-00

And the layout today: 

0208200753-00

Just a wee bit of difference.  ;-) 

Mitch 

Attachments

Images (2)
  • 0625190934-00
  • 0208200753-00
Apples55 posted:
Looks good, Mitch... looks like you’ve hot a lot going on in a relatively small space. Did you give up on your idea to have that center track include a reversing wye???

Yeah, we're gonna have a different mountain built, instead, so I decided to go with 042 and 027 ovals.  Between replacing the Fastrack with tubular, and putting a layer of Homasote scrounged from a scrapped HO scale layout on the table,  the trains are a LOT quieter...   

Mitch 

What did I do on my layout?? I took a pic of this enlargement which is part of the scenic backdrop of the Plywood Empire Route:

      IMG_0334

Why did I put up this and similar enlargements on the train-room walls?? Because that is me on the left. My experiences depicted in these old photos inform my life and are one of the roots of my interest in model railroading. Why did I then post this pic on this Forum?? Because that is what I did on my model railroad today and that is the topic of this thread and this Forum is for sharing OT thoughts, experiences and yes, pics.

At least that is my understanding of the TOS.

Attachments

Images (1)
  • IMG_0334

Erica Ann, Wonderful work on the Alco shells!

Lew, those are some fantastic photos! Thanks for sharing with the rest of us~!

Third Rail, Great job on the weathering, thanks for the step by step information!

JLM, Your son has an eye for taste! Let him flow with it, it will help keep him interested!

Johan, You never let up! Once again what a great looking scene!

Mitch, Outstanding work, what an improvement and I bet the kids really love it!

As for me, nothing, noda, zip, zilch. I guess you all get the point, been working on the house! LOL

geysergazer posted:

What did I do on my layout?? I took a pic of this enlargement which is part of the scenic backdrop of the Plywood Empire Route:

      IMG_0334

Why did I put up this and similar enlargements on the train-room walls?? Because that is me on the left. My experiences depicted in these old photos inform my life and are one of the roots of my interest in model railroading. Why did I then post this pic on this Forum?? Because that is what I did on my model railroad today and that is the topic of this thread and this Forum is for sharing OT thoughts, experiences and yes, pics.

At least that is my understanding of the TOS.

Lew, Check your email from me.  That is familiar country and ROW to me too!

Johan, those are great pics. You have a good eye for capturing a scene.

Mike g, good to see you got a chance to run trains. Hope you find the problem with the power to the track.

Erica ann, very nice paint job on the diesels.

 And to everybody else you have made for good reading today on all the projects going on. 

Took a trip to Menards to get some spray paint for the different silos along with some basswood strips from the hobby section to make some loading docks for the new flats. Also picked up two 3 inch clamps that had a great rebate on them. 4.99 each with a 4.00 dollar rebate on each one. The rebate was a limit of two. Today I applied two more washes to the machine shop. Then I started piecing in the flats to see how they will work together. Did some changing out of the flats I already had in place. I decided to cut off the bottom on one of the last flats I got. I think I am pretty close to this being the final positioning. Pics..........Paul 2

DSCN0038DSCN0039DSCN0040DSCN0043DSCN0044DSCN0045DSCN0041DSCN0042DSCN0046DSCN0047DSCN0048DSCN0049DSCN0050DSCN0051

Attachments

Images (14)
  • DSCN0038
  • DSCN0039
  • DSCN0040
  • DSCN0043
  • DSCN0044
  • DSCN0045
  • DSCN0041
  • DSCN0042
  • DSCN0046
  • DSCN0047
  • DSCN0048
  • DSCN0049
  • DSCN0050
  • DSCN0051

55113400-8335-4963-906E-66658DD074759588E08C-BB41-46B6-8800-51FBE2146E1904DF4A7A-AA7B-418A-98AC-486C21FCE7E42923C1B5-8E65-4BC8-B3F2-162BCFC43A19399D8CED-417F-4158-8EA3-75D2F9AF402BB0FF1ED6-B2B4-41D2-8627-378A828210E50F5CAF13-8023-4940-B1CC-D1EB2FCFC444This evening I decided to get this old Lionel  depot up and going. I bought this several years ago at a Hobby Shop in St. Louis and I’m tired of moving it around Under the layout to get something. It will go on the second half of the layout. I’m undecided on the colors but have a few in mind I’m going for a fictional depot. I dismantled it and hope to get it cleaned up and painted soon

Attachments

Images (7)
  • 55113400-8335-4963-906E-66658DD07475
  • 9588E08C-BB41-46B6-8800-51FBE2146E19
  • 04DF4A7A-AA7B-418A-98AC-486C21FCE7E4
  • 2923C1B5-8E65-4BC8-B3F2-162BCFC43A19
  • 399D8CED-417F-4158-8EA3-75D2F9AF402B
  • B0FF1ED6-B2B4-41D2-8627-378A828210E5
  • 0F5CAF13-8023-4940-B1CC-D1EB2FCFC444

IMG_1516

So much to see on this thread in the last three days.

I am still painting Preiser 65602 Seated People for the next passenger cars I will detail.  I have started 38 combined figures that yield 76 people for the train.  The figures were set aside because of the painting challenges they present.  If I stray with my paint cut lines on one figure, I am marking the figure next to it.  I also have changed the way I install these figures, making them more realistic.  I do more grinding of legs that keep them vertical, rather than reclining.

Sincerely, John Rowlen

Attachments

Images (1)
  • IMG_1516
Last edited by John Rowlen
Mark Boyce posted:

Mike, the painting is looking very good!

Lee, I do not have a steady hand anymore, and even by bracing it on something it seems paint goes everywhere.  Your car looks better now than when you started.

LISteamer, the scene is really coming together!  The printed piers are great!

Paul, Your buildings are looking great!  As long as it doesn't snow a bunch next Saturday, I plan to see them first hand!!

Well what I found on the '87 crane is that the magnet works and both motors wonk but they don't turn anything.  I see the coupling between the plastic motor housings and the gears must be little square end shafts, and they both are missing.  I took all the cardboard filler out of the box, but don't see them there.

In this photograph, I have removed one of the motor housings from the base.  I had a dickens of a time getting light to shine where I wanted it, but the two circles with the line between them shows where the square shaft should go from the easy to see hole on the motor housing and the hard to see gear.  The single circle shows where the other motor housing is still mounted on the base and it is missing the shaft also.

If anyone sees where my observations are wrong, let me know.  I never saw one of these before.

Inked2020-02-08 17.16.24_LI

Hardware store keystock,  square wood dowel (craft isle at Wally world, etc) or square ended chopstick?  (a bit easier than finding plastistrut here)

Hold it place for assembly with a tiny dab of silicon/caulk (if it's tricky.)

I wanted to chop off my left arm last month, then my right one soon after. Each lasted about 2 weeks;  Mid fingers to elbow... I couldn't lift a coffee cup with the left one.     Arthritis or CT  most likely....It ain't fun; that's for sure.

mike g. posted:

Erica Ann, Wonderful work on the Alco shells!

Lew, those are some fantastic photos! Thanks for sharing with the rest of us~!

Third Rail, Great job on the weathering, thanks for the step by step information!

JLM, Your son has an eye for taste! Let him flow with it, it will help keep him interested!

Johan, You never let up! Once again what a great looking scene!

Mitch, Outstanding work, what an improvement and I bet the kids really love it!

As for me, nothing, noda, zip, zilch. I guess you all get the point, been working on the house! LOL

Mike. You're welcome. I just try do it my best.🤝

Johan


paul 2 posted:

Johan, those are great pics. You have a good eye for capturing a scene.

Mike g, good to see you got a chance to run trains. Hope you find the problem with the power to the track.

Erica ann, very nice paint job on the diesels.

 And to everybody else you have made for good reading today on all the projects going on. 

Took a trip to Menards to get some spray paint for the different silos along with some basswood strips from the hobby section to make some loading docks for the new flats. Also picked up two 3 inch clamps that had a great rebate on them. 4.99 each with a 4.00 dollar rebate on each one. The rebate was a limit of two. Today I applied two more washes to the machine shop. Then I started piecing in the flats to see how they will work together. Did some changing out of the flats I already had in place. I decided to cut off the bottom on one of the last flats I got. I think I am pretty close to this being the final positioning. Pics..........Paul 2

DSCN0038DSCN0039DSCN0040DSCN0043DSCN0044DSCN0045DSCN0041DSCN0042DSCN0046DSCN0047DSCN0048DSCN0049DSCN0050DSCN0051

Paul. Thank you. I waiting our new backdrops, hope they are soon ready.🤝

Johan

Adriatic posted:
Mark Boyce posted:

Mike, the painting is looking very good!

Lee, I do not have a steady hand anymore, and even by bracing it on something it seems paint goes everywhere.  Your car looks better now than when you started.

LISteamer, the scene is really coming together!  The printed piers are great!

Paul, Your buildings are looking great!  As long as it doesn't snow a bunch next Saturday, I plan to see them first hand!!

Well what I found on the '87 crane is that the magnet works and both motors wonk but they don't turn anything.  I see the coupling between the plastic motor housings and the gears must be little square end shafts, and they both are missing.  I took all the cardboard filler out of the box, but don't see them there.

In this photograph, I have removed one of the motor housings from the base.  I had a dickens of a time getting light to shine where I wanted it, but the two circles with the line between them shows where the square shaft should go from the easy to see hole on the motor housing and the hard to see gear.  The single circle shows where the other motor housing is still mounted on the base and it is missing the shaft also.

If anyone sees where my observations are wrong, let me know.  I never saw one of these before.

Hardware store keystock,  square wood dowel (craft isle at Wally world, etc) or square ended chopstick?  (a bit easier than finding plastistruct here)

Hold it place for assembly with a tiny dab of silicon/caulk (if it's tricky.)

I wanted to chop off my left arm last month, then my right one soon after. Each lasted about 2 weeks;  Mid fingers to elbow... I couldn't lift a coffee cup with the left one.     Arthritis or CT  most likely....It ain't fun; that's for sure.

Butch, Thank you for the ideas.  Someone else suggested he has the ability to cut plexiglass to size as well.  On the one hand, it is a back burner project.  On the other hand, it is a project I would like to put back together once and know it's working.  Right now it is sitting there in pieces.  

I'm sorry you have had so much pain with arthritis or even carpal tunnel.  I had CT surgery in each hand twice.  Scar tissue caused the second go round.  It was much worse. 

Mark Boyce posted:

Lee, I was looking for something else and found another AmeriTown kit I forgot I had.  It says it is a Realtor office, but I think it looks like a small company store in coal country. I’m going to build it next trying a thinner, more tan mortar, and see how it goes before I do the Atlas switch tomorrow.

Mark- when I did my building over the weekend I mixed the paint to a very thin milkshake consistency. Seemed to work well.

Bob

Add Reply

Post

OGR Publishing, Inc., 1310 Eastside Centre Ct, Suite 6, Mountain Home, AR 72653
800-980-OGRR (6477)
www.ogaugerr.com

×
×
×
×
Link copied to your clipboard.
×
×