


Correction. The new Menards building is resin, not ceramic. Menards Seed & Feed. $99.95. 11.5 x 14 high x 14.5. It is in stock now. The two prior resin items, the Menards Store and the Menards Garden Center are beautiful pieces, and now sold out. I have both on my layout. They have lots of lights and action, and work flawlessly. Does anyone out there have them?
Me and my son just got done taking apart my MPC era Illinois Central GP7/9, reseating the trucks, lubing it up, and putting it back on the track. It now runs better then it ever has for me. He is now down in the train room putting it though its paces.
Originally Posted by Bob Anderson:
Today I hit a cumulative 100,000 views on my 28 layout videos. The first 14 are a previous layout, with Lionel operating accessories and two levels. The second 14 are my current in-progress layout, with more realism and wider curves. Both attempt the look of the red-rock desert country around Colorado and Utah.
Bob A.

I love the Highway!!!
This morning I collected the last of the lichen and sprayed it with glycerin. Decided to add some grass ground foam to areas missing it before I put the lichen back down................Paul
Originally Posted by Diok S:Have both of them.
Correction. The new Menards building is resin, not ceramic. Menards Seed & Feed. $99.95. 11.5 x 14 high x 14.5. It is in stock now. The two prior resin items, the Menards Store and the Menards Garden Center are beautiful pieces, and now sold out. I have both on my layout. They have lots of lights and action, and work flawlessly. Does anyone out there have them?
Attachments
Videos (1)

Originally Posted by Bob Anderson:
Today I hit a cumulative 100,000 views on my 28 layout videos. The first 14 are a previous layout, with Lionel operating accessories and two levels. The second 14 are my current in-progress layout, with more realism and wider curves. Both attempt the look of the red-rock desert country around Colorado and Utah.
Bob A.
Wow, Bob, didn't realize you were a member here.
I've viewed your videos many times, love all of them. Great stuff and I've really enjoyed watching your layout progress. Hope to someday have one as nice as your layout!
Briefly ran some trains. Thats all I had time for unfortunately.
Ran some trains today. Finish spraying the last of the lichen with glycerin and placed it around the layout. Tomorrow Mr. Brown will be bringing me a nice package......Paul
USPS was good to me today. Received the set of Crest rollers I'd ordered; had the 6/32 nuts (per JohnS' tip) on hand to attach on the bottoms of the roller bases for a far more stable install on LIONEL and Gargraves track; and, tried out some track for a test track based on JohnS' design.
Also, I received from the good folks at Tomar Industries the LED-equipped drumhead for my Great Northern Empire Builder repaint project.
Exchanged emails with Dave/LBR reviewing and giving final approval to the proofs Dave supplied for some NP North Coast Limited passenger car decals I've been trying to find for months.
And received from an Ebay seller the male part of some extremely small single wire connectors; the female parts are being supplied by a different Ebay vendor. I'll use them for installing LED's in PW-style LIONEL 15" aluminum cars.
Finished tuning up the Marx transformer and removing the Marx uncouplers from the factory layout (they interfere with trolley operation).
Currently figuring out how to PERMANENTLY attach Thunderbirds 1-4 to their respective flatcars... ![]()
Mitch
Jon came over today. He finished hanging the last of the track lighting, which completes that project.


We only installed a couple of fixtures because I wanted to wait until Patrick is done painting the backdrop.

While Jon was doing that, I added plywood strips to the lower section of the helix to create a smooth surface to which the backdrop could be fastened.

Then we cut and hung the first piece. All of this is preparation for the last section of track on the lower level. Eventually, there will be a bridge over the Mississippi carrying the track around the curve.

We also got this piece hung, completing Hiawatha

At first I thought I might have miscalculated, because the vertical clearance looked too short. But at 5 1/2 inches, it should be just fine, as the only cars that will ever go to Hiawatha are grain hoppers and the occasional scrap gondolas and lumber loads.

Attachments
Images (7)
Don't run any electrics. They wouldn't clear.
Originally Posted by rboatertoo:
Don't run any electrics. They wouldn't clear.
Not a problem, I don't own any.![]()
Originally Posted by Big_Boy_4005:
Originally Posted by rboatertoo:
Don't run any electrics. They wouldn't clear.
Not a problem, I don't own any.![]()
![]() HERESY!!!!
HERESY!!!! ![]()
Mitch
Originally Posted by M. Mitchell Marmel:
Originally Posted by Big_Boy_4005:
Originally Posted by rboatertoo:
Don't run any electrics. They wouldn't clear.
Not a problem, I don't own any.![]()
![]() HERESY!!!!
HERESY!!!! ![]()
Mitch
Those giraffes better keep their heads down riding behind that GG-1, lest they become crispy critters.![]()
![]()
Actually, I do own exactly one electric. An MPC Milwaukee Road Little Joe, but I can't run it on my layout because it's conventional, and the layout is 100% TMCC.
Watch your stack train also. Double stacks wont clear.
WOW!!! what a post 100+ pages
woohoo.
bought a new piece of Atlas 40"
ridged straight track.
working on building a new board and am
experimenting with new connector tracks
between moduels.
I sat and ate my oatmeal and watched the Lionel 2065 that I bought yesterday, pull a nice freight around my layout. I already have a nice 2065 but this one is in nice condition and was priced right you know the story, no need explaining.
Originally Posted by jim pastorius: Yes Jim the 2065 is a great locomotive!! It was the one that came with my first Lionel set when I was 4 years old in 1956. I had it up and running on my Mountain Division last week. She was pulling 3 Lionel Santa Fe streamlined passenger cars. What a thrill to watch her do her thing! Keep on enjoying yours!
I sat and ate my oatmeal and watched the Lionel 2065 that I bought yesterday, pull a nice freight around my layout. I already have a nice 2065 but this one is in nice condition and was priced right you know the story, no need explaining.Yes
I changed out the steam engines on my layout, replacing them with diesels. The grandkids are coming over to stay tonight. They prefer diesels over steamers. ![]() Well, at least they like the trains.
Well, at least they like the trains.

Originally Posted by jmiller320:
Watch your stack train also. Double stacks wont clear.
Stack trains will never go to this part of the layout. This is an industrial branch with 6 grain elevators / mills, a lumber yard and a junkyard. Stack trains are confined to the mainline where there is plenty of clearance.
Originally Posted by Big_Boy_4005:
Originally Posted by M. Mitchell Marmel:
Originally Posted by Big_Boy_4005:
Originally Posted by rboatertoo:
Don't run any electrics. They wouldn't clear.
Not a problem, I don't own any.![]()
![]() HERESY!!!!
HERESY!!!! ![]()
Mitch
Those giraffes better keep their heads down riding behind that GG-1, lest they become crispy critters.![]()
![]()
Actually, I do own exactly one electric. An MPC Milwaukee Road Little Joe, but I can't run it on my layout because it's conventional, and the layout is 100% TMCC.
I hadn't thought of it before, but wonder if that's also why Gramps modified his giraffe cars to stay down till over an un-coupler. He owned 18 GG-1's and did have catenary for a short while
Finished assembling the parts for my wood, tell tale signal pole. Cotter pins, a 6'' dowel, and a shish-kabob skewer for the counter levered arm & brace. Using heavily serrated scissors scraping deeply, and haphazardly at angles, to produce that deep weathered pole grain. Ill stain, dip the pin tips in urethane paint ,and call it done.
It looks great to me![]() . And was so easy I'm thinking my electrics need at least one catenary line a la Great Northern style poles..
. And was so easy I'm thinking my electrics need at least one catenary line a la Great Northern style poles..
I have been a way from my work in process layout for several days while I rebuilt a couple of ZW's and a few KW's. A couple weeks ago I posted pictures of a prototype girder bridge I planned to build in several different lengths for my layout. I finally came up with my final design. I painted it gray and dry brushed a rust color paint to make it appear like a slightly rusted metal. there will be eight of these on the layout of various lengths. The unpainted pictures were my original design.


Attachments
Images (4)
I sanded off the bumper markings (and tire pressure markings over the rear wheelwell, which the Army didn't start doing until well after WW2) for three 1:43 scale WW2 Jeeps that will eventually be on the layout. I'll be repainting those bumpers for my own custom-made unit markings (for a fictional RR operating unit) tonight.
I also placed large sheets of paper over the two back corners of the layout and traced the roadbed for the tracks. The reason is so I will be cutting sheets of plywood in those shapes, doing all the corner scenery (and backdrops where they will be rounded into the corners) away from the layout for easy of construction, then when finished, dropping the completed corners into their proper places. This should make the scenery in the corners go much faster as they'd be very hard to reach otherwise. I plan on cutting the plywood this weekend.
Finishing placing my refreshed lichen around. Mr. Brown came early and dropped off my packages. Took two of the Hy cubes up to see them rum along with the GT auto rack. Awesome to say the least. Love the direction Lionel is going with scale length freight cars. After dinner I'll get the rest of the Hy cubes on the track..................................Paul
Originally Posted by Big_Boy_4005:
Those giraffes better keep their heads down riding behind that GG-1, lest they become crispy critters.![]()
![]()
Actually, I do own exactly one electric. An MPC Milwaukee Road Little Joe, but I can't run it on my layout because it's conventional, and the layout is 100% TMCC.
Heh. Don't worry, my G's run on third rail. ![]() I do know that extended pantographs DO do a nice job of sweeping up the telltale and depositing it down the line.
I do know that extended pantographs DO do a nice job of sweeping up the telltale and depositing it down the line. ![]()
Wonder if that Little Joe could be converted to TMCC?
Originally Posted by Adriatic:
I hadn't thought of it before, but wonder if that's also why Gramps modified his giraffe cars to stay down till over an un-coupler. He owned 18 GG-1's and did have catenary for a short while
Finished assembling the parts for my wood, tell tale signal pole. Cotter pins, a 6'' dowel, and a shish-kabob skewer for the counter levered arm & brace. Using heavily serrated scissors scraping deeply, and haphazardly at angles, to produce that deep weathered pole grain. Ill stain, dip the pin tips in urethane paint ,and call it done.
It looks great to me![]() . And was so easy I'm thinking my electrics need at least one catenary line a la Great Northern style poles..
. And was so easy I'm thinking my electrics need at least one catenary line a la Great Northern style poles..
Pic, please! And that's actually an interesting theory about your Grandpa's giraffes...
Mitch
Of course, your Little Joe can be converted to TMCC, and i'm sure it would be as easy or easier than the GG1's i do all the time for customers.
jackson
I started to wire up the yard track and the ten turnouts I installed. I was able to get two of the Fastrack turnouts wired for Auxiliary power and the control switches hooked back up.
My International Rescue consist is complete! Thunderbirds are "O"!

Mitch
Attachments
Images (1)
Set-up my tripod and began photographing ~50 die cast cars and trucks that I'm selling; taking notes on any flaws; doing some simple Ebay "completed transactions" searches to get a ballpark value for them; and, considered some different packaging approaches since single diecast vehicles' shipping costs can be a problem.
Continued on my quest to achieve satisfactory results on 3 PW F3 A unit shells and a B unit shell bodywork before beginning paint. I'm getting real close.
In other words, not as much as I wished I had done.![]()
I have completed the paint job on my Ameritowne Homestead Furniture kit. This is one huge structure! No build issues here. Next comes the clear plastic window material.
I have a Plasticville School that I am thinking of converting into a restaurant. I have some left over windows and parts from other kits. I can use those.
Originally Posted by M. Mitchell Marmel:
Wonder if that Little Joe could be converted to TMCC?
It would be a very simple conversion Mitch, because this engine was modified with small can motor trucks. I'm not going to do it though. It wouldn't make it up the helixes with any kind of a train, and it doesn't fit with my railroad's motif.
If I was going to spend the money on a board to convert an old engine, it would probably be a 20 year old BN F-7 by Williams (not WBB).
I was working on the helix wrap when Jon called this afternoon. Among other things, he wanted to thank me because he had a good time yesterday. I get him to work on my layout, and he wants to thank me. I tried to tell him he had it backwards, and that it was I who should be thanking him.
Here's what I did today...


Thanks Jon!!!![]()
Attachments
Images (3)
Pre-layout preparation is coming right along. A recent resurgence in enthusiasm finds me tackling the large area of a "T" shaped floor plan. Transforming an attic can be frustrating when a lot of time is wasted moving junk that already occupies the space. Here's what I started with 2 weeks ago.

Some sore muscles later the sub-floor is half down giving me some much needed storage space in the background. I'm strapping the rafters with 2 X 2's, increasing their depth to accept more insulation.

As of tonight, things don't look any neater but are definitely progressing. Note how I crammed that previously open space in the background full of crap. It's the ultimate test of my engineering ( fingers crossed ). I'm ready to have my buddy come by and rough in the wiring, then I can experiment with the positioning of the LED lighting and retire that old floor lamp.

The only area needing sub-flooring is the left side but i ran out of lumber. Instead, I assembled my future work station/control central and positioned it. the proposed track plan will have rails running along the back of the desk, about 8-10" above desk top. Got the rotary dial phone hooked up to save some steps. That's it so far!

Bruce


strangely, at the same time I was building the shelves, the village of Plasticville suffered an earthquake.The Post Office was devastated, one of the mail trucks ended up inside. Even the local coal/auto salvage yard was hit. The building inspector stopped by to look at the remains of the Post Office, and was overheard saying that if some kind of bonding agent had been used in the construction, the building would have survived.


Attachments
Images (2)
Ran some of my pre-war and specially late pre-war locos behind some passenger cars of like age. Just a fun-run. Excercise the fleet.
It's a very rainy day outside, and somewhat cool here in Baltimore. So, I completed my Ameritowne 443 Homestead Furniture kit. It looks good! Now, I've started converting my Plasticville school into a restaurant/banquet hall. One set of the rear windows was blanked out with some styrene stone building sheet as have both ends of the structure. A porch has been added to the front.
I also have a K-line hen house that was poorly built. It was a glue bomb with poor fitting sides and roof. But I dismantled it, put it back together, and gave it a coat of Polyscale BN green with light gray trim. I'm thinking of converting it into a tavern. Debating what to call it; the Hen House or the Rat Trap?
THE GLACIER LINE UPDATE:
For the first time in a long time I think it is easier to understand what I'm doing in the lower staging (hidden from view) area. 03-14-2015 The first through track and four staging lanes are physically connected. 03-14-2015. I still have to finish the wood/base support system for lanes: 6, 7 and 8. It is really coming along! I will be able to park seven trains in this area and they one by one may leave pass through the public visible area and disappear into an upper staging area that DOES NOT EXIST as of yet. One thing at a time! I'm just glad to be able that I'm very close to getting this done which will allow me somewhere to leave the majority of trains free from obstructing the main-line! The diagram shows the track arrangement more clearly than the series of photos.
Attachments
Images (6)


Originally Posted by 56f100:
I also have a K-line hen house that was poorly built. It was a glue bomb with poor fitting sides and roof. But I dismantled it, put it back together, and gave it a coat of Polyscale BN green with light gray trim. I'm thinking of converting it into a tavern. Debating what to call it; the Hen House or the Rat Trap?
Call it Clucker's. With a name like Clucker's, it HAS to be good! ![]()
Mitch
Springfield Train Show Report, 3/14/15:
My, but I'm tired. Lotsa fun, tho! And thanks muchly to Joe D. for the chauffeuring and setup/tear-down help!
A fine time was had by young and old:

Plenty of future railroaders present!


Bill Ondeko's "Jungle Train" railroad was a hit:


Complete with the Creature From The Black Lagoon putting the moves on a local lovely...

And the natives enjoying some Mulligan stew with real Mulligans!

DISCLAIMER: No actual Mulligans were harmed in the making of this diorama. ![]()
I acquired a Lionel #51 Navy Yard switcher in rather ratty condition:

With a cracked shell, messed up headlights and missing windowpane, I have no qualms about putting on a trolley pole and painting this up for Razorback Traction Co. ![]()
Also acquired: A Williams GP-9 and a Lionel Minneapolis & St. Louis caboose. The caboose because a) it was the first Lionel caboose I ever got (in 1966) and b) in honor of a chum of mine who lives in Minneapolis. ![]()
The Geep is going to get the roof details removed, a pantograph added and become a poor man's EF-4...

If anybody has a spare GP-7 shell available, please let me know. The conversion would be easier without having to deal with the dynamic braking blister... ![]()
After getting home, I scrubbed down the #51, who I've dubbed "Junior" (which prompted some "Mean Widdle Kid" jokes from some of my old time radio enthusiast friends) and gave the motor a good cleaning and lubing, as well as new brushes. Newly revived, "Junior" trucked on down around my layout, handling two boxcars, three gondolas and Princess Daphne with aplomb:

Road Supervisor Sylvia Siamese approves.
Williams wins the "Less is More" award with their "Two Can Motors, a Bridge Rectifier and a Capacitor" wiring scheme:

All in all, a fun and rewarding day! More photos below.
Mitch
Attachments
Images (27)


Track planning. Starting to think about a 10' x 45' section of our basement. Had been using the Atlas RTS 10 for track planning. Downloaded SCARM today. It is great, especially for freeware, and has all of the Ross in it that I need.
Originally Posted by John C.:
THE GLACIER LINE UPDATE:
For the first time in a long time I think it is easier to understand what I'm doing in the lower staging (hidden from view) area. 03-14-2015 The first through track and four staging lanes are physically connected. 03-14-2015. I still have to finish the wood/base support system for lanes: 6, 7 and 8. It is really coming along! I will be able to park seven trains in this area and they one by one may leave pass through the public visible area and disappear into an upper staging area that DOES NOT EXIST as of yet. One thing at a time! I'm just glad to be able that I'm very close to getting this done which will allow me somewhere to leave the majority of trains free from obstructing the main-line! The diagram shows the track arrangement more clearly than the series of photos.
I can relate, John. Often it's hard to think in 3D, let alone put the idea into an understandable form. Only until the idea is physically built then does its intention become understood.
Long before things like SCARM I practiced the art of hand drawn layout plans and still do. Normally these plans never come to fruition but that's really not my goal...I just enjoy putting the ideas down on paper. The challenge of creating a workable design on multiple levels sure comes in handy once it's decided it's time to build.
Bruce
Took measurements and moved things around to make room for a Menards Seed and Feed. Rearranged some train consists to operate for our local Club meeting over here on Wed.
Mitch,
Jealous of the time you get to spend with my dad! Hey if he lets any good Birthday, Christmas, or Father's day gift ideas slip...PM ME!
I'll be back in AR in May...it can't come soon enough!
Originally Posted by M. Mitchell Marmel:
Springfield Train Show Report, 3/14/15:
My, but I'm tired. Lotsa fun, tho! And thanks muchly to Joe D. for the chauffeuring and setup/tear-down help!
All in all, a fun and rewarding day! More photos below.
Mitch
We had a pretty powerful wind situation going on yesterday, so I didn't want to do anything that needed electricity and then have the power go out. Thankfully, it never went out.
Still, I decided to do something I'd wanted to do for a long time with 2 1/43 scale Jeeps. I painted the seat covers (as they come in tan and nobody even made tan canvas for them), made windshield covers, painted over the 'invasion' stars which wouldn;t be seen stateside, removed the tire pressure markings which were postwar, and then weathered the living heck out of them.
Bofore the weathering, I placed custom-made bumper markings for a fictional RR operating unit for my layout.
I'm thinking of doing a independent blog here on how WW2 vehicles should look on layouts.
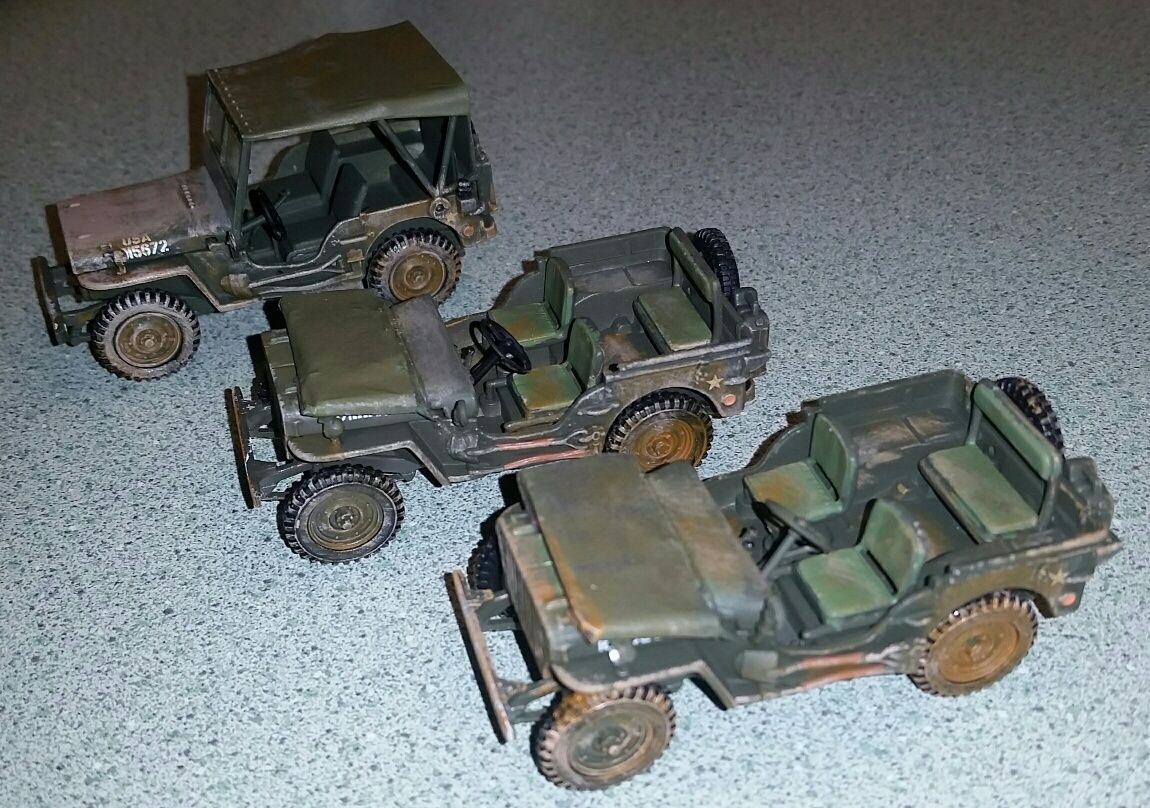
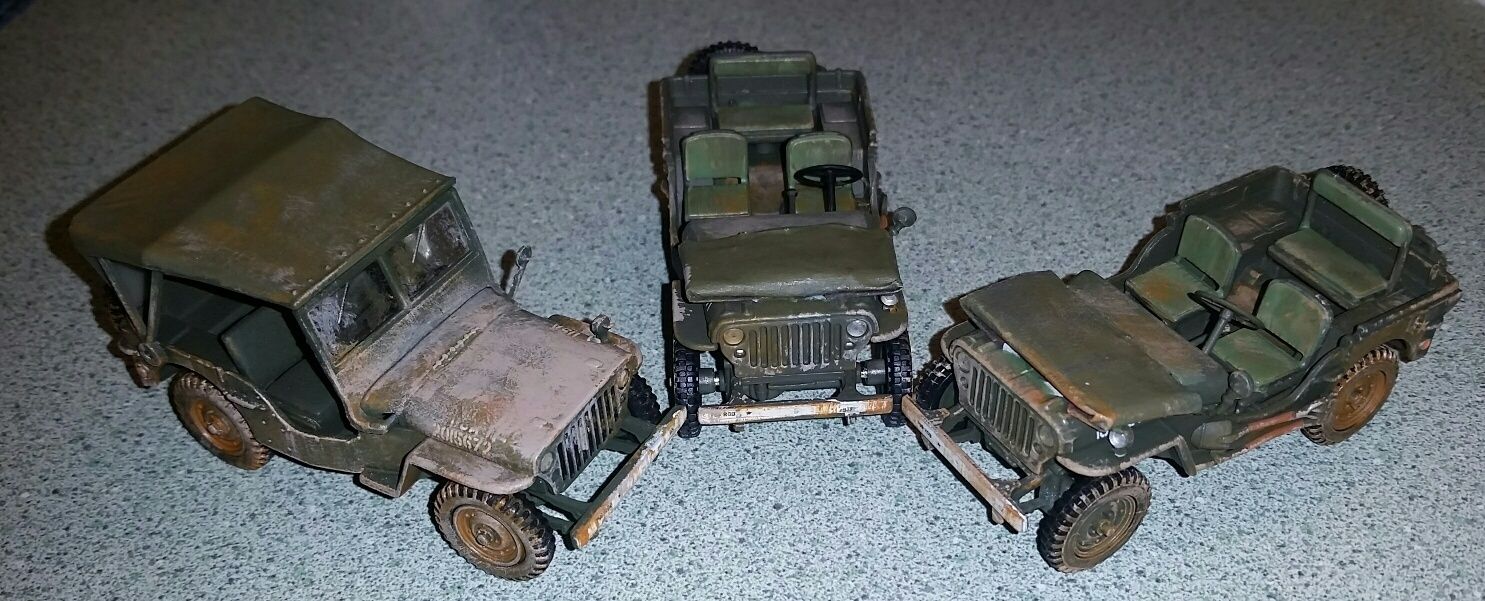
For stateside training vehicles they're probably way dirtier than you'd find back then, but I like how they turned out,.
A few days ago I got my Hy cube box cars. So I am going to change out the beer reefers on the one mainline and put the double stacks and Hy cubes on there today......Paul
I ran trains today. Did a bit of switching cars on my under construction version of Ken Hoganson's article in Run 273 I believe it was. The only problem I had was needing to put a K-line reefer with a coupler that won't stay closed on the repair track.
Began the tedious task of masking windows in a dome for my NP North Coast Limited train. Had to get going since the decals I needed arrived from Dave/LBR today! THANK YOU, Dave.
Also received the DC-DC buck boost modules in the mail from China for LED lighting of the NP NCL cars.
Anyway, it's back to trimming the masking tape on dome #1.![]()
Originally Posted by p51:
For stateside training vehicles they're probably way dirtier than you'd find back then, but I like how they turned out,.
I think they look fabulous and particularly appreciate the grimy and worn appearance to where the passengers/driver sit. That is real attention to detail, if you ask me.
FrankM
The missing link won't be missing for long.
The east end was finished Saturday.

The west end today.

A long term temporary bridge will span the gap, and when it does, the lower level will be done.

Attachments
Images (3)
Have not started scenicing yet really (ballasting, ground cover etc.), but trackwork and wiring and other things are done.
So, today I started trying out trees in one area of the layout. Not satisfied yet, but I will keep adding and moving and changing trees around before I finalize some locations.
I am having fun, though!
John


So, today I started trying out trees in one area of the layout. Not satisfied yet, but I will keep adding and moving and changing trees around before I finalize some locations.
I am having fun, though!
John


Attachments
Images (3)
That's the real objective John. Having fun.![]()
Larry
Fixed the smoke unit in a lionchief Linoel Lines 2-4-2 Scout. Some how it was installed not lining up properly, and with I think oil in the reservoir. A good flush of smoke fluid too clean it out, a resetting in the frame, minus a few bits of fuzz, and off it went with a working puffing smoke unit around the oval.
Originally Posted by Moonson:
Originally Posted by p51:
For stateside training vehicles they're probably way dirtier than you'd find back then, but I like how they turned out,.
I think they look fabulous and particularly appreciate the grimy and worn appearance to where the passengers/driver sit. That is real attention to detail, if you ask me.
FrankM
Thanks. I really need to get shots of them with better light. They're not flattering photos at all. The one bit of weathering I need to go back and do is to make the paint look heavily worn where the driver's feet go. As for the rest, I have numerous reference books on Jeeps in service, and the heavy mud-dust splash on the hood of the one with the top up was based on a photo I found from the Tennessee Maneuvers in 1943. I can only assume that Jeep had driven into a very dep ditch or mud hole, or had been splashed by a tank of large truck.
I know all too well where mud and dust can be found on a Jeep when you don't wash it, as I have a 1944 Willys MB Jeep that I take to historical events, airshows and a couple of local car shows each year. In fact, I really need to change the oil, charge the battery and fire it up as it's been sitting cold all winter long this year...
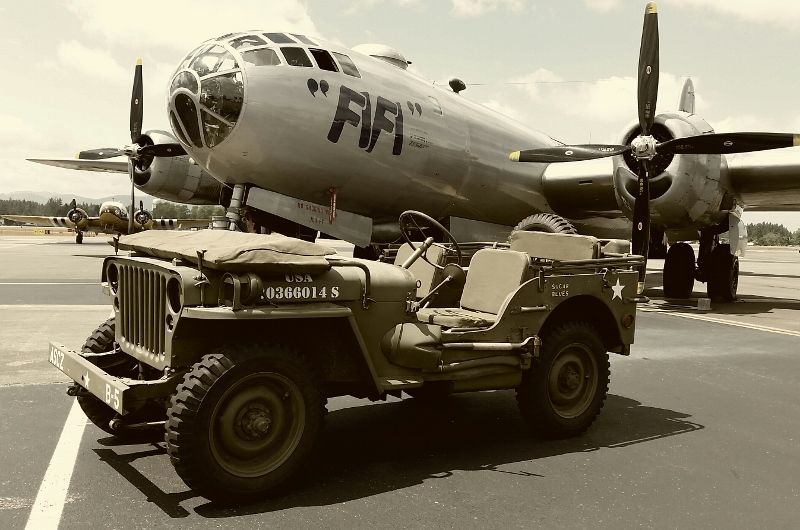
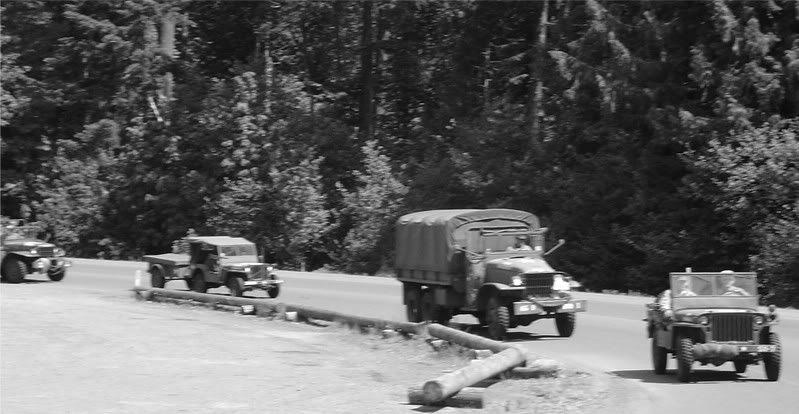
(I'm driving my Jeep to the far right in this shot. It's blurry but still one of my favorites as it's the best, "Germany, 1945" shot it's even been in)
HUGE NEWS:
As of 10:30 tonight, the layout is fully operational! I soldered the turnouts into place and fixed the kink. I ran two locomotives over all the changed spots. My God, I can finally run trains now!
Originally Posted by p51:Congratulations, I'm sure it feels great.
HUGE NEWS:
As of 10:30 tonight, the layout is fully operational! I soldered the turnouts into place and fixed the kink. I ran two locomotives over all the changed spots. My God, I can finally run trains now!
Boxed 15 cars last night getting down to the end of boxing up my layout to permit access to the electrical panel for solar installation. 35 trains (45 engines or so) running simultaneously on 13 loops is history. Will need to post inventory on the buy and sell forum in hopes that others might benefit from my 50% reduction in rolling stock and engines to permit a more leisurely running sessions with scenery . One bedroom is full of trains with 2nd one 1/2 way there. I still have more boxes in the attic. Ugh!!
Attachments
Images (1)

Hey Winrose46.. Keep me posted on rolling stock disposal. Muchos of thanks.
KRK
Originally Posted by Spence:
Congratulations, I'm sure it feels great.
It sure does, thanks. This is the first 'serious' layout I've ever built and the only one I've mostly built alone (the only other was a HO switching layout in the 80s, when I was a kid, Dad did all the bench work then).
I've been waiting almost 30 years for this moment. Almost brought tears of joy to my eyes to realize it was running.
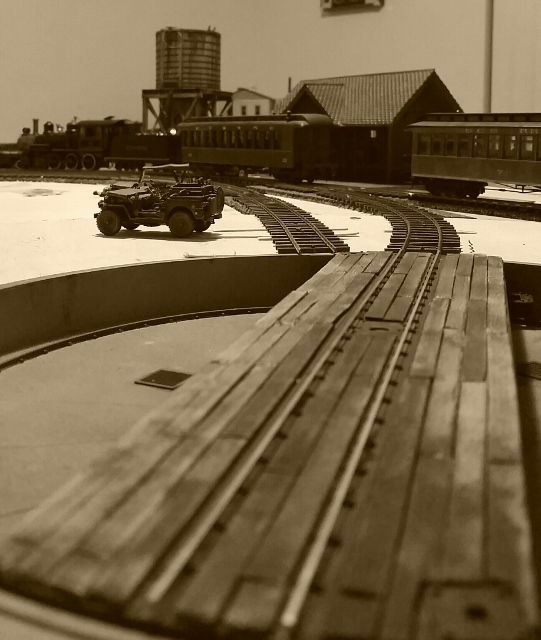
Did some decal work on the final engine that was lacking proper #s. Took this shot with my cell. In all humility, imagine what I can do with scenery in place!
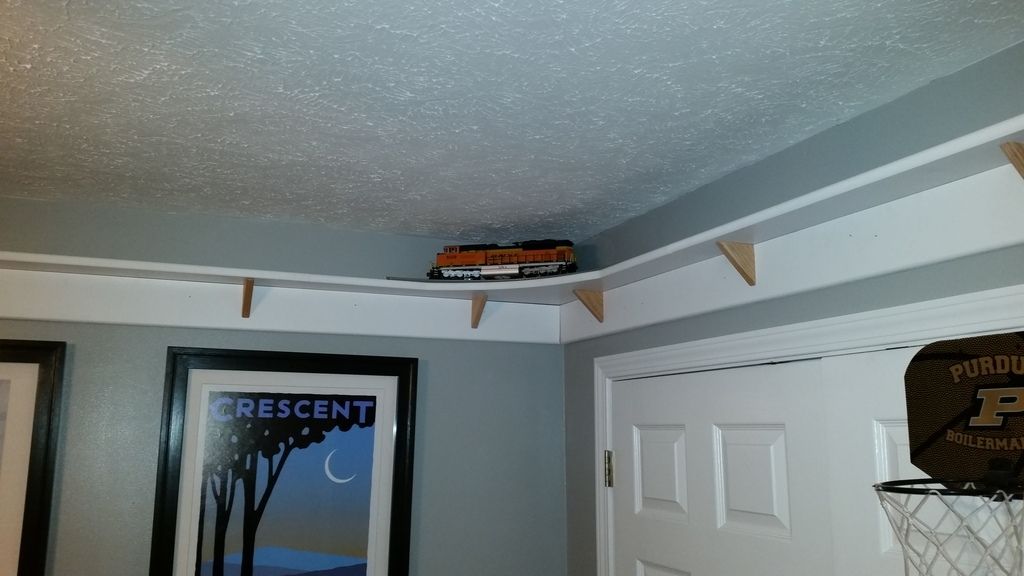
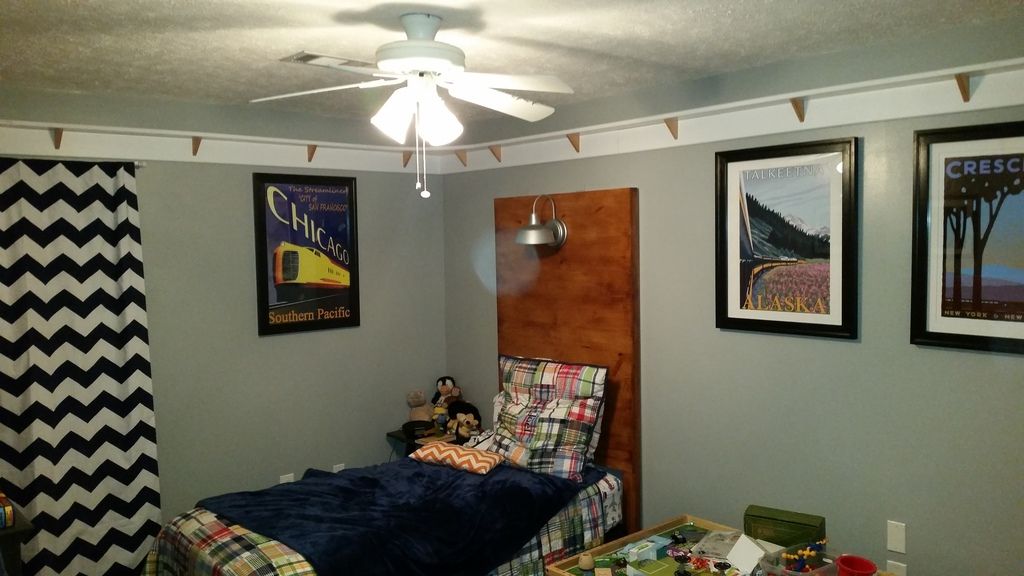
So this is not really a "layout" in the traditional sense, but I didn't really know where else to put this. I am adding a shelf "layout" to my 5 year old's room. Yesterday, I got all the shelving up. It needs some touch up paint and the shelf brackets need to be painted, but I am pretty happy with how it is turning out.
Originally Posted by p51:
Did some decal work on the final engine that was lacking proper #s. Took this shot with my cell. In all humility, imagine what I can do with scenery in place!
Nice shot! Great composition, and the sepia tone seems fitting to both the era and situation.
THe Plasticville schoolhouse to diner conversion is done. Now, I have to make some signs to hang outside the diner, which I might call Sylvia's, the chicken house turned tavern(Clucker's Bar), and the police station turned auto parts store. I have a boxcar shed from a Plasticville Hobo Jungle kit I might turn into an office for a junkyard. Presently, this boxcar shed has a sign for Nicole's Java Hut. Might change it to Bud's Junkyard.
Last night, I took some dry-transfer decal sheet of gold RR roman numbers (Woodland Scenics, they’re a pretty darned good match for the numbers that’d been there) to the third ET&WNC ten-wheeler, to change it from # 12 to # 9, one of three engines to carry wartime black and gold. The number plate for 9 in that timeframe had a silver painted center unlike the other two engine’s red centers for their number plates. I have no idea why that was. I had to hand-paint the thing using one of those magnifying visors and a very thin tipped brush with some Testor’s silver paint. Then, I hit it with a number transfer, but that didn’t come out very easy to see between the two colors. So I broke out a very small tipped pen and put in fake shadow lines to make the number ‘pop out’ as I couldn’t think of anything else to do there. It’s not perfect, but it looks okay for what it should be. It’s not something that’s going to be noticed that much anyway. I normally don’t like dry transfers much because they rub off so easily, but the cab sides and sand domes aren’t placed that would be handled much, I’d think. I’d sanded off the original numbers with the finest grit wet-dry sandpaper I could find. I still need to weather all three of them. I also have # 14 in green and gold prewar paint, and I'm not 100% sure what I'll be doing with that one, as 14 was already working Alaksa on the White Pass by then (in fact, was probably at the Northern Pacific shops at South Tacoma for a complete rebuild after it's first year in Alaska, along with ET&WNC # 10)...
Each locomotive by then had a sheet metal cover for the tender backup light, which hid the side locomotive numbers. I need to make three of them from styrene, I have a brass rod the diameter needed and my plan is to cut strips the right width, then melting them over the top of that rod to make a ‘U’ shape.
Originally Posted by Len B:
Nice shot! Great composition, and the sepia tone seems fitting to both the era and situation.
Thanks!
More bodywork: 3 PW LIONEL F3 A units and one B unit; stripping an aluminum observation car for NP NCL train; and, continuing to mask the first dome for the NP NCL.
Assembling components for LED lighting installation on 4 more LIONEL repainted, 15" aluminum cars.
For all you model railroaders who have small children running around your layout or even older adults with "sticky" fingers who just HAVE to go and GRAB at everything, here is a sign you can post to essentially say: "Don't Touch" !!!
Cheers.
KRK

Attachments
Images (1)
Originally Posted by p51:
... Took this shot with my cell. In all humility, imagine what I can do with scenery in place!
Oh, I am imaging that, all right, and am looking forward to your next move!
FrankM
Hey, that's looking really sweet Lee.
I'd like to suggest one thing....but really cant think of anything![]()
![]()
![]()
I "saved" some more junk post war accessories over the last few days.
Last fall I picked up an old post war 4x8 loop layout with a 1033. It was obviously stripped of its unbroken accessories but it had the frame work of the timed AF taking City Station, Lionel crossing gate, flagmans shack, girder bridge, a bunch of pressure contact switches, lock-on isolated rails, a #90, the controller & accessory shoe W/uncoupler track etc. etc., and two pickup shoe-to-the outside rail, accessory actuators. Much like the giraffe's tell tale pole holders, but it has two rails for the old shoes. I think it is for a operating brakeman (Is it? Ive never had one)
In fall, I robbed the layout of its station. It worked, but it was "hit".
No roof, no door section, filthy dirty, and stained windows. It was stained too bad
missing parts. So I turned it into a factory with PVC for smoke stacks, and a semi-trucks inner tube covering a sheet of Masonite!
After waiting all winter, the weather break had me in the garage, and I decided I better pull the rest off, and breath some life back into them.
Washy washy washy....rinse rinse rinse....dry dry dry...Viola, shiny post war.
The crossing gate was missing its plastic optics for lights, but I had two red machine panel jewels that fit the holes perfect. As luck would have it, the balance happened to be perfect at this point. But the gate has operated so many times, the rear-most horizontal brace of the arm, between the counterweights, has near completely worn away! So I will drill and thread the counterweights to take a horizontal screw covered by a rubber tube to act as the up-stop. This weight should also let me wire l.e.d.s inside the gate jewels, and then re- balance it with a few washers on the ends of the screw & rubber tube. I painted the bulb red, in the mean time, to get the red glow I'm used to seeing near the cross-bucks.
The flagman seemed relieved as he may not have had a bath since beginning the job. Nice paint on the face, not an offset glob. The shack got a new roof made of rough cut wood veneers & a center beam. Nothing too fancy for my layout!...
As in nothing fancy belongs there![]()
The cross-bucks were gone, but I had a white plastic chopstick with a squared handle that fit the cross-buck base well enough to epoxy it to the base then screw in place. I was going to cut it further to build a cross-buck sign, but I think I'm just going the place one at the road, and use the chopstick to fly "Old Glory"![]()
Those brakeman actuators, will get used to support two more homemade tell-tales I happened to start building...even though I didn't think I had any pole supports.
Nothing going to waste, I'm going to throw a quick coat of urethane on the layout, and fill it's bare spots with gravel, sand, and moss, using it outside at some yard sales this summer.
My luck has been running great this year for little PITA details requiring no real effort![]() .
.
Tuesday, I spent the day painting the track at Hiawatha. I finally got the paint properly thinned, the air adjusted to the correct level, and I was off to the races.


Nothing quite like a turkey baster for getting paint from a gallon can into a 2 ounce jar.

Patrick came over today, first time in almost 5 weeks. And even though I was feeling the effects of a cold, and wasn't much help, he was on a mission! Bondo, sand, prime and paint.

First order of business, hang the missing piece behind the control panel...

also the section above the workbench.

Here's what things looked like when the afternoon was done.


Attachments
Images (12)
As hoped, lighting was temporarily installed and seems to illuminate the room sufficiently. Because of the low head room and shallow mounting area I bought LED fixtures with a thin profile. No heat from lighting will help keep things cooler up here in summer with no chance of singed hair on tall occupants. Fortunately the warm white looks truly natural, not like certain LED's claiming to be warm white. 10 are already up with room for 4 more.

Bruce
Bruce: Are you going to insulate that roof between the rafters? Seems to me that the whole attic would get awfully warm (or cold) without the insulation. Not be good for the health of the trains, either. Other than that, it looks like you've got yourself a nice space for a train layout. I've seen some very interesting uses for that low hanging ceiling under the eaves.
Paul Fischer
Yes Paul, the new 2x2 strapping on the rafters will allow for a bit more insulation than would have been possible between 2x4's. I have some already installed at the back...an air gap, a 1" layer of foam insulation and finally 3" of fiberglass. I had a new tin roof put on over 2 " of foam and that significantly cut down on summer heat too.
I have utilized some of the eves area behind the hip walls for storage. Even so, I need way more hidden storage, some of which I hope to find under the layout.
Bruce
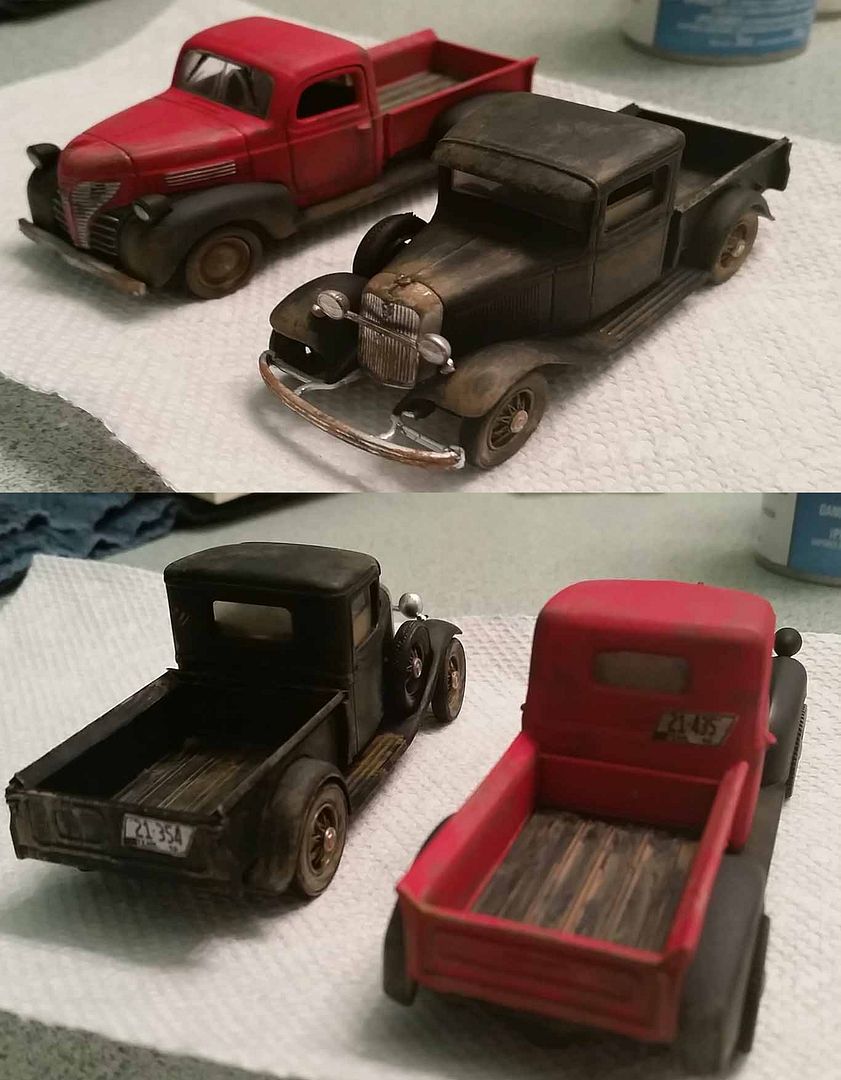
Did some quick weathering on a couple of 1/43 trucks. Probably should have spent more time on the Ford, though. Each vehicle on the layout has it's own state tag with the correct county code for the year the layout takes place.
I tried to upload some short videos I took last night when I finally got two trains running dependably on my temporary 4x8. I couldn't get them uploaded, so here are some photos instead. I had planned to be at this point before my first hand surgery in late January, and I am almost at the end of my second time off, but it is done. The inner loop features a LC+ Pennsy Mikado. The outer loop features an MTH NYC Hudson that was upgraded to PS2 at the time I bought my DCS last spring. It is being controlled by the old Z750. That is a story in itself. Which I copied below. Please read the rest, as I want to compliment the good folks here on the Forum.
I have followed many other folks' questions in regards to TIUs not being able to find DCS locos. NO DCS ENGINE FOUND error. It was quirky getting My two PS2 engines to work on DCS. One would work, then the other, then both for a brief time, then neither, then one, then finally neither ever again. Both locos worked fine running from the transformer, and I tried every suggestion given by forum members and from Barry's book. I also followed suggestions from Steve Nelson aka Mr. Muffin, and others on FaceBook. The last it worked was early February when I was off work with my first hand sugary. I was pretty sure My TIU had quit working, but wasn't able to call in while at home during their service hours until today. I am off work with my second hand surgery. I have been fighting this since last summer, thinking it must be me. Fortunately it quit altogether since my warranty runs out at the end of March. After the MTH representative ran me through some of the same trouble shooting tests you folks have suggested, he said it will have to go into the factory for warranty repair.
And so the moral to the story is: Get Barry's book, and follow the advice of Barry, Gunnrunner John, Pine Creek RR Dave, Marty, Steve, and the other DCS experts on this forum. The factory rep had nothing else to suggest than what the folks on this forum had.
The only downside is, they project 4 to 5 weeks for repair. Oh well. I can still run conventional. Then I can start my DCS experience from scratch again. Ha, ha!!


Attachments
Images (7)
I converted a Bachmann On30 ten-wheeler from ET&WNC # 12 to # 9 (which was one of three locomotives on that RR to carry that paint job). I was a minor issue of lightly sanding off engine #s, putting new ones on, and then adding a representation of the sheet-metal cover all the engines got for the tender backup lights. I made them by cutting long/thin strips of styrene, melting the strips in the center with a lighter, and then grabbing each end and pulling it down over a brass tube exactly the diameter I needed. After messing up a few and getting the hang of it, it worked pretty well.
All I need now is a very small white number set for the headlight number. Eventually, I'll get to weathering all my locomotives...

the number plate, I had to hand-paint myself with a tiny little brush, as 9 carried a silver painted center on it's plate in WW2. I have no idea why that engine along got that color...
Spent more $$$$.![]()
Last night: Glued what will be main street to downtown Ironville's removable hatch, installed a doublel tunnel portal, two sections of rock wall castings and installed a ton of basket woven cardboard strips that will be some terrain between the upper and lower decks. Tonight I plan to give my airbrush a whirl and see if i can paint those rock wall castings. If time permits, its plaster wrap time.
Originally Posted by Pingman:
Spent more $$$$.![]()
I guess most of our posts here could simply say that! ![]()
Today I cut a piece of Chip Wood into tiny pieces of log wood.
I want to have a realistic stack of wood near my Hobo Fire Pit.
The one that came with the setup was brown plastic.
Not very appealing at all.
I will have some pictures this weekend on the updated Hobo Village.
Originally Posted by p51:
Originally Posted by Pingman:
Spent more $$$$.![]()
I guess most of our posts here could simply say that! ![]()
Not me! One of the perks of being easily amused![]() ..... Oh! A piece of candy!
..... Oh! A piece of candy!
Loc-Tited a loose driver wheel on my #51 Navy Yard switcher. It's even happier now! ![]()
Mitch
Ordered a old Williams single-motor GG1 chassis for the Gi-raffe GG1 and a old #41 motorized switcher chassis for a future trolley snow sweeper project!
Also glued the underbody lifeguard fender on my customized Baltimore Peter Witt (by Bill Ondeko) and did a bit of preliminary fitting for my GP9-Rectifier conversion:

The rectifier humps are from discarded battery packs. "SCROUNGE!" is my motto.

Broke out some postwar Pullmans to give "Junior" some exercise. Also, I swapped the 12v front bulb in the Williams GP9 chassis for a 6v; those can motors are so efficient that the thing doesn't take enough voltage to light the 12v bulb very well...
Mitch
Attachments
Images (2)
Added another Z4K to the roll away Power Station!

Attachments
Images (1)
Former Member
My Dad has been working to get the back portion of the layout finished. That means more rock molds and gap filling.
Tunnel clearances are checked with the biggest car we have for the inner liner, and the Big Boy is used for the outer liner clearance.


Attachments
Images (5)
I had recently purchased an MTH Alaska SD70MAC PS2 engine with no sound from forum member "maint." The engine ran fine using DCS or conventionally, just no sound. I pulled the PS2 board and sent it to forum member GGG for repair of the audio amp. portion. I received the board earlier in the week and reinstalled it. While the board was in transit I also re-soldered a wire that had broken off the front coupler. The engine now has sound and the front coupler works.
It's practically a new engine with less than 30 hours on the chronometer and around 100 miles on the odometer.
Larry
Lot of little projects going on. finished rewiring the layout. Still in the process of rewiring department 56 style buildings to the auxiliary feeds from my transformer.
Finally was able to figure out a signal and power/short issue with my GN SD9. As a whim I replaced the wires from the trucks( Common and Hot) and now have a happy engine. Same for my CBQ Sd24 2/3 rail capable. Turned out the reason for the low speed jerking was due to the wheel sets not being seated correctly in the trucks against the motors worm gears.
My on going project of converting all my rolling stock to Kadees is on track with half now completed thanks to laid of Sick's videos( Kadees installation for Dummies )![]()
I also have gotten tired of the Weaver rolling stock with the waiting for a flood look. The fix is simple: I sanded down the couplers at the point where they sit on the truck to the height of the #8 washers I used to shim my All Nation Cars(2R to 3R wheel sets) and Weaver 3R cars the have been converted to Kadees. Now they look better and are the same height as the Atlas/MTH/All Nation/Lionel rolling stock with or without Kadee installation.
Starting to planning a new layout that will be in my Garage Haven't decide if I will go 2R with this one yet. So for the time being I going with 3R
Now I am off to Ace Hardware to buy more #2 screws as I have run out.
Just relaxing running trains today. Tomorrow heading to Dalton OH to a train show.................Paul
Serviced two PW horizontal motors per Jim Barrett's comprehensive and clear directions in the new OGR digital book.![]()
Former Member
Well not exactly layout work but here's a pic of my new work area. Converted some wasted space in the laundry room and now have my tools and train parts organized. Let's see how long it stays lol!

Attachments
Images (1)
Jon came over this afternoon, and we took on and conquered the missing link.
But first, Jon hung the track fixtures. There are just 3 left to do, but I'm holding off until Patrick finishes that last bit of backdrop.

The temporary bridge is made from strips of 1/8" Masonite and and 3/4" plywood spacers.

There are exactly 2 screws fastening it to the 2x4 support posts, everything else was done with hot glue.

The whole thing was then capped off with home made Homasote roadbed, also secured with hot glue.


I'd like to get the track done tomorrow, then the entire main level will be done!!!
It is looking like I will need one more case of track.
Attachments
Images (6)
My friend George and I took one last trip together to Catoctin Mountain Trains, something we've done occasionally for many years that both of us will miss greatly.
I bought a piece of track, a MTH corner store, and an MTH operating departure board. I debated on whether or not to get both accessories for a long time. I wasn't going to get both until I said "screw it" and got both.
That departure board - what a PITA to hook up. Finally got it hooked up and it ran great....for about 5 minutes. Sounds like it is a belt drive and the gears and/or belt are slipping and it jammed up. Oh well. Back to the store it will go and get a replacement.
On the layout, I took up the "yard" that really got little use and the switches that caused occasional "issues". Both are Ross. One went on the trolley line, the other will go into storage for another day. Will finish everything tomorrow once I get another departure board or equivalent.
I've been watching this thread to see if 4500 posts or 195,000 views happened first. People love this thread. As of 10:00 A.M. 3/22 "Views" is the winner!
I have just made 5 gondola coal loads out of Styrofoam, latex paint and coal, of course.
THE GLACIER LINE UPDATE:
03-22-2015 Man I busted bootie today! I worked on the lower staging area for the better part of seven hours, evening cleaning up, and managed to get the entire track in place! I still have to connect it to the Monaco spur and complete block 11 to a turntable or transfer table. I’m dead tired and sore from all the cutting, drilling, fitting and cleaning but I’m really proud how this is finally coming along!
In addition, Connie painted more detail onto the backdrop in the area of Cataract and Rising Wolf.
Attachments
Images (10)


Here is the video from this weekend with the train running and a very excited little boy.
No photos this time...
The Tacoma model train show on Saturday was sort of a bust, but you just never know. I was able to swing by Tacoma Trains nearby hobby shop for some scenery stuff, so the extra miles were okay with me.
To run my own op sessions, all I need to do is get my car cards all completed, get an operating concept figured out for train flow, then get two (or maybe three but probably just two) guys over for an op session. I've invited the two guys who helped me with the build (one guy was there for most of the benchwork install after I'd built it, drew up the original track plan wer mostly stuck with and worked with me on all the track laying). I promised them they'd be invited to the first op session, which to me was only fair for the work they put in. We haven't figured out a day yet but it's coming soon!
I cut plywood yesterday for the back corners, so I could build up and complete the scenery independent of the layout itself, then just drop the completed areas into those corners without having to reach way into the back to do scenery work.
Thought you would never ask. Now I ca announce the arrival today of two very good purchases bought from OGR members. This makes 5 for me in the last 6-7 months and all have been very satisfactory, to say the least. One was a Lionel 2056 which is very much as advertised-looks and runs good !! Fast service, the other is special. Waited a week for the USPS to get it here. Tracking number didn't work. The train was a "City of Denver" 1934 752 set from a list a member submitted several weeks ago. Someone missed out on getting a really nice, collectible train at a reasonable price. It has a repaint job and needs new vestibule wheels but is clean and good shape. Now I have to get some 072 curves shoe horned in to a loop of track so I can run it !! Found that out after I bought it. I must say that dealing with OGR members, so far, is more fun than da Bay. May it continue !! Jim P.
Goshawk,
That video made my day! Just like it made your son's day!
Add Reply
Sign In To Reply
