I painted the pavilion. Next, I’ll start the roof. I placed the picnic tables in the park area. I’ll set the tables more precisely when the pavilion is in place.
Andy


|
|
I painted the pavilion. Next, I’ll start the roof. I placed the picnic tables in the park area. I’ll set the tables more precisely when the pavilion is in place.
Andy
Nuthin’. The VintageHubby worked on his American Bricks structure and did some repainting of Barclay soldiers- both for the new WG/ST Basement Layout
Thank you Papa Dave and Andy.
John
I just realized I placed this post on the wrong thread last night so here it is in the right place.
Good morning everyone! Part two of my corner spruce up commenced with the back corner hill getting started.
You can see in the first photo this corner is pretty bland and has plenty of space to put another hill. I first started with cutting out two foam rectangles with the same measurements as my Hillside tunnel portals. (8” wide by 5.5” tall) I had originally planned on making these temporary and be replaced by balsa tunnel portals. I realized I have to make them permanent and put the balsa tunnel portals over the foam.
With the foam cut and placed I began work on the hill structure. I used the same method as before. I plan on placing an HO sawmill on top so I had to make the structure pretty sturdy. Thankfully, HO buildings are a lot lighter than O scale buildings so I do not think I need to put a 2x4 behind the hill. (Cough… famous last words… cough)
I left the project tonight with a lot done. I will continue with the structure work until I reach a point that I am happy with how it looks. I ran out of balsa wood so I need to make a stop at the local hobby shop to get some more.
Thanks for reading!


Morning guys and gals, I hope everyone is having a great time with their layouts!
@DrSteveDC Steve wonderful work on the lighting! The whole scene looks Amazing!
@Fendermain John the filling station looks perfect! You sure have some great looking scenery!
@pennsyfan Bob sure sounds like you have been busy! You better take a few days off and just run trains! LOL
@ScoutingDad Jeff outstanding work! Things are moving along so fast you will be running trains in no time!
@Steamfan77 Andy you did an outstanding job on the picnic tables and the Pavillion along with the tables will look great in your park area!
@OhB1Looks like you have a great start and it is nice that you have a club to be part of! I hope you will keep us posted on your progress.
@Trainmaster04 If your hill turns out like everything else you do it is going to be Outstanding! I also love the picture of Johnny Cash on the wall!
Well guys as for me I was able to get to the train room yesterday and got some cork laid and hope to get the track and power drops done today. Here is a photo of really nothing but cork waiting for the glue to dry. But you all know as they say if there is no proof it never really happened! LOL

It is not in the photo, but I have a 4x6 post I have to go around and in SCARM if I use 054 curves, I should be able to to get around it before the end of the table where the return loop begins!
I hope you all have a great week and find time to have fun with your layout and trains!
@mike g. Thank you Mike! I am a big Johnny Cash fan and I like to collect first pressings of his albums. Ironically, I was listening to an audiobook about him while building this mountain.
Tunnels and retaining walls have been the agenda since New Years intermingled with Paula’s kidney stone, my colonoscopy, and a Boy Scout BBQ that delivered 1,150 plates Friday.
Have you seen the Woodland Scenics Shaper Sheet product? It is heavy aluminum foil backed with something like a thin cotton batting. We ordered a roll to see what it could do thinking that it might be good to use for a tunnel.

First we measured for the tunnel and then cut a generous portion since we weren’t sure how it would work.
Then we balled up the piece and straightened it out, leaving the folds and creases to resemble rocks, etc and painted the cotton side gray and black.

A box of Quick Oats from Wall Mart was perfect for creating rough curves for a single tunnel.


Hot glue worked well to hold everything together. We were surprised at the strength of the whole thing and it appears to us that the foil is thick enough to prevent a problem with sagging.

Yesterday Rich came over and we put up most of the retaining wall, going around a curve and preparing for the next tunnel section. There is some caulking to do and Paula has some scenic accents to add but we are pleased with the tunnel. It is a lot faster than some of the methods that we have seen.


Yes, trains run thru it without signal interference or hitting the walls or ceiling
Next we are going to tackle a two track tunnel and see how that goes.


@mike g.
Thanks Mike but I really couldn’t run trains till I cleaned up the whole area. All the lines were crowded with tools. 😱last night I cleaned up and this morning I did some scenery work. Here is the added golf course where the team track once was. That’s the trolley station to the left of the golf 


Thank you mike g.
John
Thank you Mike!
Bill, hope you and Paula are on the mend. The Shape Sheet material looks interesting.
Bob, the layout looks great.
Andy
Thanks Andy.
I don't know if this counts as what I did on the layout (one of half a dozen portable table layouts) or as a new purchase. What I did was test a Lionel CNJ Camelback--the one from 1999 (6-18089). As you can tell from the backdrop, this is a Reading Company proposition, so the CNJ loco is clearly "on loan." I had a Reading version but never could get over the obvious differences from a RDG prototype.
I'm extremely pleased with this loco, as my MPC Reading FM was far too big for a small table layout.
Bob M.

Evening everyone! Thank you all for the likes and comments on my previous post. Work has progressed since last and I think I have finished the structure.
I continued today’s work by finishing the top part of the hill and the front side. I made both smooth so I could make the hill be less rugged and more smooth like the main mountain. I did however, add some paper buns to add texture around the front of the tunnel portals. Similar to the other hill, it now awaits plaster cloth and paint.
Thanks for reading!


Wished my layout a Happy 7th Anniversary!
1/30/16

Bob

@RSJB18 posted:Wished my layout a Happy 7th Anniversary!
1/30/16
Bob
You’ve come a long way baby!😜
Morning guys and girls, the day is still early and if your anything like me cold! LOL
@Bill Webb Looks like a nice find Bill, I like the idea of the cotton, but I am too cheap. I just go to the CEO and barrow hers! LOL I did this with my old layout crumpled it up then flattened it out painted it black and spray glued it to cardboard. LOL
@pennsyfan Bob that looks great! I bet anyone would love to play there. Also I love all the manhole covers in the road. Some folks just put one or two and call it good, but you show the path of the underground pipe!
@SIRT Great start on the new /old Module! It is really going to look great with the new coal model and backdrop! I know asfor me it would confuse me to work on a 3R-2R hybrid!
@Trainmaster04 Looking good, Ready for Plaster!
@OhB1Nothing wrong with any of them! You might find them on my layout somewhere! LOL
Well guys I did get out to the train room yesterday and got more track laid and power added and tested! Everything worked just fine for now! LOL I know no photo it didn't happen and so I will get some today after I get more track laid!
I Hope you all have a great day and fun with your layouts and trains!
I will check in later.
Trainmaster 04 this looks great. This is fun to follow.
SIRT you are doing some interesting and varied things that require experience. Looking good. Next items look challenging.
Mike G, glad to see that the Track Dept is moving forward. Hope to see photos soon.
Paula ordered additional Shaper Sheet yesterday. She likes the result. How did yours hold up long term?
@Mike g
Mike, thanks, I can’t take all the credit for the manholes. They are hiding the screws that hold the Fastrack down.
@RSJB18 posted:Wished my layout a Happy 7th Anniversary!
1/30/16
Bob
Happy Anniversary Bob. If I recall, expansion is the appropriate gift for a 7th anniversary.
Jay
This has been my project this week. It's a Korber Models Shoe Factory that I will rename later today with the signs making it a matterss factory for a friend of mine that was National sales Manager for Sealy Bedding.


@Tranquil Hollow RR posted:Happy Anniversary Bob. If I recall, expansion is the appropriate gift for a 7th anniversary.
Jay
from your lips to the CEO's ears.......![]()
Thanks
I am always interested to see all of the updates on this thread.
@MikeG. Glad to see you back in action so quickly. Keep on movin', looking forward to your updates on the layout tune up.
@RSJB18 Bob always great updates and tweaks to your layout. Happy 7th!
@Bill Park Nice job on that kit. I had an old one of those that gave me fits and I never finished. The castings I had were not very well defined so I had a lot of trouble with mortar lines. Yours turned out great.
Finished a plumbing supply building for an area I've been slowly filling out. Also did a few modifications to another building into a reasonable facsimile of the King Syrup factory and modified the electrical with a nice adjustable rectifier so I could just hook it up to my 14 VAC power supply.
Winter is for Trains!
Scott


Afternoon guys and girls, I am back to check in and see everyone's wonderful work!
First off I would like to say Happy Anniversary 7th years to @RSJB18! I sure hope the CEO is as excited as you are!![]()
@Bill Park Outstanding work on your future Mattress Factory!
@B&O Fan Scott you sure do some AMAZING work! Mooney's looks like a nice well stocked store! The Mangels Herold Co. Building is so very impressive!
Well guy I went out to the train room and was able to get everything I wanted to except vacuum the floor. Maybe when I get done here! LOL I was able to get my 054 & 072 & 080 curve mixture all put together and powered up. I even took a short video for you all as proof! LOL
I hope you all have a great night and fun with your layouts and trains!

Work is a starting… two of the original Wide Gauge Dorfan freights are going to get new trucks and wheels. Pic taken on The Fix-It Guy’s (The VintageHubby) Dining Room table workshop.

@B&O Fan, I just want to give you a compliment on your layout, your buildings, your really neat signs, and your weathering techniques, and I love the B&O Railroad. I’m impressed with the building flats, with neat lighting and the water towers, and yes, The Royal Flush sign….. All cool. @Bill Parks, that’s a beautiful Korber shoe factory, and I like the water tower on the top, realistically cool. @SIRT, Steve, it’s great seeing your posting comments on the many threads and your layouts coming together, great work as always. @Trainmaster04, it’s always great to see your work and that’s a cool tunnel in the making. It’s just fun watching everyone at work. @Mike G., thanks for the kind words about my BNSF, and railroad, your layout is going to be so neat as time goes on, your work is great. I like your bridges, so neat. I admire your tenacity, tear down, re-build, amazing. Happy Railroading Everyone 


Happy anniversary Bob!
Steve, love the flip sign!
Bill, the future mattress factory looks great.
Scott, the plumbing supply and building flat are terrific.
Carey, looks like an interesting project.
Larry, great scenes as always.
Andy
I added the first layer of “asphalt “ to the roof of the pavilion. I’ll add another layer and cover the bare spots. I used N scale ballast.
Andy


@Steamfan77 posted:I added the first layer of “asphalt “ to the roof of the pavilion. I’ll add another layer and cover the bare spots. I used N scale ballast.
Andy
WOW Andy, that looks so realistic! I can't wait to see it on the layout with people! I am guessing you also have a BBQ to go with it and the picnic tables!![]()
P.S. Thanks for the heads up about using N scale ballast for roofing material!
This wasn't done today, but I recently completed both inclines for the upper level


@Sams Trains posted:This wasn't done today, but I recently completed both inclines for the upper level
Nice work! That is going to be a very impressive layout when you're done! I really hope you keep posting!
@mike g. posted:Nice work! That is going to be a very impressive layout when you're done! I really hope you keep posting!
Thanks Mike! I intend to post more about it, sometimes I forget to. Typically I post updates in my discord, instagram, and YouTube. I'll need to make sure I add the forms to my list of places to do layout updates. College has me tied up for a few weeks but I'll be back February 10 to make more progress
@Sams Trains posted:Thanks Mike! I intend to post more about it, sometimes I forget to. Typically I post updates in my discord, instagram, and YouTube. I'll need to make sure I add the forms to my list of places to do layout updates. College has me tied up for a few weeks but I'll be back February 10 to make more progress
Ŵow I just post here and find it hard to keep up to date! And your doing 4? Wholly cow!
@mike g. posted:Ŵow I just post here and find it hard to keep up to date! And your doing 4? Wholly cow!
Discord and Instagram are easier to manage because I can do small or large updates fairly quickly from my phone. Youtube videos I save for larger updates since I have to edit and upload videos which takes a while.
If you are interested in checking out my YouTube, you can find it here: https://www.youtube.com/@samstrains9800/videos
Thanks Mike! There will be some grills and coolers to go along with the park goers.
Nice job Sam, looks great!
Andy
After getting help from three dealers and inspecting thirteen (13) CSX F40PH engines, I finally have a three-engine set that has all the parts and no damage.
I did have to feed a ditch light LED into its opening on CSX-2 and another on CSX-3. Also two engines were missing parts in factory-sealed boxes. Three had broken air hoses, bent horns and broken piping in the factory-sealed boxes. Factory-sealed boxes do no guarantee that an item will have all the parts and that they will be intact. One dealer inspected three engines and found yellow paint on the gray nose of a CSX-1. They found a factory-sealed engine missing a roof lift-ring, that was not in the carton, and a third with out-of-position roof panels glued and tilted upward at an angle.
The kinematic coupler porches can occasionally cause the three engines to ping-pong bounce back and forth and derail an engine in a three-engine lash-up. The front of the engine likes to lift upward off the rails. The traction tires grip the rails very well, maybe too well.
I have painted the interiors of five CSX cars and seven Ski Train cars. I just need to paint more Preiser 65602 Unpainted Seated People in the 23 packages of 24 people that arrived last month. I can paint eight to twelve people in an evening.
Sincerely, John Rowlen

@Steamfan77 Nice work on the pavilion Andy. I’ll put the roofing material idea in my Funk & Wagnall.
@B&O Fan Nice work on your buildings
@Bill Park Great job on the factory. Is that for your layout or your friends?
@Sams Trains, Hi Sam, it’s so nice to see you on this OGR Forum, your layout looks really nice and I’m glad you’ve been to my home and are using that nice picture in front of my layout. It’s cool. This young man is really knowledgeable about model and real trains and is a big supporter of the Crossville Tennessee Model Railroad Club hugh layout. @Steamfan777, Andy, Wow, your pavilion and picnic tables look so good, your roof, coated with N gauge ballast look seal. I’m not sure it need another coating…. Happy Railroading Everyone (the N&W J is a Legacy locomotive belonging to our friend Samuel)

Thanks Bob! It’s a pretty versatile material for many different looks and applications.
Thank you for the kind words Larry!
Sam looks right at home. I look forward to more from you Sam.
Looking good Steve…
Dr Steve, the loggers are a hoot, very cool.
Andy
I really got behind on this thread, 63 messages in my inbox. Great projects everyone! I have been following a lot of other threads and have been working on my layout.
Bob's post about it being 7 years since he started his layout. I made my first post in what became my Blackwater Canyon Lines thread on Jan 8, 2017. Here is a photograph from a couple of days ago.

The gap in the lower left is where my two bridges are in the up position. Here are a couple of older photographs of that area.


The billboard is really nice, Bob M. It really takes me back to when that wooden construction was the norm.
@Mark Boyce
Nice work Mark. I’ve never seen those piston lifts before.
@pennsyfan posted:@Mark Boyce
Nice work Mark. I’ve never seen those piston lifts before.
Thank you!
@mike g. Got me onto the linear actuators as they are called. They take a bit of fiddling to get the lift right and putting in limit switches to stop at the right place, but they really do a nice job!
@Lou1985- nice work on the signal bridge. I have a similar Lionel bridge that I've been trying to decide what to do with it. I think I have a plan now.....
@Mark Boyce- real easy to get behind on this thread Mark. It moves at a brisk pace. Liking your layout progress. It's really starting to resemble your plan (version ??????) now. ![]()
@mike g.- I guess the knee is healing up. Your test run on the outer loop looks good.
@RDM- Nice to put a piece together from scratch for a few bucks. It looks great.
@Zeke- nice tunnel and walls.
@DrSteveDC- all of those Lionel operating accessories look great in action.
Nothing new to report from me. I hope to have the MicroSol decal solution soon so I can put the decals on the '48 Ford. Once that's done I will install both trucks on the layout.
Bob
I have an older, conventional MTH Hudson that was purchased over 25 years ago for my oldest son. It took a lot of abuse and has sat on the shelf for about 10 years awaiting the eventual regifting to my kid when he settles. Well, I figured I'd give her a spin this morning after a thorough lube/oiling and noticed that the smoke output was less than desirable and the smoke fan was making a terrible whining noise. So I disassembled her, oiled the impeller as was done by a few on this board to fix noisy smoke fan units, and then decided to change the wick, which wasn't that bad considering all of the prior use. Well, she now smokes like crazy and that sound is gone. What a great little engine!

Found a good spot for a just purchased crane.
 and
and
and put together a little accessory for a diner

Leveled the deck on the Transfer Table…..

 Have a great day, folks!
Peter
Good Evening Guys and Gals,
I didn't go back yet but there is some serious work being done on this page! So much inspiration on a single page. Here's a shot of the progress on the roads and sidewalks I've been working on for a small town.
Dave

These streets, walks, curbs are so very realistic 😊
Your downtown will look so great.
Thanks much for sharing
Seth
Thanks Seth, I certainly hope so.
Dave
I just came across this. My Dad had used it to pull on his socks. I was going to toss it; but it spoke to me and said “I could be a tunnel entrance”. It would have to be elevated somewhat, or maybe a stream culvert. In any event it will go in the raw materials box instead of the trash.
Nice cantilever Lou, looks good.
Bob M, the billboard looks great, nice job.
Zeke the underpass is terrific, nice work.
Strap, she smokes like a Champ well done.
Steve, I like the crane and soda cases for the diner.
Peter, nice work on the transfer table. Look forward to seeing it in action.
Dave, the streets and sidewalks are great as always. That’s going to be some scene.
Andy
I ran my Shay with the log train that my late buddy Barry built for our late buddy Johnny. I have custody of the cars for now. I run them a least once a year in February; their Birthday month.

Hi guys it has been a couple days! Lots to get caught up on!
@DrSteveDC Steve that is so cool! I have never seen anything like that!
@Lou1985 Lou the cantilever signal looks great.
@Mark Boyce Mark things sure are moving right along! Looking good and you will be running trains soon!
@Zeke Sean I really love the new underpass!
@Strap Hanger Looks outstanding and runs nice and smooth for being 25 years old!
@Mayor Magoo Steve nice buy and wonderful job on the Pepsi crates!
@Putnam Division Peter the transfer table looks great!
@lovindemtrains Dave the roads and sidewalks look perfect! I can already see it full of cars and people!
@pennsyfan Bob that sure is a smooth running logging train! Very Impressive!
Well guys I didn't get to the train room yesterday due to Dr. Appt. Come to find out I got an infection at my surgery sight. But I was able to get out to the train room today and got more track laid out and marked for cork. Things will be slow for me now as I am now out of cork till Monday and soon to be out of track. I hope I at least have enough to finish the main level loops! LOL
Here is a photo of the beginning of the inner loop.

I hoe you all have a great day!
Looking good Mike. You work too fast! Sorry to hear about the infection.
Andy
Recently, a bunch of you provided guidance for my effort to run my legacy Burlington Zephyr three car consist (which requires O72 tracks). Last night, I was able to realize that dream, using two 4'x8' tables with a gap beneath them. While the layout is not yet done, I was able to run the Zephyr for quite some time with no derailing mishaps. I also meant to add video, but I think I'm running into proxy/bandwidth limits (each video weighs in at 10mb).
Anyhow, thanks to those who got me this far. More work is yet to be done, more scenery to be added.

72 fastrack on the outside.")

I was fooling around with the park scene, and I was having fun adding figures and sat the pavilion down. It will sit on a slab of concrete but I’m painting it now. It might be ready over the weekend. I have more figures on the way.
Andy


Andy,
This looks wonderful. I can't wait to see what you do with the concrete slab.
Dave
Andy, that sure is sharp looking! Do you plan on a fence?
Today I finally connected the interior just plug lights in the Railking passenger depot.
I made a cover for the wires to the Railking depot. Tonight the glue and gray paint will dry.
Yesterday I finally got all of the six street lamps connected to the just plug links. All six work at the same time now 😝
I really had an issue with the small gauge wires to those lamps.
This evening I made my plan where to set the woodlands scenic traffic lights. Tested each so I know that all four work. I finally discovered the ports in the just plug light hub was bad, not the two green lights.
Tomorrow I climb up onto the layout to mount the traffic lights…
I really enjoyed seeing both interior and exterior lights working on the depot now.
Thank you Dave. I will reevaluate my slab after seeing your work!
Mike, yes, there will definitely be a fence down the entire run of the park. That will be another detail in this scene.
Seth, this sounds great, can you provide any pictures?
Andy
It’s a shame the original poster isn’t here to see the 1 millionth view. I do want to thank Alex for taking over the post and keeping it going strong.
@pennsyfan posted:I ran my Shay with the log train that my late buddy Barry built for our late buddy Johnny. I have custody of the cars for now. I run them a least once a year in February; their Birthday month.
A great tribute Bob.
Hi Guys and gals just checking in, I am out of cork and motivation for the rest of the day. I still have to paint the sides of the rails. But I do have all weekend to get that done! I think the rest of the day is good idea just to watch a movie!
Mike I might add to what you have relayed that after this past Tuesday in a cool train room under the layout for several hours my body was stressed. On Wednesday I was not worth a plugged nickel. ![]()
Sometimes,
Rest is the best medicine.
@romiller49 posted:It’s a shame the original poster isn’t here to see the 1 millionth view. I do want to thank Alex for taking over the post and keeping it going strong.
WOW! Another milestone for this thread.
Almost up to page 1200 too ![]()
Bob
After posting my layout anniversary pic the other day I realized I didn't have a current overview photo. Fixed that!


Boring stuff was done on Warrenville today - dusting as new visitors are coming Monday and I wanted everything to look its best.
Also test ran all of the trains that are currently on the layout and tested all of the accessories.
Who knows - maybe some new train converts Monday!
Also, put the heat on downstairs - prediction is 0 degrees, with a minus 15 - 20 degree windchill this evening and tonight - don't need any pipe freezes.
I pity my new puppy when I have to take him out (about every 2 hours, he is only 10 weeks old).

Here he is with his big sister - she is much better equipt for the cold!

@Lionelski posted:Boring stuff was done on Warrenville today - dusting as new visitors are coming Monday and I wanted everything to look its best.
Also test ran all of the trains that are currently on the layout and tested all of the accessories.
Who knows - maybe some new train converts Monday!
Also, put the heat on downstairs - prediction is 0 degrees, with a minus 15 - 20 degree windchill this evening and tonight - don't need any pipe freezes.
I pity my new puppy when I have to take him out (about every 2 hours, he is only 10 weeks old).
Here he is with his big sister - she is much better equipt for the cold!
Cute pup John. By the looks of those paws, he's not going to be little for long. ![]()
Bob
It is amazing how many pages and views this thread has generated. Yes it is too bad the original poster isn’t here to see it. Maybe he will check in sometime in the future.
@Mark Boyce posted:It is amazing how many pages and views this thread has generated. Yes it is too bad the original poster isn’t here to see it. Maybe he will check in sometime in the future.
I think its fantastic following is because everyone likes following along with layout progression and sharing their work.
It is my favorite thread too, Mark. I've learned from it and have been inspired (most of the time, humbled) by it.
@Lionelski posted:Boring stuff was done on Warrenville today - dusting as new visitors are coming Monday and I wanted everything to look its best.
Also test ran all of the trains that are currently on the layout and tested all of the accessories.
Who knows - maybe some new train converts Monday!
Also, put the heat on downstairs - prediction is 0 degrees, with a minus 15 - 20 degree windchill this evening and tonight - don't need any pipe freezes.
I pity my new puppy when I have to take him out (about every 2 hours, he is only 10 weeks old).
Here he is with his big sister - she is much better equipt for the cold!
Wind chill will make him a quick learner John. Feel bad for you having to go out too.🥶
@RSJB18 posted:After posting my layout anniversary pic the other day I realized I didn't have a current overview photo. Fixed that!
Great picture, I always wondered what your full layout looked like. That is a great use of space. I'm amazed at all the sidings you have for storage, I didn't plan properly for that on my layout and miss that storage space.
@ArtsModelTrains posted:Great picture, I always wondered what your full layout looked like. That is a great use of space. I'm amazed at all the sidings you have for storage, I didn't plan properly for that on my layout and miss that storage space.
I call it "A judicious use of space....." ![]()
The space over the file cabinets was just piling up with junk so I told the CEO I'm taking over the air rights by eminent domain. Unfortunately the laws were changed since outlawing future applications of that statute......![]()
Thanks for the comment.
@RSJB18 Ha you only get to ask for forgiveness once, like that application of eminent domain. Use that forgiveness only when its worthwhile since you will not get to use it again. Nice to see the whole layout.
Bob - enjoyed seeing the overview shot of your layout. It's amazing what you've packed into that space.
Mike - Don't over do it, breaks are allowed. You're making great progress on your modifications.
Today I finished building the Atlantis, former Chevrolet truck kit. Had a few fit-a-ment issues with the parts but overall pleased with the results. I need another 2 hair brush now. Might get another one and change it up. I do like the stake-bed trucks.
Getting cold tonight,
Scott


@B&O Fan posted:Bob - enjoyed seeing the overview shot of your layout. It's amazing what you've packed into that space.
Mike - Don't over do it, breaks are allowed. You're making great progress on your modifications.
Today I finished building the Atlantis, former Chevrolet truck kit. Had a few fit-a-ment issues with the parts but overall pleased with the results. I need another 2 hair brush now. Might get another one and change it up. I do like the stake-bed trucks.
Getting cold tonight,
Scott
Thanks. I embrace "packed" 🤣
I have one of those Atlantis trucks to build too. Interested to know about the fits it gave you.
Bob
Scott, the truck looks great! I have one of those Atlantis kits as well.
Scott:
The truck is great! I also have a question for you. Where did you get your concrete fence at the top of the retaining walls in photo 2?
Thank you.
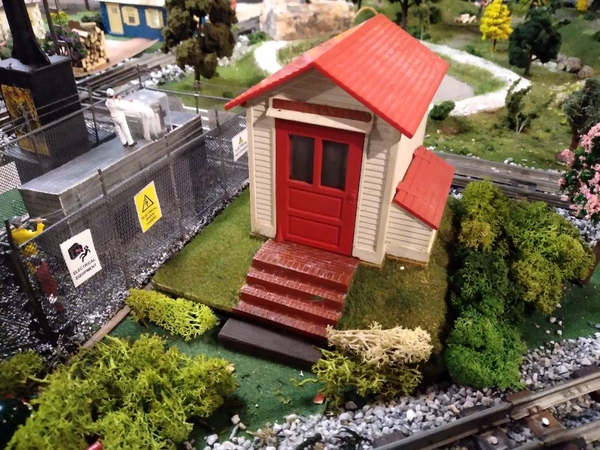
So, having finished up work on scratch-building the fencing around the 'substation' next to it, I noticed that the whistle shed, with its neon-green base, was looking a bit shabby by contrast, so I painted the 'brick' steps (also originally green!) with red oxide acrylic, then dry-brushed with white to highlight the mortar (the molding was the inverse of the prototype, with the mortar lines raised instead of indented), painted the rest a light brown and, while the paint was still tacky, sprinkled on some ground foam, following up with slightly watered white glue and more ground foam, and finally topped off with a coat of hairspray after everything dried. Oh, and also lubricated the whistle motor, since it had been slowly dying away, and added some supports underneath to keep the whistle chamber and motor from dropping out. Here 'tis:

Still needs some more landscaping, but IMHO it already blends a lot better than it did in screaming neon green!
@RSJB18 Bob - the areas where I had some issues with the truck kit were a.) the seat. It seems if you mount it where it fits well, it ends up impeding the placement of the rear wall of the cab. I ended up raising the rear of the seat to tilt it forward to get the clearance I needed. b.) The side panels with the doors were a little finicky but a little file work eased them in. c.) The rear leaf springs needed some file work to properly fit but watch it as they will break easily. d.) Almost all of the rail panels for the bed needed some adjustment and lastly the windshield just wouldn't meet the curves in the sides of the cab the way I wanted. Despite all of that I liked the end product.
@Mark Boyce Mark - Thanks for the comments and looking forward to seeing your finished layout mods.
@Randy Harrison Randy - The concrete railings are a Crow River Product. They're part of their Highway Bridge kit but they are also available separately.
Stay warm,
Scott
Scott, Thank you for answering Bob’s questions and thank you for watching my layout modifications. I need to post an update as I made a little more progress. I have roadbed in place for the upper level. Now I am ready to pull up the test fitted track and drill holes for wire drops.
Here's my current track plan. The layout has evolved since I first built it. It's all 027 except for the cross over switches in front that are 042's. The two sidings on the right used to be an elevated ramp up to the top level but the grade was too steep for most engines to navigate. It's small but I can keep myself busy switching cars or just sit back and let 2 trains loop around.
The 3 track yard was built by shortening some MTH scaletrax switches to fit.

@ScoutingDad - I will have to wait until my son is out of the house to expand. My desk is next to the layout, but he's using it for his XBox gaming lair. If the daughter goes first, then maybe I can persuade the boss to move him up into her old bedroom so I can take over the basement......![]()
@Steve Tyler- nice updates to the whistle shed. The substation looks good too.
Bob

@Steve Tyler posted:So, having finished up work on scratch-building the fencing around the 'substation' next to it, I noticed that the whistle shed, with its neon-green base, was looking a bit shabby by contrast, so I painted the 'brick' steps (also originally green!) with red oxide acrylic, then dry-brushed with white to highlight the mortar (the molding was the inverse of the prototype, with the mortar lines raised instead of indented), painted the rest a light brown and, while the paint was still tacky, sprinkled on some ground foam, following up with slightly watered white glue and more ground foam, and finally topped off with a coat of hairspray after everything dried. Oh, and also lubricated the whistle motor, since it had been slowly dying away, and added some supports underneath to keep the whistle chamber and motor from dropping out. Here 'tis:
Still needs some more landscaping, but IMHO it already blends a lot better than it did in screaming neon green!
The shack looks great Steve.
Can you share your fence building method with us?

- “I will have to wait until my son is out of the house to expand. My desk is next to the layout, but he's using it for his XBox gaming lair. If the daughter goes first”
Bob, if daughter decides to move out fine, but
if she marries first with a wedding you won’t be able to afford the son moving up and the new enlarged layout ….
Just saying 😏
@Seth Thomas posted:- “I will have to wait until my son is out of the house to expand. My desk is next to the layout, but he's using it for his XBox gaming lair. If the daughter goes first”
Bob, if daughter decides to move out fine, but
if she marries first with a wedding you won’t be able to afford the son moving up and the new enlarged layout ….
Just saying 😏
The moving part may be in the offing after she finishes her MBA this May. She's been dating a guy from Ft. Myers Fl, my wife and I aren't sure where this is going but time will tell......
@Seth Thomas posted:- “I will have to wait until my son is out of the house to expand. My desk is next to the layout, but he's using it for his XBox gaming lair. If the daughter goes first”
Bob, if daughter decides to move out fine, but
- if she marries first with a wedding you won't be able to afford the son moving up and the new enlarged layout.
Just saying 😏
WHAT ! ...![]()
![]()
![]()
![]()
![]()
![]() ...
...![]() ....
....![]()
( ....an MBA grad should be able to land a job that would guarantee them having a lot of disposable income .......say for a wedding ??? .........![]() ) just saying Bob.
) just saying Bob.
Friday evening while listening to high school basketball I set an glued the Woodland Scenic traffic lights on the corners of Scott& Cross street’s intersection of Railroad Street…
I need one more pair to finish Railroad Street.

John, the lights really look great! I have never installed outdoor lights on a layout. Maybe I should when the layout gets to the scenery stage.
Bob, thank you for the track plan! You really packed a lot of track in, but photographs show it doesn’t look crowded! 👍🏻
@Seth Thomas posted:Friday evening while listening to high school basketball I set an glued the Woodland Scenic traffic lights on the corners of Scott& Cross street’s intersection of Railroad Street…
I need one more pair to finish Railroad Street.
Nice look scene, Seth
Seth…..how do you like those Woodland Scenics traffic lights? Do they change on a timer or do you manually change the lights?
Rick
@Lionelski posted:The shack looks great Steve.
Can you share your fence building method with us?
Thanks, John! (Sorry for the delay -- I'm at a train show at the moment.)
No problem on the building method -- nothing too complicated, just styrene rods and superglue for the frame, plus some old aluminum screen from a busted frame, cut on the bias to more closely resemble chain link fabric. The 'barbed wire' is gray thread looped around the ends of the styrene rods and superglued in place, and everything was given a light coat of charcoal gray rattle can paint.
The signage was pics from the Interweb sized to fit, printed on glossy paper, and cut out and secured with a dab of white glue. Figures are a cheap Bachman set of, IIRC, factory workers. The box in the middle I had fabricated earlier, to cover most of the relay in the center that controls the "Twin Train" emulation I'd added to that loop even earlier (I just can't seem to stop tweaking! 🥴).
Access to this requires an OGR Forum Supporting Membership