Johan, another great series of pics............Paul
Brian, Mike, Pete, Matt, Bruce, thank you! I was pleased when I thought of it. I have about 10 pieces of it, so there should be leftovers for other projects.
Pete, thank you for commenting on the flag!


Attachments
briansilvermustang posted:briansilvermustang posted:
another idea Mark, using plywood to support the 036 upper level loop...
maybe add a siding on each level to store some extra cars...
Mark Boyce posted:
I noticed some of the ideas here are very similar to my layout.
The back half of the upper loop is on "land" (2" pink foam stacked up to 8"), and the front half is on a bridge.
I made the bridge by tracing the track sections on a sheet of MDF, the side girders are made of 1/16" balsa wood, and the supports are 3/8" poplar dowels. Decorated with basswood strips and spray painted. All of it came from Menards.
This maximizes the space on the main level for sidings, buildings, and roads while keeping the trains visible as much as possible. The tunnel makes room on the upper level for a passenger stop and a few small buildings and roads. I don't like long tunnels because they hide the trains too much, and are hard to access should something happen inside them.
Attachments
Hiawatha98 posted:briansilvermustang posted:briansilvermustang posted:
another idea Mark, using plywood to support the 036 upper level loop...
maybe add a siding on each level to store some extra cars...
Mark Boyce posted:I noticed some of the ideas here are very similar to my layout.
The back half of the upper loop is on "land" (2" pink foam stacked up to 8"), and the front half is on a bridge.
I made the bridge by tracing the track sections on a sheet of MDF, the side girders are made of 1/16" balsa wood, and the supports are 3/8" poplar dowels. Decorated with basswood strips and spray painted. All of it came from Menards.
This maximizes the space on the main level for sidings, buildings, and roads while keeping the trains visible as much as possible. The tunnel makes room on the upper level for a passenger stop and a few small buildings and roads. I don't like long tunnels because they hide the trains too much, and are hard to access should something happen inside them.
Very nice use of space and the color of the bridge is eye catching.
John, I most certainly see the resemblance to what we have been talking about. You did a great job. I have MDF. I was thinking my supports could be at every track joint without a base, but would look better with the supports farther apart. The bridges look great. My biggest problem is, I will need to get it done fairly quickly, with lots of other things going on.
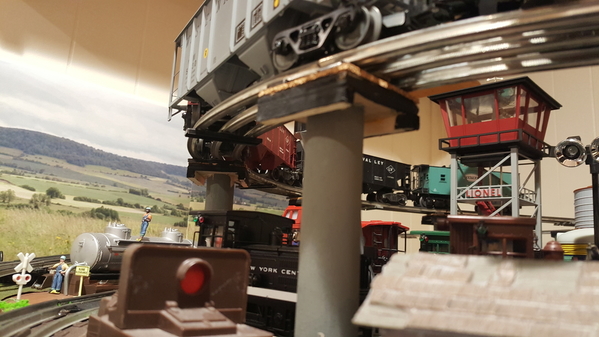
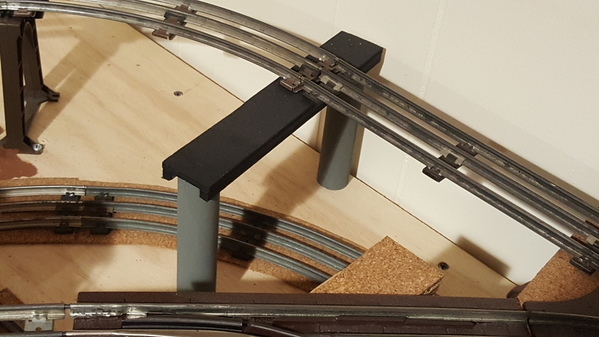
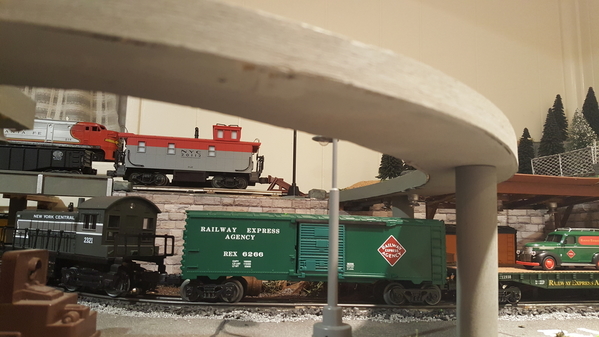
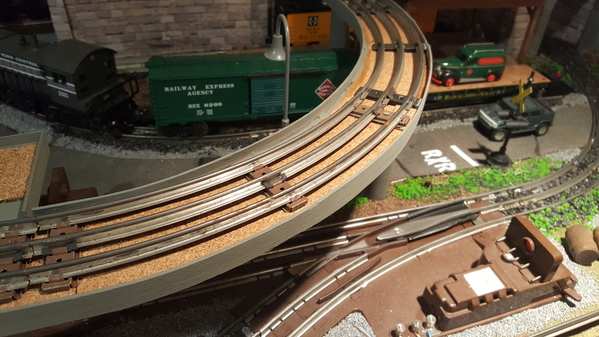
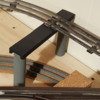
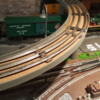
Hey Mark- here's some pix of my upper level supports. I used 1" dowel and 1/4" luan/ plywood for the platforms. The bridge section was wrapped with thin balsa to clean up the edge. Cheap quick easy. Assembled with carpenters glue and some brads to hold everything till the glue dried.
Bob
PS- My dad had the same Craftsman miter box. I thought it was the coolest thing when he got it. It was a huge upgrade from the hand held box we had.
Attachments
Bob, Before I forget, That was one tool I don't remember Dad showing me when he got it. When I was growing up he had no power tools, and he used the old wooden miter box too. He and I even cut up fallen maple trees with a two man cross cut saw, then rolled the short logs over the hill until they came to rest in the weeds at the bottom about 100 yards away. ![]() Dad would show me the tools when he got them and said I could borrow any of them at anytime. Also, they would be mine when he couldn't use them anymore since my brother hardly knows which end of a hammer to hold.
Dad would show me the tools when he got them and said I could borrow any of them at anytime. Also, they would be mine when he couldn't use them anymore since my brother hardly knows which end of a hammer to hold. ![]() He was always playing ball, while I hung out with Dad helping him with repair of our 1888 era house. That's why I was able to build my first layout with no help when I was 12.
He was always playing ball, while I hung out with Dad helping him with repair of our 1888 era house. That's why I was able to build my first layout with no help when I was 12. ![]()
The two pillar support in the third photograph is similar to what I need, because I have decided to put the one level directly over the other to maximize space for Kim's ceramic buildings. As I was telling Brian, I could put all of them butted up side by side and front to back and cover the bare tabletop with no more room for many of them. ![]() I have to keep in mind this is a temporary Christmas layout, and I have limited time. I like the idea of having a roadbed so I don't need pillars at every track joint. Also the whole thing can have a bit of fantasy to it, since it is a Christmas layout. I have several types of board to make the roadbed, but I need to think if I have anything on hand I can use for the sides. Of course I could go out and buy some sheet balsa.
I have to keep in mind this is a temporary Christmas layout, and I have limited time. I like the idea of having a roadbed so I don't need pillars at every track joint. Also the whole thing can have a bit of fantasy to it, since it is a Christmas layout. I have several types of board to make the roadbed, but I need to think if I have anything on hand I can use for the sides. Of course I could go out and buy some sheet balsa. ![]()
Thank you for your photographs! I think I said before I never built an elevated track like this. That kind of thing was taboo in HO! ![]()
Nice work there Bob! Sure is nice to scratch build stuff like that instead of just running out and buying it!![]()
Mark, we along with your wife have faith in you that you will get it built in time! You still have a month to get it done. Don't sweat it just enjoy the build!![]()
Happy to help Mark. One note of caution, I only made mine 5" tall and some bigger stuff does not clear. I forgot to include the track height in my calculation. ![]()
Thank you, Bob. I am making for 6" high and widening the supports out to maybe 5" for clearance.


Attachments
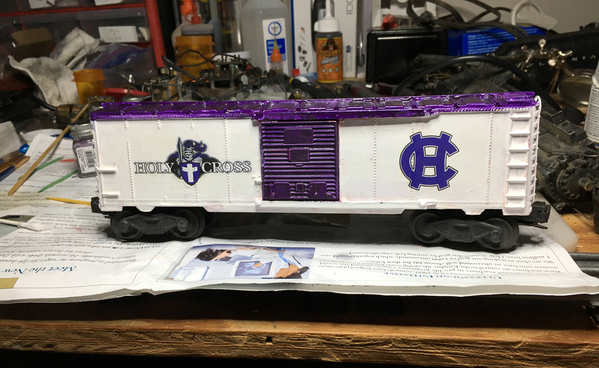
Last night I finished a little project, making a boxcar for my alma mater, Holy Cross. The school colors obviously are purple and white. I made the decals myself from images I found online. Next will be a car for Fordham.
Attachments
Any tippyness and domino effect of supports while assembling an elevated loop diminishes quickly when the track get fully supported. The end's curved track piers sit at an angle compared to the straight's piers. They form a complimentary lateral bracing sitting that way.
Pete, there is no picture!
Brian, So it is an Amtrak day! /very nice.
Butch, you sound like an engineering professor! ![]() That is a very concise way of putting it, like something the prof would want to see on a test. Your advice is well taken. Lets see if this humble builder can put it into practice. If not, there may be some hot chocolate spilled.
That is a very concise way of putting it, like something the prof would want to see on a test. Your advice is well taken. Lets see if this humble builder can put it into practice. If not, there may be some hot chocolate spilled. ![]() Not to mention, cars, the 1225, and an old hobo!
Not to mention, cars, the 1225, and an old hobo! ![]() No he will just vanish!!
No he will just vanish!! ![]()
briansilvermustang posted:
If I could give it more than one like, I would. What is the Metro North car 4145 in the top picture? Is it a light rail or subway car? Very cool. I like the black & yellow detail on the AMTRAK car as well.
mike g. posted:Pete, there is no picture!
Thanks, Mike! I tried to do it from my cell phone with no luck. Now there is a picture.
Pete
HCSader73 posted:mike g. posted:Pete, there is no picture!
Thanks, Mike! I tried to do it from my cell phone with no luck. Now there is a picture.
Pete
The car looks great, Pete! Did the decals come from the school, or did you have them made?
Typical day at the Razorback Traction shops. The KCS Geep belongs to @JohnD's dad, and is in for cleaning and servicing. The 1062 shell is from my scrap box; decided to fix it up just in case some Scout running gear presents itself.
Decided to add thinner straps and a brakewheel to my UP culvert car. Fortescue J. Gi-raffe and Freddy Flamingo supervise.
A broken boss on the 1062 shell is readily replaced by a bit of Plastruct tubing.
Mitch
Attachments
Looks like a variety of good projects Fortesque and Freddy have to keep up on!!
Mark Boyce posted:HCSader73 posted:mike g. posted:Pete, there is no picture!
Thanks, Mike! I tried to do it from my cell phone with no luck. Now there is a picture.
Pete
The car looks great, Pete! Did the decals come from the school, or did you have them made?
Thanks, Mark! I made the decals myself. I bought water-slide decal paper on Amazon, for color laserjet printers. I found mascot logos for Holy Cross on sites selling school athletic clothing. With a little help from Photoshop I turned the images into high resolution JPEG photos which would have sharp edges when printed. I shrank the JPEG files to fit the boxcar sides easily; printed them on the water-slide decal paper; and let the decals cure for 3 days. Then I cut them into small rectangles; put them in warm water for a minute or so; and delicately slid them onto the boxcar. Then I sprayed a clearcoat sealer on them to fix them in place.
This can be done for any college or high school with one caveat. The decals show well when applied to a white background. They do not show well on any other color. So the boxcar sides should always be painted white. A little imagination will be needed to accommodate school colors other than white. For example Notre Dame's school colors are blue and gold. The boxcar roof and doors could be painted blue with a gold trim, or vice versa. No doubt there are other options as well.
Pete, the car turned out looking great! Sure snaps out at you, Nice Job!![]()
mike g. posted:Pete, the car turned out looking great! Sure snaps out at you, Nice Job!
Thanx, Mike!
Pete, your more then welcome! Good work deserves to be noticed!![]()
John, sure looks like you have a good start on your crossings! Keep it up and please post the finished product!![]()
Pete, Well the process turned out great, and I can see the white background works best!
John, Glad you visited with your kids. Your crossover is coming along great! I have always heard handlaying track really can make for smoother switches. I have never tried it.
Seated Figures • Union Pacific Railroad • Passenger Cars
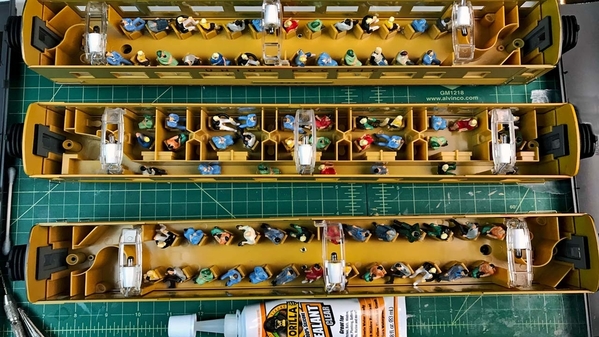
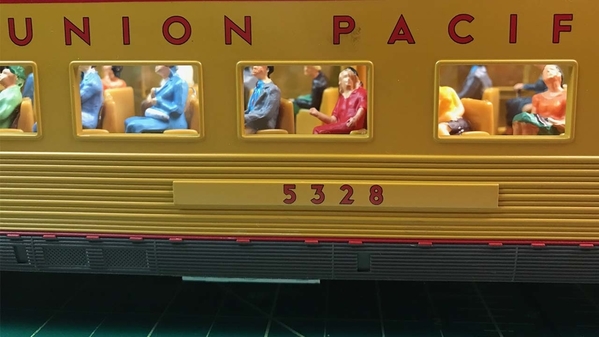
Today I worked on three MTH RailKing Passenger cars. Union Pacific Railroad, adding pre-painted seated figures. I used a 30 minute dry time, 100% Silicone clear by Gorilla Glue Company of Cincinnati, Ohio. With a fine tip glue nozzle.
Photos shot with an iPhone 7 Plus and enhanced in Photoshop CS.
Gary from Michigan.
Attachments
trainroomgary posted:Seated Figures • Union Pacific Railroad • Passenger Cars
Today I worked on three MTH RailKing Passenger cars. Union Pacific Railroad, adding pre-painted seated figures. I used a 30 minute dry time, 100% Silicone clear by Gorilla Glue Company of Cincinnati, Ohio. With a fine tip glue nozzle.
Photos shot with an iPhone 7 Plus and enhanced in Photoshop CS.
Gary from Michigan.
Where did you get the seated figures? I forgot to look for some at York.
The filled passenger cars look great, Gary!
RAK, Looks like trouble on your layout! ![]()
DennyM • Passenger Car
Hi Denny. They are from Amazon. They have five different seated figure sets. If you need more information. Hit me up with an e-mail.
Gary
Pete, background choice is always important for text & graphics, but more so with modern printing of decals and some other things because ink jet and lazer printing isn't done with the same inks they used to be on the decals we grw up with. It's much less opaque, and background bleed through it instantly fades some image's colors out. I.e. white worked out this time. If you used a lighter text, it would likely look very washed out on white, and look better on a black background. Like this, which washed the red to a pink when on white; but shows clearer definition, but darker overall tint, when on black. (it also "lost" It's outline on white due to cream & white being so similar the lack of contrast blends them into one color at the eye unless you look for it. Even then, it will appear as a fade until very closely inspected. And even then, color contrasts can pull optical illusions... those illusions can even vary from person to person or by settings around you. (was the dress blue or gold?... did you catch the internet sensation on that? That's a contrast illusion.)
Attachments
I ran a new Lionel Erie FA-2 AA set and the smoke crapped out on both units. The fan on the Non-powered unit lasted two minutes. (I heard the fan quit.) The smoke on the powered faintly fumed for ten minutes... using Lionel's "Premium Smoke Fluid", of course. The additional powered Erie B unit ran for 20 minutes. When I refilled it, nothing is happening with it either. I got dizzy blowing down all the smoke stacks. What a bummer. Another three engines going back to Lionel.
Lionel did fix my Vision Line Five-stripe Green #4935. It is doing NEW things as it runs around my layout. The sound is increasing in intensity as speed increases. It did not do that before it went in for repair. The engine can now start at a crawl of Speed Step 2. The service report said "the shell was grounding on the engine, but they could not find a short." (I thought a grounding shell and a short were the same thing. I must be uninformed.)
The Lionel Vison Line Five-stripe Tuscan #4913 is DOA for the third trip back to Lionel Service. They are offering me a new engine from a list of choices, probably a C&O 2-6-6-2 #1522. I still need to test the CSX F40PH #9999 that just returned from service for a failed smoke fan.
It is always something.
Sincerely, John Rowlen
trainroomgary posted:DennyM • Passenger CarHi Denny. They are from Amazon. They have five different seated figure sets. If you need more information. Hit me up with an e-mail.
Gary
I found them.
Today I actually hope to do some work on the layout. Raking leaves came first. They are calling for rain today. So I want to finish the liftout section. I want to add the crossing signals module. Saturday I am planing to head to the Greensburg show in Monroeville Pa.........Paul
In case anyone was wondering, this is what a 6112 gondola looks like with brakewheels, a flamingo and a gi-raffe.
This is what a 6112 gondola looks like with a photobombing kitteh.
At image right: Razorback Traction Co. RPO, getting ready to have the window areas painted orange. Note sharpened popsicle sticks, used to remove roof.
Any questions?
Mitch
Attachments
Paul, you should hire Mark to come and do your leaves! He has been doing quite a bit of them lately and is becoming a pro! I hope you have fun at the show this weekend!![]()
I will be spending tie in the train room this weekend working things out for track placement! and building placement to make sure they are going to work well together!![]()
trainroomgary posted:Seated Figures • Union Pacific Railroad • Passenger Cars
Today I worked on three MTH RailKing Passenger cars. Union Pacific Railroad, adding pre-painted seated figures. I used a 30 minute dry time, 100% Silicone clear by Gorilla Glue Company of Cincinnati, Ohio. With a fine tip glue nozzle.
Photos shot with an iPhone 7 Plus and enhanced in Photoshop CS.
Gary from Michigan.
Really nice!




![20181107_142434[1] 20181107_142434[1]](https://ogrforum.ogaugerr.com/fileSendAction/fcType/0/fcOid/12129987997660671/filePointer/81537088462759998/fodoid/81537088462759992/imageType/MEDIUM/inlineImage/true/20181107_142434%255B1%255D.jpg)
![20181107_142527[1] 20181107_142527[1]](https://ogrforum.ogaugerr.com/fileSendAction/fcType/0/fcOid/12129987997660671/filePointer/81537088462760000/fodoid/81537088462759994/imageType/MEDIUM/inlineImage/true/20181107_142527%255B1%255D.jpg)
![20181107_142502[1] 20181107_142502[1]](https://ogrforum.ogaugerr.com/fileSendAction/fcType/0/fcOid/12129987997660671/filePointer/81537088462759999/fodoid/81537088462759993/imageType/MEDIUM/inlineImage/true/20181107_142502%255B1%255D.jpg)
![20181107_142434[1] 20181107_142434[1]](https://ogrforum.ogaugerr.com/fileSendAction/fcType/0/fcOid/12129987997660671/filePointer/81537088462759998/fodoid/81537088462759992/imageType/SQUARE_THUMBNAIL/inlineImage/true/20181107_142434%5B1%5D.jpg)
![20181107_142502[1] 20181107_142502[1]](https://ogrforum.ogaugerr.com/fileSendAction/fcType/0/fcOid/12129987997660671/filePointer/81537088462759999/fodoid/81537088462759993/imageType/SQUARE_THUMBNAIL/inlineImage/true/20181107_142502%5B1%5D.jpg)
![20181107_142527[1] 20181107_142527[1]](https://ogrforum.ogaugerr.com/fileSendAction/fcType/0/fcOid/12129987997660671/filePointer/81537088462760000/fodoid/81537088462759994/imageType/SQUARE_THUMBNAIL/inlineImage/true/20181107_142527%5B1%5D.jpg)

