Ken, The latest plan looks great! It fulfills a lot of your desires in a layout!
Have a great trip on the train to and from New Orleans!


|
|
Ken, The latest plan looks great! It fulfills a lot of your desires in a layout!
Have a great trip on the train to and from New Orleans!
Ken-Oscale posted:geysergazer posted:I think it is an excellent plan.
Extending the interchange track along the wall would provide room for the 'ole 0-5-0 to do it's work of exchanging incoming and outgoing cars.
Oh, and I so agree with your wish that Lionel produce at least Fastrack #4 switches. I tire of the non-prototypical 18 foot spacing between adjacent tracks when using Fastrack.
Lew
Hear Hear! "I tire of the non-prototypical 18 foot spacing between adjacent tracks when using Fastrack." It just looks ridiculous and breaks the illusion of a double-track main. Come-on Lionel, just do it! Some of my recent designs work out a 4.25" center-rail spacing, which looks very good (and operates all my traditional equipment on O36 and O44). If Lionel worked out #4s with 4.5" spacing, that would help bring FasTrack up to big-layout expectations.
Hey Lew, Geysergazer, are you also a fan of Yellowstone? I love being out there, and Grant Teton is magnificent!
Yup, I am a geysergazer: someone who sits around all day watching a hole in the ground hoping to see it erupt a column of boiling water ![]() We both volunteered for several summers for the YNP park geologist. Our work was.....watching geysers. Have probably made the round trip between Pittsburgh and Old Faithful at least 30 times. We remember which gas stations on all the routes between have filthy bathrooms. The Tetons are wonderful but elevations above about 8000 are off-limits to me so we have to be content to stay at the bottom and look up
We both volunteered for several summers for the YNP park geologist. Our work was.....watching geysers. Have probably made the round trip between Pittsburgh and Old Faithful at least 30 times. We remember which gas stations on all the routes between have filthy bathrooms. The Tetons are wonderful but elevations above about 8000 are off-limits to me so we have to be content to stay at the bottom and look up ![]()
Lew
This variation adds two things: additional operator and viewing space by a small amount, and adds a bit more drama:

IMO every tweak is an improvement. ![]()
Lew
Lew, I added a run-around track on the NS high line adjacent to the Nuc plant, to aid in converting outbound NS staged train to inbound, for the run back to the yard with "new" interchange cargo and cars. All O72 minimum.
I was able to reduce the grade on the high line from 4% to 3%, with the top elev. at 9".

Oh, good idea, Ken! It's easy for me to forget how how big your plan is. That would be a long run backing the whole way and distinctly un-prototypical ![]()
Lew
I thought I would try a tunnel at the lower left adjacent to the restroom, for more scenery.

Overall it's a great plan! I'm glad you reduced the grade, but 3% is still significant. How are you going to stop cars parked on the NS interchange track from coasting down onto the main? Another participant on the forum developed a rod that pops up between the rails to hold cars in place to facilitate gentle coupling. That might be one option...
Ken,
Think about having the two mainlines in a tunnel. Let the local line run along the hillside in a river cut.
Jan
Ted S posted:Overall it's a great plan! I'm glad you reduced the grade, but 3% is still significant. How are you going to stop cars parked on the NS interchange track from coasting down onto the main? Another participant on the forum developed a rod that pops up between the rails to hold cars in place to facilitate gentle coupling. That might be one option...
Pretty sure the only place he'd place a cut of cars to be interchanged is on the divergent route of the first turnout past the bridge where everything is level. Placing a cut lower blocks all the switching moves prior to that point.
Jan posted:Ken,
Think about having the two mainlines in a tunnel. Let the local line run along the hillside in a river cut.
Jan
I agree--increases the scenic element.
-Greg
Thanks again for all of our comments and suggestions! Not sure if I have the right idea on the mainline in a tunnel, but here is a go: rock wall represented by a gray line, not sure how to capture this better.
Also looked at Greg's earlier suggestion about a run-around track in the towns. Westham would need to use the bridge with the run-around, Eastwick does not. Was able to make it work and added some space to the operating area, which I am happy about. Mainline is O72 through both towns, with O54 industry turnouts in Westham. Both the mainline and the passing-track in Eastwick are O72 minimum.

The double-track mains are around 54-58' in length (est.). For display, I could have two 12' trains circling in each direction simultaneously on each main, and then a fifth train on the inside town-to-town main.
There are six "locales": Eastwick and Westham, Bailey Yard and the Engine Terminal, and on the NS Hillsdale and Oak Point.
Ken, This plan is getting so good, it makes me want to scrap my new layout and build yours!! ![]() Well, maybe I'll just continue what I started!
Well, maybe I'll just continue what I started!
Ken,
I needed to add lower left to my comment. A few Forumites will know when I refer to the N&W running along both banks of the New River near Pembroke. Va. The N&W only had room on each bank for one track with the western track dug into the side of the mountain. In fact, they bored a 100 yard tunnel through a solid limestone rock.
Jan
I had forgotten that if using Lionel's Extended Truss Lift-Out Bridge there are 5" piers at either end. So I can use Lionel's if I want to, or use custom 36" bridges (single and double-track). There was an O54 reverse curve on the industry side at Westham that I eased with this revision. The mainline through Westham remains O72, and the switching there looks a bit more interesting. The viewing and aisle in front got a bit longer in usable space. The NS elevated siding at Oak Point was lengthen by about 4.5". Also reworked the engine terminal to save an inch in width.

Getting a bit crowded today. Thats me chillin in my office chair, adult beverage not shown. Some of our friends stopped by with their kid to see the trains go.
Mark Boyce posted:Ken, This plan is getting so good, it makes me want to scrap my new layout and build yours!!
Well, maybe I'll just continue what I started!
Thanks so much Mark! I am enjoying your layout construction thread, thanks for sharing with us, things are looking outstanding! -Ken
Here is a close-up image of the engine terminal. You can see there is a conveyor to empty the ash pit to a waiting hopper on the yard lead.

I plan on having two of these Rubbermaid kick-stools (libraries use these). When weight is applied, the castors retract for stable stepping stool about 12" high and 16" diameter. For kid viewing, 36" high layout is recommended, with these kick-stools, the layout could go up to 48" high. These stools will fit in a recess under the front edge of the layout viewing space, to get them out of the way when not in use. I will have to figure out some kind of handrail or border that the kids can hold on to for balance.

At 48", some folks (and kids) may be able to duck-under the lift-out bridges while in place. Getting to the access areas and under the mountain at the lower right will be much easier at 48" high.

The two longest stalls within the engine house are 24", with a couple additional inches out the doors in the rear. For comparison, the Lionel LC+ Berkshire is 19" long. I have had my eye on the MTH Railking Imperial Challenger for some time now, it measures 25" long, so would fit in the stall plus the open door room at the rear. It can also "hang out" on the ready track which is 64 inches in length.

A few odds&ends added. The scale of the "people" really helps to understand the size (compactness, really) of this 12x24 building. Its (only) about the size of a dining room. Without the figures, my imagination tends to exaggerate the size of my space. I would be great to build a bigger building, but this is the space that fits within our yard, easements, parking apron, and what has been discussed with "the wife". I really don't want to attempt something bigger, anyway, given my limitations. If I did "find" an extra foot or two, I would not change the layout configuration, just stretch the plan to give a larger operating space in the center.

Here, I am sketching-in some construction ideas. I like using seven 2" thick 4x8 foam sheets (which if you have not used, are stronger than you might imagine). They are easy to trim for the varying shape of the layout surface. They cover the surface pretty well, needing only a shelf for the NS staging. Because access and reach are quite good, I will not be up on or leaning on top of the foam to reach to the back, so the foam sheets are strong enough.
The layout surface will be supported by wood tables (design not certain yet) to give a height of 46-48". The foam sheets are strong enough for 16" centers between runners. Because I am lazy ![]() I will likely just lay-down and glue Woodland Scenics grass mats to start, and then build up the elevations, grades, and etc. on top of this surface. The stream on the left below grade will need some additional thought - it will be 2" below grade, so a length of foam below the 2" thick foam underneath will serve.
I will likely just lay-down and glue Woodland Scenics grass mats to start, and then build up the elevations, grades, and etc. on top of this surface. The stream on the left below grade will need some additional thought - it will be 2" below grade, so a length of foam below the 2" thick foam underneath will serve.

This construction will make tear-down easier after I am gone and the space will need to be re-purposed, perhaps in prep for a sale of the property.

Ken, I am totally enamored with this design. It has morphed into one of the finest layout designs I've seen in a long time IMHO, bar none. Based on the scale, size, layout plan, and operation potentials, I haven't seen such a great plan in the space that you have come up with for a long time!
The staff of OGR had better plan on doing a complete magazine write-up when you are substantially done, or else I will take some time off from work and personally make a special trip out east to administer some haircut and butch-wax treatments to these folks!!! ![]()
![]()
![]()
Thank you Paul, very kind, much appreciated! This design might make an article longer than I usually submit for publication, with lots of detail and considerations.
The building kit is from Best Barns, their Arlington model at 12x24 12x24 Arlington. The current cost at Home Depot is $7670 for the materials kit. Includes a loft and pull-down stairs, for lots of storage in the loft, can almost stand up in the center. To that kit I have to add:
Perhaps $35,000 - $40,000 for the entire building? Have not talked with a contractor yet.
Then of course, there is a cost for the layout itself and track, scenery, etc. Power supplies supporting TMCC/Legacy and DCS. Three power zones? The two mains and the interior yard and town mainline? Maybe $4500? The turnouts are over $100 each, and there are a lot of them ($26)!
Zoom-in view of Westham and Eastwick, showing O54-limited track sections. Note the station platform for passengers to reach the O72 track in Eastwick:


Interested in your opinions: This version increases the operating space, by deleting one yard track and the locomotive ready track, and condensing both towns by eliminating the passing tracks (back to all O72 again). So its a trade-off - is this version better, or the previous version?

Now, if it turns out that the contractor doesn't see a big advantage to going with the building kit, I might just increase the width by 1 foot (13x24), and return to the previous version, and "call it a day".
Ken, I like this version. More room for the humanoids plus better reachability for maintenance and derailments are very good things. Also, I like Westham and Eastwick better this way. I found the passing sidings problematic if not downright superfluous. If I were operating this pike I'd usually have the bridge between the two towns removed and operate each town as an Inglenook.
It is interesting how planning things "just growed". The Plywood Empire Route serves (6) industries with 14 cars typically spotted. Having developed this very simple operating scenario if I had the space I'd construct an interchange yard with trackage to drill&block at least 40 cars. In addition there'd be a 2 track hidden staging yard with space for 80 cars. That's what it would take to semi-prototypically support a railroad serving just those 6 customers.
Lew
Ken-Oscale posted:Now, if it turns out that the contractor doesn't see a big advantage to going with the building kit, I might just increase the width by 1 foot (13x24), and return to the previous version, and "call it a day".
I think I agree with your contractor. That's a lot of money for the kit, and I'm no fan of OSB for anything that needs to stand up to weather. Also, the big doors on the end are a liability, just another big hole you have to deal with. It's hard to believe that a stick built building would be more expensive, we're talking a very simple structure here. Framing something like this isn't that difficult, and you'll have a much better product when you're done. I notice it doesn't even include the roofing shingles in that price!
Ken-Oscale posted:Now, if it turns out that the contractor doesn't see a big advantage to going with the building kit, I might just increase the width by 1 foot (13x24), and return to the previous version, and "call it a day".
I'd definitely check with the contractor, Ken. I believe that most building kits merely contain enough raw materials to build the said structure. At least some of the lumber must still be cut to size/shape by the assembler.
I've actually built a few garden sheds (the last one really nice!) in my younger days when garden shed kits were also available. However, I ended up saving a fair amount of money in buying the lumber and all other materials and paints separately instead of buying a 'kit'. I didn't like the way the kits were built (there were built samples available to look at), they look pretty on the outside, but the construction methods and hardware were cheap on the inside. I built my shed a lot stronger and a lot nicer with much better hardware than the kits came with, and still saved money. Can't remember exactly how much I saved, but it seems like it was a good 30% or more at the time.
That's been about 25 years ago now, but the same may still hold true these days. Like I say, check with your contractor first. That extra foot would be worth its weight in gold if so.
I personally don't like eliminating the yard track and the ready track. I also like run-arounds in towns, not necessarily long enough to be a passing track, just enough room to run around 2-3 cars while switching. I like the branch like a lot. I don't car for the 3rd inside loop. I guess if your goal is to just loop 3 trains, it makes sense, but if you want to add some operation, I think you could use the space better to add operating interest.
My favorite concept is 2-3 staging tracks - hidden or not - that can hold complete trains. Then a single track main with passing sidings in each town. I would have "through" trains come in from staging to the yard, set out cars, pick up cars, and perhaps change locos and cabooses if it is a division point. then the through continues on and goes back into staging after a few loops or so. I would have one it each direction representing through traffic.
Then I would have a "crew" get a loco (older and smaller like switcher or geep) and make up a local train with the cars that arrived and take it to one or both towns. And maybe a second local for the other town, and one for the branch.
Basic switching at industries - car type for car type - if you pickup a boxcar, you set out a boxcar etc. No paperwork. If you want some basic paperwork, make car cards for each car with a pocket for a way bill. Micro mark sells these or yuo can make them. then make waybills for each car type, boxcar, hopper etc. On one side place an industry name that uses that car type. On the other side place one of the staging tracks (Interchange or other RR). When a car is on the staging tracks. put a new waybill in the pocket routing it to an industry. When at the industry, flip the waybill routing the car to one of the staging tracks/through trains. It is a pretty simple system to set up.
I want a strong attic pull-down stairs to the storage above. This one is a rated at 375lbs capacity, which should be more than sufficient for me and what I might carry ![]() . Shown is location of the opening in the ceiling above.
. Shown is location of the opening in the ceiling above.


When down, the stairs will just clear the edge of Westham, so a person could walk straight through the front door, through the lift-out bridges, and turn to go up the stairs with the new "goodies" from the train store.

Hi Ken, I just wanted to put mu 2 cents in. I built this 12 X 24 Train room myself for a little over $3500. It is only 1 story but here is the link if you would like to check it out.
Mike
mike g. posted:Hi Ken, I just wanted to put mu 2 cents in. I built this 12 X 24 Train room myself for a little over $3500. It is only 1 story but here is the link if you would like to check it out.
Mike
Awesome! Thanks so much - very encouraging on the cost. You did the labor yourself, which is beyond my capabilities right now, and I added a restroom, and interior insulation and walls and etc. But still...!! So I will look at a 13x24 train building next.
Here is a look at a 13x24 train building/man-cave. I stretched the viewing area and restroom by 4" - room for a 28" door rather than 24" - excellent! The other 8" I put into the main operating area - much improved!

Ken, great looking plan, I wish I would have seen it before I built mine. But I am happy sofar!![]()
Iowa Interstate System Map (from their web site).

Westham could become Cedar Rapids. Eastwick: Peoria. Both on branches off of the mainline. Bailey Yard could be the yard at Rock Island. Norfolk Southern connects at Des Moines and Peoria, not from the yard at Rock Island, but I suppose I could fudge that in my representation. Or, BNSF (another fave) junctions at Rock Island.
Mike Condrens pic of Chinese Steam:

Interesting: from Wikipedia: A spur of the Rock Island Railroad that ran beside a small hotel in Eldon, Missouri owned by the grandmother of Mrs. Paul (Ruth) Henning also inspired the popular television show "Petticoat Junction" in the early 1960's. Ruth Henning is listed as a co-creator of the show, along with her husband Paul, who also created "The Beverly Hillbillies" and "Green Acres."
Just as a heads-up, don't some area building codes specify that exterior doors open inward? I know that here where I live in SE-PA, the building code is for inward opening exterior doors.
Thanks John, I didn't consider that. Starting with this as a train shed, and sheds can have doors opening outward, but then it clearly evolved to a more residential type structure with a bathroom, carpet, AC, heat...
With the front door opening inward, I have clearance issues with anyone trying to view the layout - not a good experience for them. I have a couple ideas to consider and work out. Thanks again for mentioning this, I bet a contractor would see it and then I would have a delay later in the process, rather than early (now).
I don't know the rules in my neighborhood on this question, need to research. I can't do this on my own, as Mike did![]() , so need to follow "the rules" I suppose. Ken
, so need to follow "the rules" I suppose. Ken
This version expands the front viewing area by 8" to allow more clearance with an opening door inward. With a re-alignment at Westham.

Ken-Oscale posted:Thanks John, I didn't consider that. Starting with this as a train shed, and sheds can have doors opening outward, but then it clearly evolved to a more residential type structure with a bathroom, carpet, AC, heat...
With the front door opening inward, I have clearance issues with anyone trying to view the layout - not a good experience for them. I have a couple ideas to consider and work out. Thanks again for mentioning this, I bet a contractor would see it and then I would have a delay later in the process, rather than early (now).
I did some looking around and I see that some localities now allow outward opening doors on residential buildings, so you'll have to check the local building codes. It also might depend on the exact usage, though with a bathroom, etc., I'm guessing it'll be classed as a residential building.
It was kinda' interesting reading about the doors, one of the reasons for inward opening doors was security as the hinges are on the outside in the case of outward opening doors and are a weak point. However, new design hinges have largely eliminated that it seems. Another reason was the ability of emergency services to "break in" in an emergency, outward opening doors resist being pushed in a lot better than inward opening doors, makes it harder for them to get in.
Perhaps a sliding glass door set would eliminate the opening-outward vs code issue. Sliding doors aren't my favorite but are a way to deal with clearance problems.
Lew
A sliding door would be my last resort, I really dislike them!
 Thanks John and Lew! I wonder if double-doors would work: narrower doors (32"), double-width for moving materials in and out.
Unless you spend a lot of money, double doors are a royal PITA to seal properly, that would be my major concern.
I think I'd find out what code is for your area about outward opening doors first. This may be a non-problem.
As far as I can tell, from the state building code, and discussions confirm, in Georgia for residential housing doors can swing in or out. Min 36" main door, whatever suits the builder/owner. Discussions confirm that new style hinges are not really more difficult to break into with either swing direction. Fire department comment confirms out-swing doors are harder to break down in an emergency.
Problem solved, a nice big 36" door to bring the big locomotives in! ![]()
![]()
So I've gotten "greedy", with this wider 14x24 version (18x24 with the porch). Cutting into the back yard 1 foot more - need to check with the wife and my space/easements.

I brought the yard tracks around the curve: now longer and closer in length: 126, 143, 152 inches.
Gee Ken, pretty soon it'll be another house, where are you putting the kitchen and bedrooms? ![]()
![]()
Yah, approaching the size of a double-car garage. We might like that, with the layout above. To be continued....
The extra foot sure makes a difference in the operating area and livability.
gunrunnerjohn posted:Gee Ken, pretty soon it'll be another house, where are you putting the kitchen and bedrooms?
Maybe in the basement? ![]()
![]()
![]()
![]()
![]()
![]()
Ken- l love the creative process you're going through. Thanks for sharing with us.
A few thoughts- keep the run around tracks and sidings. You can't have too many in my opinion.
Can you shift the bridges to the left and just use module 5 as a swing out instead of both?
I bought a great telescoping attic ladder from Werner several years back. It's more compact than a traditional type and works great.
http://www.wernerladdersreview...attic-ladder-10-foot
I think the two car garage idea with the trains upstairs may be a winner (assuming you need a garage too).
I would look at conventional construction over a kit as well. Talk to some local contractors for their thoughts.
Bob
Ken-Oscale posted:As far as I can tell, from the state building code, and discussions confirm, in Georgia for residential housing doors can swing in or out. Min 36" main door, whatever suits the builder/owner. Discussions confirm that new style hinges are not really more difficult to break into with either swing direction. Fire department comment confirms out-swing doors are harder to break down in an emergency.
But swing out doors enable people to leave a building faster & safer should there be an emergency, say like...a fire. Down here, it's rare you see a house with entrance doors that swing in, unless it's an extremely old house.
balidas posted:Down here, it's rare you see a house with entrance doors that swing in, unless it's an extremely old house.
Well, up here all the doors swing in, including new construction. I think the building codes are changing in some localities, but so far, not in ours.
I have been in thousands of houses, apartments, townhouses, cabins, mobile homes and RVs. Have only ever seen outward-opening doors on RVs and eight-wide mobile homes (old and trace their lineage directly to travel trailers). If you've ever RV'd you know one very good reason for inward-opening doors: wind. A wind-whipped door can be deadly to either people or property. That is why storm doors have chains and closers but a big wind can tear that stuff off and whip the door against the house. Only in a well-protected area would I consider an outward-opening door.
Lew
Fire codes require that all exits from public places open out to prevent crowds from jamming the doors closed. Storage sheds have outward opening doors so as to not obstruct access to the interior. Most residences will have an inward opening main door with an outward opening storm/screen door. Big crowds are not expected in a home.
Jan
RSJB18 posted:Ken- l love the creative process you're going through. Thanks for sharing with us.
A few thoughts- keep the run around tracks and sidings. You can't have too many in my opinion.
Can you shift the bridges to the left and just use module 5 as a swing out instead of both?
I bought a great telescoping attic ladder from Werner several years back. It's more compact than a traditional type and works great.http://www.wernerladdersreview...attic-ladder-10-foot
I think the two car garage idea with the trains upstairs may be a winner (assuming you need a garage too).
I would look at conventional construction over a kit as well. Talk to some local contractors for their thoughts.
Bob
Thanks Bob! Your point on the run-around tracks is good. Now that I have allowed my space to expand to 14x24, I could put those back in and crowd the operating space a few inches. I may do that. Not sure what you mean about a swing module rather than slide out: that implies that the end by the bridges is a fixed pivot (right?), and that the module joints is a curve (hard to get perfect). I will think about some more, I may be missing your point.
I had mentioned the above a garage idea earlier in discussions with Mary (wife, who organizes "train vacations" for me![]() ), and she was interested. Have not yet brought up the idea again, but did spend some time looking at double-car garages on the internet yesterday - 24x24 seems to be about the minimal practical size.
), and she was interested. Have not yet brought up the idea again, but did spend some time looking at double-car garages on the internet yesterday - 24x24 seems to be about the minimal practical size.
Thanks on the ladder idea, cool!
Best, Ken
geysergazer posted:I have been in thousands of houses, apartments, townhouses, cabins, mobile homes and RVs. Have only ever seen outward-opening doors on RVs and eight-wide mobile homes (old and trace their lineage directly to travel trailers). If you've ever RV'd you know one very good reason for inward-opening doors: wind. A wind-whipped door can be deadly to either people or property. That is why storm doors have chains and closers but a big wind can tear that stuff off and whip the door against the house. Only in a well-protected area would I consider an outward-opening door.
Lew
Lew, Good point about the wind - I have lived in a very windy area (North Dakota) where this is an issue. I have had numerous closers and chains ripped off during storms and blizzards over the years, I have even seen storm doors ripped off of their hinges (one time). Where I live now in Georgia, we don't have those kind of winds. Perhaps being under a porch with buildings adjacent, the wind will not be as much of a problem. Thanks for that observation!
Jan posted:Fire codes require that all exits from public places open out to prevent crowds from jamming the doors closed. Storage sheds have outward opening doors so as to not obstruct access to the interior. Most residences will have an inward opening main door with an outward opening storm/screen door. Big crowds are not expected in a home.
Jan
Thanks Jan!
I am thinking at this point, that if I need an inward opening door, I will try the two door entrance with two 32" doors. The ones I am looking at come in a a steel frame pre-hung (but expensive!), so I would hope that the seal issue that John mentioned would not be a problem in that case. The double-doors would certainly make moving materials in and out easy, and when I have a crowd of kids or families come by to look at the layout (my hope), the wide entrance would be convenient. Will leave that as an option for a final decision later. -Ken
Here is how a 14x24 might look with the run-arounds in both towns, with the O54 restricted sections in red. The O54/O72 curved turnout at Eastwick is the only O54 restriction from that end of the siding, the bridge end is O72.

I wonder if it adds much to operations, to think of Oak Point as an interchange/junction, and the line running past the warehouse is actually a connection to another road. So, the connection labeled NS, could actually be BNSF (as in the prototype at Rock Island/Davenport), and the new connecting road is NS. Trains then could arrive and depart the yard intended for two different directions, and trains could be imagined at the staging siding as either coming from BNSF or NS. Just an idea.
I added another junction or interchange, with the UP at the lower left by the restroom. And marked the change to BNSF with a NS connection on the high line. And began changing place names to prototypical: Rock Island Yard, Cedar Rapids, Peoria. Will research towns for Hillsdale and Oakpoint in the future.

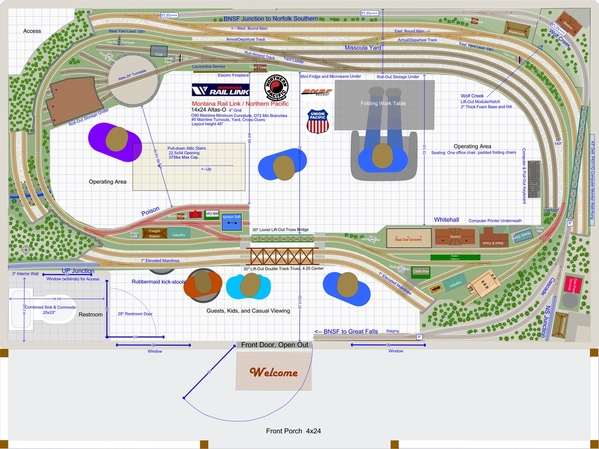
Considering an identity change to the Montana Rail Link / Northern Pacific. Have long admired the MRL, and has connections to BNSF and UP, with interesting branch lines - one runs to Poison, Mont. Cool name. Have watched trains from the pedestrian overpass at the Missoula yard.


The connections don't actually come in at Missoula, so some poetic license needed.
BNSF has a currently unused connection from Helena to Great Falls, through Wolf Creek and Cascade.

Ken-Oscale posted:I added another junction or interchange, with the UP at the lower left by the restroom. And marked the change to BNSF with a NS connection on the high line. And began changing place names to prototypical: Rock Island Yard, Cedar Rapids, Peoria. Will research towns for Hillsdale and Oakpoint in the future.
Hi Ken,
I got your Oak Point rename: A quick google search resulted in finding the "Quad Cities Nuclear Generating Station" at Cordova, Illinois, located in Rock Island County. This is northeast of the Quad Cities (Rock Island, Moline, Davenport, Bettendorf) along the Mississippi river.
I don't know if this was originally on Rock Island trackage, but based on the one map I was looking at, it appears that it might currently be served directly by the Iowa Interstate Railroad.
Do some searching and see what you think. Hope this helps. ![]()
Ken,
The BIGGER your layout gets, the BETTER it gets. The latest 14’ x 24’ is awesome.
I love the it. Do you plan on starting construction this year or next?
Are we going to be treated to and “animated” version of your layout any time soon? Hope so. That really brings the track plan to life.
thank you,
jim
Jan posted:Fire codes require that all exits from public places open out to prevent crowds from jamming the doors closed. Storage sheds have outward opening doors so as to not obstruct access to the interior. Most residences will have an inward opening main door with an outward opening storm/screen door. Big crowds are not expected in a home.
I seriously doubt that Ken's train building will be considered a "public place". ![]() In any case, if it's allowed by local building codes, I think the outward opening door seems preferable in Ken's situation.
In any case, if it's allowed by local building codes, I think the outward opening door seems preferable in Ken's situation.
SantaFeJim posted:Ken,
The BIGGER your layout gets, the BETTER it gets. The latest 14’ x 24’ is awesome.
I love the it. Do you plan on starting construction this year or next?
Are we going to be treated to and “animated” version of your layout any time soon? Hope so. That really brings the track plan to life.
thank you,
jim
Thanks Jim! I am thinking to start construction within the next 12 months. I can do an animated recording, I thought to wait until the plan has stabilized, which it seems to have now![]() . I was thinking to replace my 2015 Mustang (great car, nothing wrong) with a 2020, but would rather have a train building and layout, and so stay with my current machine for a few more years! -Ken
. I was thinking to replace my 2015 Mustang (great car, nothing wrong) with a 2020, but would rather have a train building and layout, and so stay with my current machine for a few more years! -Ken
You have come a long way in a short time. Your original track plan was good, consuming a substantial amount of the 240 sq.ft. of the allotted area. However my biggest hang up was the water closet inside the layout.
In just a few short weeks, with the help of many valuable suggestions and opinions from the OGR community your layout morphed into this spectacular layout while keeping the most of the original plan in place.
True you did manage to increase the square footage by nearly 50% but imho it was worth every inch. Best of luck going forward.


Ken- Prior to my last post you mentioned that the module to the right of the bridges was going to be on wheels. I've seen others on the forum do swing out gates instead of lift-outs. Yes- they pivot from one corner. Just thinking out loud.
Also- one final track plan tweak- Poke a track out the front wall on the BNSF interchange to deliver a cold one to your guests on the porch. ![]()
Bob
PS- I would keep the car and build the train room.
Mixed Freight posted:Ken-Oscale posted:Now, if it turns out that the contractor doesn't see a big advantage to going with the building kit, I might just increase the width by 1 foot (13x24), and return to the previous version, and "call it a day".
I'd definitely check with the contractor, Ken. I believe that most building kits merely contain enough raw materials to build the said structure. At least some of the lumber must still be cut to size/shape by the assembler.
I've actually built a few garden sheds (the last one really nice!) in my younger days when garden shed kits were also available. However, I ended up saving a fair amount of money in buying the lumber and all other materials and paints separately instead of buying a 'kit'. I didn't like the way the kits were built (there were built samples available to look at), they look pretty on the outside, but the construction methods and hardware were cheap on the inside. I built my shed a lot stronger and a lot nicer with much better hardware than the kits came with, and still saved money. Can't remember exactly how much I saved, but it seems like it was a good 30% or more at the time.
That's been about 25 years ago now, but the same may still hold true these days. Like I say, check with your contractor first. That extra foot would be worth its weight in gold if so.
I agree, these kits will use the cheapest materials available & just barely meet minimum code. Once you get your building plan down, you could work out a better deal with your local lumber company buying all your materials from them & on a payment plan.
I haven't seen where you will build on the ground with a concrete slab or up off the ground.
Either way, I would go with double doors opening out. Even if each door is 30", you will still have 60" of opening to bring in material.
I agree that for the radius of curves you want to use, 14' x 24' is better; 14' x 28' would be better still. Heck, I thought I read that you were using RailKing / traditionally-sized trains. Personally I would reduce the curvature to O72, or even O54 to lengthen the straightaways, and gain more flexibility. Yours is a great and well-thought-out design as it is. But with sharper curves, perhaps the track wouldn't have to rigidly parallel the edges of the benchwork, or the walls of the room. This is a problem I can't easily resolve in the design of my own layout!
By encroaching into my "precious" operating-space/person-space by about 6" in the lower left curve near Poison/Westham, I was able to make the Poison tracks all O72 minimum. I think this is a worthwhile sacrifice of the space, the siding/run-around is more useful, and the town just looks better. I re-aligned Cascade and added a Lionel Animated Freight Station there.

Ted S posted:I agree that for the radius of curves you want to use, 14' x 24' is better; 14' x 28' would be better still. Heck, I thought I read that you were using RailKing / traditionally-sized trains. Personally I would reduce the curvature to O72, or even O54 to lengthen the straightaways, and gain more flexibility. Yours is a great and well-thought-out design as it is. But with sharper curves, perhaps the track wouldn't have to rigidly parallel the edges of the benchwork, or the walls of the room. This is a problem I can't easily resolve in the design of my own layout!
Yes, currently everything I own is traditional/LionChief with one MTH RailKing diesel. Even so, I want the layout to be capable of equipment that requires O72 - who knows? - in retirement, I may want to go with Legacy/scale locomotives. And I really like the way trains look on wide curves, that is one of my "must haves" for this layout. If you look back through the thread, I posted some other layout designs more along the lines of what you are thinking about, so I am aware of those kinds of possibilities. -Ken
I think you're right Ken, my new layout is planned with O72 as a minimum so that there will be no restrictions on the equipment I can run.
Revised:

I worked on extending the UP junction track into a staging track - double-ended, so that trains could originate on this track, and return to it. A locomotive can run around to either end of the visible UP Staging Track, which adds another operational element to the plan.
I also staggered the ends of the yard tracks at the far right. I thought that having the yard tracks run so close to the edge of Whitehall somewhat undermined the impression that these are two different locales. I added a stream running through the area.
I looked at the long straight BNSF connection at the top that runs closely parallel to the wall. I like the look of long straight tracks when they have terrain on either side, which this does not. So I tried adding a shallow S curve into the alignment to see if I like that better. The trains are on a 3% grade here, but this curve is very wide diameter, so hopefully will not greatly increase the drag pulling the hill.

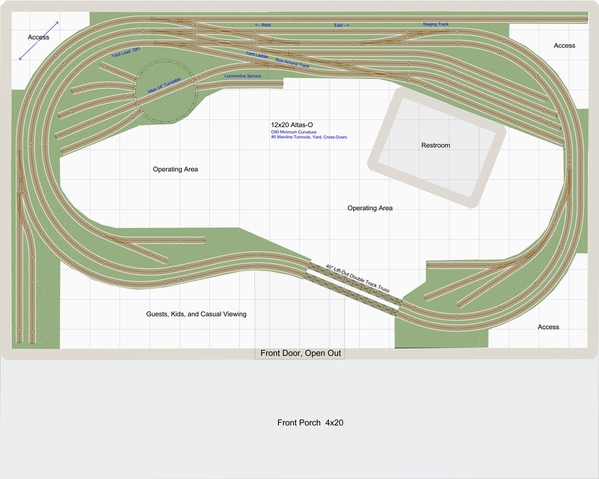
My first starting sketch as a 12x20 = 240 square feet. I expanded the area twice, going to 14x24 = 336 square feet. An increase of 40% in area.

Ken, I like the double tunnels on the left. I think it is neat watching a train run through where two parts are hidden, but it doesn't give the effect of 'where did the train go?' I also like the work you did on the staggered yard track ends and the stream. That will definitely make for two distinct scenes.
You may have answered this, but I did not see it. When do you plan to start building the train building? I don't know what part of the country you live in, so don't know if snow and frozen ground would make it a 2020 build or if you could start earlier.
Thank you. It has been an interesting project and one of your best designs; and that is saying a lot!!
Mark Boyce posted:Ken, I like the double tunnels on the left. I think it is neat watching a train run through where two parts are hidden, but it doesn't give the effect of 'where did the train go?' I also like the work you did on the staggered yard track ends and the stream. That will definitely make for two distinct scenes.
You may have answered this, but I did not see it. When do you plan to start building the train building? I don't know what part of the country you live in, so don't know if snow and frozen ground would make it a 2020 build or if you could start earlier.
Thank you. It has been an interesting project and one of your best designs; and that is saying a lot!!
Thanks very much Mark! I appreciate your comments and viewpoint. Planning to start construction in 2020, not sure if early or late in the year. Weather is mild here in North Georgia, so can do construction any time of the year. We usually get snow once or twice in the winter (foothills of the Appalachians), so likely March at the earliest for convenience.
That sounds great, Ken!! You will have a great track plan and have finalized what type of building construction is best suited, plus getting permits and all that jazz! ![]()
A pic from May 2019 of UP and NS power, with double-stacks and TOFC (in the distance) going past a weird rock formation. This is further south than my layout in Montana, but illustrates how common it is to mix power these days.


Yes, and you see UP engines on NS trains here as well!
Details to the trestle scene at the left, and a few tweeks:

I did some measuring yesterday, and a layout height of 48" seems too tall, I want to be able to see and operate the layout while seated, so I am thinking of a height of 42" for the moment.
Update to the Module/Table construction plan. Module-5 rolls-out in the direction indicated by the arrows, which matches the alignment direction of the double-mains departing the tunnel at the bottom. At the right end of Module-5 the track alignment does not match the direction of module roll, so a slide in track connection won't work. Instead, there are three section track pieces that will drop in, with rail joiners that slide into the section, to allow lift out, and the replacement and joiner slide. This will have a tie at each end separate from the track section, and beneath the joiners, embedded in the ballast and not moving with the track section.

The slide in joint to the shelf section along the mountain can be hidden by scenery and trees. The straight joint on the right side of Module-5 will be obvious, but Oh-Well ![]() .
.
Very nice plan and your train building plan looks really nice too! Everytime I follow these threads I want to start over on my setup. Yours has gotten better with each little change. I think expanding the building to accommodate some of the layout details was definitely the way to go, rather than trying to shoehorn the layout into the smaller space to accommodate the building size.
I ended up with about 40-1/2" to 41" or so for my layout height (depending on basement floor slope). It has 40" legs with 1/2" plywood for a top (I'm 5'-9"). That seems to be a pretty good height for the top so I think you would be happy with the 42". I would very likely go with 42" legs if I had it to do over. I have a few shop stools that I sit on and can still see everything on top (only one level), but no chairs.
I would lose the bathroom. I mean, how often do you need to use it. Unless you are living in your train room, that seems silly. I know I only go once a day. Stay away from Budweiser and chili in a can and you should be ok. Or if it is that important put a bump out, I mean separate room addition off to the side. Why not make a trip to the house if the need prevails. I would think the expense of having to run sewer and water alone would be a deterrent. Just my two cents. Hope I am not being insensitive.
Remember pay toilets? Was a dime at the Bears’s games back in the day. I always thought that was cold hearted.
Cheers, W1
William 1 posted:I would lose the bathroom. I mean, how often do you need to use it. Unless you are living in your train room, that seems silly. I know I only go once a day. Stay away from Budweiser and chili in a can and you should be ok. Or if it is that important put a bump out, I mean separate room addition off to the side. Why not make a trip to the house if the need prevails. I would think the expense of having to run sewer and water alone would be a deterrent. Just my two cents. Hope I am not being insensitive.
Remember pay toilets? Was a dime at the Bears’s games back in the day. I always thought that was cold hearted.
Cheers, W1
Lose the bathroom? ![]()
If you're lucky, someday way off in the future you'll understand. If not, oh well. Our condolences to your immediate family in advance. ![]()
Not insensitive, William. It is just that you must not have hit that point in life where one has to go to the bathroom many times a day. I can relate to Ken's concern. I have to constantly be making pit stops when working outside. I'm glad I do office work now, and the bathroom is down the hall.
rtr12 posted:Very nice plan and your train building plan looks really nice too! Everytime I follow these threads I want to start over on my setup. Yours has gotten better with each little change. I think expanding the building to accommodate some of the layout details was definitely the way to go, rather than trying to shoehorn the layout into the smaller space to accommodate the building size.
I ended up with about 40-1/2" to 41" or so for my layout height (depending on basement floor slope). It has 40" legs with 1/2" plywood for a top (I'm 5'-9"). That seems to be a pretty good height for the top so I think you would be happy with the 42". I would very likely go with 42" legs if I had it to do over. I have a few shop stools that I sit on and can still see everything on top (only one level), but no chairs.
Thanks RTR12, I appreciate the feedback. So my table legs will be 40", with the 2" thick foam sheets making 42" in height. The kids viewing on the "kick stools" will have a good view!
Mark Boyce posted:Not insensitive, William. It is just that you must not have hit that point in life where one has to go to the bathroom many times a day. I can relate to Ken's concern. I have to constantly be making pit stops when working outside. I'm glad I do office work now, and the bathroom is down the hall.
That is my situation exactly Mark and Paul!![]() Particularly after my morning meds kick in. I am keeping the restroom for now
Particularly after my morning meds kick in. I am keeping the restroom for now![]() .
.
Take it from me Ken, you'll use the restroom! People that come down to my trainroom are always jealous that I have facilities right at the site. ![]()
Lets see, the building interior (deducting wall thickness) is 13.33 feet by 23.33 feet, which totals to 311 square feet.
The restroom including the interior walls on two sides, is 2.75 feet by 4 feet, which totals to 11 square feet.
The restroom consumes 3.5% of the building's interior. I am keeping the restroom![]() .
.
Another way to think about the question, is what is the "opportunity cost" of the feature. I would like to have more space in the interior. 6" (or 0.5') x23.33' is about the same as 11 square feet. So if by magic, I could trade the square feet for more interior space, that is what I could get for it - about 6" of width in the interior. I would be tempted if such a trade were possible in our real world in two dimensions.
Here is one idea of what could be done with the restroom space:

So a third town could be worked in, coming off the UP line. Would the trade-off be worth it?
Keep the restroom! I have an unfinished basement, but it has provisions for a full bathroom. I've been seriously considering using those provisions, at least for a toilet and sink at minimum. As posted earlier, the older one gets the more useful these things become! ![]()
Ken-Oscale posted:rtr12 posted:Very nice plan and your train building plan looks really nice too! Everytime I follow these threads I want to start over on my setup. Yours has gotten better with each little change. I think expanding the building to accommodate some of the layout details was definitely the way to go, rather than trying to shoehorn the layout into the smaller space to accommodate the building size.
I ended up with about 40-1/2" to 41" or so for my layout height (depending on basement floor slope). It has 40" legs with 1/2" plywood for a top (I'm 5'-9"). That seems to be a pretty good height for the top so I think you would be happy with the 42". I would very likely go with 42" legs if I had it to do over. I have a few shop stools that I sit on and can still see everything on top (only one level), but no chairs.
Thanks RTR12, I appreciate the feedback. So my table legs will be 40", with the 2" thick foam sheets making 42" in height. The kids viewing on the "kick stools" will have a good view!
Ken - why 2" thick foam ?
Why not 1/2"- 3/4" Homasote and then 1" foam ?
Ken-Oscale posted:Here is one idea of what could be done with the restroom space:
So a third town could be worked in, coming off the UP line. Would the trade-off be worth it?
Maybe you can put the bathroom outside at one of the porch ends?
balidas posted:Ken-Oscale posted:Here is one idea of what could be done with the restroom space:
So a third town could be worked in, coming off the UP line. Would the trade-off be worth it?
Maybe you can put the bathroom outside at one of the porch ends?
No can do, the covenants would not allow that in our neighborhood. In addition to easements and building permits, I have to get approval from the homeowners assoc. The structure must match the exterior of the house.
Richie C. posted:Ken-Oscale posted:rtr12 posted:Very nice plan and your train building plan looks really nice too! Everytime I follow these threads I want to start over on my setup. Yours has gotten better with each little change. I think expanding the building to accommodate some of the layout details was definitely the way to go, rather than trying to shoehorn the layout into the smaller space to accommodate the building size.
I ended up with about 40-1/2" to 41" or so for my layout height (depending on basement floor slope). It has 40" legs with 1/2" plywood for a top (I'm 5'-9"). That seems to be a pretty good height for the top so I think you would be happy with the 42". I would very likely go with 42" legs if I had it to do over. I have a few shop stools that I sit on and can still see everything on top (only one level), but no chairs.
Thanks RTR12, I appreciate the feedback. So my table legs will be 40", with the 2" thick foam sheets making 42" in height. The kids viewing on the "kick stools" will have a good view!
Ken - why 2" thick foam ?
Why not 1/2"- 3/4" Homasote and then 1" foam ?
The 2" thick foam is a usable structural element, that is, it will support the weight of trains and scenery on 16-24" centers. Easy to work and shape to the irregular dimensions of the layout plan. Easy to carve for below-grade details. Easy to plant trees, easy to run wires, easy to poke holes though to the underside. Besides those points, its become my favorite layout surface for quite a few years now.
Minor updates, now showing the restroom or new town alternative (need a name).

Very nice, Ken.
Peter
I setup a ‘temporary ‘ Christmas layout on 2” foam supported by about 20” centers. It stayed up for 3 years without a sag. Now I’m building permanent on 1/2” wood and Homasote for track, but I don’t mind building a town on foam .
Mark Boyce posted:I setup a ‘temporary ‘ Christmas layout on 2” foam supported by about 20” centers. It stayed up for 3 years without a sag. Now I’m building permanent on 1/2” wood and Homasote for track, but I don’t mind building a town on foam .
Mark, I did a test of 12" overhang with a train parked for about 6 months, with no discernable deformation of the foam. I am planning on 16" centers, but with 2"x2" supporting the foam at each center, so really about a 14" span between supports.
There is a town of Dillon (pop. 4200) on the UP, making a connection at Butte, so that is a candidate name for the optional new 3rd town.
Or, if I want to follow the prototype more closely (not sure that I do), I could center the layout at the yard at Helena, with the BNSF branch to Great Falls, short branches to Deer Lodge at the left (west) and Three Forks at the right (east), and a connection to the UP at Silver Bow (optional 3rd town instead of the restroom). This makes for a nice/suggestive set of place-names: Cascade, Wolf Creek, Deer Lodge, Silver Bow, Three Forks, and then Helena Yard. [Cascade, Wolf Creek and Deer Lodge are actual towns with sidings on the rail line, that I added in the correct location as they were left off of the MRL map from the Internet, as they are actually on the BNSF.]

No Norfolk Southern this far north and west, that is a bit of a fudge/imagination. The branch to Deer Lodge is on the BNSF, along with the branch to Wolf Creek/Cascade.
Back in history, the NP connected from Whitehall/Spire Rock to Butte, and the Milwaukee Road from Sappington to Butte; thus making a big oval like the layout! The NP and Milwaukee from Butte on different routes, met at Deer Lodge and then ran parallel west on separate mains (the NP exists as MRL and BNSF, the Milwaukee is gone).
Ken-Oscale posted:There is a town of Dillon (pop. 4200) on the UP, making a connection at Butte, so that is a candidate name for the optional new 3rd town.
Or, if I want to follow the prototype more closely (not sure that I do), I could center the layout at the yard at Helena, with the BNSF branch to Great Falls, short branches to Deer Lodge at the left (west) and Three Forks at the right (east), and a connection to the UP at Silver Bow (optional 3rd town instead of the restroom). This makes for a nice/suggestive set of place-names: Cascade, Wolf Creek, Deer Lodge, Silver Bow, Three Forks, and then Helena Yard. [Cascade, Wolf Creek and Deer Lodge are actual towns with sidings on the rail line, that I added in the correct location as they were left off of the MRL map from the Internet, as they are actually on the BNSF.]
No Norfolk Southern this far north and west, that is a bit of a fudge/imagination. The branch to Deer Lodge is on the BNSF, along with the branch to Wolf Creek/Cascade.
Back in history, the NP connected from Whitehall/Spire Rock to Butte, and the Milwaukee Road from Sappington to Butte; thus making a big oval like the layout! The NP and Milwaukee from Butte on different routes, met at Deer Lodge and then ran parallel west on separate mains (the NP exists as MRL and BNSF, the Milwaukee is gone).
Trying-out the new place-names:

An idea occurs: cut the inside 3rd bridge, and instead elevate Deer Lodge to about 6", allowing clearance over the double-track mainlines to connect Silver Bow to Deer Lodge, closer to the prototype arrangement. Probably won't do, but an interesting idea.
Heck, if you raised Silver Bow high enough, you could have your 3rd town and a bathroom at the same time, just a low ceiling in the bathroom. ![]()
Chuck
PRR1950 posted:Heck, if you raised Silver Bow high enough, you could have your 3rd town and a bathroom at the same time, just a low ceiling in the bathroom.
Chuck
Chuck, I know you are being silly: the line from the yard to Deer Lodge is the constraint in elevating that town (and hence Silver Bow). It would have to be steep just to get to 6" elevation, about 4%.

Access to this requires an OGR Forum Supporting Membership
