


Thanks Dave, I will be keeping my eye out for your up coming video!![]()
Dave, It all looks fantastic!! You are really doing a great job transforming that foam into rock banks and cliffs! The flowering trees really add to the scene! That is super with the large mill in the background as a contrast.
Mark Boyce posted:Dave, It all looks fantastic!! You are really doing a great job transforming that foam into rock banks and cliffs! The flowering trees really add to the scene! That is super with the large mill in the background as a contrast.
Hey Mark, thank you much my friend.
WOW Dave everything is looking absolutely amazing. Beautiful work !
Alex
Not going to say this often but have to agree with darth vader just awesome
Alex and Bob I really appreciate your comments. With all that goes on in a day, unfortunately not always trains, I try to put some time in regularly. This forum is where much of my motivation comes from.
Dave
Good Afternoon Guys and Gals,
Below are some pics of some work I have been doing in the 2 Rail room. I installed a stone arch bridge over a section of the yard. I also finished the majority of the rock work. Lastly, I was able to put down some ground foam and start planting trees. The third from the last pic shows the blending of the left side of the layout to the newest section which is the right side. The last pic shows the installed bridge with surrounding rock work and ground foam. This project is far from being completed but I have achieved a level of accomplishment where I feel it would be appropriate to post.
Unfortunately I didn't do the best job of showing progress pics because I simply forgot to stop and snap them. What was mostly omitted was the sub terrain(pink foam) pics before the plaster cloth and rock molds were applied. If you go further back in the thread you will see this technique used on other sections of the layout.
Thanks for following my progress. More to come soon...
Dave


Attachments
Images (14)


Awesome work Dave !! very nice !
Thanks Brian!
Dave, your scenery work is superb. You're a natural at capturing it. One more question. How did you hide the third rail on some of that track. Inquiring minds would like to know. LOL......................Paul 2
Dave:
Your arch bridge is a work of art. Bravo!!!!!
Randy Harrison posted:Dave:
Your arch bridge is a work of art. Bravo!!!!!
Thanks Randy,
I agree but will not take credit for the build. A fellow model railroader created it for me.
paul 2 posted:Dave, your scenery work is superb. You're a natural at capturing it. One more question. How did you hide the third rail on some of that track. Inquiring minds would like to know. LOL......................Paul 2
Hey Paul thanks for the compliment. As far as your question, the "die hard" 2 Railer's created a special dust that instantly lowers the profile and makes the middle rail go poof. I think the Proto 48 guys and gals are working on the width between rails as we speak, lol.
I said if all I have to do is use some of that then what the heck, I'm not against trying something new.
Dave
Dave, It does take discipline to stop and take progress photographs when you are on a roll! I too love the stonework! What manufacturer made the turntable, and what is the diameter?
Thanks Mark! That is an Atlas 24" turntable. I thought it was a good start for now and was certainly budget friendly. I may change over to a more realistic one in the future as the layout get's closer to a more finished look.
Dave
Dave, I thought it looked like an Atlas. I agree it is price friendly and looks good!
Great work Dave! Thanks for the update. I agree with the other guys, you have a knack for this scenery stuff!
Andy
Hey Andy,
Thanks a lot buddy, I'm trying! There's so many ways to learn this stuff and I'm thankful that I get to see and learn from some fantastic people.
Dave
Beautiful Dave
bluelinec4 posted:Beautiful Dave
Much appreciated.
Dave, you sure have been doing some Amazing work! Everything looks great and really shows your skills! Very Nice!![]()
Hi Everyone,
This past week a great modeler named Peter visited me and there were a few projects started on the layout. Unfortunately with time, nothing got finished so in the next couple of weeks I will try to get a more completed look with these particular areas. I also need to work on a couple of other areas of the layout that I am not happy with.
Anyhoo, we worked on the town scene(complete make-over). The pics show the initial layout of the buildings, then added foam, then finally the start to the road system. The center of the layout will feature a small park with a creek that ends at a pond. This gives the truss bridge more of an excuse to be in the way. The park area is a much needed pop out for this area of the layout. I have provided two close up pics of the two main roads that run east-east on the layout and what work has been done on each of them thus far...sidewalks, retaining walls, steps. At the top of both of these roads will be Main Street which made use of some flats I acquired a few years ago.
The next area was the hillside. With Peter's suggestion I decided to removed the outer tunnel and just have that part of the hillside act as a section that was "blown out" by the railroad. You see pictures of the initial tear out of a large section of the hillside to the beginning stages of the alterations with plaster cloth. I now need to create a rock face on the vertical area in the front along with some rock carving. Below the track and in front of the hillside is another project in itself. There was a hatch that was closed up and another was created in the same area. It gives me more access to this section of the layout as well as a large portion of the hillside.
Lastly, I made use of my 4X8' closet in the 2 Rail room. It is now an industrial area that comes off the mainline. This gives me more switching options and also adds more interest to this relatively small area of 2 Rail. You will see pics of the initial framing to the installation of the valance(with storage already being utilized), to the initial laying of the track.
As always, thanks for viewing and any comments are welcome.
Dave


Attachments
Images (16)


Dave,
That looks like a lot of good progress to me! So many things to do! Just work on what you feel like working on any particular day!!! The closet area looks great!
Thanks Mark,
That's just what I intend on doing. I will pick one large project or a couple small ones and concentrate on them until near completion. I believe I am at that point on the layout where no one area is completely unfinished...well except for the closet.
Dave
Wow Dave, it looks like you’re off to a great start. Looking forward to following along.
Andy
luvindemtrains posted:Good Afternoon Guys and Gals,
Below are some pics of some work I have been doing in the 2 Rail room. I installed a stone arch bridge over a section of the yard. I also finished the majority of the rock work. Lastly, I was able to put down some ground foam and start planting trees. The third from the last pic shows the blending of the left side of the layout to the newest section which is the right side. The last pic shows the installed bridge with surrounding rock work and ground foam. This project is far from being completed but I have achieved a level of accomplishment where I feel it would be appropriate to post.
Unfortunately I didn't do the best job of showing progress pics because I simply forgot to stop and snap them. What was mostly omitted was the sub terrain(pink foam) pics before the plaster cloth and rock molds were applied. If you go further back in the thread you will see this technique used on other sections of the layout.
Thanks for following my progress. More to come soon...
Dave
Dave, is the photo immediately above a kitbashed structure from parts of a dual stall engine house?
The reason I ask is I tried unsuccessfully 20 years ago to kitbash an International Hobbies engine house. The shape of the arched windows and color of your structure reminds me of that International Hobbies engine house.
If your structure is a result of a kitbash, I think you did a great job.
What is your structure in the photo immediately above supposed to be?
Arnold
Hey Andy,
Thanks a lot man I appreciate the encouragement. While I am off I am trying to get in and do at least one project a day even if it's small. Of course the larger projects take longer.
Arnold the structure is an Atlas 3 stall roundhouse and it is being used for that purpose. Probably not the best view as the main purpose for the pic was to show the rock work below it. I plan to detail the interior but that is not quite a priority at this time. The building sitting on top of it goes with a coal tipple and was just placed there to clear some space so I could do some work.
Dave
Hi Everyone,
I realized a couple of things just now. One is I haven't done and update since way last summer. Secondly, I started this thread with this particular section. I have had 3 transformations with what I originally did and it's simply because I wasn't satisfied with it. It's in an awkward corner but still in your face when you walk in the room. I will add all of the structures, road, etc. before I make the decision to change it again but I think this may work. Not to mention as I add more things I can't just get up on the table to do serious work back there.
This was my first attempt using resin and though it was a little more involved I really like the outcome. I try to show the stages and have pictured some close-ups so you can see the detail. Elbee asked me to put him near the finished product for a photo opp and I couldn't resist.
I have many more updates and hope to get them posted within the next couple of months. I have been enjoying everyone else's work and have neglected to show my own.
Thanks for visiting,
Dave
")
")
")
")


Attachments
Images (8)
")
")
")
")


Beautiful, Dave!
Thank you much!
It looks great, Dave! Elbee looks great with the hillside as a background!!
Thanks Mark, I think he does too but he won't be permanent so I guess I need to add a coal tipple and bridge.
Looks great.
Thank you much Dave!
Looking great Dave! I like how you took the slope of the ceiling and have the hillside flow right into it! I think when your done you will really like how it looks!
Thanks Mike! I just have a few more things in that area to do and then I can move on.
Hello Guys and Gals,
It's been a very long time since I posted any progress on the layout. I have done some work on the layout but between not feeling it was worth posting to just plain ole' laziness, I haven't posted in a while. With that being said there has been quite a bit of work done since my last post. Some of that work is "do over because I didn't like". I have no particular order I am working in and that's exactly how I navigate different projects on the layout...good or not so good that's me. However I am getting better with the use of logic in moving from one project to the next. I will post more projects in the next couple of weeks that will give you a glimpse into my shenanigans.
I will start with some added "furniture". These are pics of my work bench and the finished bench work for my harbor scene. I have posted the harbor scene bench work unpainted but wanted to show the finished product. Before about three days ago it was my work bench but now I have a permanent area to do work. The first pic is the harbor bench work and the last three are of the work bench. Both tables fold under the layout as seen in the last photograph. This project was necessary because I do not have a basement or another room I can set up shop. I was tempted to buy a work bench from one of the hardware stores but decided against it because those things can get pretty pricey.
I also wanted to post some progress on the installation of the signaling system. The photos show signals installed on the lower level of the layout. They are not yet wired. I also have provided a photograph of the panel where the signal circuit boards, etc. will be housed. This is the last major electrical related endeavor on the layout and it is a big undertaking. I am happy to say that things are moving along pretty good. A few people reached out to me after one of my posts about the signaling system and have been of great support. I also have to thank Dave Bennett, of Train Installations and one of our forum sponsors, for his help with both of these projects. Any bench work or major wiring on the layout is being or was done with Dave's help and expertise.
Dave


Attachments
Images (10)


WOW Dave, That looks great! I do have one question, How do you keep your work bench up when its under the layout?
Dave;
you may want to put a wiring label list on your signal board panel, so that you can easily see which wires go where. I made one out of an XLS spreadsheet. After a few test prints, I was able to make the printout match the locations on the signal boards. There are so many wires involved, proper labelling is very important, and can help when troubleshooting the initial design, plus later when something goes wrong.
This is the front of the panel, before most of the circuit boards were installed. Note the distribution block at the top, so all internal wiring can be completed, the just connect the wires from the layout to the top of the board. This terminal strip covers all occupancy detection, power and switch position. The signal phone plugs go straight from near the signals straight to the circuit board plug.

This is the back of the panel, with the power and detection wires all connected from the circuit board to the distribution strip. Be sure to leave enough wire to re-strip and connect, as the wires can break and replacing the wire is a bit more work. I used 22ga phone wire.

Below is the panel as pre-wired in my workshop.

This is the panel, up at the layout. I have enough wire length that I can pull the panel out from under the layout to easily and comfortably work on it. I place the panel on my lap, while sitting in a chair. This panel is quite large, so I have two sides to it, connected by a door hinge.

This is the panel opened up to show both sides.

If you have any questions, email me from my profile or just ask here. I can send you my excel files, which you could use as a starting point. Again, be sure to develop a wiring label standard. I can share my standard with you if you are interested. Really, anything that has short names will work OK. I printed out multiple copies of all my label names on a piece of 8-1/2x11 label paper, then cut out the wire labels, stuck them to the wire and reinforced with scotch tape. I figure the label will dry out and fall off, so the scotch tape will help it last longer.
I also have developed a troubleshooting list. You would not believe how many mistakes can be made. I have had a bad signal board, bad switch board and a few bad (or mysteriously inconsistent) signals. Of course I had spares, as perfection is just a theory.
Then there were my mistakes, too numerous to discuss here. I kept notes as this helps with future installations. You will also need a logic table to keep track of what needs to be checked and verified for each signal. The logic list allows you to conduct your testing over a period of time without the need to remember where you left off. My list started out small and kept growing, as no assumptions are allowed on a real railroad. Again, the logic list is to catch all my wiring, plug connection and maybe a few logic errors.
Good luck and enjoy hooking up and testing your signals. It can be fun if you have the time and patience it requires.
Attachments
Images (5)

Thanks Mike,
I can better show you than tell you. But, a hole was drilled into one side of the tables just large enough for the pin on this latch to go into. This holds the tables up under the layout just fine. Also the legs fold inward. They are attached to the inside of the framing. I used a washer and wing nut to tighten the legs when they loosen up from being folded in and out. The harbor table will not be folded often, only for maintenance or work on the main bench work. I will only fold the work bench under when I have visitors, taking pictures/video, or again doing work on the layout.
Dave
Attachments
Images (2)


Joe,
Thank your for taking the time to provide me with that information. I know with "spaghetti" junction labeling is going to be very important. The picture I showed of the panel unfortunately does not show that I have labels on each circuit board. The labels basically have the direction(east or west) and the route(mainline or diverging). I did pretty much the same thing on the signal wires themselves.
I like what you have done with your panel and I may have to take you up on your offer and contact you. I want to make sure maintenance on this as painless as possible.
Dave
Nice job !!!
Nice layout!!!
![]()
![]()
![]()
Thank you kindly sir.
Dave: I am in the last phase of troubleshooting my signal installation. I have 56 signals and 25 switches. The last 10 are really giving me the gears. Solution may be simple, once I figure out the cause. Contact me when you are ready, Happy to share what I have learned.
Dave, the folding benches are slick looking! You have great looking signal masts. All the wiring makes me remember I am glad I am retired from working with electronics for 43 years. ![]()
Thanks Mark! You are correct, that's why I said this would be the last major electronic endeavor on the layout. Though the signaling process can be interesting and I'm sure will garner a sense of accomplishment, I want it to be over. Though, I really like all aspects of model railroading I must say these types of projects are my least favorite. With that being said, I know this will add another level of dimension to the layout.
Dave
Hi Gals and Guys,
In an effort to play "catch up" on the progress of the layout I wanted to share some efforts that date back several months. All of these projects were "DO OVERS". All of these areas, in their original attempts, can be seen earlier in this thread. I sat on the other attempts for a bit, but realized I would not be satisfied if I overlooked them and the project would be more difficult to redo as more scenery was added. So the modifications and "face lifts" began. I clearly took photographs during the process but simply didn't post them. Ask me why and you will not get a confident answer. Anyways, pressing forward here you go! I will go in order of each project.
The first few shots are of the started but not completed gorge area. The rock work has been completed but as you can see, I still need to add ground cover, bushes, trees, and water for the river. I am planning to install a road bridge across the river with a tunnel on either side of it. Progress is forthcoming. This is the only area that can be seen as you're walking down the hallway to the layout room. I want this first view to give the visitor a true sense of the level of modeling I am going for before they actually see the entire layout.
Secondly, is the creek. The first modification was to extend the creek further back as not to see the end of it. Prior to that I had the river starting at some culverts. After sitting on that for about 3 months I didn't like the concept. Also, I was unhappy with the banks and rock work within the creek bed. Except for a few small details, some dry brushing, and oh yeah, some water this area is almost completed. I will add "water" to all creeks and rivers as I am nearing the end of all basic scenery on the layout.
Third and final for this update, was the rock work in the second room of the layout. I call this room the 2-rail room but the 3-rail system does make an appearance in this room. As soon as you walk into this room you will see the area pictured. The first attempt was ok but I wanted to do better. As I did some research and learned some other techniques I wanted to feel better about this area than I did. I can now say I am happy with the results. The rock work itself is completed but I do have some ideas of how I am going to detail the area and will update when that work is completed. The last two photos show the "in progress" control panel for the few switch machines located in hard to reach areas of the layout.
Thanks,
Dave
Attachments
Images (17)


The rock really looks great!
WOW Dave, thing are really looking great! Keep up the wonderful work and keep us posted!
Nice work !
Hi Dave,
Very impressive! I especially like the rockwork. You've used a combination of carved foam, rock forms, and resin casting. Do you have a preference? In my opinion, they all look great. I'm going to add this thread to my reference list for when I get to that aspect of my layout.
John
Dave , wow everything is looking fabulous. Excellent craftsmanship!
Alex
Outstanding rock work!
Peter
Hi Everyone,
I did some scenery work on the back side of the layout. I'm sure once I add a few buildings, trees, etc. some of this will not be seen easily. I guess I don't want to regret not doing something back there as I move towards the front of the layout.
Check out the video I created of my shenanigans by clicking the link below.
Dave


Attachments
Images (10)

Mark, Mike, Alex, NYC 428, and Peter- I'm extremely late but thank you for your positive comments. This forum keeps me on my toes and I have gotten many ideas simply by looking at what others post.
John,
Thank you for your complimentary words about the rock work. The techniques all have their pluses and negatives. Plaster work is faster but resin gives great results. I use them all to create variety which is how it is in real life.
Dave
Dave, things look great! I wish I would have been smart enough to do the stuff in the back of the layout first! LOL
Mike,
Thank you and it happens...don't ask me how I know.
Dave
@luvindemtrains posted:Mike,
Thank you and it happens...don't ask me how I know.
Dave
LOL, at one point I hope it ends!
Dave, looks great!
Dave , fabulous work !
Alex
Wow says it all for me.
Well done! Great work!
Peter
Jon, Alex, John, and Peter thank you very much!
Dave
Excellent job!!!
Don,
Thank you kindly sir.
Dave
Dave, I just got caught up with your thread and watched your scenic work evolve from simple carved foam ( always hard to make it convincing unless you are a sculptor in your day job!) to plaster and rock castings. You are now officially a Life Master Rock Scenery Expert! Great work! I don't believe you posted a track plan of your new room, or how the two rooms connect. I thought your original track plan was very good: Lots of room for scenery and trains running.
Hey Will,
I'm glad you joined in and thank you for the honorary award! There are so many books, videos, and methods out there that it's very hard to mess up if you are determined to get good results. Sometimes I wonder if I spend more time researching than I do on the layout but that's simply how I internalize information. I do have a separate track plan of the second room and should probably post it at some point. There were a few tweaks done along the way but I will see what I can come up with.
Dave
Dave,
I just finished looking at this thread. Wow! ![]() Very impressive work and it's obvious to me that your skills are definitely improving as time goes by.
Very impressive work and it's obvious to me that your skills are definitely improving as time goes by. ![]()
There are many great scenes in your work, but I was particularly struck by:
- The use of that HO train in gorge - nice forced perspective!
- I really like that steel mill backdrop and how you blended it into the scene
- Your city street scenes are very realistic
- That farm! Again, the use of the backdrop and its relationship to the foreground is terrific.
- The rock formation are very, very good. Lots of detail and vegetation make it look realistic
- The river gully between tracks is just outstanding. I love that.
As to "do-overs", it happens to all of us. Don't worry about it. It's your own satisfaction that matters. That's the great thing about this hobby, if we don't like something we can tear it out and do it over.
Keep up the good work, man!
George
When I saw this all I could think about was when Bob Ross would drop a big tree in the middle of a painting and he would laugh about how people would say "You gone and done it now Bob, you just ruined a perfectly good picture." when he did things like that.

But like Bob you pulled it off!
KUDOS!
Jerry
@G3750 posted:Dave,
I just finished looking at this thread. Wow!
Very impressive work and it's obvious to me that your skills are definitely improving as time goes by.
There are many great scenes in your work, but I was particularly struck by:
- The use of that HO train in gorge - nice forced perspective!
- I really like that steel mill backdrop and how you blended it into the scene
- Your city street scenes are very realistic
- That farm! Again, the use of the backdrop and its relationship to the foreground is terrific.
- The rock formation are very, very good. Lots of detail and vegetation make it look realistic
- The river gully between tracks is just outstanding. I love that.
As to "do-overs", it happens to all of us. Don't worry about it. It's your own satisfaction that matters. That's the great thing about this hobby, if we don't like something we can tear it out and do it over.
Keep up the good work, man!
George
George,
Thank you for your complimentary words and encouragement. At one point I was just so anxious to get to scenery I wasn't thinking things through. Sometimes it was just a first attempt and other times just not well planned or thought out. From this point forward I plan to think things through and do more research if I am trying something new. This may not prevent all the issues but at least I will know I didn't just go in blind. I guess that was another part of the journey which means I had to go through it. Sounds a bit like life.
Dave
Jerry,
Thank you so much. Trust me, there were several times during this process I thought about repainting and starting again. Instead I kept going through the process. As I neared the end I became more and more confident because of the transformation I was seeing.
Dave
I just skimmed the thread as quick as I could on lunch (so I looked at the pictures and subscribed to your Youtube Channel haha) and I cannot get over your scenery and that backdrop! The backdrop makes the layout look enormous and your scenery is jaw dropping good. I can't wait to go over the thread in my more detail later on.
Bill,
Thanks for the subscription and your very kind words. I'm planning a steel mill so I will be watching the progress on your layout as well.
Dave
The latest scenery looks great, Dave! I really like the gravel road and fence going up the hill.
Thanks Mark,
I've added taking dioramas outside to see how it compares to real life. Of course, I build them in the train room because that's obviously the best way to know beforehand how it will look on the layout.
Dave
@luvindemtrains likewise! I'll be asking about your scenery when I get to that point.
No problem Bill! If I don't know the answer we can certainly figure it out together.
Dave
Hi Everyone,
I have been working on the redo of this section for some time now. Most of it was thinking about what I wanted to do. I've done more work in the river bed, tunnel work, and added trees. I would say this update complete's 95% of the area. I still want to add a few details like vehicles, a few more scenic elements, and oh yea, water. I appreciate all comments and suggestions. Additionally, my latest YouTube video is posted with more of the adventure with this project. Just click on the link.
Thanks,
Dave


Attachments
Images (8)
The gorge looks great, Dave
Superb!!!
George
Thank you Mark and George!
Dave
Hi Dave,
I did go back to see your earlier iterations of the gorge. You posted the first picture almost exactly 2 years ago- April 2, 2018. I like all three. You have definitely put your rock casting skills to work on the latest version, but the first has a certain charm.
These seem to be a rare case of nature returning to a wilder state rather than becoming more refined. The river has returned to a rock cut.
But this begs the question. Has this ever been anything but a dry riverbed? You mentioned adding water back in 2018 but I couldn't find any pictures of it.![]()
Keep up the good work! It's fascinating to watch your scenic evolution.


Attachments
Images (3)


Hey Will,
I never thought about this until you brought it up. I guess the first rendition did show a more civilized scene than the most recent. I put some time in with the first rendition as I was experimenting with cutting rock from pink foam. I'm not 100% sure what I didn't like about it but I just wasn't satisfied. I can usually tell as I am nearing the end of a project how I feel about it. With the first two I "sat" on them for a while which is a sign that something is going to be changed, altered, or sometimes completely redone. I did get "that feeling" as I completed the rock work this third time or it could've been a "like it or not" moment. As far as the water, when that is added there is no turning back. That is probably another indication that change was going to happen for the first two renditions. I have four water scenes on the layout and I will pour them all around the same time. To me this will be like adding people and other details. When I get to that point I will be at the 95% complete mark with the layout. The last 5% will consist of all of the minute details that really give a layout character and a final layer cleverness. That process will continue until I decide to move or build another layout.
Dave
I realize one of the things I like about your layout is the lack of people and clutter. Sometimes, IMO, a layout can have too many people- particularly when it is the same figure you see on every layout. Loses its uniqueness ( I say this although I am guilty of this very thing on mine, ![]() )
)
The first version reminds me of an eastern landscape and the second of a western one. I think you have a winner with the last version.
Thanks Will, I certainly hope so!
Dave
That gorge is just....dang haha I haven't watched the youtube video yet but that scenery is just awesome.
I also like the less populated look. I guess that seeing static people takes the illusion away for me. I like the motion on layouts.
Thanks Bill, let me know what you think about the video when you get a chance to check it out.
Dave
Hey Dave, Things are sure looking amazing your place! If you ever get tired and need a little change you could always do a instructional video! I know I would watch it!
I will be trying to keep my eye open for the next post and update!
Hey Mike,
Thank you for your kind words. They truly motivate me. I will certainly consider doing more of a tutorial type video with some of the techniques I have been using on the layout. In some cases I will simply make reference to a particular modeler I have learned the technique from while demonstrating. If it's my own derivative of that technique or something of the sort I could do more of a demonstration. Anyways I will keep everyone posted.
Dave
I thought the video was killer @luvindemtrains. The audio was a bit loud at the end.
I've enjoyed the last three videos to be honest. You got a killer layout coming along.
Thanks Bill, glad you enjoyed. More to come.
Dave
Hello Everyone,
I've been very busy lately as I have a goal to reach with the layout by the end of this year. Also, I will be part of the Piedmont Pilgrimage this year. This is a tour of layouts in the Atlanta area. I've been doing several different projects on and for the layout. This helps to keep me from boredom and monotony. I really enjoy working on individual projects but have to step away for sanity.
Anyways, I have been doing some structure building, kit-bashing, 3-rail scaling of some rolling stock, painting clouds, and the signaling system continues to move forward with headache included. The first few photos will show my kit-bash from an Atlas (Walthers) dairy kit. On my layout it will be a fruit factory. The photos show the inside of the building and its two floors, one side of the building that will be attached once all of the interior work is completed, and the conveyors w/fruit that will go inside the building. The building also will have interior lighting. I also am creating a side basement entry and have pictured that insert that was made out of styrene and detailed. I think I will be able to finish this one up this week. That's if I don't get any more bright ideas.
The last two photos show some work I have begun doing that will be around the factory. I am going to install a cobblestone road in this section. I want to have this area completed before the factory is put in place. These photos show me test fitting the road and sidewalk pieces after trimming the foam.
Next, is the gas station. I probably spent more time on this than I should have but once you get the detailing bug it's hard to just do nothing. Right now the gas station is ready to go but I am working on the gas pumps and sign to place in the front of it.
I also have a provided a photo of one wall that I painted clouds on and a few photos of some hoppers I have put Kadee couplers on. As you can see, by comparison, the next step is to weather them to blend with the existing cars.
Lastly, I have provided some photos of some building fronts I have painted and begun detailing. Some will simply be placed on the layout once painted and "glass" installed, others will be changed into shadow boxes, and a few will be full size buildings. Pictured you see a couple of Chooch fronts I painted and three DSL Shops row house fronts I am using to create a full building. Pictured I'm am test fitting the side panels. The building will be put together once all inside detailing and lighting are completed.
All of these projects will be documented on my YouTube page. I will do another post when these projects are completed.
Thanks,
Dave


Attachments
Images (16)


You been a busy boy!! The work looks great. I look forward to your video on Youtube!!
I could never paint clouds like that. They look awesome!
Bill,
Thanks again for checking out the work. I stay busy on it because it keeps me out of trouble. As far as the clouds, if I can do you you certainly can. I did some free hand and also used a stencil.
Dave
Dave, all the projects look great! The weathering on the left hand car really looks nice, so that long string of hoppers will really look more realistic going past your scenes. I think the row homes look really nice as the fruit processing factory. I like the stone building and am looking forward to seeing the cobblestone.
I'm with Mark, that weathered car looks great.
Outstanding work Dave, good luck getting ready for piedmont. I wish I was close enough to check it out!
Good Morning Everyone,
Mark-Thanks for the wonderful compliments. The row houses will be an apartment building but the brick building will be the fruit factory. My apologies if I didn't clarify in the description.
Dan-Thanks, I'm still working on my weathering skills but it seems to get better each time I do it. Mostly!
Mike- Yes, it can be a big headache because I try to do too much. It's good for people to see what stage your layout is in and that doesn't mean it has to be "finished". I just spend a lot of time trying to get it as far along as I can. The return visitors see the difference from year to year. Last year the tour was virtual for obvious reasons but this year we had a choice. I decided to do an in person visit but still have the opportunity to go virtual. If I do I'll let you know. If not, I'm sure there will be someone or myself getting some footage. I too, will share that. Anytime you're in Atlanta you're more than welcome to come by.
Dave
The weathering and the backdrop Dave, make that hopper look like the real thing.
Absolutely beautiful work on the layout. Very inspiring.
Jay Francis and Artie-DL&W thank you both.
Dave
Hi Everyone,
I've been doing some work on the left front edge of my layout. This is a section of my small town and has to be completed before I move on to a water scene I'm anxious to begin. I've been building kits, kit-bashing, and detailing the few buildings that will go in this area and am starting to finish those up. Today's entry is for the gas station scene. The building, many will notice, is a kit from Walther's (Atlas) that many have used. This is my spin on it. Here are several photos of the project from beginning to about 90% complete. I've yet to add vehicles, people, and a few other small details. The gas pumps were modified and were an afterthought not included before the video was edited as are a few details I have added since publishing it. I have documented the project in video format. Just click on the link below to watch it on YouTube. The last photo shows the station as it stands today with a few more added details. Unfortunately, the photo does not show the station with the lighting on. More to come...
Thanks,
Dave


Attachments
Images (12)


Great job Dave, I just got done watching your video and really enjoyed watching it come to life from start to end! Thank you so much for sharing it with the rest of us!
Thanks Mike! I try to document my steps. It's fun and helps me keep organized.
Dave
Great Video!! I thought the results were awesome! I was skeptical about fitting the building in front haha but I thought maybe the camera was playing tricks on my eyes.
![]()
Thanks Bill, that was my wishful thinking. Had I not put the gas station in that location maybe, but I'm glad I made the decision. However, I have found a home for the apartment building not too far away. Stay tuned...
Dave
Hi Everyone,
I made the mistake of not painting my walls before benchwork and yes, even some scenery began. DON'T DO THAT! Anyways, several years ago I finally decided to take the time to carefully paint the visible areas of the walls. Later I added backdrops on the areas of the room that have flat walls(the main train room is the bonus room over my garage). About 3 years ago I had an artist come in and blend those walls into the backdrop. He also painted some clouds. In doing this the colors of the walls without backdrops was off.
It didn't look right, to me, to see clouds and then have an entire section without them. Especially when a cloud was cut off at the corner of a wall. Because of this, I decided to try and match the wall color up or at least come close and also extend the clouds. After studying some videos interspersed with stenciling this is what I came up with.
Lastly, the hillside on one of my backdrops is abruptly cut off at the corner where the wall meets the vaulted ceiling. I couldn't let that be so I decided to rip apart some unused backdrop and continue the hillside.
As with the latest postings on this thread, I have a video of this. If you're interested click on YouTube link below.
Thanks,
Dave


Attachments
Images (15)


Dave, I watched the video. Your ceiling is more chopped up than I originally thought. I finally figured out what your outdoor roofline must look like. We lived in a cape cod house at one time with two dormers and two sloping ceilings, but that was less tricky than your room. I think you did a great job picking colors and blending them together. I see how the valleys in the ceiling helped you make scenic dividers. Great job!!!! I need to go back and see your other videos.
Great job in a difficult situation Dave. I don’t know that I would have the patience. But, it does make for a nice result.
Mark,
First thank you for you complimentary statements. Yes the room is a challenge as it pertains to backdrop work. It also influenced the height that I could have the bench work. If and when I move I will take those things into consideration. Right now, I am content and find it rewarding to overcome those challenges. Secondly, thank you for watching the video.
Jay Francis-Thank you for the compliment. You are correct in that a lot of patience is involved and that is not one of my strongest characteristics. I guess I can consider it an exercise to strengthen that characteristic within me. If I fail at it, more time spent correcting it and possibly more money. I don't want that so there's only one choice, lol.
Dave
Dave, outstanding work on the walls and the clouds look great! You definitely had a challenge with the way the ceiling is. As for learning Patience I have not got there like you, but I keep working on it I just keep putting more money out for train stuff!
Mike,
I appreciate it man. Definitely a challenge but much of it is making a decision and going with it. Also, hoping it comes out ok. You just have to go in and do it. I'm just happy that the results are acceptable. I don't put myself in these "learning" situations they just come to me and I have no choice but to accept, lol.
Dave
@luvindemtrains posted:Hi Everyone,
I made the mistake of not painting my walls before benchwork and yes, even some scenery began. DON'T DO THAT! Anyways, several years ago I finally decided to take the time to carefully paint the visible areas of the walls. Later I added backdrops on the areas of the room that have flat walls(the main train room is the bonus room over my garage). About 3 years ago I had an artist come in and blend those walls into the backdrop. He also painted some clouds. In doing this the colors of the walls without backdrops was off.
It didn't look right, to me, to see clouds and then have an entire section without them. Especially when a cloud was cut off at the corner of a wall. Because of this, I decided to try and match the wall color up or at least come close and also extend the clouds. After studying some videos interspersed with stenciling this is what I came up with.
Lastly, the hillside on one of my backdrops is abruptly cut off at the corner where the wall meets the vaulted ceiling. I couldn't let that be so I decided to rip apart some unused backdrop and continue the hillside.
As with the latest postings on this thread, I have a video of this. If you're interested click on YouTube link below.
Thanks,
Dave
Yeah, been there, done that. Caused lots of wailing, screaming, and gnashing of teeth. ![]()
![]()
![]()
![]()
At least you are correcting that before going much further. ![]()
The layout looks fantastic, too.
George
Thank you George! For part of this I used one some of the stenciling I bought from you at York.
Dave
Good Day Model Railroaders and Enthusiasts,
Today's post is some work I have begun on what used to be my work area. I waited to begin scenery here until the work further back on the layout was in a more completed state. The main goal of this project was to install the cobblestone road and street lamps. I also, did some scenery work in the area. There is still a bit more work to do in the area but this work has motivated me to continue tackling it.
If you get some time click on the link to my YouTube page to see this project in video form. Also, please subscribe to my page to receive notifications of new uploads concerning my train related endeavors.
Thanks,
Dave


Attachments
Images (10)


Dave, very nice job on the road. I watched the video. Thank you for taking the time to do it.
That road is amazing!!!
George
Mark and George,
Thank you both. It was fun to do.
Dave
Good Morning Everyone,
I recently finished my "scratch-bashed" apartment building and installed it on the layout. This is one of the buildings that will be on the cobblestone road in my last post. I wish I had two or three more of these DSL shops fronts because I would've had more options with configuration. With that being said, I feel good about how the building turned out. It's one of those things I can say is "one of a kind" on the layout. Not to mention, this was my first build of this kind.
You can see the steps I took to create the building by watching my latest video on YouTube. Just click below.
Dave


Attachments
Images (9)


@luvindemtrains posted:Good Morning Everyone,
I recently finished my "scratch-bashed" apartment building and installed it on the layout. This is one of the buildings that will be on the cobblestone road in my last post. I wish I had two or three more of these DSL shops fronts because I would've had more options with configuration. With that being said, I feel good about how the building turned out. It's one of those things I can say is "one of a kind" on the layout. Not to mention, this was my first build of this kind.
You can see the steps I took to created the building by watching my latest video on YouTube. Just click below.
Dave
Fantastic work. Simply outstanding. You make me want to upgrade some of the details on my building. Love the roof, vines, and interior details.
Really great!
Wow! That looks awesome! You really captured the look of a older apartment building. Excellent!
Dave, Sorry I had to go back aways to get up to speed, but it was well worth it as your modeling skills are just amazing! I love the new apartment scene, really knocks it out of the park!
Strap Hanger-Thank you kindly sir. I would say go for it. Once you start you will want to keep going. Please share if you decide to do it.
Ron H. and Hudson J1e-I appreciate the compliments from both of you.
Mike-No problem. You can always go back and look as you find time. Your kind words are a motivation and much appreciated.
Dave
Dave, the buildings and surroundings really look great!
Ya can't fool me Dave, that is a real apartment building, not a model!
Mark-Thank you.
John-You caught me! I must say if you go in and try to turn on the water you may have a bit of trouble, lol.
Dave
@luvindemtrains posted:Good Morning Everyone,
I recently finished my "scratch-bashed" apartment building and installed it on the layout. This is one of the buildings that will be on the cobblestone road in my last post. I wish I had two or three more of these DSL shops fronts because I would've had more options with configuration. With that being said, I feel good about how the building turned out. It's one of those things I can say is "one of a kind" on the layout. Not to mention, this was my first build of this kind.
You can see the steps I took to create the building by watching my latest video on YouTube. Just click below.
Dave
Dave:
Your modeling is "world class". Bravo!!!!!
How did you create your roof cornices and window frames or are they commercially available? Thank you for any information.
Dave, I totally agree with all the above comments. Very realistic, and very well detailed work. Just beautiful.
Randy-I'm speechless! Thank you for the wonderful compliment. You make me wanna go do some more work on the layout. The front of the building are 3 row house fronts by a company called DSL Shops(cornices and window frames included). If you haven't already, you can click on my YouTube link below and see exactly how I did this project.
Artie-Much appreciated.
Dave
Good Morning Everyone,
I finally completed my fruit factory/warehouse. It's bittersweet. The sweet part is the fact that it has been completed so I can move on. The bitter part is that I have lost one of my working spaces. But oh well, it had to be done.
This was two Walthers/Atlas Fairview Farm Dairy kits. I have seen several renditions of it right here on the forum, so I thought I would try my hand at it. The building turned out ok, especially for my first kit-bash or as I call it "scratch-bash". If I could change one thing I might have left a few of the windows more clear. Though you can see the detail inside at certain angles I should have made it where it didn't take much effort to see the inside of the building. Especially with all the work I did with the interior.
Here are some photos at various stages of construction and the scenery around the finished product. As always you can see a video of this project on my YouTube page by clicking the link below.
Thanks,
Dave


Attachments
Images (9)


The fruit factory warehouse looks terrific! It seems you added every detail imaginable! What a great scene.
I know what you mean about losing workspaces. I have no room for a dedicated workspace, so the layout top often becomes a workspace for even projects not layout related.
The new build is spectacular!
Peter
Thank you Mark and Peter! Mark, that's exactly what it was for me, but fortunately I saw this coming and built a workbench. I must say the building looks better than seeing screws, hammers, drills, plaster, etc. lol.
Dave
Wow, wow, wow!!! That's an awesome fruit factory "scratch-bash". ![]()
Looks superb.
George
Much appreciated George!
I can't get over that factory! Even the vines look good!!
Everything is so realistic from the rooftops to the concrete sidewalks. Beautiful work!
Thank you Bill and Artie! Bill I wasn't too sure about the vines but if you like them I'll leave them alone...for now, lol.
Dave
Dave, the fruit factory is terrific! I need to go back and catch up a bit. I like what you did with this kit. Great work.
Andy
Thank you much Andy! I've been waiting to see your updates as well.
Dave
Love it! Looks very good. Especially love the ivy. Very nice touch!
Wow ! That looks fantastic!!!
Alex
@luvindemtrains posted:Good Morning Everyone,
I finally completed my fruit factory/warehouse. It's bittersweet. The sweet part is the fact that it has been completed so I can move on. The bitter part is that I have lost one of my working spaces. But oh well, it had to be done.
This was two Walthers/Atlas Fairview Farm Dairy kits. I have seen several renditions of it right here on the forum, so I thought I would try my hand at it. The building turned out ok, especially for my first kit-bash or as I call it "scratch-bash". If I could change one thing I might have left a few of the windows more clear. Though you can see the detail inside at certain angles I should have made it where it didn't take much effort to see the inside of the building. Especially with all the work I did with the interior.
Here are some photos at various stages of construction and the scenery around the finished product. As always you can see a video of this project on my YouTube page by clicking the link below.
Thanks,
Dave
Looks fantastic Dave. Can't get more realistic than that!
That fenced in concrete yard would me a great place for you to put some hoops so that the factory employees can play on their lunch breaks
@luvindemtrains wow great work, I am handy enough to build almost anything, but the vision you have to pull this together is impressive. Looks like it should be there. Jeff
@Mark Boyce posted:The fruit factory warehouse looks terrific! It seems you added every detail imaginable! What a great scene.
I know what you mean about losing workspaces. I have no room for a dedicated workspace, so the layout top often becomes a workspace for even projects not layout related.
Here's my former work hench where I used to have a band saw and a vise:

Hey, we all have our priorities, and you know what mine are. LOL, Arnold
Attachments
Images (1)
Jacobpaul81-Thank you. I pulled the first thing I saw out of my scenery stash for the ivy. Just happy it turned out ok.
Alex-Much appreciated. I've been anxious to see the progress on your layout again.
John-I'm speechless. As I always say, I learn from some of the best in the hobby right here on this forum. I may have to consider the hoop set up. Who needs cars and trucks, lol.
Jeff-Much appreciated. I'm happy it is coming off like it belongs. I'm sure you know it can take a lot of moving things around to get something satisfactory.
Arnold-RIGHT ON BROTHER!
Dave, that is just AMAZING! You put so much detail into it that you can drive down any industrial area and see the same building in the same condition in real life! I wish I was that good, I just dont have the attention span for that much detail! Once again outstanding job!
Mike,
I really appreciate the compliment. It is a motivation for me. If you go back in the thread you will see a few do-overs. That's because I didn't take the time to figure out what I really wanted and just did something. As my eyes and skill level got somewhat better I went back for a revisit. So my lesson is to take a little more time and do it to my liking the first time. This doesn't mean I don't make mistakes but if I do I try and fix them before I call it done. Patience is not one of my strengths but endless money and time isn't either. The choice is obvious.
Dave
Good Day Everyone,
This week I am doing another sweep of work on the layout. I do this "marathon" every year to prepare for the Piedmont Pilgrimage. The Piedmont Pilgrimage is a tour of Atlanta area layouts sponsored by the Piedmont Division of the NMRA. Last year the event was virtual and this year members had a choice if they wanted to have a virtual or in-person event. My open house will be in-person. Though the goal is not to have a completely finished layout, my personal endeavor is to see how much I can get done before the event...within reason and not overdone. My friend Peter is helping me out for 4 days and so the plan is to utilize his expertise while he is visiting. With our heads put together we usually come up with something that I won't re-do in the future.
Here are some photos of DAY ONE. These were mostly tear out sections that I wasn't completely happy with and needed to prep for "make-overs". Additionally, there is a section of hillside that was started. It now needs some dry brushing on the rock work, dirt, ground foam, bushes, trees, etc. added. Today's shots are not very exciting but I wanted you to see the project from the beginning to end. More progress is forthcoming for day two.
Thanks for stopping by,
Dave
This shot was taken mainly for the foreground and fascia. The fascia was cut down so that it would be below track level and have proper drainage. It obviously will need to be painted. Also you can see where I've set some buildings out as I begin experimenting with placement for a small town.

This photo was taken to show the creek bed and arch bridge. Both will be re-done.

This is where the main room goes into the closet to a switching area. The entrance and hillside on the left will be re-done.

This is the BEFORE with the small mound and to the right, the rock cut above the rock cut tunnel. The mound will be taken out and the rock cut will be significantly smaller.

This section is a pop up that goes in the corner behind it. It was simply easier to work on it here than WAYYYY back in the corner.

Here is the pop up back in place with the rock work done and sprayed with a black wash. I discussed the following steps in my intro to the project above.

Same hillside with a bit of brown added to the rock work.

Attachments
Images (7)


The fire escapes on the buildings are awesome.
Thank you Arnold!
Very impressive work Dave, but, as Simple Simon says, you could have called it the 1910 Fruit Gum Factory.
You are seriously talented man. I love the way your scenery looks!
Simply incredible craftsmanship Dave. The apartment buildings look so real it makes me want to go there an open up a fire hydrant out in front. ![]()
John
The new hillside looks great!
Arnold-Thank you. They are from a kit made by a company called Tichy.
Jay Francis-Thanks a lot for the compliment. I think I'm missing something, why 1910 Fruit Gum Factory?
Bill-I appreciate it man. It's seriously one of those things that the more you do it you just naturally get better. If I can do it...
John(Craftech)-You're too kind. I might have to do a water scene with a fire hydrant. Thanks for the idea!
Mark-Thank you so much for stopping by and as always I appreciate the compliment.
Dave
Dave, I agree with everything that everyone has said, Your modeling skills are just outstanding! I will be fallowing to see how things progress! I think the rock cut in the back corner looks better smaller and I just love the popup in the corner!
Your work just shows how much is to do on a layout!
Mike,
You are too kind and thanks for your uplifting words.
Dave
Hi Everyone,
Here are some photos of DAY TWO progress. I'm a bit late posting this. Today was a slow due to having to make a run for more materials and family obligations. It's not pretty but I will share as promised.
Thanks,
Dave
Mock-up of tenement row and warehouse area.

Another view.

All buildings have to be removed to start ground and rock work.

Carved rock entering the switching area.

Beginning process of painting/weathering track.

More tenements laying where there was space. Still waiting on the ground work to dry on the top of the hillside.

I took this pic outside of the hobby store today. This is Georgia in late fall and it was about 77 degrees today. I will use this image to make my next batch of trees.

Attachments
Images (7)


Looks like good progress to me! Your late fall photograph looks like September in Western Pennsylvania.
Thanks Mark. I guess any step forward constitutes progress. If things go well the "transformation" will happen tomorrow. Yes, we're a bit behind down this way with the fall transformation. However, we will probably be completely green as the leaves just start to appear up your way.
Dave
I really like how you do your buildings. I'm taking notes!
@luvindemtrains posted:Thanks Mark. I guess any step forward constitutes progress. If things go well the "transformation" will happen tomorrow. Yes, we're a bit behind down this way with the fall transformation. However, we will probably be completely green as the leaves just start to appear up your way.
Dave
I’m looking forward to seeing the transformation!!!
Probably be completely green? I guarantee they will be completely green. 👍🏻
Mark-You are right. We're the last to catch up to fall and winter but the first back to spring and summer.
Bill-I just start putting buildings together until I see combinations I like.
Dave,
It's awesome work, but I am confused. ![]() Have you gone to 2-rail? The first 9 pages of this thread distinctly show 3-rail track, but towards the bottom of 9 and here, it's 2-rail. Or am I losing it?
Have you gone to 2-rail? The first 9 pages of this thread distinctly show 3-rail track, but towards the bottom of 9 and here, it's 2-rail. Or am I losing it? ![]()
George
Dave,
Caught up now. Where do I begin? You’re filling out the layout with unique and interesting structures and formations, and doing so with amazing skill. Well done. I like the fact that you’re willing to redo something if it doesn’t look right to you. I subscribed to your YouTube channel. Can’t wait to go through the videos. Keep up the great work! I look forward to the future works.
Andy
George,
Let me first assure you that you ARE NOT going crazy. My main train room is 3-rail. However, I have a second room that has a small 2-rail set up. There are some entries in this thread that show the 2-rail room but most of my postings here, are of the 3-rail section.
Andy,
I appreciate your positive feedback. It's not easy to go back after I have done something because sometimes I just want to move on. However, I don't want to look at any part of the layout and say, "I wish I would have". Especially if there is something I could've done about it. Thanks for the sub!
Dave
Good Afternoon,
I didn't get a chance to post yesterday's progress so everything will be a day behind. Though I didn't get to everything I wanted to yesterday, progress is progress. Today is Peter's last day with me but, together, we were able to accomplish a lot. I think with some much needed time off from work, I will be able to get a bit more progress done before the open house. It will be nothing "major" but transforming.
Dave
More dirt/ground cover around and in the pond. It's now ready for water.

This is the park pop out. Added more dirt/rocks to stream bed. It too, is now ready for water.

Cut down the hillside on top of the natural rock cut. Added more plaster to top of tunnel and re-cut rock.

Put some sculptamold down on each side of the grade crossing and uphill along tenements. Created a road on other side of grade crossing using spackle. I won't do the road on the other side until I have the small town in place. Also put planking between tracks at grade crossing.

Painted dock first coat of "concrete". Also spackled between the tracks so the trucks have access to the loading dock.

Retaining wall installed.

Attachments
Images (6)


Dave, you and Peter accomplished a lot!! It all looks great! The rock surfaces look fantastic!
Thank you Mark! We put together a task list so that there were things he and I both could do to make it happen. Hopefully I can keep a schedule going to get a few more things done.
Dave
Dave, that is truly a work art. Like so many other postings on the forum; it’s intimidating! Congratulations, outstanding job.
Jay Francis,
I really appreciate your very kind words.
Dave
Outstanding Dave! The transformation is great. You have a nice eye for the various scenes. Do you have a video showing the rock work from start to finish? What are you planning to use for water?
Andy
Andy,
Thanks you kindly. I will have a video with everything I have been doing on the layout recently. The video will show the various phases of the rock work but because it's not a how-to video I don't actually show how the rock is carved. I may need to make a how-to video.
I will use Envirotex Light and Woodland Scenics Deep Pour Water for the water. I will be building a harbor and I'm not quite sure what I will use there.
Dave
The scene in the first picture blows my mind. It looks like I've been there.
Thank you Bill! I have been to all of the places on the layout. Mostly in person all others in my imagination.
Dave
Luvindemtrains
Great work. You manage to fit a lot of scenery in without it looking to be on top of itself or compressed.
fast freight,
Thank you much.
Thanks Dave. I’m curious (and I’m sure others are too) how you achieve such amazing results.
Andy
How did the open house go?
Andy
@luvindemtrains posted:George,
Let me first assure you that you ARE NOT going crazy. My main train room is 3-rail. However, I have a second room that has a small 2-rail set up. There are some entries in this thread that show the 2-rail room but most of my postings here, are of the 3-rail section.
Really? ![]()
![]()
![]()
Where did you get your medical degree? ![]()
They BOTH look great! ![]()
George
@luvindemtrains posted:Andy,
Thanks you kindly. I will have a video with everything I have been doing on the layout recently. The video will show the various phases of the rock work but because it's not a how-to video I don't actually show how the rock is carved. I may need to make a how-to video.
I will use Envirotex Light and Woodland Scenics Deep Pour Water for the water. I will be building a harbor and I'm not quite sure what I will use there.
Dave
Dave, before you purchase Woodland Scenics Deep Pour Water, check out his manufacturer. FGCI Super Epoxy Systems SuperClear Super Epoxy Systems. You can purchase much larger quantities than WS Deep Pour for less. I used this for my lake, worked great with WS water systems paints and tints.
https://www.superepoxysystems....mp;mc_eid=ce3884b92a
Check it out and let me know what you think. below is at online purchase code for current sale prices.
Code: lgdp30
Scott
Dave,
I enjoy following your progress. I noticed that you paint your track a brown color first and ,if I am correct, you then go back over it to darken the ties. Am I correct? It looks great and seems like a great way to do it.
Great work Dave. Beautiful scenes!
Bob
Andy,
Again, you are too kind. I'm not ashamed to say I learn by asking questions, watching a lot of videos, studying photos, and from right here on this forum. I also have worked with some people over the years because I saw their work and said hmmmm. There is too much information out there that I don't have to reinvent the wheel. Sometimes along the way I may figure out a way to do it "my way" but it's just a variation of something I've learned. One thing I don't do is say I can't do it. If I can't, at first, I will learn using everything I stated earlier.
BTW, the open house is next Saturday November 20. I'm doing a few more small projects and running trains to make sure there are no hiccups.
George,
Thank you much! No medical degree here but my assurance is based on your observation of this thread. What you have seen is accurate. I certainly don't have the magic to make the middle rail disappear.
Scott,
I will look into your suggestion. Would you mind showing some photos of where you have used the product on your layout?
Dave
Thank you Bob!
Hey Dave,
Yes I do paint most of the track brown(Rustoleum Camo Brown). Then I paint the some of the ties for variation. I only paint the ties that are within viewing range. I experimented with an oxide color and I think it looks ok. I will see what I think of it once I add ballast.
Dave
Thanks Dave. I've already experimented with the same color and plan to play with the tie color. I like your choice of oxide. I have seen a video or two of folks using a light gray to show age (after roughing up the tie surface) and some using almost black colors randomly suggesting new tie replacement. I'm going to start with your choice and go from there.
Earl
@luvindemtrains posted:Andy,
Again, you are too kind. I'm not ashamed to say I learn by asking questions, watching a lot of videos, studying photos, and from right here on this forum. I also have worked with some people over the years because I saw their work and said hmmmm. There is too much information out there that I don't have to reinvent the wheel. Sometimes along the way I may figure out a way to do it "my way" but it's just a variation of something I've learned. One thing I don't do is say I can't do it. If I can't, at first, I will learn using everything I stated earlier.
BTW, the open house is next Saturday November 20. I'm doing a few more small projects and running trains to make sure there are no hiccups.
George,
Thank you much! No medical degree here but my assurance is based on your observation of this thread. What you have seen is accurate. I certainly don't have the magic to make the middle rail disappear.
Scott,
I will look into your suggestion. Would you mind showing some photos of where you have used the product on your layout?
Dave
Hi Dave,
I just took some new photos of the lake, waterfall, and pond leading into the lake. I used the SuperClear Liquid Glass 2.0. The lake is about 3/8" deep. The lake is modeled after a couple of my favorite lakes in Plumas County California. I wish I had put more WS tint into the resin, but live and learn.
Here's the product.
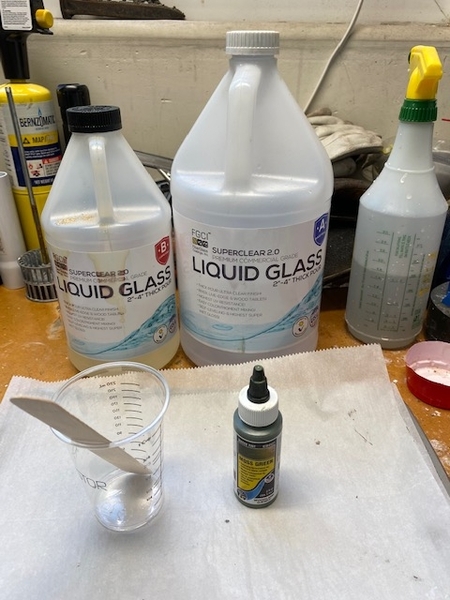
I left it glassy like a mirror for the early morning Sierra Nevada lake look.


I used WS water waves to chop up the surface of the water in the pond and the water coming out of the culvert into the lake.

Hope this helps,
Scott
Attachments
Images (6)


Dave,
Sounds good! Let me know how it works out.
Scott,
Thanks for the photos. I may have to try this product out.
Dave,
in that case, good luck this Saturday.
Andy
Thank you Andy! It should be lots of fun.
Dave
Good Morning Forumites,
I, again, wanted to share some progress on the layout. I think I'll work today and tomorrow to finish this up. Friday will be running trains ALL DAY and preparing for visitors on Saturday.
Dave
First layer is real dirt...

Next fine ground foam then coarse(darker) ground foam...

The next morning, I gave the foreground(drainage) the same treatment.

This is the insert on the workbench to start planting trees.

Insert back on the layout to start blending the trees with two outer sections.

Believe it or not this is over 60 trees!

Re-install of the girder bridge with a new coat of paint/weathering.

Started the ground work around tenements. NO, those are not clouds but patch work for the screw holes that were in the walls.

Dirt added to hillside, steps added way in the corner and the second house from right, and gravel added to parking area.

Fascia also patched. Needs sanding then it will be ready for painting.

Attachments
Images (11)


WOW Dave, That looks Outstanding! Have fun running trains on Friday, I sure hope the gremlins dont show up this weekend!
Thanks Mike! After all of this work it will be nice just to run the trains. Gremlins?
Dave
@luvindemtrains posted:Thanks Mike! After all of this work it will be nice just to run the trains. Gremlins?
Dave
Gremlins, I spent last Friday running trains as I had friends coming over to see the trains and visit. The trains made 2 loops and stopped!![]()
I checked the next morning as in one place on 2 different loops I had a power feed come loose! My bad, it just sucked as they ran perfect the day before!
OK, I gotcha! I hope that doesn't happen. I always give the trains a pep talk before we have company. It works...most of the time, lol.
Dave
Lots of eye candy Dave. Nice work, the insert looks great. I wish I could see this in person. I hope the folks that come through on Saturday appreciate the level of work involved. Outstanding…
Andy
Add Reply
Sign In To Reply
