Nice kit Mark. It’s coming along nicely. The weathering looks terrific, great job.
Andy


|
|
Nice kit Mark. It’s coming along nicely. The weathering looks terrific, great job.
Andy
Thank you, Andy! I got a little more done last night.
Looking good Mark, sorry I would have commented sooner but with working with you and Bill on the AIU problem, then the 3 day weekend and a house full of family and grandkids I wasn't able to get to my computer and hate typing on my smart phone.
But I think your doing an outstanding job and it is going to look wonderful on the layout! I will keep my eyes open for upcoming updates! ![]()
Thank you, Mike! You have been quite busy! I don't like typing on a smart phone either. I'm very slow.
I mentioned earlier that I wondered if the walls of the fire house kit would need bracing. They certainly do. With painting, they bowed slightly. I have been scrounging up stock to do that since it wasn't provided in the kit. The intent is that two 1/16" thick layers have no support except at the corners, and the two roof sections just plop down on top of that. I did finish installing all the windows into the walls and they look pretty good.
As is often the case, I forget why I went into a room. How about forgetting why I went into a store? Yes, it happened yesterday!
I ventured down to visit Mum and Dad at the personal care home yesterday, and had two reasons for continuing on after the visit to the hobby shop a couple miles farther. One reason was to make an inquiry. The second was to buy some stock to brace the walls of the fire house kit. After I had been home for a while, I realized I had looked around the store but never even thought about the kit. Whoops!
I am at the point I need to brace the walls before continuing the kit, so I decided to mock up an area I have been thinking of ever since the mainline rebuild started. With two mainlines and two inclines, I lost the space where I was going to place the Idaho Hotel that I purchased from forum member Myles "Trainman2001" My thought is to put it on a raised area right inside the door and adjacent to the track just coming off the double track bridge. I'm thinking it would be like the Shady Rest Hotel from the old television show "Petticoat Junction" Here is an idea.... ![]()
![]() -take your pick.
-take your pick. ![]()


I know, the hotel is sitting on the edge of the cliff. Since it is a mock up, I didn't cut anything to fit the curve that would be in the final scene.
Looking at it from the door entrance, since I am thinking I could have the station scene below with some string lights so it can be seen and there would be plenty of room to separate the two views.


I'm sure Jeff will notice the new 3-bay hopper in the first photograph that is standing in for the Cannonball. I broadened my horizons since it is the only non 2-bay hopper I own. Maybe someday, I will buy something other than boxcar red and WM oxide red. ![]()
@Mark Boyce posted:As is often the case, I forget why I went into a room. How about forgetting why I went into a store? Yes, it happened yesterday!
I ventured down to visit Mum and Dad at the personal care home yesterday, and had two reasons for continuing on after the visit to the hobby shop a couple miles farther. One reason was to make an inquiry. The second was to buy some stock to brace the walls of the fire house kit. After I had been home for a while, I realized I had looked around the store but never even thought about the kit. Whoops!
I am at the point I need to brace the walls before continuing the kit, so I decided to mock up an area I have been thinking of ever since the mainline rebuild started. With two mainlines and two inclines, I lost the space where I was going to place the Idaho Hotel that I purchased from forum member Myles "Trainman2001" My thought is to put it on a raised area right inside the door and adjacent to the track just coming off the double track bridge. I'm thinking it would be like the Shady Rest Hotel from the old television show "Petticoat Junction" Here is an idea....

-take your pick.
Been there, done that..... on both counts......![]()
![]()
Mark, wow a BLUE box car and a YELLOW caboose! What were you thinking? ![]()
The area looks a little tight as is. The station looks fine below , not sure the background building makes sense there. Can you overhang the building area into the walkway a few inches to create the illusion of spaciousness? I am thinking a building like that needs a few trees, grassy area and flower garden. Will that be the first area seen when you enter the room?
Making some nice progress Mark, looking good. I like that hotel, but no room on the layout for me. The turntable is a nice addition, but it takes lots of real estate.
I live with sticky notes! As I need something, I immediately write it down or I can guarantee forgetting it.
Gene
Thank you, Bob, Jeff, Gene! So it isn’t just me!! 😄
Jeff, yes, the area is tight, as is every area on the layout. I can push it out a little, but the aisle between the layout edge and the wall is 28”. Yes, I agree that trees and gardens would be the way to go with scenery. It is right inside the door, so it is the first thing to see. I thought it would give something of interest before seeing the big bridges.
Ah ha, Jeff, you noticed! 😄 The blue boxcar is one with the voltmeter built into each side, so it is a ‘novelty car’ to me. I picked the blue Westinghouse car since Westinghouse is a Pittsburgh company. The yellow caboose is decorated for Chessie with the Western Maryland WM as Chessie did along with B&O and C&O. That merger took place when I was finishing high school, so the B&O blue started disappearing on local tracks and we started seeing WM red, white, and black before everything was repainted.
Gene, I use lots of sticky notes, but failed to write one for the hobby shop. This time my mind was more on Mum and Dad, I think. They are 92. Mum has dementia and is confined to a wheelchair. Dad is wasting away, and in fact was taken to the hospital the next morning; yesterday. They are doing tests today. I’ll be going back down, so should be able to stop by the hobby shop soon. I work on the kits when I can’t sleep at night.
Thank you for every response!!
Mark,
Praying for your parents health.
Joe, I appreciate it so much! Believe me, Mum and Dad would appreciate it as well!!
Most folks don’t have both parents live so long, but it is tough for them no matter their age. After our youngest daughter turned 30 last month, I realized Mum and Dad were 30 when I had my first memories of them. They have been blessed with long and healthy lives.
Oh, I wanted to add that the Idaho Hotel is a bigger building than I had planned for a country hotel/inn. When Myles offered two or three of his kit built buildings for sale to make room for more of his fantastic scratch builds, I just had to get one. I really admire his work, photo descriptions of his processes, and how he shares every mistake he makes and how he gets out of a jam. It was also good to meet him and his wife in person for delivery of the hotel.
Mark, sorry to hear about your parents. Your mind was thinking of what was most important!
Gene
The hotel building is a very nice structure. Can't wait to see this scene finished. Push forward my friend.
Thank you, Gene and Joe!
Mark, great progress and fine work as we have come to expect on your layout. That hotel is going to look tremendous, what a great idea to include it on your layout !
Parents with long lives are a blessing. Prayers for their improved health and many more happy memories.
Sorry to hear about your parents Mark, but both into their 90's is nothing to sneeze at. My in-laws are 89, 87 respectively and both still in good health and still living in the same house my wife grew up in. We count our blessings every day.
Bob
Good morning Mark, I like the placement of the hotel and if it was me and had room, I would just cut a curved section of foam to match the track, so you don't have to move the hotel into the walkway.
I am sorry to hear about your parents and they are in our prayers! It is nice that you have had this amount of time with them.
Thank you, Eddie, Bob, Mike!
I was looking at the hotel trying to imagine what it would look like as Mike suggested with the shelf and foam around the curve. I think it would be okay, but there is only one way to know for sure.
Jeff, I forgot to comment that the warehouse is only there to hold up that end of the shelf for the mockup. I would do something different on the lower level.
Thank you for the comments and prayers for Mum and Dad.
It's only been a few days, but I got a good bit done a few minutes here and a few minutes there. I had to drive right past the hobby shop when I made my first trip to see my dad in the hospital on Friday, so I picked up some K&S 1/4" square tube stock to reinforce the walls. I cut it to length and glued it on with E6000, a product our older daughter pointed out a number of years ago. After clamping and letting it set, the walls were no longer bowed and ready to put together.


After painting the supports to match the interior paint, assembling the walls was pretty easy. They all have tabs that fit into slots in the base that is scored like poured concrete. As you can see, I don't have the best of tools for clamping and weighting, but this worked nicely. ![]()
![]()

Here is the building with the roof sections press fitted onto the walls. I had to widen all the slots with a small file to get everything to fit.


The instruction sheet calls the square section on top of the main building a "watch tower". I'm no fireman, but I think it is a tower for hanging hoses to dry, and should be positioned something like this.

I also think the only photograph of the prototype included in the instructions shows this. As can be seen in the photograph below, this structure was built in 1894, so I am guessing they had wagons equipped for fighting fires inside. I'm going to shingle the roof with a nice diamond patterned card stock shingle that was provided in the kit. I won't attach the upper structure until I do some investigation onto where it should be positioned.

A truck like my '36 Mack would fit nicely and still leave room for hanging hoses and storing other tools and equipment. I would be glad for any feedback on the positioning of the upper structure that I think is for hanging hoses to dry.
As an aside, Dad was taken back to the personal care home yesterday. It was determined that arthritis in his upper spine is pressing on his esophagus making it hard to swallow food, and some was getting in one lung. He is much improved, but weak. He will have to eat finely chopped food (I don't know, maybe for life), since they can't risk anesthesia for surgery at his age. He is always so gracious even when ill. He showed me by example how to be a proper man and continues to show me how to live into old age, if I live that long. Thank you for thoughts and prayers.
Mark, first, sending prayers for both your parents. Second, I would cut several pieces of curved foam, largest at the bottom to the smaller at the top, maybe make it look like jagged rock that was blasted away for the track rails to get put in, then grade up slightly to the hotel for a forced perspective look. Third, I'm not a expert but I believe you are right that you would want the tower to be up at the back end of the firehouse to have hoses hanging out of the way from the trucks and personnel needing to get around inside. It all looks great. 4th, if I don't write something down I'll forget by the time I get to the store, if I remember which store I wanted to go to. You're certainly not alone!😁
@Mark Boyce I’m liking that fire station, nice job so far. A few times during my builds I had to use a variety of soup cans for weights. When in need you use what’s available.
Gene
Mark,
That building is coming out awesome. I really like the colors.
Glad to hear your Dad is improving. The power of prayer.
Mark, everything looks great. My prayers for your parents.
my 2.5mos old granddaughter fell asleep in my arms and after a little cat nap myself I was reading your post and did some searching. I'm doing this on my phone and I found a similar picture of the fire station, and it might provide some additional perspective (hard to tell on my phone, but it seemed to provide a little more view of the roof line). Maybe the location is near where the hoses were on the truck to make hanging them easier.
I'm sorry, but I'm new to posting pictures, I hope this works: 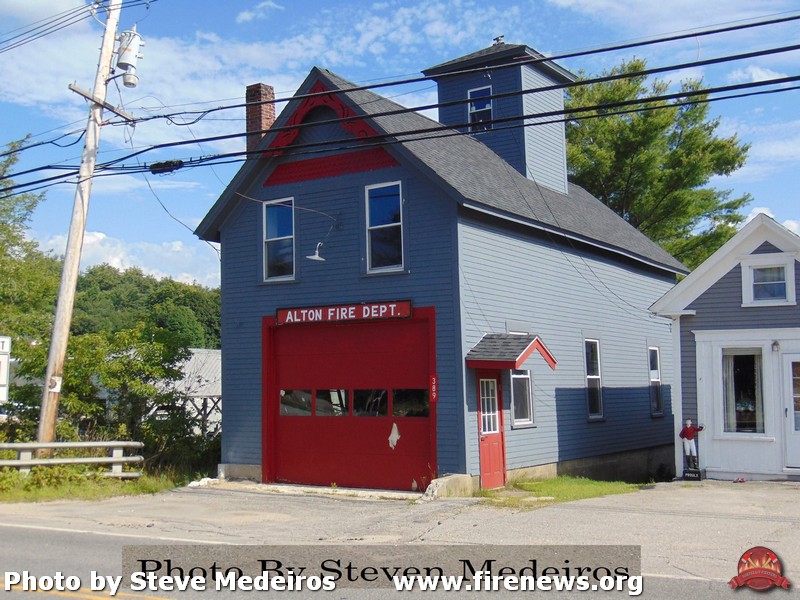
Here's the main page where I found it:
http://www.firenews.org/nh/a/alton/altonnh.html
Keep up the good work! Better go, grandma (aka my wife) says our granddaughter has to wake up - guess my rest time is over! 😀
@Mark Boyce posted:It's only been a few days, but I got a good bit done a few minutes here and a few minutes there. I had to drive right past the hobby shop when I made my first trip to see my dad in the hospital on Friday, so I picked up some K&S 1/4" square tube stock to reinforce the walls. I cut it to length and glued it on with E6000, a product our older daughter pointed out a number of years ago. After clamping and letting it set, the walls were no longer bowed and ready to put together.
After painting the supports to match the interior paint, assembling the walls was pretty easy. They all have tabs that fit into slots in the base that is scored like poured concrete. As you can see, I don't have the best of tools for clamping and weighting, but this worked nicely.

Here is the building with the roof sections press fitted onto the walls. I had to widen all the slots with a small file to get everything to fit.
The instruction sheet calls the square section on top of the main building a "watch tower". I'm no fireman, but I think it is a tower for hanging hoses to dry, and should be positioned something like this.
I also think the only photograph of the prototype included in the instructions shows this. As can be seen in the photograph below, this structure was built in 1894, so I am guessing they had wagons equipped for fighting fires inside. I'm going to shingle the roof with a nice diamond patterned card stock shingle that was provided in the kit. I won't attach the upper structure until I do some investigation onto where it should be positioned.
A truck like my '36 Mack would fit nicely and still leave room for hanging hoses and storing other tools and equipment. I would be glad for any feedback on the positioning of the upper structure that I think is for hanging hoses to dry.
As an aside, Dad was taken back to the personal care home yesterday. It was determined that arthritis in his upper spine is pressing on his esophagus making it hard to swallow food, and some was getting in one lung. He is much improved, but weak. He will have to eat finely chopped food (I don't know, maybe for life), since they can't risk anesthesia for surgery at his age. He is always so gracious even when ill. He showed me by example how to be a proper man and continues to show me how to live into old age, if I live that long. Thank you for thoughts and prayers.
Good looking structure.
Mark, glad to hear your Dad is doing better. Mine just turned 92 and is still active and at home.
That’s a really nice looking kit. I’ve been changing up my layout a bit. Going for a more rural, countryside look. Rather than a brick and mortar look. This looks like something I could squeeze in somewhere. Just a question on the doors. Can they be positioned so they are opened ? Looks like the perfect structure near the layouts edge to feature some interior detailing.
The kit looks great Mark!
The buildings are nicely done, Mark.
Best wishes for both your parents. My prayers are with you.
Peter
Thanks for posting how you did the building. Looks great! Looking forward to seeing it complete.
Gary P, Gene, Joe, Steve, Dave K, Dave C, Lance, Peter, T-Bone1214!!
Thank you everyone for prayers for my Mum and Dad!
Gary P, I do like your idea of cutting the foam to build up a cut for the railroad then a hillside to the hotel!
Joe, thank you about the colors. I like the very light gray better than the dark gray that shows in the Prototype photographs!
Steve, thank you for the prototype photograph with the better angle for our purposes to determine where the tower should go. You shared it correctly. I took a look at the Website and even looked up Alton Bay on Google Maps. I'm with you on naps, though we still don't have any grandchildren to watch. In fact, sometimes I think I nap too much, but my wife doesn't mind.
Dave C, you noticed I didn't put the doors on yet. I have been debating on how to do it so they could be open, even if it was to only show the front of another truck. As the photographs show, they warped also and need some trim for straightening, which could be used as trim for the windows and bracing on the interior sides. After that, I could just them into the open position.


I might add here I started to putting on the diamond shingles last night. I only did three rows using white glue as the instructions suggest. To get the white glue on thin enough so it doesn't squash out onto the shingles when pressed down, it was already drying when I put on a row of shingles. When I did get it to stick, it dried before I could get the strip in the final position, needing to move it only the width of the stock. I thought about trying a glue stick my wife has. I also thought of abandoning the shingles that came with the kit and using some dark gray '3-tab stick on shingles' that I bought from Bolinger Edgerly Scale Trains (BEST) after putting their lighter gray 'slate shingles' on the Thomas WV station. Wow I see by the postmark that I bought these over a year ago already! I also bought some of their 'aluminum/tin/lead' flashing. I don't mind admitting my hands just can't handle some work anymore whether I am using tools or not. When I look at my scratchbuilt N-scale buildings from 30 and more years ago, I am amazed I was able to do that small work at one time! ![]()
Dave, I might add that I am with you on the more rural small town look with less brick buildings and smaller buildings since I don't have a lot of room. I have some 'built up' buildings and on kit built building that I am seriously considering putting on he 'for sale or trade' category. For the most part, they look great but take up too much room.
Thank you again for all the great comments!! Have a great day!!
You're doing a splendid job on the fire house! Can't wait to see the finished job.
Myles! Thank you so very much!! As I just mentioned, dexterity is slowly leaving me. Finding ways to compensate reminds me of your posts where you describe how you get out of jams. ![]()
Miniature door hinges are available on the 'bay and may help in assembling the doors so that they are open. You'd have to figure out and search for the right size and material, like brass, but they exist.
Search for "doll house door hinges".
Mark, I glue a lot of things with Micro Marks PSA Adhesive. Mostly window glazing. I have used it on shingles if they come in a kit and need to be glued on. The best part is you can apply it with a brush and just walk away for a bit and let it set up. It will remain tacky. Works good if your like me and don’t always get things straight the first time. As advertised. Nothing oozes out when you give everything a final press. It’s on the pricey side and unfortunately it looks to be out of stock at the moment.

Mark, I got Doll House Hinges and Door Knobs on the A and used them to create doors with Basswood for my Menards 2 Bay Engine House that will open and close. It gets cold up here in the winter at Phillips Junction in Slackerville, Western Upstate NY!😁 I actually got the idea about the cut and grade up to the building from what used to be my grandparents house. The original state highway used to run up the hill in front of their house, then the state blasted out the rock on the far side of the road, leveled it out, and moved the road over so it no longer ran up the hill. The property still had a grade up about halfway to the house before starting to flatten out in front of the house. The state left the old road in place from the west side of the house to use as their west driveway and regraded the east side entrance from the new road so they could still use it. As we all know and have seen many places where rock was blasted away to make a cut for roads and especially trains to travel through hills.
Thank you, Richie, Dave, Gary!
Richie and Gary, the dollhouse hinges are a good idea. I never put the doors on my Carolina Craftsman Kits 2-stall enginehouse either. I will have to look for some.
Gary, your enginehouse doors look great! That is a great example from real life. Thank you!
Dave, that sounds like a great product. I will keep an eye out for it.
I tried 3 different types of glue, and all three didn't work well. Two soaked through the thin cardstock provided, and two dried too fast when applied very thin to avoid some squishing out when the shingles were pressed lightly. I checked the 3-tab stick-on shingles I have, but there aren't enough for this building. Instead of ordering one more pack, I ordered enough dark gray diamond shingles from Bolinger Edgerly Scale Trains (BEST).
In the meantime I am going to cut some trim to fit a gap between the top of the side walls and the roof. There is a small gap which I realized when paining the wall sections, but forgot about it by the time I started shingles. I decided to do it this way instead of trying to trim the angled end walls before gluing them together and messing it up. ![]()

Besides that I an put on the little roof over the man door and search for hinges and door handles. I'll leave the roof so it can be removed to detail and light later. I want to get some things built and scenery going before I do much detailing.
@Mark Boyce posted:Thank you, Richie, Dave, Gary!
Richie and Gary, the dollhouse hinges are a good idea. I never put the doors on my Carolina Craftsman Kits 2-stall enginehouse either. I will have to look for some.
Gary, your enginehouse doors look great! That is a great example from real life. Thank you!
Dave, that sounds like a great product. I will keep an eye out for it.
You're very welcome Mark. I just held rectangle sheets of Basswood in place inside from the back door, traced the openings with a pencil, cut them with a knife, trimmed to fit at track top level and opening. Primed, spray painted, let dry, then used a butane lighter outside to smoke up the doors for a weathered effect. Drilled holes to screw in Hinges and Door Knobs, then put super glue on the screws as I screwed them into place. I thought it came out pretty good. Glad you like it too. My hands are bad too so if I can do it, you can too! Good luck!
Regarding your "Time out" dilemma. It happened to me the other night. One thing I do when I think about it is to save the copy so all I have to do it reproduce the pictures and not have to remember what I wrote. Then I just paste the text and add the pics.
Myles, I am going to start doing what you are doing. As you can see, I didn’t type a lot and there was only one photograph. I didn't have to think about it as much and I condense it a bit on the second go round.
For those who may not have seen what he is referring to, I had a couple sentences where I described what happened. On my original attempt to post, the Crowdstack application OGR uses, timed out when I tried to post, then refreshed with none of that post saved. I’m not complaining, I just have to be aware and save my typing every so often like Myles suggested. Thank you!
Gary, thank you for sharing the method you used. Yes, we have to adapt how we do things as we age!
Mark,
Had to catch up. The firehouse is a nice kit. You are doing some nice work with your building placement. Can't wait to see them when you finalize the locations.
Dave
Morning Mark, you are doing an outstanding job on the fire house! I think it is a smart idea to keep going and setting the roof aside for when you get the shingles you need! Sorry I haven't commented more but my new job is kicking my rear and by the time I get home it dinner, shower, and bed.
I haven't even made it to the train room yet! LOL![]()
Always here to help my friends out of jams...
Thank you, Dave, Mike, Myles!
Dave, as you have shown, building placement is something to be worked on to get a look we like. The manufacturer of the kit makes mostly HO, but offered this one in O scale. There are some minor variations between the kits as is evidenced by the HO photographs in the instructions, but there are no glaring issues. I did email the manufacturer with a question early on, and he responded almost immediately. It is a good kit for a building with minimal details.
Mike, I knew you started the new job, and was wondering how it was working out for you. Your reply sounds like what I felt the first job I had right after I graduated from high school at age 17. I was whipped for a week or two. I hope you can bounce back quickly. At 66 and with my back and nerve issues, I couldn’t possibly do it. I hope you get some time in the train room this weekend!
Myles, you certainly have been helping friends out of jams for a long time!!
I pealed off the shingles that didn’t work well and sanded the roof surface smooth. I also took photographs of three built-up and one kit-built buildings that I will list for sale maybe tomorrow. I still need to research what would be fair asking prices. I’m going to go with smaller/narrower kits for buildings in town. The ones I picked to sell take up too much valuable real estate. Besides, I want to build instead of just plopping down a pre-fab building. 😄
Mark, my thoughts and prayers are with you and your parents.
The firehouse kit is coming along nicely and looks great. Thanks for the progress as you go. I enjoy your problem solving as you work through an issue.
Andy
Andy, thank you very much!!
I hope to be able to share some things that worked for me. Hopefully others are helped or encouraged.
Hey Mark, I hope your parents are making out okay. It can be rough at times, and really trying for everyone. Models giving you trouble, me too. I think my issue is just me being clumsy. I may have messed up what I was doing, resulting in a repair. Building looks okay though Mark. Pretty soon the fire company will be parking their truck indoors.
Thank you, Dave! I’ve tried to not mention much off topic about my mum and dad. They are both back at the personal care home. We will see how well they perk up.
Clumsy is my middle name!
I cut, glued, and painted a strip of styrene at the top of each side wall. They look passable, especially since the eaves will mostly block the view anyway. I added the little roof over the man door. I’ll leave it set until the shingles arrive.
Here’s how it looks now, Dave. I think it will work okay.
That kit looks great Mark!
Andy
@Mark Boyce posted:Here’s how it looks now, Dave. I think it will work okay.
Looks great from what I can see Mark. The styrene could pass as a piece of fascia board.
Gene
@Mark Boyce posted:Here’s how it looks now, Dave. I think it will work okay.
That looks excellent Mark. Just wait till when it is done. The firemen will have to have a breakfast buffet to celebrate(and help for the cost of it).
Thank you, Andy, Gene, Dave!
I just put the roof back on, and it even fits correctly!!!
Breakfast buffet, chicken barbecue, carnival, Bingo…I’ve heard of all kinds of things to raise funds! 😊
The building is looking great Mark!!! I’ve been away and I’m finally getting caught back up on several threads. My thoughts and prayers are with you and your parents.
Catching up on your progress - looking good, and I'm impressed by the quality and amount of work you're getting done. Sorry to hear about your parents - it's sad, but it's nice that you are able to look after them.
@Mark Boyce posted:Breakfast buffet, chicken barbecue, carnival, Bingo…I’ve heard of all kinds of things to raise funds! 😊
How about a train show? ![]()
Hall rentals too. Our local firehouse has had receptions there, sandwich sales, breakfast's, dinner's, and a whole host of other things. Come harvest time I don't exactly recall what they do, but pumpkins could be involved.
Thank you, Rich, Mallard, Joe, Dave!!
For some reason it seems I am slow at progress, but a few minutes a day add up fast! Thank you!
Joe, You got me there! How could I forget the train show held several times a year at the West Kittanning Fire Department just 27 miles over US 422 from my home? I know the VFD at least gets money from rent and concessions. 😄 🚂 🚒
Dave, good deal!! A local VFD makes a good bit on hunting rifle raffles. Boy do they have a sweet activities hall! Another local one sponsors an annual carnival in a large lot behind the fire station!
The ideas are endless!
Hey Mark, catching up on your progress. Sorry I've been MIA. Our move-in ready house was not so move-in ready! The move has been a total uphill battle! I'm still completing house projects. We had to move quite a bit of our stuff into the basement - where the layout is planned to go. Slowly but surely making space and might have a layout started in a few months.
I have missed you, RJ. Thank you for writing! We bought a house that sounds like that. In fact after the movie “Money Pit” came out, I didn’t enjoy it because I had lived it!
Our older daughter and son-in-law had to move everything out of their basement because of problems. We have had some of their furniture in our basement for a couple years.
I hope your work pays off and we can see you starting your layout before long!
Mark, the firehouse looks awesome. Have you done any more work on the fruit stand and any idea on placement?
RJ, Thank you!
No, I haven't finished up any more detailing on the fruit stand. I don't have a particular placement yet. I am thinking of it as a roadside stand that would make a point of interest along a road without other buildings around it. That will come as I get farther along with the scenery.
Sorry to hear about your mom and dad, my prayers go out to you during this time. The firehouse is coming along nicely and your solution to the gaps will solve this common problem encountered with plastic models. The Mack pumper will be a good fit and compliment your finished building. Gerry
Growing older equals clumsy, don't I know it.
Gerry, thank you very much! I was clumsy to start with! 😢
@Mark Boyce posted:Thank you, Rich, Mallard, Joe, Dave!!
For some reason it seems I am slow at progress, but a few minutes a day add up fast! Thank you!
Joe, You got me there! How could I forget the train show held several times a year at the West Kittanning Fire Department just 27 miles over US 422 from my home? I know the VFD at least gets money from rent and concessions. 😄 🚂 🚒
Dave, good deal!! A local VFD makes a good bit on hunting rifle raffles. Boy do they have a sweet activities hall! Another local one sponsors an annual carnival in a large lot behind the fire station!
The ideas are endless!
Yes, so true! Our volunteer fire dept does several fund raisers each year to help our bottom line. We have hosted a Golf Tournament in May for over 20 years, we had 30 - 4 person teams this year with steak dinner back at the firehouse afterwards, awards, raffles, door prizes, trophies, and cash prizes.
We just did our 2nd annual Classic Car Show last week with 97 entrants, cars, pickups, motorcycles, and even tractors. Same with awards, raffles, door prizes, trophies, and cash prizes.
We have an outside food auction company rent our firehall once a month, we get to run a concession stand in our kitchen, with the company doing a public auction. Just some ideas for your local volunteer fire department to do for fundraising.
We do firehall, kitchen, tables, and chairs rentals. Others functions too many to try to mention here.
We haven't tried a train show yet but who knows, anything is possible!😁
Mark, I owe you an apology. I've been so focused on my Saga, that I neglected to read yours. You're at 92 pages so you're not sitting still. I pledge to be more supportive of my #1 reader. Also, I had missed your note about you dad having to go to the hospital. How did that resolve itself. Also, thank you immensely for all the nice things you've said about me and my wife.
My parents are long gone, Dad in 1995 at 85 and mom in 1999 at 89. But I have a sister, a sister in law and two brothers in law who are in their 80s. Modern medicine is keeping them all alive and reasonably functional. In fact, it's keeping almost every body I know alive. In my parents generation by the time my parents were in their mid-70s, most of the husbands were gone… almost all due to heart attacks. Now, you have an attack, you get a stent or bypass and you're good to good for another 10 to 15 years.
BTW: the building is look'n great. You can also use Plastruct I-Beam or H-Beam structural members instead of brass to straighten the warped walls. Depends on what you have hanging around the shop. What kind of adhesive was that you used to glue metal to the wall?
Looks great, Mark!
George
Thank you, Myles and George!
Myles, Apology graciously accepted. Please don't feel bad. You spend a lot of time on this Forum just documenting what you build and the thought process that goes into it. As I mentioned a few weeks ago, I have been overwhelmed by the interest and discussions that have contributed to 92 pages. Without all the folks who have replied, this topic wouldn't be so much.
Thank you for asking about my dad. It was determined that he didn't have pneumonia, but that food was getting into one lung. This was because a vertebra has arthritis and is pushing forward narrowing his esophagus. He is back at the personal care home with Mum, and close to back to his normal self. He will have to eat finely chopped food from now on, but the nurse says he is eating. He has always been very compliant; a good role model for me. I'm the oldest of three. Dad had just turned 26, and Mum was almost 26 when I was born. They are doing well for being almost 93.
Our older daughter, Heidi, got me onto using E6000 for gluing parts of different materials together. It is kind of hard to keep too much from coming out of the tube, but by putting a puddle on a surface and picking a little at a time up with a toothpick, I am able to manage to not get it everywhere. I did not have any stock that was stiff enough, but small enough to do the job straightening the warp. Fortunately, there is a handy hobby shop just a couple miles beyond Mum and Dad's personal care home. They had some Plastruct I-beams that I thought about getting, but I think I would have needed some a little thicker than what they had in stock. Metal was not my first choice.
The sticky-back diamond shingles arrived today from Bolinger-Edgerly Scale Trains. They are very close to the same color as the thin stock that came with the fire house kit. Maybe I will get started roofing tomorrow. In the meantime, I have been doing some basic steam engine maintenance. One had a side rod that had come lose locking up the mechanism. Another had a burnt out headlight. I still want to open the tenders on both and see if they have BCRs. I installed some before I started labeling the undersides of the tenders, so I foolishly don't have a record. That is being corrected.
Mark, just looked up E6000 on Amazon. Never heard of it, but I like that it's high strength AND flexible. Flexibility and strength are not often found together. What's it's drying time? Does it need clamping? Do you know what it's based on? I think I'll get some to add to my very-full glue drawer. I think I have at least 10 different kinds of adhesives. I have some many I created a matrix for the modeling club's newsletter.
Thanks for telling us about your dad's challenges. It's surprising all the stuff that starts going wrong when you're really old. Speaking of old, my mom used to say that "old was anyone ten years older than she was." When she was in her late 80s I suggested she re-calibrate her "old scale". My wife turned 78 in April. It's my turn next month. It's getting weird when you read obituaries about people dying in their 80s (many of them) and realize that your own life may end in less than a decade. Looking back, the last decade went by really fast. That doesn't bode well looking forward. At least I can't pass in my early to middle 70s. That milestone is past.
Happy Father's Day!
Thank you, Myles! Happy Father's Day! Here's to good health for you and your wife!!
Yes, you have to clamp E6000. It takes a while to dry. It is one of those that you glue, clamp, and go do something else until tomorrow. Eclectic Products Inc. says, "E6000 starts getting tacky in approximately 2 minutes and begins setting in approximately 10 minutes. A full cure takes between 24 and 72 hours. Remember, temperature and humidity will affect dry time."
https://eclecticproducts.com/p...0affect%20dry%20time.
You shared your glue matrix on your "Saga" thread, because I saved it. Quite handy, although I do not have nearly 10 glues here.
Today, I cut some 90-degree triangles of thick styrene to give the roof some support and ensure a 90-degree fit on the wall tabs. I could have done that while waiting for the shingles, since I had tried using the shingles that came with the kit on the roof section flat on the table. I used E6000 again. So, in keeping with what I wrote above, I did not start shingling.
I did a little more engine maintenance. The nicer H9 had burnt bulbs in the headlight and firebox. I noticed the headlight out when I bought the engine used about 4 or 5 years ago, but didn't do anything about it. I removed the good bulbs with leads from the not-as-nice H9 and got everything on the nicer one up to snuff. I gave both engines a quick test, but will need to do some more test running of them and the B&O Mike. All three engines are PS2 Premier from 2002 and 2003. As of now, all my engines are fixed, except I need to order lights for the not-as-nice H9. Maybe by saying that exception, I don't have to knock on wood! ![]()
Evening Mark, The fire house looks great! I am sure it will fit right in on your layout! Your fire engine will really make it stand out as a focal point!
I am glad about your dad being back with his wife! I hate to say it, but were all getting older, it is just how you chose to live it that really matters! As for me with a loving CEO and a Amazing hobby like model trains I am just fine with getting older! LOL![]()
@mike g. posted:As for me with a loving CEO and an Amazing hobby like model trains I am just fine with getting older! LOL
Well said Mike, my feelings exactly!
Gene
Thank you, Mike, Gene!
Getting older is good. No one wants me to work for them anymore! 😆
Mike, I am hoping the job is working out well. I’m sure Robin will take it easy on you! 👍🏻
I haven't made much progress on the shingles, but did finish the first side of the the main roof and a bit of the hose drying tower. The diamond shingles are the same dimension so I could use the lines already scribed on the roof for a guide. They stick quite well. I did cut a hole in the roof before gluing the tower on permanently. Though it wasn't readily seen, I thought it better than being able to look in the window and see the roof right below.

Tedious I'm sure, but the finished product looks great Mark.
Bob
Bob, thank you. It is tedious, and there are flaws in my work, but when it sits on the layout I have to look for the flaws, so I’m happy. Theses sticky backs do allow you to gently skooch them into position. After a few minutes they adhere more tightly, but you can peel them back off without too much trouble. I started three rows, and didn’t like it, so I pealed them back off and started over. Once they adhere well to each other they stick together when pealed off.
I wised up for the second side of the roof. I started cutting the shingles with the Northwest Short Lines Chopper. I got nice right angles that I didn’t always get with a sharp XActo blade. Here is an hour and a half’s worth of work. Much better looking up close, except that lowest row of diamonds isn’t seated down good on the wider strip I used at the roof edge. Maybe it actually will look fine.

Mark, the roof looks great! You made the right call on the tower. I’m with Bob, tedious but worth it. This model is coming together nicely.
Andy
Thank you, Andy!! I got a few more rows of shingles installed this afternoon.
Mark, the roof is looking great and now with the hole in the roof for the tower area you can spend some extra time and install a light! LOL
I think your work is wonderful!
Thank you, Mike! I should research how the hoses would be hung and install that. I have two stations and a signal tower to research the interior also. I’ll add it to the list. Ha, Ha!!
Mark the roof looks great!👍 Similar to the fire station I did a while back.
Gene
Gene, Thank you! Your station looks great! I like the shingles and those fancy windows!
I finished the roof on the fire house. I'm pleased with how it turned out.


Since I didn't look for hinges or handles for the doors, I improvised with poor man's hinges, strips of painters tape on the inside. At least the doors won't get lost in the meantime. This last photograph also shows the simulated tarpaper roof covering for the man door awning that I did after I took the first two photographs.

I still need to research what to put inside, but with the removable roof, this kit like the others will be easy to outfit later.
Mark,
Your work is just impeccable, made even more impressive by the impairments you apparently cope with so well. What’s next on the agenda?
Rubin
Rubin, thank you! I do what I can when I can. 😊
Next on the agenda is making a removable upper level scenic Idaho Hotel module for the corner just inside the door. I’ve been looking at the mock up for a few weeks and like it. I just started building a lightweight frame with legs that can sit on top of the lower level. I can’t do much on that at one time, but it is coming along. I’ll post photographs once I get the basic frame done.
Impeccable it is! Lovely! A home for Idaho sounds nice too.
Mark, you did it! Excellent job, I like the color contrast.
Gene
Excellent job Mark, you have a good eye for detail.
Jay
Great build Mark! Looks amazing!
WOW! That turned out really nice!!
Great job Mark!
That's a beautifully built structure! Great work!
Wow Mark! Great job with beautiful detail
As a FAR aside I spent a couple of days at Blackwater Falls State Park in WV this spring. One afternoon we went out to Lindy Point and walked the half mile to the edge of the canyon. The line across the trees in the attached photo is the Western Maryland Roadbed on their Blackwater Canyon LIne I think. It is a hiking trail now but not within the park. Supporedly they assigned a locomotive for every 10 cars coming up out of the canyon.
Thank you, John and Jim!
Jim, I often think of the real Blackwater Canyon. Yes, I believe that is the Rails to Trails line in the distance in your photograph from Lindy Point. I have read the same, an engine for every ten cars. Hopefully we can make a visit there next year or soon after. It has been a long time. Thank you for sharing your photograph!
Nice job, Mark.
I'll be in Alton, NH in a couple of weeks and, if that's the one it was modeled after, I'll see if I can take a few pic's of the original, but I'm pretty sure it was burned or torn down many years ago.
Thank you, Richie! Yes Alton, New Hampshire! I found the fire house is right up at Alton Bay. I hadn’t seen anything about it burning and torn down, but it sounds like you are familiar with the community.
Still there in this Google May 2023 view:
Now that is a firehouse Mark. Ours downtown is red, and dang big. I don't know when it replaced the prior firehouse as I imagine it had to be replaced considering how big and modern ours is now. I believe it was built either very late 60's or very early 70's, 73 the latest. Looks great though. I really like the roof.
@Mark Boyce posted:Thank you, Richie! Yes Alton, New Hampshire! I found the fire house is right up at Alton Bay. I hadn’t seen anything about it burning and torn down, but it sounds like you are familiar with the community.
My family has summered at Lake Winnipesaukee for over 100 years. We rarely get down to that end of the lake, but I'm familiar with it and, from Dave's google map, it looks like it's still there - near the channel. It might have been the West Alton firehouse that burned down.
Thank you, Dave, Dave, Richie! It looks like a great place for a vacation! The photographs I see of the lake look great! That would be dandy if you get down that way, Richie! Don’t go out of your way, though. It looks like Dave found a good image.
Volunteer fire departments around here are having trouble getting volunteers. They are also merging, pooling resources, and when able building larger fire houses with several bays. A heavy equipment operator bought the vacant fire house closest to us.
Morning Mark, sorry I am a week late but wow what a wonderful job on the fire house! It sure is nice when things come together so smoothly like the way you make it look!![]()
Thank you, Mike! Better late than never, as they say. I hope the new job is going well for you.
I'm moving on to something that I'm not so good at, that is carpentry. I made a somewhat permanent lift-off framework for the corner Idaho Hotel scenic section. It looks rough, but is surprisingly sturdy, and it is relatively lightweight. As is always the case, I used what I had on hand. I used some 1x2 poplar, and some hardboard I had removed from the backdrop sections that were too high for my purpose. The white boards are from an old decoration my wife had discarded. The thought is that I will make the hotel removable, as with any other structures on the layout. After removing the building(s), I will be able to lift this section off and set it on the floor in the adjacent room. Then I will have access to anything underneath. I am guessing I will make the rocky cut in the foreground and hillside to the right of the hotel permanent and the lift-out will seat up next to them with some ground cover hiding the seam.

I shortened it a bit from the mock-up to allow normal access to the two track switches. I'll make a rocky hillside much like you would find along a river, since you can see the edge of the track support where the double track bridge lowers into place. I still need to make some pockets to set the legs in for proper alignment, but it is secure enough it isn't going anywhere for the time being.

Here it is as you walk in the room. The placement of the hotel is approximate at this point of course.

Here is a better view of the little station scene underneath. I'll figure out something to make it a little vignette. I think the verticle separation is enough to not be distracting.

I'm glad I had time to do this now. I'll be getting out-patient surgery on my back Wednesday, July 12th. I have a herniated disc and stenosis at L2, just above my L3-L4-L5 fusion I had done 2 years ago. All of that is pinching the nerves going to my thighs and knees, causing pain with movement and intermittent loss of leg strength. I have to be very careful and have been not doing things that can cause me to fall. Recovery will be like the fusion but expected to be 3 months instead of 1 year for full recovery. Back to the no lifting, then adding pounds in increments. Taking that all into consideration, I'm looking forward to it.
That said, I have two kits to choose from when not working on the layout. One is a laser-cut River Leaf Models one-story brick sandwich shop-diner and the other is an Atlas O plastic car dealership, brick with big windows. I've had the laser-cut one for several years, so that may be the choice, but I may try my hand at a plastic kit again like the signal tower. I have a week and a half to decide and gather up kit, tools, paint, etc.
Mark, the benchwork looks like it will do just fine. Great idea making it removable. Best of luck on your surgery!
Gene
Good luck Mark and I hope your recovery is swift. It’s amazing what is done on an outpatient basis anymore.
Jay
Mark,
Overall your creativity on this layout has been wonderful. You really have found a way to make it all work, and the hotel vignette is no exception. I also like how you are planning to do the build projects during your recovery time. I'm sure which ever kit you decide to build will come out great and the focus will bring out some additional creativity. Most importantly take it easy before and after your surgery.
Dave
Mark,
Best of luck on your surgery. I hope the surgery and the recovery all go as well and as speedily as possible. If I can help you in any way, please don’t hesitate to ask.
All the best,
Rubin
@Mark Boyce, Mark, page 93 already, Wow, your buildings look so good, I love the firehouse and the hotel, very nice. You must be partly a magician with your use of space, lots of nice work in a modest space. Once you get the scenery in place, it’s going to be a spectacular layout, a fun to run railroad. You have come a long way and I’m so glad I’ve met you along the way. Keep up the excellent work. Happy Railroading Everyone
You always amaze me at what you can do with detail, planning and creativity. This is just another example of all of that focused on this section.
Best wishes on your surgery, you will be in our prayers for sure and hoping for a painless recovery.
Coming along very nicely Mark!
Add me to the chorus Mark. The buildings are coming along nicely. We all have to take liberties with size, scale, and placement on our layouts. After all- our trains run on 3 rails.......![]()
Best wishes for you and a speedy recovery from the back surgery. Chronic back problems suck.....
Bob
Mark, your layout is looking great! I you would like to get more done before your surgery, but if you think about it now is a good time for you to get your back done.
That way you can have all winter to work on it as your back will be better by then! I have faith that you will make the best of the situation!
I pray for a fast recovery!![]()
Thank you, Gene, Jay, Dave, Rubin, Larry, John, Alan, Bob, Mike!!!
I figure as long as the benchwork is functional, it will eventually be covered with scenery so won't be noticed. Sort of like framing a house. Yes, I certainly need to make all track accessible because we know where the trains will derail or the track will fail! ![]()
I certainly appreciate the comments about creativity and figuring out how to cram as much into an 11x11 room, but not make it look crammed. I have so many folks here on this forum to thank for inspiration, ideas, and encouragement!!
When digging out the sandwich shop from a large plastic tote bin, I also discovered another small kit, BTS Greely's Place which is a boarded up cabin. I bought it at least 15 years ago when I dabbled in On30 because HO trains and models were getting too small ![]() I barely started it when my mother-in-law enticed us to buy her in-law's house 12 years ago. I put it away and then discovered OGR Magazine in a Giant Eagle grocery store near where I worked. It was the issue that featured Dave Minarik's now closed Mercer Junction Train Shoppe store layout about a 45-minute drive from home. The next Saturday, I visited Dave and came home with a RailKing train set. It wasn't long before I sold the On30 engine and cars and the rest is history.
I barely started it when my mother-in-law enticed us to buy her in-law's house 12 years ago. I put it away and then discovered OGR Magazine in a Giant Eagle grocery store near where I worked. It was the issue that featured Dave Minarik's now closed Mercer Junction Train Shoppe store layout about a 45-minute drive from home. The next Saturday, I visited Dave and came home with a RailKing train set. It wasn't long before I sold the On30 engine and cars and the rest is history.
I think I will hold off on Greely's Place until later when I decide to make it either boarded up and in disrepair as BTS intended, or make it a decently maintained and occupied cabin which would fit into my West Virginia layout. So, I will probably make the River Leaf Models Texas Tavern, which I had Andre make custom signs for Burger Hut here in Butler, Pennsylvania. The kit is a hole-in-the-wall place just like the Burger Hut here on Main Street. It's a pretty easy build when compared to the Thomas Station and Greely's Place.
I wasn't going to mention the surgery here, but thought I would have to since the layout construction will come to a halt. I will be glad to get it done. I don't want to dwell on it here, but many thanks for prayers and well wishes. @leapinlarry Larry, I am certainly glad I met you last summer, especially since I wasn't able to endure the car ride we had planned for this past April.
Hey… this forum is sort of like group therapy for train guys. If you're having a physical challenge, we provide the moral support to get you through it. Sharing is part of the deal… at least that's how I view it. Do exactly what the docs say to do. Expect it to take about a year before things really feel normal. Don't take any shortcuts and you'll be crawling under and over the layout before you know it. We're all here for you.
Layout is looking great! Speedy recovery from your surgery! You'll be back at it in no time at all.
Wunderbar!
I couldn’t have said it any better.
Get well soon, Mark.
Mark
The layout looks great Love the firehouse I found that removable sections are better off having a hinge That was after many balancing acts on the layout trying to hold a section and place it somewhere Needless to say I fell through a couple of times.
@Mark Boyce posted:Thank you, Gene, Jay, Dave, Rubin, Larry, John, Alan, Bob, Mike!!!
...snip... when I dabbled in On30 because HO trains and models were getting too small
I barely started it when my mother-in-law enticed us to buy her in-law's house 12 years ago. I put it away and then discovered OGR Magazine in a Giant Eagle grocery store near where I worked. It was the issue that featured Dave Minarik's now closed Mercer Junction Train Shoppe store layout about a 45-minute drive from home. The next Saturday, I visited Dave and came home with a RailKing train set. It wasn't long before I sold the On30 engine and cars and the rest is history. ...snip...
Considering what you have done in three-rail O, I just can not imagine what your "could-have-been" On2½ layout would be like!
Prayers for your surgery and recovery.
Good luck on the surgery Mark, and take it easy while you recovery.
Thank you, Myles, T-Bone1214, Darrell, Rubin, Ben, Dave, and Dave!!
Myles, you are so right! This is group therapy. Does a member need physical support? Another member needs emotional support at the loss of a spouse or pet. I could go on.
In response to everyone, I have been through enough of these 'setbacks' to do just what I am told. Besides my dear wife Kim is a retired Registered Nurse, so she keeps me on the straight and narrow. Also, the doctor listed the possible problems, and that there is no guarantee that I will get back to 100%, but I will work towards that goal. Thank you! ![]()
Darrell, what a great sentiment; Wunderbar! Thank you!
Ben, the hinge is a great idea. Even before looking at the layout, I was able to envision the hinged section. I can certainly imagine myself losing my balance and falling as well! I'll work that out after I recover!
Dave PRRMP54, I have imagined what I could have done in On2-1/2. Trying to cram what I have into an 11x11 room makes one think of those things. I bought a Bachmann 2-6-0 with DCC and sound and a Shay without DCC and sound at the Monroeville, Pennsylvania Greenberg Show at a great price even though I didn't have DCC. I also bought a few log cars. Bachmann really makes some sweet equipment in that scale. I didn't have DCC and was surprised by the sound worked on the 2-6-0 running conventional. I sold almost all my HO trains and used the money to help our daughters by books, etc. for college. It didn’t go far, but I was starting from scratch again with trains moneywise. Once I had the RailKing O gauge set, I couldn’t imagine running a narrow-gauge short line layout. I wanted to emulate mainline running. Of course, I could have run the On2-1/2 trains anyway I wanted, but the preaching by the HO media sources for prototype modeling and running was ingrained. I do like the freedom in O Gauge where nearly everyone says, “It’s your railroad, run it any way you want.”
Mark, it always impresses me how you are able to make something wonderful out of scrap. The lift out looks great. It’s positioned nicely and kind of prelude to what the visitor will see after they walk into the room more.
Sorry to hear about your pending back surgery, but as you mentioned, all things considered it does sound like a quicker recovery and hopefully a better outcome for you. I’ll keep a good thought for you and for a speedy recovery.
Best,
Andy
Thank you, Andy! I do what I can. 😊
I did spend some time working on the SCARM plan to show the as-built. It isn’t exactly correct, but close enough. I’ll post that later. I also need to type up the wiring and AIU and remote assignments since I only have what I documented by hand.
I am finding I made a mistake when wiring my Ross switches. I decided not to bother wiring for non-derail thinking I could remember to throw switches when needed. Wrong!!!!! Nearly every time I have a derailment, it is because I forgot to throw a switch. Once I get up and able to do it, I am going to have to rewire for non-detail. So far the only damage has been a broken step on two hopper cars, but I know I am on borrowed time. I am certainly glad I did install PSX1-AC fast breakers on each Z4000 output.
Mark,
I feel your pain. I did the same thing on my last layout and I’ve sworn not to make the same mistake again. We’ll see how well I do, especially since I really want to get some trains running by Labor Day when my New York grandchildren come out.
I’ve never installed any breakers beyond those on my Z-4000, without harm, but I’ve probably just been lucky.
Get well soon
Rubin
@Mark Boyce posted:I am finding I made a mistake when wiring my Ross switches. I decided not to bother wiring for non-derail thinking I could remember to throw switches when needed. Wrong!!!!! Nearly every time I have a derailment, it is because I forgot to throw a switch. Once I get up and able to do it, I am going to have to rewire for non-detail. So far the only damage has been a broken step on two hopper cars, but I know I am on borrowed time. I am certainly glad I did install PSX1-AC fast breakers on each Z4000 output.
Don't ask me how many times I've forgotten to throw the two switches that I converted to manual.......![]()
And they are right in front of me on the edge of the layout too......![]()
Mark just read about your upcoming surgery. We will be praying for you.
Great job on the buildings. Your layout is outstanding!
At least the work on the turnouts is simple… after you get to them.
I have come to appreciate this feature with my fastrack switches.
Gene
@Mark Boyce, Mark, yes we will be praying for your upcoming surgery, may the Lord Bless you. Now, you hit the nail on the head, wire the Ross switches for non-derailing when you install them, years later our bodies may not bend easily as when we were younger… I did the same thing with a few switches thinking my memory would allow the switching. Nope, it didn’t….So, to remedy the issue, we set up Routes via the Lionel ASC’s with the Cab 1L and Cab2 remotes, ta-da, problem solved. Each of my switches work with the remotes. Good luck, we are here for you. Your friend in Tennessee. Happy Railroading Everyone
Mark, I have my fair share of derailments. But most of mine are usually involved in train movements to get at a area I’m working on. Or getting a car or engine to the layouts edge to remove it to be worked on. My thought process is more on doing the the job I’m going to do than running trains. When I do just sit down and operate a train. Running that train becomes my main focus. I seldom if ever have a lapse and forget to throw a turnout. Running more of a rural road. I’ve got into the habit of stopping the train and pausing while the turnout is hand thrown. Then stopping again to throw it back.
While a non derailing feature is nice. I think when you get past the major construction and just run trains it will happen less.
Mark, Best of luck with your upcoming surgery.
Thank you, Bob, Bill, Gene, Larry, Dave!
I see I am in good company. 😊
Larry, I do have switches controlled by the remote and should set up routes to get the best use of it. I just haven’t done that yet. I think Bill mentioned it to me a few months ago since he helped me with the wiring requirements to set it all up. 😊
Dave, I run trains slowly and could slow or stop them to throw a switch as you do. One mistake is I try to set them up ahead of time, then don’t think the whole way ahead. I’m sure you are right, when I get more used to running the layout I will be able to do better.
Many thanks ahead of time for thoughts and prayers for my upcoming surgery Wednesday!!!
I still don't know how to run my layout as well as I should considering the track's been down for over 10 years. I'm just not running it enough to become a habit. I still have to physically look at each switch to make sure it's set right. I don't trust the lights on the Z-Stuff for Train operating buttons. I've lost line-of-sight on some of the switches with installations, so it's really better to run the layout with helpers (which I don't seem to have any longer now that they've grown up).
Mark…….feel better……best of luck with your surgery…..
Peter
Mark - wishing you a speedy recovery! Green signals going forward my friend!
Thank you, Myles, Peter, Pat!!
Myles, I had a time with those Z-Stuff LEDs as well. I thought I wired correctly, but still have a couple that I couldn’t figure out and finally gave up.
Bob, I have 4 switches for the new yard that I made manual. They are right up at the layout edge, within easy reach. I can remember those except the one that connects to the lower mainline. 🤷♂️
I know the surgeon and the therapists, and they know all my previous surgeries. That has to count for something. 👍🏻👍🏻
Best wishes on your surgery, you are in our prayers for sure. May God Bless you!
Continuing to enjoy and take inspiration by the quality and quantity of your work. Wishing you a speedy recovery. Smart of you to set aside some projects that you can work on during the downtime. Do you get frequent-flyer miles from the surgeons?
Thank you, John and Jay!
Jay, Over the weekend, I did a little pre-painting of the diner and gathered up some tools and materials to take upstairs in case I don't want to do the stairs much the first few days. From the last back surgery, I know he will want me to use them some, but not a lot at first. You are so right, we really have a lot invested in Tri-Rivers Orthopedics! ![]() My wife asked the knee surgeon if he would give us a BoGo when I needed a knee replacement right after her second.
My wife asked the knee surgeon if he would give us a BoGo when I needed a knee replacement right after her second. ![]() You got me counting. This will be my 5th surgery with their group, and Kim has had 4, with a hand problem waiting in the wings. We are even on a first name basis with the surgical group at Butler Memorial Hospital. Oh, I can't forget, NovaCare Physical Therapy group has seen a lot of as well!!
You got me counting. This will be my 5th surgery with their group, and Kim has had 4, with a hand problem waiting in the wings. We are even on a first name basis with the surgical group at Butler Memorial Hospital. Oh, I can't forget, NovaCare Physical Therapy group has seen a lot of as well!! ![]()
Mark,
Good luck with your upcoming surgery and for a speedy recovery.
Gerry
A little bit late with this but success with the upcoming surgery; prayers will be said.
Thank you, Gerry and Dave!
Mark, how are you feeling and will you be going to PT?
Jay
Jay, Thank you for asking!!! The anesthesia wore off last night, and I hurt from the middle of my back on down my legs. ![]() However, it isn't as bad as when I had the fusion or knee replacement!! The doctor told my wife that everything went really well, I was still in recovery. I didn't see him because all the surgeries were backed up an hour and a half due to a computer blitz!
However, it isn't as bad as when I had the fusion or knee replacement!! The doctor told my wife that everything went really well, I was still in recovery. I didn't see him because all the surgeries were backed up an hour and a half due to a computer blitz! ![]() Actually, this is a very good hospital, the nurses did the incoming on paper (that's because they were both old like me), but other things had to wait a while. I go back to see him on Monday the 24th to get the staples out and general evaluation. If all goes to plan, then he will give me the script to start PT, let me drive the car if I want, and lift a little more than the 10-pound limit right now.
Actually, this is a very good hospital, the nurses did the incoming on paper (that's because they were both old like me), but other things had to wait a while. I go back to see him on Monday the 24th to get the staples out and general evaluation. If all goes to plan, then he will give me the script to start PT, let me drive the car if I want, and lift a little more than the 10-pound limit right now.
I am allowed, and in fact encouraged, to use the stairs to the train room, but I haven't done anything train related. Thank you everyone for all the prayers and good thoughts!!!
Mark, glad to hear the positive report. Wish you as speedy a recovery as one can have... This getting old thing is "way over rated !!!"
Chris, 😄
I was just covering for saying the nurses were old, so they had no trouble with the computer down. One told my wife she is 66, same as me! 👊🏻
@Mark Boyce posted:Chris, 😄
I was just covering for saying the nurses were old, so they had no trouble with the computer down. One told my wife she is 66, same as me! 👊🏻
Mark, sounds like you’re doing well. Nice to hear you’re slowly back in action!
Gene
First of all, 66 is NOT OLD. That said, I hope you have a quick and successful recovery! You can do all of things before you need to climb on or under your railroad. Build a model!
Thank you, Gene and Myles. You are right Myles, I’m not old. I’m hoping to be able to sit or stand long enough to work on the kit in a day or two. That Burger Hut is calling my name! I think there is always a little while after surgery that no position is comfortable. 😄
Mark, I’m so glad that you’re recovering quickly enough to be able to check in with all of us. Stay strong!
All the best,
Rubin
Mark, its great to hear your surgery went well! Here’s hoping for an equally successful recovery.
Good morning Mark, that’s great news echoing over the OGR Forum that your surgery was successful and you’re on the mend. That’s great, keep up the good work and keep us updated. By the way, the New 2023 Lionel wish book has many items that would look great on your layout…. Western Maryland mania…. Wow…. Have a great weekend. Your friend from Tennessee… Happy Railroading Everyone 
Good to hear that the surgery went well Mark. Maybe it will be like when I had my wisdom teeth out. A few days of pain as the prescription of pain meds didn't do shoot(other word) for me, so I stopped taking them. It couldn't sleep much, but after the second day passed, I was better.
I do hope that it is easy, and yes, you are not old. My oldest aunt is coming in today from North Carolina and she is 85. She still gets around like she is ten years younger, and still sharp as a whip.
Morning Mark, I am sorry I haven't been around lately, I am glad that your surgery went well and that your doing well! I think you might want to make sure you take it easy on the Burger Hut while on your medication! LOL it could turn into a donut Hut! LOL![]()
Honestly I hope you are doing well and I will be watching how things are coming along! Our prayers are with you and for a speedy recovery!
Bravo Zulu Mark!
Thank you, Rubin, Steve, Larry, Dave, Mike, Darrell!
Larry, the former C&O Challenger 1309 is great for sure!! The description says it can handle 054 curves like mine, though I’m sure the overhang would make me have to make clearance adjustments. Unfortunately, that engine is waaayyy over what my budget can handle.
Your photograph of me in Hobby Express reminded me to tell you, they did lease the unit to the left of the other two units. That whole section is full of trains and die cast cars. The engine wall is bigger than ever!
Dave, I had one wisdom tooth extraction get infected, but that was not nearly what this is. My mother-in-law is 87, 20 years and a few months older than me, and she has only started to be unstable this year.
Mike, well I’m trying to not take the hard stuff he gave me, but I haven’t been allowed to take my regular pain prescription since 5 days before surgery. That will last until I see Doc on the 24th. On the other hand, I do have to be careful on the Burger Hut. It could turn into a Dollar General!! It seems they are popping up everywhere, even in cornfields. 😄
Darrell, thank you! BZ
I am glad to read that your surgery went well.
I have wondered what hardboard Andre used for his River Leaf kits. I learned if you make a mistake it is easy to pull the glued parts apart. The hardboard gives way at the glued joint, and the joint cleans up easily. I’ve glued wall sections together twice and had to pull them apart. Andre used right angle joints on his kits. I turned out the lights and moseyed back to the couch. 🙄
I think I must still be affected by the stuff they gave me at the hospital!! 😄
It's good that you're not taking the hard stuff. You don't need it. I hate the feeling it gives. That's clearly why I've never used drugs (or even tested cannibis… and that's hard for people to believe since I was in a rock band in the 60s).
Mark, Glad your surgery went well and you're on a path to full recovery. Follow the surgeon's advice and take it slow. Good planning that you lined up some less strenuous tasks beforehand to keep you busy.
Gerry
Great news on the surgery!!!! You know to take things easy and steady. Prayers for a short recovery and the best results possible.
Thank you, Myles, Gerry, John!
Myles, you are right; we don’t take the pain prescriptions they call into pharmacy.
I’ve been here before, so I’m not in a hurry to try to do anything. I’m starting to not hurt quite as much with movement. Prayers are greatly appreciated!!
Morning Mark, I am glad you're feeling better! We have a shelf full of the Hard stuff that the Dr. prescribed after neck dissection. Pill form of Morphine that I might have taken 2 times and put on a high shelf as it was just not for me!
I will continue to pray for a speedy recovery and hope you feel better each and every day!
Mark,
I share your pain…and your aversion to pain killers. Over the course of 5 major surgeries over the last twenty years, I have accumulated, ignored and disposed of numerous bottles of oxycodone. 4 pills were used and 116 were disposed of. Stay strong; keep getting well; and building.
Rubin
Mark, I haven’t been around much lately but I’ve been thinking of you and hoping for a speedy recovery. Glad the initial period has been better than last time. It’s only up from here!
Andy
Hi Mark,
Catching up on various threads, thinking of you today and hoping for great outcomes all around!
Jim
Thank you, Mike, Rubin, Andy, Jim!
Continuing the story on the Burger Hut; I couldn't sleep last night, so I thought I would give it a go once again. I came down this afternoon, and discovered I had glued the parts correctly this time. I need to clean up the edges a little more before I glue on the little brick cover strips that are laying right at the rear of the building.
Building models isn't on the list of things patients aren't supposed to do until the meds wore off! How is one to know???? ![]()

The custom sign Andre etched for me. ![]()

That's a great sign! The Andre to whom you refer is Andre Garcia of River Leaf Models? If so, is he still in business? The last contact I had with him was he was full-time with an Israeli tech company. He did my distillery and Woodbourne Gallery laser cutting.
Mark, looks like a great start even with a late-night start! I will be watching and hoping the best for you and the burger Hut!
Mark- good to hear that the surgery went well. Hope your recovery and PT goes the same. Watch it with the opiates. They will kick your butt....
I'm getting hungry looking at the Burger Shack.....![]()
Thank you, Myles, Mike, Bob!
Myles, yes Andre Garcia. I remember he worked with you on some projects. Here is the scoop on his homepage. https://riverleafmodels.us He says he closed in October last year.
Andre’s kit has a narrower front window than the real Burger Hut, but it certainly passes for the real thing.
Mike and Bob, they make a good Reuben also.
Mark,
Great news to hear about your surgery. Looks like you have a great start to your Burger Hut. Really like the custom sign. No doubt, some light work on your railroad will assist in a smoother recovery, mentally as well as physically.
Dave
Gald the surgery went well.
Just back from vacation up at Lake Winnipesaukee and attached are pics of the actual Alton Fire Station.
We were there last Thursday at about 2:00 PM and there was no one around and the building was locked.


Thank you, Richie! They keep it up nice. Thank you for taking the time to go over to Alton.
Took the pics while visiting friends in Alton Bay, so no big deal.
I'd say the kit is pretty faithful to the real one. I did note, however, that it appears they replaced the double swinging doors on the original fire station with an overhead door.
Richie, I’m glad it worked out. I did notice the new door on the prototype photograph that came with the kit. My hose drying tower may be a few scale feet behind theirs, but not much.
Now that you've seen the prototype, you'll have to make up a decal for over the front door ![]()
Actually, that sign looks pretty basic. Even I could do it on the computer, I think. 😄
I got a little more done on the Burger Hut last night when I couldn’t sleep.
the windows and side door are in. The front door is a bit loose fitting, so I left it go for the time being. The red rectangles are the strips that go on top of the brick walls to keep the rain from seeping through. I need to get some better lit photographs of the brick. I tried a new technique for painting the brick and I like the results first go round. When does that ever happen??? 🤷♂️

Earlier, I painted the interior. White walls with black roughly where the roof will sit. Note that River Leaf Models didn’t include any strips to support the roof. The roofs of both my kits from Andre are exact fit. Also, Andre didn’t provide bases/floors. I will look through my scraps for something to make a base.

Looking good. When I first read the revised title, I thought that it said Burger King! Whoops!!
Ha, ha! That is certainly easy done!! ![]()
Mark, a day late and a dollar short as usual, or should I say ten dollars short due to inflation?!
Glad to hear surgery went well. Are you planning any type of lighting for the lift-off section?
RJ, I look at it as, Better late than never! 😊 That’s the great thing about the Forum format, anyone can jump in and write something, a day, week, month, year later, whenever you see the posts.
Thank you. For underneath I was thinking it would be easiest to hand a section off LED road lights. As for the buildings on the lift-off or tilt-up as was suggested, I would just use some kind of easy disconnect plug on each building. This section will not have many, if any other buildings. Across the double tracks and over the yard tracks will be another lift-off/lift-up, probably two sections. That will be a town section, so a lot more plugs. In fact, even other buildings on solid benchwork would still need plugs. Thank you for asking. I can certainly get ahead of myself.
I updated the thread title Burger Hut Kit "Done". Done is because the "kit" is done, but I will be adding some interior and exterior details in the future. I am going to say it is done for now, since I don't have the details on hand like with my other structures. ![]()
Here is a front quarter view as it stands now. Notice some nice details Andre included. First is the laser etched plexiglass for the front door and window. Those are really nice. The 'Burger Hut' raised letter sign is a nice touch as well. I wasn't sure if I wanted the 'Eat" arrow sign, but decided it added too much character to not add it.

I mentioned the other day about the technique I used for the bricks. Here is a close up view of the bricks. Closeup you can tell the mortar joints aren't painted separately. I just kept dry brushing burnt sienna acrylic craft paint on the tops of the bricks hoping to leave the lighter color of the laser cut material showing to not bother with mortar. That didn't quite work out, but I like the variations in brick color. I decided not to mess with it any further. From normal viewing distance, I am well pleased with the results.

Here is the opposite side and rear of the building which was designed to look like stucco that is starting to fall off. These two sides definitely need weathered if they are going to show when the town is built. I will cross that bridge when and if I come to it. I think another building will probably be placed right up beside this one.

Ah, the base. I cut it out of some thick styrene I have and glued on little posts to center the building when placed on the base. I need to decide what treatment I want for the foundation. But as I said at the top of this post, the kit itself is done.
@Mark Boyce posted:I updated the thread title Burger Hut Kit "Done". Done is because the "kit" is done, but I will be adding some interior and exterior details in the future. I am going to say it is done for now, since I don't have the details on hand like with my other structures.
Here is a front quarter view as it stands now. Notice some nice details Andre included. First is the laser etched plexiglass for the front door and window. Those are really nice. The 'Burger Hut' raised letter sign is a nice touch as well. I wasn't sure if I wanted the 'Eat" arrow sign, but decided it added too much character to not add it.
I mentioned the other day about the technique I used for the bricks. Here is a close up view of the bricks. Closeup you can tell the mortar joints aren't painted separately. I just kept dry brushing burnt sienna acrylic craft paint on the tops of the bricks hoping to leave the lighter color of the laser cut material showing to not bother with mortar. That didn't quite work out, but I like the variations in brick color. I decided not to mess with it any further. From normal viewing distance, I am well pleased with the results.
Here is the opposite side and rear of the building which was designed to look like stucco that is starting to fall off. These two sides definitely need weathered if they are going to show when the town is built. I will cross that bridge when and if I come to it. I think another building will probably be placed right up beside this one.
Ah, the base. I cut it out of some thick styrene I have and glued on little posts to center the building when placed on the base. I need to decide what treatment I want for the foundation. But as I said at the top of this post, the kit itself is done.
Mark, your burger joint looks great. I also enjoyed the step-by-step tutorial.
Well done, Mark!
Peter
Looks great Mark!
Art
Nice work Mark! Now I want a burger.
Dave
Thank you, Dave, Peter, Art, Dave!!!
"I'll gladly pay you Tuesday for a hamburger today" ![]()
I love it Mark. Great little structure.
Great job Mark! I like the realism you achieved on the brick. One of my favorite things to do on the layout is building and weathering the wood structures.
Gene
Great job on the Burger Hut! I hope rehab is going well !!!!
Looks fabulous, Mark!
And remember to eat your spinach! ![]()
George
Another great model Mark. I like the "Eat" sign too, adds character to an otherwise bland storefront. Marketing 101- make sure you stand out from the crowd!
Hope your recovery is going well.
Bob
Thank you, Joe, Gene, John, George, Bob!!
Gene, thank you, I was really pleased with the results. Yes, I think it is easier to get nice effects on wood than it is on styrene or other plastics. In this case, I took it slow, and it almost just happened on its own. ![]()
George, I yam what I yam!!
Bob, Yes, I thought the sign may be too garish for a small town joint, but then similar signs started being drawn from deep in my memory. ![]()
John, Bob, Everyone. I get my staples out tomorrow and get evaluated to see if I should start PT. Having been here before, I'm going to guess that will be the case. My wife says the incision looks good. The pain isn't as bad as it was a week ago, but my back does tire quickly. More important to me is that since surgery, I have not felt tingling going down my legs and I haven't felt like my knees would give out. That tells me that whatever was pressing on the nerves, isn't doing it anymore. ![]() Thank you so much for asking!
Thank you so much for asking!
Good news so far on the tingling and knees feel solid! Hoping doc confirms this, that will be great news. You are in our prayers and hope for a good consistent recovery
I dig the brick! It came out great, as did the entire structure. Great work!!
Great skills on display with the build. Watching your progress, especially while dealing with medical issues, puts me to shame. Best wishes for continued recovery.
I can't recall if your layout has ever been in the magazine. If it hasn't, it should be - between the design, innovative use of space, and workmanship, it definitely deserves to be in print. And doing so will earn you a little bit of extra train cash. Tagging @Allan Miller...
Thanks for sharing your progress.

Access to this requires an OGR Forum Supporting Membership

