Not much, but was able to get some late night scenery work done.


Attachments
Images (3)


|
|
Not much, but was able to get some late night scenery work done.
Korea, not Vietnam!
@Dallas Joseph posted:That's really a nice looking building Mark.
Good luck getting the best viewing angle ......the thing looks great no matter which way you would turn it.
IMHO I could see it rotated clockwise slightly. 🤔
Thank you, Dallas! Best viewing angle doesn't necessarily mean parallel to any tracks as we usually think of stations. I'll have time to move it all around before settling on one spot. Since the steps will be glued to the foundation, it could be moved on the to-be-built plank platform at any time.
I've decided to make shoulder patches for my fictional army railway unit, and am working with a vendor right now. They'll be 3 inches tall, which was a very common size for a unit patch*:

Once I have them I'll make them available for anyone who might want one. I'll also include a full fictional history booklet for the unit.
*Yes, I know that Battalions almost never had their own shoulder patches, but I've had many people ask me about making these over the years, so why not?
@p51 posted:I've decided to make shoulder patches for my fictional army railway unit, and am working with a vendor right now. They'll be 3 inches tall, which was a very common size for a unit patch*:
Once I have them I'll make them available for anyone who might want one. I'll also include a full fictional history booklet for the unit.
*Yes, I know that Battalions almost never had their own shoulder patches, but I've had many people ask me about making these over the years, so why not?
Lee, That's a really neat idea. The fictional army unit deserves such recognition! ![]() I have my dad's uniforms from when he served in Germany during the Korean War and the patches and medals my uncle earned in WWII.
I have my dad's uniforms from when he served in Germany during the Korean War and the patches and medals my uncle earned in WWII.
While I'm waiting for the epoxy to cure, I've been busy planning the decals for the ballast hopper. Still some sizing to do. I have decal paper but plan to take the sheet to a local printer to have them print the color version on my decal paper. Still chipping away on the project. Snow is planned for the next few days but hopefully spring will return again soon so I can to do some air brush painting in the garage.
Cheers, Dave

@Ross posted:Korea, not Vietnam!
I didn't think you were old enough to have someone as a child that would be as Ancient as myself. ![]()
So finally got back downstairs tonight after work, just about have this road weathering and random weeds and tufts looking like I was hoping for... First photo is "before" (3/12/22).. all the others are updated tonight.
Dave, @darlander, that detail work on the hopper is awesome, looks very prototypical. Can't wait to see it painted and decaled.


Outstanding Chris. The road weathering and weeds and tufts add depth to the scene.
Andy
@chris a posted:So finally got back downstairs tonight after work, just about have this road weathering and random weeds and tufts looking like I was hoping for... First photo is "before" (3/12/22).. all the others are updated tonight.
Dave, @darlander, that detail work on the hopper is awesome, looks very prototypical. Can't wait to see it painted and decaled.
Chris......it looks too real to be a model!!!!
Amazing!
Peter
As usual Chris, WOW!
@chris a posted:So finally got back downstairs tonight after work, just about have this road weathering and random weeds and tufts looking like I was hoping for... First photo is "before" (3/12/22).. all the others are updated tonight.
Dave, @darlander, that detail work on the hopper is awesome, looks very prototypical. Can't wait to see it painted and decaled.
![]()
![]()
![]()
![]()
![]() (pretend they are standing.....)
(pretend they are standing.....)
Awesome Chris!
I finished wiring the lights on my F3 last night and tested them out.


Bob


Your F3 Santa Fe will look great on any layout at night.
Especially on mine! ☺️
john d
Great job Bob, it looks very sleek.
@RSJB18 posted:I finished wiring the lights on my F3 last night and tested them out.
Bob
Looks good Bob! Did you also resolve the issue with the classification light? Cheers, Dave
Outfitted the third series of StreetScape shadowboxes. Built to a count of 10 each. Four sets are spoken for/sold.

@darlander posted:Looks good Bob! Did you also resolve the issue with the classification light? Cheers, Dave
Not yet Dave. I actually swapped shells and used the other A that I didn't drill holes in.
I still need to figure it out.
Thanks
Finished the build of the Hart ballast hoppers. Ready for primer, maybe tomorrow weather permitting! Cheers, Dave


It is great to see so many projects being concluded and looking fantastic. You guys are really getting a lot accomplished.
We are working to complete the engine service yards and have a list of items to complete, some of which have to be built. So far we have completed 6 tanks of various kinds and a rooftop water tank. One elevated tank remains. All but one of the major buildings are completed, interiors detailed, and lighting connected.
A machine shop addition to Roanoke Shops 5 diesel service building and a Lubritorium in the steam service yard both need final assembly and detailing.
Other structures have been/will be placed and are ready for wiring to be connected.
Decals for several buildings, tanks, etc need to be ordered, applied, and the structures weathered.
Floodlights and other lighting are being converted to LEDs and painted. They have to be placed and wired up.
Much of the above can be completed off the layout. That is a good thing since my knee is 44 days past replacement and I was released from PT Friday. That means that I go to the gym two days instead of three and am walking, exercising, etc BUT CAN’T get on or under the layout. It pretty much dictates that nothing can be finished which is a real pain. But it has also resulted in a lot of small things being accomplished that were awaiting time (and interest) to complete.
Track in the diesel area needs to be completed. Paula and I laid some of it out last week where we could reach. Yeah, kinda hard to place track very accurately from afar.
The leads to the turntable need to be detailed/things placed and completed.
Somewhere in all of this, we are going to have to address landscaping, roads, sidewalks, figures, etc, things that we know very little about and the scenes that will bring the area alive. It is going to be quite a challenging and fun time.
One thing that we have no answer for. What the heck is used in a diesel service area for fueling the engines? We can’t find anything to adopt and do that job.
We have a wash rack, etc but no fueling. Something is wrong with this picture.
@RSJB18 posted:I finished wiring the lights on my F3 last night and tested them out.
Bob
Bob, looks awesome!
@RSJB18 posted:I finished wiring the lights on my F3 last night and tested them out.
Bob
Looks really sharp, Bob. I hope Lionel does a Legacy version of this to go with my classic warbonnet F3’s.
Bob, the lights on the F3 look great!
Bill, that is quite a list of small items. I’m glad things are going well with your knee.
Got some more scenery work done this evening. This area is still a work in progress as I still need to add figures, get power to the shack, and add more trees. Besides that, I think I have a good start.


Posted an update on my F3's. I figured out the bi-color led's and got them working. ![]()
@Pingman- Carl- I have pix of the wiring posted on my build thread. I like to use hot glue to hold the led's and wires in place.
Bob
Got some more work done tonight. I decided to continue plastering Riese Ridge, but unfortunately I ran out of sheets. Until I can get some more I will start painting what I got done this evening.
Working on a fix for one of my street crossings. This has been an issue for a while and would cause an engine to stall or hesitate going over the crossing. I’ve made the pieces next to the middle rails thinner so that the middle rail is the highest point (as it should be). I repainted last night and tonight I’ve glued them back in place. Below shows one side installed, the other waiting to be installed. Below that is the video after the fix. #35 runs smooth as silk now. Not sure why the light is blinking, I don’t see that as the engine is running. Maybe the camera is picking up what the eye can’t.
Andy


Found the perfect color match for the ballast hoppers at ACE Hardware - Rust-Oleum, Marigold (gloss). Time for a cure and then ready for decals. I somewhat hate to see a project come to completion. What to do next????
Primed and ready:

Finish coat:

Cheers, Dave
Excellent project Dave! You’ll come up with something interesting to do I’m sure.
Andy
Andy- the flash has something to so with the frame rate of the video IIRC. #35 is a beauty. I used to climb around on #39 when it was at Eisenhower park.
Dave- the hoppers look great. Will you weather them or leave them showroom new?
Trainmaster- the mountain is coming together. I like the cabin at the bottom of the cliff too.
Bob
Thanks Bob. I used to climb on #39 too! Is that a setting on my phone that I can change?
Andy
@Steamfan77 posted:Thanks Bob. I used to climb on #39 too! Is that a setting on my phone that I can change?
Andy
Wow. Small world. Not sure about the camera. I'm sure one of the experts will speak up.
Bob
@RSJB18 posted:Andy- the flash has something to so with the frame rate of the video IIRC. #35 is a beauty. I used to climb around on #39 when it was at Eisenhower park.
Dave- the hoppers look great. Will you weather them or leave them showroom new?
Trainmaster- the mountain is coming together. I like the cabin at the bottom of the cliff too.
Bob
Bob, I guess weathering will have to be my next endeavor!
Cheers, Dave
@Steamfan77 posted:Below that is the video after the fix. #35 runs smooth as silk now. Not sure why the light is blinking, I don’t see that as the engine is running. Maybe the camera is picking up what the eye can’t. Andy
As Bob mentioned, it could be the camera.
Does this locomotive have an LED headlight ? If so ,I see that ' vibrating ' light on a lot of videos Andy.
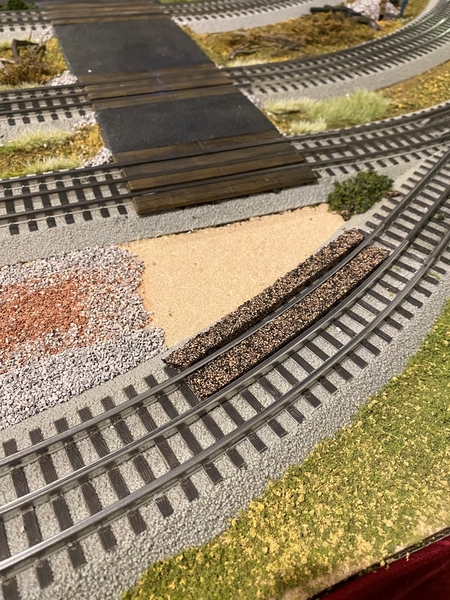
@WesternPacific2217 posted:I finally extended my RR crossing on my 8" layout extension. It's been like this for about 5 months!!
Because part of the crossing is on a curve I was trying to figure out the best method between rails when "@chris a" showed his layout and he used cork road bed, although his was concrete. So I went out to the hobby store and bought some HO scale roadbed, 1/8" thick. It bends really easy with the curve, how simple is that! Then on either side for the track I used cork cabinet contact sheets 2' x 8' that can be had at Homey Depot or Lowes. Con-tact Brand as you can see in the photo. The contact cork is around 3/32" think.
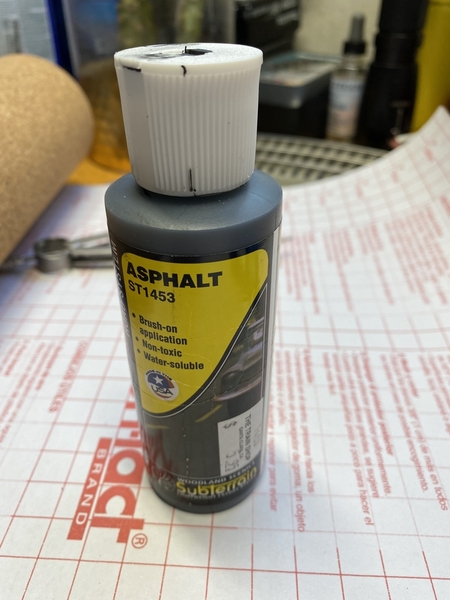
Photo of HO scale roadbed and Contact cork.
Then a little Woodland Scenics Asphalt paint.
In order to get the thickness I needed for the rail height, I precut 3 Contact pieces and stacked them using just the contact adhesive. Then I marked all the curves with a compass, following the outside rail, and cut to the required length with a box cutter with a fresh blade. Then I painted them before installing. Underneath the cork is a wood plank that goes from ballast to ballast, then the cork is applied to that. I used super glue for the cork between the rails and the wood planks between the ballast
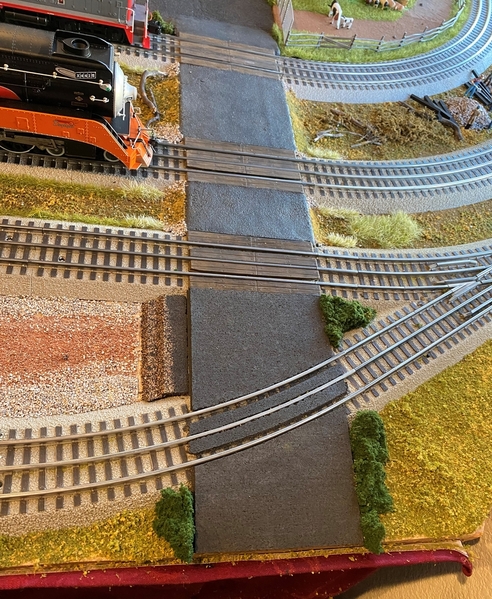
Here's the results. I think I'll do a little weathering before calling it finished. Plus, I need to add some dirt on the left side for the railroad service vehicles can get to the trackside service area. I used the roadbed cork to build it up, then I'll apply the dirt with some white glue.
The other two roads just in front of the SP GS were done the had way, with Woodland Scenics Fine Cinder ballast and white glue mixture.
I'll post another photo when I finish the dirt work and add a few more bushes. Now there's a road out of town, although that last step is a doozy!
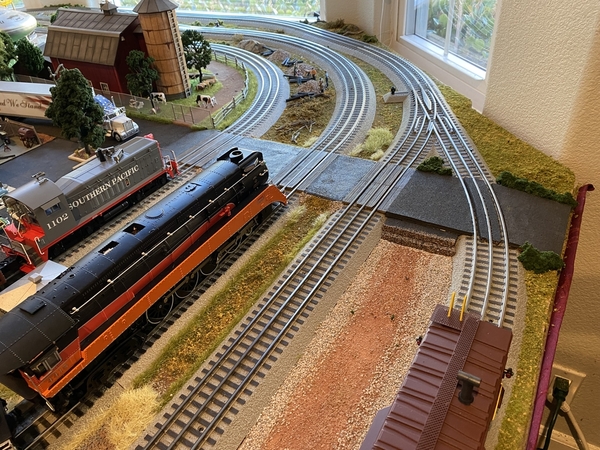
Here's a update on my 8" layout extension with 4 track RR crossing where I used cork for the road. I really like the way the cork turned out.


There's still work to do, like lines and RR Crossing paint on the road. I think a few more bushes and some weathering on the road, too. I threw some red dirt on the road, as it is the access to the trackside service area. I'm going to experiment with making truck tire marks on the road and across the tracks, except for the rails themselves. It's coming along slowly! Life got busy!


Bob, Dallas, I located some settings for taking a video that may help. I’ll see tomorrow.
Scott, the grade crossings are looking good, nice job.
Andy
Access to this requires an OGR Forum Supporting Membership