


Back to working on the layout on a more consistent basis after a December surgery... ran a MTH NYC Empire State Express (PS-1) after 10+ years in the box with no problems.
Between going out to clean up snow, I have been 'staging' some scenes for photo shoot of the LCCA 'Switching Track' car program. Yes, Car #5 is in Butler, Pennsylvania this week!
I ran trains again, always testing the track. No train show today, snow squall right now or tomorrow. High of about 3 they say. No way. When I built my new layout I left a 4'x6' opening in the middle so I could reach everything not like the old one. I could use the space but like the convenience. Debated the lift up idea but settled for a "crawl under" instead. Layout too low to duck under. When I thought of a lift up with 5 ovals of track, which meant 10 track joints I decided to crawl. So far, so good.
Sunny and in the mid-60s here in the Ozarks, so I took full advantage of this to put another coat of Krylon on the Gi-raffe GG-1 in my back yard. Helpful hint: A retired pool stepladder is perfect for the purpose...

Mitch
Attachments
Images (1)
JUST finished cleaning up from painting all the fascia, and had beforehand drilled pilot holes to mount the DCC throttles. Next, the blue points go in for the turnouts, that'll likely be tomorrow as I'm taking my lovely wife out to dinner for Valentine's Day in a short while...
Originally Posted by tstark:
After watching the forum for years and reading all the negative posts on duckunders I figured they could not be that bad WRONG!!!!!!! I started laying track and every thing I needed was always on the other side. One day of crawling back and forth tha duck under is now history. A hinged lift bridge is now in place. Pays to heed good advice. Thanks. Tstark
I got to watch the duck under learning curve in development as a kid.
You might not be done.
One or two tracks isn't bad. But 5 or more wide, gets heavy. A screen door closer saves fingers. there are cabinet plunger stops for protection from the seam too. A tether/stop to lock it in the up position, or stop to keep it from falling closed when left up for a while, is next best!
If it swings to a safe angle already, it may still need a brace to keep from being accidently pressed on, over opening it, and stressing the hinges till something pops crushing the local Plasticville market, a news stand, and a small dog.![]()
Gramps could swear quite well. ![]() But no finger brace that time.
But no finger brace that time.![]()
Originally Posted by Chugman:
Originally Posted by fisch330:
What is the stone facing made of? Is it commercially available or did you do all the art work on it yourself?
Paul Fischer
Thanks, Paul. I am using 1/8" pink foam that is used to insulate under metal siding. I carve the stone patterns on it and then am gluing it to a Masonite form. There are more pictures of the construction process on the thread on the Scenery & Buildings topic..........
........... a "wow effect" and I think it will do that.
Thanks again, Art
Hand carved too! ![]() Wow!
Wow! ![]() .....Hey you were right, "Wow effect" already!
.....Hey you were right, "Wow effect" already!![]()

Primed and painted the homasote. Just need to paint the trim, and then I can start laying track.
Not much done today. I added some grass foam to spots and ballasted some areas I missed. I had been redoing the yard trying to figure a good way to incorporate the 4 way into the area. So I played around till I thought I had the right position. Ordered a 11 degree Y switch from Ross to tie it in better. So until that comes by way of Mr. Brown I will probably measure for a piece of wood to do a small engine yard off to the side of the four way. I should follow up with a few pics of the progress. Maybe after dinner............Paul
Well, the Gi-raffe Express GG-1 is complete!
Details here: https://ogrforum.ogaugerr.com/t...and-final-assembly-1

Mitch
Attachments
Images (1)
A few pics of what I have been working on now. The open space between the four way and the other switch will be closer once I get the Ross 11 degree Y switch. I got the track coming out of the tunnel tied into the yard lead. The track to the left of that is my grade going to the top mainlines. To the left of the yard where the boxes are sticking up through the framework will be the engine yard. The track to the right of the four way will be the makeup track..................Paul


Attachments
Images (4)
Got to meet an ORG Forum member 10 minutes from my house.
Had a great time visiting his layout and watching the trains run!
Holy headed banger! How many giraffes do you have? Are they with painted spots or without? I bought two Turtle Back Zoo cars and got one of each.
Originally Posted by M. Mitchell Marmel:
Well, the Gi-raffe Express GG-1 is complete!
Details here: https://ogrforum.ogaugerr.com/t...and-final-assembly-1
Mitch
Originally Posted by RichO:
Holy headed banger! How many giraffes do you have? Are they with painted spots or without? I bought two Turtle Back Zoo cars and got one of each.
Fourteen, all of which have spots except for one I rebuilt recently... ![]()
https://ogrforum.ogaugerr.com/t...-later-type-gi-raffe
Mitch
Patrick, Matt and Jon all came over last Wednesday, and I spent the afternoon running around like a chicken with its head cut off.
Patrick started off by filling the cracks that had developed in some of the backdrop seams, while Matt went to work repairing engines.
Then Patrick and I cut the tricky piece that went over the back door, leaving room for the trim which will go on last.

Then Patrick hung and Bondoed 4 more sections.

There wasn't enough time to prime and paint, so we started the Ford Plant approach realignment by notching the 1x4 and extending the plywood. We'll finish this little project next time while the primer is drying.

Jon and I untangled wires, and started stringing feeder buses in the next aisle. Toward the end of the afternoon, we ran the connecting wires back to the power supply, so when I'm ready another 40' of mainline can go live.

When the guys aren't around, I've been working on redrawing my track plan. This is the upper deck. I never had a finished plan for this. I just built it as I went along.

I know it looks like a spaghetti bowl and there isn't room for structures and scenery, but I don't have a problem with that. This is urban railroading. One yard after another in a nearly continuous chain.

That brings us back to today. I started laying track at the Ford Pant.

The near ladder is finished. Tomorrow the far ladder.

Attachments
Images (8)
Drilled all the holes in the fascia for the blue point pulls, along with the PVC cups to secure the pulls.
The pulls will all rest inside these cup, to keep them from being ripped off if someone brushed up against them. Probably more work than it's worth, but I'd rather go the extra mile ahead of time than have to risk going back and fixing stuff later.
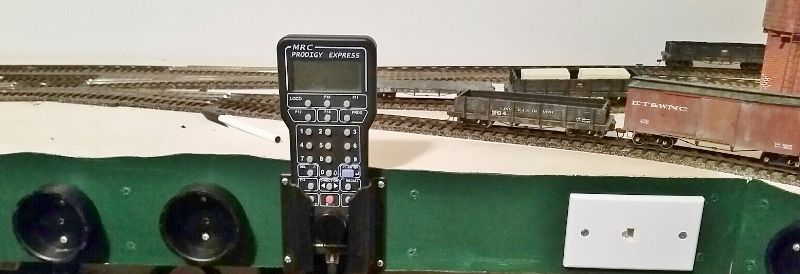
I tried mounting the blue points but I'm going to need some help with that.
This is the last step before making my layout operational. After this, the scenery starts...
Hay P51
Took the grand kids for a ride over to Roan Mountain to play in snow yesterday. Took a picture of this for you on the way back through Elizabethton, just for grins.
Larry


Attachments
Images (2)
Thanks, Larry. Wish I could get back out that way as it's been a while since I've been in the area. My parents still own Dad's childhood hom on Stoney Creek, not far from where this photo was taken (my Uncle also lives very close by, down by the river near the Gilbert Peters bridge).
I see they still have that boxcar numbered as 434, which it can't be. 434 has been ID'd and it isn't that one: http://www.tarheelpress.com/etbox/Page4.html
That 0-6-0 was one of the very last steam locomotives in commercial operation in the US and the last to run in interchange with other steam. It ran the North American Rayon plant in Elizabethton, as late as 1991. It ran interchange with ET&WNC standard gauge locomotives 207 and 208 (today known as Southern RR 630 and 722) into 1967.
I was lucky enough to get into the cab of the Porter fireless loco in the mid 1980s once chilly afternoon.
Have the last front panel on my curved arch bridge painted and ready to be glued on. Things are finally moving along at a descent clip again.
Art
With a thread running on naming your layout, considering progress not being made on
this elevator, I should rename my road, "The Piddling and Dawdling". Today I finsihed
putting glazing in the window frames and have started installing door and windows into
the structure. Foundation around bottom and roofing will finish.

Today it took awhile to find my uncoupling tracks I bought a few years ago. Can't do much at the start of the yard till my wye switch comes in. So at the other end I ripped up some old cork roadbed that was there from when I had an older smaller curved radius switch 96/72 coming into the back of the yard. I replaced it out with a Ross 120/96 curved switch So now I can put down some new cork and extend the sidings back a bit further picking up two more cars per siding. Every little bit helps.........Paul.
The difficult part of the Ford Plant is done!
These tracks will be filled with the new 86' high cubes and auto racks.

In celebration, I opened up my K-line Ford sign and placed it on the layout, much like planting the flag on the moon.![]()

Building flats of the plant, trees and other vegetation, ballast and a yard office will complete the scene.
This was the Ford Plant almost 11 years ago. It has been reduced to rubble. I'm not sure if the tracks are still there. If they are, they won't be there for long.![]()

Attachments
Images (3)
Originally Posted by Tom M:
Working on a new caboose to add to my White Pass and Yukon Route rolling stock.

Nice!
My wife and I are seriously discussing a Alaska cruise for our 15th anniversary this year, we did that cruise for our Honeymoon. And yes, that means a return to the White Pass, if we go! ![]()
Lee,
I have a wealth of knowledge on Skagway and South East Alaska. If you need some help planning your trip or want an inside man while you're in Skagway shoot me an email.
Tom.
I have a wealth of knowledge on Skagway and South East Alaska. If you need some help planning your trip or want an inside man while you're in Skagway shoot me an email.
Tom.
Well, my gi-raffe...er, ZEBRA car is back from having an artist buddy do the zebra detailing! I added the mane to a horn-less giraffe... ![]()

As soon as the paint dries on the actuating lever, I'll install that and make up some labels for the car and it'll be ready to roll!
Mitch
Attachments
Images (1)
Today would have finished installation of doors and windows on this elevator, EXCEPT
the "glazing" fell out of two of the window frames and vanished, and had to be replaced. Those will go in tomorrow, and roofing will begin. Paint touch-up and
dullcoating was done tonight, too.
Former Member
Nice work Elliot
Former Member
Half the Ford plant tracks are gone now and so is half the plant
Originally Posted by Matt Makens:
Half the Ford plant tracks are gone now and so is half the plant
Matt, Elliot,
so Elliot shared with me on Google maps where this location is. Does Ford have any activity there now, and if not, when did they close?
thanks
Former Member
Well they used to make Ford Rangers at the plant but they shut it down a few years ago. The plant was old and out dated and too expensive to upgrade.
Fabulous. Very cleaver.
Originally Posted by M. Mitchell Marmel:
Well, my gi-raffe...er, ZEBRA car is back from having an artist buddy do the zebra detailing! I added the mane to a horn-less giraffe... ![]()
As soon as the paint dries on the actuating lever, I'll install that and make up some labels for the car and it'll be ready to roll!
Mitch
Originally Posted by Matt Makens:
Well they used to make Ford Rangers at the plant but they shut it down a few years ago. The plant was old and out dated and too expensive to upgrade.
I had an '89 Ranger extended cab with center facing jump seats. Our girls loved riding there until they got big enough that their knees kept hitting each other. Then there was contention. :-(
Hey Mark, my wife and I were planning to take a little field trip today. There's a great deli a few blocks away, so we'll see if the tracks are still there. The entire structure is definitely gone.
Using Google maps again, there is a bridge over the tracks at the throat on Cleveland Avenue, that's where I took that picture. Go to the street view, and there's a little clock icon. Click on that, and you can see all of Google's images for that spot over time. I think there were 5 of them going back to 2007 with the most recent being last August.
Originally Posted by Big_Boy_4005:
Hey Mark, my wife and I were planning to take a little field trip today. There's a great deli a few blocks away, so we'll see if the tracks are still there. The entire structure is definitely gone.
Using Google maps again, there is a bridge over the tracks at the throat on Cleveland Avenue, that's where I took that picture. Go to the street view, and there's a little clock icon. Click on that, and you can see all of Google's images for that spot over time. I think there were 5 of them going back to 2007 with the most recent being last August.
Eliot,
Thank you. I will take a look. Now it is even more interesting since Matt pointed out my old Ranger may have been built there. It is kind of like remembering the old Pullman Standard factory that used to be here.
Nothing productive--just took and posted a picture of my N&W 4-8-2 Mountain type, aka the "Water Buffalo". Its been idle for eons.


Attachments
Images (2)
While still waiting for my wye switch to come but I know it shipped today I am still in a holding pattern on finishing the yard. So I spent this morning putting plaster between the two lower mainlines along the side of the freight yard. And in this case it was a slow go because it was mostly hard to reach spots. I don't think I will ever manage to put the ox before the cart but maybe I just like a good challenge. Lunchtime then make up another batch of plaster and finish those areas before dinner......Paul
Yesterday I changed out one Lionel KW transformer for another. Suspected the one taken out wasn't putting out the volts but not sure. This AM I went to my favorite LHS and purchased some Lionel O gauge 40" straights and several 042 curves with the intention of removing my loop of S gauge track and replacing it with the new O gauge. Think I will reserve this loop of track to run my Old Timey trains more often. Fun !!
I played with some more scenery today. Really liking how it's turning out! Have a bunch more different stuff coming from Scenic Express so I was working with what I have. Have to decide on what trees I want and may add one or two over here at a later date.


Attachments
Images (1)
Big Boy: Where is that layout located? Looks like the basement of a mall, or a very VERY large home.
Originally Posted by Big_Boy_4005:
The difficult part of the Ford Plant is done!
These tracks will be filled with the new 86' high cubes and auto racks.
In celebration, I opened up my K-line Ford sign and placed it on the layout, much like planting the flag on the moon.![]()
Building flats of the plant, trees and other vegetation, ballast and a yard office will complete the scene.
This was the Ford Plant almost 11 years ago. It has been reduced to rubble. I'm not sure if the tracks are still there. If they are, they won't be there for long.![]()
Finally received the scored flooring wood I need for the roundhouse stalls, actually model ship decking. On back order for months. Now to move the entire roundhouse for the last time, do the work, re-paint the "concrete base" so it aligns with the actual foot print, place the little workmen and details, set it back in place for the last time, ballast the tracks and install the doors. Hummm ... that's probably going to take a couple of months, at the speed I work. lol!
Received via USPS the Ross 4-way switch purchased last week from a forum member; and, continued to fill and sand F3 LIONEL PW shells for a repaint project.
Originally Posted by Kerrigan:
Big Boy: Where is that layout located? Looks like the basement of a mall, or a very VERY large home.
That's the basement of my house, 38'x57'. The train room total is 1902 sq ft.If you do the math it doesn't add up, because there is a big rectangular notch out of one corner. The entire basement is 4450 sq ft, so the train room is less than half. The main floor is the same size. It has about the same number of rooms as a typical large modern suburban home, except the rooms are just much bigger. Because it is not a two story, the basement is huge.
It was to cold to do anything today do I started a new project, I am going to paint the Conrail gp38 in the picture, to replicate RJ Cormans gp38 and I have around 20 hopper cars from weaver, one is pictured to be painted in RJ Corman colors as well.
I will keep updating as progress is done.
I will keep updating as progress is done.
Attachments
Images (4)


Finished the benchwork for my layout expansion. Looks like I have another snow day tomorrow, so hopefully I can start laying some track.
It was cold and snowing(again !!) so I took out my S gauge loop and put down new O gauge tubular. Used the 40" sections because it eliminates a lot of joints. It will be my "vintage" track. Looks good and pleased with the results. The S gauge will go somewhere else, probably the basement in JULY when it warms up.
I received the two Fastrack switches and some track from Mr. Brown. This evening I struggled with two bum hands to get the pieces together, and couldn't figure out why it didn't work like the plan. Looking at the plan again, I realized I had ordered the O-48 switches for the Phase 3 siding instead of the O-60 switches I needed to finish my double loop crossover. No wonder the price looked so good!! Oops! Oh well, the project will have to wait until another payday when I can order the O-60 switches. Then I can do Phase 2 and 3 at the same time.
Reminds me of what I do on my projects at work. Absentmindedly get ahead of myself or mix two projects up. It's a good thing my manager's office is located a thousand miles from mine, or he may get wise to me and put me out to pasture for good. Ha, ha!
Today was engine entering time. Over the past few months I had procrastinated over punching the info into my Legacy handheld on a number of recently purchased TMCC engines. Along with assigning numbers, names, setting momentum and stall, it was also initial run time to assess whether further tweaking is needed. Are they ever really perfect?
Bruce
I fixed (easy fix see forum post) this loco and ran it for the first time with some Horizon cars. My generation's F unit. Now to work on fixing the pilot and giving it a scale coupler.

Attachments
Images (1)
I got all the plaster down and was able to apply earth tone color to it. A very good day for me...............Paul
Hi Guys-- I couldn't resist this story because "paul 2" brought up the subject of plaster.
About 50-years ago at our old O-scale layout of the Eastbay Model Engineers Society in Oakland, CA, there was a guy that started coming around on Friday nights and he really wanted to help out and become a member. So we welcomed him aboard and told him that the trolley boys were currently doing a big scenery project involving "plaster" and could definitely use some help!
He says, "I got some plaster at home".. "I'll bring it down next Friday night"..
OK-Great.. Now what we used to do in them days was to take poster paint powder and mix it right in with the plaster. Then it was all colored and ready to apply!
Mr. "New Member" arrives with a big container of his plaster and we get him a bucket and send him over to the 'deep sink' next to our coke machine to start mixing it up!
Well, maybe the stuff was from France or something else. After all, it WAS 'Plaster of Paris' and maybe it was too old. Our guy added the poster paint powder and some water and started mixing ! Voila-- he suddenly could NOT remove the mixing stick from the bucket !! I have not forgotten that choice episode in my life. It was hilarious !!
Cheers.
KRK
Originally Posted by keyrouteken:
...
About 50-years ago at our old O-scale layout of the Eastbay Model Engineers Society in Oakland, CA, there was a guy... Our guy added the poster paint powder and some water and started mixing ! Voila-- he suddenly could NOT remove the mixing stick from the bucket !! I have not forgotten that choice episode in my life. It was hilarious !!
Cheers.
KRK
Good thing he did not get any of that mixture down the sink drain!
FM
Today I spent putting a second coat of earth color on the plaster. Filled in areas that needed ballast. Sprinkled grass on and glued it all down down. I think I ran out of areas to work on. I suppose I could measure the open framework for the engine facility and cut the wood. Still hoping my wye switch will get here by tomorrow or Saturday. Maybe I will make a run to the hobby shop to get a bag of foam grass. Or I could clean up the areas so I can run some trains................Paul
I thought today would be a slow day but it turned out better then I thought. Mr. Brown delivered my wye switch early. Like 2:00. He must of known I needed it early. I sprinkled down some grass foam earlier today but I placed the switch in where I wanted it and it is all going to work. I had to pull up some old cork bed and glue down a few new pieces for the wye switch. Once dry I can paint the cork and once that is dry I can start laying in the front of the yard. It looks like it is going to come together better then I had thought. When I get the front pieced in I'll post a pic...........Paul
I FINALLY have finished this feed mill/elevator kitbash, except for needing to get a
couple of bottles of Testor's for paint touch-up...may be delayed doing that with
another snowdump forecast. Got the foundation on, all the trim, (dummy) outside
lighting and the "stone" foundation. Certainly did not work diligently at it. Will
shoot some photos and post after touch-up. Next project?
Former Member
I wired up some shtuff on the Feinberg Lines


Lance, what is "Eric's way"?
Tuned up some of my postwar locos. Pullmor motors perk right up with a clean commutator, fresh brushes and a bit of lube! ![]()
Mitch

This morning I finished "Oxley's Golden Grain Elevator". Rather than make like Nanook
of the North and mush out into a blizzard for two tiny bottles of Testor's, I sprayed rattle cans into their caps and brushed it on for final touch=ups. Now for photos.
Changed a traction tire on our Acela today. Silly little job but very satisfying as I did not lose any bits.![]()
Any one who has done this job on the Acela will know what's involved![]()
Spent a hour running the Acela with our youngest (age 6) It is one of his favourite trains.
Nick
Well with it snowing today I got the wye switch and the 4 way all tied in. Two more uncoupling tracks to put in and run the sidings down to the end of the yard and I can go back and take up some of the old cork and re ballast the new track areas and plaster in the open areas and the yard is basically done. I can then move to finishing off the engine yard,,,,,,,,,,,,,,,,,,,Paul
Thanks, Lance.
Installed 3 vintage crossing signals, two old lighted bumpers and one new lock on. Also, crawled under layout to find out where 4 unconnected sets of wires came from, without success. Will try again tomorrow. Finally, I unpacked a sealed box containing a Conventional Classics Santa Fe F unit A-A set and put it on the layout. I found the replacement body shells that Lionel sent me but I like the original color better.
Pingman Eric's Train videos are on Youtube and he explains how to mix up this 2 part foam that is flexable and to put petroleum jelly on the rock molds so the foam wont stick. Choo Choo Kenny![]()
I have a cantilevered extension off a trestle top on my elevated line, and wasn't happy with the oversized pad I ended up with. I was going to add a dwarf signal, catwalk, and trim it. But I took the extra AF 23750 bridge shack I had, and it was exactly the same size, so I made a small tower to set it on, and have a wee little switching tower now. A "two fur", I also have a set of red & green jeweled industrial indicator lenses small enough to fit the 2 holes in the shacks side, so I'll get my signals too once I wire it to the area.
Tested out the Veranda Turbine GGG upgraded for me; works great! Very clean work. George is one of the good go-to guys here for Proto upgrades and fix work. He has done both a turbine and a cab-forward for us, and they are both making the rounds on the CL&W in grand style.
Whilst testing some old RailKing throttles that have been in storage for some years, what used to be termed "An Unfortunate Incident" occurred:

I really should move that poor little church, as it seems to be the target of every errant locomotive on the system. On the other hand, it DOES keep the wall from getting scuffed up... ![]()
No doubt, the congregation of Our Lady Of Unexpected Deceleration will be sending yet ANOTHER Stiff Note to railroad management... ![]()
Mitch
Attachments
Images (1)
MMM - That's the same way Old 97 wrecked: too fast on a left-hand curve!
After moving a transformer to a lower shelf I have room to run a road into a depot. The first picture is "before".. The 2nd shows plywood attached to the train table, and the third is the first coat of drywall compound for the road.


Attachments
Images (3)
I got most of the yard track in. Just a few more sections at the back of the yard to finish off the sidings. So in the pics the two tracks to the far right are my lower mainlines. Going to the left the next track is the makeup track. The Ross 11 degree wye switch brought it all together for me. And as I mentioned in a prior post the track on the left will go to the engine yard. The curving track going off to the left will be a small short line with some industries for switching at the other end of the tunnel.......Paul


Attachments
Images (3)
![]()
Originally Posted by TrainsRMe:
MMM - That's the same way Old 97 wrecked: too fast on a left-hand curve!
Indeed! I blame the cats...

I do like the additional plywood; your American Flyer track was skating way close to the edge there...
Mitch
Attachments
Images (1)
Having finished the last elevator structure, I turned to trains, and took a look at two
Lionel 0-8-0's. One I had modified with a front coupler, and assorted appliances, and
a Vanderbilt tender (before discovering there waa a version with an operating front
coupler and a Vanderbilt tender). I have this one in hand and have the Vanderbilt tender repainted to get my lettering, but was suprised that the boilers of the two are identical, but the chasses are quite different, with the second having more elaborate
valve gear, wide, flangeless center drivers, and a wired connection to the tender
front coupler. It will also get an Elesco and another pump. The loco has the front coupler and that is creating a problem, as it is in the way of my converting it into a Consolidation. I have pounds of brass and bronze spoked O scale pilots picked up in
shows (if this was gold, I'd be somewhere warm) and am figuring out how to extend
and modify the pilot (replaced, but a variety to choose from) to accomodate the front truck.
Made a second tower to fill the other cantilevered trestle pad, all wood this time, except a tin roof. I'll weather, and maybe condemn it.


The rock work on your mountain looks very good, Lance!!
Laid out and formed some curves on the main line for about 20 feet of Gargraves Flex track. Satisfied with the alignment so tomorrow will close up the joints a bit and fasten the track in place.
I didn't do anything TO the layout, but I did pick up a bunch of Gargraves for the new layout.
I finished off the sidings for the yard. Now back to the front of the yard to cut away old cork roadbed and lay down some plaster to fill in the areas and ballast where needed. I have a larger Korber switch tower that if I trim the base around the building it will fit in nice at the top of the yard ................Paul
Renewed my subscription for O Gauge Railroading Magazine

Attachments
Images (1)

I got the old cork up and now I have filled in the areas with plaster. That's it for tonight. Tomorrow morning I'll color the plaster and ballast the track. Then figure out what I will tackle next...........Paul


I got the Zebra car complete!

And yeah, I know, ZBRX, but the stock symbol is ZBRA and the company was founded in 1969, so that explains the reporting marks, OK? OK.
And the staple-end trucks are what I had handy when I assembled the new chassis from Train Tender. ![]()
Mitch
Attachments
Images (1)
Well, Suzie and I got the Lionel stuff in my Shop stored in a neater spot. All the Lionel boxes and new support table boxes (big) have all been nicely stacked up against the Living Room fireplace. The 5 x 9 plywood top was removed from our dining room table and stood up on end against her china hutch. NOW, we got room for the 'movers' to remove the Dining Room table and the big Sofa. Once they're out of the way, the real FUN begins!
In the Living Room, the plywood tops for the Layout will be supported on top of a 2 x 6 grid, re-enforced by 2 x 4's. The GRID will be supported by FOUR tables as shown in Photo 1... Along one edge of the Top, it will also be supported by a 39-inch wide bookcase as shown in Photo 2 ... My multi-shelf display rack that got taken down yesterday from the dining room wall will be anchored along another edge of the layout GRID ... Photo 3...
My new Lionel "Hell Gate" bridge will go in center-front of the living room "front windows" .. Photo 4. Double-track will be used across said bridge! Other items for the overall purpose of "support" for the layout TOP will be used or positioned as required!
**** I do NOT want to Nail or Screw anything into the Carpeted floor****
More later!
KRK


Attachments
Images (4)

Paul, did you use Ross transition pieces for the outside routes of the 4-way switch? If you did, which did you use?
Originally Posted by paul 2:
I got most of the yard track in. Just a few more sections at the back of the yard to finish off the sidings. So in the pics the two tracks to the far right are my lower mainlines. Going to the left the next track is the makeup track. The Ross 11 degree wye switch brought it all together for me. And as I mentioned in a prior post the track on the left will go to the engine yard. The curving track going off to the left will be a small short line with some industries for switching at the other end of the tunnel.......Paul
got some heat out in my railroad room (outside temp was 12 degrees, fired up kero and waited an hour and it was 70 degrees in my shop and railroad room)
fired up the new engine and just watched it run, got a few rough spots on track but can iron that out. mainline is only about 60' total, played with a cheap camera and put it on a flatcar and rubber banded it down and went around and made a video.
now the completed run around is not worth showing but the camera on a flat car worked, got to finalize it some, make sure angle is good and it goes all way around and shoots, camera slipped on first go around and i got great video of ceiling and some terrain.
but it was fun, been waiting long time to hear the thing go chuffing and not and yeah there are some dollars spent, supposed to snow next week
but i remember the posting about the 300.00 plus camera and the one i had was 40 dollars at k mart and makes **** good videos. I video'd a close friend shooting a rapid fire relay at camp perry ohio, and it came out great, i just sat the camera on a ammo crate and he shot.
so video of the Lizard Lick rail road coming soon
Last night I looked for my custom decals, since I was working on this Lionel 0-8-0 I want to add a front truck to....could not find them...wasted a couple of hours going
through boxes. Took a break today, loaded some pictures on here, and then looked some more..could not find, in a box that should have had all the decals, including a lot of others...found others..could not find these. Stopped for dinner and to watch the news, then searched boxes again...found them on top, in the "right" box, somehow overlooked, a lot of time wasted that should have been spent working on the loco.
Started mounting the blue points for my turnouts.
Got half of them done, just ended for now.
good grief, what a pain it was mounting some of them.
Broke a turnout points bar, no idea how I'm going to fix that without replacing the turnout itself...
Got half of them done, just ended for now.
good grief, what a pain it was mounting some of them.
Broke a turnout points bar, no idea how I'm going to fix that without replacing the turnout itself...
Matt came over last Friday and did a bunch of wiring. By the end of the afternoon, we had the mainlines powered almost half way around the upper deck. When it came time to test run the newly completed section, all the engines that we tried, worked really well. However, I did discover a couple track defects. No big deal, they are easy to fix.
While Matt was doing that, I worked on prepping a bunch of uncoupler magnets.
First you have to get the center rail out.

I hope the black one isn't some rare variation.![]() I wish they were all black, it would save me the step of painting them.
I wish they were all black, it would save me the step of painting them.

Hot gluing the magnet to the rail.

What's in the bucket is ready to be installed in Gargraves track. The pile on the floor will go in the recycle bin.

I spent much of Sunday unpacking my 86' box cars. Did anyone else have a hard time getting them out of their boxes without ripping the end flaps?

Attachments
Images (5)
Elliot,
I agree, it seems odd to me that the uncoupling magnets normally come red. I guess they think that makes it easier for the train operator to see them. I can't think of another reason.
The 86 footers look impressive. It wouldn't take many to completely encircle my 4x8 layout! ![]()
Saturday, I purchased a LionChief Plus PRR Mikado from my fairly local hardware store who sells Lionel and MTH trains. Excellent price. I ran it Sunday on the 4x8 layout I am just prepping. It only took a few minutes to lower the sound volume, understand the uncoupler/bell-whistle and chatter buttons, and have it rolling. I took a video, and the only trouble was right as I was going to finish the video, the Mike picked the point of one of my new Fastrak switches which just knocked the pilot wheels off track. May be an issue with the switch, they are all new. I will either figure out how to edit the last couple seconds off or take another video and post in a few days. It will be a busy week for me away from trains.
My initial take on the locomotive:
Very nice appearance, sound, control, and running for the price! ![]()
![]()
Elliott/Big Boy: To open box ends, I just bend about #14 (?) bare wire into a double hook (helps hold one end) and slide it into the flap and pull. works every time. Better: use a flat piece of aluminum metal about an inch wide; it gives a broader hook. But the wire works fine.
Cho Cho Wally
I knew that with the last delivery, you wouldn't be able to resist opening boxes and loading tracks. There's a simple trick getting into boxes without damaging them. I'll show you next time I'm over. Looks good, Elliot.
Originally Posted by Big_Boy_4005:
While Matt was doing that, I worked on prepping a bunch of uncoupler magnets.
Hot gluing the magnet to the rail.
Have you done this before with hot glue?
Those magnets seem to get hot pretty quick.
I've owned one since I was a boy, but didn't use it much outside of wooden stage coach kits. But, I've been using hot glue "a lot" for the first time recently, urged by the heavy use among folks here.
I avoided it due to heat concerns mostly, but moved past that with the help of people here.
I find it great for fast scenery/structure work.
But (like I thought) I find it really doesn't take much heat to soften it again, and have had a few things "drop" from being around things I consider "warm".
I think silicone would be a better choice, or at least a back up faster considering you likely done hot gluing.

Originally Posted by Adriatic:
Originally Posted by Big_Boy_4005:
While Matt was doing that, I worked on prepping a bunch of uncoupler magnets.
Hot gluing the magnet to the rail.
Have you done this before with hot glue?
Those magnets seem to get hot pretty quick.
I've owned one since I was a boy, but didn't use it much outside of wooden stage coach kits. But, I've been using hot glue "a lot" for the first time recently, urged by the heavy use among folks here.
I avoided it due to heat concerns mostly, but moved past that with the help of people here.
I find it great for fast scenery/structure work.
But (like I thought) I find it really doesn't take much heat to soften it again, and have had a few things "drop" from being around things I consider "warm".
I think silicone would be a better choice, or at least a back up faster considering you likely done hot gluing.
I used the hot glue on the ends farthest away from the magnet coil. Looking back at some of the ones I did a long time ago, I had super glued them. I can still go back and hit the edges, which would be a good idea from the sound of it. Belt and suspenders.![]()
Originally Posted by Big_Boy_4005:
Originally Posted by Adriatic:
Originally Posted by Big_Boy_4005:
While Matt was doing that, I worked on prepping a bunch of uncoupler magnets.
Hot gluing the magnet to the rail.
Have you done this before with hot glue?
Those magnets seem to get hot pretty quick.
I've owned one since I was a boy, but didn't use it much outside of wooden stage coach kits. But, I've been using hot glue "a lot" for the first time recently, urged by the heavy use among folks here.
I avoided it due to heat concerns mostly, but moved past that with the help of people here.
I find it great for fast scenery/structure work.
But (like I thought) I find it really doesn't take much heat to soften it again, and have had a few things "drop" from being around things I consider "warm".
I think silicone would be a better choice, or at least a back up faster considering you likely done hot gluing.
I used the hot glue on the ends farthest away from the magnet coil. Looking back at some of the ones I did a long time ago, I had super glued them. I can still go back and hit the edges, which would be a good idea from the sound of it. Belt and suspenders.![]()
not sure i understand this, hot? they only get hot when power applied for long time arent these used as momentary on/off deal? do you hold the button down and keep it down?
Add Reply
Sign In To Reply
